Sprayers Plus AIR BOOSTER 603 User manual
1
Water-Based / Sealants / Xylene / Form Oil !
Bleach / Graffiti Removing

2
INDEX
Index . . . . . . . . . . . . . . . . . . . . . . . . . . . . . . . . . . . . . . . . . 2# !
Unpacking . . . . . . . . . . . . . . . . . . . . . . . . . . . . . . . . . . 3 - 4!
Specifications . . . . . . . . . . . . . . . . . . . . . . . . . . . . . . . . . . 5!
Important Product Note . . . . . . . . . . . . . . . . . . . . . . . . . . . 6!
General Warnings . . . . . . . . . . . . . . . . . . . . . . . . . . . . 7 - 8!
Battery Safety . . . . . . . . . . . . . . . . . . . . . . . . . . . . . . . 9 - 10!
Charging Information . . . . . . . . . . . . . . . . . . . . . . . . . 11 - 12!
Preparing the Air Booster for Operation . . . . . . . . . . 13 - 16!
Spraying Flammable Liquid (4 steps) . . . . . . . . . . . . 17 - 20# !
Maintenance . . . . . . . . . . . . . . . . . . . . . . . . . . . . . . . . . . 21# !
Nozzle & Performance . . . . . . . . . . . . . . . . . . . . . . . . . . . 22!
Replacement Parts - Diagram A#. . . . . . . . . . . . . . . . . . . 23!
Replacement Parts - Diagram B#. . . . . . . . . . . . . . . . . . . 24!
Replacement Parts - List . . . . . . . . . . . . . . . . . . . . . . . . . 25!
Notes . . . . . . . . . . . . . . . . . . . . . . . . . . . . . . . . . . . . . . . . 26!
Return Instructions . . . . . . . . . . . . . . . . . . . . . . . . . . . . . 27!
Warranty Info . . . . . . . . . . . . . . . . . . . . . . . . . . . . . . . . . . 28
3
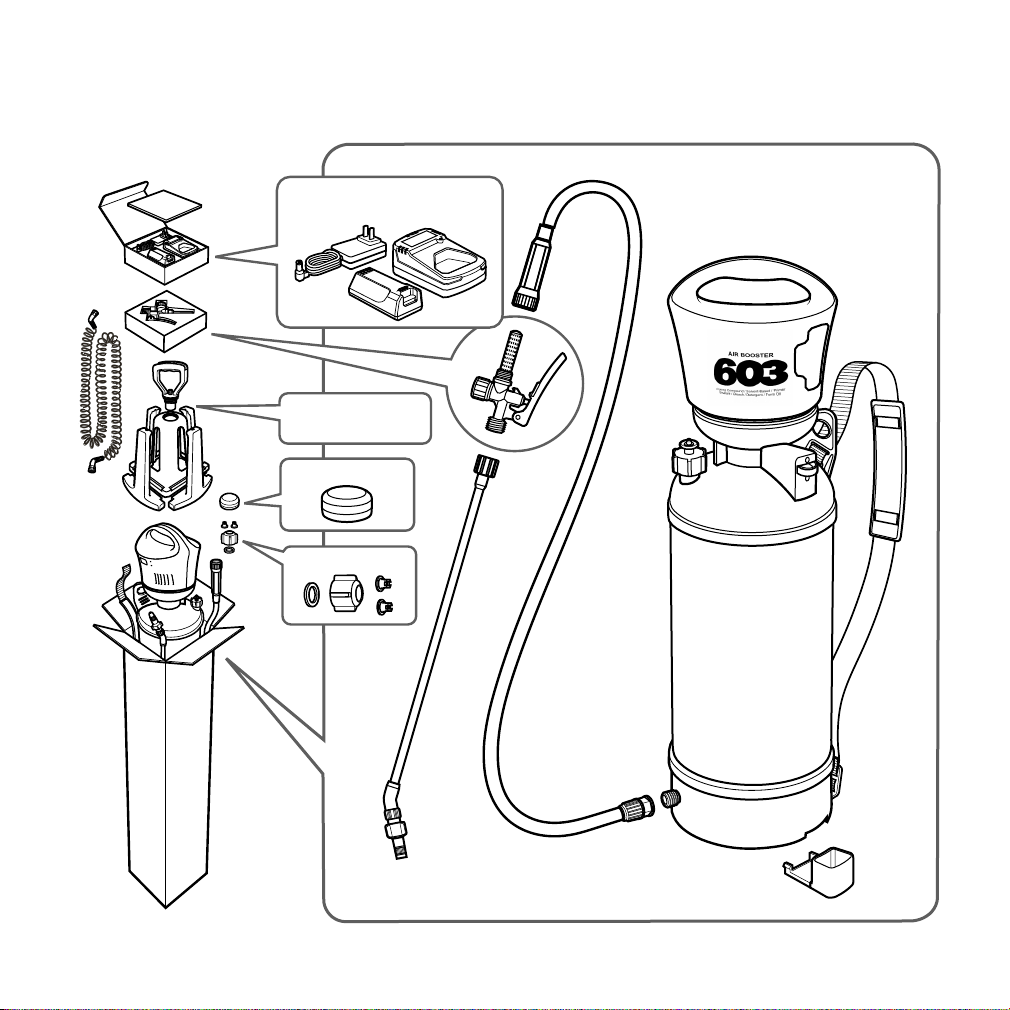
UNPACKING
Nozzles
Silicone Grease
Air Link Assembly
and Hose
Power Set: Transformer,
16V Battery Pack, Charger
Wand
Tank
Air Booster
User Manual

$
4
UNPACKING
CONT’D
1
2
3
4
5
6
Securely tighten the 6
locations indicated below
to prevent leakage
The Air Link applies only to
spraying flammable liquids.!
For operations not involving
flammable liquids, you can
disregard these parts.!
For operations involving
flammable liquids, follow
instructions from P.16 to P.19
Snap the plastic holder !
to the bottom of the tank

5
SPECIFICATIONS
Target Market
Industrial Construction
Power
16V Lithium Battery
Engineered to Spray
Water-Based / Sealants / Xylene / Form Oil
Bleach / Graffiti Removing
Number of Tanks of Liquid Sprayed per
Charge
Up to 16 tanks (mist Spraying @ 16PSI)!
Capacity - US Gallons (Litres)
2 (7.6)
Dry Weight - lbs (kg)
7.5 (3.41)
Seals & O-rings
Viton R
Spray Gun
SprayersPlusTM with Lock Pin & Filter
Wand
20” Brass
Hose
51” Polyethylene (Clear)
Pressure Range - PSI
16 - 32
Nozzles
Standard Nozzle (plastic)
Fan Nozzle A (plastic)
Fan Nozzle B (plastic)
a!
Adjustable Stream / Mist Nozzle!
90°!
110°
Shoulder Strap
Adjustable Length
Mouth Opening - inch
5.24” QuickFill
Pump Type
Powered Compression Pump
Warranty
1 Year

$
6
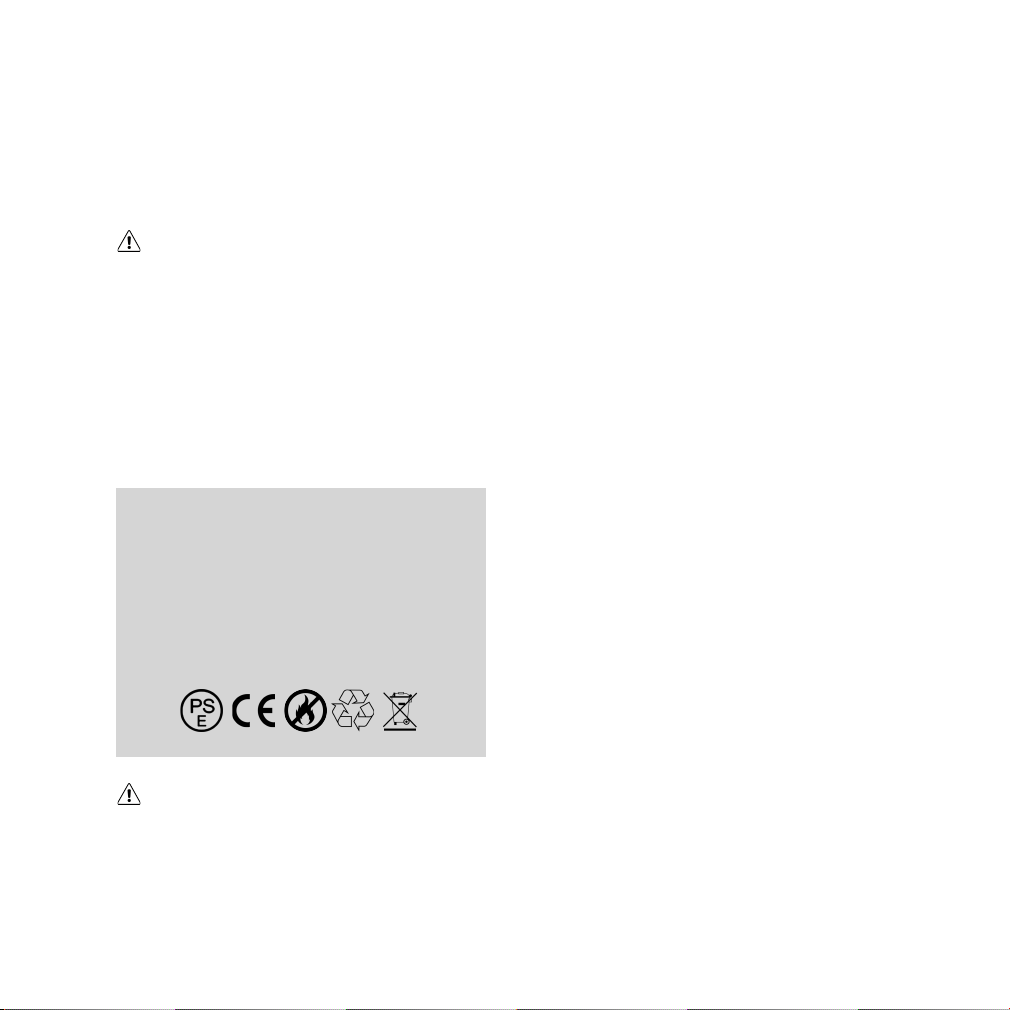
SprayersPlus produces top quality products meeting the highest standards in the industry. !
To ensure your safety, optimize the user experience and maximize the life span of this product,
it is of utmost importance to follow the product instructions, as well as the DOs and DON’Ts
outlined in the operation and maintenance procedures of this manual.!
Please read this manual thoroughly and follow carefully
USING AIRLINK AND SPRAYING FLAMMABLE LIQUIDS
Some models of our Air Boosters are capable of handling flammable liquids when they
are used with the AirLink, our special attachment.!
These models allow the Air Booster to operate and at a safe distance from the tank and
any flammable liquid or fume it contains.!
Such models can safely contain non-flammable liquids as well.!
To operate safely, user must follow all instructions carefully.
ONLY use those models specifically designated as being capable of containing and
handling flammable liquids. Carefully follow all outlines and proper procedures
when setting ups the Sprayer Plus Air Booster 603 to work with flammable liquids.
Do Not spray flammable liquids unless using the proper settings.
Warning: spraying flammable liquids too close to the motor or the battery, or
operating with improper settings lead to imminently hazardous situation which, if
not avoided will result in death or serious injury.
IMPORTANT PRODUCT NOTE
Contact us if you have any question or concern: !
7
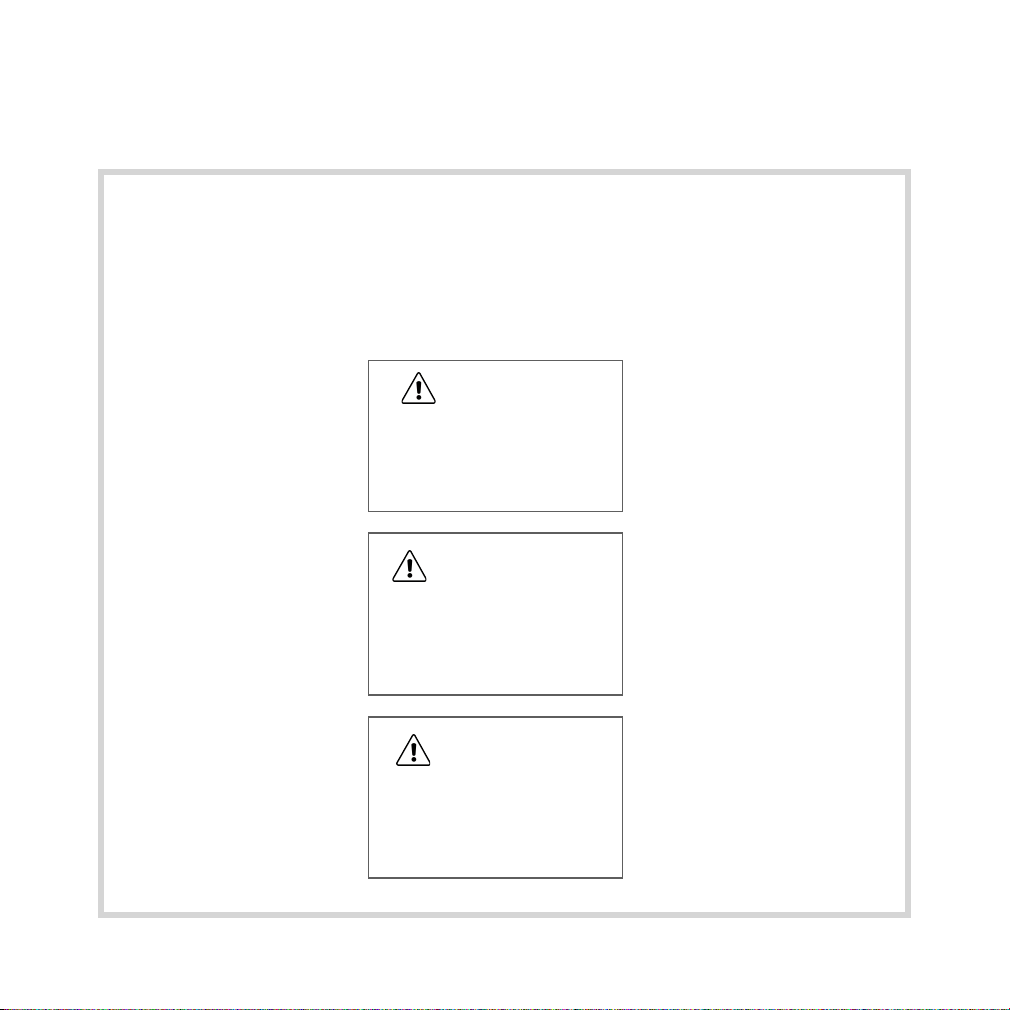
SAFETY GUIDELINES - DEFINITIONS
It is important for you to read and understand this manual. !
The information contains relates to !
protecting YOUR SAFETY and PREVENTING PROBLEMS. !
The symbols below are used to help you recognize this information.
WARNING!
Indicates a potentially
hazardous situation which, !
if not avoided, could result in
death or serious injury.
DANGER!
Indicates an imminently
hazardous situation which, !
if not avoided will result in
death or serious injury.
CAUTION!
Indicates a potentially
hazardous situation which, !
if not avoided, may result in
minor or moderate injury.
GENERAL WARNINGS

8
WARNING!
IMPROPER USE OR FAILURE TO FOLLOW INSTRUCTIONS CAN RESULT IN
EXPLOSION CAUSING SERIOUS EYE OR OTHER INJURIES.!
FOR THE SAFE USE OF THIS SPRAYER, YOU MUST READ AND FOLLOW
ALL INSTRUCTIONS. !
•Do not leave a pressurized sprayer in the hot sun. Heat can cause pressure to
build up, resulting in possible explosion. !
•Do not store or leave solution in the tank after use. Always wear goggles,
gloves, long sleeve shirt, long pants and full foot protection while spraying. !
•Do not attempt to modify this sprayer. Replace parts only with manufacturer’s
original parts. !
•Flammable, caustic, acidic, chlorine, bleach or other corrosive solutions must
not be used unless you are using the type of tank, hose, seals and accessories
with the specifications designated to handle the specific chemical. Always read
and follow manufacturer’s instructions before using this sprayer because some
chemicals may be incompatible and hazardous when used with this sprayer. !
•Handling the brass parts of this product will expose you to a chemical known to
the state of California to cause birth defects or other reproductive harm.!
•Wash hands after handling.
CAUTION!
•PRE-USE CHECK: Before each use, check the tightness of the hose to ensure the
hose is securely attached to the shut-offassembly. Ensure that all nozzles and
wand connections are tight. !
•Do not exceed a tank solution temperature of 120°F/49°C. !
NOTE: Residual water may be accumulated in the tank and hose during factory quality
and performance testing.
GENERAL WARNINGS
CONT’D
9
BATTERY SAFETY
SprayerPlus sprayers are designed to operate with a
16V lithium-ion battery by SprayersPlus.
CAUTION - OTHER BATTERIES
Use of any other batteries with the sprayer may
cause serious harm or injury to the operator and
serious damage to the sprayer.!
The battery pack does not come fully charged out of
the box. !
Before operating the battery pack and charger, !
Read the safety instructions and follow the
charging procedures outlined on page 8.
IMPORTANT SAFETY INSTRUCTIONS
FOR BATTERY PACKS!
Explosive Atmospheres: Do not charge or use
battery in explosive atmospheres, such as in the
presence of flammable liquids, gases or dust.
Inserting or removing the battery from the charger
may ignite the dust or fumes.!
Damaged Battery: Do not incinerate the battery
pack even if it is severely damaged or is
completely worn out. The battery pack can
explode if exposed to flames or high heat. Toxic
fumes and materials are created when battery
packs are burned.!
Battery Contents Leak: !
The battery electrolyte for lithium-ion batteries is
composed of a mixture of liquid organic
carbonates and lithium salts.!
•Burn hazard. Battery liquid may be
flammable if exposed to sparks or flames. !
•Contents of opened battery cells may
cause respiratory irritation. If respiratory
irritation is experienced due to exposure,
move person to a well-ventilated area
immediately. If symptoms persist, seek
medical attention. !
•If battery contents come into contact with
skin, immediately wash area with mild soap
and water. !
•If battery liquid gets into the eye, rinse
water over the open eye for 15 minutes or
until irritation ceases. If medical attention is
needed, see a doctor immediately.
WARNING - SHOCK HAZARD
Do not allow any liquid to get inside the charger. Never
attempt to open the battery pack or the charger for any
reason. If the plastic housing of the battery pack breaks
or cracks, return it to a service centre for recycling.
POWER BATTERY!
Li-ion 16V 2.2Ah/35.2wh!
WARNING!
To reduce the risk of fire or burns, do not
disassemble, crush, puncture or short
external contacts.!

10
BATTERY SAFETY
CONT’D
WARNING - GENERAL
Charging: Charge the battery packs only in
SprayersPlus chargers.!
DO NOT splash or immerse in water or other
liquids. This may cause premature cell failure. !
Operation Temperature: DO NOT store or use
the tool and battery pack in locations where the
temperature may reach or exceed 105°F (40°C)
(such as outdoor sheds or metal buildings in the
summer season). !
Never attempt to open the battery pack for any
reason. If the battery pack casing is cracked or
damaged, do not insert it into the charger. !
Do not crush, drop or damage the battery pack.
Damaged battery pack or charger: DO NOT use
a battery pack or charger that has received a
sharp blow, been dropped, run over or damaged
in any way. !
Damaged battery packs should be returned to a
service center for recycling.
WARNING - BATTERY CHARGER
Shock hazard: Do not allow any liquid to get inside the charger. Do not expose the charger to rain or snow.!
Do not attempt to charge the battery pack with any chargers other than the ones specified in this manual.
The charger and battery pack are specifically designed to work together. !
These chargers are not intended for any uses other than charging rechargeable batteries. Any other uses
may result in risk of fire or electrocution.
WARNING - STORAGE AND
TRANSPORT
Fire hazard: Do not store or carry the battery in
such a way that metal objects can come in contact
with exposed battery terminals. For example, do
not place the battery in aprons, pockets,
toolboxes, product kit boxes, drawers, etc. !
Protect and insulate battery terminal: To
prevent fire risk while transporting batteries,
ensure battery terminals do not come in contact
with conductive materials such as keys, coins,
hand tools and the like; make sure that the
battery terminals are protected and well insulated
from materials that could contact them and cause
a short circuit. !
Airplane luggage: The US Department of
Transportation’s Hazardous Material Regulations
(HMR) prohibits the transport of lithium-ion
batteries in commerce or on airplanes (i.e.,
packed in suitcases and carry-on luggage)
UNLESS they have proper short-circuit
protection.!
NOTE: Lithium- ion batteries should NOT be put
in checked baggage. !
Regulations of other countries may be different.
Please check with your airline.

11
CHARGING PROCEDURE
Sprayers Plus chargers are designed to charge
Sprayers Plus 16V battery packs only. Follow these
steps to charge the SprayersPlus battery pack:!
1. Plug the charger into an appropriate outlet
before inserting the Sprayers Plus 16V battery
pack.!
A flashing red light indicates the charger is active
and ready to operate.!
Note: If the charger does not activate, !
refer to page 18 Troubleshooting.!
2. Insert the battery pack
into the charger.!
3. A solid red light
indicates the battery is
charging.!
4. When the solid !
red light changes to a
solid green light, the
battery is fully charged.!
Note: Any light behaviour (such
as rapid flashing), other than solid red (charging) or a
solid green (charged) indicates a charging error. Refer
to page 18 Troubleshooting or contact SprayersPlus
for further advice.
CHARGING INFORMATION
BATTERY POWER INDICATOR LIGHTS !
•There are 3 LED lights on
the battery.!
Press the adjacent button !
to inspect the power level.!
•Three blue lights indicate the battery is
fully charged.!
•One blue light indicates !
the battery level is low. !
It is time to recharge.!
LEAVING THE BATTERY IN THE
CHARGER
The charger and battery pack can be left
connected with the solid green LED light on. The
charger will automatically keep the battery pack
fresh and fully charged.!
STORAGE RECOMMENDATIONS
Store the charger and battery in cool and dry
places; keep them away from direct sunlight and
excess heat or extreme low temperature.!
Storage up to 3 months will not harm a fully
charged battery pack or charger.

12
CHARGING INFORMATION
CONT’D
Charging Temperature: DO NOT charge the
battery pack in an environment where the air
temperature is below 40°F (+4.5°C), or above
+105°F (+40.5°C). Follow these guidelines to
prevent serious damage to the battery pack.
The charger and battery pack may become
warm while charging. This is normal and does not
indicate a problem.
To facilitate the cooling of the battery pack
after use,avoid placing the charger or battery
pack in a warm environment such as in a metal
shed or an uninsulated trailer.
If the battery pack does not charge properly,
follow these steps:
(1) Check current at the outlet or receptacle by
plugging in a lamp or other appliance.
(2) Check to see if outlet or receptacle is
connected to a light switch which turns the
power off when you turn off the lights.
(3) Move charger and battery pack to a location
where the surrounding air temperature is
between approximately 65°F and
75°F(18°C-24°C)
(4) If charging problems persist, take the tool,
battery pack and charger to your local
service center.
IMPORTANT CHARGING NOTES
Follow the Charging Procedure detailed on the
previous page of this manual to recharge the
battery.
The battery pack should be recharged
whenever it fails to produce sufficient power
on jobs that were previously easy to complete.
DO NOT CONTINUE with use under such
condition.
You may charge a used battery pack when
ever you desire with no adverse effect to the
battery pack.
Foreign materials of a conductive nature,such
as steel wool, aluminum foil, buildup metallic
particles, etc., should be kept away from
charger cavities.
Always unplug the charger from the power
supply when there is no battery pack in the
cavity. Unplug charger before attempting to
clean.
Do not freeze or immerse charger in water or
any other liquid.
The longest life and best performance of the
battery pack, charge it in an environment where
the air temperature is between 65°F and 75°F
(18°C-24°C).
Always charge the battery after use to maximize the life of the battery.
Leaving a drained lithium ion battery in storage for too long may cause it to fail to recharge.
13
- psi +
PREPARING THE AIR BOOSTER FOR OPERATION
Pressure
Adjustment
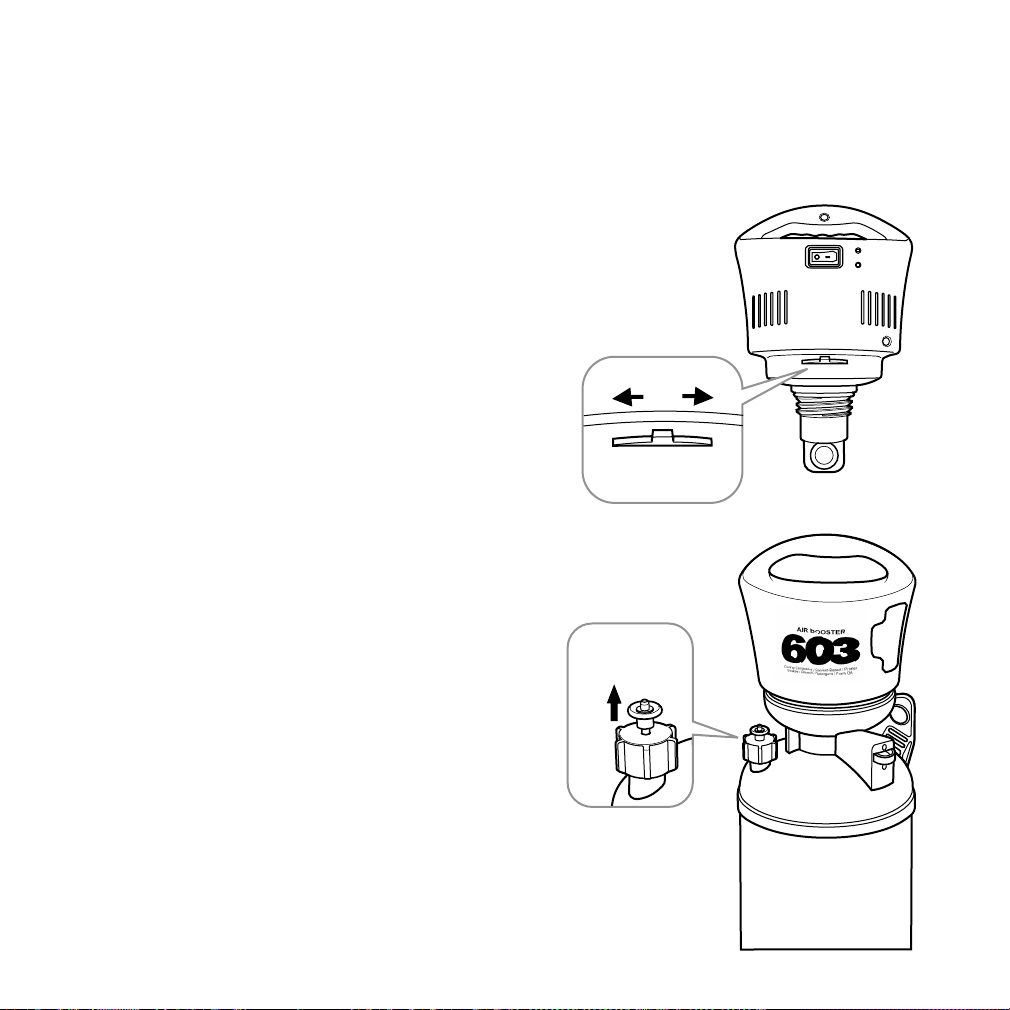
PRESSURE ADJUSTMENT
The SprayersPlus Air Booster automatically pressurizes the
tank to provide continuous reliable air pressure for spraying
and is preset at the factory for optimal pressure at 28 psi.!
It can be adjusted by an adjustment lever located in the
inner drum of the Air Booster. Moving this lever left or right
according to the + or - sign adjusts the sensor inside the
tank to increases or decreases the maximum pressure
threshold.!
Once the pressure in the tank reaches your designated
setting, the pump will stop. It will automatically restart !
again when the pressure drops below a pre-set minimum
pressure threshold.!
After using the Air Booster once, you can determine if the
maximum pressure threshold needs adjustment.!
If the original factory setting works well for you, there is no
need to do any adjustment.!
If you want to adjust the maximum pressure in the tank,
follow these steps:!
1. Turn offthe AirBooster.!
2. Pull the safety pressure valve relief until the tank is
fully depressurized. !
3. Unscrew the Air Booster from the tank.!
4. Adjust the pressure adjustment lever accordingly.!
5. Reinstall the Air Booster to test if the new setting is
satisfactory. If the pressure still needs to be adjusted,
repeat step 1 to 5.
Depressurize!
Tank
14
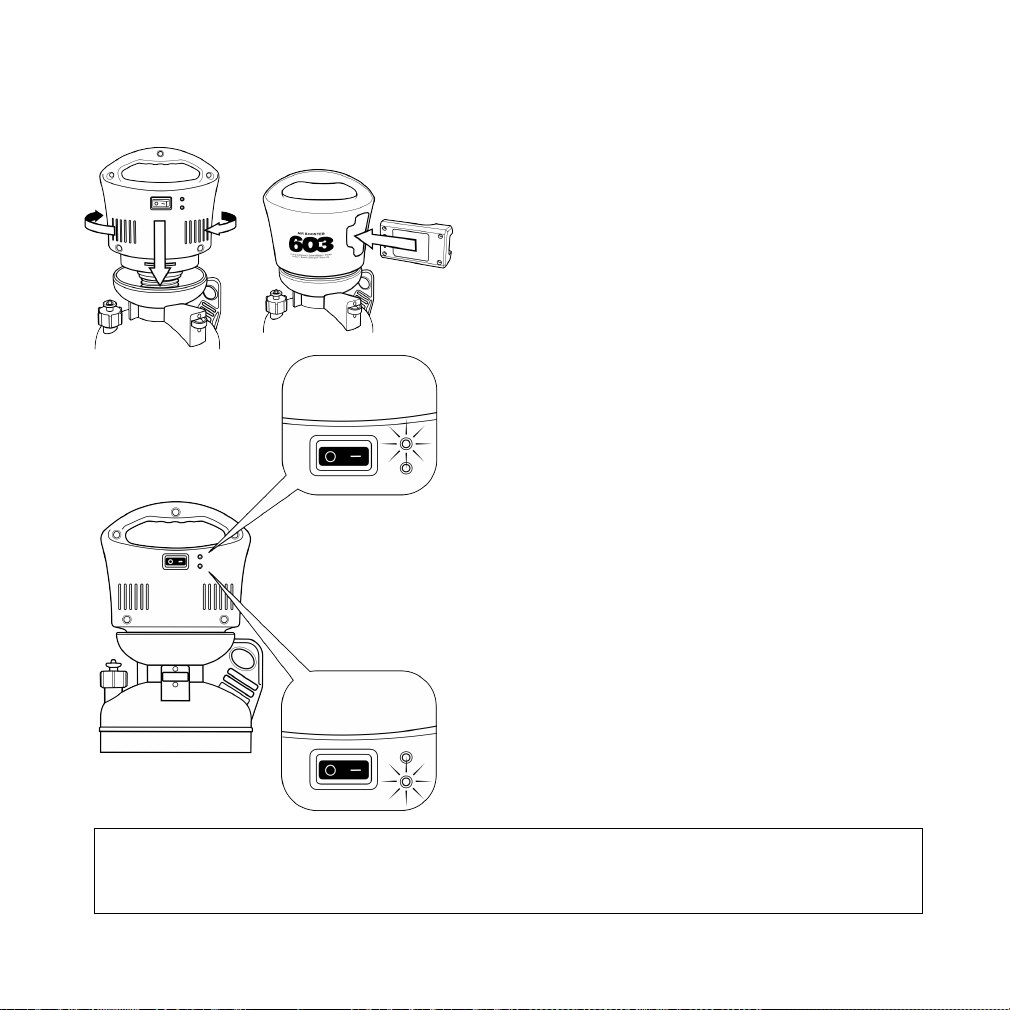
1. Tightly screw and thereby seal the Air Booster onto
the canister tank.!
2. Insert the battery into the battery slot. !
3. Switch power to ON with illuminated red main switch.!
4. Listen to detect sound of motor pressurizing the tank. !
5. When pressure in the tank reaches the preset
pressure, the motor stops and green LED illuminates
to indicate the sprayer is ready to use. !
User can adjust and set the operating pressure between
16 to 32 PSI. (see p.10)!
The Air Booster automatically starts itself when the
pressure drops below the preset reading. During the
pressurization process, the green light will temporarily
turn off.!
Ensure that the Air Booster is securely and tightly
screwed to the canister tank and the pressure release
valve is seated in place.!
In normal circumstances, a 2 gallon tank can be fully
pressurized under 2 minutes. !
Due to safety reasons, the motor shuts offif pressurizing
continues for more than 2 minutes and a blue LED will
illuminate. If it happens, restart it after 5 minutes.!
If the restart fails, it is possible there is an air leakage or a
sensor malfunction. Refer to page 18 Troubleshooting or
contact SprayersPlus for further advice.
PREPARING THE AIR BOOSTER FOR OPERATION
CONT’D
Green Light On
Blue Light On
To res ta rt , tu r n th e un it o ff fo r 10 s ec on ds a nd s wi tc h it b ac k on . Th e sy st em w il l ret ur n t o no rm al . !
To depressurize, pull out the safety pressure valve relief until all air has been released from the tank. Then
let go the pulling action and the valve will reset to the default sealing position.

15
Head Protection
Long Sleeve
Clothing
Smock
Gloves
Long Pants
Protective Boots
Eye Protection
Proper Mask
PREPARATION FOR SPRAYING
WEAR PROTECTIVE GEAR
Follow Occupational Health and
Safety regulation.!
!
Wearing protective clothing and
equipment when handling
chemicals is obligatory.!
WARNING: !
Use the correct dose and volume of
chemical according to the product label. !
WARNING: !
Do not spray near springs, lakes, rivers
and people who are not using PPE. !
WARNING: !
In case of an accident, remove the
sprayer immediately.

16
PREPARATION FOR SPRAYING
CONT’D
WAND PLACEMENT
Ready
to go!
Snap the wand into
the plastic catch
Pull out the plastic catch
Place the
nozzle (of the
wand) into the
plastic tray

17
SPRAYING FLAMMABLE LIQUID (STEP 1 OF 4)
Note: These steps apply only to spraying flammable liquids. For operations not involving flammable liquids, these
steps can be skipped and the operator can proceed with spraying and maintenance and cleaning of the sprayer.
INTRODUCTION
To spray flammable liquids safely,
the spraying operation (and the
tank) must be separated from any
motor or battery which may
potentially produce spark or heat
up to ignite the fume or the liquid.!
The Air Link is designed for such
operation. It has a base which stores
a long hose to pressurize the tank.!
The Air Link base (with the Air
Booster Head installed) can be
placed a safe distance from the
tank and the spraying operation.!
Carefully follow steps 1-4 on this
page to assemble the Air Link base
and install the Air Booster Head
onto it safely.
1.1 Install hose to the
designated opening on the
Air Link base.
1.2 Snap the four arms gently to
the base and make sure they are
tightly attached.
1.3 Wrap the hose into
the designated space.
ASSEMBLING OF THE AIRLINK BASE
1.1 to 1.3 only need to be done once (when you take
the parts straight out of the box).
1.4 Remove the Air Booster
Head from the tank and
install it onto the Air Link
base.
Note: Safe Operating Distance may
vary in different situations. To ensure
safety, measure the concentration of
the flammable vapour with
appropriate equipment and make
sure the operating distance is
substantial enough to keep the
flammable vapour below ignition
level according to the specifications
of the flammable liquid.
STEP-1 PREPARATION
18
SPRAYING FLAMMABLE LIQUID (STEP 2 OF 4)
Note: These steps apply only to spraying flammable liquids. For operations not involving flammable liquids, these steps
can be skipped and the operator can proceed with spraying and maintenance and cleaning of the sprayer.
DANGER!!
Fire Hazard! Do not spray
flammable liquid when the
Air Booster is close by. !
The flammable liquid and
fume may be ignited (by
sparks produced by the
motor or battery of the Air
Booster) and cause serious
injury.!
Leave the tank in a separate
room or at a safe distance
before fastening the hose
onto the tank.
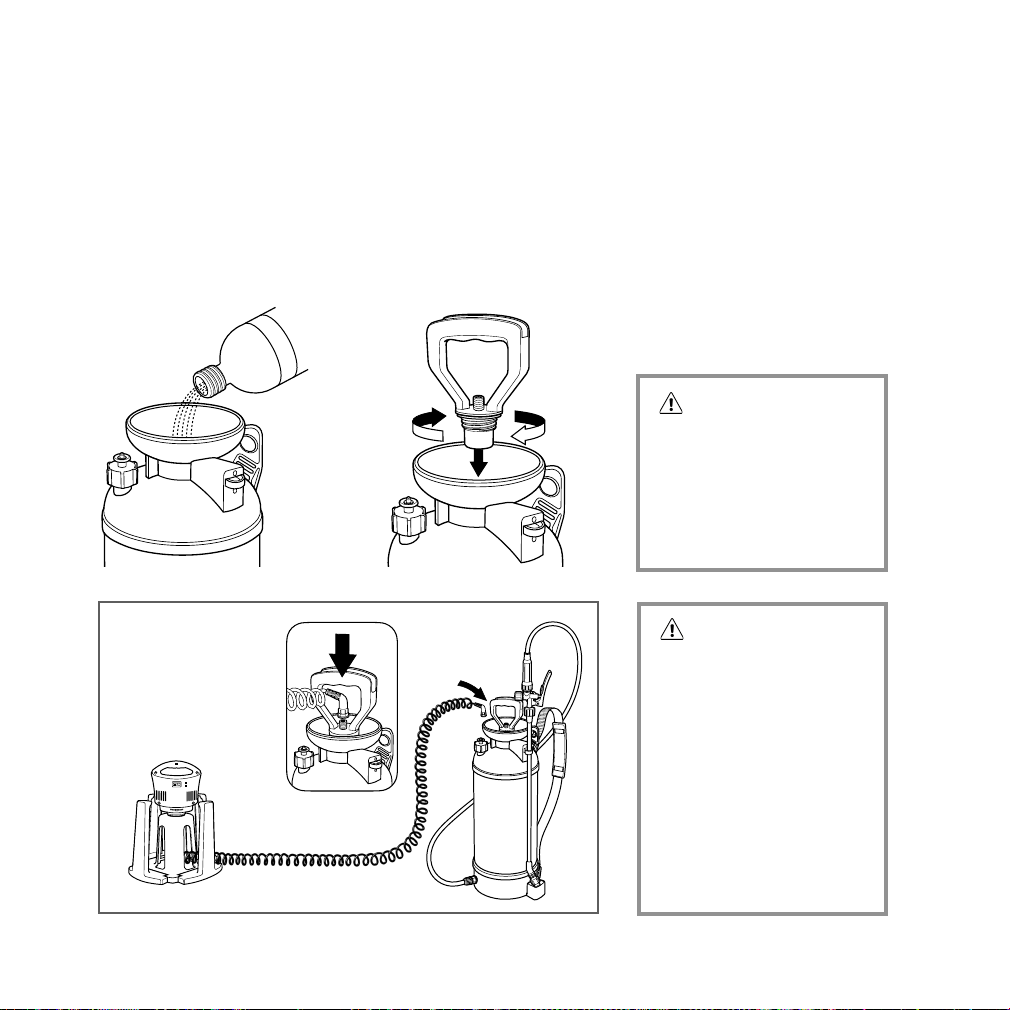
Fill the tank gradually with the
solvent and clean any spilled liquid.!
Install the cap (from the Air Link
Base) onto the tank.
2.3 Keep the Air!
Booster in a!
separate room!
and/or at a safe!
distance from!
the tank.
2.4 Attach
the hose to
the tank
2.1: Fill the tank
2.2: Install the cap
STEP-2 FILL THE TANK AND FASTEN THE HOSE
DANGER!
Fire Hazard! Keep out from
spark or open fire!!
Handle the flammable liquid
according to its specifications
and OCCUPATION HEALTH
AND SAFETY REGULATION.

19
SPRAYING FLAMMABLE LIQUID (STEP 3 OF 4)
Note: These steps apply only to spraying flammable liquids. For operations not involving flammable liquids, these steps
can be skipped and the operator can proceed with spraying and maintenance and cleaning of the sprayer.
SAFETY FIRST!
DO NOT turn on the AirLink
until it is separated and a safe
distance away from the
operation (and the tank).!
Keeping it in an adjacent
room is a good way to
eliminate the potential risks of
igniting inflammable vapour.
Wear proper protective gear
and start spraying.!
DO NOT bring the tank near
the Air Link with the Booster.!
While operating, always keep
the tank at a safe distance
from the Air Link with Air
Booster. Operate in separate
rooms wherever possible.
3.2 Turn ON the !
Air Booster
3.1 Keep the tank away
from the Air Booster
STEP-3 START SPRAYING

20
4.3
Depressurize!
the tank
SPRAYING FLAMMABLE LIQUID (STEP 4 OF 4)
Note: These steps apply only to spraying flammable liquids. If not using the Air Link base, proceed with spraying and
maintenance and cleaning of the sprayer.
Turning offthe
Air Booster
SAFETY FIRST!
DO NOT take the tank
with you.
Leave the tank (in the adjacent
room or at a safe distance) and
go to turn offthe Air Booster
on the Air Link.
4.2 Turn OFF the
Air Booster
4.1 Keep the tank away from the Air Booster
Carefully follow steps 4.1 to 4.4 on this page to safely turn off the Air Booster and empty the tank
Step-4 Finishing Up
4.4 Unscrew the hose
Emptying the Tank
1. Pull the safety
pressure valve relief
until the tank is fully
depressurized.!
2. Unscrew the hose.!
3. Take the tank to
dispose the liquid
inside, and then clean
the tank and perform
maintenance.
Table of contents
Other Sprayers Plus Paint Sprayer manuals


