Spur 1 Austria Voith Gravita 10bb User manual

Voith Gravita 10bb
The modern shunting locomotive from Kiel

www.Spur-1.at

Voith Gravita 10bb
USER MANUAL
Dear Customer,
first of all we would like to thank you very much for purchasing this
Spur 1 Austria model. We attach great importance to the fact that our
models are the best possible replicas of the original. Our models are built
for collectors as well as for railroaders and combine the highest standard of
detail with state-of-the-art functionality.
The Voith Gravita 10bb is the first model from our house whose original
was built in the modern Era VI. Even if modern locomotives appear
smooth and uninteresting at first glance, the Gravita has shown us, how
much details are worth seeing on such locomotives are available. Be it the
elaborately designed bogies, the many lines on the substructure or the
beautifully shaped design of the front ends and the driver's cab. There is so
much that can be to discover about this locomotive and we hope that you
will have the same pleasure in exploring this modern powerhouse that we
had during the research and development of this model. It is with great
enthusiasm that we look to the Gravita 10bb and its many paint schemes to
make the 1 Gauge landscape a little more colorful and we will do our very
best to expand on this. The modern era has begun and we are already
looking forward to the things to come.
We now wish you much pleasure with your model
of the Voith Gravita 10bb!
Your team from
Spur 1 Austria
03

04
Scope of delivery
The scope of delivery includes:
• Voith Gravita 10bb locomotive model
• Bag with setup and spare parts
• 20 ml steam distillate
• Dosing pipette
• Cotton gloves
• Spur 1 Austria cleaning brush
• Spur 1 Austria masking cloth
• User manual
Start-up
The locomotive is bolted to a transport board and is protected by a
polystyrene hood. After opening the box, the whole units can be lifted out
by the closing straps. After opening the straps, the hood can be lifted
straight up and removed. Now loosen the screws with which the
locomotive is screwed to the board.
CAUTION! The locomotive is loose after removing the retaining screws
and can be taken off the board. The locomotive has self-locking gears, but
may still slip off the board.
There are two screw brackets attached to the model (Fig. 1). These are
screwed directly to the frame of the model. It is best to place the models
in a locomotive couch to remove the spacers. First loosen the four screws
of the cover plate (Fig. 2) to remove it. Then loosen the two screws of the
screw bracket (Fig. 3) so that it can be removed. Then screw the two cover
plates back onto the model. Repeat the process on the second side of the
model.

Make sure that the model does not show any transport damages. You can
then place the locomotive on your tracks for a first run. Make sure that no
voltage is applied to the track. The locomotive can now be registered via
Railcom or via locomotive address 10.
The model is maintenance free and requires no lubrication. The motor
and the gearbox area are also maintenance free and do not need
lubrication. The axle bearings and current collectors on the ball bearings
must not be lubricated under any circumstances, as this can lead to poor
conductivity and worsen or completely interrupt the current collection.
Damage caused by incorrect lubrication will void the model's warranty.
05
Fig. 2
Fig. 1
Fig. 3

06
The Gravita 10bb model is designed for a minimum radius of 1020 mm. In
the area of S-curves, a radius of approximately 1400 mm should not be
undercut. We generally recommend a minimum radius of approximately
1500 mm to keep wear in the undercarriage area to a minimum. Likewise,
it is not possible to use the original coupling in small radii. This should be
used from a radius of approximately 2300 mm (for couplings with wagons
with a short overhang to the wheelsets or pivot point to the bogie, this
radius can also be smaller, this is to be determined by tests).
Models with finescale wheelsets can be used from a radius of
approximately 2300 mm. The larger the radius, the greater the
operational reliability in the train set.
A minimum radius of 2300 mm also applies to PUR wheelsets. Please note
that PUR models have original wheel flanges. The original Gravita 10bb
requires a minimum radius of 80m. This corresponds to 2.5m in 1:32 scale.
The larger the radius is chosen, the safer the model can be operated.
We can guarantee safe operation of the model with the specified radii.
Our specifications are chosen for safe and low-wear operation. In some
situations, smaller radii are possible. This must be determined by testing.
Minimum radius

Function keys
If you operate your layout with DCC command stations, the locomotive is
to be called up under address 10. When operating with Motorola the
locomotive address is also 10. The following functions can be called up
under this address:
• F0 Head light on/off • F16 Sound: Sanding
• F1 Driving sounds on/off • F17 Sound: Curve squeaking
• F2 Sound: Signal horn high • F18 Sound: Turnout squeal
• F3 Sound: Signal horn low • F19 Sound: Rail bumps
• F4 Smoke generator on/off • F20 Sound:Brake release/apply
• F5 Fan on/off • F21 Sound: Release compressed air
• F6 Servo coupler front • F22 Sound: Coupling
• F7 Servo coupler rear • F23 Sound: Open/close door
• F8 Shunting gear • F24 Sound: Radio message #1
• F9 High beam • F25 Sound: Radio message #2
• F10 Cab lighting • F26 Sound: Radio message #3
• F11 Appearance lighting • F27 Sound: Radio message #4
• F12 Tail light switch off • F28 Volume control
• F13 Sound: Double horn • F29 Not assigned
• F14 Sound: Short whistle high • F30 Not assigned
• F15 Sound: Short whistle low • F31 Random sounds
07

08
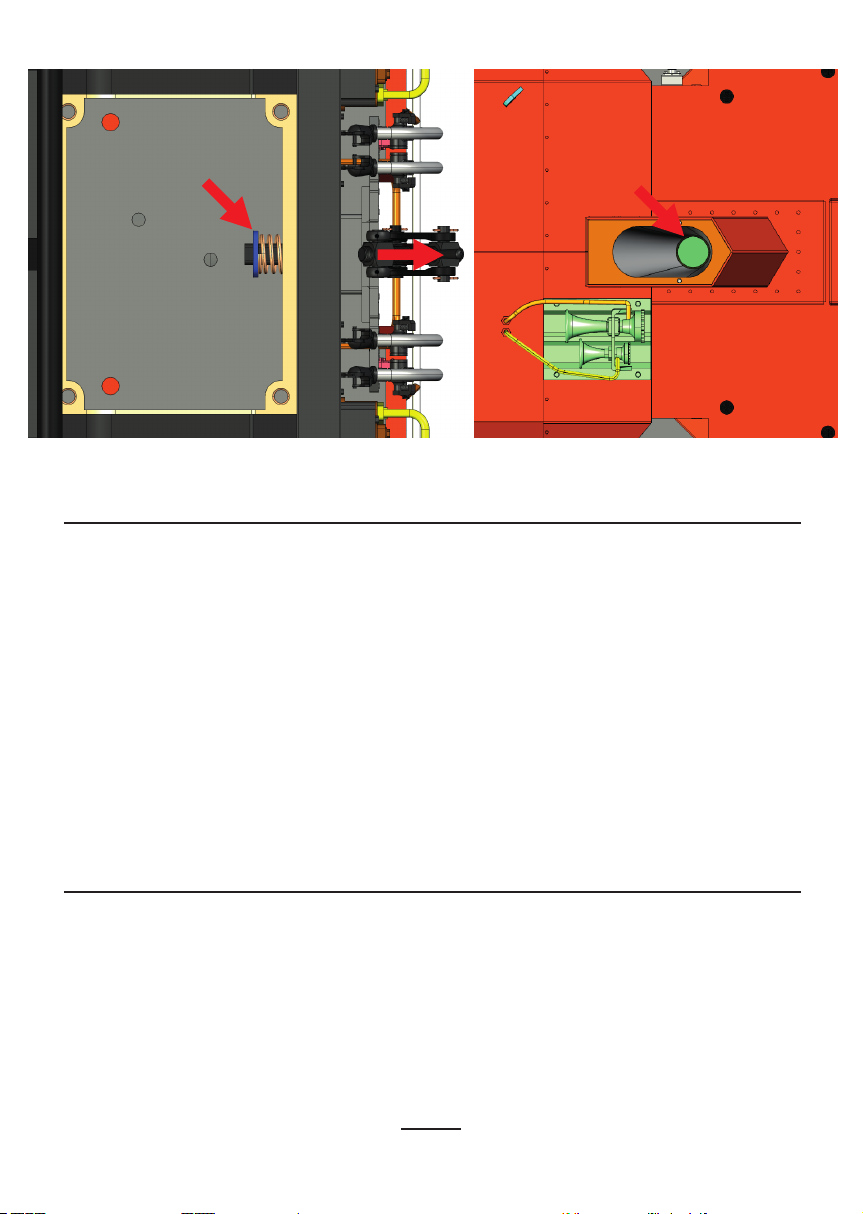
Servo-electric shunting coupler
The models of the Gravita 10bb are equipped with a servo-electric
shunting coupler. Exceptions are the "Panlog" and "Stahl Gerlafingen"
models (order number 20510-20514), as these are equipped with high
performance buffers true to the original and thus with a modified buffer
chest. As delivered, the coupler head functions as in the original (Fig. 4).
The clutch tongs can be opened via the small lever on the top and closed
again by actuating the pressure plate in the clutch head.
This primarily serves to faithfully reproduce the clutch.
For play operation, a second coupling head is included, which has been
modified so that it functions easily in play operation and can be lowered
from above onto the hook of the car to be towed.
To change the coupling head, the marked screw on the bottom of the
coupling must be loosened (Fig.5). Once this has been removed, the head
can simply be pulled out of the sleeve. The second head can then be
inserted into the sleeve and fastened again with the screw.
Lever to open
the clutch.
Clutch tongs
Pressure plate
Screw for changing
of the coupling head.
Fig. 4 Fig. 5

09
Dismantling the shunting coupler / replacement
It is of course possible to disassemble the shunting coupler and replace it
with any third party system or screw coupler. To disassemble the shunting
coupler, first the hoses and springs on the locomotive must be
disconnected. The next step is to loosen the marked screw on the bottom
of the locomotive and remove the cover (Fig.6). Then the screw
connecting the drive rod and servo can be loosened. Now the complete
coupling can be pulled out to the front and replaced by another coupling.
For the "Panlog" and "Stahl Gerlafingen" models, the cover plates on the
underside of the model must also be removed. The retaining ring can
then be pulled off the coupling and the spring removed. Finally, the
coupling can be pulled forward through the shaft and removed (Fig. 8 on
page 10).
Fig. 6 Fig. 7
Setting the servo movements
The setting of the clutch servos is possible via the following CV's:
Coupler 1 / 2 Function Value
CV387 / CV395 Mode Select Servo 27
CV388 / CV396 On/off delay 0-255
CV389 / CV397 Automatic switch off 0-255
CV390 / CV398 Run time "A" 0-63
CV391 / CV399 Run time "B“ 0-63
CV392 / CV400 End position "A" 0-63
CV386 / CV394 End position "B" 0-63
10
Abb. 8
Abb. 9
Exhaust smoke
Already out of the box your Gravita 10bb is equipped with the latest
version of the ESU smoke generator XL. As soon as you switch on F4, the
smoke generator is set to operational readiness. The locomotive will now
simulate the exhaust smoke of the diesel engine while running. The
smoke generator is filled through the filling pipe in the exhaust of the
locomotive (Fig. 9).

Running the smoke generator
If handled properly, the smoke generator is maintenance-free. Heavy use
may cause the heating element and wick material to wear out. The same
applies to damp or hot running fan motors. These are wearing parts and
can be replaced in our workshop. Operation is also possible in closed
rooms. In any case we recommend the use in rooms, but only if you have
the possibility to ventilate them well. Direct inhalation of the vapors must
be avoided at all costs. People with respiratory diseases should principally
refrain from using the smoke generator. We do not assume any liability for
possible health effects!
CAUTION!
Steam distillate is not an oil and therefore does not have an insulating
effect. If distillate is applied to the circuit boards, there is a risk of
short-circuits and damage to the model!
Please use only ESU smoke distillate to avoid damage to the electronics of
the model. Under no circumstances should smoke or steam oil be used.
CAUTION!
The maximum filling quantity of the smoke generator is 5 ml. If you fill
too much distillate into the reservoir, it may overflow and cause
considerable damage to the electronics. Always insert the pipette
completely (as far as it will go) into the filling tube when filling.
CAUTION!
The smoke generator reaches an operating temperature of up to
100°Celsius. Please be careful when refilling the smoke generator!
11

A "Loksound XL V5.0" decoder from ESU is installed in your model. All
described functions are standard on the decoder. If you have special
questions about the decoder, please contact the company ESU directly:
ESU electronic solutions ulm GmbH & Co. KG
Edisonallee 29
D-89231 Neu-Ulm
Phone: +49 (0) 731 - 1 84 78 - 0
CAUTION! Caution when programming!
Since the used decoders have their own firm- and software, there may be
problems when programming the decoder with different command
stations. Write CV's only if you are 100% sure about the effects. We are not
liable for malfunctions of reprogrammed decoders. In addition, you must
always have the latest firmware installed on your command station. Since
from time to time bugs in the software are removed, or new functions are
integrated, this step is unfortunately necessary. Please contact the
manufacturer of your digital command station.
Decoder
12

Maintenance and care
When cleaning your model you should always use a brush without hard
bristles! You will find a suitable one in the scope of delivery to remove
dust and dirt from your model. Other suitable brushes are make-up
brushes with synthetic fibers or brushes for cleaning photo lenses. For
cleaning fingerprints you can use isopropyl alcohol. We recommend
n-hexane. Apply little to a microfiber cloth and gently rub the dirty area.
Under no circumstances should harsh cleaning agents such as turpentine
and thinner be used, as these can attack the lettering and paintwork!
Check the wheel tires regularly for contamination. Clean them with
cleaning alcohol as described above. For cleaning work, we recommend
using a foam pad with an additional soft cloth as a base. This will protect
the numerous add-on parts and details.
Fitting & Spare parts
In addition to the coupler head for play operation described on page 8,
you will find useful spare parts such as screws and hoses in the accessory
parts section.
You will also find the wind deflectors for the cab windows. These small
disks can simply be mounted in the holders provided on both sides in
front of and behind the side cab windows.
13

Warranty
The legal basis is the EU directive 1999/44/EG. The warranty on your
model is therefore 2 years from delivery. The invoice is at the same time
your documentation for the warranty and should therefore be kept in a
safe place. If the model is opened, modified or not used properly within
these 2 years, the warranty will expire. In addition, the warranty is not
transferable. In case of complaints, please contact your specialist dealer if
you purchased your model from him. He will take care of all further
questions.
If you bought the model directly at Spur-1.at, you can contact them
directly:
Spur 1 Modellbahnen GmbH
Freileiten 6, 4840 Vöcklabruck, Austria
Phone: +43 7672 24111
Mail: offi[email protected]
If the model is to be shipped, repack it properly and be sure to use an
outer carton with appropriate and sufficient filling material! Otherwise
we can not give warranty on the model.
Shipping
14

Head light on both sides
Appearance light
Tail light on both sides
Cab lighting
High beam on both sides
Shunting couplers
Smoke generator
Doors and windows
Optical control
Driving characteristics
Full range of functions
Packaging and accessories
Signature of the tester
Inspection protocol and certificate of authenticity
Each of our models undergoes a strict inspection at the factory and is
checked again after arrival at our premises before it is handed over to its
new owner. Together with the serial number on the locomotive, this
protocol also forms a certificate of authenticity for your limited edition
model.
15
Geprüft:
Variant of the Gravita 10bb: Not added at the online version
Part number of the model:
Not added at the online version
Serial number of the model:
Not added at the online version
Serial number of the decoder:
Not added at the online version
Not added at the online version
SAMPLE!
SAMPLE!
SAMPLE!
SAMPLE!
SAMPLE!
SAMPLE!
SAMPLE!
SAMPLE!

Table of contents
Popular Toy manuals by other brands

Kalee
Kalee Bigfoor Monster Jeep Instruction/assembling manual

Fisher-Price
Fisher-Price K6088 instructions

Mattel
Mattel Barbie Airbrush Designer instructions

Fisher-Price
Fisher-Price Imaginext H5341 instruction sheet

Hasbro
Hasbro In the Night Garden Makka Pakka instructions

Mattel
Mattel MATCHBOX Build Your Own Adventure SQUID SUB quick start guide


