Spy Tec Zetta Z12 User manual

SPYTEC Z12 INTELLIGENT SECURITY
CAMCORDER USER GUIDE
Thank you for choosing the SpyTec Z12 Intelligent Security Camcorder. The soap-
bar-size video camera weighs only 1.6 ounces and is easily hidden. The multi-trigger,
time-programmed recording device captures video at one of two resolutions and
can be set for loop recording. Recordings can be triggered automatically by motion,
vibration or voice, and videos are date-time stamped. The camera’s microSD slot
accommodates a card containing up to 200GB of memory. With a vibration standby
time of up to 90 days and the capability to power recordings for up to 8 hours from its
internal battery, the camera is extremely exible to place and operate. It can also be
powered indenitely from its included AC or car adapters.

What’s in The Box
Camcorder (also called the DVR)
5V wall outlet adapter
5V car power adapter
USB 2.0 cable
User manual
Requirements
A microSD card with up to 200GB of memory
A Windows or Macintosh computer with USB port, media player software and
Internet access to download the camera’s control software.
GETTING STARTED
Quick Start
Here’s the fastest way to start recording video right out of the box. Since the battery
is unlikely to be charged, connect the USB cable to the camera and AC adapter and
plug the adapter into a power outlet. Insert a microSD memory card with a capacity
of 32GB or less. Keep in mind that the camera’s date/time stamp will not be accurate
since it would need to be rst adjusted from the computer software. If it’s not already
in place, move the three-position switch to the middle position, the On-the-go mode
indicated by the running man icon. Hold down the power button until the LED turns
green. When you see the green LED continually ashing, the camera is recording.
Make sure the front of the camera and its pinhole lens are pointed at your subject.
Charging the Battery
The LED ashes red while charging and turns off when the battery is fully charged.
The fastest way to charge the Z12 is by plugging the AC adapter into a wall outlet or
power strip while the other end of the cable is connected to the USB port on the right
side of the camera (with the lens facing you). If this is the product’s rst use or the
battery hasn’t been refreshed in several months, charge the battery for 6 hours (when
not recording) or until the red LED turns off. Charging the camera from a computer’s
USB port will take longer. You can also charge the camera using the included car
adapter, which turns the cigarette lighter into a USB charging port. Recharging the
camera regularly shouldn’t take more than 1 to 3 hours depending on how much the
battery has been depleted.
SPYTEC Z12 INTELLIGENT SECURITY CAMCORDER USER GUIDE 2

Note: To check if the battery has power, make sure the camera is disconnected from
an external power source and hold the power button for one second.
If there’s no memory card in the slot or the inserted card is unformatted, the LED will
briey turn a steady green (indicating internal power), then a steady red (indicating
there’s no memory card), and then turn off.
If there is a formatted memory card inserted, the LED will turn a steady green, then
after a few seconds start ashing green indicating the camera is recording. If you’re
only checking power, press the power button for two seconds to stop recording. The
green LED will stop ashing, turn orange, then turn off completely.
Tip: There’s no way to tell whether the battery is fully- or partially-charged. Always
charge the camera before a recording session. If you’re unsure how much power is
left in the battery, keep the camera plugged into a power source.
Handling and Formatting the Memory Card
Because a MicroSD card (not included) is fragile and about one-quarter the size of
an SD card, it’s easy to damage or lose. Keep your eye on the card as you insert the
edge with the eight metal contacts pointed up into the slot while the camera’s bottom
indicia plate rests on a at surface. Push the card in until it snaps into place. To
remove the card, press it in with your nger nail, being careful to block the card from
becoming airborne as it’s ejected by the slot’s spring mechanism.
The easiest type of memory card to use with the Z12 contains a capacity of 32GB or
less, while cards with more memory must be properly formatted to be recognized by
the camera. See the Troubleshooting section (pg. 16) for formatting instructions.
What’s on the Camera
FRONT RIGHT SIDE
LEFT SIDE
SPYTEC Z12 INTELLIGENT SECURITY CAMCORDER USER GUIDE 3

Using the Z12 Zetta Widget Software
To adjust the date and time in your camera and to customize the Z12’s range of
features, you must rst download and install the Widget software on your Windows or
Macintosh computer. Use your computer browser to go to:
http://support.spytec.com/help/article/link/zetta-widget.
Choose the Zetta Widget for a Windows PC or a Mac. Once the program is installed
an icon on the upper left corner of the Zetta Widget software is red when the camera
isn’t connected to a USB port on the computer and green when it is.
Note: The software refers to the camera as the DVR as in “digital video recorder”.
The Zetta Widget menus can be viewed in English, French, German, Italian, Spanish
and Chinese (simplified or traditional).
Adjusting the Camera’s Settings from the Software
Using the included USB cable, attach the camera to the computer where the Zetta
Widget software is installed.
When the Z12 is attached to the PC, two lettered drives appear: one drive is the SD
card (where the les are stored) and one is the camera’s internal memory. The latter
has a small amount of on-board ash for settings and rmware. It’s not sufficient to
store video.
The camera must be plugged into your computer to use the software. If the camera
is not connected, you’ll see an unplugged icon in red next to “DVR disconnected” at
the top of the screen. When the camera is connected using the included USB cable,
you’ll see a plug in green followed by “DVR connected.”
Note: Whenever you change settings in the software, they must be transferred to the
camera. Click on the circular icon to the left of “Sync Settings to DVR” to complete
your choices. A confirming check mark in green next to “Settings Saved” will appear
on the screen.
Setting the Date and Time
In order to superimpose the correct date and time in videos recorded with the Z12,
you must use the Zetta Widget software. With the plug icon shown in green and
labeled “DVR Connected,” click on the clock in the left icon. You can accept the PC
Date Time active on your computer or you can click on the Custom Date Time. Either
way, make sure to click on Sync Date Time to DVR so that the settings are saved
SPYTEC Z12 INTELLIGENT SECURITY CAMCORDER USER GUIDE 4

to the camera. By default, the date and time are superimposed on the bottom-right
corner of the video as it’s being recorded. See the Time stamp (pg. 8) section if you
want to record videos without the date and time.
Note: Remember to connect the camera to your computer to adjust the time when
the clock springs ahead or falls back an hour.
Setting the Mode
To get the highest resolution during manual recording, move the three-position
switch to the middle position, the On-the-go mode . For less resolution but longer
recording time before running out of memory or overwriting previous video in a
circular recording, move the switch to Surveillance mode .The frame rate is the
same for both modes. Neither mode supports the automated triggers or unattended
recording times you can set using the Zetta widget. If you’ve set the camera from the
Zetta widget to start recording on its own from a trigger or designated time, you must
leave the slider in the Custom position .
Recording a Video
To start a recording manually, make sure the mode is set for Surveillance or On-the-
go and press and hold the Power button until the green LED lights up. It will shine
steadily, then after a few seconds ash continually to indicate that a recording is in
progress. To end a recording, hold the Power button for two seconds. The LED will
turn orange, then turn off to indicate recording has stopped.
SPYTEC Z12 INTELLIGENT SECURITY CAMCORDER USER GUIDE 5

Customizable Features
The Z12’s self-starting exibility becomes evident when you take advantage of the
camera’s programmable features using the Zetta Widget software.
Note: The Custom mode is used to start a recording automatically from designated
triggers or at preset times according to your instructions downloaded to the camera
from the Zetta widget computer software.
To see the Custom selection screens,change the Setting Mode from Express to
Custom, then click on the Save Option button. A check mark in a green circle will
appear on the left side of the screen conrming Option Saved. Now, when you click
on Settings in the left column, you’ll be greeted with a laundry list of capabilities
selectable via radio buttons.
SPYTEC Z12 INTELLIGENT SECURITY CAMCORDER USER GUIDE 6

Video Quality
You can choose one of three video qualities by using the Zetta Widget software.
They are High, Medium, and Low. High Quality means that the video is saved with
the least amount of le compression; Low Quality with the most compression. The
default video quality is High. Once you’ve clicked on High, Medium or Low, make
sure to click on Sync Settings to DVR and leave the camera’s three-position switch
on Custom mode.
Resolution
When using Custom Mode, select between VGA (640 x 480) and QVGA (320 x
240) to suit your needs. VGA affords better resolution while QVGA provides longer
recording time. The default setting in the Zetta Widget software is QVGA. If you
move the slider on the camera away from Custom Mode, all custom settings will be
disabled and recording resolution will be determined by positioning the switch at On-
the-go Mode (VGA) or Surveillance Mode (QVGA).
Frame Rate
You can choose to record video at a High frame rate (20 fps) or at a Low rate (6 fps).
High is closer to full motion, while Low enables longer-duration recordings. The Zetta
Widget default frame rate is High.
Indoor Lighting Condition
The camera can be set to match the frequency of electricity in various countries to
provide the most pleasing video under indoor lighting. For use in North America, the
software should be set to 60 Hz, though you’re unlikely to see much difference. The
default is 50 Hz.
Day / Night Mode
Set to “Day mode” if the camera’s location offers adequate lighting. Set to “Night
mode” for poor lighting conditions. Set to “Auto” if the lighting condition will change
while the camera is operating. Make sure to click on Sync Settings to DVR and keep
the camera’s three-position switch on Custom mode. The default is Day mode.
Orientation
The camera can operate upside down.You may want to put this capability to use
when nding an optimum hiding position. That way, you can still have easy access to
either side of the camera in a tight corner. Resulting video will appear upside down
on your computer unless you choose the Up-side-down option in the Zetta Widget
software. Make sure to click on Sync Settings to DVR and keep the camera’s three-
position switch in Custom Mode. The default is Normal orientation.
SPYTEC Z12 INTELLIGENT SECURITY CAMCORDER USER GUIDE 7

Time Stamp
Without doing anything, the video’s date and run time are superimposed by default
along the bottom right of the screen in the format: 2016/03/04 11:04:58 (year/month/
day hour/minute/second). This allows you to identify the exact moment an incident
occurred. However, if you prefer not to time stamp the picture, click on the Disable
button, then on Sync Settings to DVR. Make sure to keep the slider switch on the
camera in the Custom Mode position. The time stamp will not be recorded, and it will
not appear on the video.
Note: You cannot change the time stamp format.
Circular Recording
Also called loop recording, circular recording means that the camera will automatically
overwrite the oldest video le with the newest video. That way, you don’t have to keep
changing memory cards or transferring les to your computer. The setting assumes
you don’t need to archive days-old video but simply want the ability to retrieve recent
footage when a surveillance situation or vehicular accident warrant further review.
Click on the Enable button, then Sync Settings to DVR. Keep the three-position
switch on the camera on Custom Mode.You can always disable Circular Recording
from the software. When the camera’s three-way switch is set to Surveillance mode,
circular recording is enabled; with On-the-go, it’s disabled; the Custom mode default
is enabled.
SPYTEC Z12 INTELLIGENT SECURITY CAMCORDER USER GUIDE 8

Split File Time
Managing your recordings is made easier from shorter-length les. That way,
you can review snippets instead of epics and upload incidents without a lots of
irrelevant video.You can set the software to have the camera save video into discrete
les every 10-, 15- or 30 minutes. So, for instance, if you selected the latter, a
3-hour recording will be automatically saved as six 30-minute les. You won’t lose
information between contiguous videos. Split File Time is not a factor when operating
the camera for a few minutes at a time in Surveillance or On-the-go modes. But for
longer durations, les will be created at timed intervals as follows: in Surveillance
mode, every 30 minutes; On-the-go, every 15 minutes. The Custom default for Split
File Time is 15 minutes.
To choose when the camera automatically saves recordings at one of the three
intervals, click on the 10-, 15- or 30-minute button, then click on Sync Settings to
DVR. Make sure to leave the camera’s three-position switch on Custom mode.
Mic
In some situations, audio in a video recording is irrelevant or undesirable.You can
turn off the camera’s microphone by clicking on the Disable button. Make sure to click
on Sync Settings to DVR and keep the camera’s three-way switch in the Custom
mode. The mic is enabled in Surveillance and On-the-go modes. It’s also enabled by
default when selecting High Quality Video recording in Custom mode. It is disabled
for Medium- and Low-quality recording.
SPYTEC Z12 INTELLIGENT SECURITY CAMCORDER USER GUIDE 9

LED On / Off
For the most clandestine surveillance, you can minimize the chances of giving away
the camera’s position from a lit LED. You can disable the multi-colored light entirely.
After clicking on the LED Off setting, make sure to click on Sync Settings to DVR and
keep the camera’s three-way switch in Custom mode.
The LED is set to On in Surveillance and On-the-go modes. It’s set to On by default
when recording in custom mode.
Tip: It may not be prudent to disable the LED. You’re also disabling the camera’s
status indicators.
Triggers
Continuous video recordings are comprehensive, but they consume storage and
make locating incidents laborious. Alternatively, you can set the camera to start video
recording by using up to three triggers: voice, vibration and/or motion. The camera’s
responsiveness to these triggers each can be adjusted according to three levels of
sensitivity.
Voice-Trigger Sensitivity
In the case of the camera’s microphone picking up a voice or voices to trigger
recording, you can adjust the mic sensitivity to High, Medium, or Low. If the goal is
to trigger a recording from people yelling or shouting, set the sensitivity to Low. If it
makes more sense to trigger a recording from people whispering, set the sensitivity
to High. If you’re not sure, set it to Medium. You should experiment to see which
setting is best in the intended environment.
Once triggered, a recording will continue for 5 minutes, then return to standby until
triggered again. After choosing a voice-sensitivity trigger in the Zetta Widget software,
make sure to click on Sync Settings to DVR and keep the camera’s three-way switch
in Custom mode. Voice triggering is disabled in Surveillance and On-the-go modes.
The Widget software’s voice-trigger is disabled by default.
Vibration-Trigger Sensitivity
You can set the camera to start recording when it senses a vibration, which may
be an appropriate use when placing the camera in an unattended vehicle.You can
set the level of sensitivity to High, Medium or Low. In a noisy environment like when
the car is parked on a busy street, set the trigger to Low Sensitivity. (Otherwise, the
camera might be triggered to record too much.) But in an isolated parking lot, set the
SPYTEC Z12 INTELLIGENT SECURITY CAMCORDER USER GUIDE 10

trigger to High Sensitivity.(That way it will pick up subtle changes.) If you’re not sure,
set it to Medium. You should experiment to see which setting is best in the intended
environment.
Once triggered, a recording will continue for 5 minutes, then return to standby until
triggered again. After choosing a vibration-sensitivity trigger in the Zetta Widget
software, make sure to click on Sync Settings to DVR and keep the camera’s
three-way switch in Custom mode. The Vibration trigger is disabled in Surveillance
and On-the-go modes. It’s set to High for high-quality video recording; Medium for
medium quality, and Low for low quality. The software’s vibration-trigger is set to Low
by default.
Vibration Standby Mode
Choosing Power Saving can enable 90 days of standby time, but it will cause a slight
delay before recording begins. Fast Wake Up, on the other hand, kicks in instantly.
When you change a setting, make sure to click on Sync Settings to DVR and leave
the camera’s three-position switch in the Custom mode. Vibration Standby Mode
is not applicable to Surveillance and On-the-go modes. As for the Zetta Widget’s
custom settings, the default is Power Saving.
Motion-Trigger Sensitivity
The most useful automatic trigger to cause a video to start recording from a xed-
position camera typically is motion. Someone darts into view, and the camera begins
to record. You can set the trigger’s sensitivity level to High, Medium or Low. If you’re
expecting a lot of motion in the camera frame, such as shadows cast by tree limbs
swaying in a breeze in front of an outdoor light, you’ll want to set the sensitivity to
Low so as not to be overwhelmed by too much video. If you expect little activity, you
should set the trigger sensitivity to High. That way, if there are subtle changes, you’ll
be able to pick them up. If you’re uncertain, try the Medium setting. In any case, it’s a
good idea to try out your choices in a test run before a mission-critical operation.
Once triggered, a recording will continue for 5 minutes, then return to standby
until triggered again. After choosing a motion-sensitivity trigger in the Zetta Widget
software, make sure to click on Sync Settings to DVR and keep the camera’s three-
way switch in Custom mode. The motion trigger is disabled in Surveillance and On-
the-go modes and disabled by default in the software’s custom settings. Otherwise,
it’s set for High sensitivity for High Quality Video, Medium for medium quality and
Low for low quality.
SPYTEC Z12 INTELLIGENT SECURITY CAMCORDER USER GUIDE 11

VEHICULAR USE
The Z12 can be used to automatically trigger video recording in a variety of ways in
a vehicle:
• Car-Activate Recording for video capture when the engine is turned on
• Car-Stop Recording for when the engine is turned off
• Car-Activate & Car-Stop Recording for both
SPYTEC Z12 INTELLIGENT SECURITY CAMCORDER USER GUIDE 12
Tip: Keep in mind that the motion trigger cannot distinguish between a cat and a
cat burglar. If a guard dog is typically active, for instance, you may want to aim the
camera so that the oor is out of frame.

Using the Zetta Widget software, rst click on the Disable setting under Motion-
Trigger Sensitivity. Then, choose one of the following:
Car-Activate Recording: To capture video while driving, the camera will automatically
power on and start recording when the car’s ignition is started. The camera will
automatically shut down when the car is turned off.
Car-Stop Recording: To capture video while the car is parked, the camera will
automatically start recording video when the car is turned off and stop recording
video when the ignition is started.
Car-Activate & Car-Stop Recording: To capture video while both driving and when the
car is parked, the camera can be set to record for 24-hours of coverage.
After making your selection, make sure to click on Sync Settings to DVR. In addition
to leaving the camera’s three-position switch in the Custom mode, the camera must
be plugged into the vehicle’s cigarette lighter socket using the included USB cable
and 5-volt car adapter. The camera recognizes whether the vehicle is running or not
based on whether power is owing into the socket. In the case of a vehicle with an
always-on powered socket, recordings must be manually started and stopped.
Auto On / Off
Like using the On/Off alarm setting on a clock radio, clicking on Scheduled Recording
will activate recordings at the times you’ve set. Clicking on Disable will cause the
camera to ignore scheduled recordings. Remember to click on the Sync Settings to
DVR button in the software and leave the camera’s three-position switch in Custom
mode. Auto On/Off is disabled for Surveillance and On-the-go modes.
Scheduling the Camera for Auto Recordings
Most times, you’ll want to leave the camera unattended so that it starts and stops
recordings on its own. Using the Zetta Widget software, you have the exibility to
schedule the camera to shoot video at various times on a weekly schedule. You set
each block of recording time in three-hour increments and book them beginning
at 3 am, 6 am, 9 am, noon, 3 pm, 6 pm, 9 pm or midnight. You can also designate
whether the camera starts recording based solely on preset times or whether the
programmed times puts the camera on standby ready to record only when triggered
by an external event such as a voice, vibration or motion.
SPYTEC Z12 INTELLIGENT SECURITY CAMCORDER USER GUIDE 13

Turn on the camera, click on Settings on the left side of the Zetta Widget software,
then scroll all the way down to the Auto On/Off selection. Click on Scheduled
Recording, then the Edit link. You’ll see the Schedule Settings screen with a 7-day,
24-hour calendar. Move your mouse to a particular time slot. You can either click and
let go to highlight a 3-hour block or click and hold the mouse to extend the time in
multiples of 3 hours.
Upon highlighting a time block, the Create Task box appears. The default is to Always
Record during the designated time block. To instead set triggers during the time
block, click on Triggering Record, and check off up to three ways for the camera to
start recording: Voice-Trigger, Vibration-Trigger and Motion-Trigger. The camera will
stand by to record during the set time period but record only when triggered.
SPYTEC Z12 INTELLIGENT SECURITY CAMCORDER USER GUIDE 14

Tip: The advantage of setting triggers is that you won’t have to review hours of
non-eventful footage.
Once you click OK, you’ll be able to view your choices on the calendar. Designated
time blocks are outlined in gray. As the legend at the bottom of the calendar shows, a
transparent block indicates an Always Record task. Blocks that are occupied by one
or more colored icons indicate that you’ve set one or more triggers:
Voice -Trigger Option
Vibration -Trigger Option
Motion -Trigger Option
You can always change your options by right-clicking within a block, then choosing
Edit Task or Delete Task. If you choose Edit Task, the Create Task box will appear
with your previous settings. If you choose Delete Task, the highlighted time block will
be deleted.
To activate your designated Schedule Settings on the Z12, make sure to click OK on
the Schedule Settings screen. Then, in the Settings screen, make sure to click on the
Sync Settings to DVR button.
LEDs at a Glance
It’s important to pay attention to the Z12’s multi-color light emitting diode in order to
know the status of the camera. Here’s a quick guide:
While Powered from Camera’s Battery
Green steady: camcorder is booted up
Red steady: no card, card fail, battery low or card full (and not set for circular
recording)
Green ashing: recording in progress
Green/Red intermittent ashing: recording in progress but battery is low
While Powered from Electrical Outlet or Car Adapter
Red ashing: camera is charging
Red steady: no card, card fail or card full (and not set for circular recording)
Orange/Green intermittent ashing: charging and recording in progress
Green ashing: charging complete and recording in progress
LED off: charging complete and no recording
While Connected to Computer
Orange steady: charging
Green steady: charging complete
SPYTEC Z12 INTELLIGENT SECURITY CAMCORDER USER GUIDE 15
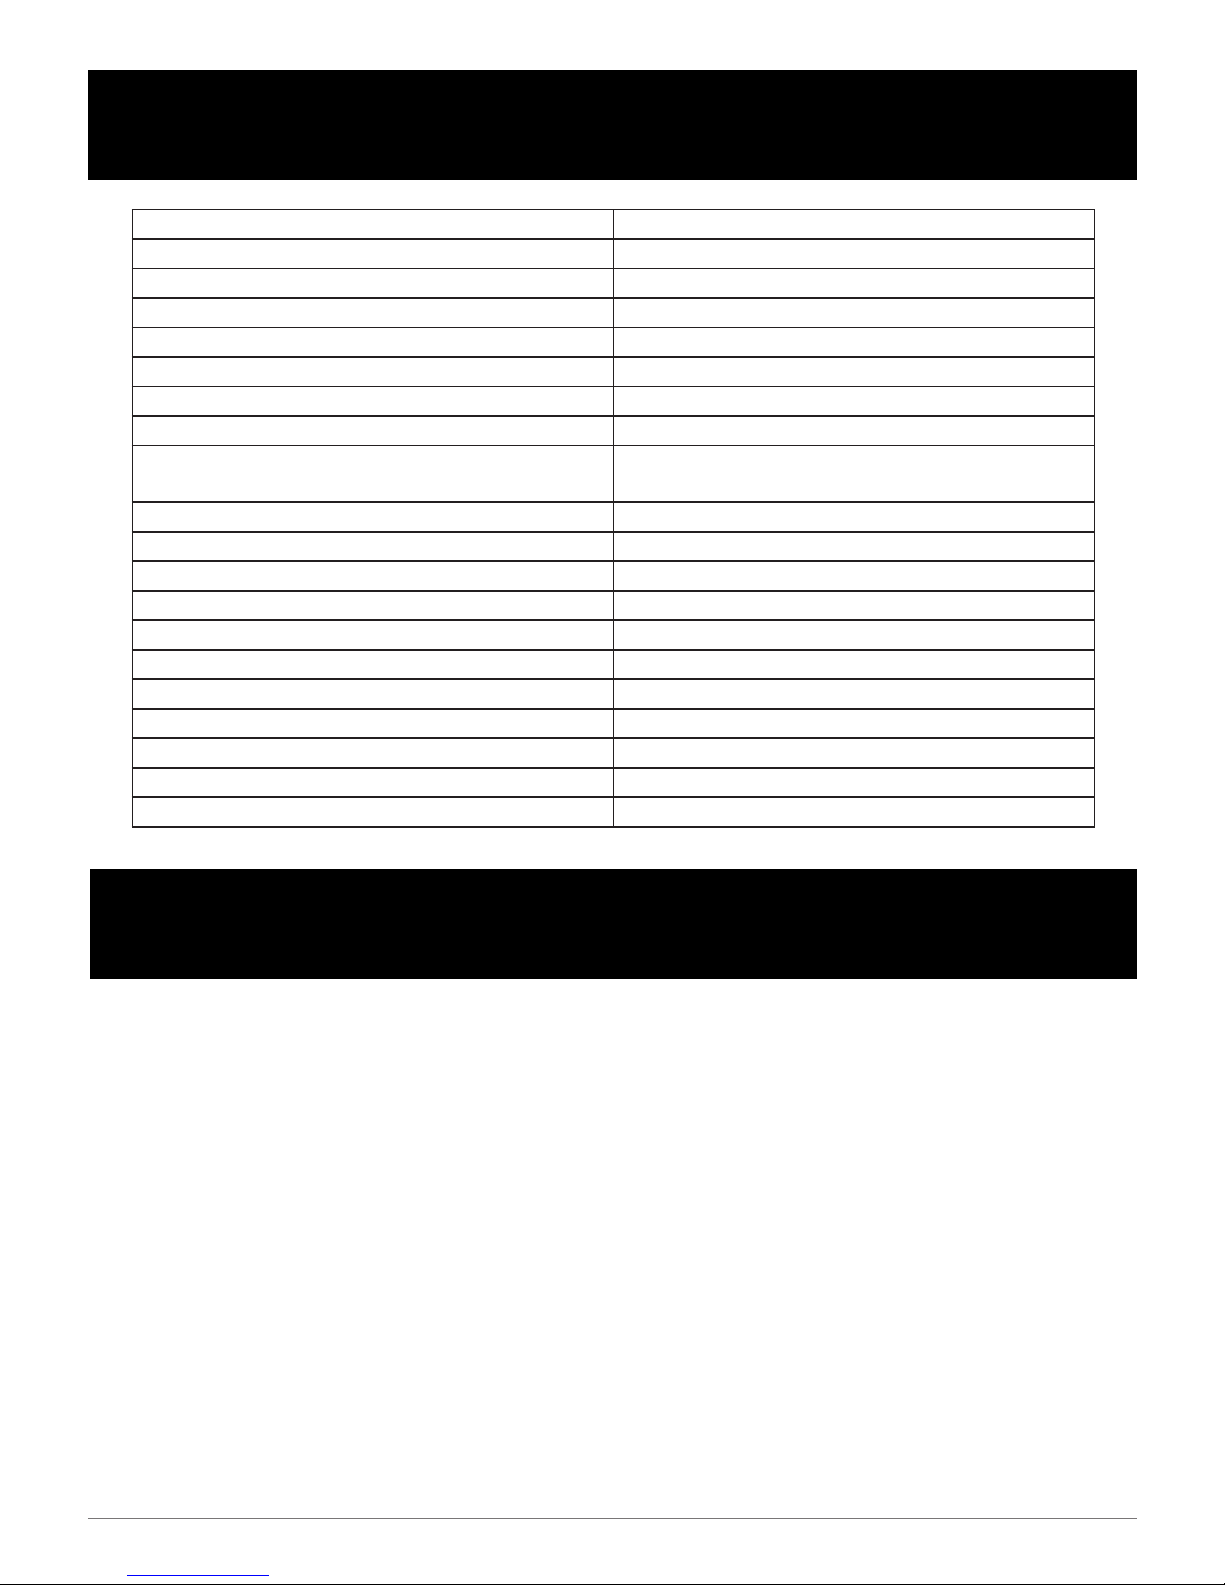
Lens Fixed
Sensor 0.3 MP
Resolutions 640 x 480 or 320 x 240
Frame rates (frames per second) 20 fps (high) or 6 fps (low)
Video qualities High, medium, low
Low-light sensor sensitivity 6.8 V/lux-sec
Sensor viewing angle H/V 62°
Memory card support Max 200GB microSD card
Memory usage High frame rate: 45 min./GB
Low frame rate: 3 hr./GB
Microphone Speech-grade
Battery handling Non-removable
Battery type Rechargeable 800 mAh 3.7V Li-ion
Current consumption 80mA
Storage and operating temperature range 32 to 113°F (0 to 45°C)
File format AVI
Port Mini-B USB 2.0
Slot MicroSD/HC/XC
Internal memory None useable
Size (D x W x H) 3" x 1.7" x .75" (7.6 x 4.3 x 1.9 cm)
Weight 1.6 oz. (46 g)
TROUBLESHOOTING AND FAQS
64- to 200GB microSD Card Support
If one of these high-capacity cards is not recognized by the Z12, you’ll need to
properly format it. If the card has not been used before, formatting it won’t wipe out
any data. But if the card has been in use, keep in mind that any data stored on the
card will be lost during formatting.
Fully insert the up to 200GB microSD card into the camera’s memory slot until a click
is heard and connect the camera to your PC using the included USB cable.
Zetta Widget Software Loads But Won’t Operate
The camera must be connected and recognized by your computer for you to use
the software. Otherwise, options will be grayed out and every screen will show an
unplugged icon in red along with the phrase DVR Disconnected.
SPECIFICATIONS
SPYTEC Z12 INTELLIGENT SECURITY CAMCORDER USER GUIDE 16

Windows Users
Download the formatting utility from http://support.spytec.com/help/article/link/gui-
format-program to format the card as FAT32. Quit all other programs including the
anti-virus, rewall, browser and le manager. Otherwise, it will fail to start formatting.
Disable the computer sleep mode. There are two removable drives added. Choose
the drive for the microSD card with capacity 59-/63-/128GB listed. The allocation
unit is 32768. Choose “quick format” and press start. Once nished, if the memory
card still cannot record, please do it again but uncheck the “quick format”. It will take
around between 2- and 9-hours to nish. Do not touch anything during this time and
make sure the power supply and cable connection are stable.
Macintosh Users
Format the card as “MS-DOS FAT” by using spotlight to search for “disk utility”.
There are two removable drives added. Choose the drive for the microSD card with
capacity 59-/63-/128GB listed. Choose Erase. Choose “MS-DOS FAT” under the
Format. Press “Erase” at the lower right corner. Then press “Erase” in the new pop-up
windows. Wait for a while, making sure and that the power supply and cable connec-
tion are stable. Formatting should be complete.
For more help formatting cards greater than 32GB, see:
http://support.spytec.com/help/article/link/64gb-sd-card-formatting-guide
http://support.spytec.com/help/article/link/how-to-video-formatting-a-64gb-sd-card
How Do I Check Remaining Card Memory?
If you’re not sure how much free space the memory card in your camera contains,
connect the Z12 to your computer using the USB cable. The device will pop up on a
Windows computer as a removable disk followed by a letter. Right-click on Properties
to see how much space has been used and how much free space remains.
Can I Use the Z12 as a Live Web Cam?
No. The camera will not record when attached to a computer via its USB cable. It will
charge and play recorded video through a media player on your computer.
SPYTEC Z12 INTELLIGENT SECURITY CAMCORDER USER GUIDE 17

When Should I Use the Reset Button?
Assuming that the camera is charged but locked up, try using the Reset button
under the camera. If you can, rst remove the memory card. Because the button
is recessed with pinhole access, grab a pin, toothpick, wire or any tool sufficiently
narrow to t into the hole. The reset button will click when pressed. Keep it pressed
for 5 seconds. Camera settings will be returned to the factory defaults. If you were
unable to remove the memory card, you may lose any content.
How Do I Know the Camera Is on Standby?
With the three-position switch set to Custom Mode and no light coming from the
LED, press the Power button until the green LED turns on. It will shine steadily, then
ash for a few seconds and turn off. The camera is set for standby. You can place
the camera in position and walk away. If, on the other hand, you press the LED for
two seconds, it turns orange and shuts off, the camera has shut down and will not
wake up on its own. Press the LED until the green LED comes on, ashes for a few
seconds, then turns off. The camera is set for standby. It’s important to recognize
the state in which you leave the camera if you expect it to recognize the Schedule
Settings.
How Can I Make the Camera More Secure?
You can purchase the optional adjustable mount for the Zetta Z12. It enables covert
and secure mounting.
SPYTEC Z12 INTELLIGENT SECURITY CAMCORDER USER GUIDE 18
Can I Schedule Recordings Outside of 3-hour Multiples?
No. When designating blocks of time for the Z12 to record video using the Schedule
Settings screen in the Zetta Widget, the minimum duration is three hours. You can
drag your mouse to program longer segments, but they must be in multiples of 3
hours. So, you can designate a 3-, 6, 9- or 12-hour block, but you can’t set a 4-hour
block. Also, a block must begin at midnight, 3 am, 6 am, 9 am, noon, 3 pm, 6 pm,
or 9 pm. And no, you can’t switch the software from military (24-hour) to 12-hour AM
and PM time.

SPYTEC Z12 INTELLIGENT SECURITY CAMCORDER USER GUIDE 19
Firmware Upgrades
An occasional firmware upgrade may be available for the Z12.
Visit http://support.spytec.com/ to check on the latest firmware for your Z12.
Help
Thanks again for purchasing a SpyTec product! We appreciate your business and
strive to make your experience the best possible. If you have any issues with your
things started.
Warranty
This Limited Warranty applies to physical goods sold by STI and lasts for a period of
one year from the date of sale of the device.
This Limited Warranty covers any manufacturing defects to the device or accessories
encountered by normal use. This warranty does NOT cover damages resulting from
improper use of the device (including the use of incompatible accessories such as
chargers, storage devices, etc.), unauthorized modications to the device, negligence,
or from any environmental or natural disasters, or from loss or theft. This warranty
requires proof of sale of the device from STI or from approved resellers only.
Devices that are covered will be repaired or replaced at STI’s discretion. Devices
requiring replacement will be fullled with a new or refurbished unit, or a similar unit if
the original unit is no longer available.
To take advantage of our warranty, please go to http://www.spytec.com/return-policy/
and review our returns policy. If your device meets the above guidelines
as well as the guidelines on our website, please click the button to proceed to the
Return Authorization Form. In the event our on-line guidelines change, this warranty
will supersede any newer changes. Once you have filled out the Return Merchant
Authorization form, please wait for instructions. The date the form is lled out must
not exceed one year from the date of sale.
SpyTec is a registered trademark of Spy Tec International, 2019.
All rights reserved.
Other manuals for Zetta Z12
1
Table of contents
Other Spy Tec Camcorder manuals


