Spy Tec IPS-30 Pro User manual

IPS-30 Wi-Fi USB Wall Adapter Pro
www.spytecinc.com
User Gu i d e

IPS-30 Wi-Fi USB Wall Adapter Pro
In the Box
Camera hidden inside USB charger
USB 2.0 microSD card adapter
Reset tool
User Guide
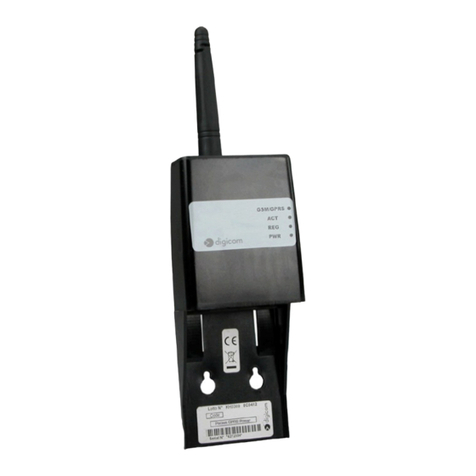
The IPS-30 is a versatile 1080p surveillance camera hidden inside a plain-looking USB power
adapter you plug into a wall outlet. Powered from the outlet (or tethered to an extension cord or
power strip), the camera transmits video and audio through the room’s Wi-Fi to the free BVCam
mobile app. It records to a microSD card (not included) and enables loop recording so that the card
never runs out of memory. It has a motion detection feature for automatically triggering recordings
and sending you alerts. One camera can support multiple users and one app can support multiple
cameras. The USB socket is fully functional as a charger for mobile devices.
Things to Know About the IPS-30
Because so much circuitry is packed into such a tiny device, heat dissipates slowly from this
camera. The surface will get hot when plugged into a power outlet. This is normal. Please make sure
As a USB electric-plug adapter, the IPS-30 can charge a mobile device. You can use it as a charger
and a camera simultaneously, but be sure that any charging cable from an external device doesn’t
block the lens.
If you plug the camera into a power outlet that is controlled by a wall switch, make sure to leave the
switch on.
If you plan to use the camera outside North America where two-slot electrical plugs are not
standard, you can plug the camera into an adapter suited to that country. The camera should be
1
2

Push a microSD card, typically 32GB (but up to 128GB), into the
slot below the electrical prongs until it snaps into place. The side
of the card with the golden contact points should be pointed away
from the side of the adapter with the QR code. (You can start using
the camera without a memory card, but you’ll only be able to
stream live to your remote viewing device and save content to
your remote device.)
Download the BVCam app into your phone or tablet from the Google Play Store or Apple App Store.
Load the app. Touch the + icon in the upper-right corner of the screen, then the Add New Online
Device tab. The default name for the camera will be Cam. You can change it now or later to
occupied by a series of X’s. Touch the QR (Quick Response) Scan tab and point your mobile
device’s camera at the rectangular code atop the adaptor. When the camera captures the code,
to enter the string of characters that appear below the QR code. Touch OK.
Quick Start
3
Indicator light
Microphone
Micro SD slot
Reset key
USB charging port
QR code
Camera lens

Switching to Wi-Fi
With your mobile device listing its Wi-Fi connection as direct to
the camera and the BVCam app showing the camera as online,
A list of Wi-Fi networks in the area will be displayed. Choose the
one you want to use with the camera. (It should be one you
typically use with your mobile device.) Enter the network’s
password. You’ll be prompted whether you’re sure you want to
connect the camera to this network. Touch OK.
You’ll then be told that the camera will reboot. Touch OK. Return
to the list of your cameras. The camera will be logging in or
requesting service. After a minute or so, it should be listed as
online. The camera and your mobile device (which had been in
ad hoc mode) should both switch to the Wi-Fi network. (You
shouldn’t have to go back into your mobile device settings to
switch from the camera’s ad hoc mode to your Wi-Fi network.)
You will now be able to leave the building and see the live view
and control the camera remotely via the Internet.
Plug the ISP-30 into the outlet where you intend to use the camera. The location should be
accessible to your Wi-Fi network and, for now, near the mobile device loaded with the BVCam app.
UID. Temporarily switch to this “ad-hoc” network, which directly connects your mobile device to the
camera. (You won’t be able to get on the Internet while connected this way.)
Reload the BVCam app. The camera should be listed as Online. When you touch it, you’ll be
prompted to change the camera’s default password, 8888, for stronger security. It’s a good idea to
change it now. With the camera online, you’ll be able to check the view and start recording, but
because you’re not connected through your Wi-Fi network, you’ll have to be nearby to operate the
Wi-Fi network.
4

Setting the Date and Time
To set the date-time stamp so that the information is
accurate when it overlays a corner of videos and
photographs captured by the camera, touch the gear
icon in your list of cameras, then Device Settings.
Choose Time Setting. Select Sync with App Time,
then OK.
Mobile Screen Navigation
select one that is online. The live view from the camera should appear full screen. Touch the screen
to bring up control icons along the top and bottom of the screen.
Touch controls along the bottom of the screen:
Mutes the sound on your mobile device from the camera’s live stream .
Not applicable to this camera since it does not contain a speaker, meaning you can’t
talk into the mic on your mobile device and be heard through the IPS-30. (The larger
mic icon that pops up in the bottom right corner of the screen is also non-functional.)
If you want to add another photo or tablet to take in the camera’s view and be able to control the
camera remotely, make sure your mobile unit has the BVcam app installed and the unit is connected
to the same Wi-Fi network as your previous device was when you switched the camera from its ad
hoc mode to Wi-Fi. Then touch the + icon on the BVcam app followed by Add New Online Device.
Touch the QR Scan tab and point the phone or tablet camera at the QR Code on the IPS-30 still
plugged into its electrical outlet. Once the UID is captured (or you enter it manually), touch the
5

Where are video recordings saved?
Make sure the camera is online with a microSD card inserted. In the app go to the gear icon, then
live video. To record to the card, change from Close to either On Alarm, All Day or Timing record.
Make sure to touch the save tab.
Saves a snapshot to your viewing device.
Starts recording a video; touch again to stop. A red dot appears over the icon while a
recording is in progress.
Flops image left or right, which is useful when the camera is pointed at a mirror.
Inverts picture, which is useful when the camera is plugged in upside down.
Exits live view and returns you to the list of cameras accessible by the app.
Brings up slider for adjusting picture brightness
Brings up slider for adjusting contrast
Toggles between color and black and white
Offers you a choice of resolutions: 1080p, 720p, 640p or 480p. The resolution is
displayed above the picture whenever you touch the screen.
Touch controls along the top of the screen:
6

Go to the Record button to bring up list
of recordings. The list should be blank
made to Local, meaning to your
mobile viewing device. Tap the down
arrow to change the recording target
to the camera’s microSD card. You’ll
also be able to download recordings
from the camera’s memory card to
your mobile unit. You’ll see the
Downloading status while a download
is in progress.
Note: When locating recordings using an iOS device, you’ll see four icons at the top of the screen
that point you to recordings: on the mobile device, on the microSD card, downloaded from the
camera to the mobile device or currently being downloaded.
Where are photographs saved?
Since to take a photo, you touch the snapshot icon while viewing the camera’s live stream, photos
are saved to your viewing device.
Alarm Config
To turn on the camera’s motion detection function and set
detection sensitivity. The default is for motion detection to
be disabled. To turn it on touch the white button so it
becomes green. There are seven levels of sensitivity.
Choose 1, the highest level, when there isn’t usually much
activity. Choose 7, the lowest level, when there’s typically
a lot of activity and you don’t want to be bombarded with
a deluge of alerts. You should experiment with different
levels and decide which level in the range is best suited to
your needs. Start by setting the level to 4, normal.
Other Device Settings
7

Note: When locating recordings using an iOS device, you’ll see four icons at the top of the screen
that point you to recordings: on the mobile device, on the microSD card, downloaded from the
camera to the mobile device or currently being downloaded.
Where are photographs saved?
Since to take a photo, you touch the snapshot icon while viewing the camera’s live stream, photos
are saved to your viewing device.
Next, set the alarm schedule by inputting a start time and
an end time for motion detection to be active. Usually, you
wouldn’t want it to be active during the parts of the day
when you’d expect people to be moving in front of the
camera. For a workplace, you’d probably want to set a
range when the business is closed. For a residence, you
might set a range when nobody is supposedly at home.
If you want to hear a warning tone on your mobile device,
touch the white button so it turns green. You can also can
get an email alert. (The email address and FTP
alarm interval from 30 seconds (the default) to every 250 seconds, meaning about every four
minutes.
also be uploaded to a TFTP server. The camera will automatically record video of the incident to its
memory card, so you can watch it later.
Be sure to touch OK for any of your changes to be saved.
Touch to bring up the camera’s total memory card
capacity and remaining space.
You can select whether recordings are made to the card
when an alarm is sent, all day or according to timed
recording you set.
Files can be saved at one of the following resolutions:
1080p (the default), 720p or 480p.
minute between 1 and 20. Each recording-in-progress that
Other Device Settings (Continued)
8

You can also record sound (the default) or disable the microphone.
You can also continue loop recording (the default) or turn it off. With loop recording, once the
computer or replacing the old card with a fresh card.
Make sure to touch OK to save changes.
You can also format the card remotely from the app. Be aware that touching OK will erase all the
The Format setting will be grayed out if no card is present in the camera.
Card status - shows the remaining capacity or that no card is detected
Resolution - Changes the video recording resolution from the default, 1080p, to 720p or 480p
File length - Changes the default video recording length from 3 minutes to any length between 1-
and 20 minutes
Record sound - Changes the default On (green) to Off (white)
Loop recording - Changes the default On (green) to Off (white). When active, loop recording will
Make sure to touch OK whenever you make a change.
IR-LED Config - Not applicable to this camera since there is no night vision capability and no
infrared LEDs.
Email Config - You can enter up to four recipients for alerts.
FTP Config
recordings.
Misc Settings - The built-in LED indicates the camera’s state when you plug it into an electrical
outlet and the camera starts up. If desired, you can turn off the LED entirely from here.
Change Password - You can change the camera’s password from here. Note: if you don’t change
the camera’s default password, you will be prompted to do so whenever you connect to the camera.
9

Device Reboot - Will turn camera off, then on. However, you cannot remotely return the camera to
its factory settings.
Resetting the Camera
To return the camera to its factory settings, plug it into an electrical outlet. Locate a pair of tiny holes
on the opposite side of the adapter from the QR code. The one closest to the USB socket houses
the status LED. The one closest to the electrical prongs is the recessed reset button. Press the reset
blue.
Playing Recordings on a Computer
Transfer the microSD card from the camera to the included USB 2.0 microSD card adapter and plug
it into a USB port on your Windows or Macintosh computer. Use your video player software (not
your computer for archiving.
10

Specifications
iOS requirements
Android requirements
Languages
Maximum number of simultaneous viewers
Maximum number of cameras per app
Operating systems
Web browsers
Player software
Sensor
Selectable resolutions
Frame rate
Field of view
Minimum illumination
Minimum focal distance
Audio capture?
Can microphone be disabled?
Is a speaker built into camera for two-way talk?
Motion detection
Video (saved to card or viewing device) format
Compression format
Photos (saved to viewing device only)
Memory card slot
Maximum capacity
Total high-def video storage on 64GB card
Loop recording?
Night vision?
Storage temperature
Operating temperature
Operating humidity
Requirements
Consumption
Battery
Size (L x W x H)
Weight
6.1 or later (on iPhone, iPad or iPad touch)
4.2 and up
English, French, German, Japanese, Korean, Russian,
5
8
Windows, Mac OS X
IE7 and above, Chrome, Firefox, Safari
VLC Player, SM Player
2 Megapixel CMOS
1080p, 720p, 480p
30 fps
90°
1 Lux
Yes
Yes
No
Up to 19.7 ft. (6 m) away
ASF
H.264
JPG
microSD
128GB
Approximately 16 hours
Yes
No
-4-176° F (-20-80 ° C)
14-140° F (-10-60° C)
14-140° F (-10-60° C)
110–220V, 2-blade electrical socket
110MA/5V
None
1.1 oz. (30 g)
BVCAM App
Computer Viewing via USB microSD adapter
Camera
Environmental
Electrical
Physical
11

Help
Thank you for purchasing a SpyTec Inc. product! We appreciate your business and strive to make
your experience the best possible. If you have any issues with your product, please contact us at
Warranty
This Limited Warranty applies to physical goods sold by STI and lasts for a period of 90 days from
the date of sale of the device.
This Limited Warranty covers any manufacturing defects to the device or accessories
encountered by normal use. This warranty does NOT cover damages resulting from improper use
of the device (including the use of incompatible accessories such as chargers, storage devices,
disasters, or from loss or theft. This warranty requires proof of sale of the device from STI or from
approved resellers only.
Devices that are covered will be repaired or replaced at STI’s discretion. Devices requiring
longer available.
To take advantage of our warranty, please go to http://www.spytecinc.com/return-policy/ and
review our returns policy. If your device meets the above guidelines as well as the guidelines on
our website, please click the button to proceed to the Return Authorization Form. In the event our
out the Return Merchant Authorization form, please wait for instructions. The date the form is
SpyTec is a registered trademark of Spy Tec International Inc., 2018.
All rights reserved.
12
Table of contents
