SpyCameraCCTV VX4SL User manual

SpyCameraCCTV.com

SpyCameraCCTV.com
Thank you for purchasing our 4CH duplex DVR. Please read this User Manual carefully to ensure that you
can use the device correctly and safely.
Please take actual machine model number as quasi to validate DVR specification.
The contents of this Manual are subject to change without notice.

SpyCameraCCTV.com
Operation Manual-4CH Duplex DVR
1
TABLE OF CONTENTS
1. INTRODUCTION ............................................................... 3
2. DVR FEATURES ............................................................... 3
3. PHYSICAL UNIT .............................................................. 3
3.1 Front Panels (Please take actual machine model as quasi)............... 3
3.2 Rear Panel (Please take actual machine model number as quasi).......... 4
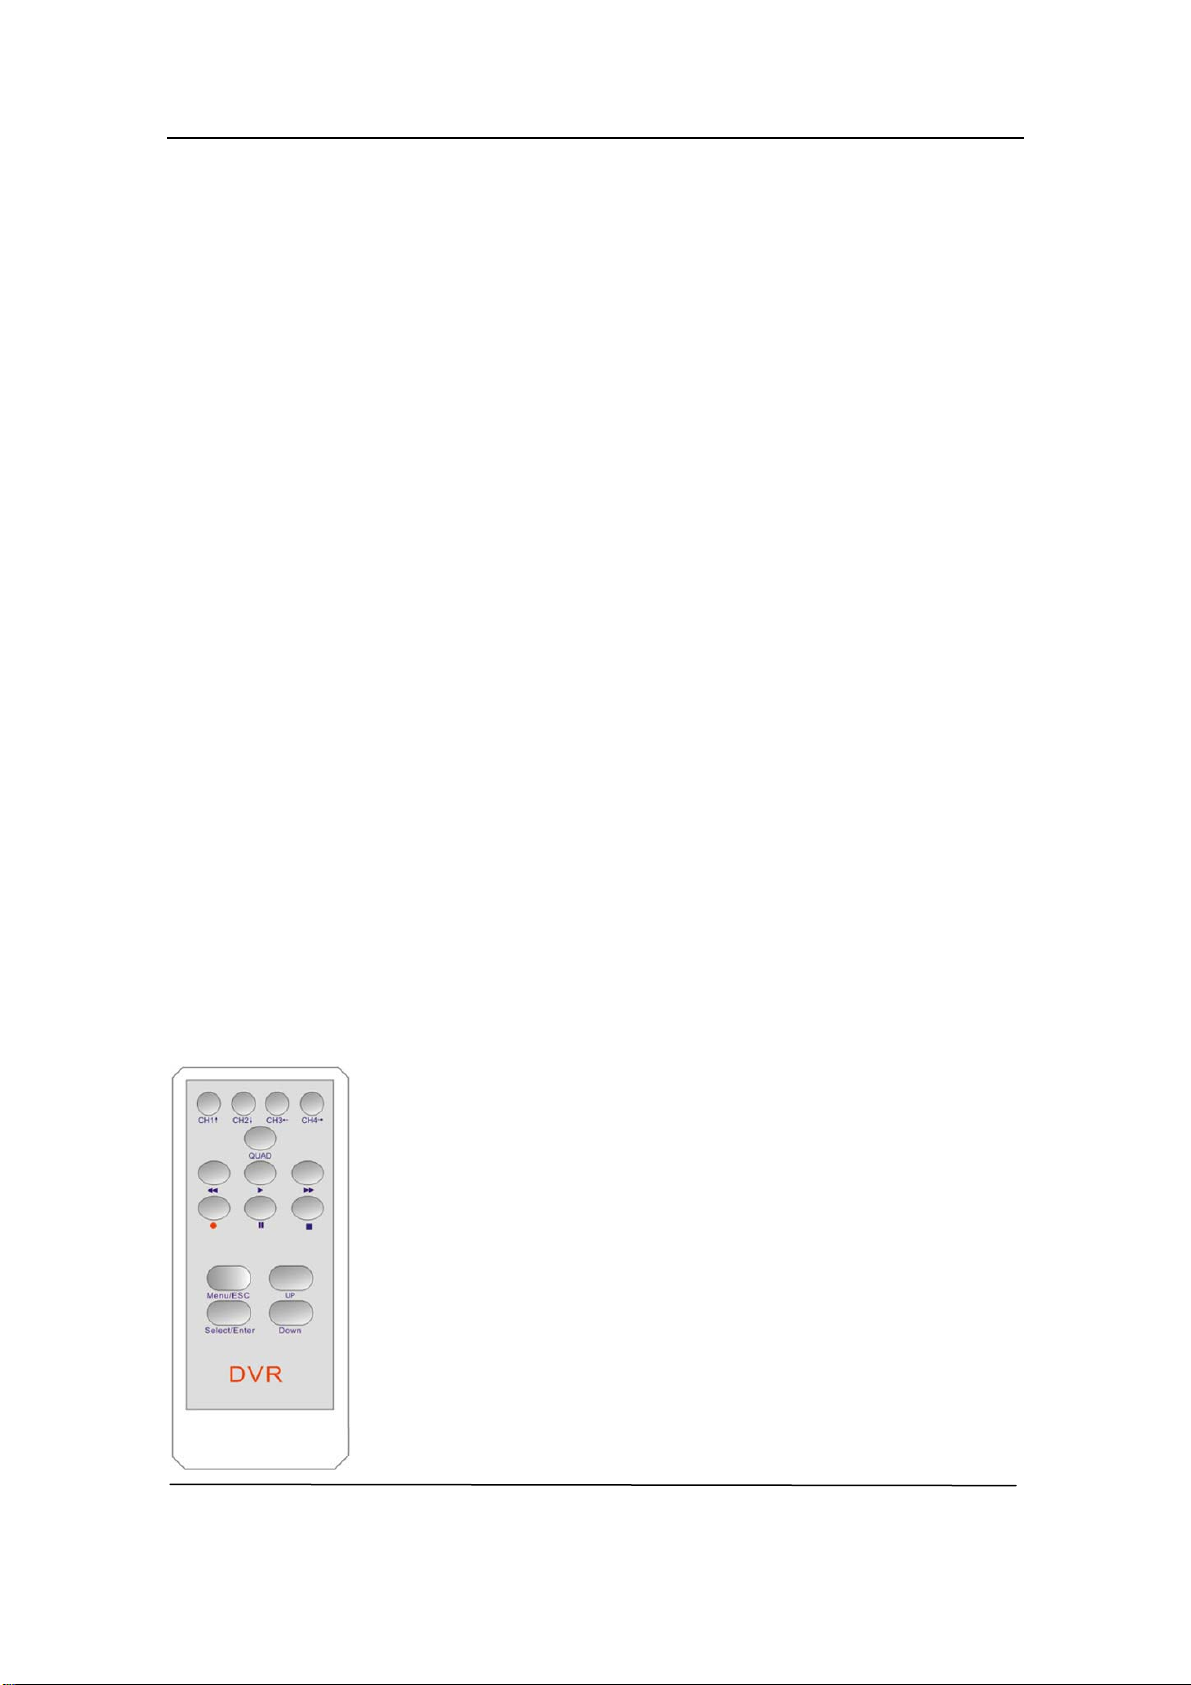
3.3 Remote Control (optional).............................................. 5
4. GETTING STARTED ............................................................ 7
5. HARDWARE SETUP ............................................................. 8
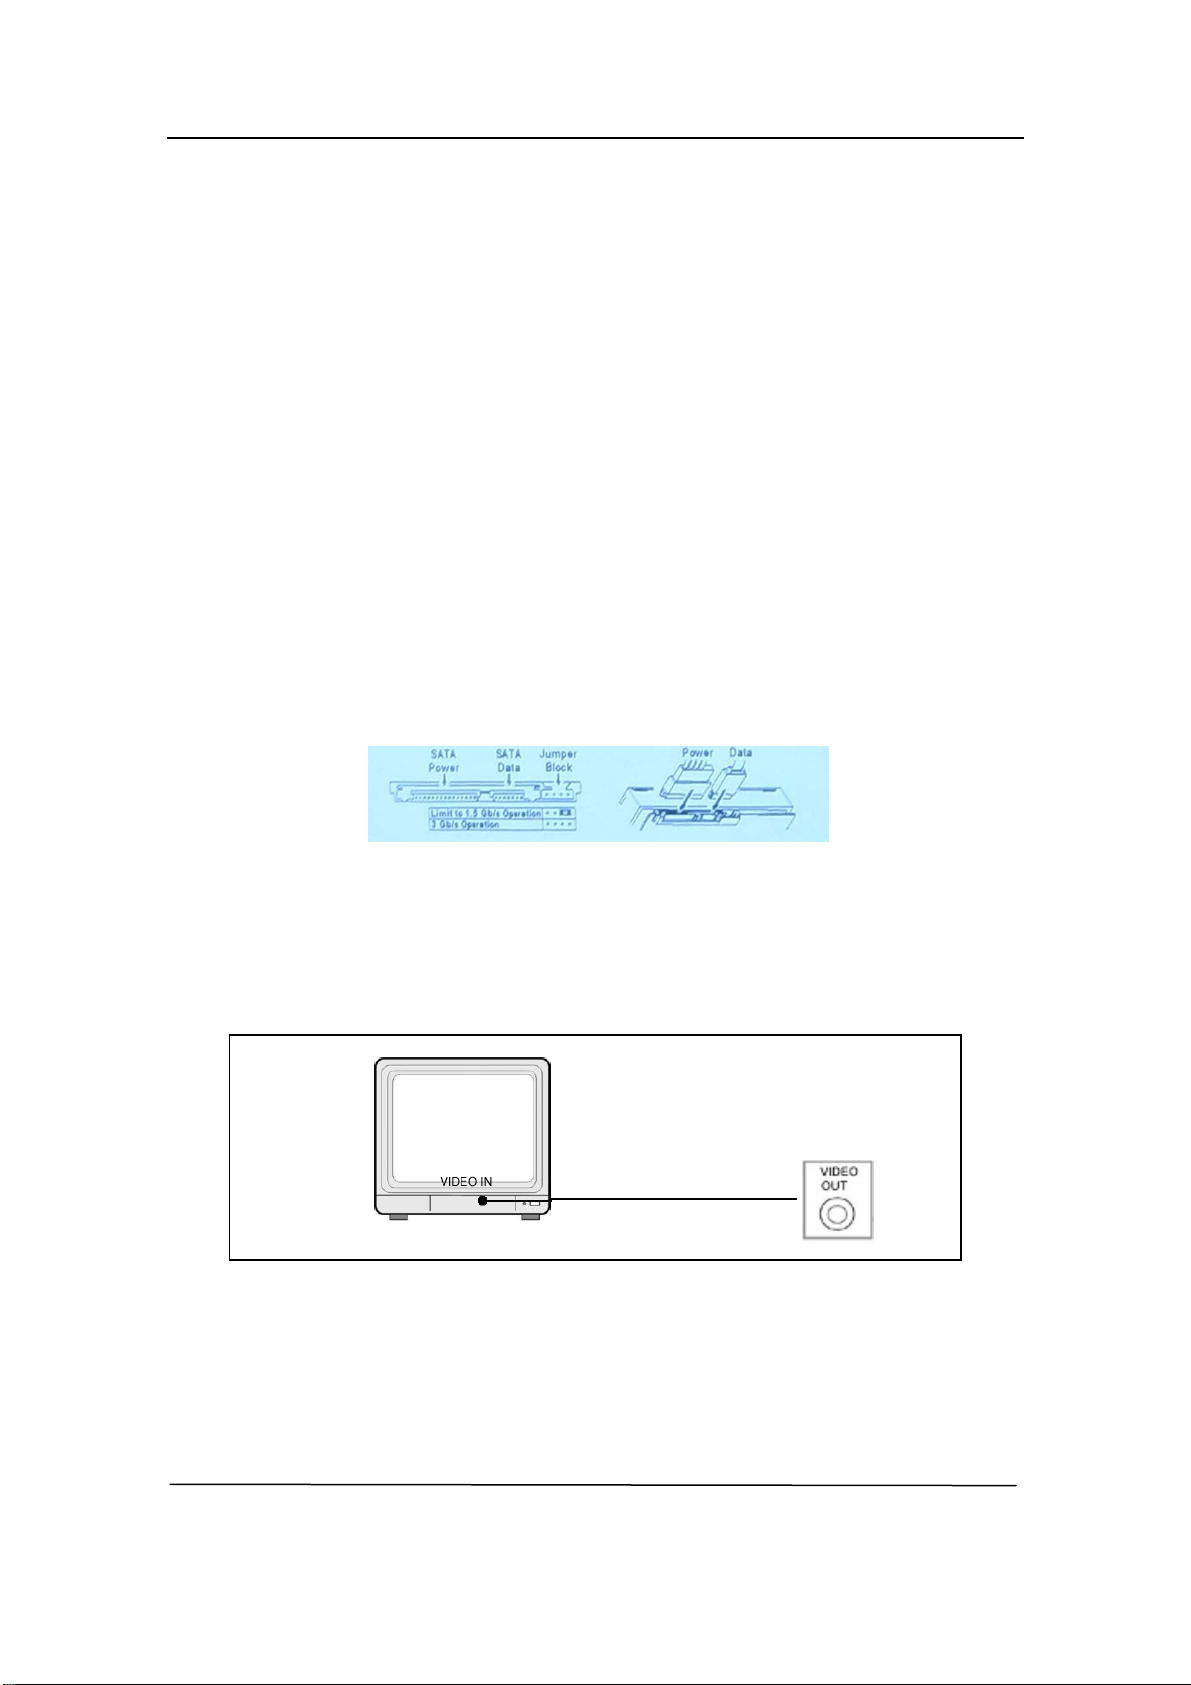
5.1 Hard Disk Drive Installation........................................... 8
5.2 Monitor Connection..................................................... 8
5.3 Camera Connection...................................................... 8
5.4 Mouse Connection (Only for some models)................................ 9
5.5 DVR Power Connection................................................... 9
6. SETUP ..................................................................... 10
6.1 Camera ............................................................... 12
6.2 Record ............................................................... 12
6.3 Alarm (optional)...................................................... 14
6.4 Screen ............................................................... 15
6.5 Audio (Only for some models).......................................... 16
6.6 System ............................................................... 16
6.6.1 Hard Disk Setup................................................. 17
6.6.2 Account Setup................................................... 18
6.6.3 Password Setup.................................................. 18
6.6.4 Clear Account Info.............................................. 19
6.6.5 Logout.......................................................... 19
6.6.6 Keypad Tone..................................................... 19
6.6.7 Time Set........................................................ 19
6.6.8 Event List...................................................... 20

SpyCameraCCTV.com
Operation Manual-4CH Duplex DVR
2
6.6.9 F/W Upgrade ............................................................................................... 20
6.7 Language............................................................................................................... 21
6.8 Logout.................................................................................................................... 21
6.9 Exit......................................................................................................................... 21
7. VGA SET (optional) ........................................................................................................ 22
8. PLAYBACK WITH TIME SEARCH FUNCTION.............................................................. 22
9. BACKUP via USB memory stick..................................................................................... 22
10. RECORDING LENGTH ................................................................................................ 24
11. PLAYBACK WITH BACK-UP VIDEO DATA ON PC..................................................... 24
11.1 Install ................................................................................................................... 24
11.2 Program Interface................................................................................................ 24
11.3 Button Function ................................................................................................... 25
12. APPENDIX ................................................................................................................... 29
12.1 Fitting Come Along With DVR (Please take actual machine model number as
quasi)........................................................................................................................... 29
12.2 Model VOC 4CH DVR series used the compatible USB Stick............................. 30
12.3 Specification..........................................................................................................31

SpyCameraCCTV.com
Operation Manual-4CH Duplex DVR
3
1. INTRODUCTION
THE VX4SL system provides total video security solution for 4-channel digital surveillance
system supporting duplex (simultaneous playback and record) functionality.
Either front panel buttons or remote control unit or mouse can operate all DVR menu setting.
The functionality of each button both on remote control or front panel is exactly same.
Note: Front panel and rear panel are different due to machine model.
2. DVR FEATURES
● True Duplex Functionality: Simultaneous Play/Record.
● PAL/NTSC Optional.
● High Quality Color Video at 50fps or 60 fps Recording/Playback.
● Display Resolution: PAL 704*576; NTSC 704*480.
● Recording Resolution: PAL 640*288(Half D1); NTSC 640*240(Half D1).
● Recording Speed: PAL max. 50 fps (Quad); NTSC max. 60 fps (Quad).
● Recording Mode: Continuous, Motion Detection, Time Schedule.
● 15 days continue recording at 25 fps with 500GB HDD.
● Recording and Compressing Video Signal Real Time.
● With USB port for media backup via HDD Avg. 200KB/Sec.
● With Motion Detection and Video Loss Alarm Function.
● OSD: Support Multi-language.
● With Power Recovery Auto-record Function.
3. PHYSICAL UNIT
3.1 Front Panels (Please take actual machine model as quasi)
Front panels are different in term of different machine model.
●IR Remote Receiver (optional)
●LED Light

SpyCameraCCTV.com
Operation Manual-4CH Duplex DVR
4
(a) GREEN (PWR): The DVR unit is powered up and running.
(b) RED (HDD): System is in Recording Mode or in Playback Mode.
●USB PORT
Use this port to backup with USB disk.
Note: For some machine model USB port is on the rear panel.
●PS/2 MOUSE PORT (optional)
Use this port for PS/2 mouse connection. If you have USB port mouse, use USB - PS/2
adapter to connect with this port.
Note: For some machine model PS/2 Mouse port is on the rear panel.
●HDD BOX Press-button (optional)
●HDD Lock (optional)
Some DVR is provided with touch-tone front panels. A series of button on DVR front panel
make a system to operate its basic functions, such as recording, playback, fast-forward,
reverse, etc. For more details about the DVR menu, refer to “6. SETUP”.
The front key panel function is the same as remote control (refer to “3.3 Remote Control”).
3.2 Rear Panel (Please take actual machine model number as quasi)
●AUDIO OUTPUT (Only for some models)
Use “AUDIO OUT” port for speaker (mono) connecting. And this port is audio output for
playback.
●AUDIO INPUT (Only for some models)
Use “AUDIO IN” port for microphone connection. If signal audio input is from channel 1,
there will be audio output in channel 1 view and quad view. If signal audio input is from
channel 2、channel 3 or channel 4, there won’t be audio output until in channel 2 view、
channel 3 view or channel 4 view.
●VIDEO INPUT
Use this BNC port to connect cameras to DVR system. You might need BNC adapter for

SpyCameraCCTV.com
Operation Manual-4CH Duplex DVR
each (CH1-CH4) camera connection.
●VIDEO OUTPUT
Use this port to connect DVR to the monitor.
●AC-DC POWER ADAPTER JACK
Connect the power adapter into DVR and plug the power cable into the wall.
Some DVR models do not have a power adapter so you may not see this. In case, just plug
power cable from the behind the DVR into the wall. Below is the information of input/output
voltage for the power adapter.
[Input: AC 100-240V, 50/60Hz, 1.5A / Output: DC +12V == 3A]
●Fan
3.3 Remote Control (optional)
A series of button on DVR remote unit make a system to operate its basic functions, such as
recording, playback, fast-forward, reverse, etc. For more details about the DVR menu, refer
to “6. SETUP”.
⑴CH1↑
Use this button for full screen display for channel 1 on the monitor or move the cursor up.
⑵ CH2↓
Use this button for full screen display for channel 2 on the monitor or move the cursor down.
⑶ CH3←
Use this button for full screen display for channel 3 on the monitor or
move the cursor left.
Also user can press this button to reduce value when adjust
parameters.
⑷ CH4→
Use this button for full screen display for channel 4 on the monitor or
move the cursor right.
5

SpyCameraCCTV.com
Operation Manual-4CH Duplex DVR
6
Also user can press this button to increase value when adjust parameters.
⑸ Quad
Use this button for full screen display for quad display on the monitor screen. If you push this
button, DVR will display all 4 channels (cameras) at the same time in quad screen.
⑹ ● (REC)
Press “REC” button to start manual recording. Then you will see this mark ‘●’ on the
selected channel of the screen, which means that the channel is now recording.
To stop manual recording, press “REC” again during recording mode.
⑺■(STOP)
To stop playback, press the “STOP” button.
⑻►(PLAY)
After recording, press “PLAY” button to start video playback.
Playback will start with the oldest unread video data and then continue playing.
⑼►►(FWD)
This is the fast forward button. To play the recorded stream faster, press the “FWD” button.
There are three levels of fast forward playback speed.
(a) FF 1 (►►) : Play two times faster (x2) than the normal play.
(b) FF 2 (►►►): Play three times faster (x3) than the normal play.
(c) FF 3 (►►►►): Play four times faster (x4) than the normal play.
To change the fast forward play back speed level, press the “FWD” button again.
⑽◄◄(REW)
This is the rewind button. To play the recorded stream backward, press the “REW” button.
[NOTE]: The fast forward and reverse playback speeds will vary depending on the frame
rate and record quality settings, as well as the number of channels recorded.
⑾ ▍▍(PAUSE)
To pause the video playback, press the “PAUSE” button. Then the video displaying will be

SpyCameraCCTV.com
Operation Manual-4CH Duplex DVR
7
stopped.
To continue playback, push the “PLAY” button.
⑿Menu / ESC
It displays menu option or will be to the previous.
⒀UP / DOWN
To change a menu field, use the “UP” or “DOWN” buttons.
⒁Select /Enter
Use this button to change values on main menu or sub menu setting. Also use can use this
button to increase value when adjusting parameters.
4. GETTING STARTED
Install a hard disk drive into your DVR.
Connect DVR to monitor.
Connect cameras (up to 4) to DVR.
Connect other peripheral devices (mouse, USB Drive) if necessary. And PS/2 Mouse must
be connected to DVR before startup system.
Connect the power adapter into DVR to turn on the DVR.
Start TV Monitoring and Recording.
Make sure that a hard disk drive and camera(s) are properly installed.
If a removable HDD rack is used in DVR, after installation of hard drive, the hard drive
drawer must be locked with key.
If a fixed HDD rack is used in DVR, after installation of hard disk drive, the hard disk drive
must be fixed tight enough with bolts.
If the power is turned off while recording (i.e. a power failure), the DVR will enter “Power
Recovery” modes at start up, detect that it has been shut down, and then reinitiate the
recording process.

SpyCameraCCTV.com
Operation Manual-4CH Duplex DVR
5. HARDWARE SETUP
5.1 Hard Disk Drive Installation
The method of hard disk drive installation is different according to different DVR. Some DVR
is built in fixed HDD rack and some DVR is built in removable HDD rack.
If building in fixed HDD rack, user must draw out the cover of DVR first. Then install a HDD
into DVR, and for some type DVR the HDD is need to fix into the bottom.
If built in removable HDD rack, user must draw out the HDD rack first. Then install a HDD
into HDD rack.
Connect power cord and data cable to hard disk drive. (HDD is recommend to be provided
by user)
Connect the cables as follows.
5.2 Monitor Connection
To display video image from cameras on the monitor, the DVR’s video output signal should
be transferred to your TV set or monitor.
Connect a monitor with the
“VIDEO OUT” port on DVR
Connect “VIDEO IN” of the monitor to “VIDEO OUT” of the DVR system.
5.3 Camera Connection
Connect between “VIDEO IN” of your DVR and “VIDEO OUT” of camera with video cable
8

SpyCameraCCTV.com
Operation Manual-4CH Duplex DVR
and plug in the camera’s power adapter.
9
“VIDEO OUT” on CAMERA
“VIDEO IN” on DVR
5.4 Mouse Connection (Only for some models)
Connect PS/2 mouse with the port below on the system. And PS/2 Mouse must be
connected to DVR before startup system.
5.5 DVR Power Connection
Connect a DVR power adapter to the adapter jack at the rear panel of DVR unit.
It will boot up the system.
If users install a new hard disk drive, it will ask for HDD formatting before a system starts to
run (Below Fig). Choose format option pressing “PLAY” button.
Below is the information of input/output voltage for the power adapter.
Input: AC 100-240V, 50/60Hz, 1.5A
Output: DC +12V == 3A

SpyCameraCCTV.com
Operation Manual-4CH Duplex DVR
6. SETUP
After installing a new hard drive on the
system, user had better to format the hard
drive first. If the system includes login
window, and there are three password levels
in the system, including admin (highest), operator, and guest (lowest). If the user does
not login the system, he can only view live video display. And when the user login the
system, if he can’t operate the system in one minute the system will be logout
automatically.
The system allows up to four user accounts. The administrator can set up the login name,
password and level for each user. The administrator can also add or delete user that he
wants to. (Please refer to Section 6.6.2 for Account Setup.)
The admin can operate everything. The operator can operate anything except examining
user accounts, formatting HDD and modifying his password level. The guest can operate
live video display and image playback, or modify some parameter value that is independent
of recording. If user has no right to modify
parameter value, there will be an identifier “ ”
on top right corner of the screen.
A: Mouse Control ----- (optional)
After system boot-up, hold a right mouse click
button and there will be login window. Hold a left
mouse button to click the order of “Account”, and
input correct account. Then left click the order of
“Password” and input correct password. At last
left click “Login” to enter system. There is one
factory-preset login “account/password”
“admin/111111” at admin level. The user can
Fig (a)
Fig (b)
10

SpyCameraCCTV.com
Operation Manual-4CH Duplex DVR
use it to login the system for the first time.
After system boot-up, hold a right mouse click button and there will be suggestive window
options on the monitor (Fig (a)). Hold a left mouse button to click the icon “ ”. You will see
the screen below on the monitor (Fig (b)). If the machine has no audio-port, the order of
“Audio” will disappear on the menu “Setup”.
Suggestive window options:
Channel 1 view Channel 2 view
Channel 3 view Channel 4 view
All channel view ●Manual recording or Stop manual recording
►Play record list Menu option
Logout
Channel auto sequence. The iron “ ” won’t display if the order of “auto sequence” is
“OFF”.
Move the mouse up or down to move the cursor. Hold a left mouse click button to change
the settings. Click a right mouse to go back to the previous.
B: The DVR Front Panel or Remote Control (optional)
After system boot-up, Press the “MENU” button on the DVR front panel or remote control
and there will be login window. There is one factory-preset login “account/password”
“admin/111111” at admin level. The user can use it to login the system for the first time.
After login the system, press button “MENU” to make any changes of DVR settings and you
will see screen on the monitor as Fig (b). If the machine has no audio-port, the order of
“Audio” will disappear on the menu “Setup”. Then press the “UP” or “DOWN” key on the
DVR front panel or remote control to move the cursor. Press “SELECT” button on the front
panel or remote control in order to change the settings. In the MAIN MENU, the cursor “ ”
will be shown on the screen right next to each sub menu. To the previous, press “MENU”
button on the front panel or remote control.
11

SpyCameraCCTV.com
Operation Manual-4CH Duplex DVR
6.1 Camera
Use this option for video color adjustment for each channel (1,2,3,4). Go to DISPLAY option
to enable or disable for screen display of each camera. Modify camera name of each
channel that user wants to.
6.2 Record
Use this option to choose the channel (1,2,3,4)
for recording. Only selected channel will be
recorded no matter how many camera channels
are displayed on the screen.
A: [RECORD FRAMERATE]
Change the record frame rate for each channel.
The higher the record frame rate, the more
natural movement you will see while playback.
12
Independent each channel frame rate
adjustment is possible.
For PAL video output format, system default
value is 12 frames per second with each channel,
which means the system will record 48 frames per second with all channels. User can set
frame rate as 3~25 frames per second with each channel. The max value of total frames per
second with all channels is 50 frames.
For NTSC video output format, system default value is 15 frames per second with each
channel, which means the system will record 60 frames per second with all channels. User

SpyCameraCCTV.com
Operation Manual-4CH Duplex DVR
can set frame rate as 3~30 frames per second with each channel. The max value of total
frames per second with all channels is 60 frames.
Press button [SEL]/[CH4] or hold the left mouse button to click icon “►” to increase the
record frame rate for each channel. Press button [CH3] or hold a left mouse button to click
icon “◄” to decrease the record frame rate for each channel.
If you make the record frame rate off, the channel won’t record.
B: [RECORD QUALITY]
Choose record quality among 1 / 2 / 3. The best record quality is 3, and the lowest record
quality is 1. The higher the record quality is, the higher the video image quality is well you
playback. Higher quality cost more hard disk space. Record frame rate, record quality and
hard disk space will affect total record time of DVR system.
C: [RECORD SCHEDULE]
Notice: To start motion record, make sure the period that you intend to record is “ ” in the
“record schedule” menu.
Press button「Up」/「Down」or move the mouse to move the prompt, then press「SEL」
or hold a left mouse button to adjust video record method during each time period. Also user
can adjust the same record method during the whole time periods synchronously, press
[QUAD] button in the DVR front panel or remote control, or hold a left mouse button to click
the time period 24.
- Grey bar: No record will be made for this
time period if user can’t activate manual
recording.
- Red bar: The time period with a red bar
will activate continuous recording mode
(Time record) unless there is any manual
stopping during recording during that time.
- Green bar: The time period with a green bar for built-in motion recording (MD). (See also
13

SpyCameraCCTV.com
Operation Manual-4CH Duplex DVR
the following chapter “MOTION DETECTION”)
6.3 Alarm (Optional)
Using [SELECT] button
14
or hold a left mouse button to click icon “◄” / “►”, adjust parameters
A: [BUZZER DURATION]
time (in seconds)
、25、30、CONT、
RATION]
on (in seconds) after motion recording is activated.
Select the channel (1,2,3,4) for recording
nsitivity of the built-in motion
sensitivity is. Value at “1、2、3、4、Off”. Th
elect the range of motion detection area.
to assign the area.
of each option.
It sets the buzzer duration
after alarm is activated.
Value at “05、10、15、20
OFF”(in seconds). Default at “OFF”. When
“buzzer duration” is “cont”, the buzzer will
B: [EVENT REC DU
work continuously.
It sets the record time of durati
Value at “05、10、15、20、25、30”(in second).
C: [MOTION DETECTION]
[CHANNEL]
mode by internal motion.
[SENSITIVITY]
It adjusts the se
sensor on the DVR system while recording.
The lower the number, the higher the
e maximum sensitivity level is 1.
[MOTION AREA]
Use this option to s
Use the keypad button, remote control button or mouse click

SpyCameraCCTV.com
Operation Manual-4CH Duplex DVR
The keypad and mouse control instructions are below.
[Using keypad or remote control button]
Press [SEL] once to pitch on the area, pr
15
ess [SEL] twice to cancel the area.
use click button, move the mouse to select, deselect or reselect the
ected from up to down and from left to right. When the
d the motion area setting, press “MENU” button or hold a right mouse click
Record, user must complete the “Motion area” setup.
ke the white borderline around each channel to appear or disappear by using
switch rotation.
fault at
ADJUSTMENT]
ideo screen up, down, left and right using this option.
CH1 - Up / CH2 - Down / CH3 - Left / CH4 - Right
[Using Mouse button]
While holding a left mo
motion detection area for recording.
By the way, the area only can be sel
block is covered by blue shadow, it’s active to record. When the block is transparent, it can’t
be recorded.
After complete
button to exit.
To start Motion
6.4 Screen
[BORDER]
User can ma
this option to be “on” or “off”.
[AUTO SEQUENCE]
This is for auto screen
Value at “Off、1~10(in seconds)”. De
“Off”.
[VIDEO
You can move the entire v
Keypad assignment in the front panel or remote control is below.
-CH1 for up, CH2 for down, CH3 for left, CH4 for right.
Mouse function is below:

SpyCameraCCTV.com
Operation Manual-4CH Duplex DVR
Hold a right mouse clic
16
k button, there will be some irons on the screen as follows
Make the record “ON” to enable sound
6.6 System
ge
gin the system at admin level, the menu bar will be displayed as Fig (c). The user
will be displayed as Fig (d).
“ ”.Holdaleftmouse button to click each iron to select.
-“▲”for up, “▼” for down, “◄” for left, “►” for right, “ ” for ESC.
6.5 Audio (Only for some models)
recording when a microphone device is
attached in AUDIO INPUT port on the system.
Adjust volume for speaker and the intensity
level of sound recording. To make the sound
enabled for speaker, leave the mute “OFF”.
In this menu, you can see the information of the hard disk drive installed in the DVR, chan
the system password, adjust keypad tone, browser event list or adjust current time on the
system.
If user lo
can enter into the order of “account” to examine all user accounts, add or delete user that
he wants to (Please refer to section “6.6.2” for account setup).
If user login the system at operator or guest level, the menu bar
The user can only modify its own password. (Please refer to section “6.6.3”for password
setup)

SpyCameraCCTV.com
Operation Manual-4CH Duplex DVR
6.6.1 Hard Disk Setup
If you choose Yes, recording continues and
recording stops when the
hard disk drive, all the video data stored on the hard disk drive will be
ult
hen HDD is su
If the password is incorrect, you will see the bel
[OVERWRITE ENABLED]
overwrites previous recording when hard disk
drive space is full.
If you choose No, the
hard disk drive is full. It won’t record until
“overwrite enable” is “Yes”.
[FORMAT HDD]
If you format the
deleted. Remind that the system has no restore option once the hard drive is formatted.
When you choose this option, it will ask for password before formatting. The defa
password is “111111”. Type the password and press any key button.
W ccessfully formatted, you will see the message below blinking.
ow message blinking. Then try to type right
password again.
17

SpyCameraCCTV.com
Operation Manual-4CH Duplex DVR
6
18
.6.2 Account Setup
Only user log in the system at admin level, the
Account Setup allows the administrator to add new
play, move the cursor to change
to Account, and then press
can be used as user account or password. Press
「SEL」to input value, and move the prompt to the
Move the cursor to change the highlight
user level (operator/guest).
The default password is 111111. All numbers,
letters and sign in the pane can be used as
Button function on the front panel or rem
users, delete existing ones and modify the user’s
name/password/and level. The system allows up to
4 user accounts.
[Account]/[Password]
In setup Menu dis
the highlighted option
button [SEL] to call up Account/Password as
shown. All numbers, letters and sign in the pane
option of “Enter”, press 「SEL」to confirm.
—CH1 for up, CH2 for down, CH3 for left, CH4 for
right, Press “Shift” for change characters.
[Level]
ed option to Level, and then press [SEL] to adjust
6.6.3 Password Setup
password. Press 「SEL」to input value, and move
the prompt to the option of “Enter”, press 「SEL」
to input current password.
ote control:
Table of contents
Other SpyCameraCCTV DVR manuals
Popular DVR manuals by other brands

Kguard
Kguard 4CH DVR user guide

Spyclops
Spyclops SPY-NVR4POE quick start guide

Silent Witness
Silent Witness SW006 instruction manual

Lupus Electronics
Lupus Electronics AEON LE800 user manual

PTCCTV Technology
PTCCTV Technology ZDDV-C304 user manual

Dahua Technology
Dahua Technology DH-XVR58 S-4KL-I2-LP Series user manual