manuals.online logo
Brands
  1. Home
  2. •
  3. Brands
  4. •
  5. OpenEye
  6. •
  7. DVR
  8. •
  9. OpenEye EasyDVR User manual

OpenEye EasyDVR User manual

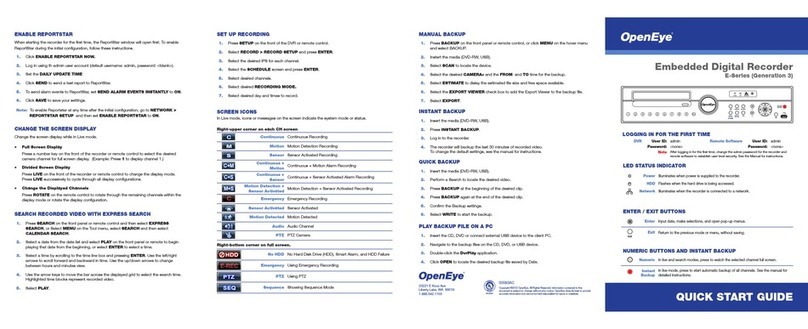
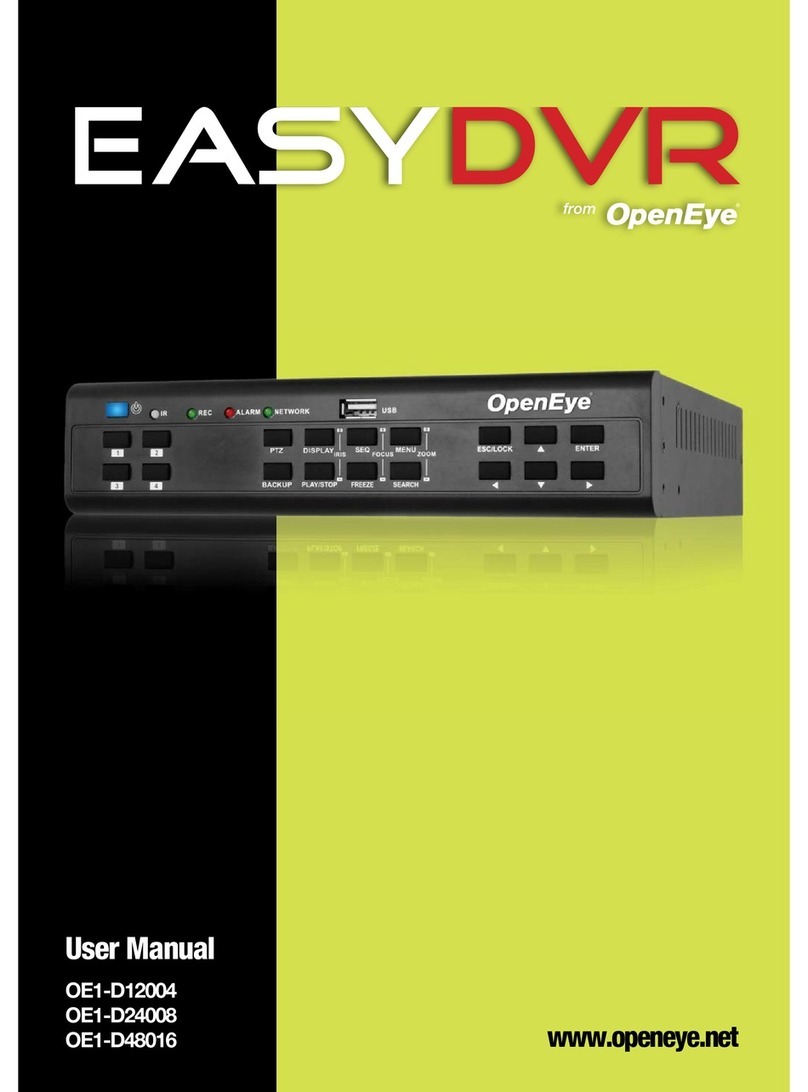
POWER Press and hold
this key to trigger the quick
shutdown function.
REC Blinks when live video is recording.
IR Receives infrared signal
from the included remote
controller
NETWORK Illuminates when
the recorder is connected to a
network.
USB Connect a ash
drive for backup or USB
keyboard.
MENU Open the
conguration menu.
SEQ Trigger automatic
camera sequencing.
ESC/LOCK Cancel a selection
or exit a menu.
ENTER Select a menu
option or conrm a
selection.
DIRECTIONAL Navigate
menu items or change a
selected value.
ALARM Blinks when an
alarm is triggered.
NUMERIC
Live and Playback modes: Press any
key to view the corresponding video in
full-screen.
Input interface: 1~4 can be used for direct
input of numbers 1~4.
PTZ mode: Press 1 to enter the Set/ Go
preset menu.
PTZ Enter PTZ mode.
PLAY/STOP
Start/Stop playback.
BACKUP Open the
Backup menu and select
export options.
DISPLAY Cycle
through the available
camera views.
SEARCH Open the Search menu.
FREEZE Freeze the
current image in live or
playback mode.
30726AA
EASYDVR 4CH 120 IPS
H.264 DVR
Logging in for the First Time
User ID: admin
Password:1234
Note After logging in for the rst time, change the admin password for
the DVR and remote software to establish user level security. See
the User Manual for instructions.
How to Use the IR Remote Controller
When more than one OpenEye EasyDVR is installed in the same location,
you can use one remote controller to control up to 16 recorders. To
control multiple recorders, you must change the remote controller ID to
match the Unit ID of the recorder. Follow the instructions below to set
the Unit ID and change the remote controller number.
Assign a unique Unit ID on the recorder
1. Press MENU on the front of the DVR or the Remote Controller.
2. Select SYSTEM > RS485 Setup.
3. Enter the desired Unit ID number. See the Unit ID and Remote
Control # table for reference.
Set the number on the Remote Controller
Press and hold the ID button on the remote controller and enter the
corresponding Remote Control number to operate the recorder.
For example, assuming the Unit ID is set to 225, press ID on the remote
controller and then press 2 immediately.
Unit ID and Remote Control #
To use the included remote controller, each recorder needs a unique
Unit ID number that corresponds with a Remote Control number. Use
the table below for reference.
Unit ID 224 225 226 227 228 229 230 231
Remote Control # 1 2 3 4 5 6 7 8
Unit ID 232 233 234 235 236 237 238 239
Remote Control # 9 10 11 12 13 14 15 16
30726AA
Copyright ©2011 OpenEye. All Rights
Reserved. Information contained in this
document is subject to change without
prior notice. OpenEye does its best to
provide accurate information but cannot
be held responsible for typos or mistakes.
A12931
23221 E Knox Ave
Liberty Lake, WA 99019
1.888.542.1103
Changing the Screen Display
Change the screen display while in Live mode.
Full Screen Display
•Press a number key on the front of the DVR or remote control to
select the desired camera channel for full screen display.
Example: Press 1 to display channel 1.
Divide Screen Display
•Press DISPLAY repeatedly to cycle through the available display
configurations. The available options include: single channel, or
four cameras (2x2).
Changing the Displayed Channels
•Press DISPLAY to locate the desired display configuration. Press
DISPLAY again to rotate through the remaining channels within
the display mode.
Playing Back Recorded Video
1. Press SEARCH, and select the video to play back using one of the
search methods listed below.
2. Playback will begin at the selected date and time.
3. Press SEARCH at any time to return to the Search Menu.
4. Press STOP at any time to stop playback and return to live view.
Searching for Recorded Video
Play First or Last Video
1. Press SEARCH.
• The From field displays the earliest recorded data available.
• The End field displays the most recent recorded data available.
2. Select From or End and press ENTER to start playback.
Select Date and Time to Play
1. Press SEARCH.
2. Highlight the Select field and press ENTER.
3. Use LEFT and RIGHT to navigate date and time options; UP and
DOWN to change the options.
4. Press ENTER again when desired date and time is displayed in the
Select field.
5. Highlight the Begin Playback option and press ENTER (or click
the START button using the mouse).
Review Calendar to Select Date and Time to Play
1. Press SEARCH.
2. Highlight Calendar Search and press ENTER. The calendar will
display highlighted dates if there is recorded data.
3. Below the calendar a horizontal bar represents 24 hours, and will
display yellow highlights to indicate recorded data.
• Click FROM to change the Select date and time to the earliest
recorded data.
• Click the END to change the Select date and time to the most
recent recorded data.
4. Highlight the Select field and press ENTER.
5. Use LEFT and RIGHT to navigate date and time options; UP and
DOWN to change the options.
6. Press ENTER again when desired date and time is displayed in the
Select field.
7. Highlight the Begin Playback option and press ENTER to start
playback.
Motion Only Recording
By default the recorder is configured to record continuously with the
configuration of“Best Quality.” To change to motion only recording:
1. Press MENU, and login with an authorized username.
2. Select CAMERAS and press ENTER.
3. Select Detection Config and press ENTER.
4. Change Motion Detect to On.
a. Select Motion Detect and press ENTER.
b. Press the DOWN arrow and press ENTER.
5. Press ESC.
6. Select Copy Settings and press ENTER.
7. Select Select All and press ENTER.
8. Select Confirm and press ENTER.
9. Press ESC.
10. Select SCHEDULE and press ENTER.
11. Change Preset Config to Event Only.
a. Select Preset Config and press ENTER.
b. Press the UP arrow three times and then press ENTER.
12. Press ESC.
Backing Up Video
1. Connect a USB thumb drive or external USB hard drive to the front
panel of the recorder.
2. Press BACKUP.
3. Select Select Device and press ENTER.
4. Change the selection option to YES for the desired device.
a. Select the desired device and press ENTER.
b. Press the UP arrow then press ENTER.
5. Select the camera channels to export.
6. In the From field, select the date and time for the start point of
the backup.
7. In the To field, select the date and time for the end point of
the backup.
8. Select the Export Format.
• AVI provides a compressed video file viewable in most media
player applications.
• DRV provides a compressed video file viewable only with the
included proprietary player software.
• Original provides a raw (uncompressed) video file viewable
only with the included proprietary player software.
9. Change Begin Export to YES.
a. Select Begin Export and press ENTER.
b. Press the UP arrow then press ENTER.
10. When completion message appears, press ENTER and remove the
USB drive.
Playing a Backup File on a PC
1. Connect the USB thumb drive or external USB hard drive
containing backup video to your PC.
2. Browse to the USB drive and open the Player folder.
3. Double-click DVR_Player.
4. Click the Playback button near the bottom of the window.
Note Available video backups located on the USB drive
will be displayed.
5. Click the desired video timeframe and click Playback.
6. Select the camera channels to be displayed in playback and
click OK. Playback of the selected video will start.
Viewing Live Video Remotely
1. Open Microsoft® Internet Explorer®.
2. Type the IP address of the recorder into the address bar and
press ENTER.
3. Confirm the prompts to install the ActiveX component.
4. When prompted type a valid username and password,
then click OK. Live video will load.
5. Use the menu button at the bottom of the screen to access
additional options.
For complete instructions and more information, visit
www.openeye.net/easydvr
This manual suits for next models

1

Other OpenEye DVR manuals

OpenEye OE2-E12016 User manual

OpenEye

OpenEye OE2-E12016 User manual

OpenEye H Series User manual

OpenEye

OpenEye H Series User manual

OpenEye OE3-X24016 User manual

OpenEye

OpenEye OE3-X24016 User manual

OpenEye OE4-X24016 User manual

OpenEye

OpenEye OE4-X24016 User manual

OpenEye E-Series User manual

OpenEye

OpenEye E-Series User manual

OpenEye OE2-E48016 User manual

OpenEye

OpenEye OE2-E48016 User manual

OpenEye OE-SHM2416 User manual

OpenEye

OpenEye OE-SHM2416 User manual

OpenEye OE2-E12016 User manual

OpenEye

OpenEye OE2-E12016 User manual

OpenEye 960H User manual

OpenEye

OpenEye 960H User manual

OpenEye OE4-N1U32 User manual

OpenEye

OpenEye OE4-N1U32 User manual

OpenEye OE3-E12004 User manual

OpenEye

OpenEye OE3-E12004 User manual

OpenEye OE-SHM2416 User manual

OpenEye

OpenEye OE-SHM2416 User manual

OpenEye N-Series User manual

OpenEye

OpenEye N-Series User manual

OpenEye OE3-X12004M User manual

OpenEye

OpenEye OE3-X12004M User manual

OpenEye OE3-E48016 User manual

OpenEye

OpenEye OE3-E48016 User manual

OpenEye EasyDVR OE1-D12004 User manual

OpenEye

OpenEye EasyDVR OE1-D12004 User manual

OpenEye OE4-RAD3U4PT User manual

OpenEye

OpenEye OE4-RAD3U4PT User manual

Popular DVR manuals by other brands

XtendLan DVR-880E user manual

XtendLan

XtendLan DVR-880E user manual

Rayvision X11ZS series quick start guide

Rayvision

Rayvision X11ZS series quick start guide

Appro DVR-3011S Installation & operation manual

Appro

Appro DVR-3011S Installation & operation manual

Navitel MR250 user manual

Navitel

Navitel MR250 user manual

VWtech VW898 user manual

VWtech

VWtech VW898 user manual

CD3 Video Security DVR-N4 Specifications

CD3 Video Security

CD3 Video Security DVR-N4 Specifications

Toshiba D-R410KU owner's manual

Toshiba

Toshiba D-R410KU owner's manual

Digimerge DHU500R Series quick start guide

Digimerge

Digimerge DHU500R Series quick start guide

Dante DLW5600 Installation and operation manual

Dante

Dante DLW5600 Installation and operation manual

Dish Network DuoDVR ViP 922 Quick reference guide

Dish Network

Dish Network DuoDVR ViP 922 Quick reference guide

Fetch Mighty user guide

Fetch

Fetch Mighty user guide

Archos DVR Station Connection guide

Archos

Archos DVR Station Connection guide

WebGate MD1600H user guide

WebGate

WebGate MD1600H user guide

Ultracker UN6504E instruction manual

Ultracker

Ultracker UN6504E instruction manual

Samsung SRD-873D user manual

Samsung

Samsung SRD-873D user manual

Swann DVR4/9-SecuraNet SW242-4SN user manual

Swann

Swann DVR4/9-SecuraNet SW242-4SN user manual

HiLook DVR-E08G-B user manual

HiLook

HiLook DVR-E08G-B user manual

Eneo DLR5-08 Quick installation guide

Eneo

Eneo DLR5-08 Quick installation guide

manuals.online logo
manuals.online logoBrands
  • About & Mission
  • Contact us
  • Privacy Policy
  • Terms and Conditions

Copyright 2025 Manuals.Online. All Rights Reserved.