SRM X-Power User manual

EN
V1.1

TABLE OF CONTENT
INTRODUCTION .................................................................................. 3
PACKAGE CONTENT .......................................................................... 3
SAFETY / WARNINGS......................................................................... 4
WARRANTY.......................................................................................... 5
TECHNICAL DATA................................................................................ 5
INSTALLATION OF X-POWER............................................................ 6
PEDAL INSTALLATION .................................................................... 7
CHARGING THE PEDALS ............................................................... 8
X-POWER APP DOWNLOAD........................................................... 9
INSTALLATION OF X-POWER PEDALS......................................... 10
USING X-POWER ................................................................................ 12
OTHER APP FEATURES.................................................................. 13
POWERMETER PAIRING ................................................................ 14
BINDING AND CLEAT....................................................................... 15
ENGAGING AND RELEASING THE CLEATS ................................ 16
MAINTENANCE................................................................................. 17
TROUBLESHOOTING / FAQ............................................................... 18
DECLARATION OF CONFORMITY.................................................... 19
CONTACT US ....................................................................................... 20

3
INTRODUCTION
PACKAGE CONTENT
• SRM X-Power pedal pair (SPD compatible)
• SPD compatible cleats incl. screws
• 3m USB-A to micro USB-B cable
• Charge adapter X-Power to Micro USB-B
• Quick start guide incl. safety instructions and warranty information
Congratulations, you are now the owner of SRM X-Power PowerMeter pedals!
This manual provides instructions on features, important safety information and how to set
up and use your X-Power pedals.
How does the X-Power pedal work? Each pedal measures the force applied and the
cadence in real-time then calculates the torque and power, sending it to your bike computer.
X-Power pedals are ANT+™and Bluetooth®4.0 or higher compatible. With its rechargeable
battery, double seal technology and an integrated robust design it is made for many years of
use. Please follow each step carefully in this manual! Enjoy the ride with X-Power!

4
SAFETY / WARNINGS
I WARNING - TO AVOID SERIOUS INJURIES
Be sure to follow the instructions provided in this user manual when installing the product. The X-Power pedals are
designed so that you release them only when you intend to release. They are not designed to release automatically at
times such as when falling o the bicycle. If you have any doubt when installing the X-Power pedals, we recommend that
you seek assistance from an authorized retailer or refer to the support page on www.srm.de. Incorrect installation of the
X-Power pedals may result in damage not covered by product warranty, serious injury or death. Please familiarize yourself
with your new pedals before riding on the road. Practice engaging and disengaging, rst at a standstill and then while
riding in a safe location.
Weight limit: X-Power pedals are designed and optimized for use by cyclists up to 120 kg (265 lbs).
Classication for bicycle usage according to international standard ASTM F2043-13 for the X-Power
pedal is rated category 3: This is a set of conditions for operation of a bicycle that includes Condition 1
and Condition 2 as well as rough trails, rough unpaved roads, and rough terrain and unimproved trails
that require technical skills. Jumps and drops are intended to be less than 61cm (24”). For more info
and explanations on all bicycle usage conditions visit our webpage www.srm.de.
ICAUTION - DANGER FOR ELECTRONIC EQUIPMENT
Sensitive electronic instruments and devices may change calibration or be damaged by the magnetic eld of
the charge adapter that includes two strong NdFeB magnets. Keep the adapter away from magnetic storage
media i.e. credit or memory cards, etc. as well as from electronic equipment such as computers, laptops, digital
cameras and mobile phones.

5
WARRANTY
SRM X-Power PowerMeter pedals are warrantied to be free from defects in materials or workmanship for three years from
the date of purchase. Within this period, SRM will, at its option, repair or replace any components that fail in normal use.
Such repairs or replacement will be made at no charge to the original owner/customer for parts or labour, provided that
the customer shall be responsible for any necessary transportation cost. Any damage to the pedals that is not considered
normal wear and tare, is not covered by warranty.
Further information and exceptions for which the guarantee does not apply can be found at www.srm.de/support/warranty/
Additionally, SRM reserves the right to refuse warranty claims against products or services that it deems fraudulent. The
SRM PowerMeter is dened as: shaft, pedal-body, rechargeable battery, internal electronics, seals, covers.
TECHNICAL DATA
POWER MEASURING ACCURACY ± 2%
IP PROTECTION IP 67
BATTERY TYPE 70mAh rechargeable Lithium Polymer battery
VOLTAGE 3.7 V DC / 5V DC Charging
BATTERY RUN TIME Up to 35 hours of riding time
OPERATING TEMPERATURE -20 / +60°C (-4 / 140°F)
CHARGING TEMPERATURE +10 / +45°C (50 / 113°F)
WIRELESS FREQUENCY PROTOCOL ANT+™2.4GHz @ 4dbm nominal
Bluetooth®2.4GHz @ 4dbm nominal
WEIGHT 345g per Pair (not including cleats)

6
INSTALLATION OF X-POWER
Setting up X-Power pedals is quick and easy. Follow the installation steps outlined below and fully charge both pedals
as described on page 8. Install the X-Power app on your cell phone and follow the installation process inside the app
properly.
I IMPORTANT
It is essential to perform the installation process with the X-Power App any time the pedals are removed, installed or
tightened, otherwise the data may not be displayed correctly.
7
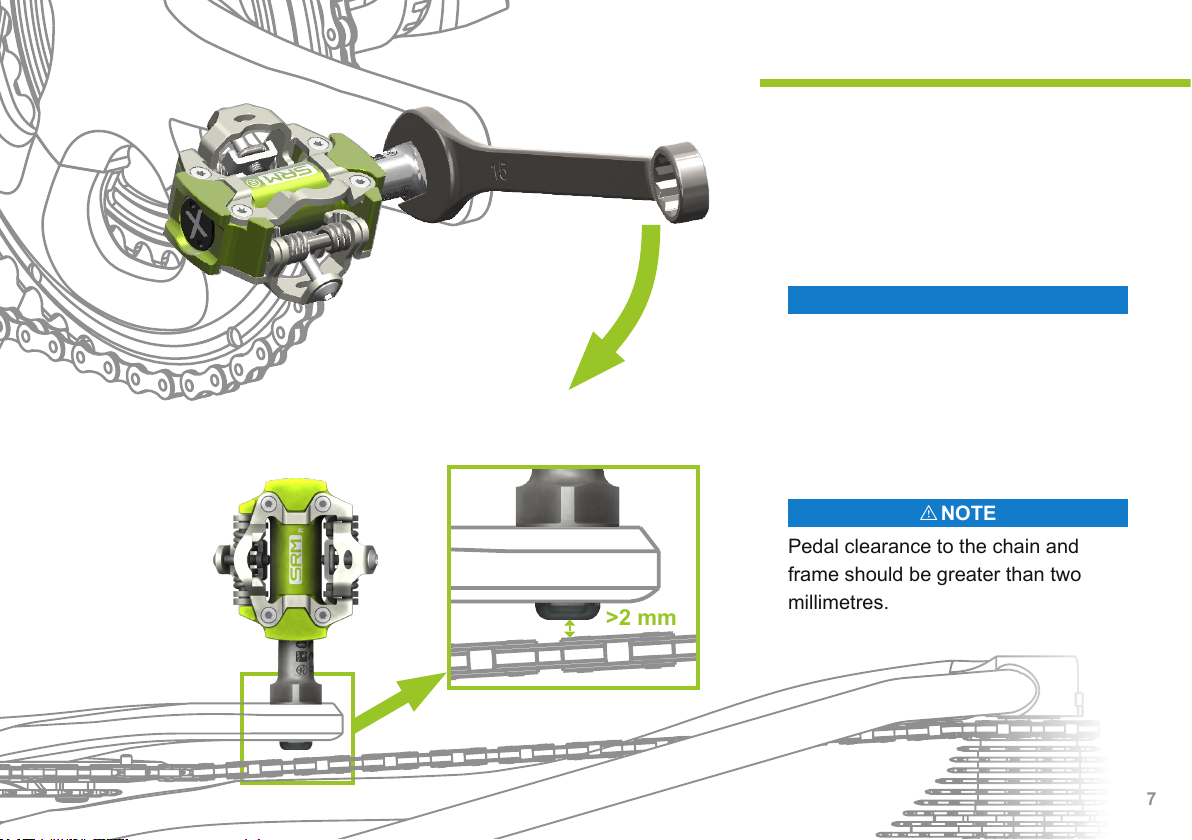
PEDAL INSTALLATION
Apply grease to the pedal threads.
Use a 15 mm open end wrench (width
>6 mm) to install the pedals into your
crankset. Recommended min. torque
30Nm (22 lbf-ft). The pedal sides are
clearly marked with R and L.
I NOTE
Do not use a cone wrench as it might
damage the charging port.
Right pedal - right hand thread
Left pedal - left hand thread
I NOTE
Pedal clearance to the chain and
frame should be greater than two
millimetres.
>2 mm
8
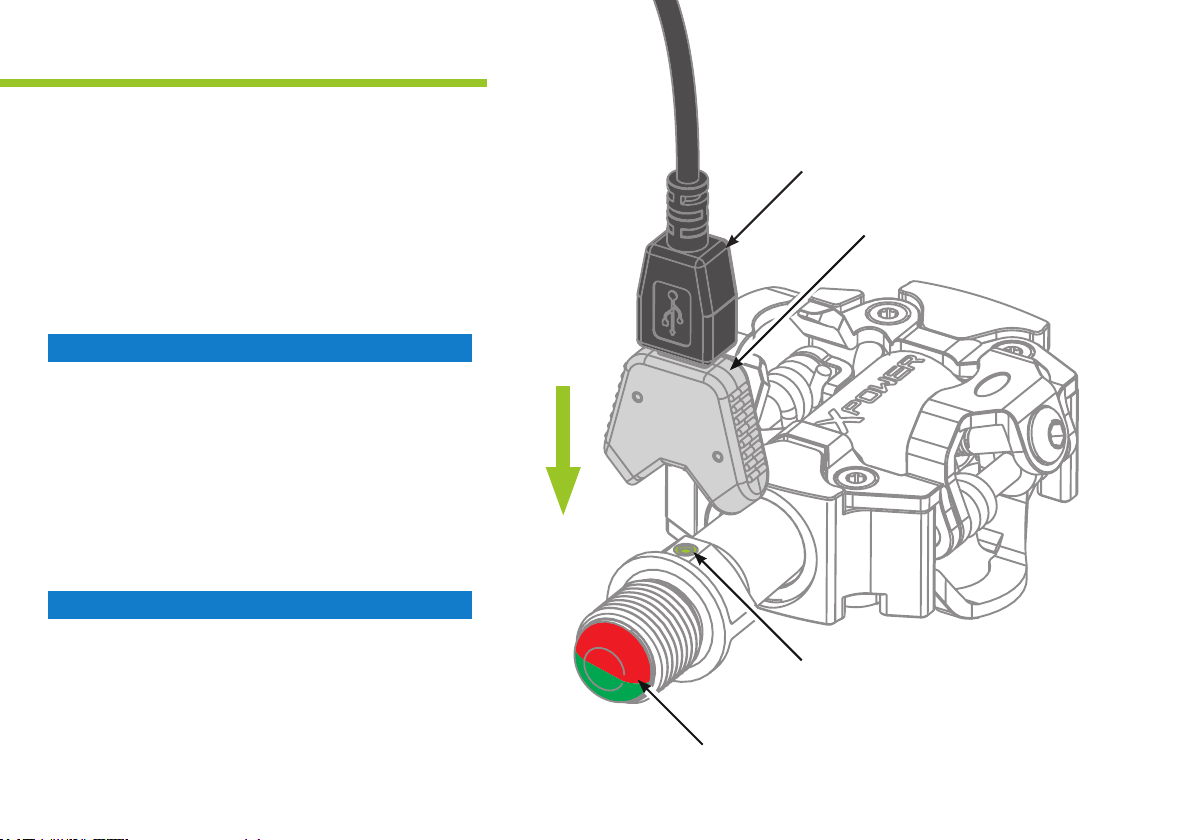
CHARGING THE PEDALS
To charge the X-Power pedals attach the
magnetic charge adapter to a USB wall charger
(not included) with the enclosed USB cable.
Connect the adapter onto the charge port on
the pedal shaft. A blinking red LED indicates
that the pedal is charging. Once the pedal is
fully charged the LED will blink green. A full
charge cycle takes approximately three hours.
INOTE
When charging the pedals the internal
electronics goes in standby automatically. To
re-activate the pedal remove the charger and
turn the pedal.
A blinking yellow LED indicates cadence for the
rst couple pedal revolutions. If the cadence
LED is blinking red the pedal battery is low and
should be recharged!
INOTE
Using crank boots on your crank can cover
the charge port and make charging impossible
when mounted. Add pedal spacers or remove
the boot if necessary.
USB Micro-B cable
Magnetic charge adapter
Charge port one side only
Status LED
9
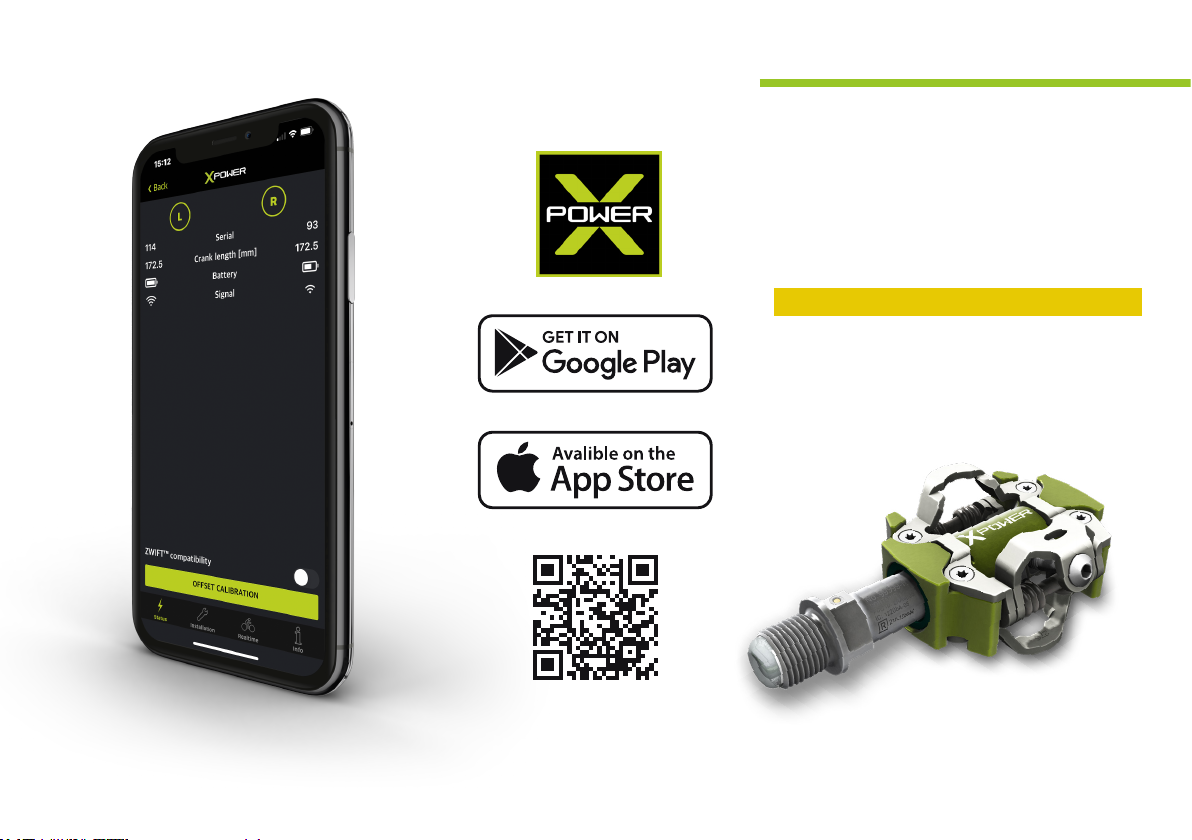
X-POWER APP DOWNLOAD
To congure and calibrate the pedals
download the X-Power application (iOS
and Android), enable Bluetooth®on the
phone and spin both pedals to turn them
on. You can then follow the on-screen
instructions to connect to the app.
I IMPORTANT
For correct operation you must follow the
installation steps on page 10-11.
10
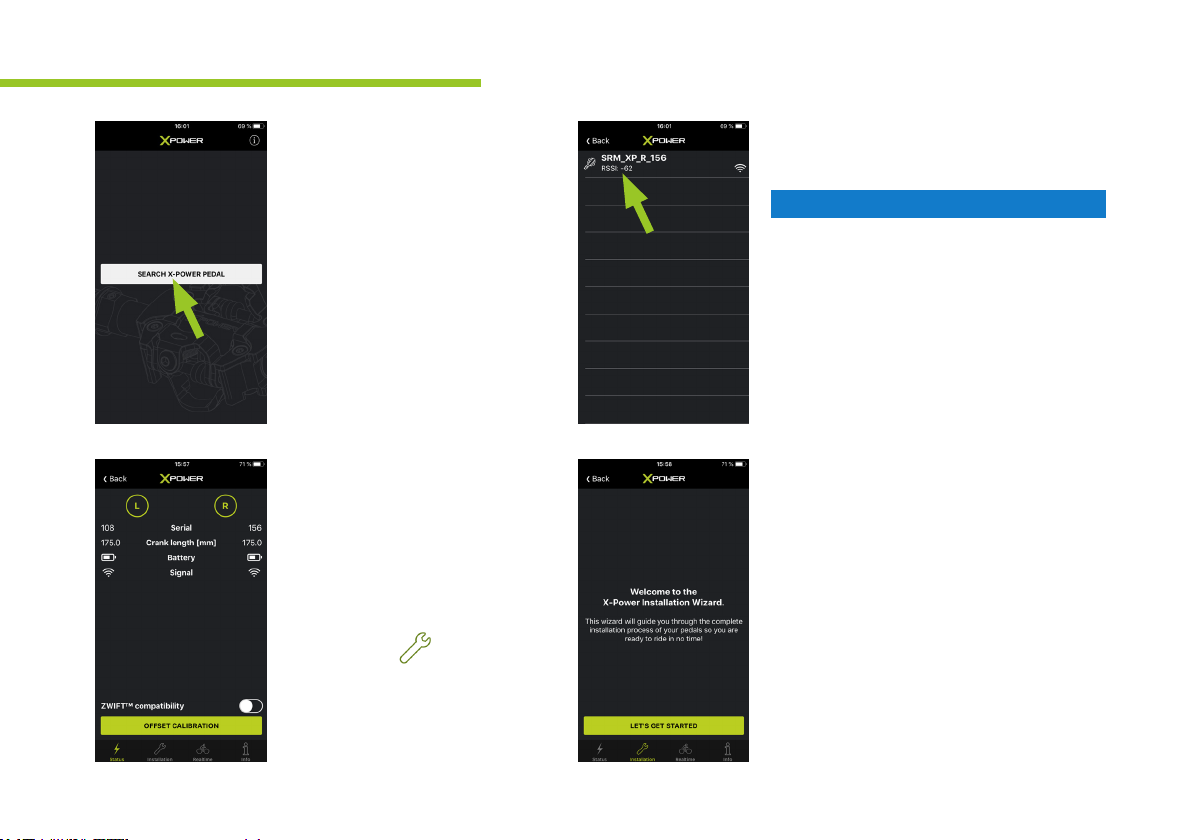
INSTALLATION OF X-POWER PEDALS
Step 1:
Open the X-Power App and
search for your pedals. Make
sure both pedals are turned
on and Bluetooth®is enabled.
Step 2:
Select the pedal shown!
INOTE
Only the right pedal will be shown!
The left pedal connects automatically
as soon as a connection has been
established on the right side.
Step 4:
... and follow the instructions in the
Installation Wizard carefully.
If no left pedal was found you can
search and select the left pedal in the
next screen. Make sure the left pedal
is charged and turned on.
Step 3:
The Status screen will show
all needed information such
as battery level. If you don’t
see a left pedal here, proceed
with the initial installation.
Choose the Installation
tab now...
11
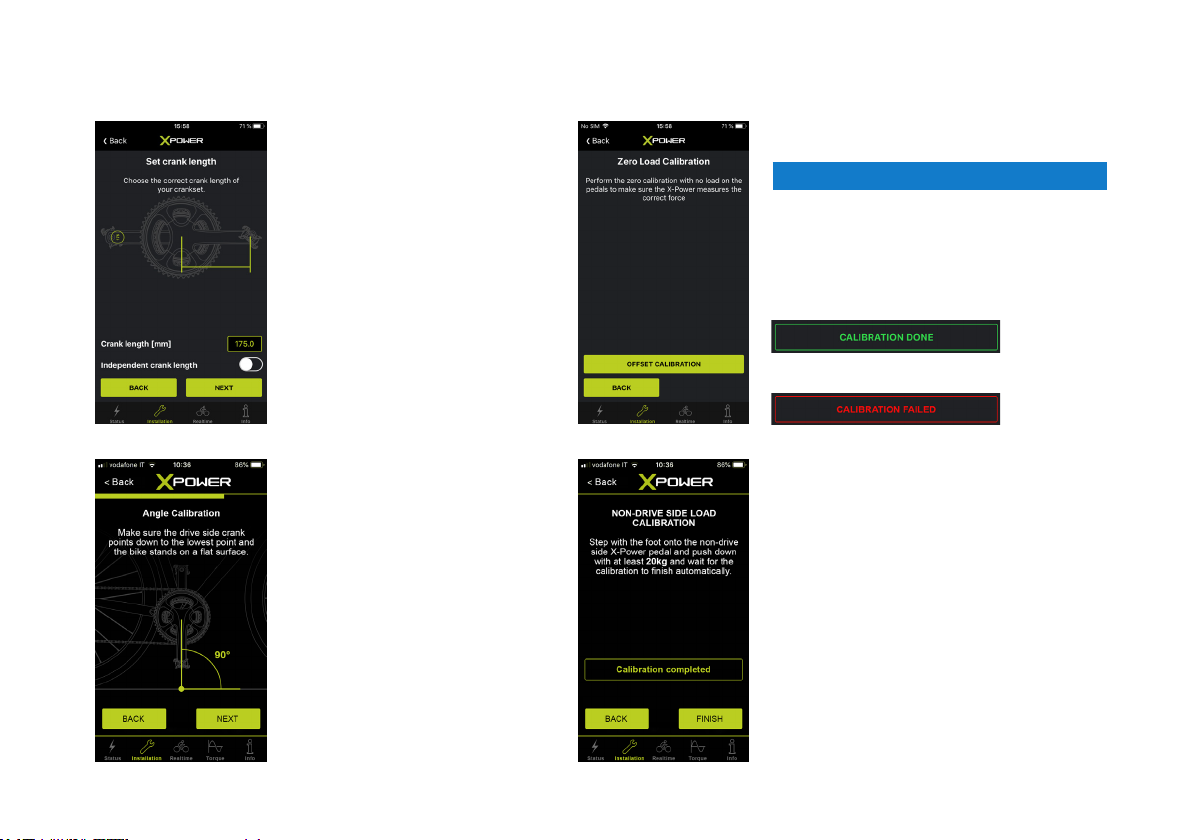
Step 5:
Choose the correct crank
length of your crankset.
Step 6: Zero Load Calibration
INOTE
Ensure there is no load on the pedal
while performing the oset calibration!
Continue with next step when
successful.
Repeat this step if calibration fails!
Step 7: Angle Calibration
NOTE
Make sure the right crank
is facing directly down (at
90 degrees to the ground as
in the graphic on screen).
and the bike is on a level
(horizontal) and at surface
when performing this
calibration step.
Step 8:
If the angle calibration is successful
you are all set and ready to go for a
ride!
If angle calibration fails repeat this
step until completion! Make sure the
crank doesn’t move while performing
the angle calibration.

12
USING X-POWER
Before the rst ride! Spin the X-Power pedals to turn them on and connect to your bike computer. See page 14 on
how to pair your pedals to your bike computer. See page 15-16 on how to mount the cleats and adjust the bindings
according to your needs. Practice engaging and disengaging, rst at a standstill and then while riding in a safe location.
Zero load calibration
In order for the pedals to measure the correct power, you should perform a zero calibration before starting the ride. Trigger
the calibration with the X-Power app or with your bike computer. Search the sensor menu and select the X-Power pedals.
Calibration button should be available inside the menu. When paired via Bluetooth®make sure both pedals are calibrated
separately.
Temperature compensation
The X-Power pedals are temperature compensated, but should not be exposed to any major temperature changes during
the zero load calibration process. The pedals react very quickly to changes in temperature which can lead to measurement
errors if the calibration is performed incorrectly.
I WHAT DOES IT MEAN EXACTLY?
If the bike was stored in the garage over night, you should perform the calibration process here - especially if the outside
temperatures are signicantly dierent (hot or cold).
13
OTHER APP FEATURES
START SCREEN
Make sure Bluetooth®is enabled on your device when connecting to the X-Power pedal. Spin the pedals to activate
them. Connect to the drive side pedal shown - the non-drive pedal will connect automatically if available.
STATUS
Status screen displays an overview of the most important information such as serial numbers, battery status, and
crank length. Oset calibration can be triggered and Zwift™ compatibility turned on/o.
I ZWIFT COMPATIBILITY
Enabling Zwift™compatibility is only needed when connecting the X-Power pedals via Bluetooth®to your device
running Zwift™. Disable this feature when riding outside using a Bluetooth®device. ANT+™connections are not
aected.
INSTALLATION
Guides through the quick installation process of the X-Power pedals to make sure pedals are correctly setup. See
page 10-11 for more information on how to install the pedals.
REALTIME
Realtime tab shows power, torque, and power balance for each pedal independently and the combined values.
INFO
Info tab shows all necessary info to debug when errors occur and shows if rmware updates are available.
14
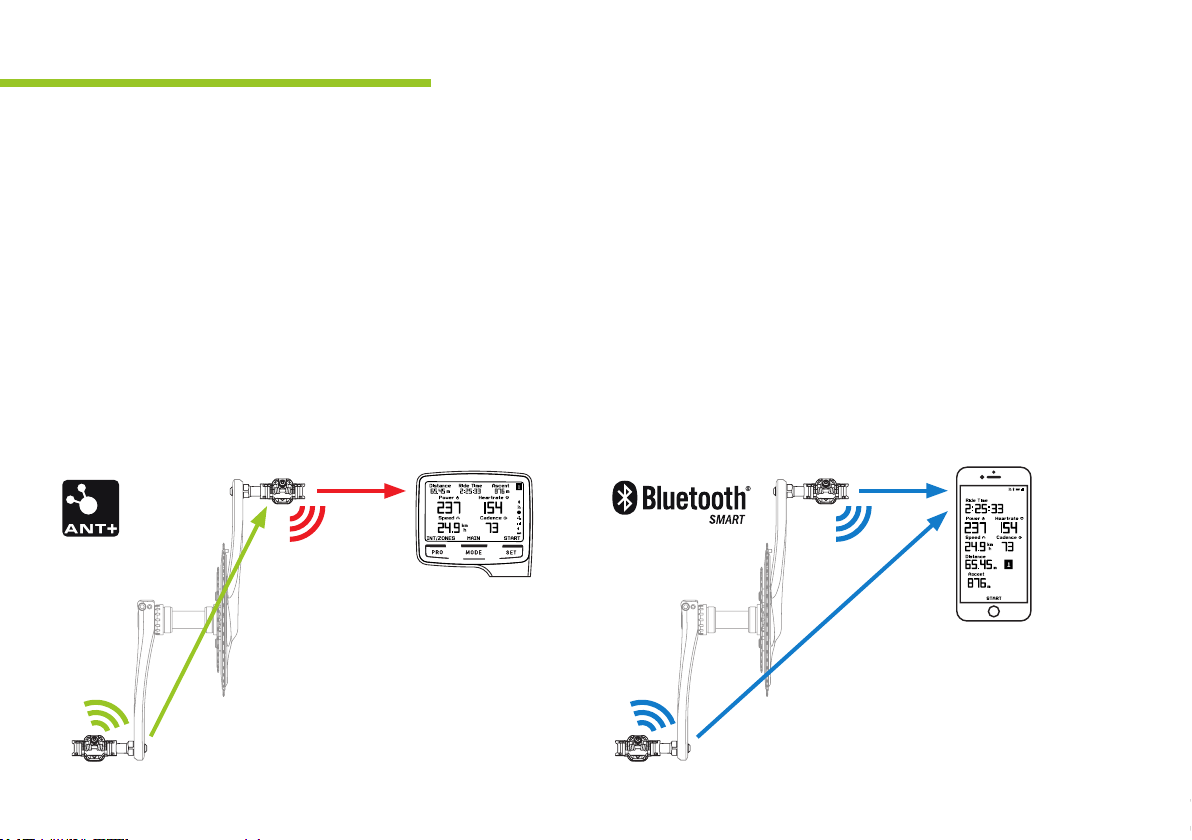
POWERMETER PAIRING
PAIRING VIA ANT+™
Make sure both pedals are turned on when pairing to your
device. Search in the device for sensor menu, add/pair
sensor and if necessary choose power sensor. Via ANT+™
only the drive side serial will be shown and needs to get
paired. The non-drive pedal (Slave) and drive side pedal
(Master) work as a distributed system and send all data incl.
power balance, etc. via the Master to your bike computer.
PAIRING VIA BLUETOOTH®
Make sure both pedals are turned on when pairing to your
device. Search in the device for sensor menu, add/pair
sensor and if necessary choose power sensor. When
adding sensors via Bluetooth®you need to add both
pedals separately. Make sure both drive and non-drive
pedals are added to get the correct measurements incl.
power balance.
X-Power pedal PowerMeter supports ANT+™and Bluetooth®connections. To show data on your device you need to
pair the X-Power pedal with your device. Depending on the device you might see one or more sensors. Select either
Bluetooth®or ANT+™to connect your bike computer.
PAIR RIGHT SIDE ONLY PAIR BOTH SIDES
SEPARATE WITH DEVICE
R
L
L
R + L
15
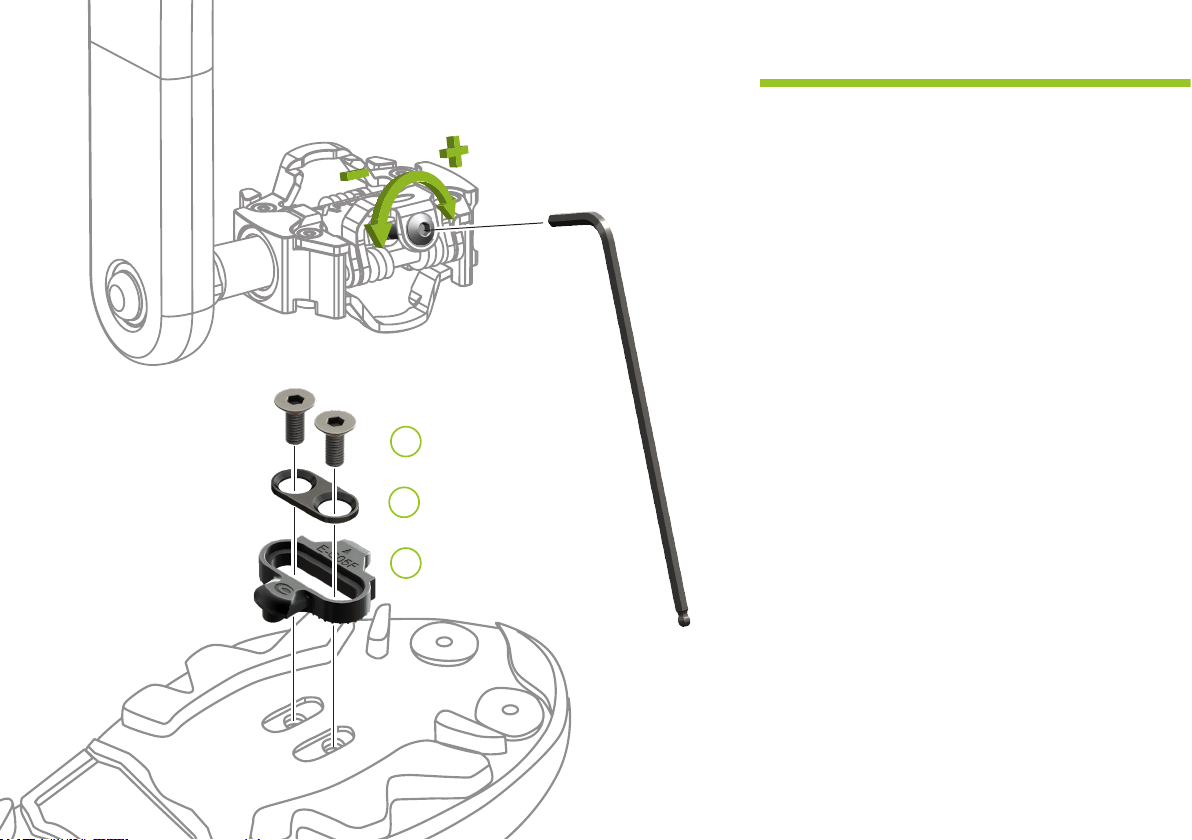
BINDING AND CLEAT
Adjust the spring force to the optimal
cleat holding force as needed when
releasing the cleats from the bindings.
The adjustment bolt is located at the
rear of each binding. To adjust the spring
tension use a 3mm allen key.
Clockwise rotation will increase and
counter clockwise will decrease the
holding force. Make sure to adjust both
bindings on each pedal equally.
Position the cleat (A) followed by the
cleat adapter (B) on to the sole of the
shoe and then temporarily tighten them
with the cleat mounting bolts (C) with a
4mm allen key. Make sure the arrow is
pointing toward the front of the shoe. The
cleats are compatible with both left and
right pedals. Tightening torque 5 - 6Nm
(3.7 - 4.4 ft-lbf).
A
B
C

16
ENGAGING AND RELEASING THE CLEATS
Engaging the cleats with the pedal
Press the cleats into the pedals with a forward
and downward motion until the cleat engages
with the bindings.
Releasing the cleats from the pedal
These cleats only release when the heel is
twisted outward.
I NOTE
Practice engaging and releasing
the cleats and adjust holding force if
necessary.

17
MAINTENANCE
To keep the X-Power pedals running
smoothly you don’t need to disassemble
them. Simply use a dry cloth and wipe
away the dirt and debris around the
green outer seal.
I NOTE
Please do not use solvents, as this can
damage the seals or other parts inside the
pedal, which can lead to further damage.
Do not use high pressure cleaners as water
ingress can damage the components.
Once everything is clean and free of
dirt, apply some lubricant, such as light
grease or oil on the lip of the seal and
spin the pedal a few turns so that the
lubricant can distribute evenly. Wipe
away any excess.
1. 2.

18
TROUBLESHOOTING / FAQ
My bike computer shows no power or cadence
Check if the X-Power pedals are fully charged, turned on and
paired with your bike computer. Follow the installation process
with the X-Power app and check the realtime data tab to
ensure the pedals show correct data.
I see three dierent sensors when pairing the pedals to
my bike computer
Your bike computer supports ANT+™and Bluetooth®and
therefore shows all sensors found. Make sure to pair only one
or the other. See page 14 for more information on how to
pair to your device.
Power data is incorrect / Left - right balance is o
Follow the installation process on page 10 with the X-Power
app once again. Make sure that you entered the correct crank
length and that you oriented the drive side crank downwards
when performing the angle calibration. If the problem persists,
please contact SRM - the info page of the X-Power app is
helpful for diagnosis.
I already have SPD cleats mounted on my shoes
The X-Power binding is compatible with all SPD compatible
cleats. However, a worn cleat might feel looser when engaged
than the enclosed new set. SRM recommends new cleats for
better engagement and power transmission. See page 15
on how to adjust the binding and mount the cleats.
The body or binding is worn out. How can I replace them?
Remove the 4x Torx T10 screws on each side of the pedal
and remove the old binding. Mount a new set of bindings and
tighten the new screws with a torque of 4 Nm (3 lbf.ft) max.
Make sure to adjust the spring tension according to page
15. The complete pedal body can only be replaced at an
authorized SRM Service Center - please contact SRM for
more details.
How do I know I am on the most up to date rmware?
Use the X-Power app on your phone to connect to your
X-Power pedals. If new rmware is available, you will be
notied in the app.

19
DECLARATION OF CONFORMITY
This device has been tested and found to comply with part 15 of the FCC rules. These limits are designed to provide
reasonable protection against harmful interference in a residential installation. This equipment generates, uses and can
radiate radio frequency energy and, if not installed and used in accordance with the instructions, may cause harmful
interference to radio communications. However, there is no guarantee that interference will not occur in a particular
installation. If this equipment does cause harmful interference to radio or television reception, which can be determined by
turning the equipment o and on, the user is encouraged to try to correct the interference by one or more of the following
measures:
(1) Reorient or relocate the receiving antenna. (2) Increase the separation between the equipment and the receiver. (3)
Connect the equipment into an outlet on a circuit dierent from that to which the receiver is connected. (4) Consult the
dealer or an experienced radio/TV technician for help.
Operation is subjected to the following two conditions: (1) This device may not cause harmful interference, and (2)
this device must accept any interference received, including interference that may cause undesired operation. Note:
Modication to this product will void the user’s authority to operate this equipment.
This device complies with Industry Canada license-exempt RSS standard(s). Operation is subject to the following two
conditions: (1) this device may not cause interference, and (2) this device must accept any interference, including
interference that may cause undesired operation of the device.

Table of contents
Other SRM Bicycle Accessories manuals


