ENVO D Series User manual

D-SERIES + R-SERIES
CONVERSION KIT
USER MANUAL
+1 (604) 423-3381 ENVODRIVE.COM

ENVO D-SERIES + R-SERIES CONVERSION KIT MANUAL |VERSION 1.0 2
TABLE OF CONTENTS
1. INTRODUCTION 3
1.1. Use of Manual 3
1.2. Service & Technical Support 3
1.3. Illustrations 3
2. SAFETY & GENERAL TIPS 4
2.1. Street Legality 4
2.2. Rules of the Road 5
2.3. Before your First Ride 6
2.4. Battery & Charger Safety 7
2.5. First Charge 7
2.6. Battery Removal & Installation 9
2.7. Charging your Battery 10
2.8. Battery Transport 11
2.9. Battery Disposal 11
2.10. Local Regulations 11
2.11. General Riding Tips 11
2.12. Safe Operating Conditions 14
3. PRODUCT DESCRIPTION 15
3.1. Components 15
4. ASSEMBLY INSTRUCTIONS 16
4.1. General Requirements 16
4.2. Unboxing and Unpacking 16
4.3. Rear Hub Motor 17
4.4. Downtube Battery Installation 21
4.5. Rack Battery Installation 23
4.6. Display, Throttle & Brake Sensors 26
4.7. Pedal Assist Sensor Installation 30
4.8. Wiring 32
4.9. Wiring Map 34
4.10. Controller & Controller Bag Setup 35
4.11. Testing of Sensors & Motor 36
5. OPERATING YOUR PRODUCT 37
5.1. LCD Controller Function Overview 37
5.2. Display Content 38
5.3. LCD Meter Programming And Use 38
5.4. Hand Throttle Control 40
5.5. Brakes 40
5.6. Operating Range 41
5.7. Maximize your Range 41
6. MAINTENANCE & REPAIR 42
6.1. Maintaining Parts 42
6.2. In Case of Accident 43
6.3. Quick Troubleshooting 45
6.4. Troubleshooting Table 45
7. TRANSPORTATION & STORAGE 51
7.1. Transportation 51
7.2. Storage 51
8. GENERAL TERMS & WARRANTY 49
8.1. Warranty 49
8.2. Registering Product Warranty 50
9.4. Liability Disclaimer 50
9.5. Exclusions 50
9.6. Satisfaction Guarantee 50
9.7. Customer Service 50
9.8. Troubleshooting & Technical 50
10. CONTACT 52
ENVO D-SERIES + R-SERIES CONVERSION KIT MANUAL |VERSION 1.0 3
1. INTRODUCTION
WELCOME TO THE ENVO FAMILY
Thank you for choosing an ENVO Conversion Kit. As a leader in electric bike design and distribution
in Canada, we are passionate about our customers riding their bikes more and driving their cars
less. We are focused on ensuring that you have a safe and enjoyable riding experience for years to
come. At ENVO, we are committed to developing sustainable zero emission mobility systems and
work hard to maintain the satisfaction of our customers. Please stay connected and share anything
that can help us improve our products and service.
1.1. USE OF MANUAL
For safe and enjoyable operation and installation of all ENVO Drive Systems products please
carefully read and follow the recommendations outlined in this manual. It is critical that you clearly
understand all general operations of various parts of your ENVO Drive Systems product.
Please pay extra attention to any information marked with a caution or warning symbol:
1.2. SERVICE & TECHNICAL SUPPORT
Please contact us regarding any technical issues that you encounter, we are here to help. Give us
a call, visit our help centre at support.envodrive.com, or refer to the tutorial videos on our website.
This manual is not intended to be an extensive service guide.
1.3. ILLUSTRATIONS
The illustrations in this manual may not be perfect representations of your ENVO Electric SnowBike Kit,
and some of the components may differ. The models illustrated are for instructional purposes only.
Read, understand, and follow all of the instructions and safety precautions in this manual
and on all product labels. Failure to follow the safety precautions could result in serious
injury or death.
ENVO D-SERIES + R-SERIES CONVERSION KIT MANUAL |VERSION 1.0 4
2. SAFETY & GENERAL TIPS
2.1. STREET LEGALITY
• Electric bikes or conversion kits considered street legal under Canadian and US Federal Electric
Bike Regulations are viewed as bicycles, not motorized vehicles and do not require an insurance
license plate or driver’s license. It is important to check your province/state, county, and local
laws to ensure that your ebike complies with local regulation provisions
• ENVO ebikes general settings comply with 32km/h (20mph) max assisted speed, 500W max
mechanical power, equipped with brake cut-off switches and options to control assist power
while riding. These provisions suce all Canadian federal and provincial regulations. Parks and
other privately managed properties might have different rules. ENVO ebikes are considered
ebike Class II in the US
• Please note street legal does not mean cyclists can ride an electric bike or trike on bicycle
pathways and trails that restrict the use of electric assist bikes
• There may be components such as throttle that have a different legal denition depending on
the province/state you are located in. Because of this we have provided controller settings that
can adapt to a variety of specications
• By modifying an electric bike or conversion kit’s settings, upgrading a component’s capacity,
such as the controller or motor, the product may lose its street legality even if modications are
done by a professional. If at any point ENVO Drive Systems is asked to implement upgrades, we
will notify you if the modications exceed street legal limits
• ENVO is not liable for the legality of use of products in various locations
Your insurance policy may not provide coverage for accidents related to the use of an ebike.
Make sure to contact your insurance company to know about your coverage.

ENVO D-SERIES + R-SERIES CONVERSION KIT MANUAL |VERSION 1.0 5
2.2. RULES OF THE ROAD
• Always obey all the trac rules, regulations, signs, and signals
• Always wear a bicycle helmet that meets or exceeds safety standards
• Ride in a single le on the right side of the road
• Avoid drain grates, soft road edges, gravel, sand, potholes, and uneven paving
• When crossing the railroad track, pay extra attention as you may lose control
• Avoid unsafe actions when riding the ebike
• Do not carry a payload that shifts your balance, hinder your vision, or affect your hearing
• Always have both of your hands on the handlebar
• Do not tow or push the product
• Replace broken parts immediately
• If any ebike component is not functioning properly, end the ride immediately
Failure to follow recommendations outlined in this section may cause damage to property,
injury, or even death.
ENVO D-SERIES + R-SERIES CONVERSION KIT MANUAL |VERSION 1.0 6
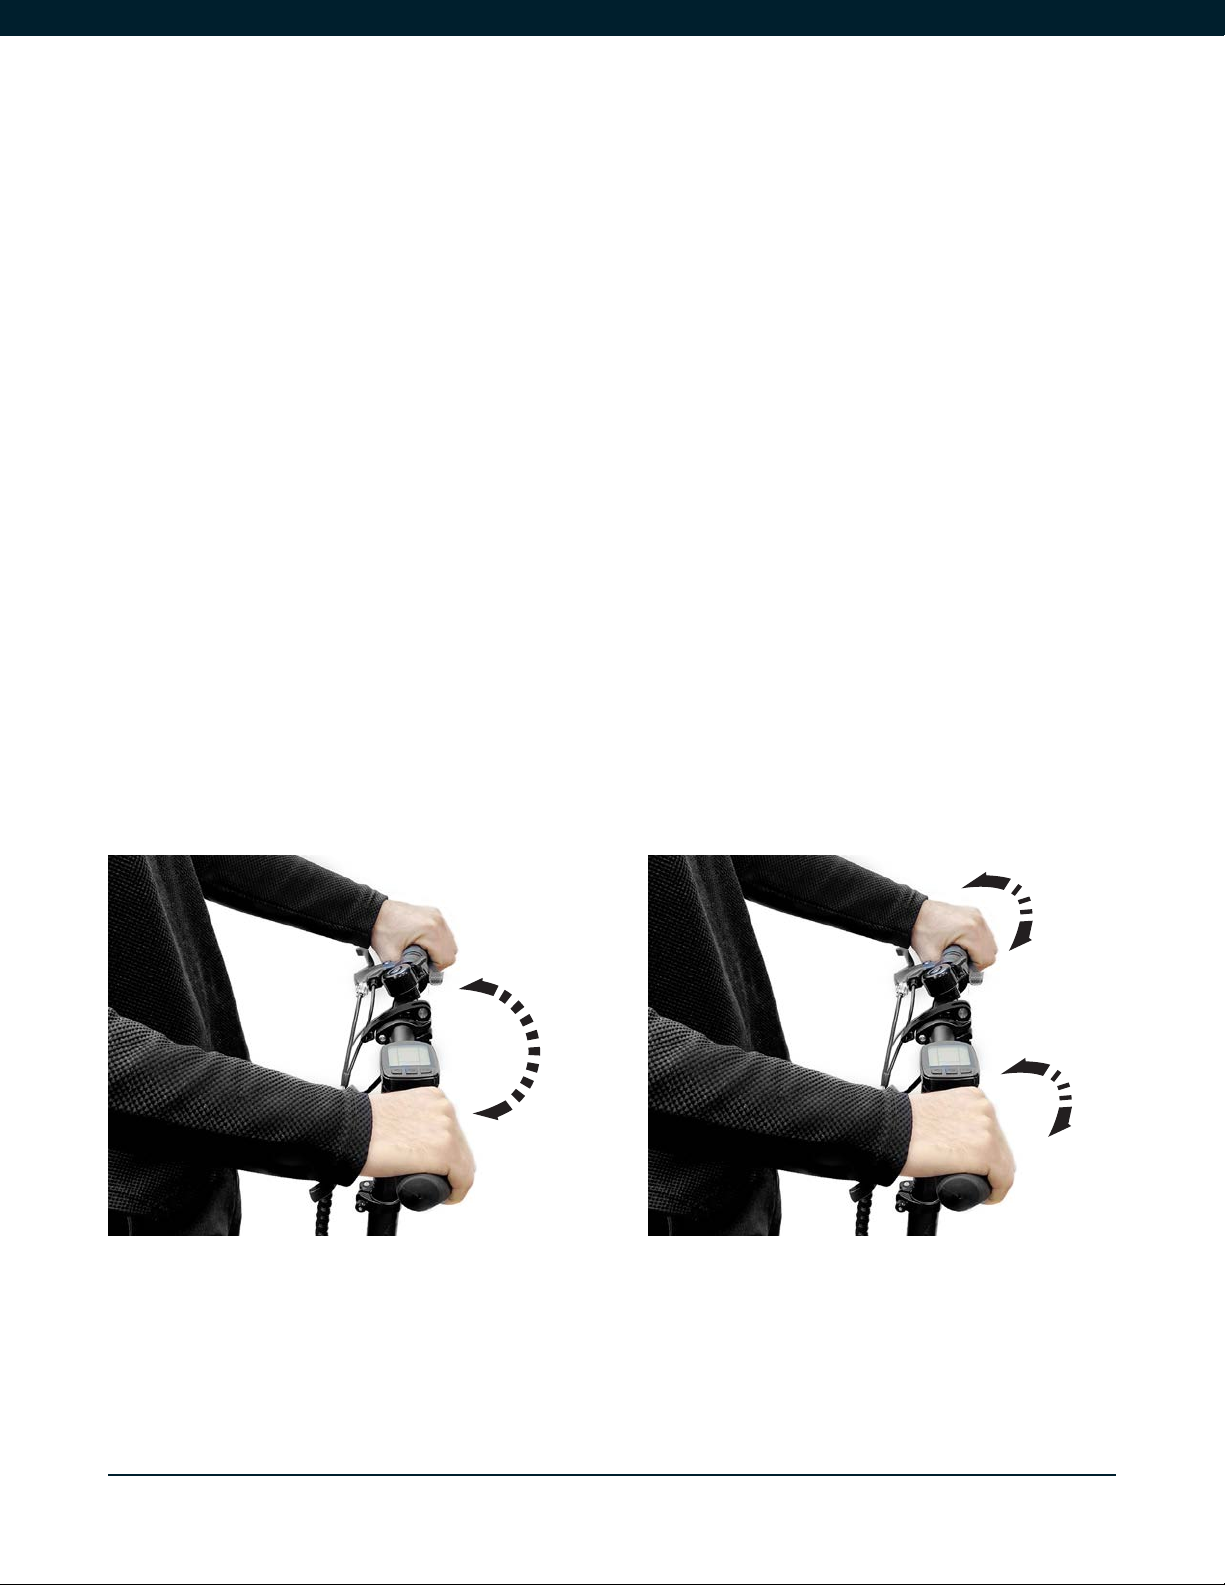
Figure 2.3.A Figure 2.3.B
2.3. BEFORE YOUR FIRST RIDE
• If you have an impairment or disability such as visual impairment, hearing impairment, physical
impairment, cognitive impairment, and/or a seizure disorder, consult your physician before
riding any ENVO Drive Systems product
• Before going on your rst ebike adventure, take time to get familiar with your ebike
• Make sure everything on the bike is secured and tight, the battery is locked, and there is no play
in any screws or bearings
• Check if you are able to turn the handlebar while the wheel is held in place Figure 2.3.A
• Check if the handle bar is secured to the stem by trying to twist the bars forward and backward
Figure 2.3.B
• Ride around a quiet area at the lowest PAS (Pedal Assist LCD) setting, get familiar with your
brakes and settings
• Be sure to bed in the brakes (See Brakes, Section 5.5.). Failure to do so will result in lower than
optimum braking performance and can lead to squealing
ENVO D-SERIES + R-SERIES CONVERSION KIT MANUAL |VERSION 1.0 7
2.4. BATTERY & CHARGER SAFETY
• Please keep the battery away from excessive heat and moisture, do not spray with high pressure
water, and do not store outdoors in freezing temperatures below 0°C
• Always store your battery in a well ventilated, cool, dry room at room temperature
• Keep away from children and pets
• If you notice any SMOKING OR SPARKING while charging immediately disconnect the battery
• Disconnect the battery from the charger once the charger light is green. And disconnect the
charger from the wall plug
• Always fully charge the battery before storage and continue to check up on and charge every 2
months. Failure to do so can result in a loss of capacity to the battery and may even permanently
damage the battery cells, which will void the warranty
• Always unplug the charger when not in use
• Take care of the pins. Always be gentle when pulling the charging pin out. Rough use of the pins
can cause irreversible damage to the pins and battery
• Always use the charger provided by ENVO for the ENVO battery
• Make sure you always seal the USB port when not in use
• Port is only designed for charging low voltage electronics. The output of the USB port is 5V, 1A
• Always unplug the charger when not in use
• To minimize chances of sparking, rst gently plug the charger into the battery and then plug the
charger into the wall
• The charger may get hot while charging. Make sure charger’s surrounding is open for natural heat
dissipation
NEVER disassemble the battery, there is signicant risk of shock and damage to the battery.
Doing so will also void the warranty. DO NOT puncture or crush the battery, or expose to server
vibrations and impacts.
ENVO D-SERIES + R-SERIES CONVERSION KIT MANUAL |VERSION 1.0 8
Do not use the ENVO battery charger for any purpose other than charging your ebike. Do not
use the ENVO battery as a power source for any other devices than your ENVO ebike. If you
do so the warranty will not be applicable, and ENVO Drive Systems will not be liable for any
damage to the system or injury to the persons.
2.5. FIRST CHARGE
• When you rst receive your battery it will have about 50-70% of charge
• After your rst few rides charge your battery fully as close to 12 hours, but no longer than that
• This may require you to leave the battery in charge even when the charger light is green
• This is to ensure that each and every cell is charged to its full capacity leading to a more ecient
and long lasting system
• The full voltage of the 36V battery pack is around 42V, and can be checked in the LCD display
• Future charging times should only be limited to 5-6 hours
Do not drop the battery. Damaged batteries can cause re and may explode which can lead
to damaged property, injury or even death.
Do not puncture or crush the battery. Do not expose the battery to severe vibrations or impacts.
Failure to properly use, charge, and store your battery as instructed will void the warranty and
could cause a hazardous situation.
ENVO D-SERIES + R-SERIES CONVERSION KIT MANUAL |VERSION 1.0 9
Figure 2.6.A
Figure 2.6.B
Figure 2.6.C
Figure 2.6.D
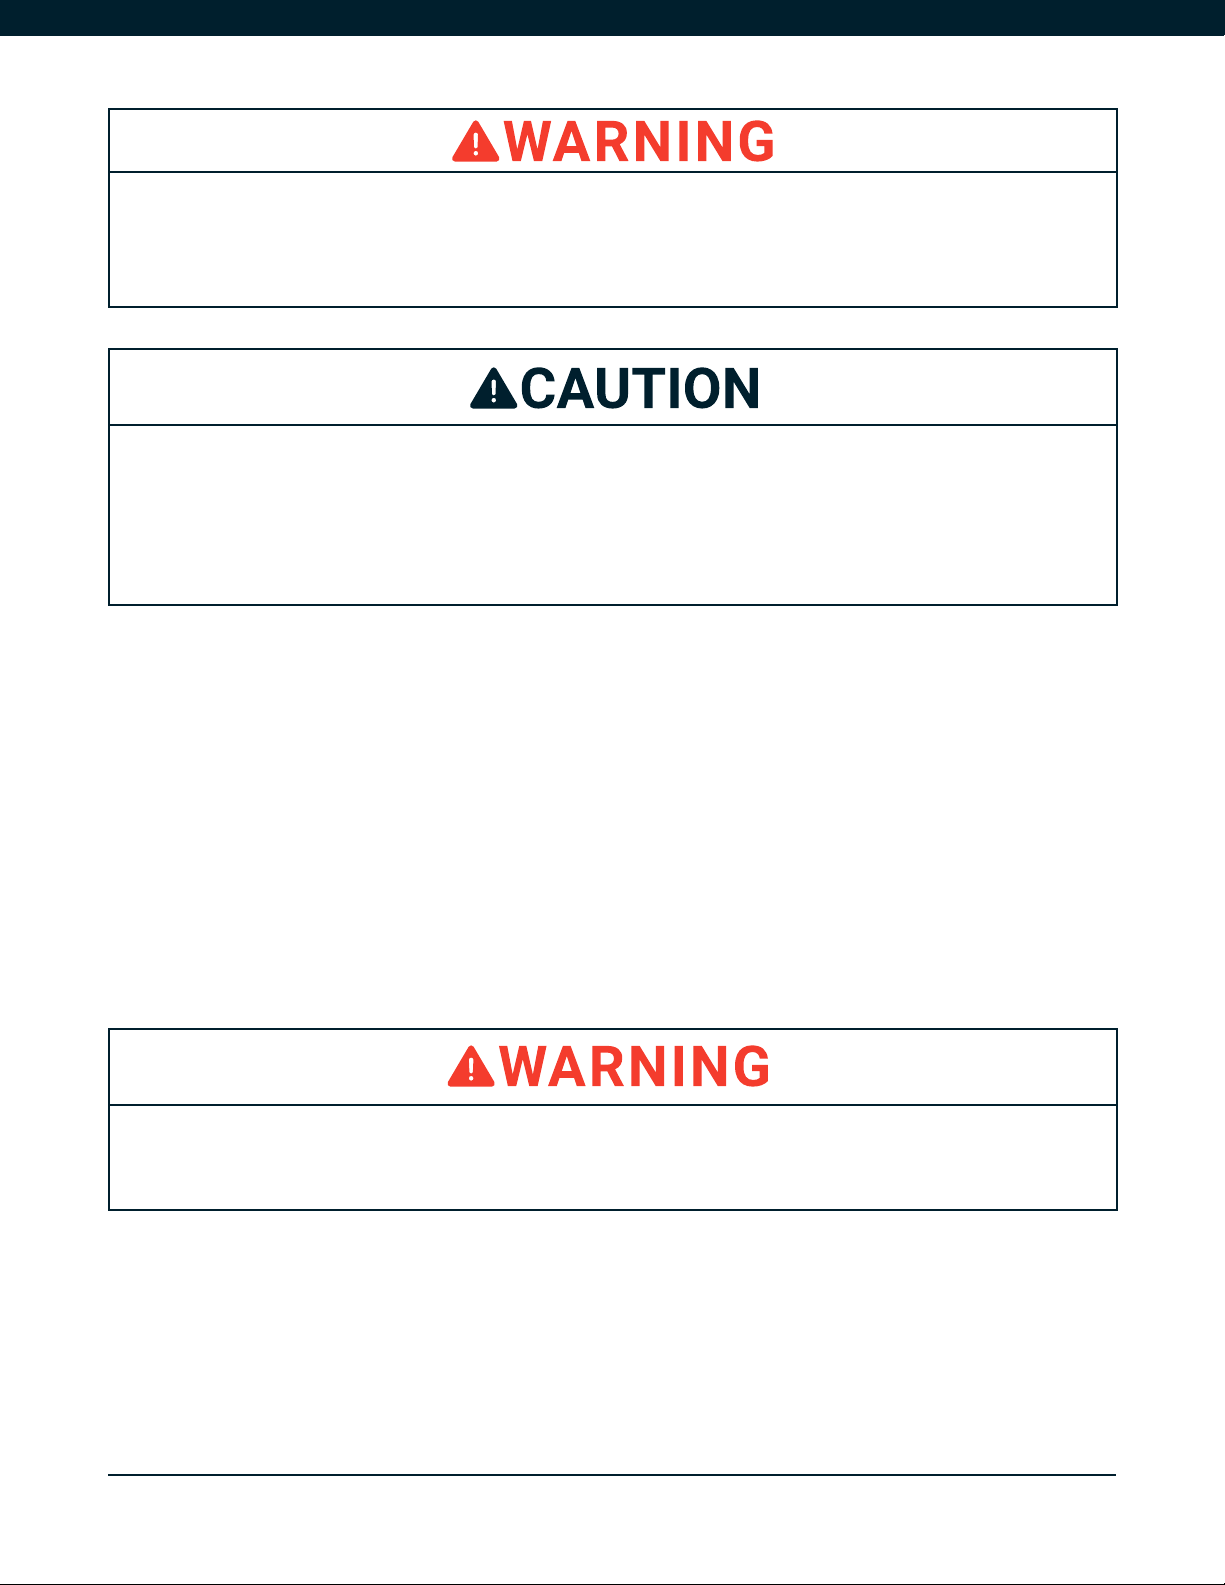
2.6. BATTERY REMOVAL & INSTALLATION
BATTERY REMOVAL
• Turn the key counterclockwise to unlock the battery
• The lock is located on the left side of the bike Figure 2.6.A
• Hold the battery and push with your thumb while pulling with
your ngers. The battery should easily come off Figure 2.6.B
BATTERY INSTALLATION
• To reinstall, rst gently turn the key into the lock position
• Then line the pins at the back of the battery with the slots
and make sure the battery is aligned Figure 2.6.C
• Give a gentle push towards the back, then rmly press the
front of the battery down. If done correctly, you should hear a
click locking battery into the place
• Make sure the battery is rmly locked before operating the
ebike Figure 2.6.D

ENVO D-SERIES + R-SERIES CONVERSION KIT MANUAL |VERSION 1.0 10
2.7. CHARGING YOUR BATTERY
• When it comes to charging the battery, there are two options you can either charge the battery
while it is on the bike, or you may take it with you and charge it in your home or oce
• For safety, always turn off your battery before charging
• Your bike comes with an on-board charging system accessed by the pull-out zip chord on the left
side of the controller, if you choose to charge while battery is still on the bike
• If you choose to take the battery with you to charge, there is a charging port near the bottom of
the battery. Located on the bottom side there is a pullout zip chord.
• Always charge in a well ventilated, cool room
• Do not leave unattended for long periods of time
• Charging time: 5-6hrs or until the charger light is green no longer than 9hrs
IMPORTANT NOTE:
As your battery ages, it will gradually lose capacity. With proper care and maintenance, your
lithium ion battery will retain up to 70% of its capacity for about 500 full discharge/recharge
cycles. As capacity diminishes, you will notice a gradual drop off in max range capability.
When range falls to an unacceptable level, contact your local ENVO dealer to purchase a
new battery.
Please make sure you are gentle anytime you are inserting or removing the port’s charging
cable. Failure to do so can result in damaged pins and poor connections.

ENVO D-SERIES + R-SERIES CONVERSION KIT MANUAL |VERSION 1.0 11
2.8. BATTERY TRANSPORT
• Lithium-ion batteries are subject to many regulations and are often considered dangerous
or hazardous materials by carriers. Be sure to check for relevant laws and ask the carrier for
approval prior to shipping a Lithium-ion battery or transporting it by air
2.9. BATTERY DISPOSAL
• Be a friend to the environment. Recycle your old batteries at a local battery recycle centre
• Batteries should never be thrown in the garbage
• Contact ENVO for more information about how to recycle your batteries
Disposing of Lithium-Ion batteries incorrectly can allow moisture and oxygen to enter the
battery. This can lead to the oxidation of lithium components and which can cause a heat
reaction that may include re or explosion. In addition overcharging, overheating, shock from
dropping, or crushing can lead to a heat reaction. Batteries must always be recycled. They
should not be thrown in the garbage.
2.10. LOCAL REGULATIONS
Generally, the regulations for ebikes throughout North America follow the same guidelines; however,
there may be local differences such as where you can ride, minimum rider age, or required equipment
and registration. Please follow the specic regulations for the use of an electric bicycle in your local
municipality. It is the rider’s responsibility to know the local regulations that apply to an electric
bicycle and to obey them.
ENVO D-SERIES + R-SERIES CONVERSION KIT MANUAL |VERSION 1.0 12
2.11. GENERAL RIDING TIPS
The pedal assist is activated as soon as you spin the pedals or stimulate the throttle, make
sure you are rmly seated on the bike and have at least one brake engaged prior to engaging
the motor. Failure to do so may result in injury or even death.
Failure to wear a helmet and other recommended safety gear when riding an ebike can lead
to serious injury or death.
Electric bikes, like any other vehicle, require regular maintenance by mechanically inclined
persons to guarantee safety of use. Screws and nuts are subject to become loose due to
road vibration, especially within the rst few kilometers of use. Make sure you inspect your
bike often and have it serviced by a professional regularly.
Read, understand, and follow all of the instructions and safety precautions in this manual.
Electric Bikes can be dangerous to use. The user or consumer assumes all risk of personal
injuries, damage, or failure of the bicycle or system and all other losses or damages to
themselves and others and to any property, arising out of or as a result of using the bicycle.
As with all mechanical components, your bicycle is subjected to wear and high stresses.
Different materials and components may react to wear or stress fatigue in different ways.
If the design life of a component has been exceeded, it may suddenly fail, possibly causing
injuries to the rider. Any form of crack, scratches or change of coloring in highly stressed
areas indicate the life of the component has been reached and should be replaced.

ENVO D-SERIES + R-SERIES CONVERSION KIT MANUAL |VERSION 1.0 13
• Always ride at a speed that’s appropriate for the conditions. Higher speed means higher risk
• Ensure brakes and motor cut off switch are working prior to every ride
• Ensure nothing is loose (ie bolts, battery, wheels, pedals, and handlebar) and everything is
secured on the bike prior to every ride
• Always keep both hands on the handlebars and both feet on the pedals
• Do not operate if you are sleepy, sedated or while under the inuence of drugs and/or alcohol
• If motor speed is noticeably dropping while climbing a hill, assist the motor by pedaling
• Do not pedal around a corner as you may gain to much speed and lose control
• Always keep the brakes covered, and be prepared to stop in case of emergency
• Apply both brakes simultaneously and smoothly
• Make sure you clearly understand that it is very dicult for any vehicle to notice your presence,
ALWAYS assume that you cannot be seen and dress in bright colours, reective gear and use
bright lights
• Ebikes are silent and move faster than people and trac expect them to. Ensure those around
you are aware you are approaching by ringing your bell and verbally address pedestrians when
passing by, or when riding in areas where wildlife are located
• Wet weather impairs traction, braking and visibility, both for the cyclist and for other vehicles
sharing the road. The risk of an accident is dramatically increased in wet conditions
• Reectors are not a substitute for required lights. Riding at dawn, at dusk, at night or at other
times of poor visibility without adequate bicycle lighting systems and without reectors is
dangerous and may result in serious injury
• Ensure your wheels are TRUED before each ride. Spin each wheel and check for brake clearance
and side to side wobble. If a wheel wobbles side to side even slightly or rubs against or hits the
brake pads, take the bike to a qualied bike shop to have the wheel trued
• Never ride with headphones. They mask trac sounds and emergency vehicles sirens, distract
you from concentrating on what is going on around you. Headphone wires can tangle in the
moving parts of the bicycle, causing you to lose control
• Wear proper attire, including bright clothing, protective glasses, and sturdy shoes. Never wear a
loose-tting dress or long dress when riding as it can get caught in the moving parts of the bike
and cause serious injury or even death

ENVO D-SERIES + R-SERIES CONVERSION KIT MANUAL |VERSION 1.0 14
• Always wear an approved helmet and ensure it ts according to the manufacturers’ instructions.
Ensure your helmet meets the latest certication standards and is appropriate for the type of
riding you do and if there are any special requirements for riding an electric bike
• At temperatures below -10°C the motor grease might be too stiff for sudden throttle, high speed
and high-power rides. Give the motor some low speed and low power spins and warm up the
gears before going full power
• Avoid changing gears very rapidly from rst gear to the last gear, or vice versa. If you change
multiple gears too quickly, the chain may come off the front sprocket
• Never pedal backwards while shifting, this could jam the chain and cause serious damage
• Never shift gears under heavy loads, this may break the chain. You must only apply just enough
force so that the gear can shift
2.12. SAFE OPERATING CONDITIONS
2.12.1. CARRYING CARGO
• Always ensure that any luggage or child seat is securely attached to the bike and there are
no loose cables. Carrying a load requires getting accustomed to. Practice maneuvering and
braking on a at, hazard and trac free street with and without a load before going out into
the road. Carrying a seated passenger or heavy load involves risks, foremost of which can be
decreased braking power and increased stopping distance. The maximum weight capacity
is 140kg shared between the rider and cargo, for more details consult bike’s manufacturer’s
instructions
2.12.2. UNSAFE USE
• Do not use this bike for jumping over curbs, riding on technical mountain trails, or any use other
than for commuting and cruising in a safe, relaxed manner
• Never exceed 32 km/h on this bike
ENVO D-SERIES + R-SERIES CONVERSION KIT MANUAL |VERSION 1.0 15
Figure 3.1.A
Parts provided in your ENVO Conversion Kit Box:
1. Controller Bag (20A controller)
2. Motor extension cable
3. Controller
4. Front/Rear Hub Motor
5. Battery Charger
6. Battery
3. Controller
1. Controller Bag 4. Motor
2. Motor Cable 5. Battery Charger
6. Battery
3. PRODUCT DESCRIPTION
3.1. ENVO CONVERSION KIT COMPONENTS
ENVO D-SERIES + R-SERIES CONVERSION KIT MANUAL |VERSION 1.0 16
4. ASSEMBLY INSTRUCTIONS
4.1. GENERAL REQUIREMENTS
ENVO Conversion Kit components need to be installed professionally, as they require ne-tuning
and adjustment after installation. It is highly recommended to get help from an experienced
mechanic. Find a local ENVO dealer or book an appointment with us for an installation session. If
you choose to do it yourself, please refer to our online guides at support.envodrive.com, to ensure
you install your product safely.
Use a soft surface for the workplace area, you can use the thermocol that came with the box. The
bike can be placed on a bike stand; however, the motor is quite heavy and it would be easier if the
bike is placed upside down resting on the handlebar and seat. Please make sure it is rmly placed.
REQUIRED TOOLS
• Allen key set
• Philips screw driver
• 10,13, and 15mm wrenches
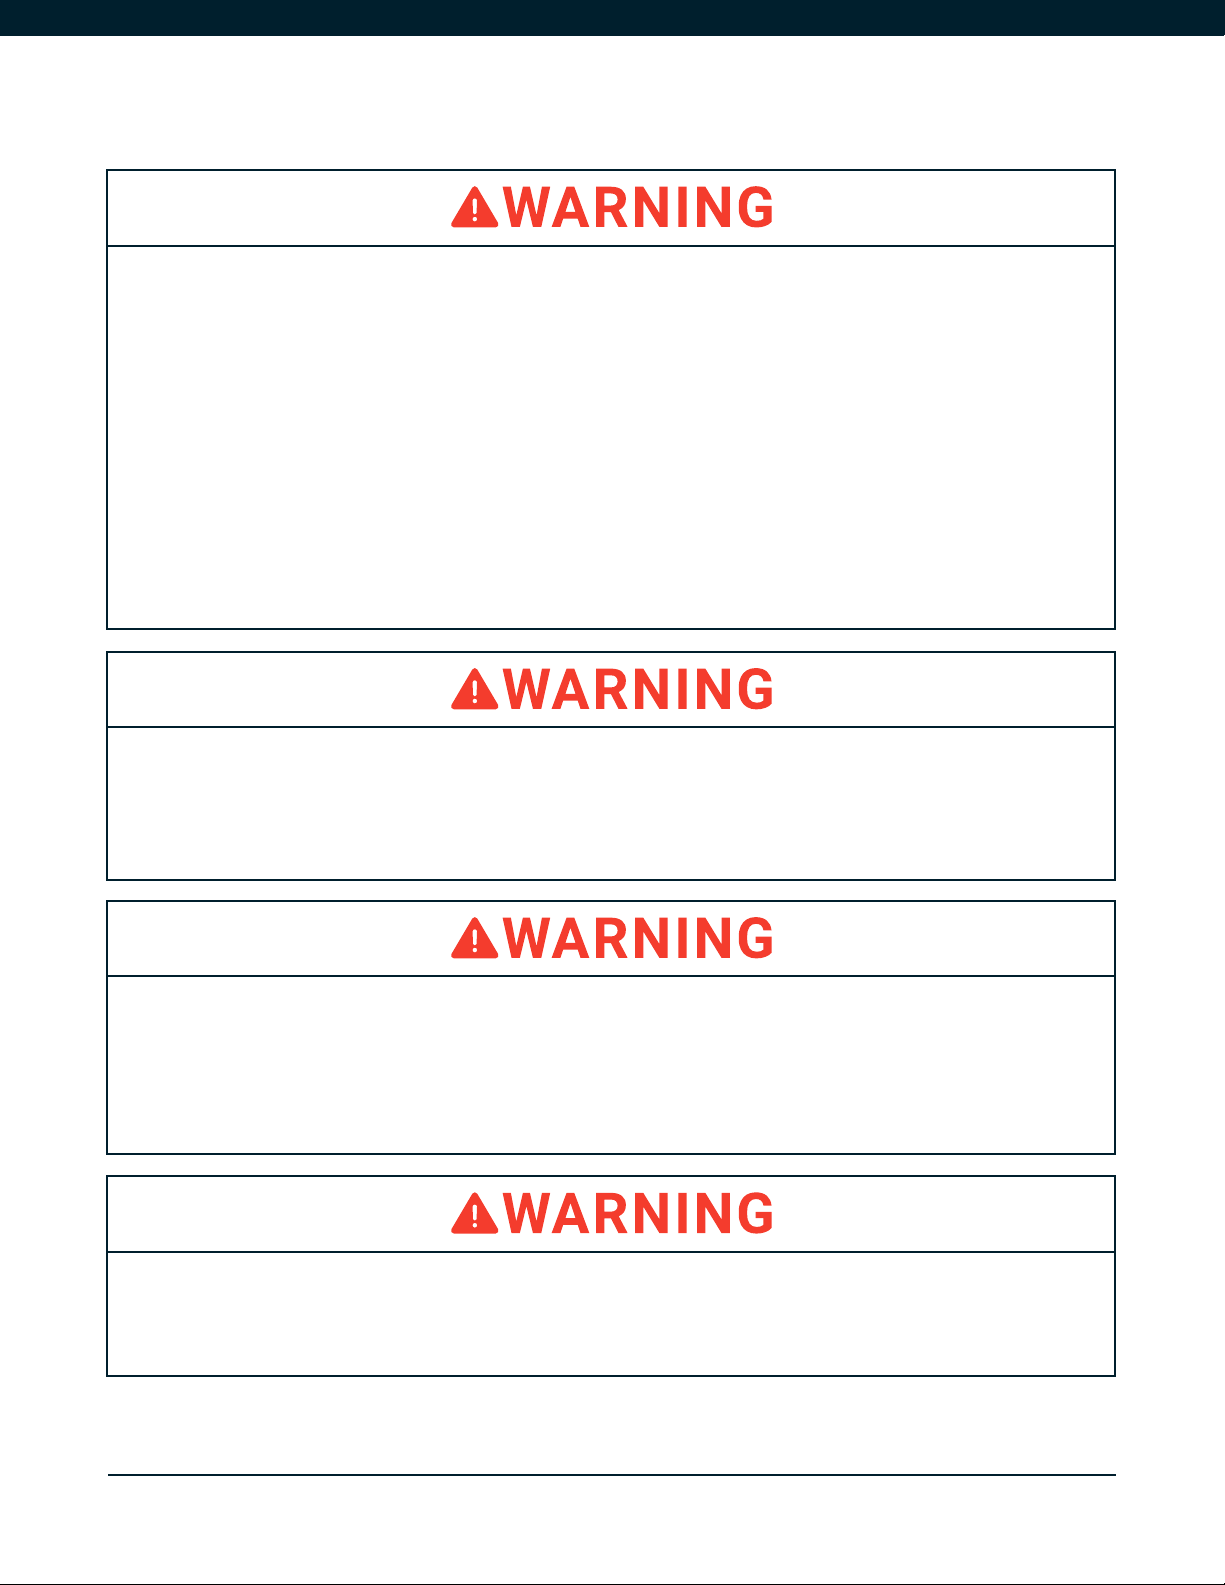
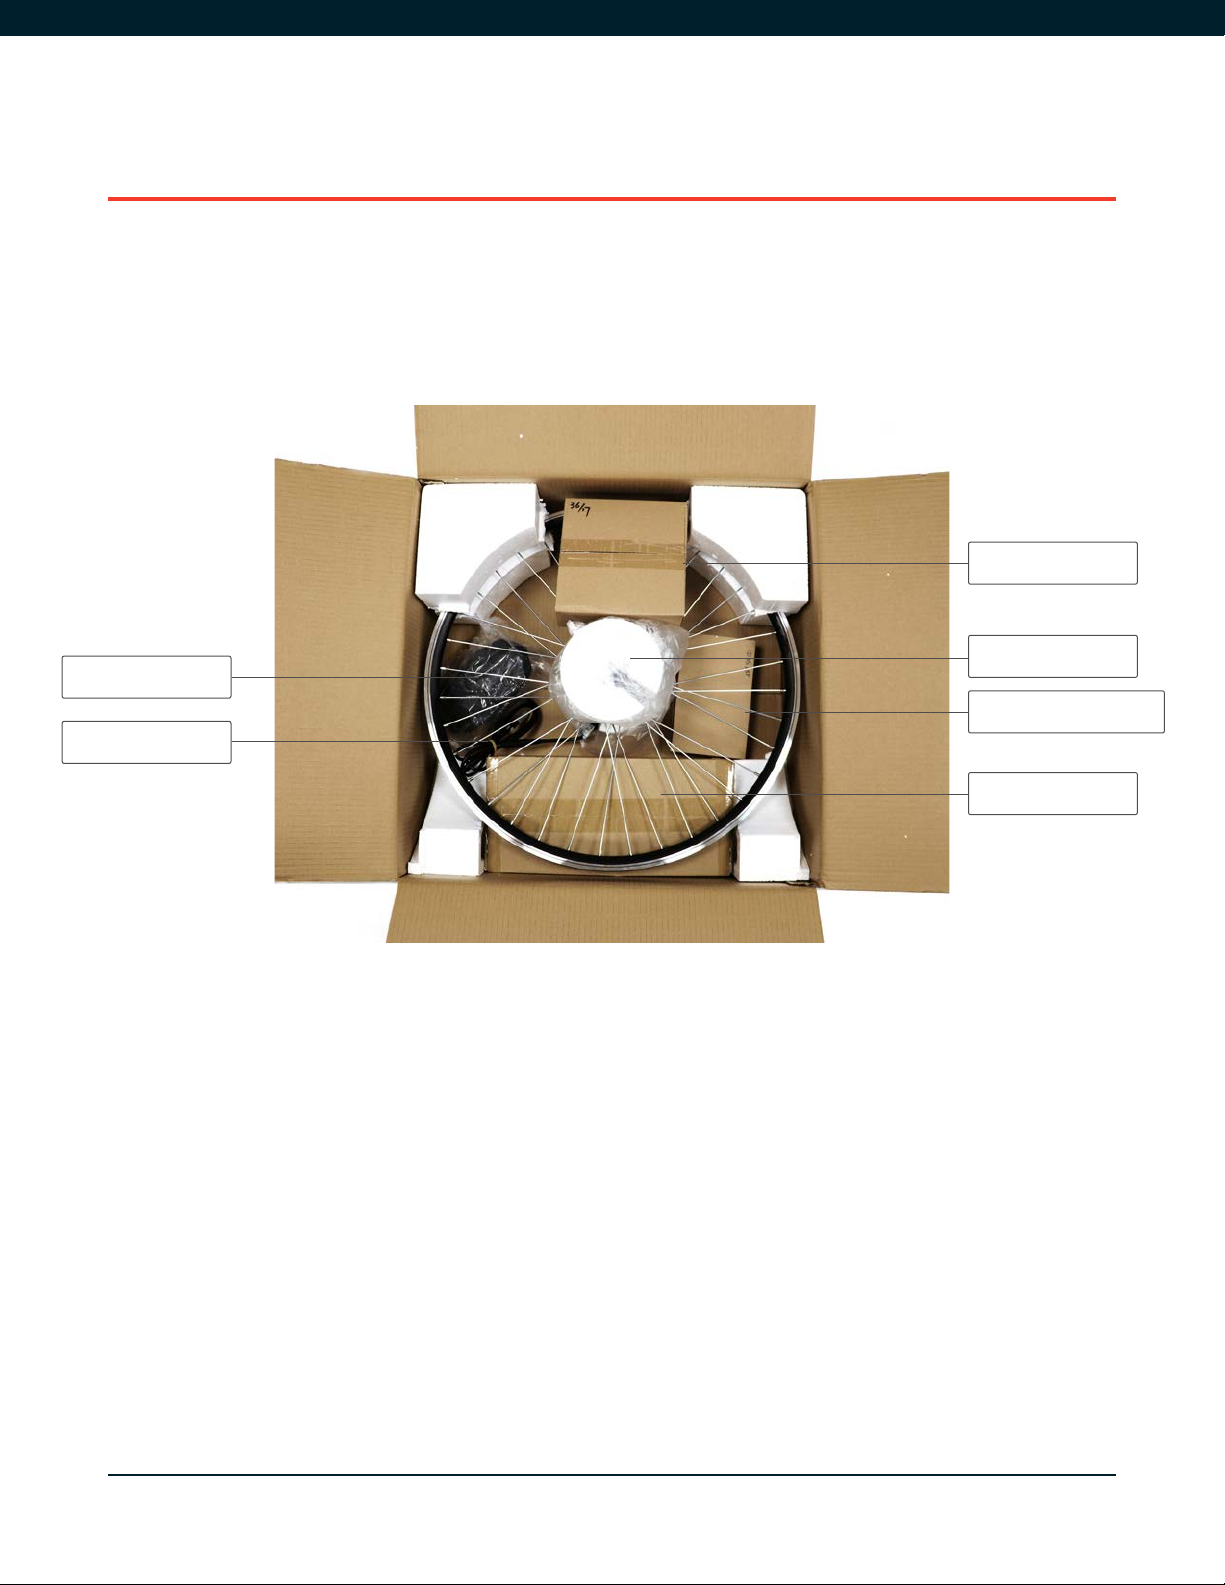
4.2. UNBOXING AND UNPACKING
• Open the box from the top and cut all the zip ties
• Use caution when pulling out the wheel, protect all cables and carefully remove all components
Be careful when dealing with any moving parts as you may get pinched. Do not wear loose
clothing. Always wear safety glasses, and gloves during installation.

ENVO D-SERIES + R-SERIES CONVERSION KIT MANUAL |VERSION 1.0 17
4.3. REAR HUB MOTOR
4.3.1. REMOVAL OF THE REAR WHEEL
• Shift the chain into the smallest gear before attempting to remove the wheel. You may also
remove the chain for easier removal of the wheel but it is not necessary
• If you have V type brakes or any type of rim brakes, you may nd it dicult to remove the wheel
without deating your tire rst. You may also need to disconnect the 2 brake pads from one
another as well, as they can restrict the tire from being removed, (depending on tire size)
• Use a wrench to unscrew the bolts on either side of the wheel. If you have a quick release then
pull on the lever to unlock the wheel
• Remove the wheel from the frame
• If you have disc brakes, DO NOT squeeze your brake levers at any time while removing the
wheel, this can affect the pistons positioning within your calipers
• You may also remove your brake caliper as this can make the future installation of the rear
motor wheel easier
• It is much easier to t the motor wheel with the caliper removed. The disk brake rotor installs
onto the side of the motor hub just like a regular hub. You will need to use the existing screws
that are already installed into the side of the hub. Loosen them, install your disc rotor and then
tighten the bolts. Max 5Nm (40 lbs) tightening torque. If you over-tightened these bolts, you may
risk stripping the hub, which is not covered in the warranty
4.3.2. REMOVAL OF THE TUBE TIRE AND BRAKE ROTOR FROM THE OLD RIM
Note: For this procedure you will require 2-4 plastic tire levers
• To begin, rst pinch the tire as much as you can away from the rim and insert the tire lever
under the tire
• Lift up the lever over the rim and secure it to the nearest spoke with the hooked end
• Insert the second lever approximately 10cm/4″ away from the rst lever and repeat the
procedure, however this time instead of hooking right away try to slide around the rim getting
as much of the tire off and over the rim as possible then secure the lever
Do not use anything other than plastic tire levers for tire removal, you may damage your rims
or end up with a punctured tube.

ENVO D-SERIES + R-SERIES CONVERSION KIT MANUAL |VERSION 1.0 18
4.3.3. INSTALLATION OF TUBE, TIRE, AND BRAKE ROTOR ON NEW RIM
• The rst step is to install rim tape onto the new rim, make sure it is centered all along the rim.
Ensure that the valve hole is not covered
• Add a little bit of air into the tube, just enough so it has shape
• Get one side of the tire bead onto the rim, using tire levers will make it easier
• Insert the tube in the tire and insert the valve through the valve stem
• Using the tire levers get the other side of the tire bead onto the rim using the same technique as
before
• The last bit of remaining tire can sometimes be very stiff, just go around the rim and make sure
that both beads are centered on the rim. This should give you some more wiggle room to get
the last part of the bead onto the rim
• Repeat sliding and lifting all around the rim until the whole side (bead) of the tire is off the rim
• Now starting on the opposite side of the valve, pull the inner tube from the tire. Lift valve from
valve hole and remove tube from wheel. Remove the second bead from the rim, by using both
hands placed rmly on top of the tire and push the tire down with the weight of your body and
force the tire off the rim
• Check tube for any punctures by inating and listening for any escaping air
• The new motor rim does not include the rim tape on the rim, you may use new tape or you may
remove the ones from your old rim
• Remove the brake rotor, unscrew each screw in a star pattern
ENVO D-SERIES + R-SERIES CONVERSION KIT MANUAL |VERSION 1.0 19
Figure 4.3.4.C
Figure 4.3.4.B
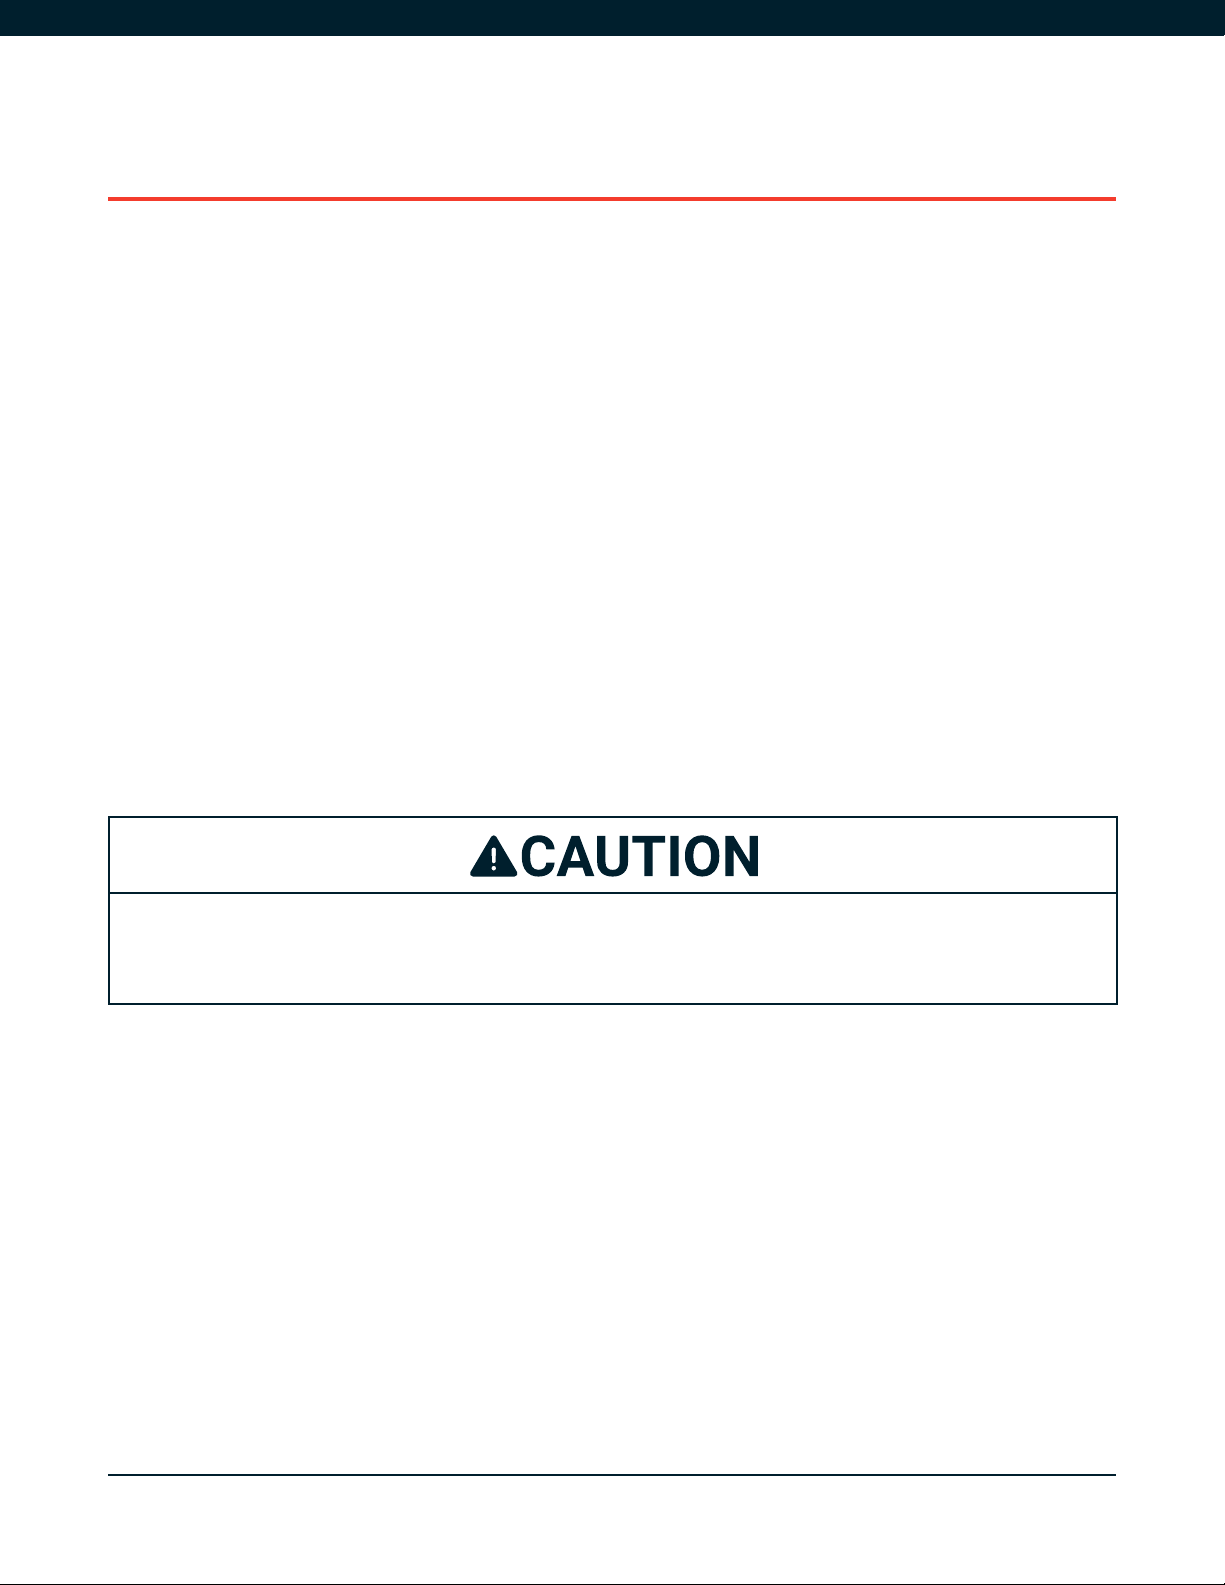
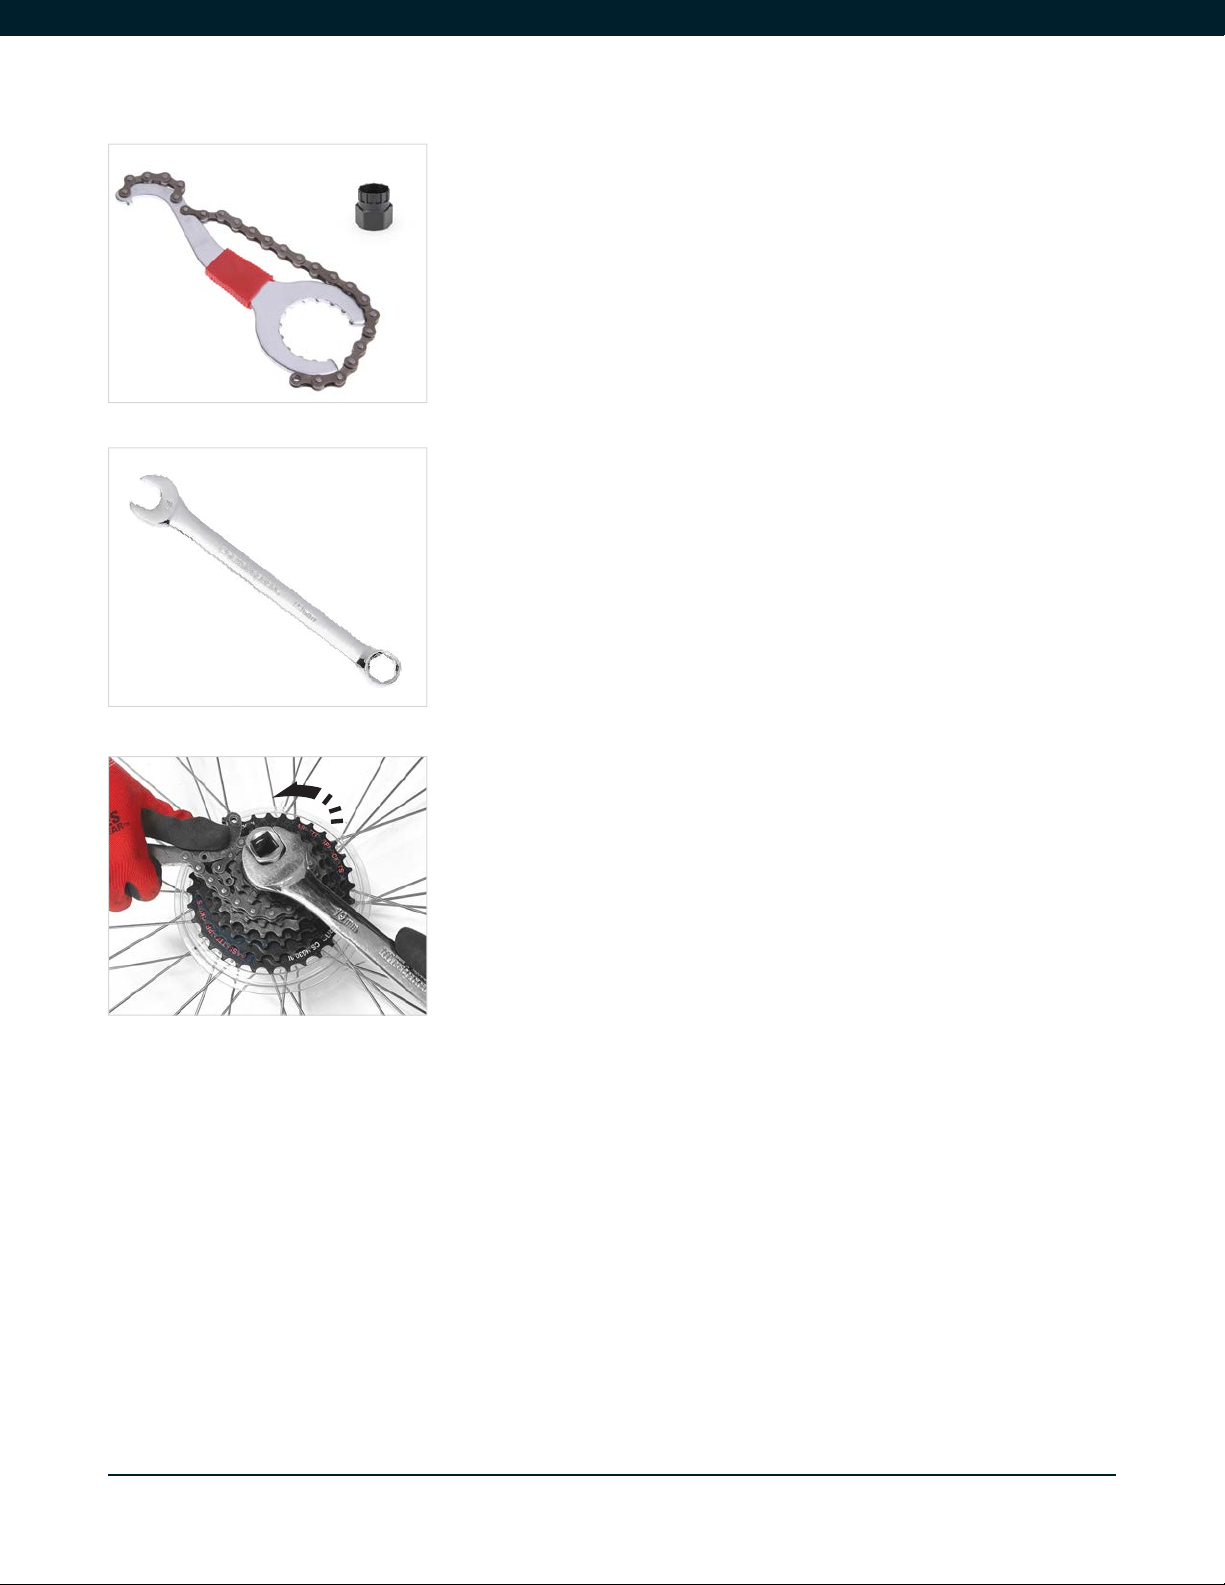
Figure 4.3.4.A 4.3.4. TRANSFERRING YOUR CASSETTE
• To remove the cassette, you must rst loosen the lockring
using the chain whip and the lockring tool, Figure 4.3.4.A
some cassettes may need a more specic tool
• Wrap the chain around the middle chain and have a rm
grip on the cassette
• Now with a 19mm wrench Figure 4.3.4.B apply some force
and rotate the lockring anti-clockwise
• Once loosened, remove the tools and pull the cassette off
the wheel. Keep everything in the same order
• Install the cassette onto the new rim
• Hand tighten the lock ring as much as you can
• Tighten the bolt to the manufacturer-recommended torque
and don’t be tempted to over tighten as it can damage the
freehub body threads Figure 4.3.4.C

ENVO D-SERIES + R-SERIES CONVERSION KIT MANUAL |VERSION 1.0 20
4.3.5. INSTALLING MOTORIZED RIM TO THE
FRAME
• First pull on the derailleur and guide the cassette into
position in between the chain (If you have removed your
chain, reinstall your chain after the wheel is fully installed)
• Align the axles with the dropouts. If you have disk brakes,
and you did not remove your caliper then take care while
inserting the disk into the brake caliper. Do not apply
pressure if you are unable to insert it. Check if something is
not aligned properly
• Use the locking nut and align it as per the cassette or
freewheel, the locking nut must be at the same level as the
cassette or freewheel when tightening Figures 4.3.5A
• Both ends of the axle should rest on the dropouts of each
side
• The order that you should use to install the hardware to the
dropouts are shown in Figures 4.3.5.B and Figure 4.3.5.C
• Use an 18mm wrench to tighten up the nuts to 40Nm,
rotating in a clock rotation on both sides
• Install the nut cap and secure the wire
• Inate the tire to the recommended tire pressure (written on
the tires sidewall)
• Do a nal check of everything making sure no wires are
caught, the wheels not loose, brakes are aligned and gears
are shifting smoothly
• Congratulations you have installed your motor! Flip over
your bike and take it for a spin
The axle should t perfectly, if not then you have to use torque arm for safety, we will not be
responsible if the axle comes out of the frame at anytime and condition.
Figure 4.3.5.C
Figure 4.3.5.B
Figure 4.3.5.A
Locking Nut
Use 10mm spanner to
guide the axle to the slot
It should t completely
in position
Nut
Locking Washer
Washer
This manual suits for next models
1
Table of contents


