SSANGYONG DGU-7T45-A161SA User manual

Model name: DGU-7T45-A161SA
FCC ID: 2AE77DGU7T45A161SA

1
English
Car Smart Audio System OWNER’S MANUAL Smart Audio
Please read this manual carefully before operating your set and retain it for future reference.
Designs and specications are subject to change without prior notice.
Please visit the Ssangyong Motor online Webpage for the detail information about the SmartAudio system.
- Smart Audio manual download website address : http://www.smotor.com
User Manual
Manuel d’utilisation
Manual de usuario
Manuale dell’utente
Gebruikershandleiding
Benutzerhandbuch
Руководство пользователя
Ver 1.0
使用说明书

2
English
Smart Audio Detailed Manual download URL :
http://www.smotor.com
Precautions 3
· · · · · · · · ·· · · · · · · · · · · · · · · · · · · · · · · · · · · · · · · · · · · · · · · · · · · · · · · · · · · · · · · ·
Key Product Features 4
· · · · · · · · · · · ·· · · · · · · · · · · · · · · · · · · · · · · · · ·· · · · · · · · · · · · · · ·
Location of controls(Front View) 5
· · · · · · ·· · · · · · · · · · · · · · · · · · · · · · · · · · · · · · ··
Location of controls(Rear View) 6
· · · · · · ·· · · · · · · · · · · · · · · · · · · · · · · · · · · · · · · ·
Steering Wheel Controller 7
· · · · · · · · · · · · · · · · · · · · · · · · · · · · · · · · · · · · · · · · · · · · ·
Basic Opertaion 8
· · · · · · · · · · · · · · · · · · · · · · · · · ·· · · · · · · · · · · · · · · · · · · · · · · · · · · · · · · · · ·
System Settings 9
· · · · · · · · · · · · · · · · · · · · · · · · · · · · · · · · · · · · · · · · · · · · · · · · · · · · · · · · · · ·
Selecting Mode 10
· · · · · · · · · · · · · · · · · · · · · · · · · · · · · · · · · · · · ·· · · · · · · · · · · · · · · · · · · · · ·
Product Specications 12
· · · · · · · · · · · · · · · · · · · · · · · · · · · · · · · · · · · · · · · · · · ·· · · · · · · ·
Starting Rear Detection Camera Mode 11
· · · · · · · · · · · · · · · · · · · · · · · · · · · · ·
Contents
Smart Audio Manual

3
English
For Safe Use
- To reduce the risk of re or electric shock, do not expose this product to rain or
moisture.
- Users should not directly disassemble the device for repair purposes.
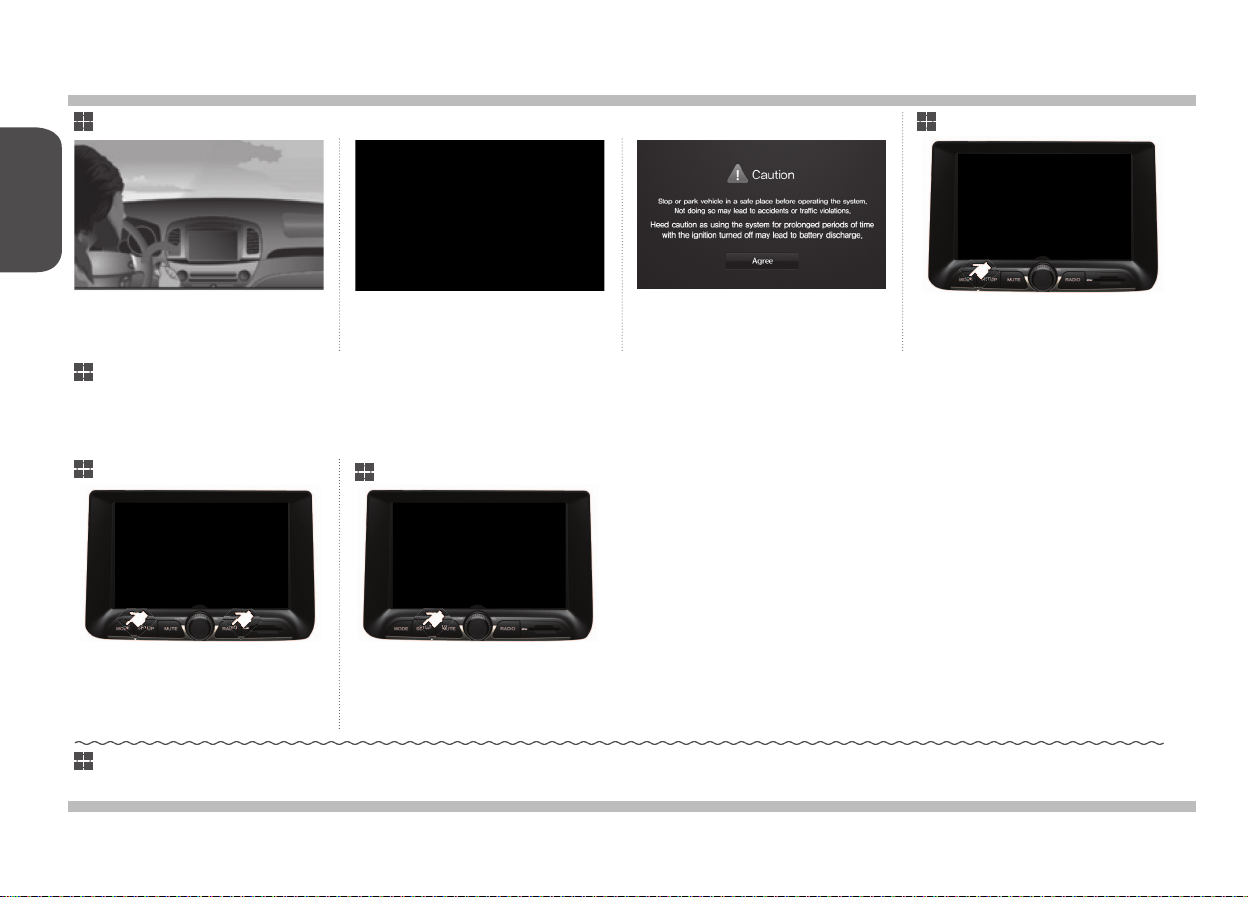
- When you must operate the device while the vehicle is in motion, pay close atten
tion to upcoming road conditions and practice safe driving.
- Parking under direct sunlight for prolonged periods of time can produce high tem
peratures inside your car. In such instances, open the windows to lower the tem
perature prior to product use.
- This product is designed to operate using a DC 14V, negative-ground
battery system. The preset memory is cleared to the default factory state when the power connector
or battery is disconnected.
- Excessively high volume level can interfere with driving. Maintain the volume level
low enough to be aware of road and trafc conditions.
- When requiring complicated operations, please operate only when the vehicle is in
parked state.
- Do not expose the product, including speakers and amps, to water or excessive
moisture. Such exposure may cause electrical shocks or res.
- To reduce the risk of re, electric shock and unnecessary interference, use only
included components and accessories.
The product is designed for DC 14V negative-ground vehicle use only.
Do not use a non-standard power supply.
Do not use gasoline, thinner, benzene, organic solvent, etc., to clean the
unit.
Do not use gasoline, thinner, benzene, organic solvent, etc., to clean the
unit.
Precautions
Safety Cautions
Safety Warnings
Cautions upon Use
Caution!
Caution!
When Driving
When Driving
Power Supply Information

4
English
Key Product Features
Feature
Display
HDMI
Bluetooth
Miscellaneous
Radio
USB MEDIA
FeatureDescription Description
Wide LCD Display
HDMI feature of HDMI devices can be connected for
use.
Easy control of screen brightness, contrast, color and
saturation through touch screen.
Shows the vehicle rear side when positioning the gear
in reverse.
Bluetooth Connection Feature
Digital Screen Control Features
Rear Detection Camera
Provides Hands-Free feature that enables drivers to
make wireless calls while driving as well as music
enjoyment through Audio Streaming.
RDS(Radio Data System)
AF, REGION, TA, TP, PTY
Media Auto Search Feature
Outstanding reception using a high-sensitivity inte-
grated antenna.
Radio Digital Tuner Feature
Possible to save 6 independent present bands for
FM1, FM2 and AM broadcasts each. The system uses
a one-chip digital radio solution.
Automatically identies music les saved in the media
and displays as lists for convenience.
Provides high quality video and music simultaneously
through the 7-inch wide screen display
Touch screen for maximum user convenience
Enables selection of video screens according to situ-
ation
This device is a Smart Audio system that supports Radio (FM, AM, RDS), USB Music, HDMI, iPOD. The 7-inch WIDE VGA LCD
provides high quality resolution while the powerful and rich sound system adds to driving enjoyment. In addition, the rear view cam-
era increases safety when reversing by providing a wide eld of vision of the rear side.
Key Product Features

5
English
Button Description
Front View
POWER/VOL
MODE
SETUP
MUTE
RADIO
1. Turn the Radio on.
2. Change the Band/Preset.
Location of controls
1
1
2
3
4
5
2345
1. Used the turn the power ON/OFF or control the volume.
2. Press and hold (over 1.5 seconds) to turn the power OFF.
3. Press shortly to turn the AV ON/OFF.
4. Turn left/right to control volume.
1. Converts to MODE selection screen.
2. Displays the most recent AV screen regardless of whether AV
is ON/OFF.
1. In all modes, press and hold (over 1.5 seconds) to display AVN
System Settings screen.
2. In Radio mode, press shortly to display RDS Settings screen.
1. Mute/Pause the Audio/Media

6
English
Rear View Smart Audio 42P CONNECTOR
Location of controls
1) Radio Antenna Jack
- To plug the radio antenna cable
2) USB Port
- To connect a USB connector for USB host function
3) HDMI Port
- To connect a HDMI connector
4) I/O Connector (42 pin)
Smart Audio
PIN NO.
A1
A9
A5
A13
A2
A10
A6
A14
A3
A11
A7
A15
A17
A4
A12
A8
A16
A18
PIN NO.
B1
B9
B5
B13
B19
B2
B10
B6
B14
B20
B3
B11
B7
B15
B21
B17
B23
B4
B12
B8
B16
B22
B18
B24
SPEC
RL+
REVERSE
B/V_GND
RR-
FL+
RL-
B/V_POWER
B/V_VGND
FR+
FL-
ALT_IN
B/V_VIDIO
ILL-
RR+
FR-
ILL+
DOOR_UNLOCK
ANT_B+
SPEC
NC(CAN_H)
NC(AUX_REF)
NC(SPDIF_DP)
NC(CAN_L)
NC(AUX_VGND)
NC(UCOM_TX)
MIC+
NC(SPDIF_DM)
NC(UCOM_RX)
NC(AUX_DET)
NC(MULTI-BOX PWR)
ACC
NC(AUX_CVBS_IN)
NC(P_POSITION)
NC(AUX_L_IN)
ST_REMO_GND
MIC_GND
ST_REMO
BATT+
NC(AUX_R_IN)
SPEED
MIC-
NC(SPDIF_GND)
P_GND
12 3 4

7
English
Button Description
Steering Wheel Controller
- When there is an incoming call, shortly press the button to accept
the call or press and hold the button to reject the call.
- During a call, press the button to end the call.
Steering Wheel Controller
1
3
4
5
During a call, press the button shortly to mute call volume
In listening mode, mutes broadcast volume
Press the button to adjust the volume level.
In le play mode (USB/BT Audio)
- When pressing the mode switch in up/down direction: moves to the
previous or next song.
In radio mode
- When shortly pressing the mode switch in up/down direction:
searches saved frequencies
- When pressing and holding the switch in up/down direction:
scans frequencies
- Press the button to select the desired function mode.
( RADIO → USB → BT Audio → HDMI → iPOD )
- Press and hold the button to select radio frequency bands.
( FM1 → FM2 → AM )
1
2
234 5

8
English
Basic Operation
Starting the System
Turning the System Off
MODE
NOTICE
1.
1.
2. 3. 1.Set the ignition key to ON or
ACC.
- Resetting the system will restore all existing settings and congurations back to their default states. This is to ensure device stability.
Press and hold (over 1.5 seconds) the POWER/VOL button to turn the power off. When the system power is turned off, the nal operating mode is
saved. When the ignition is turned on again, the system will automatically turn on the most recently operated mode.
However, if the nal mode was Bluetooth audio, then the mode prior to Bluetooth will operate.
The Ssangyong Motors logo is
displayed and the system will
boot.
Once booting is complete, User
agreement screen is displayed, and
Press the Agree button.
(the most recent mode will operate)
Press the MODE button to con-
vert to MODE selection screen.
Resetting the System Settings
1.
2.
1.Press the MODE and Radio but-
ton simultaneously.
The system will turn off and
reboot.
Press and hold (over 1.5
seconds) the SETUP button to
convert to Smart Audio Settings
screen.

9
English
SYSTEM SETTINGS
Smart Audio
RDS Settings
Display SettingsSettings Menu
Clock Settings
Sound Settings
System Information
1.
1.
1.
1.
1.
1.
1.Press and hold (over 1.5 sec-
onds) the SETUP button on the
front panel.
Used to set RDS (Radio Data
System) settings.
In Settings screen, select the
desired mode.
Used to set the time.
Used to set sound fader/bal-
ance, EQ and other sound
settings.
Used to check system informa-
tion and Reset/Upgrade/Select
Language.
Used to set screen brightness,
size and other display settings.

10
English
Selecting MODE
Smart Audio MEDIA MODE
MAIN MODE
Bluetooth MODE
RADIO MODE
Bluetooth Music MODE
1. 1.1.
1.
1.
1.
Press the MODE button on the
front panel. You can enjoy preferred MEDIA,
such as USB MUSIC.
In Mode screen, select the
desired mode.
Mobile phones can be con-
nected via Bluetooth to make
and receive calls.
You can enjoy RADIO and RDS
information.
Bluetooth devices can be con-
nected to listen to music.

11
English
Selecting MODE
HDMI MODE IPOD MODE
MHL/HDMI Gender &
Cable Connection iPod/iPhone Cable
Connection
1. 1.Devices can be connected via
HDMI to watch Phone Screen.
iPOD/iPhones can be connected
via USB to listen to music.
- When connecting MHL/HDMI,
use only authentic connection
genders.
- When connecting USB Cable,
use only authentic connection
Cable.
USB Cable
Caution Caution

12
English
Starting Rear Detection Camera Mode
When placing the car in reverse, the rear detection camera will begin operating regardless of the current mode and display the rear view on the
monitor.
When the gear is shifted to another position, the rear detection camera deactivates and restores the previously operating screen.
Even when the device power is off, shifting to reverse will automatically turn on the device and operate rear detection camera mode.
When reversing, the volume and mute can be used to improve concentration on external conditions.
This device is connected to a rear detection camera to acquire rear eld of vision for safe reversing.
1.
2. Place the ignition switch to ON or IGN position.
Shift the gear to R.
CAUTION!
- Rear Detection Cameras use wide-angle lens to acquire a wider view, so there may be differences between the actual distance and the distance that
appears on the screen. For safety, make sure to check the rear, right and left sides of the car yourself.
- Only the volume and incoming call features will operate when operating the rear detection camera.

13
English
Audio
Bluetooth
Certica-
tion
Common
Display
Radio
Storage
Device
Name
Screen Size
Current Con-
sumption
Operating Tem-
perature
Storage Tempera-
ture
Frequency Range
Operating Method
Power Supply USB
Resolution
Sensitivity
Sleep Current
Dimensions
Supported Files
Compatibility
Weight
Frequency Range
Frequency Band-
width
Supported
Proles
Transmission
Output
Operating Power Format
Backlight
Car TFT LCD Display Smart Audio UNIT
167.8mm(W) x 104mm(H) x 6.4mm(D)(7.0” WVGA)
FM: 87.5MHz~108.0MHz(Step : 0.05MHz)
AM: 522KHz~1620KHz(Step : 9KHz)
2A
LED Method
DC 13.5V1 port , USB2.0 HOST
384,000 pixels (Resolution : 800 x 480)
FM: 10dBuV, AM: 40dBuV EMF
3mA(Head Unit Only)
247.1mm × 153.9mm × 197.1mm
MP3, WMA, OGG, AC3, APE, FLAC
BLUETOOTH V2.1+EDR
1.9 Kg
20Hz ~ 20KHz
2402 ~ 2480MHz
MP3 Play, Hands-Free
Max +4dBm (CLASS2 Support)
DC 9V ~ DC 16V FAT 32
TFT Active Matrix Method
-30℃ ~ +75℃
-40℃ ~ +85℃
Product Specications
QD ID : 58103
E910R-04.1696
SD 1 slot, SD-HC

14
English
Notice
FCC Information to User
This equipment has been tested and found to comply with the limits for a Class B digital device,
pursuant to Part 15 of the FCC Rules. These limits are designed to provide reasonable protection
against harmful interference in a residential installation. This equipment generates, uses and can
radiate radio frequency energy and, if not installed and used in accordance with the instructions, may
cause harmful interference to radio communications. However, there is no guarantee that interference
will not occur in a particular installation. If this equipment does cause harmful interference to radio or
television reception, which can be determined by turning the equipment off and on, the user is
encouraged to try to correct the interference by one of the following measures:
• Reorient or relocate the receiving antenna.
• Increase the separation between the equipment and receiver.
• Connect the equipment into an outlet on a circuit different from that to which the receiver is con-
nected.
• Consult the dealer or an experienced radio/TV technician for help.
Caution
Modifications not expressly approved by the party responsible for compliance could void the user’s
authority to operate the equipment.
FCC Compliance Information : This device complies with Part 15 of the FCC Rules. Operation is
subject to the following two conditions: (1) This device may not cause harmful interference, and (2)
this device must accept any interference received, including interference that may cause undesired
operation
IMPORTANT NOTE:
FCC RF Radiation Exposure Statement:
This equipment complies with FCC RF radiation exposure limits set forth for an uncontrolled
environment. This equipment should be installed and operated with a minimum distance of 20
centimeters between the radiator and your body.This transmitter must not be co-located or operating
in conjunction with any other antenna or transmitter.

Table of contents
Other SSANGYONG Car Stereo System manuals
Popular Car Stereo System manuals by other brands

Kenwood
Kenwood KMM-D505DAB quick start guide

Voxx
Voxx SiriusXM owner's manual

JVC
JVC KD SH1000 - Radio / CD Installation & connection manual

Rockford Fosgate
Rockford Fosgate RFX9020M Installation & operating guide

JL Audio
JL Audio Stealthbox SB-F-TRKCTR/10W3 installation guide

Blaupunkt
Blaupunkt BARCELONA MP35 operating instructions