SSR Buccaneer 250i User manual

Buccaneer 250i Owner’s Manual

Preface
Thank you for purchasing the SSR Buccaneer 250i fuel injected motorcycle, it will
bring you years of pleasurable riding in a safe to operate package.
Riding a motorcycle is one of the most exciting past times. For your safety, you
should read this owner’s manual carefully and follow these instructions before
you ride.
This manual introduces regular maintenance and service, please follow these
instructions, it will help you to keep your motorcycle in good running order and
functioning for years to come.
Our company never stops improving our quality and performance, this may lead
to color or structural changes not outlined in this manual. We apologize if this
brings you any inconvenience.
SSR Motorsports

Important Notice
1. Vehicle load capabilities
This motorcycle is designed for one driver and one passenger only.
2. Road conditions for driving
This motorcycle is only suitable for driving on roads.
3. Please read this manual carefully. Following the instructions outlined here will make your
motorcycle more durable and stable.
Please note the followings words:
Warning: Means if you DO NOT follow the instructions, it could lead to serious damage for
driver and passenger.
Caution: Means if you DO NOT follow the instructions, it may cause the person/s to be injured
or damage to the motorcycle.
Notice: Provide useful information
This user manual is propriety to this motorcycle. If this vehicle is sold to others, you should
pass this manual on to the new owner together with the vehicle.
Without our company permission, it is not allow to copy or translate any part of this manual.
This vehicle uses motorcycle grade engine oil.
---The special lubrication oil for motorcycle.

Special Notice
Warning: This motorcycle must use the correct spec fuse, DO NOT use other spec fuses
or operate without a fuse. Incorrect fuses may cause damage to the vehicle or re.
Fuse position: next to the battery.
Fuse spec: Main Fuse 15 Amp.
If you blow the main fuse, before you replace the fuse you should perform a simple check of
the vehicle for electrical shorts. If after replacing the fuse it blows again, send the vehicle to an
authorized SSR dealership for inspection.
Notice:
* When changing the battery for the rst time be aware of the positive and negative terminals.
If you connect the battery to the wrong terminals check the main fuse immediately. Even if the
main fuse is not blown you should take your motorcycle to a SSR dealership for inspection. An
incorrect connection could lead to electrical system damage.
* Before replacing the fuse, turn off the ignition switch and remove the key.
* When replacing the fuse, use caution not to damage the bottom of the fuse, otherwise it may
cause failure or other electrical system damage.
Forbidden Modications:
Please do not change the original parts position, otherwise it will seriously effect ve-
hicle performance and safety and may even cause the vehicle to operate improperly.
Modication examples are: electronic, emissions and/or fuel system, these changes
may also be illegal. Our company will not take any responsibility for any of these chang-
es made.

Preface
Important Notice
Special Notice
Safety Information........................................................1
Safe Riding..................................................................1
Riding Gear.................................................................1
Helmet..........................................................................1
Riding in Rain..............................................................1
Motorcycle VIN Number...............................................2
Part Description...........................................................3
Speedometer................................................................4
Parts.............................................................................5
Key.................................................................5
Ignition Switch.................................................5
Left Handlebar Switch.....................................5
Right Handlebar Switch..................................6
Fuel Tank........................................................7
Shift Pedal.......................................................7
Rear Brake Pedal...........................................8
Side Stand......................................................8
Tool Kit............................................................8
Rear Shock Absorber......................................8
Mirrors.............................................................8
Gasoline and Engine Oil Information...........................9
Engine Break-In...........................................................9
Pre-ride Inspection.....................................................10
Riding your Motorcycle...............................................11
Starting the Engine.......................................11
Starting..........................................................11
Shifting Gears...............................................11
Riding Up Slopes..........................................11
Using the Brakes and Stopping....................11
Inspections and Maintenance....................................12
Maintenance Schedule.................................12
Engine Oil Change........................................14
Spark Plug....................................................15
Throttle Cable Adjustment............................15
Clutch Adjustment.........................................15
IdleAdjustment.............................................16
Throttle Body................................................16
Drive Chain...................................................16
Brakes...........................................................17
Tires..............................................................18
Seat..............................................................19
Air Filter Maintenance...................................19
Catalytic Converter.......................................20
Fuel Injection System...................................20
Parts Lubrication...........................................20
Battery...........................................................21
Fuse.............................................................22
Headlight.......................................................23
Bulb Replacement........................................23
Vehicle Storage Information.......................................24
Specication...............................................................25
Electrical Diagram......................................................26
Table of Contents

1
Safety information
Safety Regulations:
1. Before riding check over your vehicle, in
case of accident or damage parts.
2. The rider must posses a valid drivers
license, and do not allow those without a
drivers license to operate.
3. To avoid accidents with other drivers the
rider should:
• Wear bright colored clothes.
• DO NOT ride close to other vehicles.
4. Strictly obey trafc regulations, do not cut
in and out of trafc rapidly.
5.Most accidents are caused by speeding,
you should follow the speed limit at all times.
6. When making turns, use the turn signal
indicator.
7. Use caution when riding in parking lots,
the fast lane, and at intersections.
8. DO NOT modify your motorcycle or re-
move parts, it may effect it’s function or void
your warranty.
9. DO NOT add accessories that will affect
riding your motorcycle, DO NOT overload
electronic parts.
Clothing:
1. For safety reasons, the rider must wear
a helmet, glasses and boots, gloves and a
riding jacket/pants. A passenger should also
wear the same gear listed above.
2. While riding, the exhaust system will be
hot, DO NOT touch the exhaust system while
riding or after riding until it has cooled com-
pletely.
3. DO NOT wear loose tting clothing while
riding, it could become caught on the motor-
cycle leading to an accident.
Helmet:
It is extremely important to wear a good qual-
ity helmet and glasses/goggles if not a full
face helmet.
Riding in the rain:
Take special caution when riding in the rain,
the braking distances are two times longer
than dry riding.

2
Motorcycle VIN Number
Vehicle Identication Number (VIN) and the
engine number are used for registration of
your motorcycle. Please record your num-
bers for future use.
VIN Number is stamped into the vehicle
frame on the right side of the steering stem
(1). Engine Number is stamped on the lower
engine crankcase on the left side (2). Prod-
uct information label is on the vehicle frame
on the right side below the fuel tank (3).
VIN Number:__________________________
Engine Number:_______________________

3
Parts Description
(1) Left Mirror
(2) Clutch Lever
(3) Left Handlebar
Switch
(4) Ignition Switch
(5) Speedometer
(6) Right Handle-
bar Switch
(7) Right Mirror
(8) Front Brake Lever
(9) Throttle Grip
(10) Fuel Tank
(11) Oil Filler Cap
(12) Rear Brake
Pedal
(13) Front Footrest
(14) Rear Footrest
(15) Rear Brake
(16) Front Brake
(17) Side Stand
(18) Shifter Lever
(19) Seat Lock

4
• Speedometer
(1) Turning Signal Indicator
When the left turn signal is on, the left indicator
will ash.
When the right turn signal is on, the right indicator
will ash.
(2) Neutral Indicator
When the engine is in Neutral, the neutral indica-
tor light will be on.
(3) High Beam Indicator
When the high beam headlight is on, the high
beam indicator will be on.
(4) FI Indicator
When the ignition is switched on, the fuel injection
indicator will light up. The fuel pump will cycle for
3 seconds, after that the engine will start. When
the engine starts the F.I. indicator will shut off. If
the indicator remains on, there is a F.I. problem
present. Under normal operatation the indicator
should remain off. If the indicator remains on
while the engine is running, stop riding and have
the motorcycle inspected immediately.
(5) Speedo
This shows your driving speed.
(6) Odometer
This records the total driving distance.
(7) Gear Position Indicator
This indicates the gear postion.
(8) Fuel Gauge
This indicates the fuel volume in the fuel tank.

5
Parts
• Key
This vehicle comes with two
keys, both can be use to
start the motorcycle and
open all the locks. Please
keep one key in a safe place.
If you loose your key or need
another one, please contact your closest
dealer.
• Ignition Switch
“ ” position: To prevent theft, when you
park please use this handlebar lock function.
Turn the handlebars to the left, press down
the key and turn the key to “ “ position, it
will lock the handlebars. Then you can re-
move the key from the ignition switch.
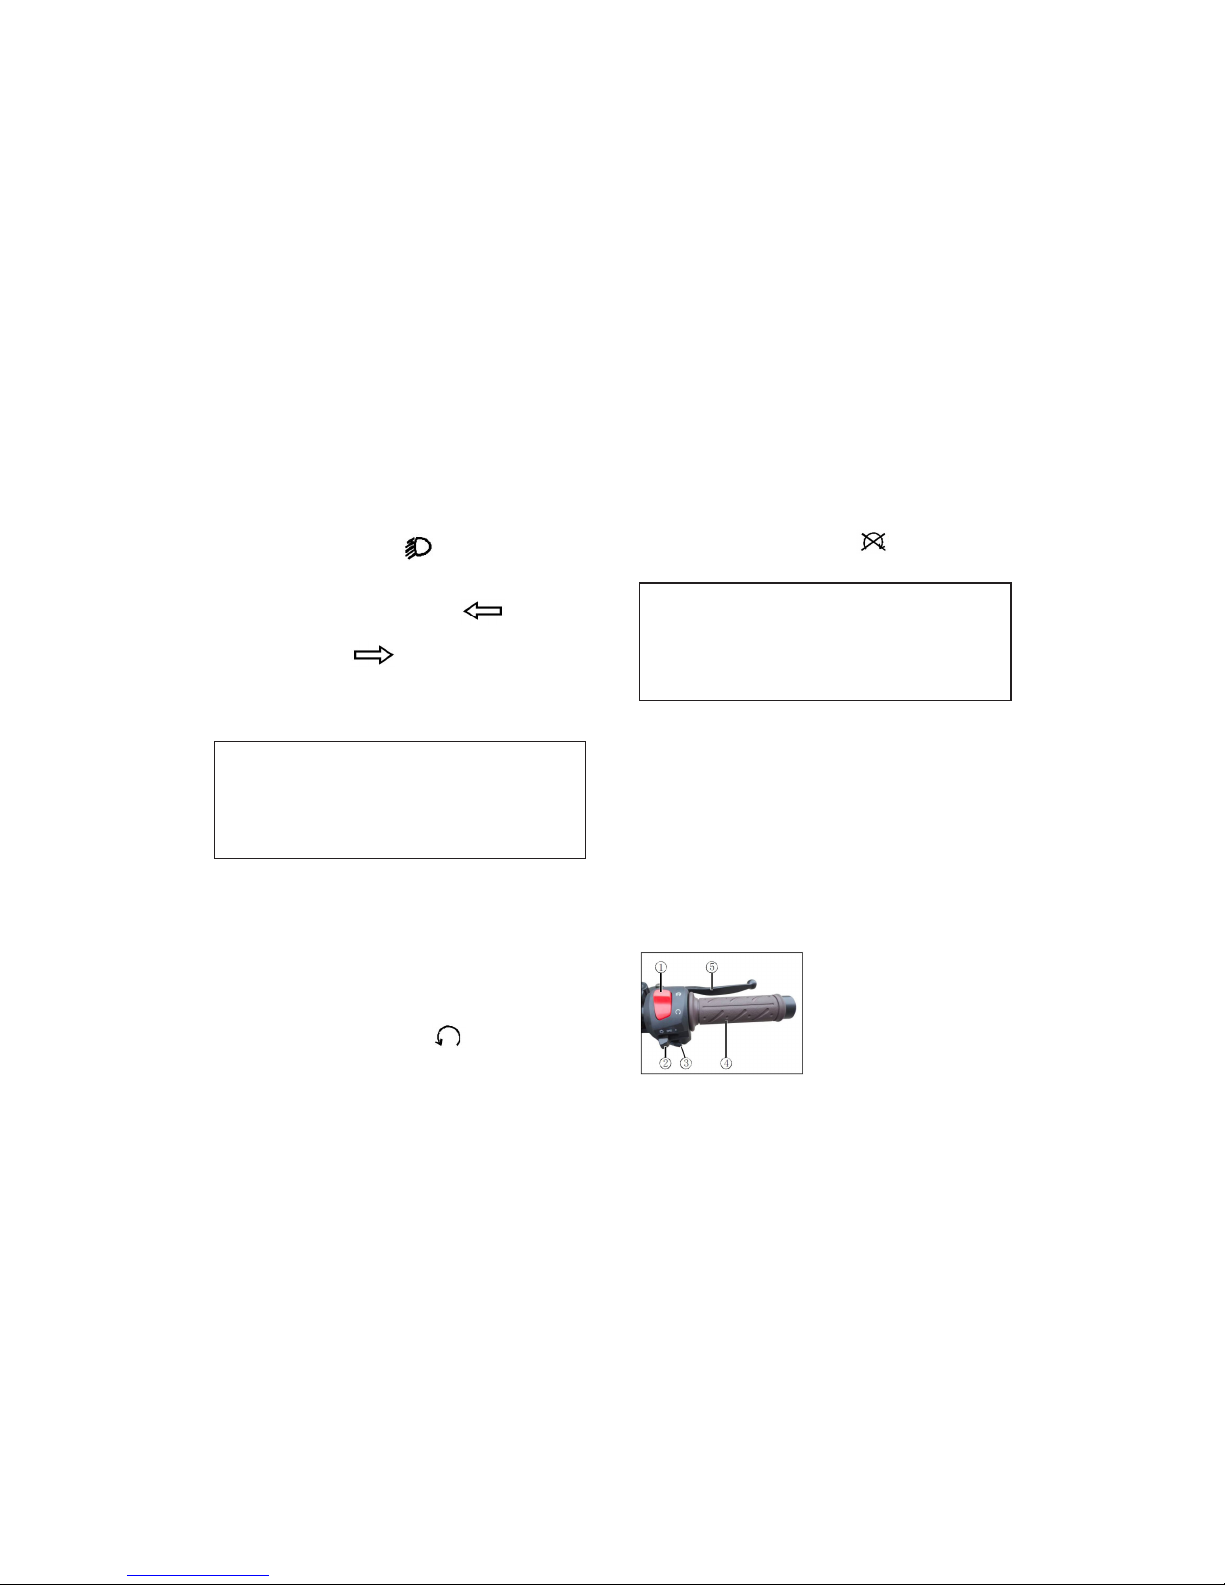
• Left Handlebar Switch
(1) Clutch Lever
When starting the engine
or shifting gears, please
grip clutch lever, it will
stop rear wheel spinning.
(2) Horn Button
When you press horn
button, the horn will sound.
(3) Hi / Low Beam Switch
when the switch is in “ “ position, the high
beam is on, and the speedo high beam indi-
cator light will be on as well.
Warning:
DO NOT turn off the key or remove it while riding,
otherwise you could loose control of the vehicle.
“ “ logo......when the key is on “ “
position, there is no power and cannot
start engine, the key can be removed
from the switch.
“ “ logo......when the key is on “ “
position, it has electrical power and the
engine can be started, the key cannot
be removed.
Notice:
When parking your motorcycle please lock
the handlebars and remove the key to pre-
vent theft. Always park the motorcycle in an
appropriate place.
6
When the switch is in “ “ position, the low
beam is on.
(4) Turn Signal Switch
Press the left side turn signal “ “ the left
side turn signal light will ash. Press right
side turn signal “ “ the right side turn
signal light will ash. To turn off the turn sig-
nal, please press the switch in, in the middle
position.
(5) Passing Light
When you press this button the headlight
high beam will ash. Use this only for pass-
ing or as a warning to other motorists.
• Right Handlebar Switch
(1) Engine Kill Switch
When this switch is in the “ “ position, the
engine can be started.
When the switch is in the “ “ position, the
engine cannot be started.
(2) Start Button
When you press this button, the engine will
start.
(3) Throttle Grip
The throttle grip controls the speed of the en-
gine. When you want to accelerate, turn the
grip toward the rear of the motorcycle.
(4) Front Brake Lever
When braking, please grip the right side lever
gradually.
Warning:
When changing lanes or turning, always
use the turn signal indicator. Shut off the
turn signal as soon as you have completed
your turn.
Warning:
Only use the Engine Kill Switch for emer-
gency situations. Don’t use this switch to
shut off the engine as it could lead to dam-
age to the catalytic converter.

7
• Fuel Tank
When the speedometer’s low fuel level
warnging light is on, please add gasoline
immediately.
First open the dust cover (1), then insert the
key and turn it clockwise, remove the key
with the fuel tank cap.
After lling with gasoline reinstall the fuel
tank cap, align the arrow with the front of the
fuel tank and press down until the key returns
to the removable position.
• Gear Shift Lever
This vehicle is equipped with an internal 5
speed transmission engine. Neutral is locat-
ed between rst and second gear. When you
shift gears, please follow the warnings.
Warning:
Please DO NOT overll the fuel tank. See
the maximum fuel level image and DO
NOT splash gasoline on the engine while
hot, it is very dangerous. Open ame is
prohibited when lling the fuel tank. If the
tank is overlled and the charcoal canister
is lled please contact your local dealer for
replacement. Gasoline contamination will
cause the charcoal canister to fail earlier.
Caution:
When the engine is in neutral, the neutral
indicator will light up. Please release the
clutch gradually to ensure that the trans-
mission is actually in neutral.
8
• Rear Brake Pedal
Press down on the rear
brake pedal (as pictured).
When the brake pedal is
operated, the taillight will
turn on.
• Side Stand
The side stand is on the left side of
the motorcycle, be sure to use the
stand when parking the vehicle.
• Tool Kit
The tool kit (1) is under the seat.
The tool kit includes a screw-
driver, screwdriver handle, and
a wrench.
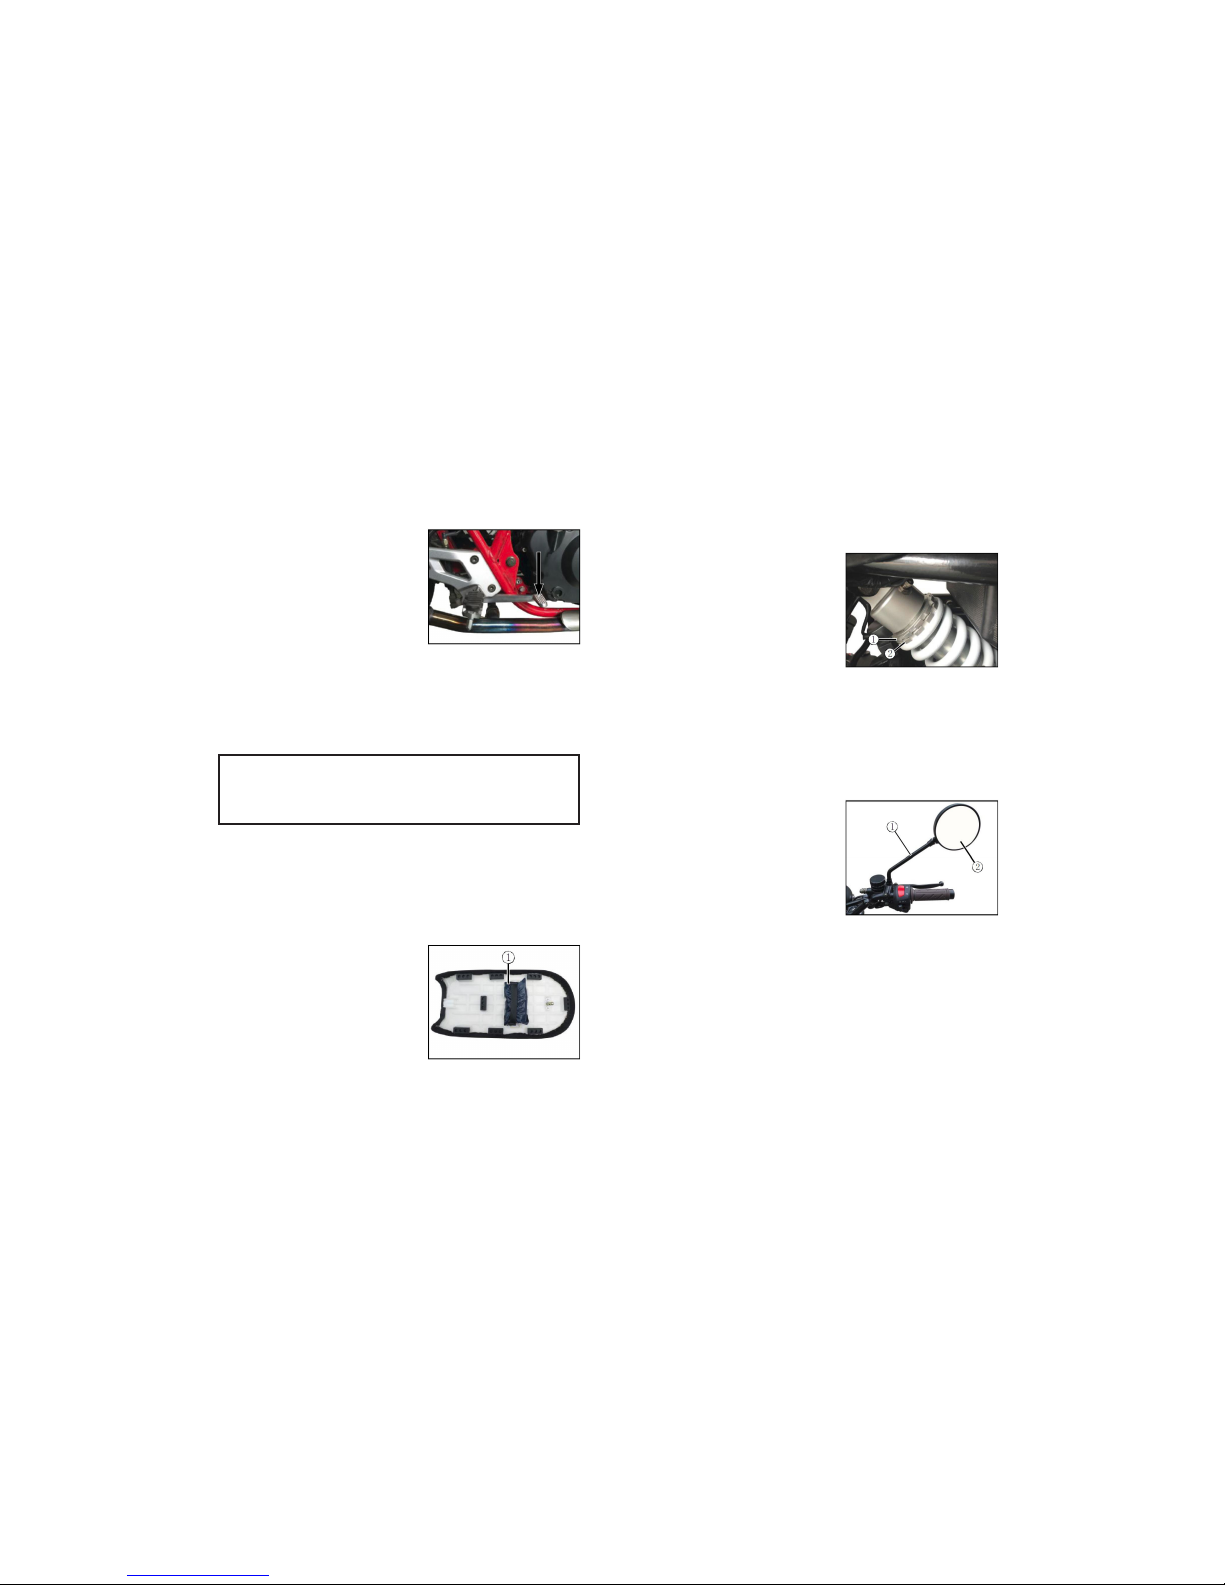
• Rear Shock Absorber
This vehicles rear shock
absorber includes a spring
and liquid dampening, the
shock absorber can be
adjusted according to
different road conditions.
To adjust, release the lock
nut (1) and loosen/tighten the adjustable lock-
ing ring (2) up or turn down, this will change
the spring pressure.
• Adjustable Mirrors
Turn the mirror (2) and
the mirror rod (1) to
adjust the angle of the
mirror.
Caution:
Don’t park your motorcycle on a slope,
otherwise your motorcycle may fall over.
9
Gasoline and Oil Information
• Gasoline
Please use unleaded gasoline. Please use
the octane of #91or above.
• Oil
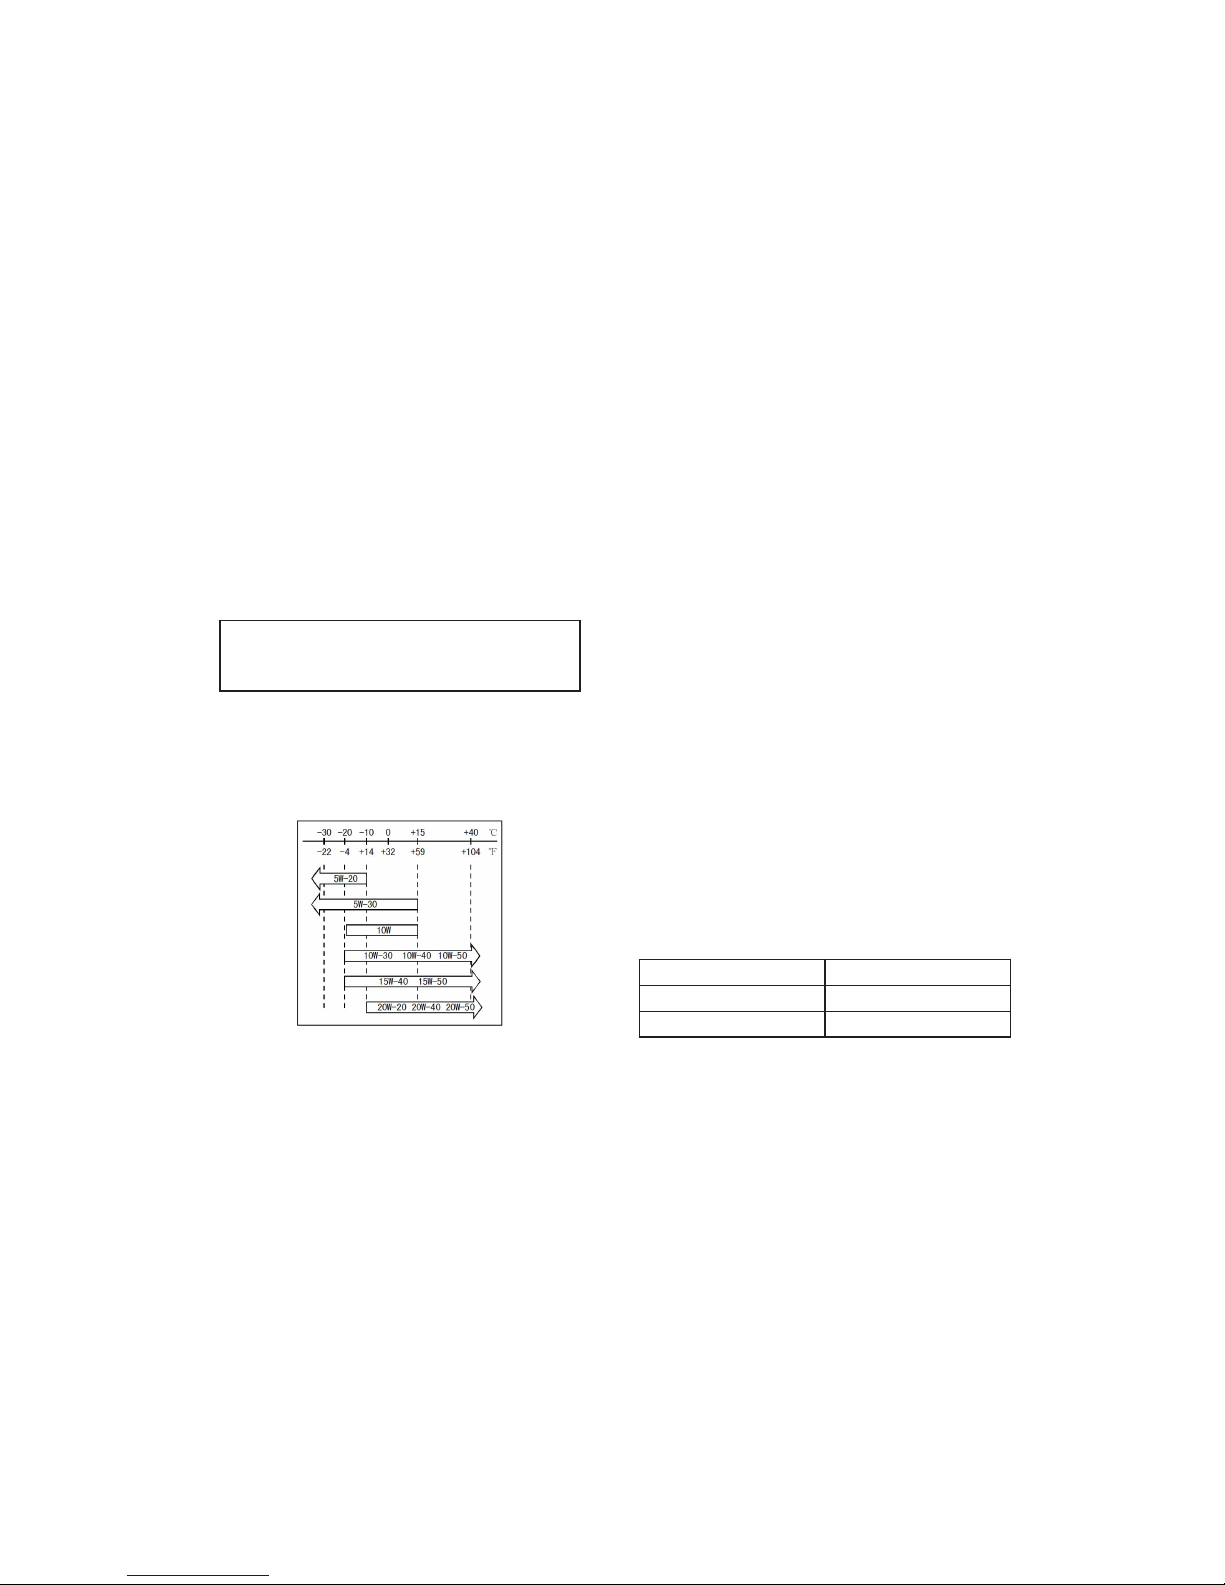
Please use SJ or above SJ grade engine oil.
Use the viscosity chart below to determine
the best viscosity for your region.
Engine Break-In
• Top speed
During the rst 1,000 miles of operation, do
not run the engine at high speed or accel-
erate too quickly. RPM’s should not exceed
80% of the maximum RPM.
• Engine speed change
Speed should always be variable, it should
change frequently, it helps the engine parts
to break-in smoothly.
• Avoid Long Distances at Low Speeds
To help prevent damage and to assist the
engine break-in period long distance travel
at low speeds should be avoided until the
engine is past the rst 1,000 miles of use.
The chart below shows the recommend-
ed maximum RPM’s during the break-in
period.
First 500 miles Under 5,000 RPM
First 1,000 miles Under 6,000 RPM
Over 1,000 miles Under 7,500 RPM
Caution:
Use only unleaded gasoline as this will
prolong the life of the spark plugs.
10
• Before Riding
Check the engine oil level before operating
your motorcycle every time.
• First Service Maintenance
The rst 600 mile maintenance is the most
important service to have performed. Please
tighten all hardware and change the oil.
• Special Notice
Once your motorcycle has 200 miles on it
return to the dealership for oil and lter re-
placement. Then after 600 miles return to the
dealership for oil and lter replacement and
air lter cleaning. After the 600 mile service
the next oil change will be done at 3,000
miles or one year, whichever comes rst.
Check engine oil level frequently.
• Before Riding
Before riding check the items in the chart to
the right.
Item Checks Points
Handlebar
1) Stable
2) Turning Flexibility
3) Not Loose
Brakes 1) Brakes feel rm
2) No Fluid Leaks
Tires
1) Air Pressure Correct
2) Check Tire Wear
3) No Cracks or Damage
Fuel Enough for planned travel
Lights Turn Off / On all lights
Indicators
Check high-beam, neutral
light, and turn signal indica-
tors
Horn Check Function
Oil Level is Correct
Throttle 1) Rotates Freely
2) Engine Accelerates
Clutch Check Function
Drive Chain 1) Correct Adjustment
2) Lubrication
Caution:
600 mile maintenance should be per-
formed according to this manual. Please
pay special attention to the “Caution” and
“Warning” notes.

11
Riding your Motorcycle
• Engine Starting
Please turn the key to “ “ position, if in
neutral gear, the indicator will be on.
• Start
Pull in the clutch lever, press down gear shift
lever into rst gear. Turn throttle grip a little
bit rearward and slowly and smoothly release
the clutch, the motorcycle will start to move.
• Shifting Gears
The rider should change gears according to
riding speed.
• Riding on Inclines
When riding up an incline, the motorcycle
speed will decrease and may stall. When this
happens, down-shift the transmission to get
more torque.
• Using the Brakes and Parking
You should completely close the throttle and
gradually apply the front and rear brakes.
Before reaching a complete stop, pull in the
clutch lever and shift gears into the neutral
position. Check the gear indicator to make
sure the transmission is in neutral.
Your motorcycle should be parked on at
ground. If your motorcycle must be parked
on an incline, please put your motorcycle in
rst gear and angle the front wheel into the
curb to keep it from rolling.
Caution:
New riders tend to use only rear brake,
this will cause the rear brakes to wear out
rapidly and will make braking distances
too long.
Warning:
Only using the front or rear brakes is dan-
gerous, especially in wet conditions. This
can cause loss of control. Always apply
both brakes evenly. DO NOT brake sud-
denly as this may cause wheel lock up and
skidding.

12
Maintenance
The follow chart shows the maintenance schedule. When each service interval is reached
you must perform the services outlined below. Suspension, Engine, Electronic System, Fuel
Injection and Tires are key components. These items may require a professional technician to
perform.
Maintenance Symbols: I: Inspect/Adjust C: Clean R: Replace A: Adjust L: Lubricate T: Torque

13
* When the mileage exceeds the highest mileage on the table, please restart the table at the
600 mile interval.
* If riding in a dusty environment clean the air lter and chain more frequently.

14
• Oil Change and Oil Level Check
Check the engine oil level
before you start the engine.
When checking the oil level,
make sure the vehicle is on
at ground. Look through
the oil window to check if
the oil is between the L and H
marks. If the oil level is lower than the L
mark, remove the oil ller plug (1) and add oil
until the level reaches the H mark.
The engine oil capacity is 1.6 liters.
1. When draining the oil,
please place an oil pan
under the drain hole, and
then remove the drain plug
(1). When completely
drained reinstall the oil drain bolt.
Torque the bolt to 20-25 Nm.
Follow these steps to clean the oil lter.
(1.) Use a wrench to remove the oil lter cap.
(2.) Using clean dry rag to clean the oil lter
cap and engine surface. In the meantime
clean the oil lter screen (3).
(3.) Using a new or cleaned oil lter screen,
put some oil on the cap o-ring (A).
(4.) Reinstall the oil screen cap and torque it
to 15-20 Nm.
2. Add 1.6 liters of oil into the engine, until
the oil level reaches to the maximum H mark.
3. Reinstall the oil ller cap.
4. Start the engine and allow the engine to
idle for few minutes then turn off the engine.
5. Use the window to check the oil level.
Make sure it’s at the H mark and not leaking.
Caution:
The best time to change the oil is when the
engine is warm. The motorcycle should be
supported vertically by a rear stand so that
the warm oil will exit the engine quickly.
Caution:
Replace the oil screen cap o-ring and the
oil drain bolt crush washer every time you
change the oil to avoid oil leakage.

15
• Spark Plug
Use a small wire brush
or a spark plug cleaner to
clean the carbon deposits
from the plug in the rst 600
miles of use and after every
2,600 mi of riding. Every
5,000 miles, the spark plugs
should be replaced.
• Throttle Cable Adjustment
1. Turn the throttle grip to check if it reacts
quickly or not.
2. Please check the throttle cable play, it
should have 10° to 15° of freeplay at the
handlebar grip.
Steel throttle cables. (A) throttle pull cable
(B) throttle push cable. Please follow these
steps to adjust the throttle
grip travel distance.
1. Pull back the throttle
cable cover.
2. Loosen the nut (3).
3. Adjust the screw (4).
4. Loosen the other nut (1).
5. Turn the adjustment screw (2) to allow for
10° ~ 15° of travel.
6. Tighten the nut (1).
7. Adjust screw (4) to allow freeplay.
8. Tighten the nut (3).
• Clutch Adjustment
Clutch lever freeplay should be around 10-
20mm, if incorrect please follow these steps
to adjust:
1. Move clutch cable cover
2. Loosen the lock nut (1).
3. Loosen or tighten the adjustment screw
(2), until you reach the proper adjustment.
4. Tighten the lock nut (1).
Caution:
DO NOT over torque the spark plugs. Over
torque could lead to cylinder head thread
damage.
Table of contents
Other SSR Motorcycle manuals


