SSV eSOM/SK4 User manual

eSOM
/
SK
4
eSOM/
3517
Embedded Linux Starter Kit
First Steps
SSV Embedded Systems
Dünenweg 5
D-30419 Hannover
Phone: +49 (0)511/40 000-0
Fax: +49 (0)511/40 000-40
E-mail: sales@ssv-embedded.de Document Revision: 1.0
Date: 2012-01-20
F
OR FURTHER INFORMATION REGARDING OUR PRODUCTS PLEASE VISIT US AT WWW
.
SSV
-
EMBEDDED
.
DE

eSOM/SK4 eSOM/3517 - First Steps
2
Manual Revision 1.0
CONTENT
1INTRODUCTION...............................................................................................................3
1.1 Safety Guidelines...................................................................................................................3
1.2 Conventions...........................................................................................................................3
1.3 Features and Technical Data..................................................................................................4
2GETTING STARTED.........................................................................................................5
2.1 Serial Link between eSOM/EVA2-SV1 and PC ...................................................................5
2.2 Ethernet Link between eSOM/EVA2-SV1 and PC...............................................................6
2.3 Connecting Power Supply and Power-up the Starter Kit............................................................7
2.4 Using Serial Link with Terminal Program ............................................................................8
2.5 Power-up eSOM/3517 with RCM disabled...........................................................................9
2.6 Power-up eSOM/3517 with RCM enabled..........................................................................10
2.7 eSOM/3517 Linux File System ...........................................................................................12
2.8 Checking IP Address of PC.................................................................................................13
2.9 Checking Ethernet-based TCP/IP Communication .............................................................14
2.10 Using a Telnet Connection ..................................................................................................15
2.11 Checking FTP Server...........................................................................................................16
2.12 Checking TFTP Client.........................................................................................................17
2.13 Checking HTTP Server........................................................................................................18
2.14 Changing Ex Factory IP Address ........................................................................................19
3HELPFUL LITERATURE.................................................................................................21
CONTACT..............................................................................................................................21
DOCUMENT HISTORY .........................................................................................................21

eSOM/SK4 eSOM/3517 - First Steps
Manual Revision 1.0
3
1 INTRODUCTION
The Starter Kit eSOM/SK4 contains everything you need to get started with your embedded
networking application. The Starter Kit includes an eSOM/3517 module with a pre-installed
U-Boot boot loader and an embedded Linux, the Evaluation Board eSOM/EVA2-SV1,
power supply, serial interface (null modem) cable, a CD-ROM with software and documen-
tation and a printed user manual for the first steps with the Starter Kit.
The Starter Kit CD-ROM comes with a full GNU cross tool chain for C/C++ software de-
velopment. The binary files of this pre-build tool chain run on an x86 Linux based host
(SuSE, Red Hat or other).
For using the eSOM/SK4 Embedded Linux Starter Kit you need a development system. The
minimal configuration for this system is a Windows based PC with the HyperTerminal ter-
minal emulation program and a free COM port (COM1, COM2 or USB based COMx) for
the RS232 serial link between the eSOM/3517 and HyperTerminal.
For using the Ethernet link, your PC needs an Ethernet adapter with 10 Mbps or
10/100 Mbps LAN interface. This environment allows Web server programming (HTML
pages, Java applets) and Linux shell script programming. For using the GNU C/C++ cross
tool chain, it is necessary to run Linux on the development system.
1.1 Safety Guidelines
Please read the following safety guidelines carefully! In case of property or personal
damage by not paying attention to this document and/or by incorrect handling, we do
not assume liability. In such cases any warranty claim expires.
ATTENTION: Observe precautions for handling – electrostatic sensitive device!
•Discharge yourself before you work with the device, e.g. by touching a heater of
metal, to avoid damages.
•Stay grounded while working with the device to avoid damage through electrostatic
discharge.
1.2 Conventions
Convention Usage
bold
Important terms
italic
User inputs and other specials
monospace Pathnames, internet addresses and program code
Table 1: Conventions used in this Document

eSOM/SK4 eSOM/3517 - First Steps
4
Manual Revision 1.0
1.3 Features and Technical Data
The eSOM/SK4 comes with a pre-installed U-Boot boot loader and an Embedded Linux op-
erating system. The eSOM/3517 Linux consists of two main components: 1. the Linux ker-
nel and 2. the root file system.
The eSOM/3517 U-Boot boot loader allows the downloading of new Linux kernel versions
and root file systems to the eSOM/3517 RAM and Flash. This in-system programming fea-
ture can be used by a simple serial and Ethernet link between the development system and
the eSOM/3517.
•eSOM/3517 with Texas Instruments AM3517 32-bit ARM Cortex-A8 SoC @ 600 MHz
•256 MB DDR2 SDRAM
•1 GB NAND Flash memory for O/S boot image and data files
•8 MB NOR Flash memory
•U-Boot boot loader and Embedded Linux pre-installed in Flash memory
•Evaluation Board eSOM/EVA2-SV1
•Null modem cable
•110 VAC or 230 VAC to 5 VDC international power supply
•CD-ROM with user manual and hardware/programmers manuals
•Embedded Linux with source
•GNU cross tool chain for C/C++ software development for Linux-based PCs
•GNU gdb and gdbserver for Ethernet-based remote debugging
•Linux remote login with Telnet
•Web server setup sample
•FTP server setup sample
•TFTP client setup sample
•Many source code samples
eSOM/SK4 eSOM/3517 - First Steps
Manual Revision 1.0
5
2 GETTING STARTED
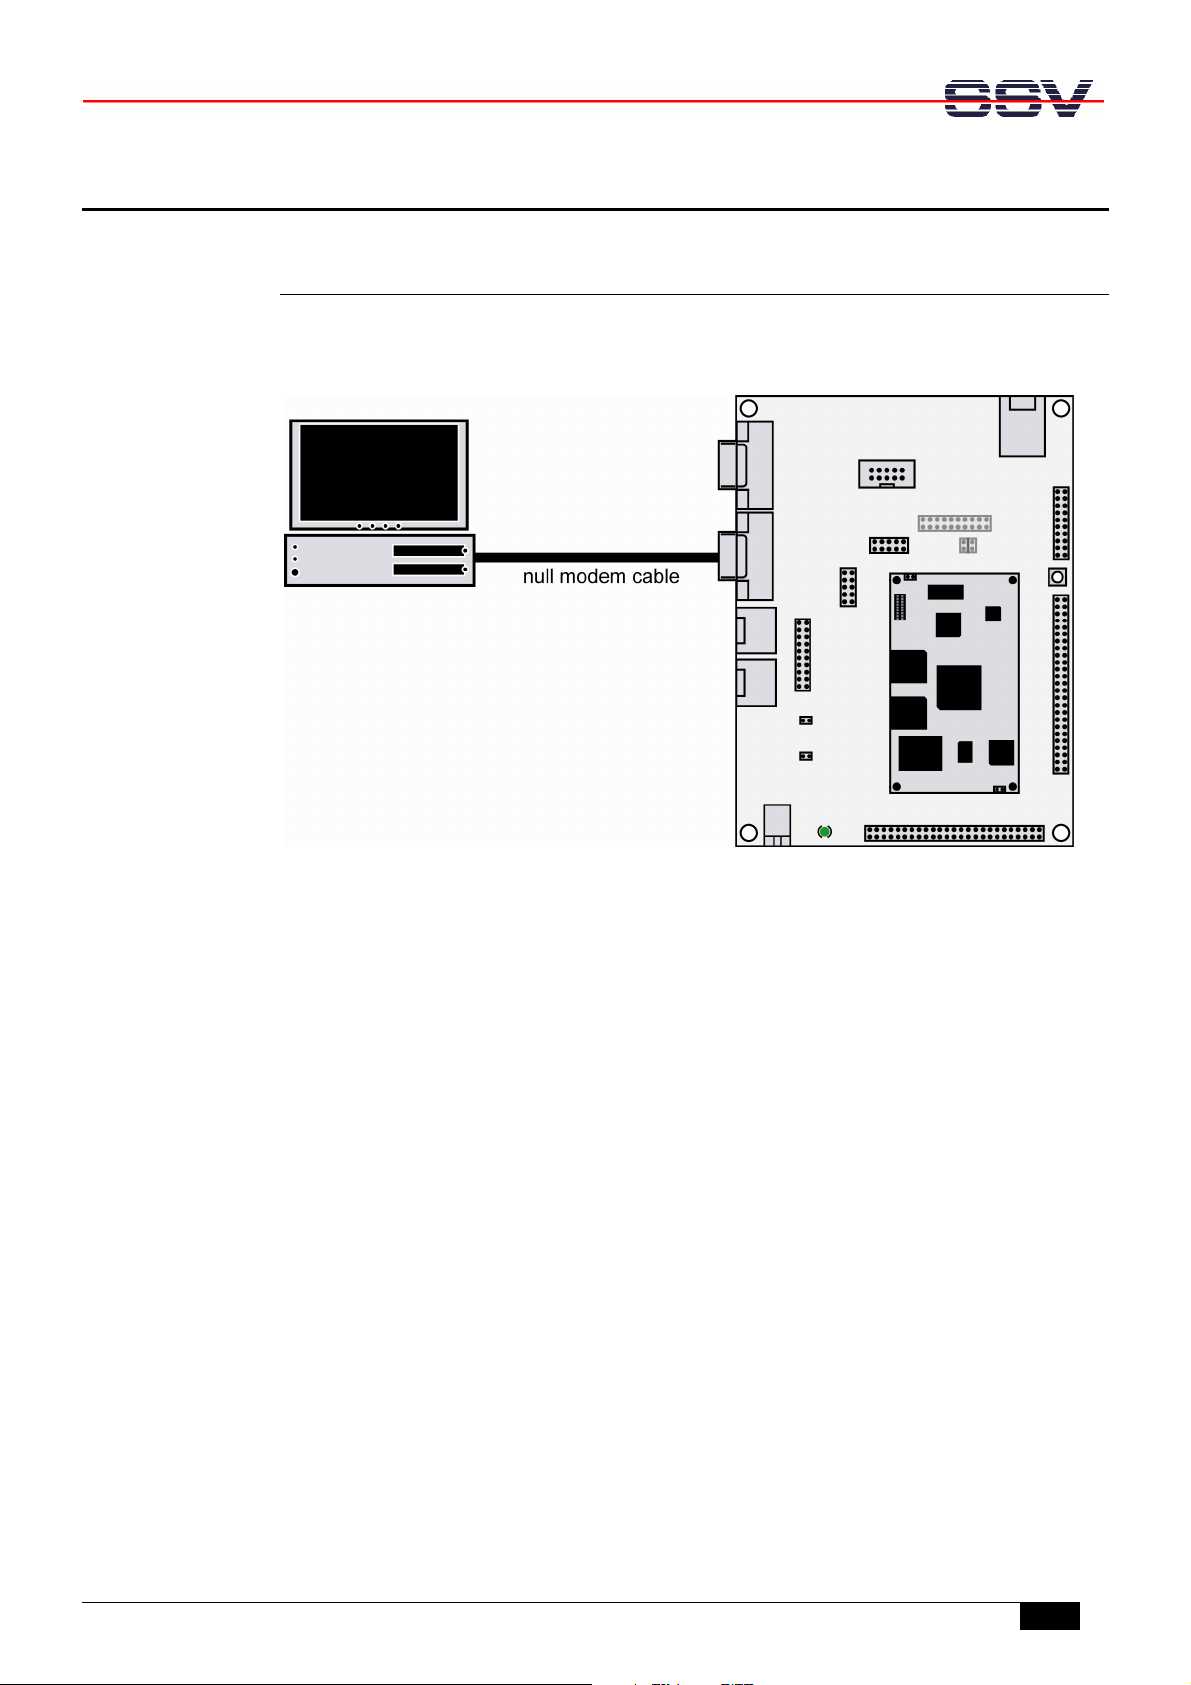
2.1 Serial Link between eSOM/EVA2-SV1 and PC
Setup the serial link between the Evaluation Board eSOM/EVA2-SV1 and your PC. Use a
null modem cable for this connection.
Figure 1: Serial link between eSOM/EVA2-SV1 and PC
Connect one end of the null modem cable with an unused COM port of your PC. Make sure
that this PC COM port supports 115.200 bps.
eSOM/SK4 eSOM/3517 - First Steps
6
Manual Revision 1.0
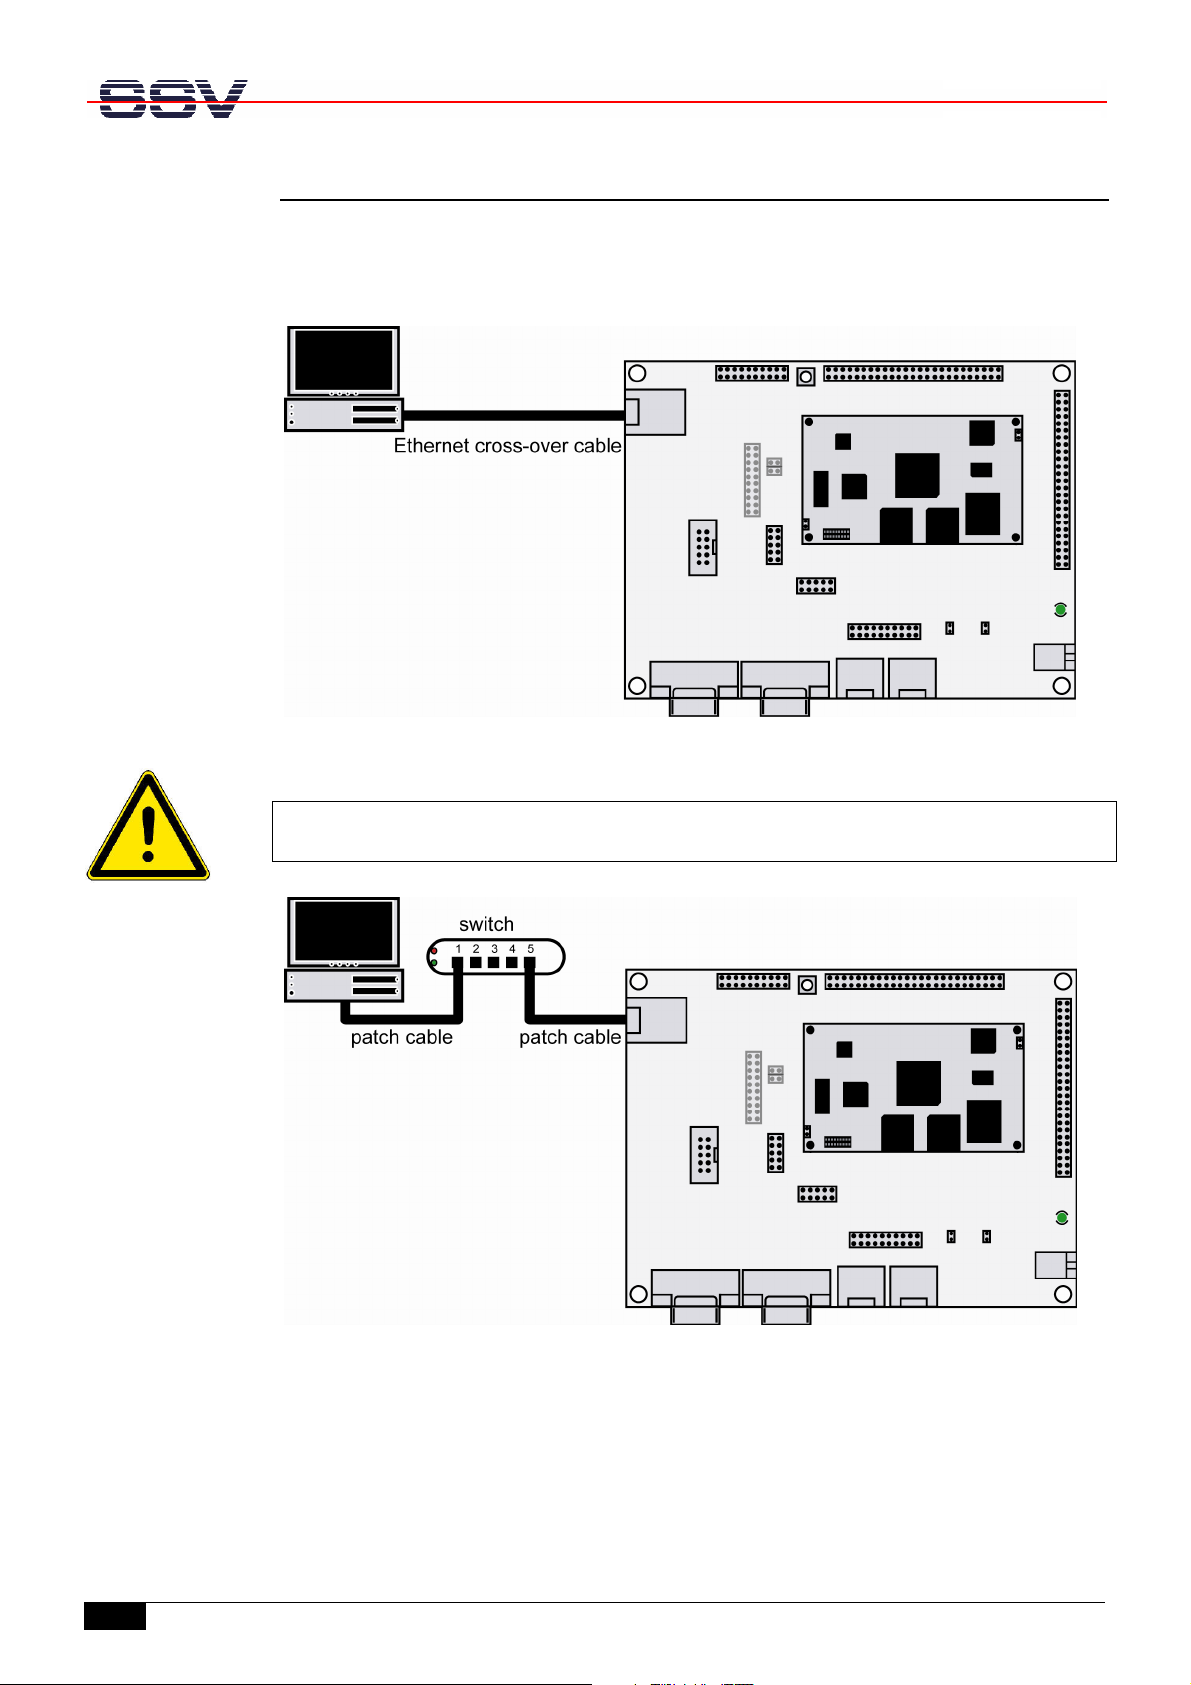
2.2 Ethernet Link between eSOM/EVA2-SV1 and PC
Setup the Ethernet LAN link between the Evaluation Board eSOM/EVA2-SV1 and your PC.
Use an Ethernet cross-over cable or a switch-based infrastructure with two Ethernet patch
cables for the LAN connection.
Figure 2: Ethernet link between eSOM/EVA2-SV1 and PC
Please note: The eSOM/3517 comes with the default IP address 192.168.0.126.
Please make sure that your PC can work with the IP address range 192.168.0.x.
Figure 3: Switch-based Ethernet link between eSOM/EVA2-SV1 and PC
eSOM/SK4 eSOM/3517 - First Steps
Manual Revision 1.0
7
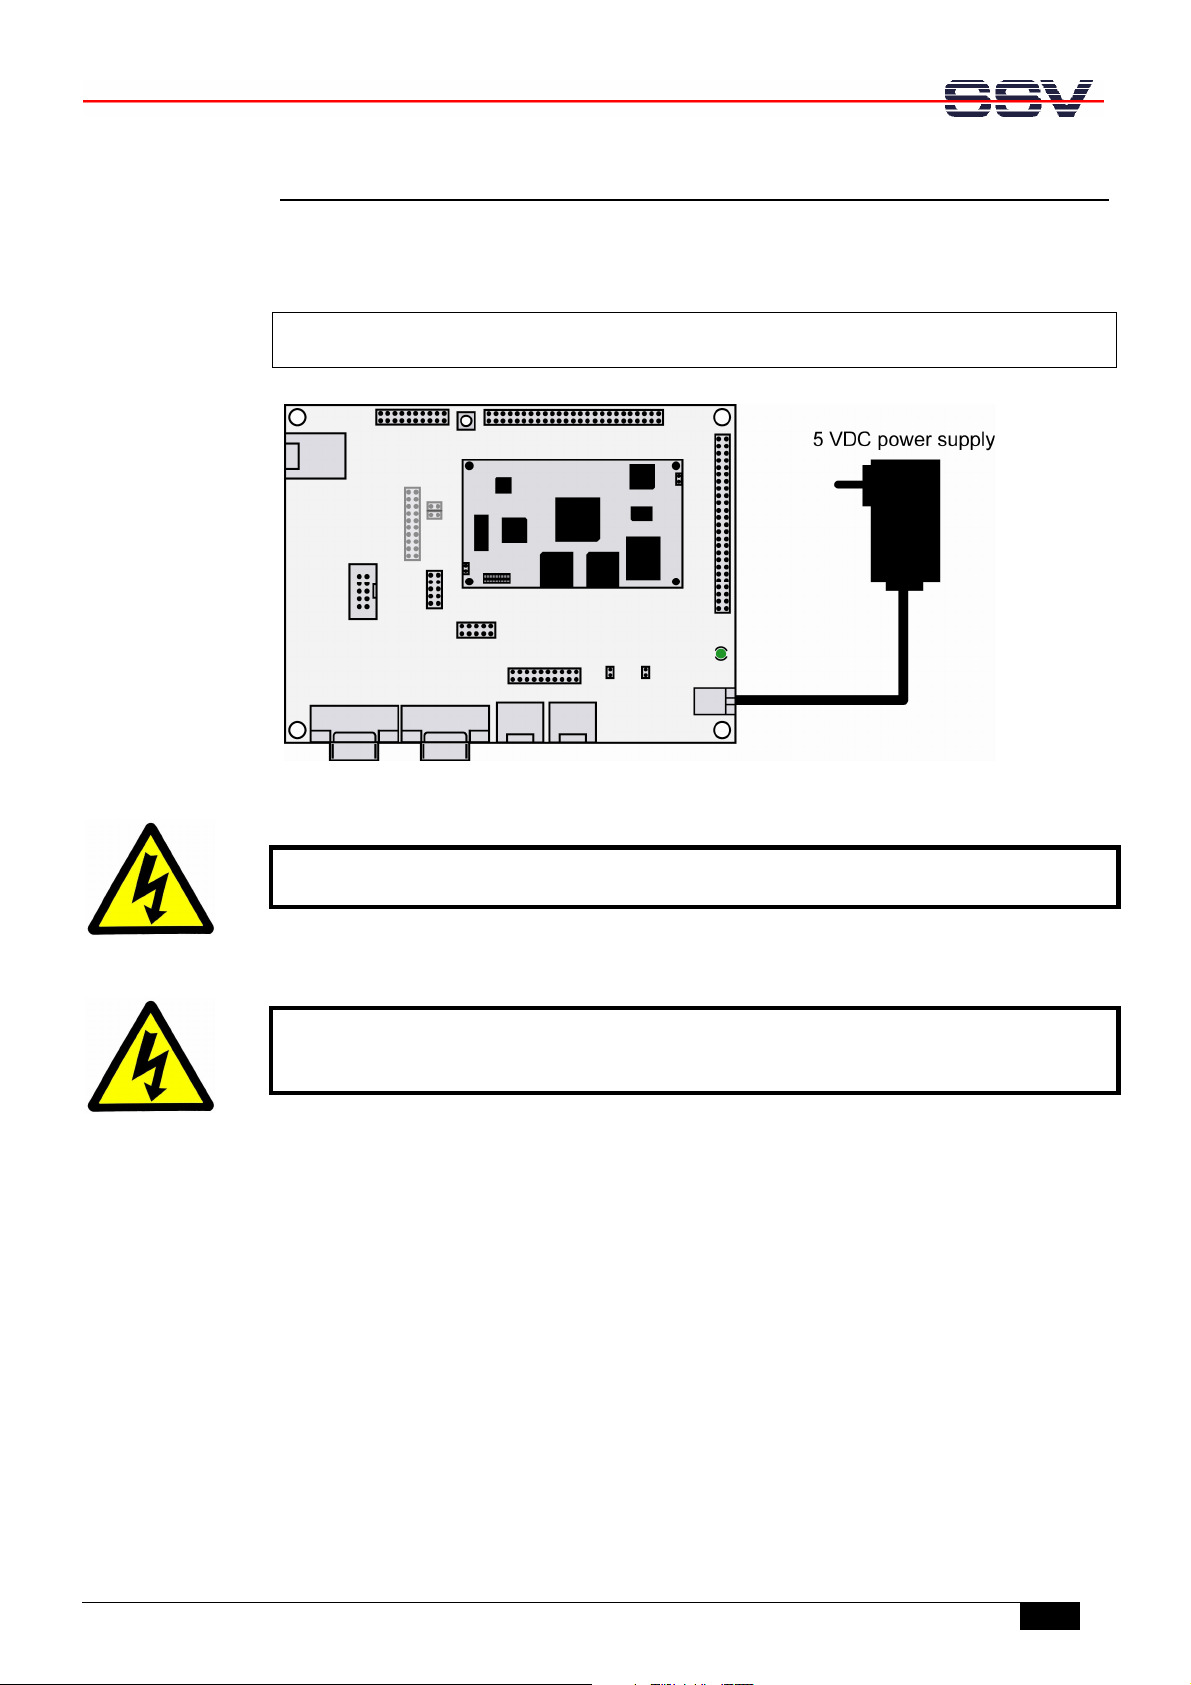
2.3 Connecting Power Supply and Power-up the Starter Kit
Connect the 5 VDC power supply with the barrel plug with the Evaluation Board
eSOM/EVA2-SV1.
Please note: Make sure that all cable connections are OK. Then power-up the Starter
Kit.
Figure 4: Power supply for the eSOM/EVA2-SV1
CAUTION: Providing the eSOM/EVA2-SV1 with a voltage higher than the regular 5 VDC
±5% could resolve in damaged board components!
CAUTION: Do NOT turn on the power supply before it is connected with the
eSOM/EVA2-SV1. This could cause damaged board components! First connect the board
with the power supply and THEN turn the power supply on.

eSOM/SK4 eSOM/3517 - First Steps
8
Manual Revision 1.0
2.4 Using Serial Link with Terminal Program
Run HyperTerminal on your Windows-PC, minicom or a similar simple terminal emulation
program on your Linux-based PC.
Figure 5: Direct connection setup with HyperTerminal
Setup a direct connection with the parameters of table 2. Make sure, that the PC COM port
supports 115.200 bps.
Figure 6: Parameter setup with HyperTerminal
Parameter Value
Speed 115.200 bps
Data Bits 8
Parity None
Stop Bits 1
Protocol No (Xon/Xoff, RTS/CTS or similar)
Table 2: Setup parameters for the serial link

eSOM/SK4 eSOM/3517 - First Steps
Manual Revision 1.0
9
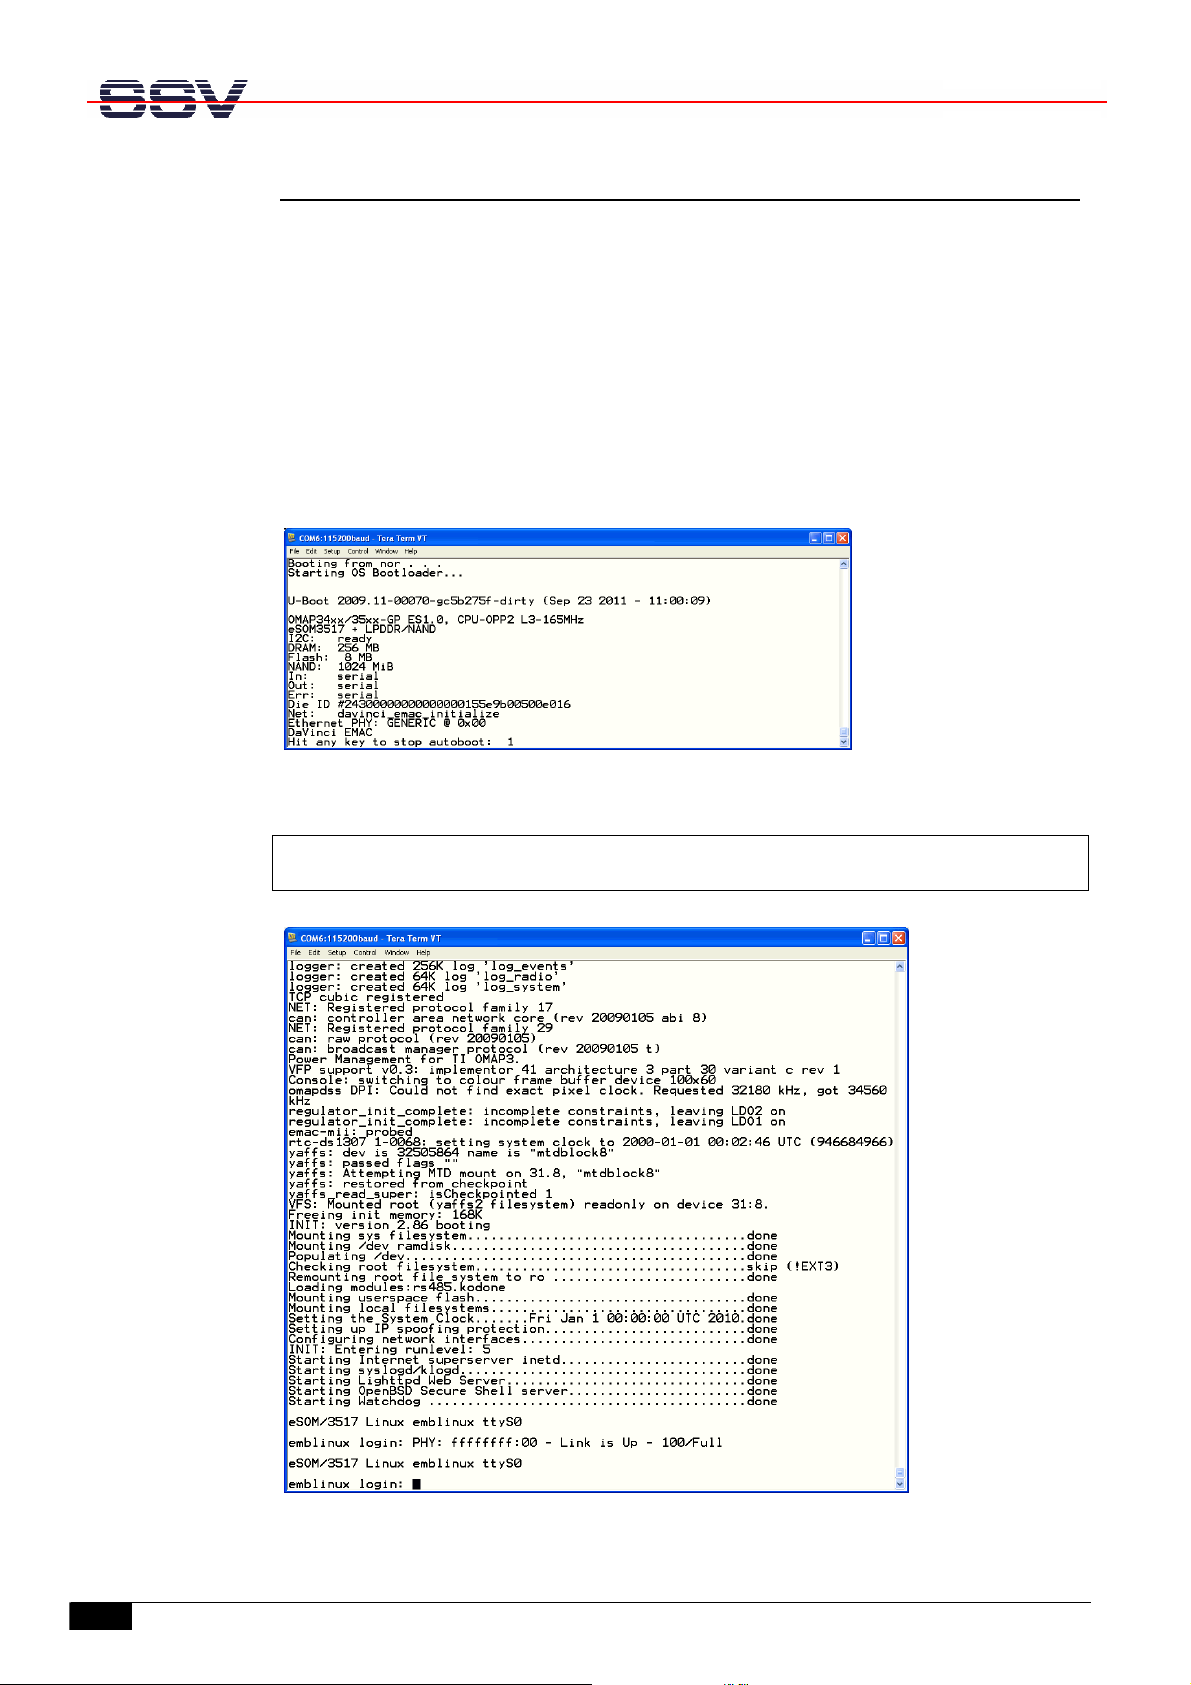
2.5 Power-up eSOM/3517 with RCM disabled
After power-up the eSOM/3517 starts an automatic boot process from the on-board flash
memory chip. This process consists of two steps:
1. Directly after power-up, the eSOM/3517 runs the U-Boot boot loader program
for some milliseconds. U-Boot initializes the hardware components (hardware
init). With RCM disabled (please see the eSOM/3517 hardware reference man-
ual for details), there is no U-Boot text message output over the eSOM/3517
COM1 serial interface and no boot delay-based
1
wait period. Direct after the
hardware init, the U-Boot boot loader starts the Linux OS image.
2. Linux takes control over the eSOM/3517 hardware and runs all necessary proc-
esses for coming up to live.
Figure 7: Linux booting process with HyperTerminal
Please note: The U-Boot environment variable boot delay does not influence the
eSOM/3517 boot process with RCM (Remote Console Mode) disabled.
The eSOM/3517 Linux supports a serial console. It allows running a Linux-based system
in a headless configuration without a monitor or keyboard. Wait until the Linux boot pro-
cess finishes. Please use the username root and the password root. Then press Enter.
“boot delay” is a U-Boot environment variable. The value defines a wait time before
U-Boot starts the Linux operating system.
eSOM/SK4 eSOM/3517 - First Steps
10
Manual Revision 1.0
2.6 Power-up eSOM/3517 with RCM enabled
The eSOM/3517 boot sequence with RCM enabled is similar to the boot procedure with
RCM disabled. Only the first step is different:
1. The eSOM/3517 runs the U-Boot boot loader program. This software shows a
wait message over the eSOM/3517 COM1 serial interface if RCM is enabled
(please see the eSOM/3517 hardware reference manual for details). It is possible
to interrupt the boot process and switch to the U-Boot command line interface.
Just hit a key of your terminal emulation program.
2. Without interruption the U-Boot boot loader starts a Linux OS image after the
wait period from the eSOM/3517 Flash memory.
Figure 8: U-Boot wait message
Please note: The U-Boot command line interface allows changing the wait time of
the first step. Please see the U-Boot environment variable boot delay for details.
Figure 9: Linux booting process after the U-Boot boot delay

eSOM/SK4 eSOM/3517 - First Steps
Manual Revision 1.0
11
Figure 10: After a login the serial console offers a Linux command line interface
Wait until the Linux boot process finishes. Please use the username root and the pass-
word root. Then press Enter.

eSOM/SK4 eSOM/3517 - First Steps
12
Manual Revision 1.0
2.7 eSOM/3517 Linux File System
After booting the eSOM/SK4 all directories in the root file system are read-only. There
are only three exceptions, which are shown in the following table:
Directory Remark
/flash
R/W directory, non-volatile memory within Flash
/home/root
R/W directory, RAM disk, volatile memory
/var/volatile
R/W directory, RAM disk, volatile memory
Table 3: R/W directories in the file system
The read-only restriction protects all files of the file system. Under ordinary operating
conditions it is not possible to overwrite or delete a file which is necessary for the
eSOM/3517. To disable the write protection just login with the username root and the
password root and enter the following command:
mount / -o remount,rw
This command „mounts„ the file system as read/write. All files are now writable and de-
letable. Please pay attention not to damage important system files! With the command
mount / -o remount,ro
the system is set to the read-only initial condition after the boot process.
Figure 11: Disabling the write protection with the mount command

eSOM/SK4 eSOM/3517 - First Steps
Manual Revision 1.0
13
2.8 Checking IP Address of PC
Make sure that your PC is using the right IP address for the Ethernet-based TCP/IP com-
munication with the eSOM/3517.
Please use 192.168.0.1 or 192.168.0.254 for your PC and 192.168.0.126
for the eSOM/3517.
Figure 12: Windows-PC IP address check with ipconfig
Talk to your network administrator if you have problems with the IP address understand-
ing.
Please note: To change the ex factory IP address 192.168.0.126 of the
eSOM/3517 please refer to chapter 2.14.

eSOM/SK4 eSOM/3517 - First Steps
14
Manual Revision 1.0
2.9 Checking Ethernet-based TCP/IP Communication
Check the Ethernet-based TCP/IP communication between the eSOM/3517 and the PC
with a simple ping command.
Figure 13: Windows-PC TCP/IP communication check with ping
First check the cable connections and then the IP addresses if your ping does not work.
Then check the TCP/IP setup of your PC.

eSOM/SK4 eSOM/3517 - First Steps
Manual Revision 1.0
15
2.10 Using a Telnet Connection
Run a Telnet client program on your PC with the IP address of the eSOM/3517. You can use
a Telnet session for remote entering Linux commands.
Figure 14: Run the Windows Telnet client program
Wait until the eSOM/3517 Linux requests a user name. Please use the login name root and
the password root. Then press Enter.
Please note: The eSOM/3517 Linux comes with BusyBox. All Linux command line
commands are implemented in BusyBox. BusyBox combines tiny versions of many
common UNIX utilities into a single small executable. It provides replacements for
most of the utilities you usually find in GNU fileutils, shellutils, etc. The utilities in
BusyBox generally have fewer options than their full-featured GNU cousins; how-
ever, the options that are included provide the expected functionality and behave
very much like their GNU counterparts. BusyBox provides a fairly complete envi-
ronment for any small or embedded system.
Figure 15: Using Linux commands within a Telnet client window
eSOM/SK4 eSOM/3517 - First Steps
16
Manual Revision 1.0
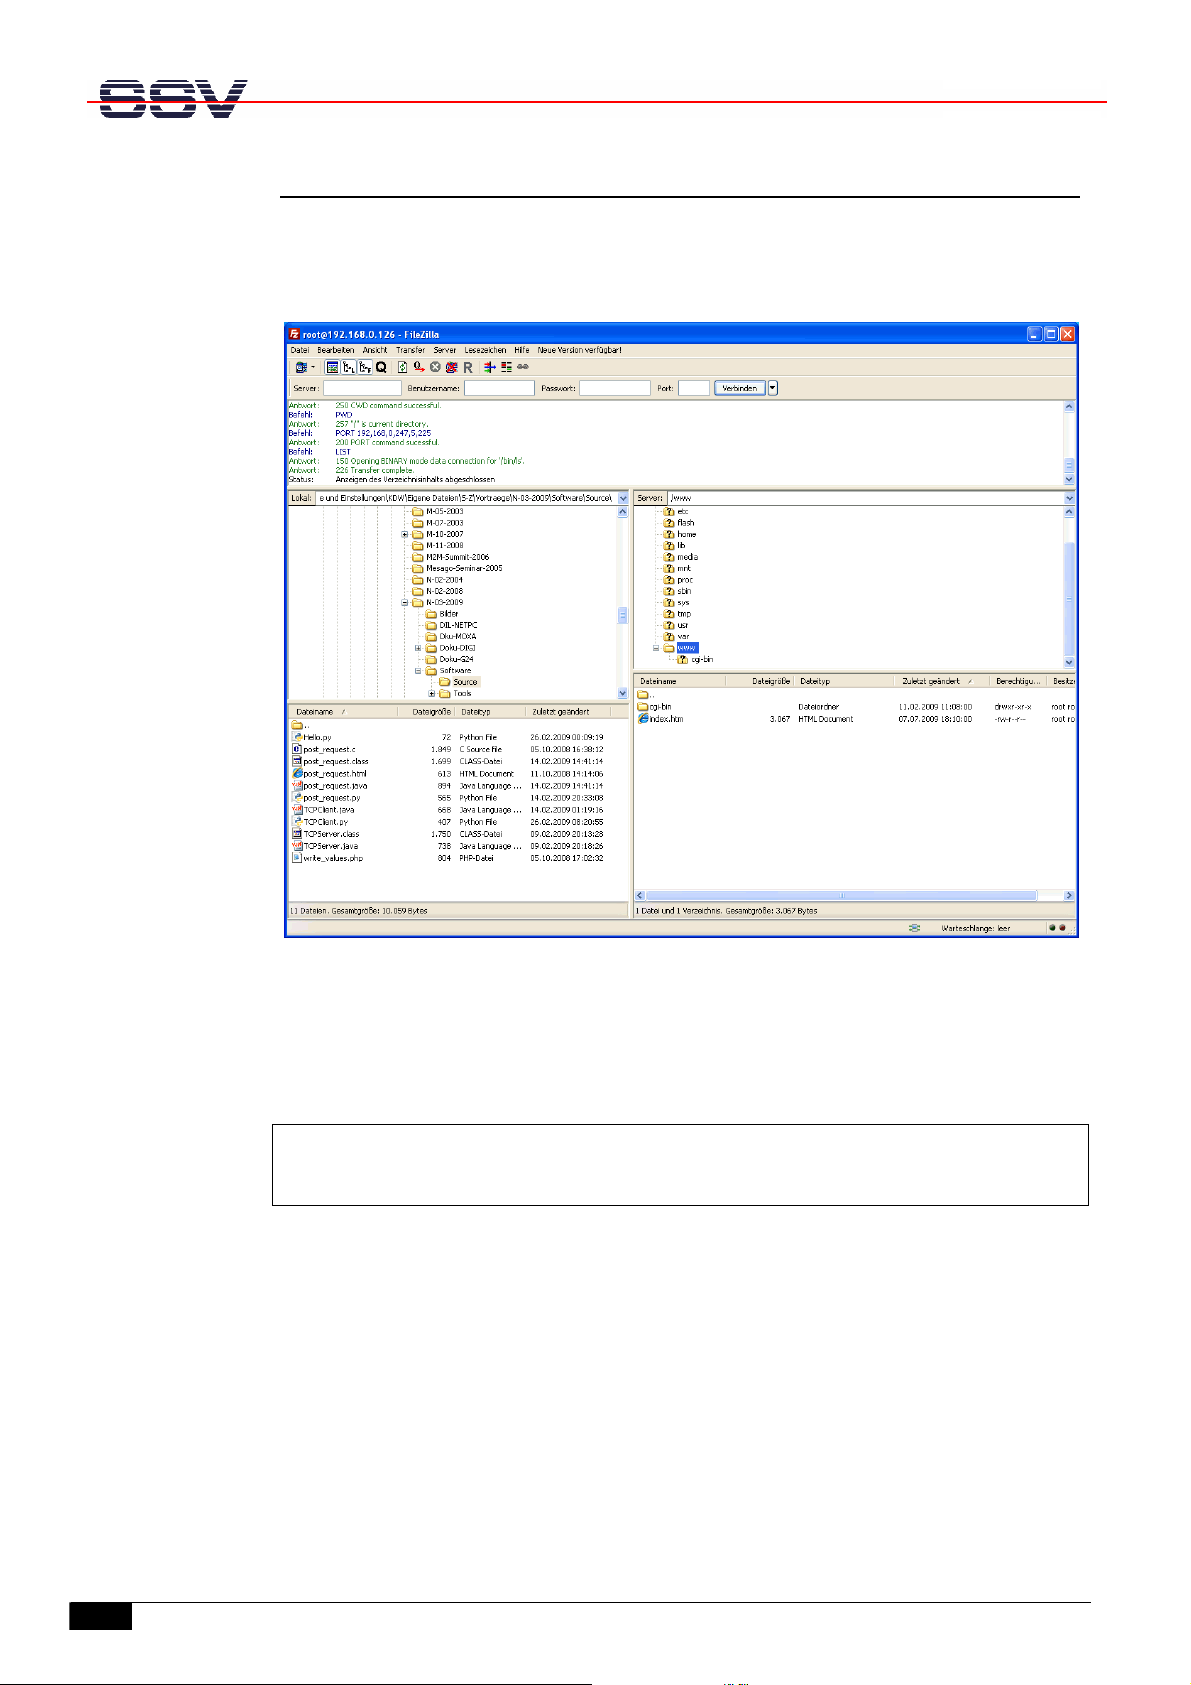
2.11 Checking FTP Server
The eSOM/SK4 Linux comes with a pre-installed FTP server. This server allows the file
transfer via Ethernet between a PC and the eSOM/SK4. Run an FTP client program like
FileZilla on your PC for a test.
Figure 16: FileZilla as FTP client to access the FTP server
Use for the FTP login the IP address 192.168.0.126, the username root and the
password root. With this login you have FTP read/write permission in the file system of
the eSOM/SK4.
Please Note: Before you start an FTP file transfer to the eSOM/SK4, please make
sure you have the read/write permission in the file system. For further information
about the file system please refer to chapter 2.7.

eSOM/SK4 eSOM/3517 - First Steps
Manual Revision 1.0
17
2.12 Checking TFTP Client
The eSOM/SK4 Linux comes with a pre installed TFTP client. This client allows the file
transfer via Ethernet between a PC and the eSOM/SK4. Run a TFTP server like
TFTPD32 on your PC for a test.
To transfer a file with the name autostart.sh into the directory /var of the eSOM/SK4
execute the following commands within a Telnet session:
cd /var
tftp 192.168.0.249
get autostart.sh
quit
With the first command you change into the directory /var of the eSOM/SK4.
The second command establishes a connection to the TFTP server. In this example the
PC with the TFTP server has the IP address 192.168.0.249.
The third command transfers the file with TFTP-GET. After the file transfer Linux shows
how many bytes have been transferred.
The fourth command disconnects the TFTP server. You can now access the new file in
the file system of the eSOM/SK4.
Figure 17: File transfer via TFTP
Please Note: Before you start a TFTP file transfer to the eSOM/SK4, please make
sure you have the read/write permission within the file system. For further infor-
mation about the file system please refer to chapter 2.7.

eSOM/SK4 eSOM/3517 - First Steps
18
Manual Revision 1.0
2.13 Checking HTTP Server
The eSOM/SK4 Linux comes with a pre-installed Web server. Run a Web browser on
your PC for a test and enter the following address
http://192.168.0.126
into the address bar of the browser. The browser shows the file index.html which is stored
in the directory /www of the eSOM/SK4. Into this directory you can load own files.
Figure 18: Checking the Web server of the eSOM/SK4 with a browser

eSOM/SK4 eSOM/3517 - First Steps
Manual Revision 1.0
19
2.14 Changing Ex Factory IP Address
The default IP address of the eSOM/SK4 is 192.168.0.126. The IP address settings
are stored in the file /etc/network/interfaces. Run a Telnet session and start the
editor mcedit which is part of the Linux.
To start mcedit with HyperTerminal in ANSI mode enter the following command:
TERM=ansi mcedit /etc/network/interfaces
Figure 19: The editor mcedit within HyperTerminal
To start mcedit with PuTTY enter the following command:
TERM=xterm mcedit /etc/network/interfaces
Figure 20: The editor mcedit within PuTTY

eSOM/SK4 eSOM/3517 - First Steps
20
Manual Revision 1.0
Change the file /etc/network/interfaces to your needs and save it.
The changes of the IP address settings will not be active until a system reboot.
The commands shown at the bottom of HyperTerminal and PuTTY are available with the
shortcut ESC + number, e.g. for SAVE the shortcut is ESC+2.
Please Note: To change a file with the editor mcedit, you need the read/write per-
mission within the file system. For further information about the file system
please refer to chapter 2.7.
This manual suits for next models
1
Table of contents
Other SSV Computer Hardware manuals


