Stack-On GCM-1918-DXD User manual
FOAM PAD FOR BOTTOM
(QUANTITY 1) 1 12
Rev2207
Record the key number and serial number from the back of the cabinet.
Keep keys in a secure place away from children.
Do not store this document in the cabinet
Instructions
GCM-1918-DXD
GCM-1918-DXF
GCM-1918-DXTX
PARTS INCLUDED
Serial #:
Key #:
WARNING
Tip Over Hazard
A child or adult can tip the cabinet and be killed or
seriously injured.
Failure to secure the cabinet as shown in these
instructions can result in death or serious injury to
children and adults.
Children should not play with or around the
cabinet at any time.
IMPORTANT:
Tools Required:
Phillips screwdriver
7/16” wrench
drill
3/16” drill bit
Scissors
Hardware included:
(22) 8-32 x 1/2 machine screw
(22) 8-32 nut
(12) 8 x 1/2 screw
PLASTIC PLUG
(QUANTITY 2)
SCOPE REST
(QUANTITY 4)
5-POSITION BARREL REST
(QUANTITY 2)
4-POSITION BARREL REST
(QUANTITY 2)
®
WARNING: This product can expose you to chemicals
including Di(2-ethylhexyl)phthalate (DEHP) which is known
to the State of California to cause cancer and birth defects
or other reproductive harm. For more information go to
www.P65Warnings.ca.gov
REGISTER THIS PRODUCT
For warranty and customer support, please register this
product at “www.Stack-On.com/product-registration”
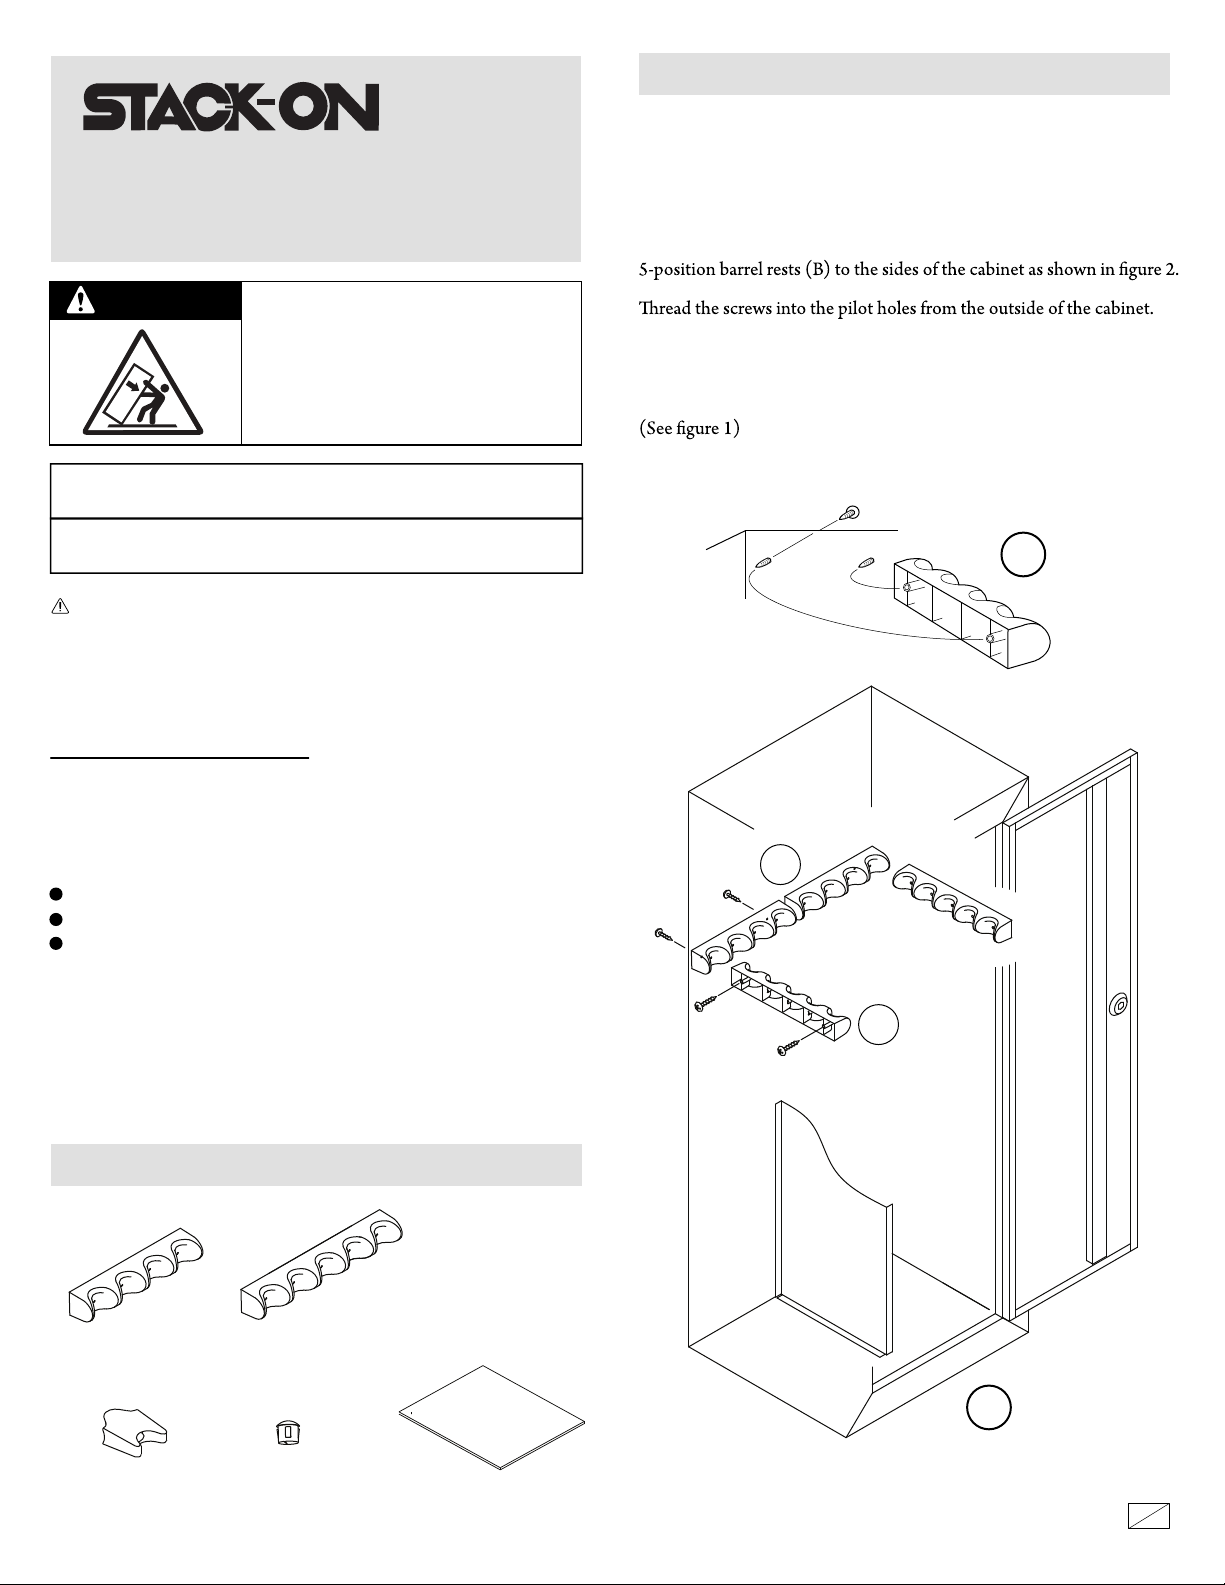
THE BARREL RESTS MUST BE INSTALLED BEFORE
MOUNTING THE CABINET TO A WALL AND FLOOR.
Installation of Barrel Rests
Install the 4-position barrel rests (A) to the back of the cabinet and the
Align the holes of the barrel rest over the tips of the screws and lightly
press the barrel rest into place. Now tighten the screws from the
outside of the cabinet. Tighten each screw partially, alternating from
one screw to the other until they are both tight. Do not over tighten.
2
A
B
1
INSTALLATION OF BARREL RESTS
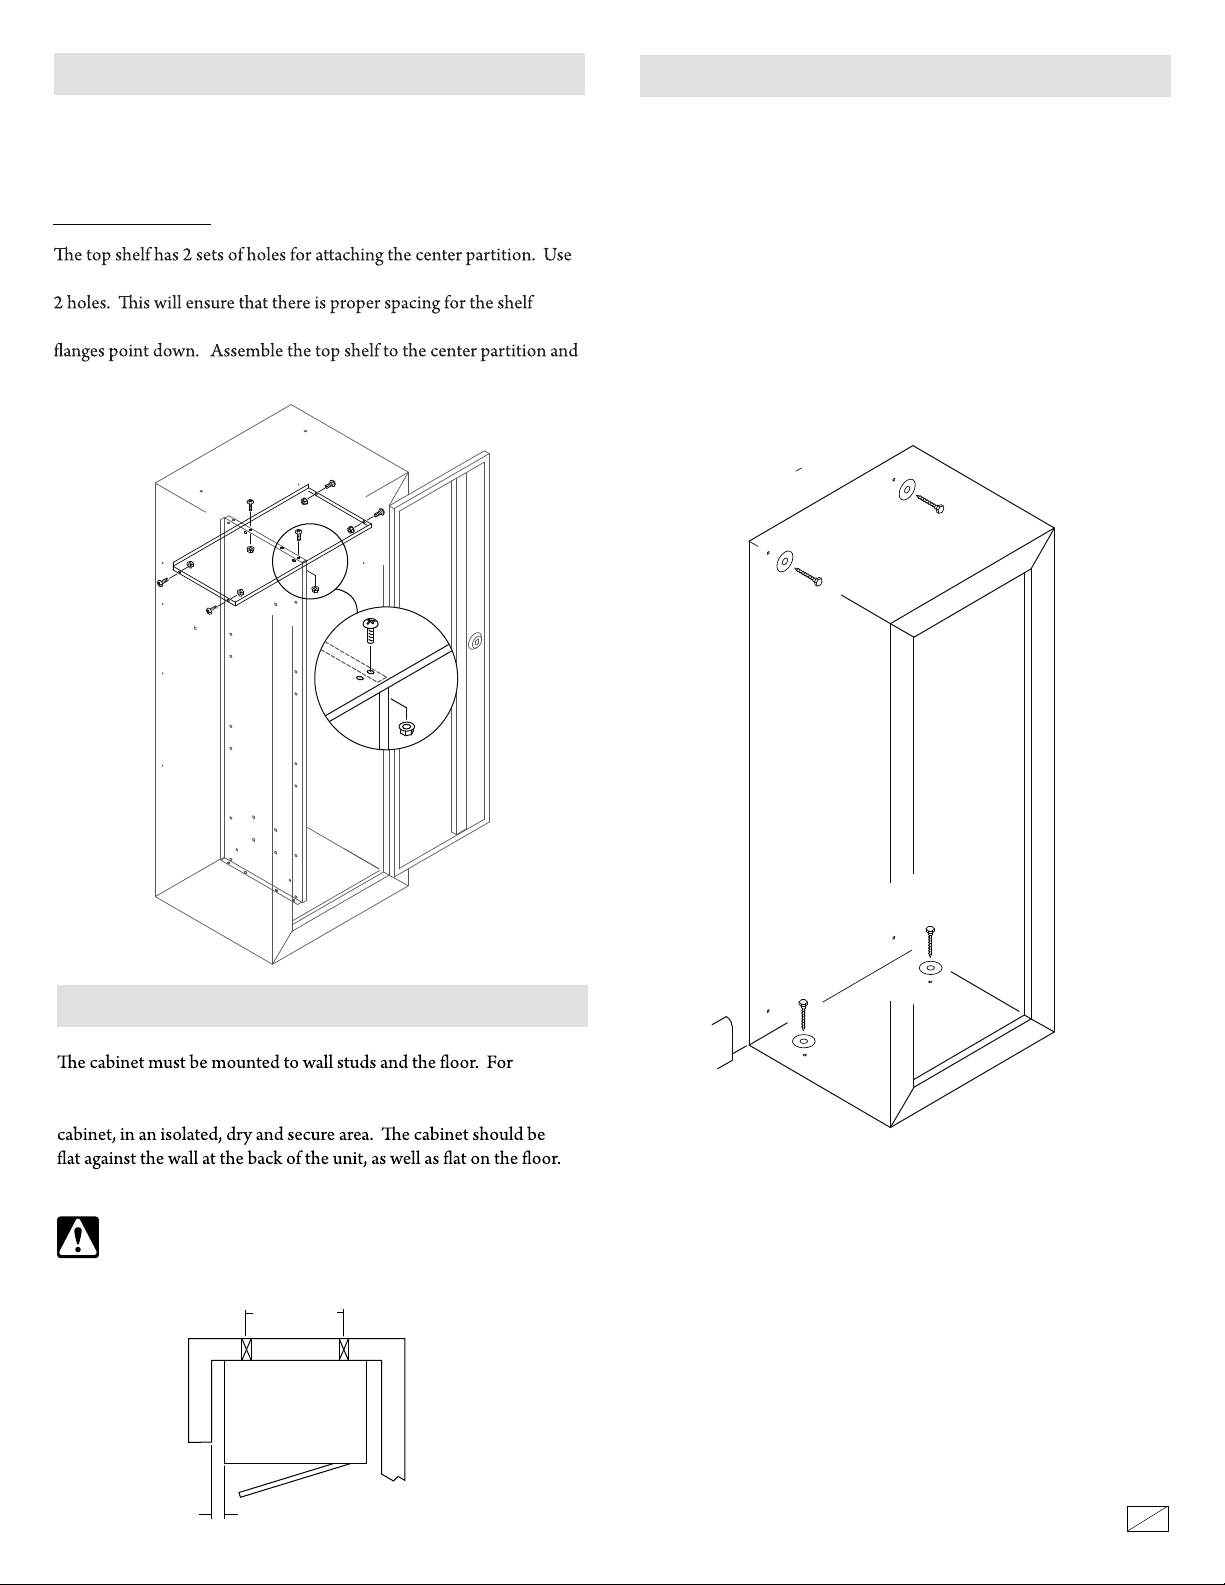
Top Shelf Assembly
SHELVES MUST BE INSTALLED BEFORE MOUNTING THE
CABINET TO A WALL AND FLOOR.
the set of holes that will allow the partition to be centered between the
installation on both sides. Position the shelf so the front and side
the sides of the cabinet using 6 nuts and bolts.
INSTALLATION OF SHELF
2 12
Rev2207
optimal safety and security, the cabinet should be installed adjacent
to the side wall of a closet with minimal space on either side of the
Remove the baseboard if necessary.
THE CABINET SHOULD ALWAYS BE KEPT OUT OF
THE REACH OF CHILDREN.
SELECTING A LOCATION
16”
CENTERS
CABINET
TOP VIEW
MINIMUM
Insert the plastic plugs in the cabinet's top mounting holes if you
are not installing the a Pistol-Ammo cabinet on the top of the
security cabinet.
SECURING THE CABINET
Before you install the cabinet to a wall and the floor, install
the interior components as described in the assembly
instructions.
NOTE: This cabinet must be mounted to wall studs and the
floor. Failure to do so will compromise the safety and
security of the cabinet.
NOTE: The cabinet must be secured to wall studs in the top
holes in the back of the cabinet so that it is anchored to the
wall studs in two locations. The cabinet must also be
mounted to the floor. Consult your hardware retailer for
fastening hardware for your particular mounting surfaces

3 12
Rev2207
IMPORTANT
0.75
12
10.25
INSTALLATION OF SCOPE STAND-OFF
FOAM INSTALLATION
Keep keys away from children. Keep this record of your serial and
key numbers in a secure place separate from your security cabinet. If
you lose your keys you will need this information as a reference for
obtaining new keys.
ORDERING A REPLACEMENT KEY
Visit “www.Stack-On.com/key-replacement-form” and follow the
online instructions for form submission and payment.
Place the foam onto the bottom of the cabinet

412
Rev2207
®
LIMITED ONE YEAR WARRANTY
STEEL CABINETS AND PISTOL CASES
Stack-On Products Co. (“Stack-On”) Steel Cabinets and Pistol Cases, are warranted to be free from
defects in material and workmanship for a period of one (1) year from the date of original purchase by a
consumer. This warranty extends to the initial consumer only.
If you believe there is a defect in material or workmanship in your Steel Cabinet or Pistol Case, during the
one-year warranty period, please contact our customer service department, by regular mail or email at the
address listed below, and include with your correspondence proof of purchase information and the model
number of the product.
Stack-On
2895 W. Capovilla Ave, Suite 140
Las Vegas, NV 89119
If Stack-On is properly notified during the one-year warranty period and, after inspection confirms there is a
defect, Stack-On will, at its sole option, provide repair parts or exchange the product at no charge, or
refund the purchase price of the product.
THIS WARRANTY DOES NOT COVER ANY PRODUCT, OR ANY PARTOF ANY PRODUCT,
WHICH HAS BEEN SUBJECT TO EXCESSIVE USE, ACCIDENT, NEGLIGENCE, ABUSE OR
MISUSE, INCORRECT MAINTENANCE, ALTERATION OR REPAIR BY ANYONE OTHER THAN
STACK-ON. IN ADDITION, THIS WARRANTY DOES NOT COVER ANY ACCESSORIES OR PARTS
USED WITH OR IN THE PRODUCT, WHICH ARE NOT INCLUDED WITH THE ORIGINAL PURCHASE.
THIS WARRANTY IS EXCLUSIVE AND EXPRESSLY IN LIEU OF ALL OTHER
WARRANTIES EXPRESSED OR IMPLIED INCLUDING THE WARRANTIES OF MERCHANTABILITY
AND FITNESS FOR A PARTICULAR PURPOSE, WHICH ARE HEREBY DISCLAIMED AND
EXCLUDED. STACK-ON SHALL NOT BE SUBJECT TO ANY OTHER OBLIGATIONS OR
LIABILITIES. STACK-ON NEITHER ASSUMES NOR AUTHORIZES ANY OTHER PERSON TO
ASSUME FOR IT, ANY OTHER LIABILITY IN CONNECTION WITH THE SALE OF STACK-ON’S STEEL
CABINET OR PISTOL CASE.
STACK-ON WILL NOT, UNDER ANY CIRCUMSTANCES, BE LIABLE TO THE INITIAL CONSUMER FOR
ANY INCIDENTAL, CONSEQUENTIAL, SPECIAL, EXEMPLARY, OR PUNITIVE DAMAGES ARISING
OUT OF THE PURCHASE OR USE OF ANY STACK-ON STEEL CABINET OR PISTOL CASE.
STACK-ON’S LIABILITY FOR ANY BREACH OF THIS WARRANTY SHALL BE LIMITED
EXCLUSIVELY TO REPAIR OR REPLACEMENT OF THE DEFECTIVE PRODUCT, AS DESCRIBED
ABOVE, OR A REFUND OF THE PURCHASE PRICE OF THE PRODUCT.
IN NO EVENT SHALL STACK-ON’S OBLIGATION UNDER THIS WARRANTY EXCEED THE PRICE OF
THE PRODUCT.
THIS WARRANTY GIVES YOU SPECIFIC LEGAL RIGHTS. YOU MAY ALSO HAVE OTHER RIGHTS
WHICH VARYFROM STATE TO STATE.

5 12
Rev2207
REVÊTEMENT EN MOUSSE
POUR LE FOND (1)
Portable Case
Instructions
No de clé :
No de série :
Risque de basculement
Un enfant ou un adulte peut faire basculer le cabinet,
ce qui peut causer la mort ou une blessure grave.
Le fait de ne pas fixer le cabinet tel qu’illustré dans les
présentes instructions peut causer la mort ou des
blessures graves aux enfants et aux adultes.
Les enfants ne doivent pas jouer avec le coffre ni
autour du coffre.
Outils requis :
Tournevis Phillips
Clé de 7/16 po
Perceuse
mèche de 3/16 po
Une paire de ciseaux
Matériel inclus:
(22) Vis Mécanique 8-32
Notez le numéro de clé et le numéro de série à l'arrière de l'armoire.
Tenez les touches dans un endroit sûr, loin des enfants.
Ne pas stocker ce document dans l'armoire.
IMPORTANT:
APPUI À CANON
À 4 POSITIONS (2)
APPUI À CANON
À 5 POSITIONS (2)
APPUI POUR
LUNETTE DE VISÉE
(4)
BOUCHON DE
PLASTIQUE (2)
PIÈCES INCLUSES
®
MISE EN GARDE : Ce produit peut vous exposer à des
produits chimiques, dont le phtalate de di-2-éthylhexyle
(DEHP), qui selon l’État de la Californie cause le cancer,
des malformations congénitales et d’autres dommages liés
à la reproduction. Pour en savoir plus, allez à
www.P65Warnings.ca.gov
ENREGISTREZ CE PRODUIT
Pour la garantie et le support client, veuillez enregistrer ce
produit sur “www.Stack-On.com/product-registration”
1
2
A
B
POSE DES APPUIS À CANON
IL FAUT POSER LES APPUIS À CANON AVANT DE FIXER
L’ARMOIRE AU MUR ET PLANCHER.
Installation des appuis à canon
Installez l'appui à canon à 4 positions (A) à l'arrière de l'armoire et
l'appui à canon à 5 positions (B) sur les côtés de l'armoire, comme
Insérez les vis dans les avant-trous à partir de l'extérieur de l'armoire.
Alignez les trous de l'appui à canon par-dessus la pointe des vis et
Resserrez maintenant les vis à partir de l'extérieur de l'armoire. Resserrez
chaque vis partiellement, en alternant d'une vis à l'autre jusqu'à ce
GCM-1918-DXD
GCM-1918-DXF
GCM-1918-DXTX
6 12
Rev2207
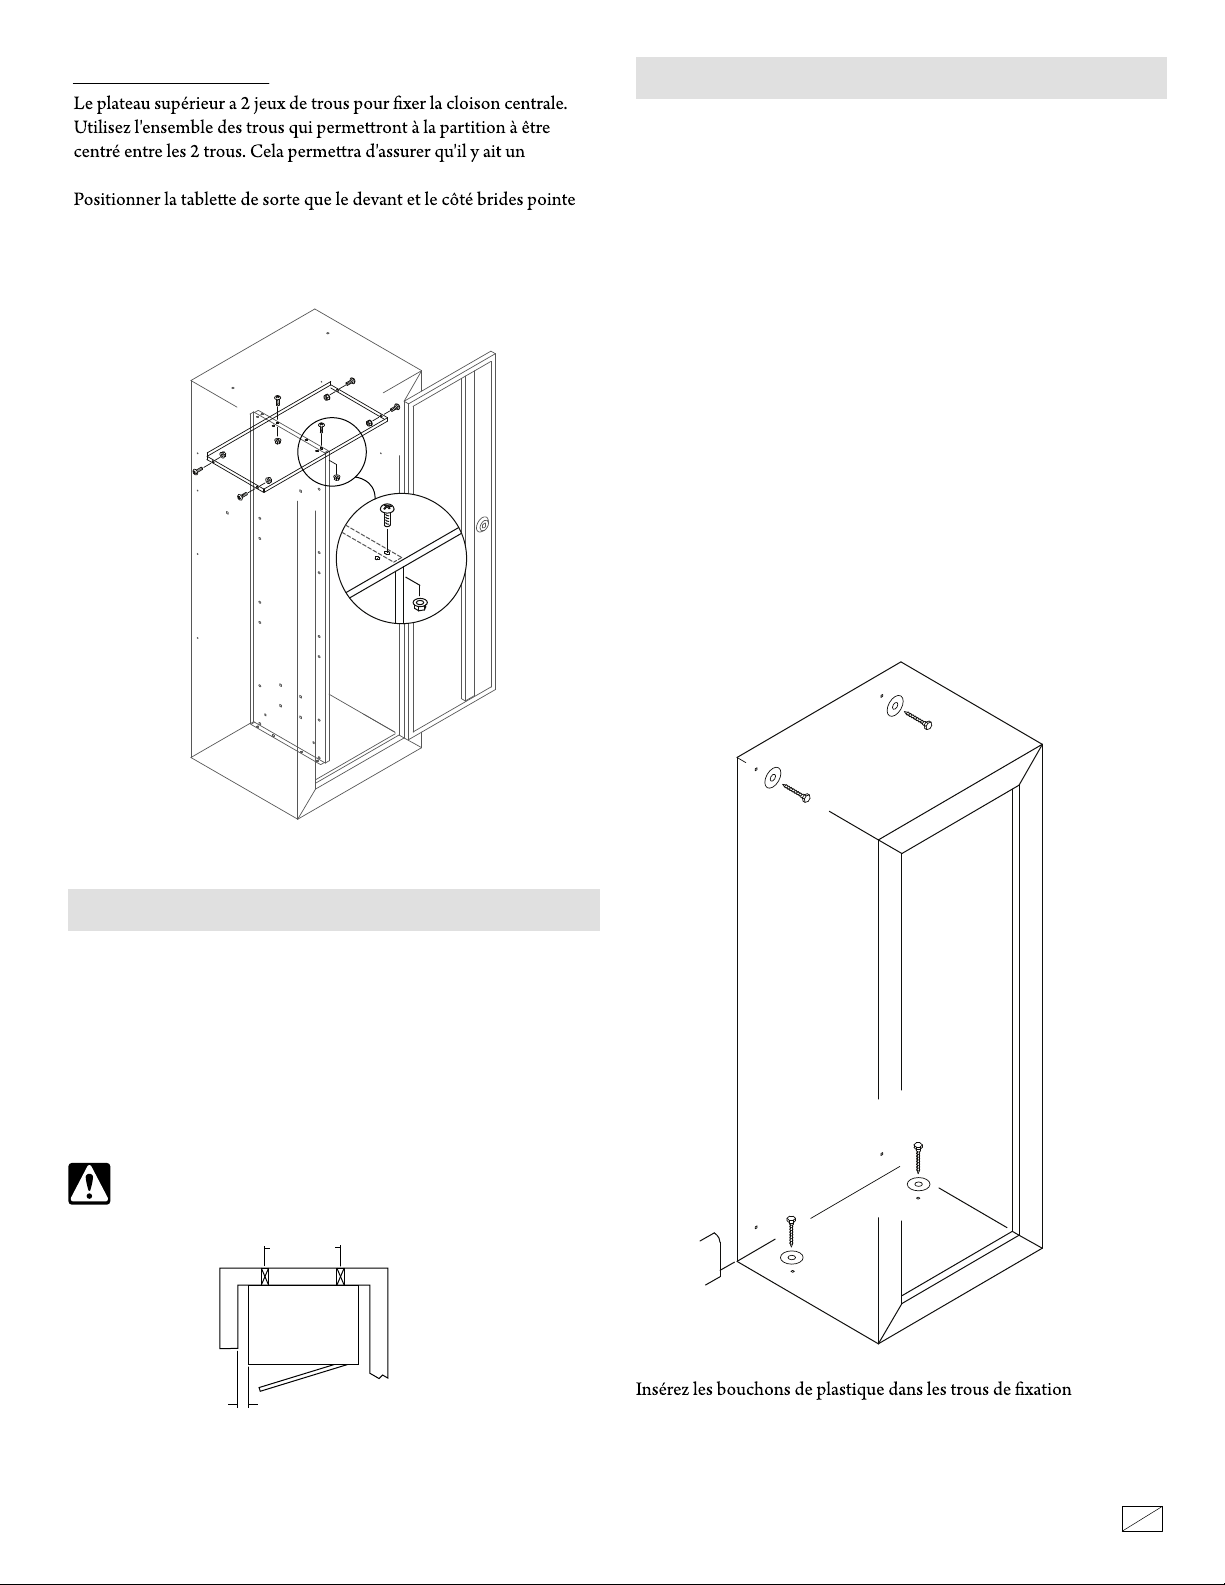
Pose de l’étagère du haut
espacement adéquat pour l'installation du plateau des deux côtés.
vers le bas. Assemblez l'étagère du haut de la cloison centrale et les
côtés de l'armoire à l'aide de 6 vis et écrous.
CHOIX D’UN EMPLACEMENT
L'armoire doit être monté sur un poteau de cloison et le sol. Pour
plus de sécurité et une sécurité optimale, le cabinet doit être
installé à côté de la paroi latérale d'un placard avec un minimum
d'espace de chaque côté de l'armoire dans un endroit isolé, sec et
sécuritaire. L'armoire doit être à plat contre la paroi à l'arrière de
l'appareil ainsi que plat sur le sol. Enlevez la plinthe si nécessaire.
L'ARMOIRE DOIT TOUJOURS ÊTRE HORS DE LA
PORTÉE DES ENFANTS.
16 po
CENTRE
VUE DU HAUT
DE L'ARMOIRE
MINIMUM supérieurs de l'armoire si vous n'installez pas l'armoire à munitions
et pistolets sur le dessus de l'armoire de sécurité.
Avant d'installer l'armoire sur un mur et sur le sol, installez
les composants intérieurs comme décrit dans les instructions
de montage.
REMARQUE : Cette armoire doit être montée sur des
montants muraux et sur le sol. Ne pas le faire compromettra
la sécurité et la sécurité du cabinet.
REMARQUE : L'armoire doit être fixée aux montants du mur
dans les trous supérieurs à l'arrière de l'armoire afin qu'elle
soit ancrée aux montants du mur à deux endroits. L'armoire
doit également être fixée au sol. Consultez votre détaillant de
matériel pour le matériel de fixation pour vos surfaces de
montage particulières

POSE DU EN MOUSSE
0.75
10.25
12
Placez la mousse sur le fond de l'armoire.
Lorsque la cloison centrale est utilisé, couper le coussin de mousse en
bas, comme illustré.
7 12
Rev2207
INSTALLATION DE LA PIÈCE D'ESPACEMENT
NOTE: La pièce d'espacement conviendra à de nombreuses
Vissez la pièce d'espacement dans l'avant-trou de l'appui à canon.
IMPORTANT
Gardez les clefs en lieu sûr, hors de portée des enfants. Gardez le
document à propos du numéro de série et portant les numéros de vos
clefs dans une endroit sûr, à l'écart de l'armoire. Si vous perdez vos
clefs, vous aurez besoin de ces renseignements pour commander un
nouveau jeu de clefs.
COMMANDER UNE CLÉ DE REPLACEMENT
Visitez “www.Stack-On.com/key-replacement-form” et suivez les
instructions en ligne pour la soumission et le paiement du formulaire.

8 12
Rev2207
GARANTIE RESTREINTE D’UN AN
ARMOIRES D’ACIER ET CAS À PISTOLETS
Les armoires d’acier et cas à pistolets de Stack-On Products Co. (« Stack-On ») sont garanties
exemptes de défauts de matériel ou de fabrication pour une période d’un (1) an à partir de la date de
l’achat original par un consommateur. Cette garantie ne touche que le premier acheteur.
Si vous croyez que votre armoire d’acier ou cas à pistolets présente un défaut de matériel ou de
fabrication au cours de la période de garantie d’un an, veuillez communiquer avec notre service à la
clientèle, par courrier postal ou courriel, à l’adresse mentionnée plus bas, sans oublier d’inclure les
renseignements sur la preuve d’achat et le numéro de modèle du produit.
Si Stack-On a été adéquatement avisée du problème au cours de la période de garantie d’un an et,
qu’après inspection, elle confirme le problème, Stack-On fournira les pièces de réparation ou échangera
le produit sans frais, ou remboursera le prix d’achat du produit.
LA PRÉSENTE GARANTIE NE S’APPLIQUE PAS AUX PRODUITS, OU À TOUTE PIÈCE D’UN
PRODUIT, QUI ONT ÉTÉ ENDOMMAGÉS À LA SUITE D’UN USAGE EXCESSIF, ACCIDENTEL,
NÉGLIGENT, ABUSIF, D’UNE MAUVAISE UTILISATION, D’UN ENTRETIEN INCORRECT,
D’ALTÉRATIONS OU DE RÉPARATIONS PAR QUICONQUE AUTRE QU’UN REPRÉSENTANT DE
STACK-ON. EN OUTRE, CETTE GARANTIE NE S’APPLIQUE À AUCUN ACCESSOIRE OU PIÈCE
UTILISÉS AVEC LE PRODUIT OU DANS LE PRODUIT ET QUI NE FONT PAS PARTIE DE L’ACHAT
ORIGINAL.
CETTE GARANTIE EST EXCLUSIVE ET REJETTE FORMELLEMENT TOUTE AUTRE GARANTIE
EXPRIMÉE OU SUGGÉRÉE, Y COMPRIS LES GARANTIES DE QUALITÉ MARCHANDE ET
D’ADAPTATION À UNE FIN PARTICULIÈRE, QUI, PAR LA PRÉSENTE, SONT DÉSAVOUÉES ET
EXCLUSES. STACK-ON NE SERA PAS ASSUJETTIE À TOUTE AUTRE OBLIGATION OU
RESPONSABILITÉ. STACK-ON N’ASSUME, NI N’AUTORISE PERSONNE D’AUTRE À ASSUMER
POUR ELLE, UNE QUELCONQUE RESPONSABILITÉ RELIÉE À LA VENTE DES ARMOIRES
D’ACIER ET CAS À PISTOLETS.
EN AUCUNE CIRCONSTANCE, STACK-ON NE SERA RESPONSABLE ENVERS LE CLIENT INITIAL
DE TOUT DOMMAGE, CONSÉCUTIF, INDIRECT, SPÉCIAL, EXEMPLAIRE OU PUNITIF PROVENANT
DE L’ACHAT OU DE L’UTILISATION DE TOUTE ARMOIRE D’ACIER OU CAS À PISTOLETS.
LA RESPONSABILITÉ DE STACK-ON POUR TOUTE VIOLATION À CETTE GARANTIE SE LIMITERA
EXCLUSIVEMENT À LA RÉPARATION OU AU REMPLACEMENT DU PRODUIT DÉFECTUEUX, TEL
QUE DÉCRIT PLUS HAUT, OU AU REMBOURSEMENT DU PRIX D’ACHAT DU PRODUIT.
L’OBLIGATION DE STACK-ON EN VERTU DE LA PRÉSENTE GARANTIE N’EXCÉDERA JAMAIS LE
PRIX DU PRODUIT.
LA PRÉSENTE GARANTIE VOUS ACCORDE DES DROITS LÉGAUX PRÉCIS. VOUS POUVEZ
POSSÉDER D’AUTRES DROITS QUI VARIENT SELON LES ÉTATS.
®
Stack-On
2895 W. Capovilla Ave, Suite 140
Las Vegas, NV 89119
9 12
Rev2207
COJÍN DE ESPUMA
PARA LA PARTE INFERIOR (1)
Portable Case
Instrucciones
# de Serie:
# Llave
Puede Volcarse
Un menor o un adulto pueden volcar la gabinete y
pueden morir o ser dañados seriamente.
Si no aseguran la gabinete como se indica en las
instrucciones puede resultar en muerte o daños
serios a menores y adultos.
Los niños (a) jamas deben de jugar con o alrededor
de la gabinete.
Herramientas necesarias:
destornillador Phillips
7/16 "llave
perforar
3/16 "broca
Tijeras
Hardware incluido:
(22) Tornillo de máquina 8-32
(22) Tuerca 8-32
(12) Tornillo 8 x 1/2
Registre el número de serie y de llave ubicado en la parte de atrás de la caja
fuerte.
IMPORTANTE:
Conserve las llaves en un lugar seguro fuera del alcance de los niños.
No guarde este documento dentro de la caja fuerte.
PARTES INCLUIDAS
BARRIL DE DESCANSO DE
4-POSICIONES (2)
BARRIL DE DESCANSO DE
5-POSICIONES (2)
ENCHUFE DE
PLÁSTICO (2)
ALCANCE
DE DESCANSO (4)
®
ADVERTENCIA: Este producto puede exponerlo a quími-
cos, incluido el Di(2-ethylhexyl) phthalate (DEHP), lo cual es
conocido por el Estado de California que causa cáncer y
defectos de nacimiento u otros daños reproductivos. Para
obtener más información, vaya a www.P65Warnings.ca.gov
REGISTRAR ESTE PRODUCTO
Para garantía y atención al cliente, registre este producto en
“www.Stack-On.com/product-registration”
1
2
A
B
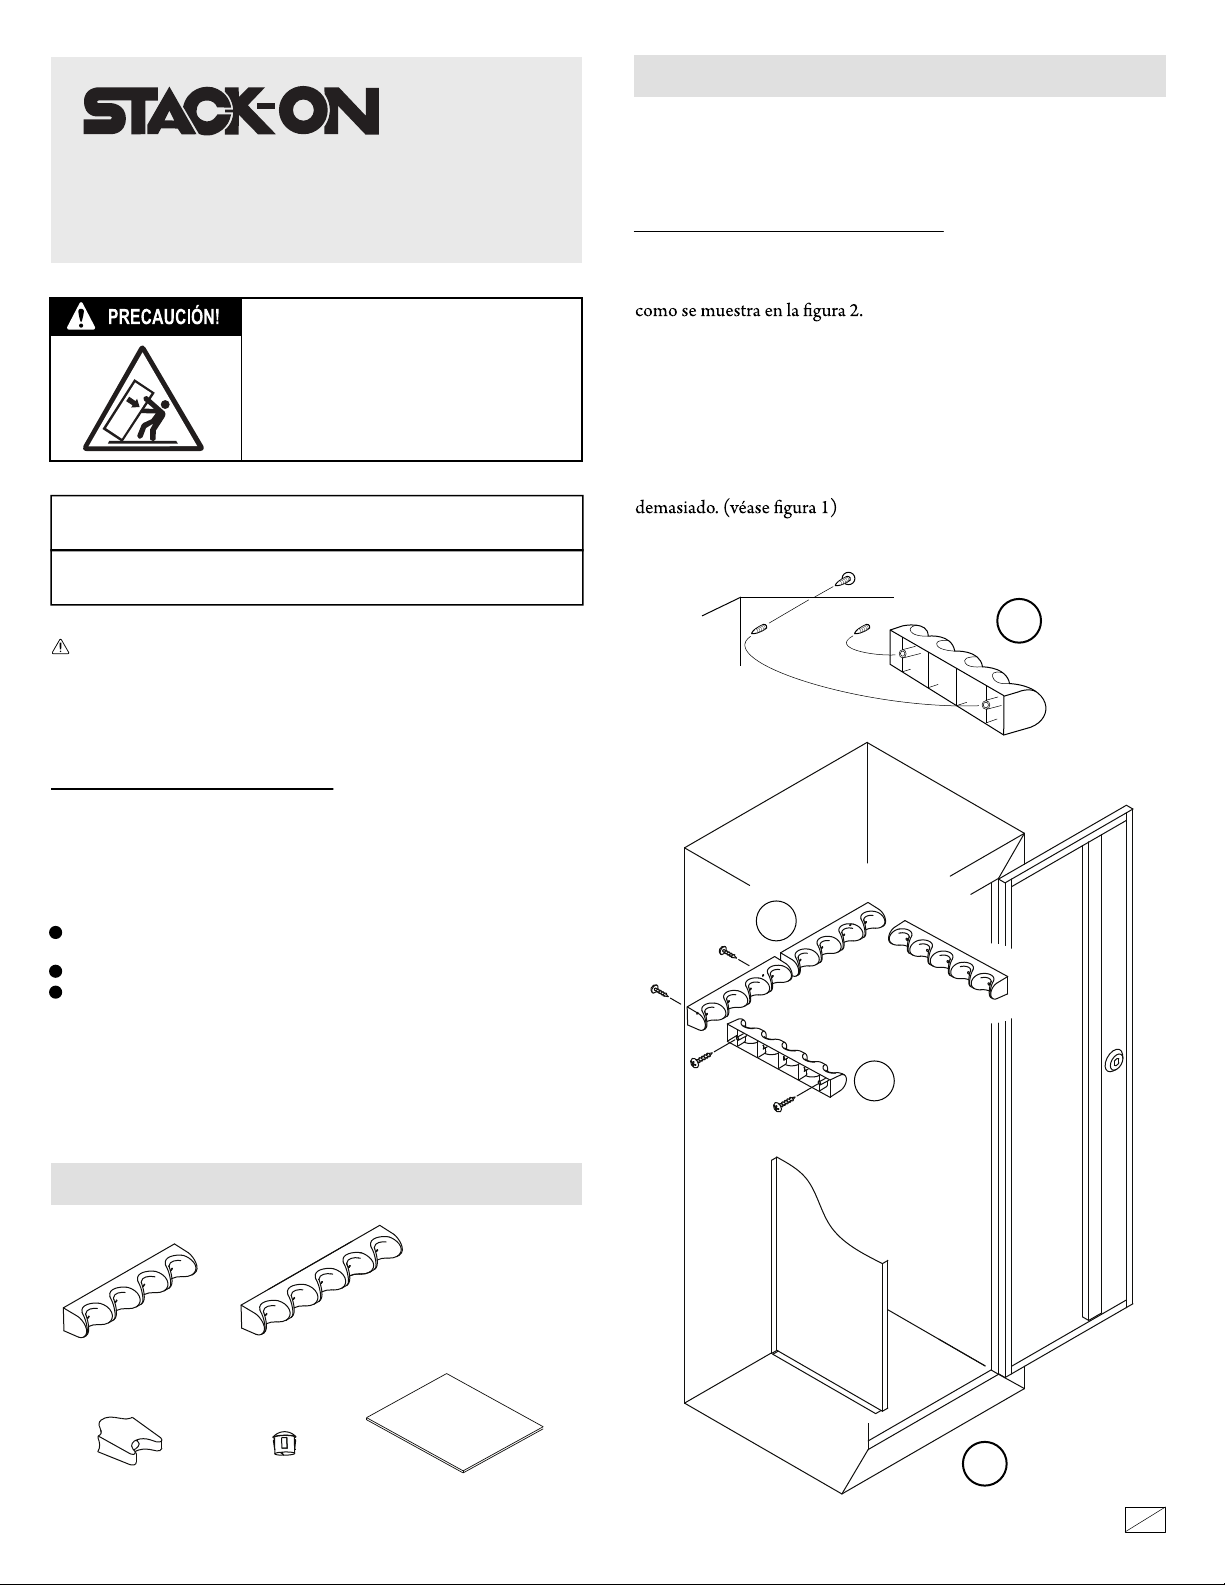
INSTALACIÓN DE SUJETADORES PARA BARRILES
LA PISTOLA SOPORTES BARRIL SE DEBE INSTALAR
ANTES DE MONTAR LA CAJA EN LA PARED Y EL PISO.
Instalación de sujetadores para barriles
Instale los sujetadores de 4 posiciones para barriles (A) a la parte de de
atrás del gabinete y los sujetadores de 5 posiciones para barriles (B)
Atornille manualmente los tornillos dentro de los hoyos desde la parte
exterior del gabinete. Alinee los hoyos del descanso para barriles sobre
las puntas de los tornillos y presione el sujetador para barriles
ligeramente en su lugar. Ahora apriete los tornillos desde la parte
exterior del gabinete. Apriete cada tornillo parcialmente, alternado de
un tornillo a otro hasta que estén ambos apretados. No apriete
GCM-1918-DXD
GCM-1918-DXF
GCM-1918-DXTX
10 12
Rev2207
Asamblea del Estante Superior
que se centra entre los 2 agujeros. Esto asegurará que hay espacio
adecuado para la instalación de estantería en ambos lados. Coloque la
plataforma para la parte frontal y lateral bridas punta hacia abajo.
Ensamble el estante superior de la pared medianera y los lados de la
caja con 6 tornillos y tuercas.
MANTENGA SIEMPRE EL GABINETE DEL
ALCANCE DE LOS NIÑOS.
Centros de
16"
VISTA
SUPERIOR DEL
GABINETE
MÍMINO
SELECCIÓN DE LA UBICACIÓN
El gabinete debe estar montado en un poste de la pared y el piso.
Para la seguridad y la seguridad óptima, el gabinete debe ser
instalado adyacente a la pared lateral de un armario con un espacio
mínimo a cada lado de la cabina en una zona aislada, seco y seguro.
El gabinete debe ser plana contra la pared en la parte posterior de la
unidad, así como en el piso. Retire la placa base si es necesario.
Inserte los pernos de plástico dentro de los hoyos que se
encuentran en la parte superior del gabinete si no se va a instalar un
gabinete para pistolas y municiones sobre este gabinete.
Antes de instalar el gabinete en la pared y el piso, instale los
componentes interiores como se describe en las
instrucciones de ensamblaje.
NOTA: Este gabinete debe montarse en montantes de
pared y en el piso. El no hacerlo comprometerá la seguridad
y seguridad del gabinete.
NOTA: El gabinete se debe asegurar a los montantes de la
pared en los orificios superiores en la parte trasera del
gabinete para que quede anclado a los montantes de la
pared en dos lugares. El armario también debe montarse en
el suelo. Consulte a su vendedor de hardware para obtener
hardware de sujeción para sus superficies de montaje
particulares.
INSTALACIÓN DE LA ESPUMA
0.75
10.25
12
Coloque la espuma en la parte inferior del gabinete.
Cuando se utiliza la partición de Centro, cortar la espuma de la parte
inferior como se muestra por lo que se ajusta alrededor de la partición.
11
12
Rev2207
INSTALACIÓN DEL SEPARADOR PARA ESCOPETAS
NOTA: Los separadores para escopetas funcionarán adecuadamente
para muchas combinaciones de armas con escopetas.
Atornille el separador para escopetas usando el hoyos del
descanso para barriles.
IMPORTANTE
Mantenga las llaves fuera del alcance de los niños. Guarde este
documento con el numero de serie y de llave en un lugar separado de
la caja de seguridad. Si se pierden sus llaves, será necesario que nos
proporcione el número de serie como referencia para obtener otras
llaves.
PEDIR UNA LLAVE DE REPUESTO
Visite “www.Stack-On.com/key-replacement-form” y siga las
instrucciones en linea para el envio y pago de formularios.

1212
Rev2207
®
GARANTÍA LIMITADA DE UN AÑO
GABINETES DE ACERO Y CASO DE PISTOLAS
Los Gabinetes de Acero y Caso de Pistolas de Stack-On Products Co. (“Stack-On”) están garantizados como libres de
defectos de materiales y hechura durante un período de un (1) año a partir de la fecha de compra original de un
consumidor. Esta garantía se aplica al consumidor inicial solamente.
Si usted considera que existe un defecto de material o hechura en su Gabinete de Acero o Caso de Pistolas durante el
período de garantía de un año, comuníquese con nuestro departamento de servicio a clientes por correo regular o
correo-e en la dirección indicada abajo, e incluya con su correspondencia la información de constancia de compra y el
número del modelo del producto.
Stack-On
2895 W. Capovilla Ave, Suite 140
Las Vegas, NV 89119
Si se notifica debidamente a Stack-On durante el período de garantía de un año y, después de la inspección se confirma
que existe un defecto, Stack-On, a su exclusiva opción, proporcionará piezas de repuesto o cambiará el producto sin
cargo, o reembolsará el precio de compra del producto.
ESTAGARANTÍANO CUBRE NINGÚNPRODUCTO O NINGUNAPARTEDE UN PRODUCTO QUE HA ESTADO
SUJETO AUSOEXCESIVO, ACCIDENTE, NEGLIGENCIA, ABUSOO MAL USO, MANTENIMIENTO INCORRECTO,
ALTERACIÓN O REPARACIÓN POR CUALQUIER TERCERO QUE NO SEASTACK-ON. ADICIONALMENTE, ESTA
GARANTÍANO CUBRE ACCESORIOS O PIEZAS USADASCON O DENTRO DEL PRODUCTO QUE NO ESTÁN
INCLUIDOSCON LA COMPRA ORIGINAL.
ESTA GARANTÍA ES EXCLUSIVA Y EXPRESAMENTE EN LUGAR DE CUALQUIER OTRA GARANTÍA EXPRESA
O IMPLÍCITA, INCLUSIVE LAS GARANTÍAS DE COMERCIABILIDAD E IDONEIDAD PARA UN
PROPÓSITO ESPECÍFICO, QUE POR ESTE MEDIO SE DESCONOCEN Y EXCLUYEN. STACK-ON NO
ESTARÁ SUJETO A NINGUNA OTRA OBLIGACIÓN O RESPONSABILIDAD. STACK-ON NO ASUME NI
AUTORIZA A NINGUNA OTRA PERSONA QUE ASUMA EN SU NOMBRE, CUALQUIER OTRA RESPONSABILIDAD
EN RELACIÓN CON LA VENTA DE UN GABINETE DE ACERO O CASO DE PISTOLAS.
STACK-ON NO SERÁ BAJO NINGUNA CIRCUNSTANCIA RESPONSABLE ANTE EL CONSUMIDOR INICIAL
POR DAÑOS INCIDENTALES, CONSECUENTES, ESPECIALES, EJEMPLARES O PUNITIVOS QUE SURGIESEN
DE LA COMPRA O EL USO DE CUALQUIER GABINETE DE ACERO O CASO DE PISTOLAS.
LA RESPONSABILIDAD DE STACK-ON POR CUALQUIER VIOLACIÓN DE ESTAGARANTÍAESTARÁ
LIMITADA EXCLUSIVAMENTEALA REPARACIÓN O EL REEMPLAZO DEL PRODUCTO DEFECTUOSO, SEGÚN
SE DESCRIBE ARRIBA, O EL REEMBOLSO DEL PRECIO DE COMPRA DEL PRODUCTO.
LA OBLIGACIÓN DE STACK-ON BAJO ESTA GARANTÍA BAJO NINGUNA CIRCUNSTANCIA EXCEDERÁ EL PRECIO
DEL PRODUCTO.
ESTA GARANTÍA LE CONFIERE DERECHOS LEGALES ESPECÍFICOS. ES POSIBLE QUE TAMBIÉN TENGA OTROS
DERECHOS, QUE VARÍAN DE UN ESTADO A OTRO.
This manual suits for next models
2
Table of contents
Languages:
Popular Industrial Equipment manuals by other brands


Siemens
Siemens 3TX7462-3 Series operating instructions

DWK
DWK WHEATON Standard instruction manual

STOKVIS ENERGY SYSTEMS
STOKVIS ENERGY SYSTEMS ECONOPLATE E3 Series Installation, operation & maintenance documentation

Manntek
Manntek DCC Service instruction

Rapid
Rapid AB-Z Operation manual

JRClancy
JRClancy Titan Series Maintenance manual