Stadium USBMIC1 User manual

OFF
ON
USBMIC1 User Manual
Cardioid Condenser USB Microphone
Contents
Preliminary setup with Mac OS X2
Preliminary setup with Windows XP4
Preliminary setup with Windows Vista7
Preliminary setup with Windows 7/108
Additional Information11
Specifications & Technical Assistance12

2
1. Plug the free end of the provided USB cable into the USB port on your computer.
Your computer will automatically recognize the USB device and install a driver.
2. System Preferences.
Preliminary setup with Mac OS X
Note: Many recording software programs are available online. Audacity is widely used free software
for recording and editing sounds. It is available online at http://audacity.sourceforge.net/

3
USBMIC1 USB
3. Next, click Sound to display the Sound preference pane.
4. Click the Input tab and select the USBMIC1 as the device for sound input.
Your preferences are now set to use the USBMIC1 on your Mac with GarageBand or another
recording program of your choice.
Preliminary setup with Mac OS X (continued)

4
(Service Pack 2; other operating systems may vary slightly)
1. Plug the free end of the USB cable into the USB port on your computer.
Your computer will automatically recognize the USB device and install a driver.
2.
In the lower right portion of your screen you may see a message that new hardware was found;
or you may see a driver software installation notice.
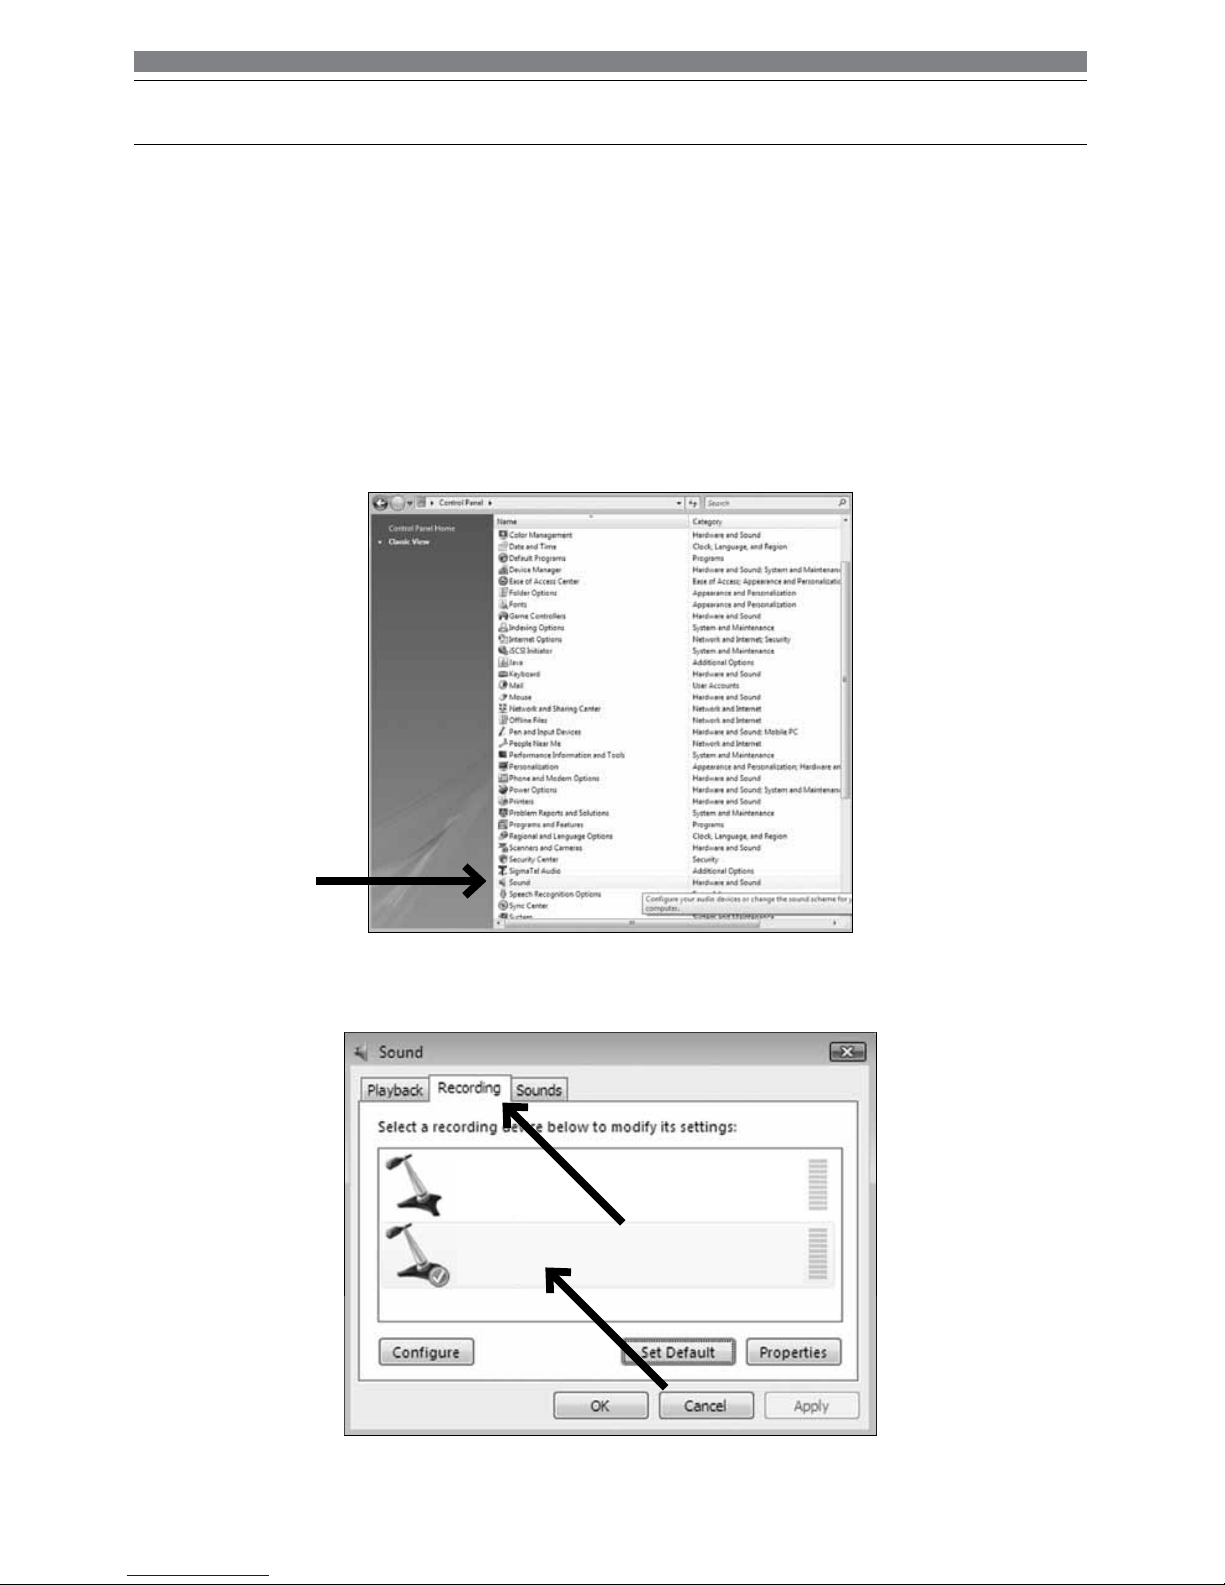
3. To select the USBMIC1 as your default recording device, begin at your Start menu.
Select Control Panel.
Preliminary setup with Windows XP

5
4. Select Sounds and Audio Devices .
Preliminary setup with Windows XP (continued)

6
5. Select the Audio tab, and choose USBMIC1 as the default device.
6. Adjust computer volume by clicking on the Volume button beneath Sound recording Default device.
Preliminary setup with Windows XP (continued)
USBMIC1
7. Through the Wave In window, you can set the computer volume or mute the microphone.
Your preferences are now set to use the USBMIC1 with Windows XP with the recording program
of your choice.
USBMIC1
7
Microphone
USBMIC1 Mic
Working
Microphone
SigmaTel C-Major Audio
Working
Preliminary setup with Windows Vista
1.
Plug the free end of the USB cable into the USB port on your computer.
Your computer will automatically recognize the USB device and install a driver.
2.
In the lower right portion of your screen you may see a message that new hardware was found;
or you may see a driver software installation notice.
3. To select the USBMIC1 as your default recording device, begin at your Start menu.
Select Control Panel.
4. Select (double-click) Sound.
5. Select the Recording tab. Make sure that the USBMIC1 microphone is set as the default
Your preferences are now set to use the USBMIC1 with Windows Vista with the recording
program of your choice.
recording device. (You should see a green check mark beside the USB microphone icon.)

8
1. Plug the free end of the USB cable into the USB port on your computer.
Your computer will automatically recognize the USB device and install a driver.
2.
In the lower right portion of your screen you may get a message that new hardware was found;
or you may see a driver software installation notice.
3. Start menu > Control Panel > Sound
To select the USBMIC1 as your default recording device, begin at your Start menu.
Select Control Panel .
Preliminary setup with Windows 7/10

9
4. Select Sound .
5.
Preliminary setup with Windows 7/10 (continued)
The following screen will pop up:

10
6. Select the Recording tab, and choose USBMIC1 as the default device.
7. Double click on the USBMIC1 icon to open the Microphone Properties window. Select the
levels tab to adjust microphone level (loudness). You may need to come back to this window to
readjust the level after you begin recording.
Preliminary setup with Windows 7/10 (continued)
Your preferences are now set to use the USBMIC1 with Windows 7/10 with the recording program
of your choice.
Microphone
USBMIC1-Mic
Default Device

11
Selecting software
You have many choices in recording software. Audacity, available for free online at
http://audacity.sourceforge.net/, is a widely used software program that provides basic recording software.
Setting your software levels
Correct adjustment of microphone level is important for optimum performance. Ideally, the microphone
level should be as high as possible without overloading the input of your computer. If you hear
distortion, or if your recording program shows levels that are consistently overloaded (at peak levels),
turn the microphone volume (or level) down, either through your control panel (or system preferences)
settings, or through your recording software. If your recording program shows insufficient level, you
can increase the microphone gain either from the control panel (or system preferences) settings or
through your recording program.
No further microphone level adjustments should be needed, as long as the acoustic input does not
change significantly.
Positioning your microphone
It is important to position the microphone directly in line (on axis) with the person speaking/singing
or instrument (or other sound source) to achieve the best frequency response of the microphone.
This requires the user to speak into the microphone with the Stadium logo positioned towards the
mouth. As this microphone is directional. The distance from the mouth should be about 1 inch, or
10 - 40mm for optimal recording. For use in speaking/singing applications, the ideal placement for the
microphone is directly in front of the person speaking/singing The same placement is optimal when
miking an instrument such as an acoustic guitar, drums or piano. Experiment with different mic
placements to find the best sound for your particular setup.
Protecting your microphone
Avoid leaving your microphone in the open sun or in areas where temperatures exceed 110° F (43° C)
for extended periods. Extremely high humidity should also be avoided.
Additional Information
12
Type: Condenser
Pickup: Omni (Cardioid)
Frequency response: 30Hz – 20 KHz
Sensitivity: -38 dB (+/-2 dB) (0 dB =1V/Pa at 1 KHz)
Output impendence: 250 ohms, (+/-30%) at 1 KHz)
Dynamic range: 140 dB
ENL: 18dB A
Max. sound pressure: 15 dB (at 1KHz≤1% T.H.D)
S/N: 76dB
Power supply: computer USB power
Current consumption: 3Ma / hour
1x USB microphone
1x Tripod desk stand
1x Windscreen
1x USB cable (1.5M)
1x Owners’ manual
System Requirements:
Inclusions:
Macintosh: Mac OS X; USB 1.0 or 2.0; 64 MB RAM (minimum);
Windows: XP/ Vista/Windows 7; USB 1.0 or 2.0; 64 MB RAM (minimum)
Specifications are subject to change without notice.
USBMIC1 Specifications †
Polar Pattern
Technical Assistance:
If you need assistance setting up or using your Stadium product now or in the future, call
Stadium Support.
Australia
TEL: 03 – 8587 8898
FAX: 03 – 8587 8866
Mon-Fri 9am – 5pmAEST
Please retain this user guide for future reference
Scan QR code for
more products in
the STADIUM range www.stadiumsound.com.au
†
LEGEND
200 Hz
1 kHz
5 kHz
8 kHz
SCALE IS 5 DECIBELS PER DIVISION
240˚
180˚
210˚
270˚
300˚
330˚
0˚
150˚
120˚
90˚
30˚
60˚
LEGEND
200 Hz
1 kHz
5 kHz
8 kHz
SCALE IS 5 DECIBELS PER DIVISION
240˚
180˚
210˚
270˚
300˚
330˚ 0˚
150˚
120˚
90˚
30˚
60˚
12" or more on axis
LEGEND
Frequency in Hertz
Response in dB
10 dB
100
50 200 10k
5k
1k
500 2k 20k
Table of contents
Other Stadium Microphone manuals


