Stalgast 965001 User manual

965001
Stalgast Radom Sp. z o.o. Plac Konesera 9, Budynek O, 03-736 Warszawa
Multi-funcional electrical oven
· User manual - translation of the original manual ·
v.1-11.2019

Fig 1
Fig 2

- 3 -
EN
Thank you for purchasing our product. Please read this manual carefully before using it for the rst time. In
order to provide you with the best technical solutions for your devices, we are constantly developing them
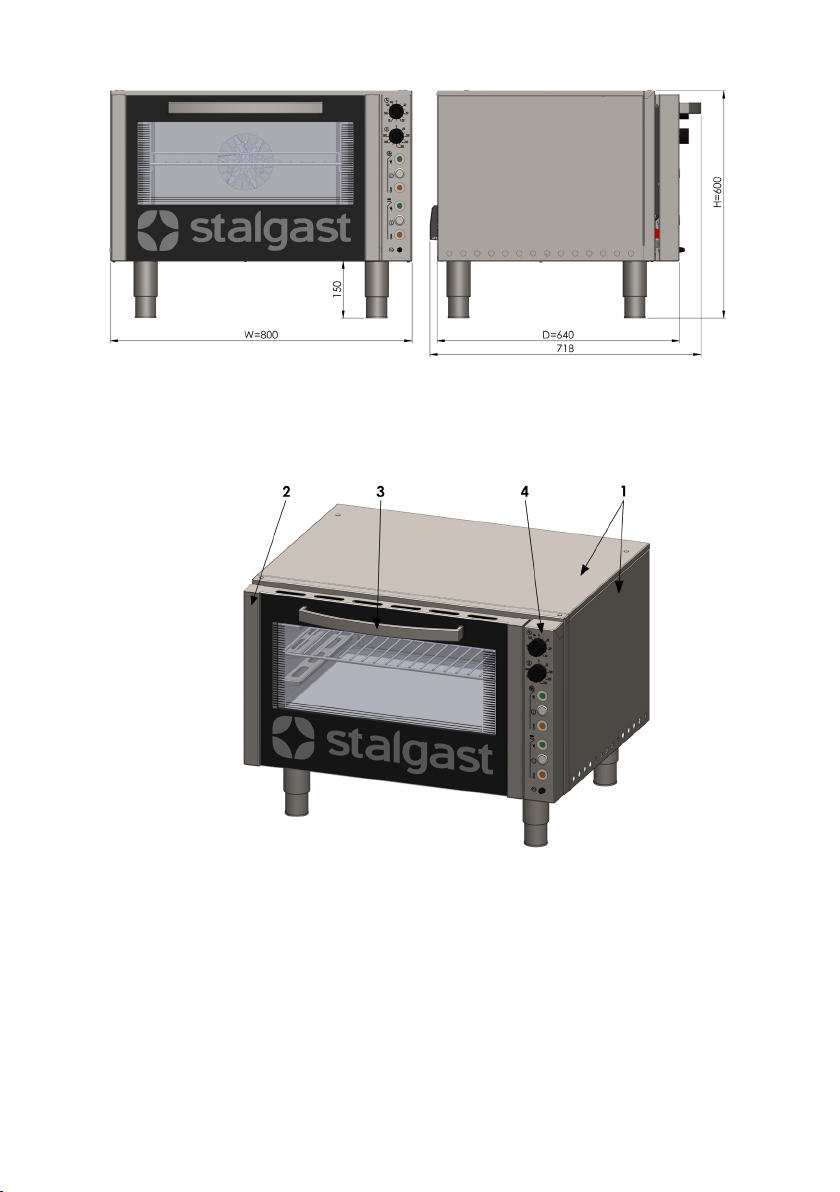
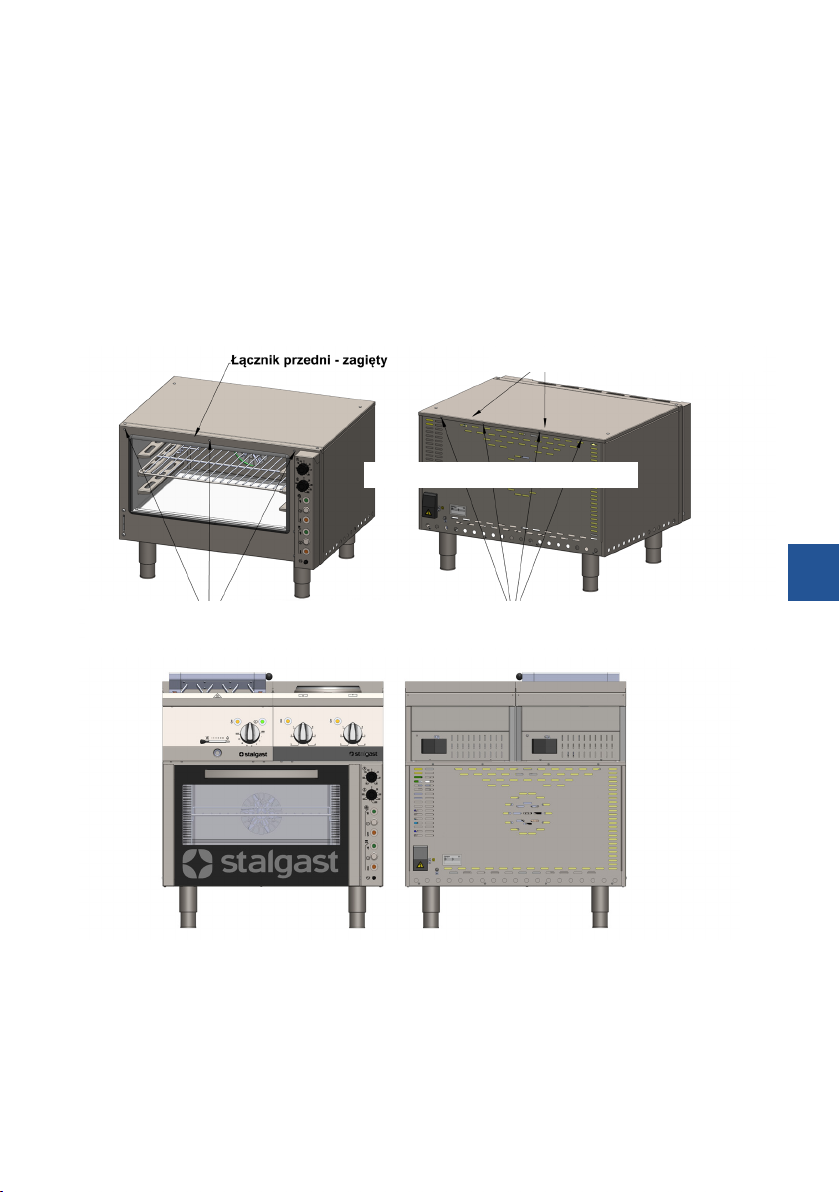
technologically. Therefore, the pictures and drawings in this manual may dier from the device you have
purchased.
NOTE:The manual should be kept in a safe place and accessible to personnel. The manufacturer reservesthe
right to change technical parameters of the equipment. Copying of this manual without permission of the
manufacturer is prohibited.
1. SAFETY INSTRUCTIONS
•Caution! If the device has been damaged during transport, do not connect it!
•Improper operation and misuse may cause serious damage to the unit or injury to persons.
•The device must only be used for the purpose for which it was designed.
•The manufacturer assumes no responsibility for damage caused by improper handling and use of the
device.
•During use, protect the device and the power cord plug from contact with water or other liquids. In the
event that the device inadvertently falls into water or is ooded with water, immediately unplug the
power cord from the outlet and have the device inspected by a specialist.
Failure to follow these instructions could result in life-threatening injuries.
•Never open the housing of the device yourself.
•Do not insert any objects into the openings of the unit housing.
•Do not touch the power cord plug with wet hands.
•Regularly check the condition of the plug and the power cord. If you detect any damage to the plug or
the power cord, have it repaired by a specialized repair facility.
•If the device falls or is otherwise damaged, always have it inspected and possibly repaired at a speciali-
zed repair facility before further use.
•Never repair the unit yourself- doing so may endanger your life.
•Unauthorized alterations or repairs are prohibited.
•Protect the power cord from contact with sharp or hot objects and away from open ames. If you need
to unplug the unit from the power outlet, always grasp the plug; never pull on the power cord.
•Secure the power cord to prevent someone from mistakenly pulling it out ofthe power outlet or trip-
ping over it.
•Check the functioning of the device during use.
•This equipment may be used by children of at least 8 years of age and by persons of diminished physical,
mental capacity and lack of experience and familiarity with the equipment if supervision or instruction
is provided on how to use the equipment safely so that the hazards involved are understood. Children
should not play with the equipment. Unsupervised children should not perform cleaning or mainte-
nance on the equipment.
•If the unit is not currently in use or is being cleaned, always disconnect the unit from the power source
by pulling the plug from the power outlet.
•NOTE: If the power cord plug is plugged into a power outlet, the unit remains energized at all
times.
•Turn o the unit before pulling the plug from the power outlet.
•The device must be visible and easily accessible after installation.
•Ensure that the plug of the non-removable power cord is easily accessible.
2. HEAL TH AND SAFETY RULES
To prevent burns and electric shocks, observe the following safety precautions:
•Train the operating personnel on safe operation of the device before initial start-up and periodically
according to the information in these operating instructions
•Train personnel to operate the unit according to the information in this manual
•Train personnel in the basic principles of using electrical equipment, workplace safety, and rst aid sho-

- 4 -
EN
uld the need arise
•Disconnect the unit from the power source before performing any maintenance work the unit must not
be switched on if any heating element and/or control element is damaged
•Make sure the device is ready for operation before switching it on and check that the power cord does
not touch hot surfaces
•The operator's hands must be dry when working on the device.
•Do not leave the device switched on unattended. Disconnect the device from the power supply when
not in use.
•Use protective gloves when removing warm containers from the grill.
•Any repairs to the unit must be carried out by qualied technical personnel only (technical service).
3. TECHNICAL DATA
3.1. Equipment of the device (page 2 Fig. 2):
1 - Appliance housing, 2 - Door, 3 - Oven door handle, 4- Control panel,
Model 965001
External dimensions (mm) 800x640x600
Power (W) 6540
Top heater power (kW) 3
Thermo-circulation heater power (kW) 3,5
Fan power (kW) 0,04
Dimensions of the oven chamber (mm) 610x440x285
Grate size (mm) 600x400 oraz 1/1 GN
Power supply (V/Hz) 400 / 50
Power cord (mm2)5 x 2.5
4. INSTALLATION
•Before initial operation, remove the protective lm from the unit. Wash the external surfaces with warm
water and a degreasing agent used for cleaning kitchen utensils. Do not use abrasive or other agents
which could scratch the surface. Use only a damp cloth for cleaning. After washing, allow the unit to dry
completely.
•Place the oven on a rm and stable surface in a room intended for the use of the oven that meets buil-
ding codes, and then level it using the adjustable legs.
Fig. 3 Leveling the device
Conditions for connection to the mains:
•Check that the mains voltage corresponds to the voltage indicated on the unit's type plate
•To connect the unit to the mains, connect the power cord to the terminal box located on the back of the
unit. Power cord with plug is NOT included and must be purchased separately.
•The unit must be connected to an equipotential bonding system using the equipotential bonding
screw located on the back of the unit. It is marked with the following symbole:

- 5 -
EN
To connect the unit to an electrical equipotential bonding system:
•unscrew the nut on the screw
•insert the equipotential bonding wire
•Screw the nut back on as far as it will go
•Connect the other end of the equipotential bonding conductor to the equipotential bonding rail.
Fig. 4 Connecting the device to an electrical equipotential bonding system
1. Terminal box
2. Equipotential bonding screw
3. Nameplate
Fig. 5 Rear view oft he device.
The supply cable shou Id be a exible, oil-resistant cable with a grounding conductor, with a polychloropre-
ne sheath - this can be prepared by the manufacturer and available from him or from specialist repair shops!
PE- protective conductor (yellow-green)
N - neutral wire (blue)
L1, L2, L3 - phase wires (other colors)
Fig. 7 Connecting the device to the electrical installation
•The unit may only be connected to the mains by a person with electrical qualications
•The device should be connected to a three-phase socket supplied with electricity 400V SOHz equipped
with a circuit breaker with residual current protection ln=30mA by means of a plug or directly to the
power supply system.
5. DEVICE OPERATION
Before switching on the device, make sure that it has been installed correctly and is in a condition
for safe operation.
Preparation forstarting the device:
Table of contents
Other Stalgast Oven manuals
Popular Oven manuals by other brands

Brandt
Brandt FC 222 user manual

aumate
aumate TOA20M04N-1E instruction manual

Maytag
Maytag CWE4100AC - 24" Single Electric Wall Oven Dimension Guide

Kernau
Kernau KBO 1076 S PT B instruction manual

Bosch
Bosch HB 37 N Series User manual and installation instructions

Electrolux
Electrolux EOD5420AA user manual