Starblitz SRC-FREQUENCIA User manual

Wireless Timer/Trigger SRCFREQUENCIA
User guide / Mode d’emploi / Manual de instrucciones
www.starblitz.fr
EN
FR
ES


1
EN
FR
ES
For Your Safety ...........................................................2
Notices.........................................................................2
Introduction ...............................................................4
Parts of SRC-FREQUENCIA .......................................4
Remote ........................................................................4
Display Panel..............................................................5
Inserting Batteries.....................................................5
Replacing Batteries ...................................................5
When SRC-FREQUENCIA Is Not in Use...................5
Lighting /Lock Button...............................................6
Connecting SRC-FREQUENCIA................................6
Using SRC-FREQUENCIA...........................................7
Timed Photography..................................................7
Manual Release....................................................... 14
Precautions for Use ................................................ 15
Caring for SRC-FREQUENCIA................................ 15
Specications.......................................................... 16
Table of Contents
Wireless Timer/Trigger
STARBLITZ® SRCFREQUENCIA
User guide

For Your Safety (1/2)
To prevent damage to your product or injury to your-
self or to others, read the following safety precautions
in their entirety before using this equipment. Keep
these safety instructions where all those who use this
equipment will read them.
The consequences that could result from failure to
observe the precautions listed in this section are indi-
cated by the following symbol:
This icon marks warnings, information that
should be read before using this product to
prevent possible injury.
Do not disassemble or modify
Failure to observe this precaution could result in
electronic shock or product malfunction.
Should the product break open as the result of a fall
or other accident, remove the batteries and take
the product to manufacturer for inspection.
Keep dry
Do not handle with wet hands or immerse in or
expose to water or rain. Failure to observe this pre-
caution could result in re or electric shock.
Do not use in the presence of ammable gas
Failure to observe this precaution could result in
explosion or re.
Keep out of reach of children
This device contains small parts which may pose a
choking hazard. Consult a physician immediately if
a child swallows any part of this device.
Turn o immediately in the event of malfu-
nction
Should you notice smoke or an unusual smell co-
ming from this device, remove the battery imme-
diately and take the device to an authorized service
representative for inspection, taking care to avoid
burns. Continued operation could result in injury.
EN
FR
ES
2

For Your Safety (2/2)
Do not expose to high temperatures
Do not leave the device in a closed vehicle under
the sun or in other areas subject to extremely high
temperatures. Failure to observe this precaution
could result in re or in damage to the casing or
internal parts.
Observe precaution when handling batteries
Batteries may leak or explode if improperly han-
dled. Observe the following precautions when
handling batteries for use in this device:
Use only batteries listed in this manual. Do not
mix old and new batteries or batteries of dierent
types.
Read and follow all warnings and instructions
provided by the manufacturer.
Do not short or disassemble.
Do not expose to ame or excessive heat.
Do not attempt to insert batteries upside down
or backwards.
Batteries are prone to leakage when fully
discharged. To avoid damage to the product, be
sure to remove the batteries when leaving the pro-
duct unattended for prolonged periods or when no
charge remains.
Should liquid from the batteries come into
contact with skin or clothing, rinse immediately
with fresh water.
3
EN
FR
ES

Introduction Parts of SRC-Frequencia (1/3)
Thank you for your purchase of Timer/Trigger
Starblitz® SRC-Frequencia.
The Timer/Trigger Starblitz® SRC-Frequencia is
equipped with an interval timer suited to a wide
variety of tasks, including astronomical photogra-
phy.
www.starblitz.fr/en/
RECEIVER
A B C D
AShutter release button
BStatus indicator
CChannel switch
DShutter socket
Please see the back of the cover illustrations.
REMOTE CONTROL
1Connector (More models available)
2Cord
3Focus and the release of two-color indicator light
4Display panel
5TIMER START/STOP button
6SET button
7(Lighting/lock) button
8Arrow button
9Shutter-release button
10 Battery-chamber cover
11 Straps xed deduction (available separately;
use cell phone or other similar strap)
4
EN
FR
ES
Parts of SRC-Frequencia (2/3)
5
EN
FR
ES
DISPLAY PANEL*
1Functional cursor
2Timer display
3Lock indicator
4Low battery indicator
5TIMER ACTIVE indicator
6Speaker on/o indicator
7SET indicator
8RELEASE indicator
9Number of shots
*The illustration inside the front cover shows the
control panel with all elements lit. In the other illustra-
tions throughout this manual, elements relevant to the
explanation in the accompanying text are shown in
black. Indicators not mentioned in the text are shown
in gray.
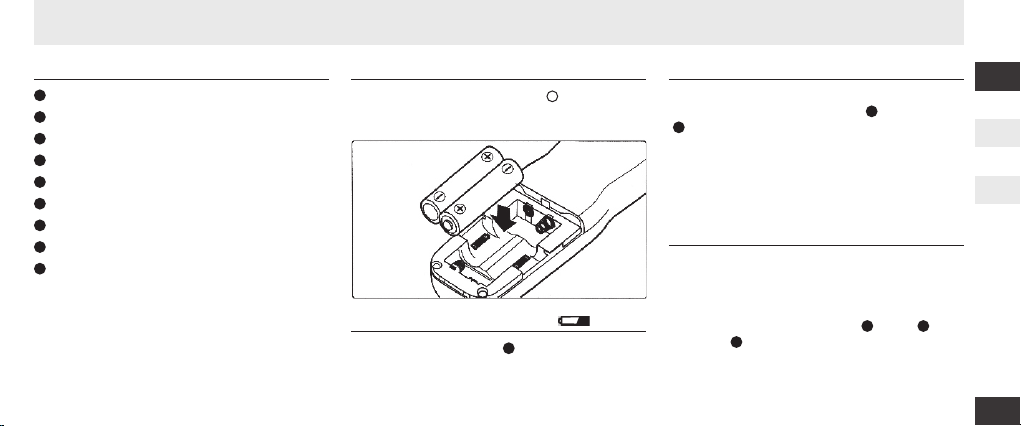
INSERTING BATTERIES
Slide the battery-chamber cover (10 ) from the back
of SRC-Frequencia and insert two AAA 1.5V LR03
alkaline batteries (available separately) as shown.
En En
Timed Photography (6/7)
Show Panel Display (Timer Active)
Flashes while timer is active
When that did not open the
shutter: shots: Time remaining
until next shot
While shutter is open: Time remain-
ing until shutter closes
Number of shots remaining
Flashes while shutter is open
The Speaker and Release Lamp
The following illustration shows when a beep will soud( )and the release lamp flash ( ) with a delay
of 5 s, an esposure time of 4 s,and an interval of 5 s.
Loudspeakers
Light green
The red indicator light
Focus output
The release of output
811
2 3 167 1 2
0 1 2 3
4 5
6
7
9 01
1
1
415
1 18
9
20
1 22 23
2
4 25 26 27
1
4. End Shooting
Shooting will end automatically when the se-
lected number of shots has been taken. To end
shooting before all photographs have been
taken, press the TIMER START/STOP button ( 5 ).
Partsof the (2/3)SRC-ALBA
12
Display Panel*
Functional cursor
Show time
Lock indicator
Low battery indicator
“TIMER ACTIVE” indicator
Speaker on/off indicator
“SET”indicator
“RELEASE” indicator
Number of shots
*The illustration inside the front cover shows
the control panel with all elements lit. In the
other illustrations throughout this manual,
elements relevant to the explanation in the
accompanying text are shown in black. Indi-
cators not mentioned in the text are shown
in gray.
1
2
3
4
5
6
7
8
9
5
Inserting Batteries
Slide the battery-chamber cover ( 10 ) from the
back of the SRC-ALBA and insert two AAA 1.5V
LR03 alkaline batteries (available separately)
as shown.
The Low Battery Indicator ( )
The low battery indicator ( ) will blink when the
batteries are low. Please replace the battery
4
Replacing Batteries
When replacing batteries:
1 Check that the “TIMER ACTIVE” ( ) and “RE-
LEASE” ( )indicators are not displayed.
2 Turn the camera off and disconnect the SRC-
ALBA.
3 Remove the batteries.
4 Wait until the control panel has gone out and
insert new batteries.
5
8
When the Is Not in Use
The is not equipped with an off switch.
To reduce the drain on the batteries when theSRC-
ALBA is not in use; end shooting and check that
the “TIMER ACTIVE” ( ), “SET” ( ),and
“RELEASE” ( ) indicators are not
displayed.
The drain on the batteries increases when these
indicators are flashing.
SRC-ALBA
SRC-ALBA
5 7
8
THE LOW BATTERY INDICATOR
En En
Timed Photography (6/7)
Show Panel Display (Timer Active)
Flashes while timer is active
When that did not open the
shutter: shots: Time remaining
until next shot
While shutter is open: Time remain-
ing until shutter closes
Number of shots remaining
Flashes while shutter is open
The Speaker and Release Lamp
The following illustration shows when a beep will soud( )and the release lamp flash ( ) with a delay
of 5 s, an esposure time of 4 s,and an interval of 5 s.
Loudspeakers
Light green
The red indicator light
Focus output
The release of output
811
2 3 167 1 2
0 1 2 3
4 5
6
7
9 01
1
1
415
1 18
9
20
1 22 23
2
4 25 26 27
1
4. End Shooting
Shooting will end automatically when the se-
lected number of shots has been taken. To end
shooting before all photographs have been
taken, press the TIMER START/STOP button ( 5 ).
Partsof the (2/3)SRC-ALBA
12
Display Panel*
Functional cursor
Show time
Lock indicator
Low battery indicator
“TIMER ACTIVE” indicator
Speaker on/off indicator
“SET”indicator
“RELEASE” indicator
Number of shots
*The illustration inside the front cover shows
the control panel with all elements lit. In the
other illustrations throughout this manual,
elements relevant to the explanation in the
accompanying text are shown in black. Indi-
cators not mentioned in the text are shown
in gray.
1
2
3
4
5
6
7
8
9
5
Inserting Batteries
Slide the battery-chamber cover ( 10 ) from the
back of the SRC-ALBA and insert two AAA 1.5V
LR03 alkaline batteries (available separately)
as shown.
The Low Battery Indicator ( )
The low battery indicator ( ) will blink when the
batteries are low. Please replace the battery
4
Replacing Batteries
When replacing batteries:
1 Check that the “TIMER ACTIVE” ( ) and “RE-
LEASE” ( )indicators are not displayed.
2 Turn the camera off and disconnect the SRC-
ALBA.
3 Remove the batteries.
4 Wait until the control panel has gone out and
insert new batteries.
5
8
When the Is Not in Use
The is not equipped with an off switch.
To reduce the drain on the batteries when theSRC-
ALBA is not in use; end shooting and check that
the “TIMER ACTIVE” ( ), “SET” ( ),and
“RELEASE” ( ) indicators are not
displayed.
The drain on the batteries increases when these
indicators are flashing.
SRC-ALBA
SRC-ALBA
5 7
8
The low battery indicator ( 4) will blink when batte-
ries are low. Please replace the battery.
REPLACING BATTERIES
When replacing batteries:
1 . Check that the TIMER ACTIVE ( 5) and RELEASE
(8) indicators are not displayed.
2. Turn the camera o and disconnect the SRC-
Frequencia.
3. Remove the batteries.
4. Wait until the control panel has gone out and
insert new batteries.
WHEN THE SRCFREQUENCIA IS NOT IN USE
The SRC-Frequencia is not equipped with an o
switch.
To reduce the drain on the batteries when the
SRC-Frequencia is not in use, end shooting and
check that the TIMER ACTIVE ( 5), SET ( 7), and
RELEASE ( 8) indicators are not displayed.
The drain on the batteries increases when these
indicators are ashing.
Parts of SRC-Frequencia (3/3) Connecting SRC-Frequencia
Disconnecting SRC-Frequencia
1. Turn the camera o.
2. Check that the TIMER ACTIVE ( 5) and RELEASE
(8) indicators are not displayed.
3. Remove the remote cord socket terminal cover
from the camera. By connecting the camera shut-
ter and the shutter plug ( 1), the camera is rmly
connected.
After checking that the TIMER ACTIVE ( 5) and
RELEASE ( 8) indicators are not displayed, turn the
camera o and disconnect the SRC-Frequencia .
Replace the Remote cord socket terminal cover.
TIMER ACTIVE, SET and RELEASE indicators
En En
C o n n e c t i n g t h e S R C - A L B A
Parts of the (3/3)SRC-ALBA
6
11
The “TIMER ACTIVE” “SET”and “RELEASE”Indicators
lf this flashes Expression means: Close method
TIMER ACTIVE
SET
RELEASE
(TIMER
ACTIVE not
flashing)
Timer active (page11); press TIM-
ER START/STOP button ( 5 ).
Settings can be modified (page 7);
press SET button ( 6 )
Manual release active (page 14);
release shutter-release button
( 9 ; if button is in HOLE position,
release shutter- release lock).
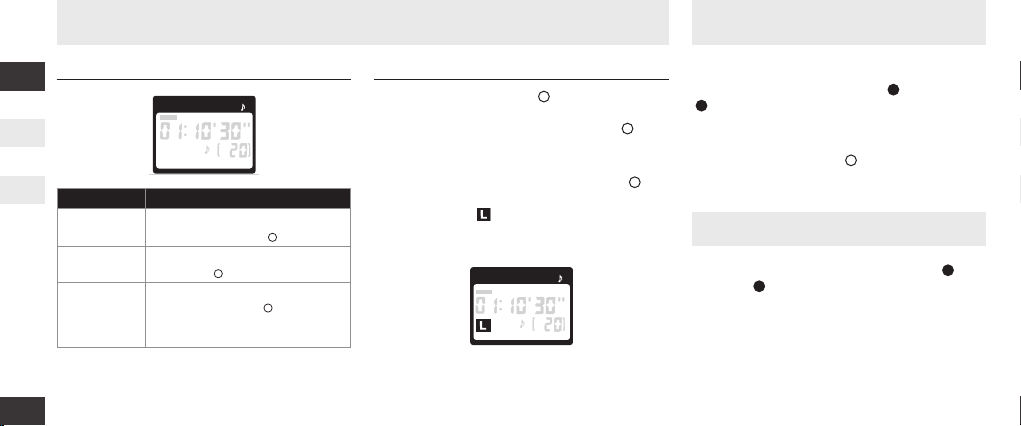
Lighting/Lock Button
Press the lighting /lock button ( 7 ) briefly to
activate the control panel backlight. The back-
light will remain lit for about six seconds; press-
ing the arrow button ( 8 ) while the backlight is
on extends the timer for another six seconds.
To lock all controls except the shutter-re
lease ( 9 ) and Lighting/lock buttons, press
the illuminator lock button until the lock icon
( ) is displayed in the control panel. To release
the lock, Please press the lighting/lock buton untill
the lock icon is no longer displayed.
L
DELAY LONG INTVL N
TIMER ACTIVE SET RELEASE
DELAY LONG INTVL N
SET
DELAY LONG INTVL N
SET
DELAY LONG INTVL N
SET
Disconnecting the MC-36b
Setting the Timer
After checking that the “TIMER ACTIVE” ( ) and ‘RE-
LEASE” ( ) indicators are not displayed, turn the
camera off and disconnect the SRC-ALBA . Replace
the Remote cord socket terminal cover.
5
8
Timed Photography (5/7)
To ensure correct operation, choose an interval at
least one second longer than the exposure time.
When using autofocus, set the delay to two sec-
onds or more and choose an interval at least two
seconds longer than the exposure time to ensure
that the camera has time to focus. When using
long exposure noise reduction (available with
some digital cameras ),the interval should be at
least twice the exposure time.
Intervals of 00:00:00 will automatically be re
set to 00:00:01 when the SET button ( 6 )is pressed
to put settings into effect.
To set the number of shots to--(unlimited),
select 1 and press the arrow button ( 8 ) down or
select 399 and press the arrow button up.
2.3 After adjusting all settings as desired, press
the SET button ( 6 )to put the new settings into
effect timer will issue a beep- (speakers in the open
circumstances ),and the “SET”indicator will go out.
The new settings will remain in effect until
changed or until the batteries are removed
or exhausted.
3.Start the Timer
Press the TIMER START/STOP button ( 5 ).The
timer will start and “TIMER ACTIVE" ( )will flash
in the show panel. Between shots the control panel
will show the time remaining until the next photograph
is taken. Two second Focus output, focus and the
release of light-green light.
5
While the shutter is open,the show panel will
show the time remaining until the shutter closes,
and the release lamp and “RELEASE” indicator
( ) will flash at one-second intervals.FocusNand
the release indicator Lianghong Deng. If the
speaker is turned on ,the timer will be issued one
second intervals for the beeps, each take a picture,
the remaining number of shots will be updated.
8
1 Turn the camera off.
2 Check that the “TIMER ACTIVE” ( ) and “RE-
LEASE” ( ) indicators are not diaplayed.
3 Remove the remote cord socket termial cover
from the camera. By connecting the camera
shutter, and will shutter plug ( 1 ) . The camera
firmly connected.
5
8
Blink It means this; do this to turn it o
TIMER ACTIVE Timer active (p. 11); press TIMER
START/STOP button ( 5).
SET Settings can be modied (p. 7); press
SET button ( 6)
RELEASE
TIMER ACTIVE
Manual release active (p. 14); release
shutter-release button( 9); if button is in
HOLD position, release shutter-release
lock).
LIGHTING/LOCK BUTTON
Press the lighting/lock button ( 7) briey to activate the
control panel backlight. The back-light will remain lit for
about six seconds; pressing the arrow button ( 8) while
the backlight is on extends the timer for another six
seconds.
To lock all controls except the shutter-release ( 9) and
Lighting/lock buttons, press the illuminator lock button
until the lock icon (
En En
C o n n e c t i n g t h e S R C - A L B A
Parts of the (3/3)SRC-ALBA
6
11
The “TIMER ACTIVE” “SET”and “RELEASE”Indicators
lf this flashes Expression means: Close method
TIMER ACTIVE
SET
RELEASE
(TIMER
ACTIVE not
flashing)
Timer active (page11); press TIM-
ER START/STOP button ( 5 ).
Settings can be modified (page 7);
press SET button ( 6 )
Manual release active (page 14);
release shutter-release button
( 9 ; if button is in HOLE position,
release shutter- release lock).
Lighting/Lock Button
Press the lighting /lock button ( 7 ) briefly to
activate the control panel backlight. The back-
light will remain lit for about six seconds; press-
ing the arrow button ( 8 ) while the backlight is
on extends the timer for another six seconds.
To lock all controls except the shutter-re
lease ( 9 ) and Lighting/lock buttons, press
the illuminator lock button until the lock icon
( ) is displayed in the control panel. To release
the lock, Please press the lighting/lock buton untill
the lock icon is no longer displayed.
L
DELAY LONG INTVL N
TIMER ACTIVE SET RELEASE
DELAY LONG INTVL N
SET
DELAY LONG INTVL N
SET
DELAY LONG INTVL N
SET
Disconnecting the MC-36b
Setting the Timer
After checking that the “TIMER ACTIVE” ( ) and ‘RE-
LEASE” ( ) indicators are not displayed, turn the
camera off and disconnect the SRC-ALBA . Replace
the Remote cord socket terminal cover.
5
8
Timed Photography (5/7)
To ensure correct operation, choose an interval at
least one second longer than the exposure time.
When using autofocus, set the delay to two sec-
onds or more and choose an interval at least two
seconds longer than the exposure time to ensure
that the camera has time to focus. When using
long exposure noise reduction (available with
some digital cameras ),the interval should be at
least twice the exposure time.
Intervals of 00:00:00 will automatically be re
set to 00:00:01 when the SET button ( 6 )is pressed
to put settings into effect.
To set the number of shots to--(unlimited),
select 1 and press the arrow button ( 8 ) down or
select 399 and press the arrow button up.
2.3 After adjusting all settings as desired, press
the SET button ( 6 )to put the new settings into
effect timer will issue a beep- (speakers in the open
circumstances ),and the “SET”indicator will go out.
The new settings will remain in effect until
changed or until the batteries are removed
or exhausted.
3.Start the Timer
Press the TIMER START/STOP button ( 5 ).The
timer will start and “TIMER ACTIVE" ( )will flash
in the show panel. Between shots the control panel
will show the time remaining until the next photograph
is taken. Two second Focus output, focus and the
release of light-green light.
5
While the shutter is open,the show panel will
show the time remaining until the shutter closes,
and the release lamp and “RELEASE” indicator
( ) will flash at one-second intervals.FocusNand
the release indicator Lianghong Deng. If the
speaker is turned on ,the timer will be issued one
second intervals for the beeps, each take a picture,
the remaining number of shots will be updated.
8
1 Turn the camera off.
2 Check that the “TIMER ACTIVE” ( ) and “RE-
LEASE” ( ) indicators are not diaplayed.
3 Remove the remote cord socket termial cover
from the camera. By connecting the camera
shutter, and will shutter plug ( 1 ) . The camera
firmly connected.
5
8
) is displayed in the control panel.
To release the lock, please press the lighting/lock button
until the lock icon is no longer displayed.
En En
C o n n e c t i n g t h e S R C - A L B A
Parts of the (3/3)SRC-ALBA
6
11
The “TIMER ACTIVE” “SET”and “RELEASE”Indicators
lf this flashes Expression means: Close method
TIMER ACTIVE
SET
RELEASE
(TIMER
ACTIVE not
flashing)
Timer active (page11); press TIM-
ER START/STOP button ( 5 ).
Settings can be modified (page 7);
press SET button ( 6 )
Manual release active (page 14);
release shutter-release button
( 9 ; if button is in HOLE position,
release shutter- release lock).
Lighting/Lock Button
Press the lighting /lock button ( 7 ) briefly to
activate the control panel backlight. The back-
light will remain lit for about six seconds; press-
ing the arrow button ( 8 ) while the backlight is
on extends the timer for another six seconds.
To lock all controls except the shutter-re
lease ( 9 ) and Lighting/lock buttons, press
the illuminator lock button until the lock icon
( ) is displayed in the control panel. To release
the lock, Please press the lighting/lock buton untill
the lock icon is no longer displayed.
L
DELAY LONG INTVL N
TIMER ACTIVE SET RELEASE
DELAY LONG INTVL N
SET
DELAY LONG INTVL N
SET
DELAY LONG INTVL N
SET
Disconnecting the MC-36b
Setting the Timer
After checking that the “TIMER ACTIVE” ( ) and ‘RE-
LEASE” ( ) indicators are not displayed, turn the
camera off and disconnect the SRC-ALBA . Replace
the Remote cord socket terminal cover.
5
8
Timed Photography (5/7)
To ensure correct operation, choose an interval at
least one second longer than the exposure time.
When using autofocus, set the delay to two sec-
onds or more and choose an interval at least two
seconds longer than the exposure time to ensure
that the camera has time to focus. When using
long exposure noise reduction (available with
some digital cameras ),the interval should be at
least twice the exposure time.
Intervals of 00:00:00 will automatically be re
set to 00:00:01 when the SET button ( 6 )is pressed
to put settings into effect.
To set the number of shots to--(unlimited),
select 1 and press the arrow button ( 8 ) down or
select 399 and press the arrow button up.
2.3 After adjusting all settings as desired, press
the SET button ( 6 )to put the new settings into
effect timer will issue a beep- (speakers in the open
circumstances ),and the “SET”indicator will go out.
The new settings will remain in effect until
changed or until the batteries are removed
or exhausted.
3.Start the Timer
Press the TIMER START/STOP button ( 5 ).The
timer will start and “TIMER ACTIVE" ( )will flash
in the show panel. Between shots the control panel
will show the time remaining until the next photograph
is taken. Two second Focus output, focus and the
release of light-green light.
5
While the shutter is open,the show panel will
show the time remaining until the shutter closes,
and the release lamp and “RELEASE” indicator
( ) will flash at one-second intervals.FocusNand
the release indicator Lianghong Deng. If the
speaker is turned on ,the timer will be issued one
second intervals for the beeps, each take a picture,
the remaining number of shots will be updated.
8
1 Turn the camera off.
2 Check that the “TIMER ACTIVE” ( ) and “RE-
LEASE” ( ) indicators are not diaplayed.
3 Remove the remote cord socket termial cover
from the camera. By connecting the camera
shutter, and will shutter plug ( 1 ) . The camera
firmly connected.
5
8
6
EN
FR
ES

Using SRC-Frequencia Timed Photography (1/7)
The SRC-Frequencia functions as:
An automatic timer (p.7-13). Choose the delay
(time before shooting starts), exposure time, inter-
val, and number of shots for timed interval pho-
tography. Shutter speed can be selected with the
camera if desired (p.13).
A manual release (p. 14). Take photographs
manually using the shutter-release button on the
SRC-Frequencia. Photographs can be taken ma-
nually even when the timer is running.
1. Adjust Camera Settings
1.1. Connect the SRC-Frequencia (p.6) and turn
the camera on.
1.2. Adjust camera settings as follows (see the
camera manual for details ):
Exposure mode M(manual)
Shutter speed Bulb
Interval timer O
Focus mode AF-C (continuous-servo
autofocus) or M(manual)
Continuous S (single frame)
2. Set the timer.
2.1. Press the SET button ( 6). SET will ash in the
display panel.
En En
10 7
Timed Photography (4/7)
Timed Photography (1/7)
Using the SRC-ALBA
The functions as:
An automatic timer (pp.7-13).Choose the de-
lay (time before shooting starts),exposure
time, interval, and number of shots for timed
interval photography. Shutter speed can be
selected with the camera if desired (pg.13).
A manual release (pg.14). Take photographs
manually using the shutter-release button on
the SRC-ALBA, Photographs can be taken
manually even when the timer is running.
SRC-ALBA 1. Adjust Camera Settings
1.1 Connect the (pg.6) and turn
the camera on.
1.2 Adjust camera settings as follows (see the
camera manual for details ):
SRC-ALBA
Exposure mode M ( manual)
Shutter speed Bulb
Interval timer Off
Focus mode AF-C (continuous-wervo autofo-
cus)* or M (manual)
Continuous S (single frame)
*Select(release priority” if available.
2.Set the Timer
2.1 Press the SET button ( 6 ). “SET” will flash in
the display panel.
Th e ca n be c onn ec t ed t o th e ca mer a
af ter t he t im e r ha s be e n se t.
SR C-A LB A
DELAY LONG INTVL N
SET
DELAY LONG INTVL N
SET
Exposure time
Interval Number of shots Speaker
Minute Second Hour Minute Second
DELAY LONG INTVL N
DELAY LONG INTVL N
DELAY LONG INTVL N
DELAY LONG INTVL N
SET
DELAY LONG INTVL N
SET
DELAY LONG INTVL N
SET
DELAY LONG INTVL N
SET
DELAY LONG INTVL N
SET
DELAY LONG INTVL N
SET
DELAY LONG INTVL N
SET
The SRC-Frequencia can be connected to the
camera after the timer has been set.
7
EN
FR
ES

Timed Photography (2/7)
8
2.2. Réglez les paramètres suivants :
Option Description Supported settings
DELAY Delay before shutter is released 0s to 99 hrs 59 min 59s (in one second increments)
LONG Exposure time
INTVL Interval 1s to 99 hrs 59min 59s (in one second increments)
NNumber of shots 1 to 399,--(unlimited)
En En
9
8
Delay (time until shooting starts)
Timed Photography (2/7)
2.2 Adjust the following settings:
Option
DELAY
LONG
INTVL
N
Description Supported settings
Delay before shutter is released
Exposure time
Interval
Number of shots
Speaker on/off
Delay, Exposure, and Interval Settings
Shutter opens
Shutter closes
0s to 99 hrs 59 min 59s (in one-second increments)
1s to 99 hrs 59 min 59s (in one-second increments)
1 to 399,--(unlimited)
(on), (off)
Timer starts
Delay
1st frame 2nd frame
Exposure
time Interval
Timer ends
nth frame
Number of shots (N)
Timed Photography (3/7)
Setting the Timer
Use the arrow button to set the timer.
Press left or right to select, up or down
to change. The current selection is in-
dicated by the selection cursor ( )1
SET
press SET ( 6 ) at any time to complete the opera-
tion and display the new settings for the selected
item. To view other settings, press the arrow but-
ton left or right. The current selection is indicated
by the selection cursor ( ). Press the SET button
to edit the current setting as described above.
1
DELAY LONG INTVL N
SET
DELAY LONG INTVL N
SET
DELAY LONG INTVL N
SET
DELAY LONG INTVL N
SET
DELAY LONG INTVL N
DELAY LONG INTVL N
Minute Second
Hour
Adjust
settings
Setting
complete
Speaker on / o
En En
9
8
Delay (time until shooting starts)
Timed Photography (2/7)
2.2 Adjust the following settings:
Option
DELAY
LONG
INTVL
N
Description Supported settings
Delay before shutter is released
Exposure time
Interval
Number of shots
Speaker on/off
Delay, Exposure, and Interval Settings
Shutter opens
Shutter closes
0s to 99 hrs 59 min 59s (in one-second increments)
1s to 99 hrs 59 min 59s (in one-second increments)
1 to 399,--(unlimited)
(on), (off)
Timer starts
Delay
1st frame 2nd frame
Exposure
time Interval
Timer ends
nth frame
Number of shots (N)
Timed Photography (3/7)
Setting the Timer
Use the arrow button to set the timer.
Press left or right to select, up or down
to change. The current selection is in-
dicated by the selection cursor ( )1
SET
press SET ( 6 ) at any time to complete the opera-
tion and display the new settings for the selected
item. To view other settings, press the arrow but-
ton left or right. The current selection is indicated
by the selection cursor ( ). Press the SET button
to edit the current setting as described above.
1
DELAY LONG INTVL N
SET
DELAY LONG INTVL N
SET
DELAY LONG INTVL N
SET
DELAY LONG INTVL N
SET
DELAY LONG INTVL N
DELAY LONG INTVL N
Minute Second
Hour
Adjust
settings
Setting
complete
(on),
En En
9
8
Delay (time until shooting starts)
Timed Photography (2/7)
2.2 Adjust the following settings:
Option
DELAY
LONG
INTVL
N
Description Supported settings
Delay before shutter is released
Exposure time
Interval
Number of shots
Speaker on/off
Delay, Exposure, and Interval Settings
Shutter opens
Shutter closes
0s to 99 hrs 59 min 59s (in one-second increments)
1s to 99 hrs 59 min 59s (in one-second increments)
1 to 399,--(unlimited)
(on), (off)
Timer starts
Delay
1st frame 2nd frame
Exposure
time Interval
Timer ends
nth frame
Number of shots (N)
Timed Photography (3/7)
Setting the Timer
Use the arrow button to set the timer.
Press left or right to select, up or down
to change. The current selection is in-
dicated by the selection cursor ( )1
SET
press SET ( 6 ) at any time to complete the opera-
tion and display the new settings for the selected
item. To view other settings, press the arrow but-
ton left or right. The current selection is indicated
by the selection cursor ( ). Press the SET button
to edit the current setting as described above.
1
DELAY LONG INTVL N
SET
DELAY LONG INTVL N
SET
DELAY LONG INTVL N
SET
DELAY LONG INTVL N
SET
DELAY LONG INTVL N
DELAY LONG INTVL N
Minute Second
Hour
Adjust
settings
Setting
complete
(o)
Delay, Exposure, and Interval Settings:
En En
9
8
Delay (time until shooting starts)
Timed Photography (2/7)
2.2 Adjust the following settings:
Option
DELAY
LONG
INTVL
N
Description Supported settings
Delay before shutter is released
Exposure time
Interval
Number of shots
Speaker on/off
Delay, Exposure, and Interval Settings
Shutter opens
Shutter closes
0s to 99 hrs 59 min 59s (in one-second increments)
1s to 99 hrs 59 min 59s (in one-second increments)
1 to 399,--(unlimited)
(on), (off)
Timer starts
Delay
1st frame 2nd frame
Exposure
time Interval
Timer ends
nth frame
Number of shots (N)
Timed Photography (3/7)
Setting the Timer
Use the arrow button to set the timer.
Press left or right to select, up or down
to change. The current selection is in-
dicated by the selection cursor ( )1
SET
press SET ( 6 ) at any time to complete the opera-
tion and display the new settings for the selected
item. To view other settings, press the arrow but-
ton left or right. The current selection is indicated
by the selection cursor ( ). Press the SET button
to edit the current setting as described above.
1
DELAY LONG INTVL N
SET
DELAY LONG INTVL N
SET
DELAY LONG INTVL N
SET
DELAY LONG INTVL N
SET
DELAY LONG INTVL N
DELAY LONG INTVL N
Minute Second
Hour
Adjust
settings
Setting
complete
Number of shots (n)
Timer endsTimer starts
Shutter opens
Shutter closes Interval
Delay
2nd frame1st frame nth frame
Exposure
time
EN
FR
ES

Timed Photography (3/7)
9
En En
9
8
Delay (time until shooting starts)
Timed Photography (2/7)
2.2 Adjust the following settings:
Option
DELAY
LONG
INTVL
N
Description Supported settings
Delay before shutter is released
Exposure time
Interval
Number of shots
Speaker on/off
Delay, Exposure, and Interval Settings
Shutter opens
Shutter closes
0s to 99 hrs 59 min 59s (in one-second increments)
1s to 99 hrs 59 min 59s (in one-second increments)
1 to 399,--(unlimited)
(on), (off)
Timer starts
Delay
1st frame 2nd frame
Exposure
time Interval
Timer ends
nth frame
Number of shots (N)
Timed Photography (3/7)
Setting the Timer
Use the arrow button to set the timer.
Press left or right to select, up or down
to change. The current selection is in-
dicated by the selection cursor ( )1
SET
press SET ( 6 ) at any time to complete the opera-
tion and display the new settings for the selected
item. To view other settings, press the arrow but-
ton left or right. The current selection is indicated
by the selection cursor ( ). Press the SET button
to edit the current setting as described above.
1
DELAY LONG INTVL N
SET
DELAY LONG INTVL N
SET
DELAY LONG INTVL N
SET
DELAY LONG INTVL N
SET
DELAY LONG INTVL N
DELAY LONG INTVL N
Minute Second
Hour
Adjust
settings
Setting
complete
Setting the timer
Use the arrow button to set the
timer. Press left or right to select,
up or down to change. The cur-
rent selection is indicated by the
selection cursor ( 1).
Press SET ( 6) at any time to complete the
operation and display the new settings for the
selected item. To view other settings, press the
arrow button left or right. The current selection
is indicated by the selection cursor ( 1). Press
the SET button to edit the current setting as
described above.
Delay
Setting
complete
Adjust
settings
MinuteHour Second
EN
FR
ES

Timed Photography (4/7)
En En
10 7
Timed Photography (4/7)
Timed Photography (1/7)
Using the SRC-ALBA
The functions as:
An automatic timer (pp.7-13).Choose the de-
lay (time before shooting starts),exposure
time, interval, and number of shots for timed
interval photography. Shutter speed can be
selected with the camera if desired (pg.13).
A manual release (pg.14). Take photographs
manually using the shutter-release button on
the SRC-ALBA, Photographs can be taken
manually even when the timer is running.
SRC-ALBA 1. Adjust Camera Settings
1.1 Connect the (pg.6) and turn
the camera on.
1.2 Adjust camera settings as follows (see the
camera manual for details ):
SRC-ALBA
Exposure mode M ( manual)
Shutter speed Bulb
Interval timer Off
Focus mode AF-C (continuous-wervo autofo-
cus)* or M (manual)
Continuous S (single frame)
*Select(release priority” if available.
2.Set the Timer
2.1 Press the SET button ( 6 ). “SET” will flash in
the display panel.
Th e ca n be c onn e ct e d to t h e ca m er a
af t er t h e ti mer h as b e en s e t.
SR C -A L BA
DELAY LONG INTVL N
SET
DELAY LONG INTVL N
SET
Exposure time
Interval Number of shots Speaker
Minute Second Hour Minute Second
DELAY LONG INTVL N
DELAY LONG INTVL N
DELAY LONG INTVL N
DELAY LONG INTVL N
SET
DELAY LONG INTVL N
SET
DELAY LONG INTVL N
SET
DELAY LONG INTVL N
SET
DELAY LONG INTVL N
SET
DELAY LONG INTVL N
SET
DELAY LONG INTVL N
SET
Exposure time Interval Number of shots Speaker
Minute Second Hour Minute Second
10
EN
FR
ES

Setting the Timer
To ensure correct operation, choose an interval at
least one second longer than the exposure time.
When using autofocus, set the delay to two seconds
or more and choose an interval at least two seconds
longer than the exposure time to ensure that the
camera has time to focus. When using long expo-
sure noise reduction (available with some digital
cameras), the interval should be at least twice the
exposure time.
Intervals of 00:00:00 will automatically be reset to
00:00:01 when the SET button ( 6) is pressed to put
settings into eect.
To set the number of shots to--(unlimited), select 1
and press the arrow button ( 8) down or select 399
and press the arrow button up.
2.3. After adjusting all settings as desired, press the
SET button ( 6) to put the new settings into eect.
Timer will issue a beep- (speakers in the open cir-
cumstances ), and the SET indicator will go out.
En En
C o n n e c t i n g t h e S R C - A L B A
Parts of the (3/3)SRC-ALBA
6
11
The “TIMER ACTIVE” “SET”and “RELEASE”Indicators
lf this flashes Expression means: Close method
TIMER ACTIVE
SET
RELEASE
(TIMER
ACTIVE not
flashing)
Timer active (page11); press TIM-
ER START/STOP button ( 5 ).
Settings can be modified (page 7);
press SET button ( 6 )
Manual release active (page 14);
release shutter-release button
( 9 ; if button is in HOLE position,
release shutter- release lock).
Lighting/Lock Button
Press the lighting /lock button ( 7 ) briefly to
activate the control panel backlight. The back-
light will remain lit for about six seconds; press-
ing the arrow button ( 8 ) while the backlight is
on extends the timer for another six seconds.
To lock all controls except the shutter-re
lease ( 9 ) and Lighting/lock buttons, press
the illuminator lock button until the lock icon
( ) is displayed in the control panel. To release
the lock, Please press the lighting/lock buton untill
the lock icon is no longer displayed.
L
DELAY LONG INTVL N
TIMER ACTIVE SET RELEASE
DELAY LONG INTVL N
SET
DELAY LONG INTVL N
SET
DELAY LONG INTVL N
SET
Disconnecting the MC-36b
Setting the Timer
After checking that the “TIMER ACTIVE” ( ) and ‘RE-
LEASE” ( ) indicators are not displayed, turn the
camera off and disconnect the SRC-ALBA . Replace
the Remote cord socket terminal cover.
5
8
Timed Photography (5/7)
To ensure correct operation, choose an interval at
least one second longer than the exposure time.
When using autofocus, set the delay to two sec-
onds or more and choose an interval at least two
seconds longer than the exposure time to ensure
that the camera has time to focus. When using
long exposure noise reduction (available with
some digital cameras ),the interval should be at
least twice the exposure time.
Intervals of 00:00:00 will automatically be re
set to 00:00:01 when the SET button ( 6 )is pressed
to put settings into effect.
To set the number of shots to--(unlimited),
select 1 and press the arrow button ( 8 ) down or
select 399 and press the arrow button up.
2.3 After adjusting all settings as desired, press
the SET button ( 6 )to put the new settings into
effect timer will issue a beep- (speakers in the open
circumstances ),and the “SET”indicator will go out.
The new settings will remain in effect until
changed or until the batteries are removed
or exhausted.
3.Start the Timer
Press the TIMER START/STOP button ( 5 ).The
timer will start and “TIMER ACTIVE" ( )will flash
in the show panel. Between shots the control panel
will show the time remaining until the next photograph
is taken. Two second Focus output, focus and the
release of light-green light.
5
While the shutter is open,the show panel will
show the time remaining until the shutter closes,
and the release lamp and “RELEASE” indicator
( ) will flash at one-second intervals.FocusNand
the release indicator Lianghong Deng. If the
speaker is turned on ,the timer will be issued one
second intervals for the beeps, each take a picture,
the remaining number of shots will be updated.
8
1 Turn the camera off.
2 Check that the “TIMER ACTIVE” ( ) and “RE-
LEASE” ( ) indicators are not diaplayed.
3 Remove the remote cord socket termial cover
from the camera. By connecting the camera
shutter, and will shutter plug ( 1 ) . The camera
firmly connected.
5
8
The new settings will remain in eect until changed or
until the batteries are removed or exhausted.
3. Start the Timer
Press the TIMER START/STOP button ( 5). The timer
will start and TIMER ACTIVE ( 9) will ash in the
show panel. Between shots the control panel will
show the time remaining until the next photogra-
phy is taken.There will be two-second focus and the
focus and release light-green indicator will be lit.
While the shutter is on, the LCD will show the time
remaining before the shutter closes, and RELEASE
indicator ( 8) will ash at one-second intervals. The
focus and release indicator is lit and stays red. If the
speaker is turned on , the timer will issue «beep» at
an interval of one second, the remaining number of
shots will be updated after every picture is taken.
11
Timed Photography (5/7)
EN
FR
ES

Timed Photography (6/7)
12
Show Panel Display
(Timer Active)
En En
Timed Photography (6/7)
Show Panel Display (Timer Active)
Flashes while timer is active
When that did not open the
shutter: shots: Time remaining
until next shot
While shutter is open: Time remain-
ing until shutter closes
Number of shots remaining
Flashes while shutter is open
The Speaker and Release Lamp
The following illustration shows when a beep will soud( )and the release lamp flash ( ) with a delay
of 5 s, an esposure time of 4 s,and an interval of 5 s.
Loudspeakers
Light green
The red indicator light
Focus output
The release of output
811
2 3 167 1 2
0 1 2 3
4 5
6
7
9 01
1
1
415
1 18
9
20
1 22 23
2
4 25 26 27
1
4. End Shooting
Shooting will end automatically when the se-
lected number of shots has been taken. To end
shooting before all photographs have been
taken, press the TIMER START/STOP button ( 5 ).
Partsof the (2/3)SRC-ALBA
12
Display Panel*
Functional cursor
Show time
Lock indicator
Low battery indicator
“TIMER ACTIVE” indicator
Speaker on/off indicator
“SET”indicator
“RELEASE” indicator
Number of shots
*The illustration inside the front cover shows
the control panel with all elements lit. In the
other illustrations throughout this manual,
elements relevant to the explanation in the
accompanying text are shown in black. Indi-
cators not mentioned in the text are shown
in gray.
1
2
3
4
5
6
7
8
9
5
Inserting Batteries
Slide the battery-chamber cover ( 10 ) from the
back of the SRC-ALBA and insert two AAA 1.5V
LR03 alkaline batteries (available separately)
as shown.
The Low Battery Indicator ( )
The low battery indicator ( ) will blink when the
batteries are low. Please replace the battery
4
Replacing Batteries
When replacing batteries:
1 Check that the “TIMER ACTIVE” ( ) and “RE-
LEASE” ( )indicators are not displayed.
2 Turn the camera off and disconnect the SRC-
ALBA.
3 Remove the batteries.
4 Wait until the control panel has gone out and
insert new batteries.
5
8
When the Is Not in Use
The is not equipped with an off switch.
To reduce the drain on the batteries when theSRC-
ALBA is not in use; end shooting and check that
the “TIMER ACTIVE” ( ), “SET” ( ),and
“RELEASE” ( ) indicators are not
displayed.
The drain on the batteries increases when these
indicators are flashing.
SRC-ALBA
SRC-ALBA
5 7
8
Flashes when timer is active
When shutter is not open:
Time remaining until next shot
While shutter is open:
Time remaining until shutter closes
Number of shots remaining
Flashes while shutter is opened
The Speaker and Release Lamp
The following illustration shows when a beep will sound ( ) and the release lamp ashes ( ) with a
delay of 5 s, an exposure time of 4 s, and an interval of 5 s.
En En
Timed Photography (6/7)
Show Panel Display (Timer Active)
Flashes while timer is active
When that did not open the
shutter: shots: Time remaining
until next shot
While shutter is open: Time remain-
ing until shutter closes
Number of shots remaining
Flashes while shutter is open
The Speaker and Release Lamp
The following illustration shows when a beep will soud( )and the release lamp flash ( ) with a delay
of 5 s, an esposure time of 4 s,and an interval of 5 s.
Loudspeakers
Light green
The red indicator light
Focus output
The release of output
811
2 3 167 1 2
0 1 2 3
4 5
6
7
9 01
1
1
415
1 18
9
20
1 22 23
2
4 25 26 27
1
4. End Shooting
Shooting will end automatically when the se-
lected number of shots has been taken. To end
shooting before all photographs have been
taken, press the TIMER START/STOP button ( 5 ).
Partsof the (2/3)SRC-ALBA
12
Display Panel*
Functional cursor
Show time
Lock indicator
Low battery indicator
“TIMER ACTIVE” indicator
Speaker on/off indicator
“SET”indicator
“RELEASE” indicator
Number of shots
*The illustration inside the front cover shows
the control panel with all elements lit. In the
other illustrations throughout this manual,
elements relevant to the explanation in the
accompanying text are shown in black. Indi-
cators not mentioned in the text are shown
in gray.
1
2
3
4
5
6
7
8
9
5
Inserting Batteries
Slide the battery-chamber cover ( 10 ) from the
back of the SRC-ALBA and insert two AAA 1.5V
LR03 alkaline batteries (available separately)
as shown.
The Low Battery Indicator ( )
The low battery indicator ( ) will blink when the
batteries are low. Please replace the battery
4
Replacing Batteries
When replacing batteries:
1 Check that the “TIMER ACTIVE” ( ) and “RE-
LEASE” ( )indicators are not displayed.
2 Turn the camera off and disconnect the SRC-
ALBA.
3 Remove the batteries.
4 Wait until the control panel has gone out and
insert new batteries.
5
8
When the Is Not in Use
The is not equipped with an off switch.
To reduce the drain on the batteries when theSRC-
ALBA is not in use; end shooting and check that
the “TIMER ACTIVE” ( ), “SET” ( ),and
“RELEASE” ( ) indicators are not
displayed.
The drain on the batteries increases when these
indicators are flashing.
SRC-ALBA
SRC-ALBA
5 7
8
Loudspeakers
Light green indicator
Red indicator light
Focus output
The release of output
4. End Shooting
Shooting will end automatically when the selected
number of shots has been taken. To end shooting
before all photographs have been taken, press the
TIMER START/STOP button ( 5).
EN
FR
ES
6. Using the Timer
Before using the timer for extended periods, check
that the batteries have enough charge. Replace the
batteries when the low battery indicator (
En En
Timed Photography (6/7)
Show Panel Display (Timer Active)
Flashes while timer is active
When that did not open the
shutter: shots: Time remaining
until next shot
While shutter is open: Time remain-
ing until shutter closes
Number of shots remaining
Flashes while shutter is open
The Speaker and Release Lamp
The following illustration shows when a beep will soud( )and the release lamp flash ( ) with a delay
of 5 s, an esposure time of 4 s,and an interval of 5 s.
Loudspeakers
Light green
The red indicator light
Focus output
The release of output
811
2 3 167 1 2
0 1 2 3
4 5
6
7
9 01
1
1
415
1 18
9
20
1 22 23
2
4 25 26 27
1
4. End Shooting
Shooting will end automatically when the se-
lected number of shots has been taken. To end
shooting before all photographs have been
taken, press the TIMER START/STOP button ( 5 ).
Partsof the (2/3)SRC-ALBA
12
Display Panel*
Functional cursor
Show time
Lock indicator
Low battery indicator
“TIMER ACTIVE” indicator
Speaker on/off indicator
“SET”indicator
“RELEASE” indicator
Number of shots
*The illustration inside the front cover shows
the control panel with all elements lit. In the
other illustrations throughout this manual,
elements relevant to the explanation in the
accompanying text are shown in black. Indi-
cators not mentioned in the text are shown
in gray.
1
2
3
4
5
6
7
8
9
5
Inserting Batteries
Slide the battery-chamber cover ( 10 ) from the
back of the SRC-ALBA and insert two AAA 1.5V
LR03 alkaline batteries (available separately)
as shown.
The Low Battery Indicator ( )
The low battery indicator ( ) will blink when the
batteries are low. Please replace the battery
4
Replacing Batteries
When replacing batteries:
1 Check that the “TIMER ACTIVE” ( ) and “RE-
LEASE” ( )indicators are not displayed.
2 Turn the camera off and disconnect the SRC-
ALBA.
3 Remove the batteries.
4 Wait until the control panel has gone out and
insert new batteries.
5
8
When the Is Not in Use
The is not equipped with an off switch.
To reduce the drain on the batteries when theSRC-
ALBA is not in use; end shooting and check that
the “TIMER ACTIVE” ( ), “SET” ( ),and
“RELEASE” ( ) indicators are not
displayed.
The drain on the batteries increases when these
indicators are flashing.
SRC-ALBA
SRC-ALBA
5 7
8
)
ashes in the show panel ( 4).
5.Using the camera to select Shutter Speed
To take photographs at the shutter speed selected with the camera, adjust settings as follows:
Camera
Exposure mode M (manual) or S (shutter-priority auto )
Shutter speed Any
Interval timer O
Focus mode AF-C (continuous-servo autofocus)* or M (manual)
Shooting mode S (single frame)
SRC-
Frequencia
Exposure time 0s
Interval Longer than camera shutter speed**
*Select “release priority” if available.
** When using autofocus, choose an interval at least two seconds longer than the camera shutter speed to allow
the camera time to focus. When using long exposure noise reduction (available with some digital cameras),
choose an interval at least double the camera shutter speed.
13
Timed Photography (7/7)
EN
FR
ES
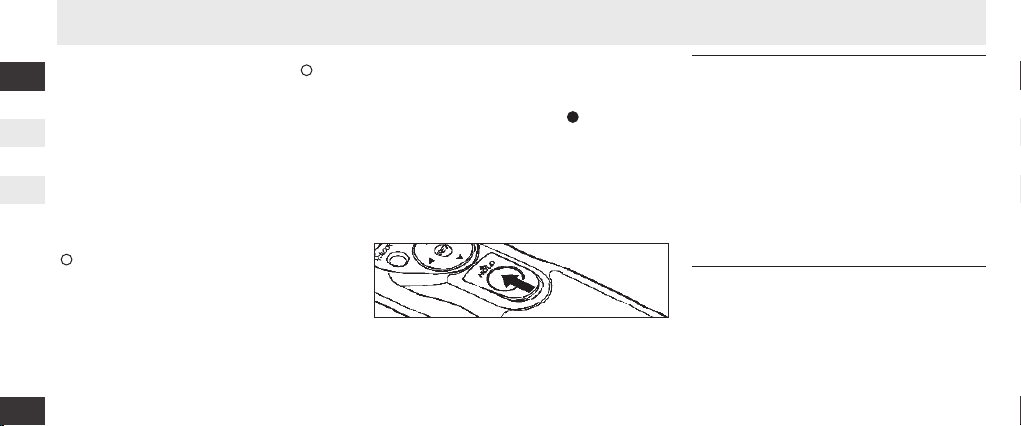
Manual Release
SRC-Frequencia shutter-release button ( 9) func-
tions in much the same way as the camera shutter-
release button.
1. Adjust Camera Settings
Connect SRC-Frequencia (p.6) and turn the came-
ra on. Choose exposure mode, shutter speed, focus
mode, and shooting mode as desired.
2. Take Pictures
2.1. Press SRC-Frequencia shutter-release button
(9) halfway and check focus and exposure. The fo-
cus and release indicator will be lit in bright green.
And then click to take pictures. When the shutter
function is ON, the focus and release indicator is on
and stays red, the camera issues a “beep….” every
second. the RELEASE indicator ( 8) will ash, and
the display will show the duration the shutter was
open.
To keep the shutter-release button fully pressed for
bulb photography, slide the button to the HOLD
position. Slide it in the opposite direction to release
the lock.
En En
Manual Release
The shutter-release button( 9 )
functions in much the same way as the camera
shutter- release button.
SRC-ALBA
14
And the display will show the shutter has
opened the time.
To keep the shutter- release button fully
pressed for bulb photography, slide the
button to the HOLD position. Slide it in the
opposite direction to release the lock.
2.2 Release the button to end shooting.
The shutter-release button can
be used when no batteries are inserted. The show
panel will remain off and no beep will sound.
SRC-ALBA
The shutter-release button can be used to release the
shutter manually while the timer is active. Timer count-
down (package so display panels, focus and the release
of the indicator light and beep). Continues during manual
release. If a manual release overlaps with an automatic
release, the shutter will remain open until both exposure
times have expired.
For Your Safety (2/2)
Read and follow all warnings and instructions provided by the manufacturer.
Do not short or disassemble.
Do not expose to flame or excessive heat.
Do not attempt to insert batteries upside down or backwards.
Batteries are prone to leakage when fully discharged. To avoid damage to the product, be
sure to remove the batteries when leaving the product unattended for prolonged periods or
when no charge remains.
Should liquid from the batteries come into contact with skin or clothing, rinse immediately with
fresh water.
3
1.Adjust Camera Settings
Connect the (pg.6) and turn the
camera on. Choose exposure mode, shutter speed,
focus mode, and shooting mode as desired.
2. Take Pictures
2.1 Press the SRC-ALBA shutter-release button
( 9 ) halfway and check focus and exposure,
Focus and the release of bright green light.
And then click to complete their photographs.
When the shutter opens, Focus and the release indicator
Lianghong Dengevery one second camera issued a beep,
the “RELEASE” indicator ( ) will flash, and
SRC-ALBA
8
2.2. Release the button to end shooting.
The SRC-Frequencia shutter-release button can
be used when no batteries are inserted. The
show panel will remain o and no beep will
sound.
The shutter-release button can be used to re-
lease the shutter manually while the timer is
active.Timer count-down (including display pa-
nels, focus and release of the indicator light
and beep). Continues during manual release.
If a manual release overlaps with an automatic
release, the shutter will remain open until both
exposure times have expired.
14
EN
FR
ES

Precautions for Use Caring for SRC-Frequencia
Checkthecamerabatterylevelandnumberofexpo-
sures remaining before using the SRC-Frequencia
(see the camera manual for details). The timer will
continue to operate even when no pictures can be
recorded due to low battery, lack or lm or memo-
ry, or lack of space in the memory buer (digital
cameras only). An AC adapter (available separately)
is recommended for longer sessions.
Some cameras have an AF activation option that
determines whether the camera will focus when
the shutter-release button is pressed halfway (see
the camera manual for details). Enable shutter-
release button AF-activation when using the
SRC-Frequencia.
Please note that the timer is less accurate than
most watches or household clocks.
Do not drop: The product may malfunction if
subjected to strong shocks or vibration.
Keep dry: This product is not waterproof and
may malfunction if immersed in water or exposed
to high levels of humidity. Rusting of the internal
mechanism can cause irreparable damage.
Avoid sudden changes in temperature: Sud-
den changes in temperature, such as occur when
entering or leaving a heated building on a cold
day, can cause condensation inside the device.
To prevent condensation, place the device in a
carrying case or a plastic bag before exposing it to
sudden changes in temperature.
Keep away from strong magnetic elds:
Strong static charges or the electromagnetic elds
produced by equipment such as radio transmitters
could interfere with the device.
A note on electronically-controlled devices:
In extremely rare instances, unusual characters
may appear in the show panel and the device may
stop functioning. In most cases, this phenomenon
is caused by a strong external static charge. Turn
the camera o, disconnect the SRC-Frequencia,
remove the batteries, and then replace them once
the control panel has turned o. Caution is re-
quired when handling the batteries, which may be
hot from use. In the event of continued malfunc-
tion, contact your retailer or representative.
Display panel: LCD displays tend to darken at
high temperatures and exhibit slower response
times at low temperatures. This does not indicate
a malfunction.
15
EN
FR
ES
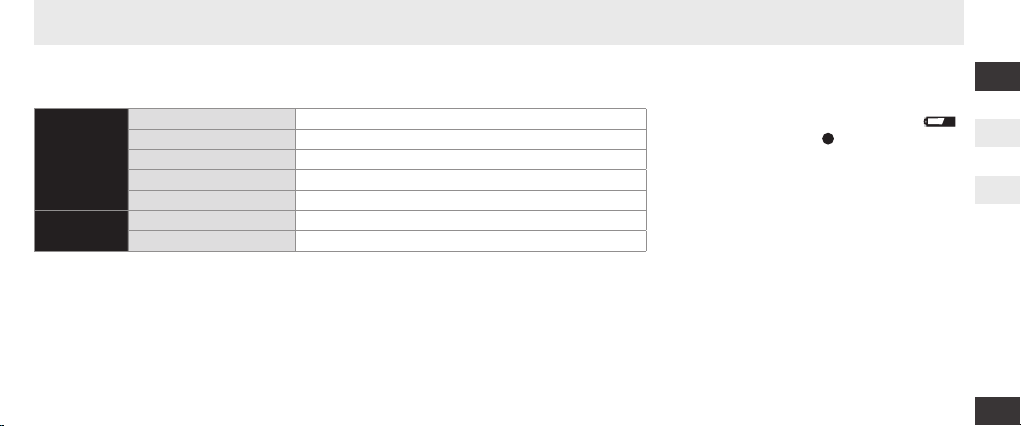
Specication
16
Supported cameras Canon, Nikon, Sony, Olympus, Pentax, Samsung, Konica Minolta, etc.
Timer delay 0s to 99 hrs 59 min 59s in one-second increments
Exposure time 0s to 99 hrs 59 min 59s in one-second increments
Interval 1s to 99 hrs 59 min 59s in one-second increments
Number of shots 1 to 399,--(unlimited)
Power source Two AAA 1.5V LR03 alkaline batteries
Battery life Approximately two months of continuous shooting with a delay of 5 min, an exposure time of 4 min 56s, and an interval of 5 min.
Use of the illuminator will reduce battery life.
Operating temperature -20-+50°C (-4-+122°F)
Dimensions Approximately 155X40X18 mm(6.1X1.6X0.7in.), excluding projections
EN
FR
ES

Pour votre sécurité....................................................2
Avertissements ..........................................................2
Introduction ...............................................................4
Composants du SRC-Frequencia ............................4
Panneau de commande ...........................................5
Insertion des piles .....................................................5
Remplacement des piles..........................................5
Lorsque vous n’utilisez pas le SRC-Frequencia....5
Bouton de rétro-éclairage/verrouillage................6
Connexion du SRC-Frequencia ...............................6
Utilisation du SRC-Frequencia ................................7
Photographie programmée.....................................7
Déclenchement manuel........................................ 14
Précautions d’utilisation....................................... 15
Entretien du SRC-Frequencia ............................... 15
Caractéristiques...................................................... 16
Sommaire
Wireless Timer/Trigger
STARBLITZ® SRCFREQUENCIA
Mode d’emploi
EN
FR
ES
1

Pour votre sécurité (1/2)
Pour ne pas risquer d’endommager votre matériel ou
de vous blesser, vous ou d’autres personnes, prenez
soin de lire attentivement les recommandations sui-
vantes avant d’utiliser votre matériel. Gardez ensuite
précieusement ces consignes de sécurité dans un
endroit facilement accessible à tous ceux qui auront
à se servir de cet équipement.
L’importance des conséquences dues au non-respect
de ces consignes est symbolisée de la manière sui-
vante :
Cette icône signale les consignes qui doivent
être impérativement lues avant d’utiliser
votre matériel pour éviter d’éventuels risques
physiques.
Ne pas démonter ni modier le produit
Le non-respect de cette précaution peut causer
une décharge électrique ou un dysfonctionnement
du produit. Si le produit se brise suite à une chute
ou tout autre incident, retirez les piles et portez-le
au fabricant pour le faire inspecter.
Conserver le produit à l’abri de l’humidité Ne mani-
pulez pas le produit avec les mains mouillées, ne
l’immergez pas et ne l’exposez pas à l’eau ou à la
pluie. Le non-respect de cette précaution peut cau-
ser un incendie ou une décharge électrique.
Ne pas utiliser le produit en présence de gaz
inammables
Le non-respect de cette précaution peut causer
une explosion ou un incendie.
Ne pas laisser le produit à la portée des enfants
Cet équipement contient de petites pièces qui
représentent un risque d’étouement. Consultez
un médecin immédiatement si un enfant avale une
pièce de cet équipement.
Éteindre immédiatement l’équipement en
cas de dysfonctionnement
Si vous remarquez de la fumée ou une odeur inha-
bituelle en provenance de l’équipement, retirez
immédiatement les piles et portez-le à un centre
de service agréé pour le faire inspecter (veillez à ne
pas vous brûler). Si vous continuez à utiliser le pro-
duit dans ces conditions, vous encourez un risque
de blessure.
EN
FR
ES
2
This manual suits for next models
1
Table of contents
Popular Camera Accessories manuals by other brands


Canon
Canon Speedlite Transmitter ST-E2 manual

Olympus
Olympus PT-022 instruction manual

Sachtler
Sachtler S2080-0010 user guide

Nikon
Nikon AF-S DX NIKKOR 18-300mm f/3.5-5.6G ED VR user manual

Sanyo
Sanyo Cadnica N-600AAK Specifications

ORION TELESCOPES & BINOCULARS
ORION TELESCOPES & BINOCULARS Atlas II EQ-G Equatorial GoTo Mount instruction manual

Tiffen
Tiffen Steadicam Curve quick start guide

Sanyo
Sanyo KR-1100AEL Cadnica Specifications

Aquatica Digital
Aquatica Digital A30D Instruction

Phottix
Phottix Strato TTL instructions

Moog Videolarm
Moog Videolarm QOD SERIES Installation and operation instructions

GRASS VALLEY
GRASS VALLEY LDK 5309 user guide