StarDot Technologies NetCam SC User manual

NetCam SC
User’s Manual
w w w.stardot .com


Table of Contents
Chapter 1 Conguration..........................................................................5
1.1 Before You Start.......................................................................5
1.2 What’s Included and What’s Required .....................................5
1.3 Parts of NetCam SC ................................................................6
1.4 Connecting NetCam SC to a Network .....................................6
1.5 An Overview of Network Connectivity......................................7
Chapter 2 Installation ..............................................................................9
2.1 Installing NetCam SC...............................................................9
2.2 Outdoor Environment...............................................................9
Chapter 3 Accessing NetCam SC ........................................................10
3.1 Viewing NetCam SC’s Images ...............................................10
3.2 NetCamSC’sCongurationMenus ....................................... 11
3.3 Image Properties.................................................................... 11
3.4 Overlay Properties .................................................................17
3.5 FTP Properties .......................................................................20
3.7 Date/Time Properties .............................................................24
3.8 Network Properties ................................................................26
3.9 Dial-Out Properties ................................................................28
3.10 Security Properties.................................................................30
3.11 AdvancedMenus ...................................................................31
3.12 Miscellaneous ........................................................................31
3.13 ManualCong........................................................................31
3.14 PTZ ........................................................................................31
3.15 Dynamic DNS.........................................................................31
3.16 Trigger Properties ..................................................................32
3.17 Weather Station .....................................................................36
Chapter 4 Imaging Tips.........................................................................37
4.1 Lighting ..................................................................................37
4.2 Image Processing Options.....................................................38
Chapter 5 Lenses...................................................................................40
Troubleshooting Guide ...........................................................................42
Technical Support ...................................................................................42
Specications ..........................................................................................43

Page 4 NetCam SC

NetCam SC Page 5
Chapter 1 Conguration
Congratulations on your purchase of a StarDot NetCam SC network camera with
integrated web server. The NetCam SC combines the best of the analog CCTV world
(auto iris, day/night IR lter*, video out, 24VAC/12VC power inputs, I/O) with the
best of the digital IP camera world (up to 5 megapixel, Power over Ethernet, integrated
video motion detection).
With proper usage, NetCam SC will provide many years of quality video. We
recommend that you read this manual carefully to completely understand the camera’s
capabilities. Throughout this manual, your NetCam SC camera will also be referred
to as simply NetCam.
* Day/night IR lter available only on IR models.
1.1 Before You Start
This manual guides you through the basic setup procedure for the
NetCam SC and provides a detailed resource of the camera’s advanced
options and capabilities.
Setting up NetCam SC consists of three steps. The rst step is to
congure the network settings. The second step is to congure NetCam to
upload images to a web server (this step is optional). The third step is the
physical installation of the camera.
1.2 What’s Included and What’s Required
The basic package includes a NetCam SC camera, a lens and the
StarDot Tools software (and this manual) on CD-ROM. Since the NetCam
SC is a PoE device (Power over Ethernet), it is assumed that most users
will provide their own CAT 5 or CAT 6 cable, as well as a PoE switch or
power injector. StarDot optionally offers a wall mount, a power supply, a
combination network/power cable and a null serial conguration cable. In
order to use the NetCam SC, you will need the following:
• Power source (PoE, 12VDC or 24VAC)
• A computer – for conguring NetCam SC and for viewing video
(viewing requires Java or ActiveX-enabled web browser)
Note: A computer is not necessary to operate NetCam, only to congure it.
• Network connectivity (LAN, cable modem, DSL, T-1, Dial-Up
Internet Account, Satellite Modem, etc.)

Page 6 NetCam SC
1.3 Parts of NetCam SC
1.4 Connecting NetCam SC to a Network
The StarDot Tools software can be used to nd the camera’s IP address
or to congure the camera with the Setup Wizard (optional).
Install the StarDot Tools software by inserting the CD-ROM and
running setup.exe (it should run automatically).
If your network has a router or server that auto assigns IP addresses
(DHCP), StarDot Tools will nd the camera’s IP address and display
it in the software. To access NetCam SC, simply double-click its IP
address. If the IP address is displayed, skip to Chapter 3.
If your network does not auto-assign IP addresses, you can assign a
manual IP using a null serial cable. Connect one end of a null model
serial cable to the S1 port of NetCam SC and the other end into an
available serial port on your PC.
Connect NetCam SC into a PoE switch or injector with a standard
CAT 5 network cable or with a StarDot Combo Ethernet/Power
Cable.
In StarDot Tools, click the Setup Wizard button.
Follow the steps in the Setup Wizard. If you’re unsure of some of
the answers or you’d like more information on connecting NetCam
to the Internet or your private network, read the next section,
“An Overview of NetCam SC Connectivity”.
StarDot
Technologies
24VAC
Useful for legacy CCTV
Power Infrastructure
S1 (Aux)
RS-232 Port, Optional Serial Configuration
Auxilliary Device Control
NET (PoE) 802.3af
100Mbit Power over Ethernet Port
PWR (DC Power Jack)
10-20VDC (500mA @ 12VDC)
I/O (Input/Output)
Alarm Trigger Input / Relay Output
NET (PoE)
S1 (AUX)
24VAC
I/O
1 2 3 4
VIDEO
12VDC
VIDEO OUT
Analog Video
(NTSC or PAL)
Auto Iris Jack (not shown)
For connecting DC auto iris lens

NetCam SC Page 7
1.5 An Overview of Network Connectivity
A LAN or network connection is the simplest configuration for
NetCam SC. NetCam SC simply needs an IP address (and other networking
parameters) to make the live images and conguration menus accessible
from any web browser on the network. There are two ways NetCam SC
can be assigned an IP address: automatically or manually.
Automatic IP Assignment (DHCP)
NetCam SC is shipped in an automatic IP assignment mode called
DHCP (Dynamic Host Conguration Protocol). If your network has a DHCP
server (in most cases, a router), it will automatically assign the necessary
network parameters to NetCam SC. Before you can access the camera, you
will need to know which IP address was assigned. Use the StarDot Tools
software to nd the camera’s IP address.
Manual IP Assignment
If you want to assign the camera a permanent IP address, you will need
the following information:
• IP Address (example: 192.168.1.5)
• Subnet Mask (example: 255.255.255.0)
• Gateway (example: 192.168.1.1)
• DNS Servers (obtain from ISP)
If you are installing the camera on a company network, you will probably
want to get this information from the system administrator.
The easiest way to congure NetCam SC manually is to connect the
camera to a serial port on your computer. Plug one end of a null modem serial
cable into the S1 port on the back of NetCam SC and the other end into an
available 9-pin serial port on the back of your computer. Use the included
StarDot Tools software to congure the camera using the Setup Wizard.
If you don’t have a serial port or are using a non-Windows machine,
you have a few options.
If NetCam SC is connected to a network with a DHCP server and your
computer is not running Windows, you can log into your router (or whatever
is acting as your DHCP server) and view the DHCP clients table. NetCam
SC will have a MAC address starting with 00:30:F4. Take note of the IP
address and enter it in your web browser. Click on the conguration link,
visit the network tab and assign the camera a manual IP address (outside
of the router’s DHCP range).
If NetCam SC is connected to a network without a DHCP server
(IP addresses are not automatically assigned) and your computer is not

Page 8 NetCam SC
running Windows, you’ll have to manually assign the camera an IP address.
This requires terminal emulation software and the included null serial cable.
On a Macintosh or on a Windows computer without a serial port, you’ll
need a USB RS-232 adapter.
To talk directly to the camera via the included serial cable, set your
terminal software to a bitrate of 38,400 (8/N/1). Log in with username
admin, password admin and use the following commands to assign the
camera a temporary IP address. Once the IP has been assigned, browse to the
camera with a web browser and congure NetCam SC so it has a permanent
static IP address (see Chapter 3.8).
In the following example, NetCam SC is being assigned a temporary
IP address of 192.168.0.2 via a terminal program connected to the S1 port
on the back of NetCam SC:
ifcong eth0 192.168.0.2
route add -net 192.168.0.0 netmask 255.255.255.0 eth0
Remember, once you can reach camera via its temporary IP address,
you’ll want to immediately assign it a permanent static IP address in the
network conguration menu.

NetCam SC Page 9
Chapter 2 Installation
Before installing the camera in its nal location, it is important to
congure and test it rst (see Chapter 1).
2.1 Installing NetCam SC
Measure the distance from the camera to the nearest Ethernet hub or
switch. This distance should not exceed 330 feet. If you wish to extend the
distance further than 330 feet, you can add an Ethernet hub or switch.
There are three ways to power NetCam SC. This allows you go install
the camera in virtually any existing infrastructure. NOTE: Only use one
method to power the camera . Do not plug two or more power sources
into the camera simultaneously.
Power over Ethernet (PoE)
Run standard CAT 5 or better Ethernet cable from a PoE hub/switch
(or PoE power injector) into the NET jack on the back of NetCam SC.
NetCam SC will run off the PoE power running in the CAT 5 cable. No
other power source is required.
Separate Ethernet and Power
If you decide not to use PoE, you can connect one end of a CAT 5 or
better Ethernet cable into a hub/switch and the other end into the NET jack
on the back of NetCam SC. Plug a 12VDC 1A power supply into the back
of NetCam SC (or you may use a 24VAC power supply and connect it to
the input marked 24VAC).
StarDot’s Power/Network Cable
If you choose not to power NetCam SC via PoE and you still want
the take advantage of a single cable run, StarDot provides Power/Network
cable that allows you to run both power and data in the same cable. Visit
http://www.stardot.com for more information.
2.2 Outdoor Environment
To mount NetCam SC outdoors, it must rst be encased in an outdoor
enclosure (different models are available from StarDot Technologies, see
http://www.stardot.com/sc). Install the camera in an outdoor enclosure and
adjust the internal mount so the lens is up against the enclosure window.
This helps to reduce glare and interior reections.
Determine where NetCam SC will be pointing and where you’d like to
mount it. The outdoor enclosure can be mounted on a horizontal or vertical
surface. When aiming the camera, factors such as sun travel and amount
of visible sky can vastly affect the quality of the image. For imaging tips,
see Section 4.1.
Page 10 NetCam SC
Chapter 3 Accessing NetCam SC
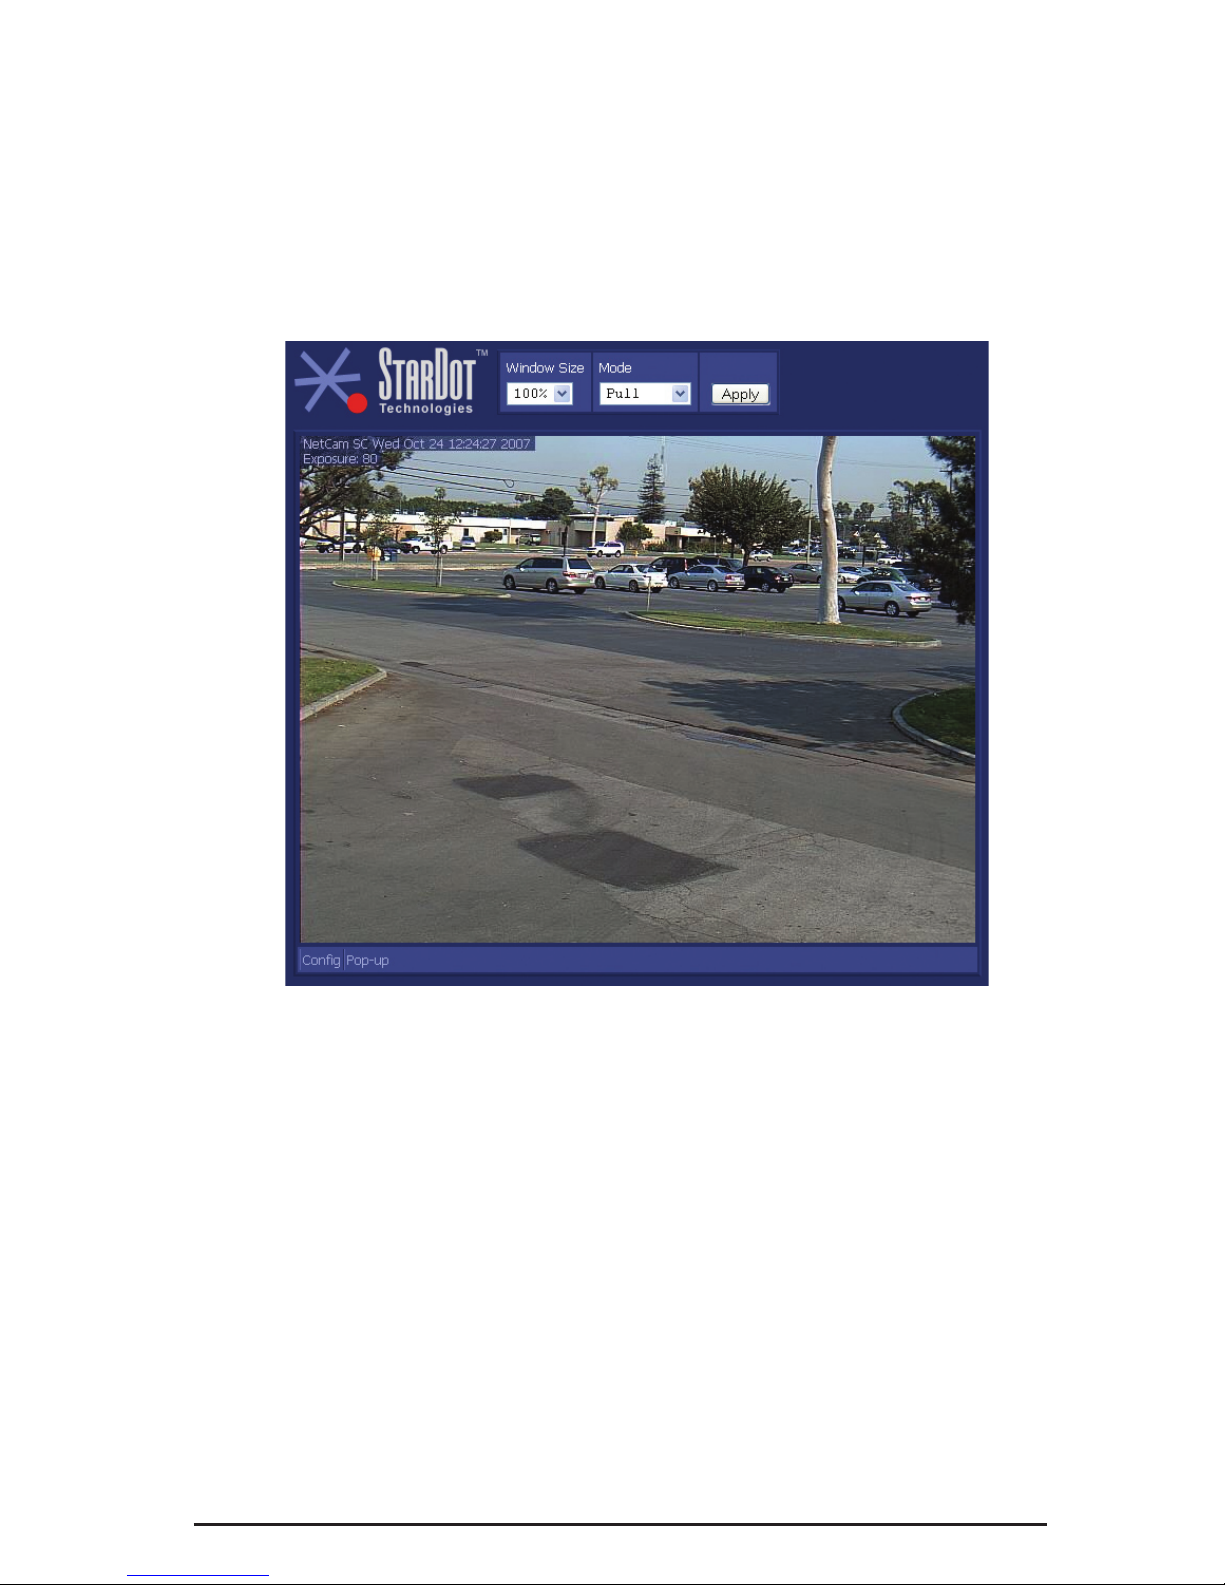
3.1 Viewing NetCam SC’s Images
Any Java-enabled browser can be used to view the live images.
Type NetCam SC’s IP address in your browser’s address bar (example:
http://192.168.1.5). Or use StarDot Tools to Find the camera’s IP
address.
Window Size
For most viewing, the window size should be set to 100%, which is a
pixel to pixel match of the image resolution. If you select 50%, the width
and height will be browser resized to 50% of the actual image resolution. If
you select 200%, the width and height will be browser resized to 200% of
the actual image resolution. This does not affect the actual image resolution
which is set on the image conguration menu (Section 3.3).
Mode
This determines which method is used to watch the live video:
Pull - Java applet “pulls” the live images via web port (usually 80)
Push - Java applet receives motion JPEG stream via port 8001
ActiveX - receives motion JPEG stream via port 8001
.NET - receives motion JPEG stream via web port (usually 80)

NetCam SC Page 11
3.2 NetCam SC’s Conguration Menus
Virtually any web browser can be used to access NetCam SC’s
conguration menus. To access these menus, type NetCam SC’s IP address
in your browser’s address bar (example: http://192.168.1.5). This
will bring up the live image page. Click on the Conguration link. You will
be prompted for a User Name and Password. Use admin for both.
Tip: We highly recommend that you change the default password. To do so, see
Section 3.10.
3.3 Image Properties
All image-related conguration options are located on the Image
Properties page. After making changes, click the Apply button to save new
settings in the camera. Each section can be collapsed and expanded. If a
section is collapsed, click to expand.

Page 12 NetCam SC
PROCESSING
Resolution
Resolution is the dimensional size of the NetCam SC image, measured
in pixels, horizontal by vertical. The higher the resolution, the larger the
picture appears in your browser, and the longer it takes to download. Some
resolutions, such as portrait and HD, crop the image. The resolution marked
with an asterisk (*) denotes the default quarter resolution image.
Tip: As with most digital cameras, NetCam SC achieves the highest quality and
clearest images at quarter resolution. This is due to the way color is calculated
with digital image sensors. The largest “high quality” image on the NetCam SC
5MP is 1296x960.
Saturation
This represents the amount of color in the image. The higher the number,
the more saturated the color.
Haze
This represents the amount of haze subtraction. The higher the value,
the more haze is subtracted and the image results in higher contrast.
Using the Auto Haze function is recommended over setting the haze
manually.
Auto Haze
Haze subtraction is automatically determined by the camera.
Enabling Auto Haze is recommended.
JPEG Quality
The JPEG Quality is a balance between lossy image compression
and image quality. The higher the number, the less compression artifacts
in the image, but the bigger the le size. A value higher than 90 is not
recommended, as it greatly increases the le size with very little
noticeable difference in image quality.
Sharpen
When enabled, software sharpening is performed on the live image.
For the best image quality, Sharpen should be enabled.
EXPOSURE
Auto vs. Manual
Unless you have a controlled (xed) lighting condition, you will almost
always want to leave Auto Exposure enabled.
Auto Exposure
Enabling Auto Exposure causes NetCam SC to automatically
adjust the image exposure based on the overall brightness of the image.

NetCam SC Page 13
The following functions are only implemented when Auto Exposure is
enabled.
• Brightness - The higher the number, the brighter the picture. This
is the target for the auto exposure code.
• Sync- Fluorescent lighting refreshes at 60Hz or 50Hz, depending
on what country you live in. This may interfere with the camera’s
exposure. Set the sync to the appropriate value for your area
(example: U.S. is 60Hz). If you are pointing the camera outdoors or
do not use uorescent lighting, turn this option off.
Manual Exposure
Enabling Manual Exposure causes the camera to expose images at
the value placed in the Exposure eld. Keep in mind that using manual
exposure is not advised for outdoor imaging, since the light conditions are
constantly changing. You may opt to use manual exposure indoors if your
lighting conditions do not change. Here are some sample values and their
fractional and decimal equivalents:
48 = 1/1000 second (0.0001)
96 = 1/500 second (0.002)
248 = 1/200 second (0.005)
480 = 1/100 second (0.01)
800 = 1/60 second (0.1666)
960 = 1/50 second (0.020)
1600 = 1/30 second (0.0333)
3200 = 1/15 second (0.0666)*
6000 = 1/8 second (0.125)*
12000 = 1/4 second (0.25)*
24000 = 1/2 second (0.5)*
32767 = 0.68 seconds (maximum exposure)*
* may introduce pixel noise
EXPOSURE GRID
When Auto Exposure is enabled, NetCam SC adjusts the exposure
of the image based on the average brightness of the pixels located in
the selected regions in the Exposure Grid. If you want the camera to
determine the exposure based on only the sky, you would select the
squares that apply to the sky (click the View Grid button to see the grid
over the image). Conversely, if you’d like the exposure to be determined
by the foreground, select only those squares. This is comparable to the
spot exposure on a traditional camera.
ADVANCED
• Auto Iris- Only enable this option if a DC Auto Iris lens is
connected into the camera. If your camera does have a DC Auto
Iris lens connected, you may optionally enable this option when the

Page 14 NetCam SC
camera is pointing outdoors.
• Back Light - Backlight compensation (BLC) adjusts the picture in
situations where a bright light source, such as window, is causing the
image to be improperly exposed.
• Low Light Presets - There are a lot of controls in determining
how the camera behaves in low light conditions. To simplify low
light use, a number of Low Light Presets are available to instantly
congure the camera as required. The presets automatically set
all the other controls. If you’d like to manually set the advanced
controls select “Manual” in the Low Light Presets dropdown.
• Exposure Limit - The camera will not expose the image sensor
above this value. The default is 32767 (about 0.7 seconds). A higher
value will make the camera more light sensitive in low light at the
expense of motion blur.
• Allow Extended Exposures - In darker lighting conditions, a
longer exposure produces a brighter image. A longer exposure also
produces an image where objects in motion may appear blurry. If
your application requires the best possible image quality and motion
blur is not a concern, enable Allow Extended Exposures and set the
Exposure Limit to a high value (up to 32767). If your application
requires capturing images of people or objects in motion, disable
Allow Extended Exposures.
• Automatic Gain Control (AGC) - The picture is digitally
amplied in low light conditions or in situations where the exposure
is limited to reduce motion blur. Enabling AGC may introduce image
noise.
• AGC Limit - The higher the limit, the more digital amplication
occurs (assuming it’s necessary). If you want to limit the digital gain
to reduce noise on the image, reduce this value.
• Low Light - In low light conditions, the analog low light mode of
the image sensor is enabled. Enabling Low Light may introduce
image noise.
• Pixel Rep - Groups pixels together for better light sensitivity, at the
expense of image clarity.
• DNR (Digital Noise Reduction) - Reduces image noise using
digital algorithms.
• Image Speed - Determines when low light gain is initiated in
relation to the exposure.
• Alternate YUV - Uses non-standard algorithms to process color,
allowing for improved light sensitivity.

NetCam SC Page 15
MISCELLANEOUS
Frame Skip
To lower the frame rate (and bandwidth), increase this value. A value
of 0 means full frame rate, a value of 1 means skip every other frame, a
value of 2 means skip every two frames, etc.
LED
The LED indication on the front of the camera can be congured in a
number of different ways:
• Off - LED is always off. Useful when you do not want the camera
to be seen at night or if you are experiencing a visible reection in a
window.
• Green-Yellow Active - LED remains green until image activity
occurs (viewing, recording, FTP, etc.), in which case it momentarily
blinks yellow.
• Green-Red Motion - LED remains green until internal video motion
is detected, in which case it momentarily blinks red.
• Green-Red-Yellow - A combination of Green-Yellow Active and
Green-Red-Motion.
Video Out
Controls video out BNC port on the back of the camera. It can be turned
off (no video out) or set to NTSC or PAL. When set to NTSC or PAL, the
camera’s video can be viewed with any standard video monitor. Note: the
video resolution will be scaled up or down to the maximum NTSC or PAL
resolution.
IR (only available on IR models)
This determines how the mechanical IR (infrared) lter behaves.
• Off - The camera will only see visible light.
• On - The camera will see both visible and infrared light.
• Auto - The camera will automatically determine what position
the IR lter should be in (IR is normally only needed in low light
situations). If you plan on using the IR mode (on or auto), an IR
illuminator is recommended.
COLOR BALANCE
Auto Color Balance
Enabling Auto Color Balance causes NetCam SC to automatically
adjust the color balance of the image based on the content of the image. In
most situations, you will want Auto Color Balance enabled.

Page 16 NetCam SC
Auto Color Balance Type
• Average - An average of the entire image is used to determine color
balance.
• Bright - Only bright areas are used to determine color balance.
• Spot - Only spot areas are used to determine color balance.
• Automatic - The camera automatically selects the best method to
use.
R - This represents the amount of red skew in the image.
G - This represents the amount of green skew in the image.
B - This represents the amount of blue skew in the image.
The recommended setting is Auto Color Balance with Average
selected.
Manual Color Balance
Enabling Manual Color Balance causes the camera to use the manual
Red, Green and Blue values to set the color balance of the image. You may
want use manual color balance if you have a xed lighting situation.
R - This represents the amount of red in the image.
G - This represents the amount of green in the image.
B - This represents the amount of blue in the image.

NetCam SC Page 17
3.4 Overlay Properties
The Overlay Properties allow you to edit the text displayed on the
image.
TIME/DATE/TEXT STAMP
Text
Any text entered into this eld will be stamped onto the live image.
Camera location and copyright information are two examples. In addition to
static text, the current date and time, as well as internal camera parameters,
can all become part of the text on the live image. This is handled through
markup characters. For instance, %d inserts the current day of the month
on the live image. There is a complete list of markup characters below and
a mini reference on the Overlay page itself.
Default: NetCam SC %a %b %d %H:%M:%S %Y
Exposure: $e
Scale
The size of the font can be scaled from 1x (smallest size) to 4x (largest
size). The larger fonts sizes are useful for high resolution images that are
being resized smaller on a web page.
Markup Character Reference
All of the following markup characters can be used in the text overlay.

Page 18 NetCam SC
Additionally, any date/time markups (preceded by the % character) can be
used to compose the lenames in the FTP Properties Page, which is very
useful for archiving images with unique lenames (based on the current
date and time, for instance).
Date Markups
%Y Year, Four-Digit [2000-2199]
%y Year, Two-Digit [00-99]
%m Month, Numerical [01-12]
%B Month, Full [January-December]
%b Month, Abbreviated [Jan-Dec]
%U Week of Year (Starting with Sunday) [00-53]
%W Week of Year (Starting with Monday) [00-53]
%d Day of Month [01-31]
%w Day of Week, Numerical (Sunday=0) [0-6]
%u Day of Week, Numerical (Monday=1) [1-7]
%A Day of Week, Full [Sunday-Saturday]
%a Day of Week, Abbreviated [Sun-Sat]
%j Day of Year (Julian Day) [001-366]
%p AM/PM, Uppercase
${Z} Time zone
Time Markups
%H Hour, Military [00-23]
%I Hour, Standard [00-12]
%M Minute [00-59]
%S Second [00-59]
$[ Milliseconds [000-999]
Date & Time Shortcut Markups
%D Date String [mm/dd/yy]
%r Time String [HH:MM:SS AM/PM]
%T Time String, Military [HH:MM:SS]
Symbol Markups
\260 Degree Sign, º

NetCam SC Page 19
\251 Copyright Sign, ©
\256 Registered Sign, ®
\261 Plus-Minus Sign, ±
%% Percentage Character, %
Camera Markups
$e Camera Exposure
${IF} Internal Camera Temperature, in Fahrenheit
${IC} Internal Camera Temperature, in Celsius
${F} Weather Station Temperature, in Fahrenheit
${C} Weather Station Temperature, in Celsius
${HUM} Weather Station Relative Humidity
${MB} Weather Station Pressure in Millibars (hPa)
${HGIN} Weather Station Pressure in Inches of Mercury
${HGMM} Weather Station Pressure in Millimeters of Mercury
$n Frame Number
$u Camera Uptime
NetCam SC supports much of the ISO 8859-1 character set, which is
very useful for adding foreign language text to NetCam SC’s overlay. For a
list of characters, visit http://www.stardot.com/netcam/netcam-overlay.txt
In most cases, you can also copy and paste characters from other
applications.

Page 20 NetCam SC
3.5 FTP Properties
The FTP Properties instruct NetCam SC to upload images to a remote
server. After making changes, click the Apply button to save the settings
in the camera.
FTP Upload
FTP stands for File Transfer Protocol, one of the most popular methods
for transferring les over the Internet. In addition to camera serving images
from its internal web server, it can also upload images to an external web
server. This is useful if you plan on having a large number of visitors viewing
the live images or if you’d like to archive every image the camera takes.
To enable image uploads, check FTP Upload on and ll out the options
below.
Required Fields
Hostname
The hostname is the name of the server where you’d like the camera to
upload images to. It can be a machine name or IP address. Do not include
the http:// or ftp:// header or a path.
Example: example.com or ftp.example.com
Other manuals for NetCam SC
2
Table of contents
Other StarDot Technologies Security Camera manuals


