Starkites EXA Version 3 User manual


VERSION 3
User Manual
T ank you for c oosing STARKITES, please read t is entire manual carefully
before using your STAR KITE. Your ExA or SBow kite sets t e standard in
safety, performance and usability for t e next generation of water and snow
kites.
RELEASE OF LIABILITY AND ASSUMPTION OF RISK
WARNING
• Always store your kite ry to increase lifespan an avoi color run.
• Always take a lesson from a properly qualifie instructor before using any kite.
• Always wear a helmet when using Kiteboar ing equipment.
• The location in which you learn is usually ifferent from the one you will practice in.
Therefore, make sure you have the necessary knowle ge to be able to practice in a
ifferent spot.
• The location for practice must be evaluate in or er to make sure the win strength an
stability are safe, to see if there are potential obstacles an to verify that there is a secure
area to launch an lan your kite.
• Never practice alone, o not go away from the shore any further than you can swim
back from.
• Almost all acci ents occur on lan so before going out on your own, make sure you
have proper abilities to etermine correct kite-size.
• Train to use all safety system before using the kite un er power.
SAFETY FUNDEMENTALS
1. Letting go of the bar, but staying hooke in will completely epower the kite.
2. Releasing the chicken-loop will completely epower your kite.
3. Releasing the leash will separate you completely from your kite (provi e you are not
in the chicken-loop).
4. Remember, maximum fun comes from maximum confi ence; maximum confi ence
comes from maximum safety.
5. Get proper lessons before trying on your own.
6. Wear a helmet an appropriate safety gear.
7. Know your limits.
8. Know your equipment.
9. Know the spot.
10. Know the weather.

VERSION 3
User Manual
DO NOT USE THIS PRODUCT UNLESS YOU AGREE WITH THE FOLLOWING
TERMS AND CONDITIONS:
Before using this pro uct, the purchaser/user has carefully reviewe , un erstoo an
agrees to comply with the terms of this User Manual.
Use of this pro uct an any of its components involves certain inherent risks, angers
an hazar s, which can result in serious personal injury or eath.
The purchaser/user of this pro uct un erstan s that the seller is not responsible for any
amage to property or injury cause by negligent operation of this pro uct by the pur-
chaser/user, an the purchaser/user releases the seller from all such liability.
In the event of your eath or incapacity, this Agreement shall be effective an bin ing
upon your heirs, next of kin, executors, a ministrators, assigns an representatives.
The purchaser/user of this pro uct expressly assumes the risk of any an all bo ily injury,
eath an /or liability which may result from the purchaser or user’s participation in kite-
boar ing.
The purchaser/user agrees to hol Ri e Best, LLC harmless from any an all liability, an
waive an release any an all claims or potential claims against Ri e Best, LLC an any of
its respective agents, affiliates, subsi iaries, employees, instructors, officers, irectors,
sharehol ers, suppliers an manufacturers in the event of any such bo ily injury or eath
which may result from the purchase an /or use of Ri e.
For all the latest info on Starkites, inclu ing new pro ucts, press-releases, safety-an-
nouncements an the latest photos, check out www.starkites.com.
Your S-BOW11/ExA11 kite sets the stan ar in safety, performance an usability for the
next generation of water an snow kites.
Featurin :
• Genuine 100% e-power
• “Just let go” Safety system
• Super-easy, super-reliable “no swim” relaunch
• Pull-pull power trim
• 360 egree emergency chicken-loop release han le
• Tough, urable construction
• Simple/high/safe performance bar

VERSION 3
User Manual
SBow 2011
Progression and Versatility
Sizes Available: 4 6 8 10 12 14 16
Now on its 6th year of R an D, the SSBBooww’s reputation speaks for itself. Designe to ful-
fill the expectations an ambitions of our most passionate clients, we have optimize the
SBow using fee back from our pros an numerous kite schools.
TThhee SSBBooww iiss vveerrssaattiillee ffoorr aallll iisscciipplliinneess aann ccoonniittiioonnss,, bbuutt rreemmaaiinnss aa ffaavvoorriittee ffoorr
wwaavvee rriieerrss aann sscchhoooollss llooookkiinngg ffoorr aa hheeaavvyyuuttyy kkiittee wwiitthh qquuiicckk rreellaauunncchh,, ffaasstt rree--
ssppoonnssee aann eeaassyy ffeeeelliinngg aatt tthhee bbaarr..
This year we gave the SSBBoowwa more athletic response by enhancing the kite's pre-
ictability when riven har . The highly efficient profile offers tremen ous power with-
out penalizing the ability to fully epower at any given time. A 16 meter has been a e
to the collection for extra light win con itions. We also gave the SBOW a onepump sys-
tem an reinforce the Lea ing an Trailing e ges to maximize urability.
VERSION 3
Exa 2011
Power and Performance
Sizes Available: 791113
The 2011 EExxAA, SSttaarrkkiitteesshybri mo el is esigne an built for one purpose, top notch
freestyle performance. It is inten e for eman ing ri ers looking for big/lofty jumps,
an high powere tricks.
Now on its thir R an D year, we specifically focuse on ynamic stability control.
This enables the EExxAA’s potential to be fully exploite at high win s, enhances safety at the
extremes, an steering comfort in or er to stay focuse on the actual trick instea of the
kite. Keeping our competition ri ers in min , we have maximize upwin ability in or er
for them to throw more tricks uring their heats. Reinforcements have been a e at
the lea ing an Trailing e ges for maximum urability.
The EExxAAcomes in onepump system. With its huge win range, heavy uty construction,
an easeofuse, this kite stays at the top of the charts.
Performance Features and Kite Set Up:
When you first open up you kite, we recommen that you take some time to familiarize
yourself with the pro uct an esign features that make your kite unique. This will help
you set up the kite correctly the first time, ensuring you gain the maximum potential
from its esign.

VERSION 3
6 10 14 18 22 26 30 34 36
26 36
18
36
14
36
14 28
12 26
10 24
10 20
Versatility & Evolution Performance & Sensation
##### $$$$$
#### $$###
## #####
##### $$###
$$### #####
##### $$###
##### $####
$#### #####
##### $####
##### #####
##### $####
$#### #####
##### #####
$$$## #####
##### #####
6 10 14 18 22 26 30 34 36
7m
9m
11m
13m
Rider Level #
Beginner
Interme iate
A vance
Rider Style#
Freeri e
Freestyle
Wave
Perfor ance #
Stability
Reactivity
De-power
Re-launch
Upwin
Lift
Hangtime
Kite loop ability
Quality construction
Wind Range #
4m
6m
8m
10m
12m
14m
16m
18
36
16
34
14 26
12 22

International
The Starkites warranty guarantees everything we sell to be free from efects in materials an
workmanship. This warranty is vali for a perio of 3 month for stan ar exchange an
1 year for free repair from the ate of purchase of the original customer. Starkites
pro ucts are covere by the Warranty only when purchase from an authorize Starkites
ealer.
For any questions about the Starkites warranty or proce ures for making claims, please
contact your local ealer or e-mail us at aftersales@starkites.com. Starkites will etermine
if a pro uct is covere un er this warranty.
If a customer returns a efecte pro uct within the first 3 month, Starkites will exchange
the pro uct an ship it back to the customer free of charge. If a customer returns a
efecte pro uct 3 month to 1 year after original purchase Starkites will offer free repair.
Customer must have the invoice an serial number of the kite/pro uct upon returning any
Starkites Pro ucts. All returne Pro ucts are to be sent clean, ry an freight prepai .
Starkites will cover the freight for the return shipment.
The Starkites warranty oes not cover amage ue to normal wear an tear, sun fa ing,
improper usage, ba storage, seam failures ue to over inflation or heat exposure,
teaching, renting, use in waves/shore break, loss of kite ue to carelessness or improper
use of safety gear, amage cause by anything other than efects in material an
workmanship.
This warranty will not be covere if unauthorize mo ifications or repairs have been
carrie out.

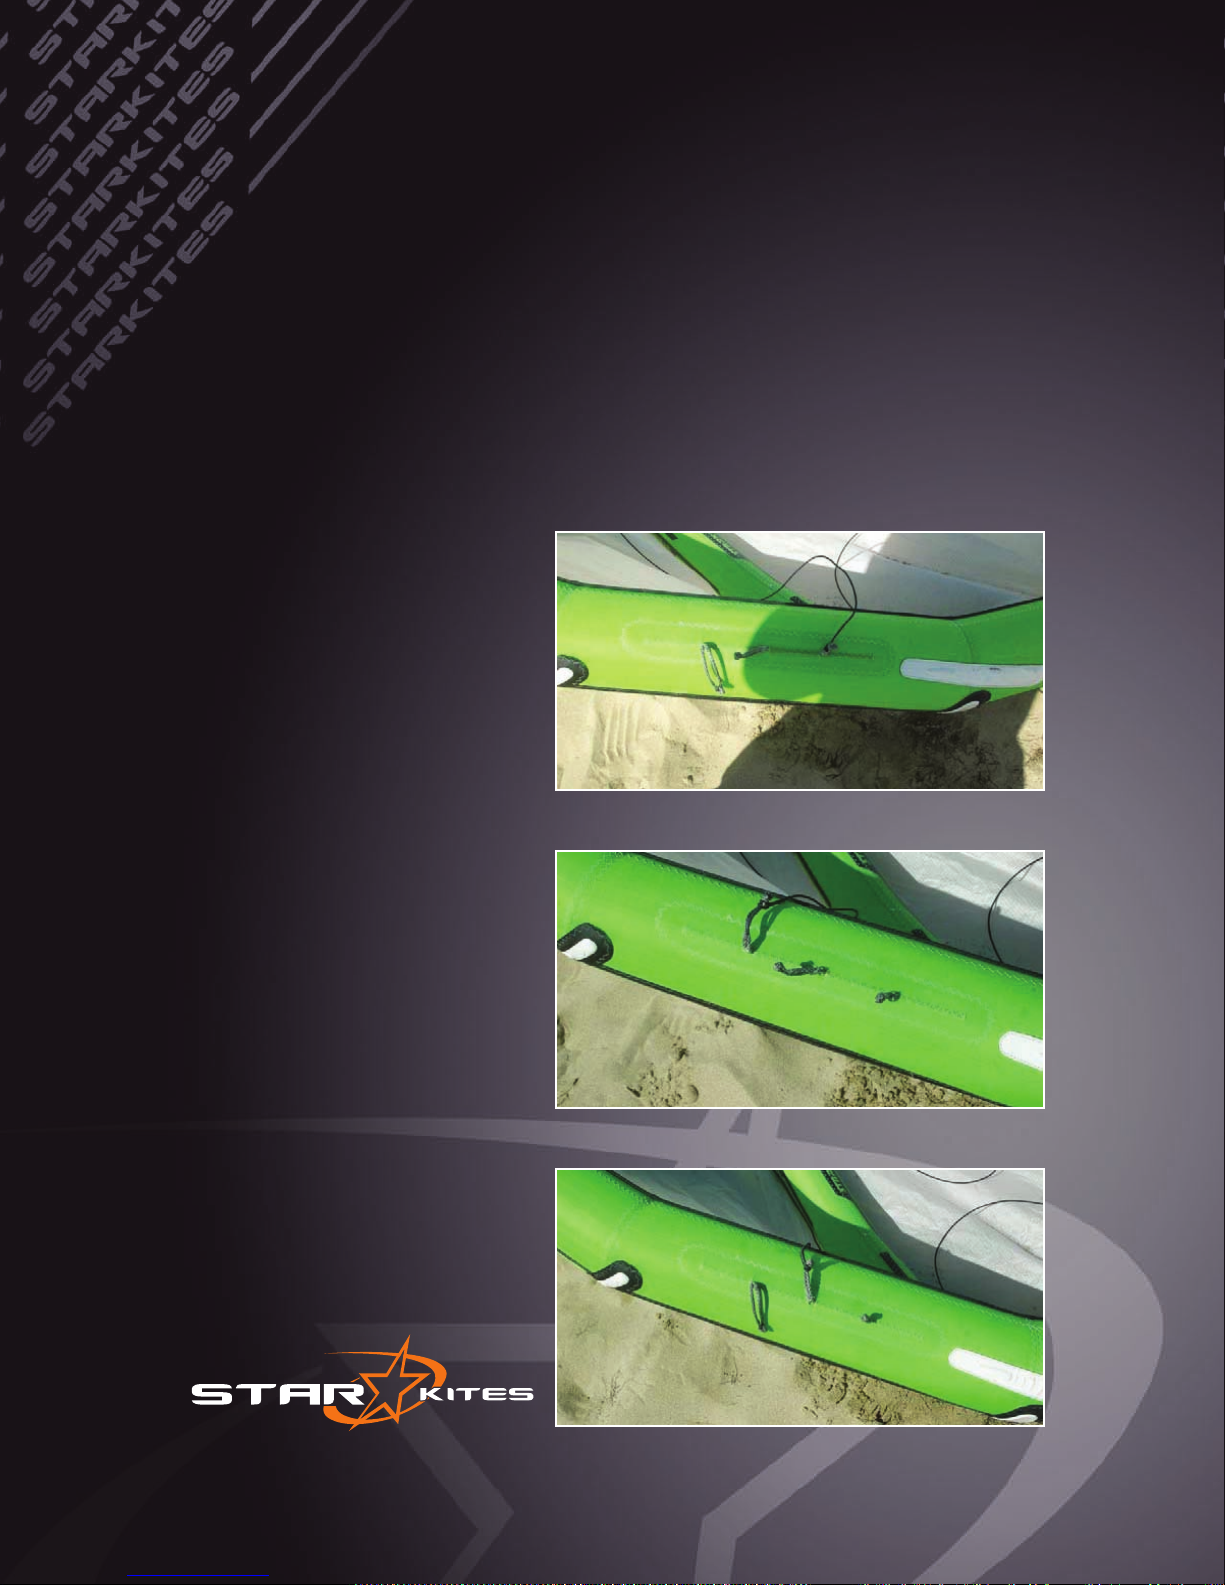
Trailing Edge
Leading
Strut
Front Bridle
Leash Release Handle
To connect to Harness De-power Strap
(-)Red less power
(+)White ore Power
Rear Line
Adjust ent
Push floater
up and down
Chicken Loop Main
Safety Push the Red
Handle Away fir ly
Connect Leash to the ring
under the chicken loop release
Functionalities
User Manual

Adjustin the Power
Resettin Chicken Loop
Release Handle
To release in an emergency, grab the re han le an firmly
push it away from you (in the irection of the arrow).This
action will isconnect you completely from your chicken-loop
an the kite power will be kille .
1) Grab the chicken loops’
open si e.
2) Stick the open si e back
into the release system.
You are now rea y to hook
back into you harness.
VERSION 3
User Manual
To e-power your
SBOW pull own
(towar s you)
on the re part ().
To powerup your
SBOW pull own
(towar s you) on
the black part (+).
Pull as many time
as nee e , webbing
is release gra ually.

The first time you setup your SBOW, it is strongly recom-
men e that you have an expert go through the process with
you.
Ensure that all the bri les are untwiste , an that everything
on the bar is untangle an running freely. The kite shoul be
place lea ing e ge own, facing into win as in pictures.
You shoul then attach the lines correspon ing to the iagram
below. If you on’t un erstan this section you MUST take a
lesson from professional instructor who will explain everything
clearly.
Kite Set Up

If you on’t un erstan this section you MUST take a lesson from pro-
fessional instructor who will explain everything clearly.
Kite Set Up

WARNING:
DDOO NNOOTT UUSSEE TTHHIISS PPRROOCCEEDDUURREE WWIITTHH SSTTAANNDDAARRDD CCSSHHAAPPEEDD KKIITTEESS
OORR IINN SSTTRROONNGG WWIINNDDSS..
• The launch area nee s to be big an clear of obstructions.
• Always ouble check the lines setting before launching your kite.
• Train in light win an o not isable any safety system.
1) Your kite is inflate
an secure an you are rea y
to go in the water.
To secure your kite:
• Position it facing the win
• Put enough san so it won’t
be lifte by a gust.
2) Your lines are set. Position
your bar so the lines have an
angle of 45 egrees to the win .
If the win is strong, apply some
epower before you launch.
3) Pull on the further tip to the
bar, until the kite takes the
win , up to the secon strut.
Self Launchin

IMPORTANT:
IIFF YYOOUU LLEEAAVVEE YYOOUURR KKIITTEE UUNNAATTTTEENNDDEEDD FFOORR MMOORREE TTHHAANN AA FFEEWW
MMIINNUUTTEESS,, AALLWWAAYYSS DDIISSCCOONNNNEECCTT TTHHEE LLIINNEESS..
Position yourself like
for a stan ar s
launching, walk
backwar to tense
the lines. The kite
will automatically fill
with air, rotate an
with a slight turning
input it will launch.
Release the power
by pushing the bar
away once the kite
takes off.
Note: the kite may move on the
san to reach the correct angle for
launching accor ing to the win .
Self Launchin

WWaatteerr rreellaauunncchhiinngg iiss tthhee ssaammee tteecchhnniiqquuee aass sseellff llaauunncchhiinngg ((sseeee
aabboovvee)).. IIff yyoouurr kkiittee ccrraasshheess iinnttoo tthhee wwaatteerr,, ssiimmppllyy lleett ggoo ooff tthhee
bbaarr,, wwaaiitt ffoorr tthhee kkiittee ttoo ffiillll wwiitthh wwiinn,, tthheenn ppuullll oonn oonnee sstteeeerriinngg
lliinnee.. TThhee kkiittee wwiillll sslloowwllyy rroottaattee uunnttiill iitt ttaakkeess ooffff.. RReemmeemmbbeerr ttoo
ppuusshh tthhee bbaarr aawwaayy jjuusstt aafftteerr ttoo kkeeeepp iitt ffrroomm bbaacckk ssttaalllliinngg..
• Never swim towar the kite.
• Pull the bar towar you
(like for maximum power)
• Ben over an grab a lea er line (on the si e
of the bar) as far as possible
• Pull on the lea er line while keeping the bar
as close as possible to your bo y.
• Push the bar away an release the lea er line
when the kite starts relaunching.
Water Relaunchin
If you on’t un erstan this section you MUST take a lesson from professional instructor who will explain everything clearly.
TThhee tthhrreeee iiffffeerreenntt ccoonnnneeccttiioonn ppooiinnttss oonn tthhee LLeeaaiinngg EEggee
aalllloowwss yyoouu ttoo ccuussttoommiizzee tthhee ffllyyiinngg cchhaarraacctteerriissttiiccss ooff yyoouurr kkiittee iinn
oorreerr ttoo ffiitt yyoouurr rriiiinngg SSttyyllee.. YYoouurr SSbbooww oorr EExxAA wwiillll ccoommee wwiitthh tthhee
eeffaauulltt aajjuussttmmeenntt ((cceennttrree ccoonnnneeccttiioonn)).. WWee rreeccoommmmeenn yyoouu ffllyy
iitt wwiitthh tthhee eeffaauulltt sseettttiinnggss ffiirrsstt..
If you attach the bri le to the
closest point from the center of
the kite it will more like a
hybri /Bow kite, big epower,
slightly longer bar travel for
sheeting in an out, an slightly
more bar pressure.
If you attach the bri le to the
closest point to the wingtips it
will have less bar pressure, but a
slightly more of a consistent pull
like a c shape, an a little less bar
travel is necessary to sheet in
an out.
The Attachment in between the
two is the optimal point for
versatility.
Front Bridle Adjustment

TThhee ttwwoo aattttaacchhmmeenntt ooppttiioonnss ffoorr tthhee rreeaarr BBrriillee AAlllloowwss yyoouu ttoo
iinnccrreeaassee oorr eeccrreeaassee tthhee ttuurrnniinngg rraattee ooff yyoouurr kkiittee..
If you use the connection
furthest from the centre of the
lea ing e ge, the kite will turn
fastest; this will also give it a
slight pivot feel, an have less
bar pressure. It will ecrease the
power generate in a kiteloop.
If you use the connection closer
to the centre of the lea ing
e ge, the kite will turn slightly
slower, but will create more
power uring a turn or a
kiteloop, the bar pressure will
increase a little bit.
Rear Bridle Adjustment

TThhee lliiffee ooff yyoouu kkiittee wwiillll llaasstt lloonnggeerr iiff yyoouu ffooll yyoouurr kkiittee pprrooppeerrllyy..
YYoouu wwiillll pprreeffeerraabbllyy wwaanntt yyoouurr kkiittee ttoo bbee rryy aann rreemmoovvee tthhee ssaann
ssttuucckk ttoo iitt.. DDoo nnoott ffoorrcceeffuullllyy ppuutt tthhee kkiittee iinn iittss bbaagg;; iitt sshhoouull sslliiee
iinn ffaaiirrllyy eeaassyy..
1) Deflate kite an lay it out.
2) Fol wingtip at the small strut an rollup all the way to the center.
4) Fol wingtip at the small strut an rollup all the way to the center.
3) Do the same for the other si e, then fol the two si es together.
Foldin the Kite

Thank you
for choosin
Have a nice fli ht!
Visit www.starkites.com for the Latest info.
This manual suits for next models
1
Other Starkites Toy manuals

Popular Toy manuals by other brands


Canon
Canon CREATIVE PARK 3D Decoupage Assembly instructions

Little Tikes
Little Tikes My First Pet Checkup Set Assembly instructions

Captain Slug
Captain Slug WSPR Assembly instructions

bruder
bruder 04040 quick start guide

REVELL
REVELL KIT 5321 Assembly manual

VTech Baby
VTech Baby Peek & Play Baby Book user manual