Starmix haaga 477 User manual

Bedienungsanleitung
Fig.1
ELECTROSTAR GmbH
Stuttgarter Straße 36
D-73262 Reichenbach/ Fils
Germany
Tel.: +49 (0)7153/982-0
Fax: +49 (0)7153/982-348
infoe@starmix.de
www.starmix.de
Sehr geehrte Kundin, Sehr geehrter Kunde,
wir freuen uns, dass Sie sich für ein Qualitätsprodukt aus
unserem Hause entschieden haben. Die Haaga 477 ist eine
besonders leistungsstarke und einfach zu bedienende
Handkehrmaschine, welche auf jeder ebenen und harten
Fläche eingesetzt werden kann. Das einzigartige Turbo-
Kehrsystem mit Tellerbürsten und Kehrwalze sorgt für
doppelte Sauberkeit. Die flach arbeitenden Tellerbürsten
nehmen Straßenschmutz aller Art, vom feinen Sand bis zur
Getränkedose, sowie nasses Laub und schweres Kehrgut
auf. Die Kehrwalze fegt den feinen Staub und sorgt
zusätzlich für die optimale Überkopf-Befüllung des
Schmutzbehälters von oben. Damit Sie möglichst lange
Freude an ihrem Gerät haben, beachten Sie bitte folgende
Bedienungsanleitung:
Montage des Schiebebügels
Entfernen Sie die Griffbeschläge (Pos. 7.13) indem Sie diese
um 45° nach vorne neigen und herausziehen. Drücken Sie
die Rastfeder am Schiebegriff (Pos. 7.12) und verbinden Sie
den Schiebebügel (Pos. 7.11) mit den Griffbeschlägen (Pos.
7.13) durch Einrasten der Rastfeder. Zur Montage/
Demontage des Griffes an der Maschine den Schiebebügel
45° nach vorne neigen und einsetzten/abziehen.
Handhabung / Einstellung
Die Haaga 477 ist werksmäßig für ebene Flächen eingestellt.
Der Bürstendruck lässt sich mit Hilfe des Verstellknopfes
(Pos. 1.11) stufenlos einstellen:
Stufe 1-2: neue Bürsten, für ebene Böden
Stufe 3-4: neue Bürsten, für feuchten Laub, Sand, nicht
ebene Böden (z.B. Waschbeton)
Stufe 5-8: zur Nachregulierung Abnützung
Bitte beachten Sie, dass die Bürsten nur mit leichtem
Druck auf dem Boden aufliegen. Tiefere Einstellungen
ergeben keine bessere Reinigung und erhöhen den
Verschleiß.
Schieben Sie die Kehrmaschine mit normaler
Schnittgeschwindigkeit, den Schiebebügel dabei leicht
anheben. Durch Hinunterdrücken des Bürstenniederhalters
(Pos. 1.22) und dem Einsatz der seitlichen Führungsrolle
kann sauber entlang von Kanten gekehrt werden.
Erhebungen von 2-3 cm können durch leichtes
Herunterdrücken des Schiebbügels überfahren werden.
Lagerung
Die Haaga 477 wird am zweckmäßigsten senkrecht
abgestellt oder aufgehängt (siehe Figur 1).
Entleerung
Zum Öffnen des Schmutzbehälters wird der Behältergriff
(Pos. 6.05) nach oben gezogen. Dann den Behälter
herausheben und entleeren. Danach Behälter wieder
einhängen und durch Herunterdrücken des Behältergriffes
verriegeln.
Pflege / Wartung
Sie haben sich für ein wartungsfreundliches Produkt
entschieden. Tellerbürsten, Kehrwalze, und Getriebe
mit Wasser reinigen. Alle Lagerstellen sind
staubgeschützt; müssen aber bei der Reinigung mit
Wasser vor Feuchtigkeit geschützt werden.
Keine Hochdruckreiniger zur Reinigung verwenden!
Die Staubfilter (Pos 1.20) sollten nach jedem Einsatz
durch Ausklopfen oder Waschen gereinigt werden.
ACHTUNG: Festgelagerte Verschmutzungen und
aufgespultes Schnüre o.ä. hinter der Walzenauf-
nahme (Pos 8.15) können zu einer Schwergängig-
keit der Kehrmaschine führen und die Funktion be-
einträchtigen. Mit Reinigung sichern Sie die
Funktion und Langlebigkeit Ihrer Kehrmaschine.
Um einen leichten und verschleißarmen Betrieb zu
gewährleisten, sollten gelegentlich die Bürsten-
antriebe Pos. 4.03 + 3.02 an der Verzahnung dünn
mit Original-Gleitspray eingesprüht werden.
Niemals andere Öle oder Fette verwenden. Das
Gleitspray darf nicht in die Kupplung (Pos. 3.10)
gelangen
Austausch der Bürsten
Die Bürsten bestehen aus hochwertigem Material. Nach
langjährigem Gebrauch kann es jedoch notwendig
werden, diese zu ersetzen. Wir empfehlen immer den
kompletten Bürstensatz gleichzeitig auszutauschen. Für
den Austausch der Tellerbürsten die Höhenverstellung
(Pos. 1.11) auf Stufe 8 stellen und Maschine senkrecht
aufrichten. Danach am Schrägrad (Pos. 4L/R) kräftig
ziehen und zusammen mit der Achse aus der Maschine
nehmen. Dann Tellerbürsten (Pos. 2L/R) zusammen mit
Zahnhülse und Kupplung (Pos. 3L/R) kräftig vom
Lagerzapfen abziehen. Achtung: An der Innenseite des
Rahmens (Pos.1.12), sowie an den Schrägrädern und
Kupplungen (Pos. 3.10) finden Sie Markierungen für L
und R. Die Tellerbürsten sind unten je nach Borsten-
richtung mit L/// oder R\\\ bezeichnet. Beim Einbau auf
die richtige Zuordnung achten. Die Montage erfolgt in
umgekehrter Reihenfolge: Tellerbürsten auf den
Lagerzapfen stecken, Kupplungen (Pos. 3.10) und
Zahnhülsen einsetzen und dann die Schrägräder wieder
einrasten - fertig. Zum Austausch der Kehrwalze,
Rastlasche am Walzenaufnahme (Pos. 8.15) drücken.
Beim Einsetzen darauf achten, dass keine Borsten
eingeklemmt sind und die Rastlasche wieder vollständig
in ihrer Ausgangsposition ist.
Garantie
4 Jahre Verschleißgarantie auf die Bürsten
2 Jahr auf alle anderen Teile gemäß EU-Recht
(Verschleiß ausgenommen)
Was tun, wenn das Gerät schwer läuft?
1. Kehrdruckeinstellung überprüfen
2. Gerät reinigen, aufgespulte Schnüre o.ä. entfernen
3. Getriebeteile mit Haaga-Spezial-Spray einsprühen
4. Drehrichtung der Bürsten (nach Reparatur)prüfen
Service-Partner

F
Chère cliente, cher client !
Nous vous remercions d'avoir acheté un produit de qualité de
notre maison. La machine Turbo est une balayeuse à main très
puissante et très simple à opérer. Elle peut être utilisée sur
chaque surface plane et dure. La balayeuse unique Turbo avec
des balais circulaires à rotation convergente et un rouleau de
balayage vous assurent un double balayage. Les balais
circulaires enlèvent les ordures de la rue de toute sorte, du sable
fin aux canettes de boissons, des feuilles humides ou même des
débris lourdes. Le rouleau de balayage central ramasse la
poussière fine et assure un remplissage optimal du collecteur de
débris par le haut. Afin que votre balayeuse vous rende cette
qualité de service aussi longtemps que possible, nous vous prions
de bien vouloir faire attention aux instructions suivantes.
Montage de l'arceau
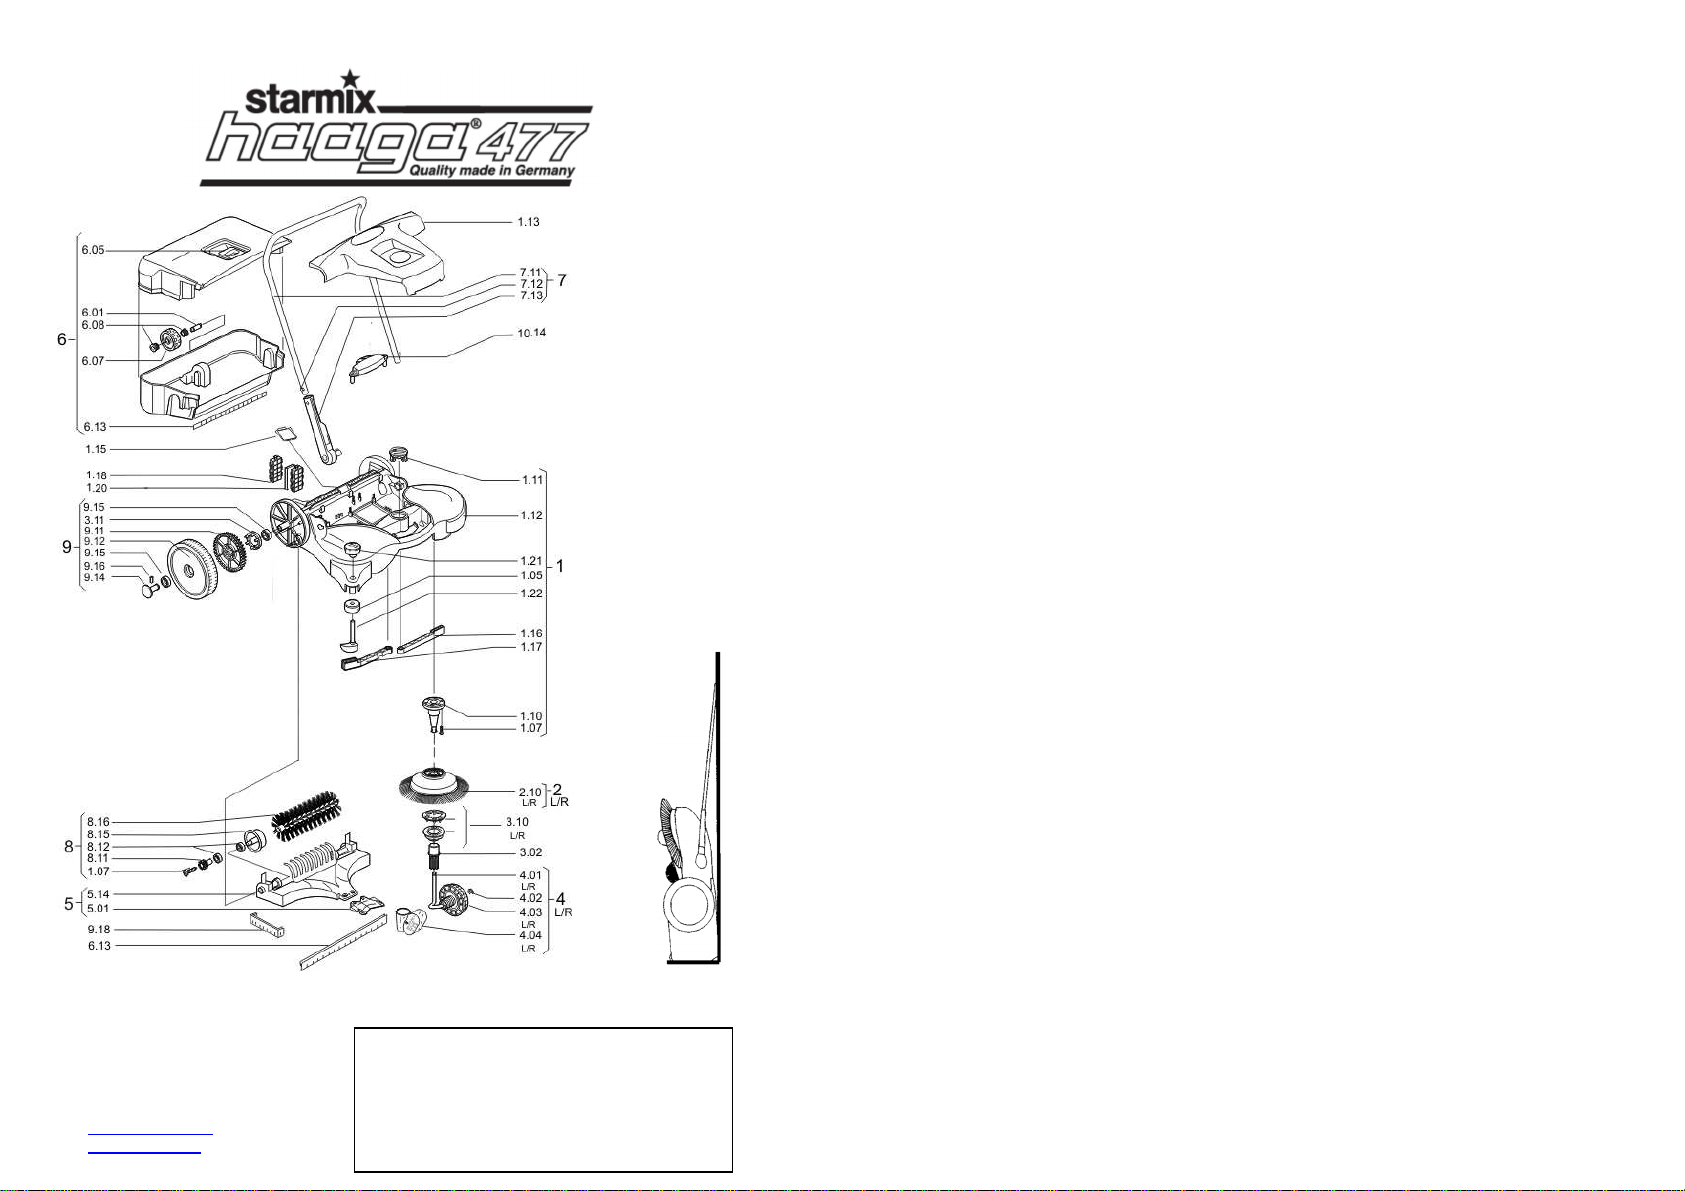
Presser le ressort à cran d’arrêt sur la poignée à coulisse (pos.
7.12) et connecter la pièce recourbée en arc (pos. 7.11) avec les
ferrures de la poignée (pos. 7.13) en encliquetant le ressort à cran
d’arrêt.
Faire prendre l’encoche de l'arceau par un coup léger dans le
cadre (pos. 12) de la balayeuse. Démontage: Placer l'arceau
verticalement et presser le ressort à cran d’arrêt avec un
tournevis grand sur le côté intérieur des ferrures de la poignée
(pos. 7.13) vers le bas et enlever à l’extérieur.
Mode opératoire / Réglage
La balayeuse Turbo est réglé en usine pour balayer sur des
surfaces planes. La pression des balais se laisse régler sans cran
à l’aide du bouton d’ajustage (pos. 1.11).
Position 1-2: des balais neufs, pour des surfaces plaines
Position 3-4: des balais neufs, pour des feuilles
humides, du sable, pour des surfaces non
plaines (par exemple le béton lavé).
Position 5-8: Pour compenser l'usure des balais ou pour décoller
des saletés particulières.
Nous vous prions de bien vouloir veiller à ce qu'en général,
les balais ne touchent le sol qu’avec une légère
pression. Une pression plus forte au sol n’apporte pas un
nettoyage plus efficace, mais contribue à une augmentation
de l’usure.
Faire glisser la balayeuse avec vitesse de marche normale en
élevant la pièce recourbée en arc en coulisse légèrement. Les
rouleaux de guidage
latéraux facilitent le nettoyage le long des arêtes. Des élévations
de 2-3 cm peuvent être surmontées en pressant la pièce
recourbée légèrement vers le bas.
Stockage
Pour stocker la balayeuse Turbo il suffit de la laisser en position
verticale ou de la pendre (face supérieure de la machine en
direction du mur, voir Illustration 1).
Vidage
Pour ouvrir le collecteur de débris tirer la poignée du
collecteur (pos. 6.05) vers le haut. Puis, enlever et vider
le collecteur. Re-positionner le collecteur de nouveau et le
verrouiller en pressant la poignée du collecteur vers le bas.
Entretien / Maintien en état
Vous avez porté votre choix sur un produit nécessitant peu
d’entretien. Les balais circulaires, le rouleau de balayage et
l’engrenage peuvent être nettoyés avec de l’eau. Tous les
roulements sont protégés des poussières. IMPORTANT – NE
PAS utiliser un appareil de nettoyage à haute pression.
Pour garantir une opération facile et résistante à l’usure, les
mécanismes de commande des balais doivent être de temps
en temps entretenus avec le spray coulissant.
NE JAMAIS UTILISER D‘AUTRES HUILES ET GRAISSES
Vérifier régulièrement que des fils, cordelettes, et autres
corps étrangers ne soient enroulés autour de la brosse
cylindrique centrale de balayage et/ou que des petites pierres
n'empêchent la bonne rotation(Pos 8.15).
Remplacement des balais
Les balais se composent des matériaux de haute qualité. Un
usage de longue durée nécessite éventuellement l’échange de
ces balais. Nous recommandons d’échanger le jeu de balais
complet simultanément. Pour l’échange des balais circulaires
ajuster le déplacement en hauteur (pos. 1.11) sur position 8 et
poser la machine verticalement. Tirer le pignon à denture
hélicoïdale (pos. 4L/R) vigoureusement et la enlever
conjointement avec l’arbre de la machine. Puis, enlever les balais
circulaires (pos. 2L/R) conjointement avec le manchon et le
dispositif d’accouplement (pos. 3L/R) du tourillon. Attention: Aux
côtés intérieurs du cadre (pos. 1.12) aussi bien qu‘aux pignons à
denture hélicoïdales et dispositifs d’accouplement (pos. 3.10)
vous trouvez des repères pour L et R.
Selon la direction des poils de brosserie, les faces inférieures des
balais circulaires sont repérées avec L/// ou R\\\. Pendant le
montage, veillez à la coordination correcte. Le montage s’effectue
en ordre inverse. Fixer les balais circulaires sur le tourillon,
insérer les dispositifs d’accouplement (pos. 3.10) et les manchons
et puis laisser encliqueter les pignons à denture hélicoïdales –
c’est tout. Pour remplacer le rouleau de balayage, presser le
collier de fixation du cylindre de balayage (pos. 8.15). Pendant le
montage, veillez à ce que pas de poils de brosserie soient serrés
et que le collier de fixation se trouve dans sa position de départ
correcte.
Garantie
4 ans de garantie d’usure pour les balais circulaires
2 ans de garantie sur toutes les autres pièces selon
le droit de l’EU (À l’exception de l’usure).
Que faire quand la machine travaille "dure"?
1. Vérifier l’ajustage de la pression de balayage.
2. Nettoyer la machine, enlever les cordons enroulés etc.
3. Vaporiser les roulements avec le spray spécial Haaga.
4. Vérifier le sens de rotation des balais circulaires
(après la réparation).
PL
Instrukcja obsługi (tłumaczenie instrukcji oryginalnej)
Szanowni klienci
Cieszymy sięże wybraliście nasz produkt wysokiej
jakości.
Starmix/Haaga 477 to niezwykle wydajne i efektywne
ręczne urządzenie zamiatające. Jest proste w obsłudze i
może byćstosowane do sprzątania niemalże każdego
rodzaju nawierzchni. Unikalny, opatentowany system
Turbo z dyskami o przeciwległym kierunku pracy oraz
rolkąwstecznąto podwójna czystość. Płaskie szczotki
umieszczone na dyskach pod odpowiednim kątem
usuwa wszelkiego rodzaju zanieczyszczenia, od pyłu,
poprzez mokre liście, puste puszki do dużych, ciężkich
odpadów. Szczotki usuwająpył i zapewniająprawidłowe
umieszczenie go w zbiorniku. W celu zapewnienia długiej
żywotności maszyny należy przestrzegaćinstrukcji
obsługi.
Montażrękojeści
Wciśnij do zamiatarki mocowanie rękojeści (7.13) pod
kątem 45°.Wciśnij sprężynęrękojeści (7.12) i połącz
rękojeść (7.11) z mocowaniami do maszyny (7.13)
umieszczając sprężynęrękojeści w otworze mocowania
do maszyny. W celu prawidłowego ułożenia rękojeści w
korpusie zamiatarki (1.12) przechyl rękojeść pod kątem
45° w kierunku frontu zamiatarki, rękojeść zatrzaśnie się
do prawidłowej pozycji.
Ustawianie maszyny
Zamiatarka Starmix/Haaga 477 jest nastawiona
fabrycznie do sprzątania równych powierzchni.
Wysokość szczotek jest regulowana za pomocąpokrętła
(1.11). Poziom:
1–2: nowe szczotki; do równych powierzchni
3–4: nowe szczotki; do mokrych liści, piasku i nierównych
powierzchni
5–8: szczotki w średnim lub wysokim stopniu zużycia.
Szczotki powinny tylko lekko przylegaćdo
powierzchni. Dociskanie nowych szczotek nie
poprawi rezultatów czyszczenia.
Pchaćurządzenie z normalnąprędkością, unieść lekko
rękojeść w celu dokładnego sprzątania w narożnikach.
Docisnąć lekko rękojeść w dół w celu pokonania
niewielkich wzniesień(2-3 cm)
Przechowywanie
Najlepszym sposobem na przechowywanie modelu 477
jest postawienie pionowo lub powieszenie za rękojeść
tak, by ze ścianąpionowąmiała styczność górna część
maszyny
Opróżnianie
W celu otwarcia pojemnika pociągnij rączkęmocowania
(6.05) do gory. Po opróżnieniu umieść zbiornik z
powrotem i zamknij pchając rączkęmocowania w dół
Konserwacja
Wybrałeśprodukt łatwy w utrzymaniu. Dyski ze
szczotkami, rolka wsteczna oraz mechanizm napędowy
mogąbyćczyszczone za pomocąszmatki i wody. Nie
zanurzaćcałych części maszyny w wodzie! Nigdy nie
używaj wody pod ciśnieniem do czyszczenia! Wszystkie
łożyska sąszczelne I odporne na zapylenie. W
przypadku prawidłowego użytkowania urządzenie nie
wymaga konserwacji. Wyczyść/umyj filtry przeciwpyłowe
od czasu do czasu. UWAGA: Elementy znajdujące sięz
boku rolki wstecznej (8.15) mogąograniczaćm
anewrowość maszyny i utrudniaćPracę. Prawidłowe
użytkowanie urządzenia zapewni jego długążywotność
W celu zagwarantowania łatwej pracy i odporności
na wodęnależy nanosićod czasu do czasu
Haaga spray na czystą, suchąprzekładnię
(elementy 4.03 + 3.0). Nie używaćinnych substancji
ani olejów. Spray nie powinien byćnanoszony na
sprzęgło I pozostałe elementy (3.10 L/R)
Wymiana szczotek
Szczotki do zamiatarki 477 sąwykonane z materiału
odpornego na ścieranie się. Po wieloletnim używaniu
może wystąpićkonieczność wymiany szczotek.
Rekomendujemy wymianęobu szczotek bocznych w tym
samym czasie. W celu demontażu szczotek ustaw
pokrętło regulacji wysokości (1.11) na pozycję8 i postaw
urządzenie pionowo. Pociągnij mocno koło (4 L/R) w celu
wyciągnięcia z gniazda. Następnie pociągnij mocno
dysk ze szczotkąwraz z zębatkąsprzęgła (2 L/R i 3 L/R)
w celu wyciągnięcia. UWAGA: oznaczenia L i R są
umieszczone po wewnętrznej stronie obudowy (1.12)
oraz na elementach sprzęgła (3.10). Dyski ze szczotkami
sąoznaczone w górnej części L/// lub R\\\ w zależności
od kierunku ruchu dysku. Upewnij się, czy dyski są
umieszczone po prawidłowej stronie. Montażdysków i
kółek jest odwrotny do procesu rozmontowywania:
umieść dysk ze szczotkami w gnieździe. Potem połącz
elementy sprzęgła (3.10) z zębatkąi umieść całość w
dysku. Następnie umieść koło w gnieździe.W celu
wymiany rolki wstecznej naciśnij wspornik rolki (8.15).
Upewnij się, żeby włosie rolki wstecznej nie były
zakleszczone we wsporniku.
Gwarancja
4 lata na szczotki włączając zużycie
2 lata gwarancji na pozostałe elementy
Co zrobić, gdy urządzenie porusza sięzbyt ciężko
1. Sprawdzići dostosowaćregulacjęwysokości
2. Wyczyścićurządzenie
3. Nanieść na zębatki specjalny spray Haaga
4. Sprawdzićkierunek obrotu dysków ze szczotkami

GB/USA
Dear Costumers,
We are happy that you chose a quality product.
The Haaga 477 is an especially efficient hand sweeping
machine that is simple to operate and that can be used
for all even and hard surfaces. The unique Turbo
sweeping system with circular brushes and sweeping roll
guarantees double cleanliness. The flatly operating
circular brushes collect all kinds of road dirt, from fine
dust to wet leaves, empty cans, and even heavy
garbage. The sweeping roll collects fine dust and, in
addition, ensures the optimal overhead filling of the dirt
container. In order to guarantee a long service life of your
sweeping machine, the following operating instructions
must be observed.
Assembly of the sliding handle
Fold the the handle fitting (item 7.13) forward to an angle
of 45° and pull it. Push the catch spring of the sliding
handle (item.7.12) and connect the sliding handle
(item.7.11) with the handle fittings (item 7.13) by
engaging the catch spring. To fit handle to the sweeper
frame (Pos 1.12) fold the handle forward to an angle of
45° towards the front brushes, the handle holder will
snap into position. To fix the handle move the handle
back to normal sweeping position.
Operation / Adjustment
The Haaga 477 sweeping machine is factory preset for
even surfaces. The brush pressure is continuously
adjustable by means of the adjusting button (item 1.11).
Step 1-2: new brushes for all even floors
Step 3-4: new brushes for wet leaves, sand, uneven
floors (e.g. exposed aggregate concrete)
Step 5-8: older brushes for readjustment of the
worn brush parts.
Please ensure that the brushes rest on the floor with
light pressure only. Deeper adjustments do not bring
about better cleaning results and may increase the
wear.
Push the sweeping machine with normal speed and lift
the sliding handle a little bit. The protruding circular
brushes will sweep all the corners, too. To sweep over
small steps (2-3 cm) slightly press down the sliding
handle. To clean edges push knob (item 1.22).
Storage (Fig 1)
The best way to store the Turbo sweeping machine is in
the vertical position and can be best accomplished by
placing the unit on the backside of the bin or by
suspending it with the sliding frame (top side of the
machine in direction to the wall).
Emptying
To open the dirt bin, pull the bin handle (item 6.05)
upward. After removing and emptying the bin, replace it
and lock it by pushing down the bin handle.
Maintenance
You chose a product that is easy to maintain. Disc
brushes, roller brush and drive can all be cleaned with a
rag and water. Do not submerge any of these parts in
water! Never use a pressure washer for cleaning! All of
the bearings are dust-protected and when used and
maintained correctly, this machine is maintenance-free.
Please clean/wash the dust filters from time to time
WARNING: Built-up dirt and spooled laces etc. behind
the brushholder (Pos. 8.15) can impede the
manoeuvrability of the sweeping machine and adversely
effect its operation. Maintaining your sweeping machine
will ensure its operation and long life.
In order to guarantee an easy and wear-resistant
operation, the brush drives Pos. 4.03 + 3.0 should be
sprayed with the original lubricant spray from time to
time. Do not use other oils or grease.
Exchanging Brushes
The brushes are made of highly wear-resistant material.
After using them many years, it may be necessary to
replace them. We recommend to replace the complete
brush set at the same time. For the replacement of the
circular brushes, set the height adjustment (item 1.11) to
step 8 and place the machine vertically. Then, pull the
oblique wheel (item 4L/R) strongly and remove it together
with the shaft from the machine. Next, strongly pull off the
circular brushes (item 2L/R) together with the tooth
sleeve and the clutch (item 3L/R) from the pivot housing.
Attention: The markings for L and R are applied on the
inside of the frame (item 1.12), on the helical gears and
on the clutches (item 3.10). The circular brushes are
marked on the bottom with L/// or R\\\ depending on the
direction of the bristles. Ensure that the correct side of
assembly is used. The assembly is carried out in reverse
order: Fit the circular brushes into the pivot housing.
Then, fit the clutch (item 3.10) into the tooth sleeve (item
3.02) and insert them into the circular brush. Lastly, insert
and engage the oblique wheel – and you’re ready to go.
For the replacement of the sweeping roll, press the stop
bracket of the brush holder (item 8.15). Ensure that the
bristles are not pinched laterally and that the stop bracket
is in its correct starting position again.
Guarantee
4 year warranty against wear for the disc brushes
2 year warranty for all other parts referring to the EU-law
(excludes wear)
What should be done when the unit does
not run smoothly?
1. Check the sweeping pressure adjustment
2. Clean the unit and remove spooled laces etc.
3. Spray the gear parts with Haaga special spray
4. Check the sense of rotation of the circular brushes
(after repair)
Table of contents
Languages:
Other Starmix Blower manuals
Popular Blower manuals by other brands

Kraftixx
Kraftixx KX-ALB 1821 Li Kit Original operating instructions

Black & Decker
Black & Decker 90538065 instruction manual

Challenge Xtreme
Challenge Xtreme BVA2400 instruction manual

Dolmar
Dolmar AG-3750 instruction manual

BMS
BMS alpha CR operating instructions

Snapper
Snapper ELBX10152BV Operator's manual