Starmobile Engage 8 User manual
User Manual


Thank you for purchasing the Starmobile ENGAGE 8. We trust that it will meet
your satisfaction.
Please read the instructions in this manual prior to operating. Starmobile does not
assume any liability from improper operation or accidental damage of the unit.
We will periodically refresh the content in this user manual in order to serve you
better. If the actual setup and usage of your unit differs from what is detailed in
this user manual, please visit the Starmobile website (www.starmobile.com.ph)
Introduction

TABLE OF CONTENTS
I. Important Reminders 1
II. Tablet Overview 2
III. Quick Guide 4
IV. Operating Instructions 5
1. Getting Started 5
2. Settings 6
3. Wi-Fi 7
4. Managing Applications 10
5. Setup and Usage 14
6. Connecting to the Internet 20
VI. Apps and Functions 21
1. Audio and Video Playback 21
2. Viewing Your Photos 23
3. 3G USB Dongle 23
4. Camera 24
5. Connecting with External Devices 24
6. Your Gmail Account 25
7. Google Play Store 28
8. Data Reset 30
9. MicroSD Card 30
10. Email Settings 31
11. Taskbar 32
VI. Connecting to Networks and Devices 33
VII. Troubleshooting 33
1. Handle your ENGAGE 8 with care. Dropping or vigorously shaking the
Starmobile ENGAGE 8 may damage the display.
2. Your ENGAGE 8 is optimized for touchscreen operation. Do not use any
metal object as a makeshift stylus to prevent short-circuiting.
3. Take precaution against data loss by backing up your data, particularly
before upgrading your ENGAGE 8 rmware. Starmobile is not
responsible for any malfunction or damage due to unauthorized software
upgrade or rooting of the device.
4. Direct hardware concerns/issues to Starmobile-accredited service centers. Do
not attempt to disassemble the device on your own.
5. Clean your ENGAGE 8 using dry cloth. Do not use alcohol, thinner or
benzene to clean the surface of the ENGAGE 8.
6. Do not disconnect your ENGAGE 8 while in the middle of formatting or
uploading/downloading, as this may lead to errors in operation.
7. Operate your ENGAGE 8 as detailed in this manual to ensure proper
usage. Starmobile is not responsible for ash damage caused by product
malfunction or repair.
8. Keep your ENGAGE 8 away from liquids or foreign objects that may
enter the unit and cause permanent damage.
9. Do not leave behind the ENGAGE 8 inside the car or use your ENGAGE 8 in
extremely hot, cold, dusty, or humid conditions. This will affect tablet
performance and will likely damage the unit.
10. Device specications are subject to change and improvement without prior
notice.
1
I. Important Reminders
2
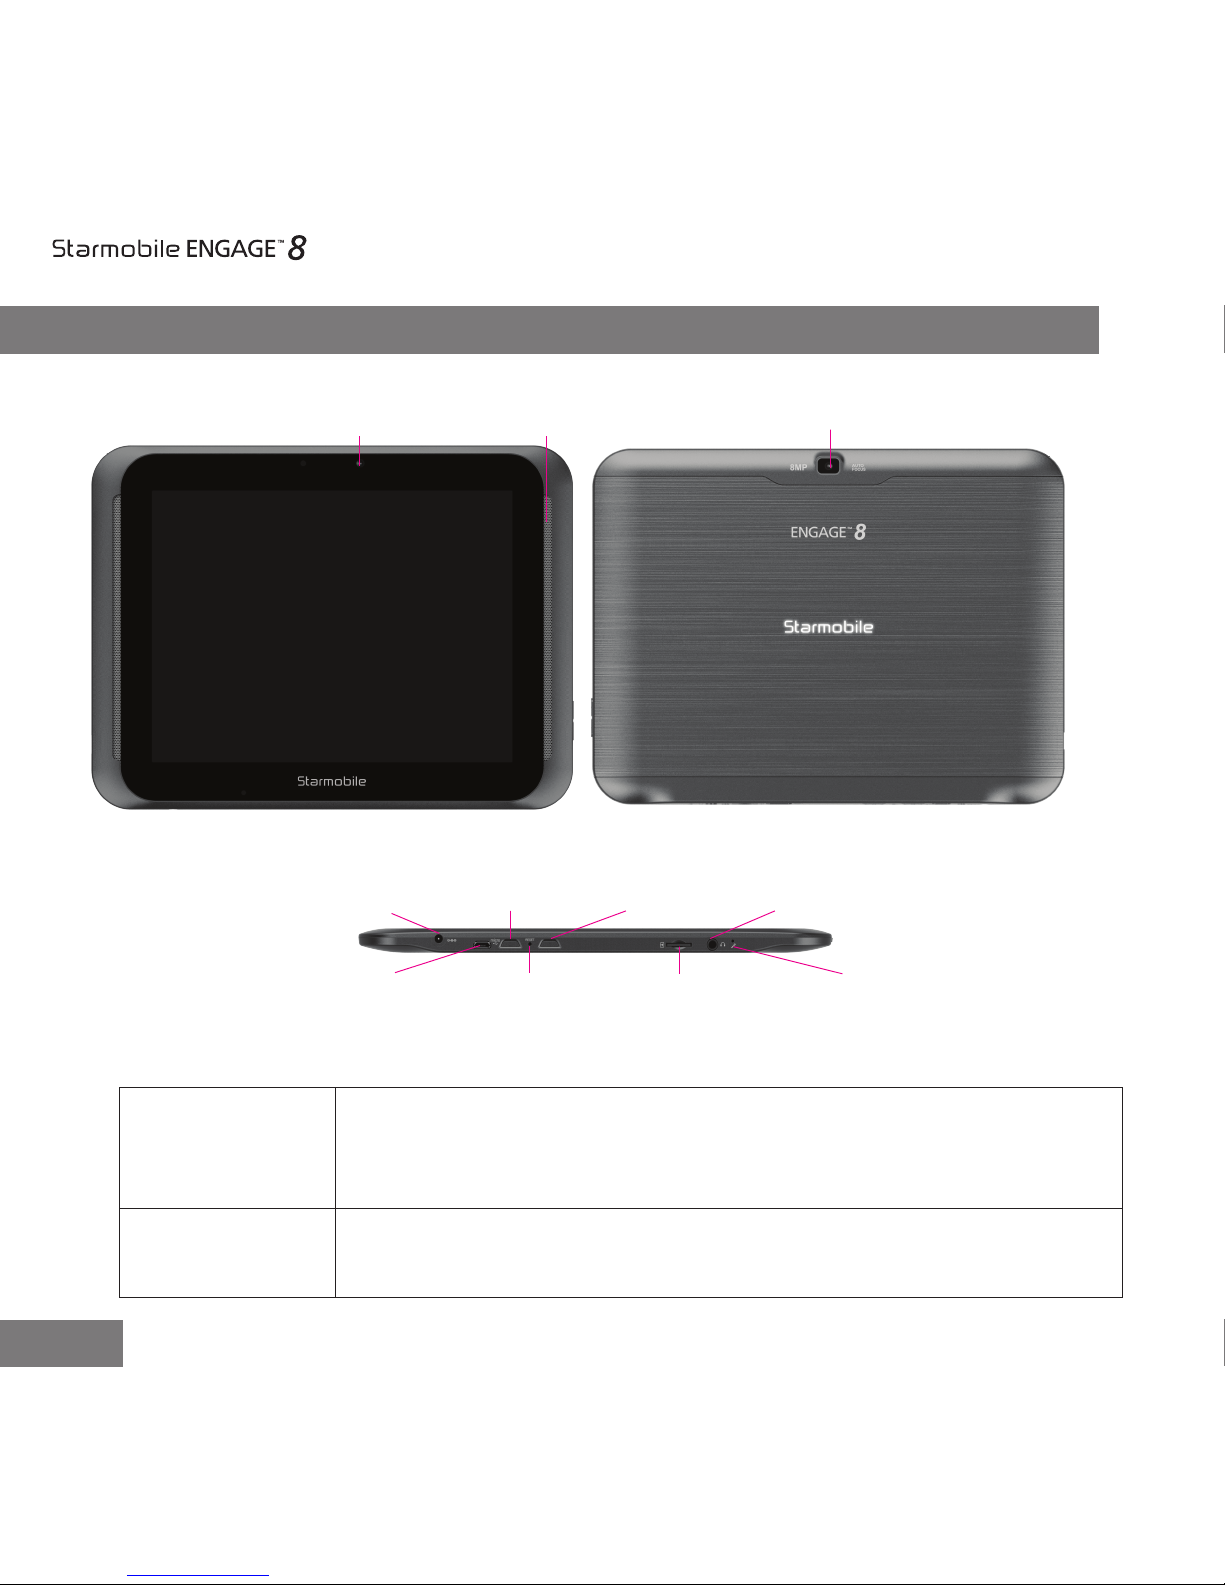
Front Camera
DC Charger Interface
Micro USB Reset Key Micro SD Card Slot Mic
Home Key Power Key Earphone Jack
Rear CameraSpeaker
Press and hold to switch on/off the device. If device is in use,
press once to turn off screen backlight. If device is on sleep
mode, press once to activate screen display.
Power Key
Press to exit current screen and return to home screen.Home Button
II. Tablet Overview

3
Back Camera
Lens
Front Camera
Lens
Microphone
Speakers
Charger Port
Micro SD Slot
Reset Button
Battery Status
Indicator
Micro USB Port
Earphone Jack
8MP rear camera for image and video capture.
2MP front-facing camera for image and video capture.
Used for picking up voice or audio during recording.
Used for playback of audio and video, notication alerts,
and tones.
Allows you to connect the charger.
Allows you to install memory card for additional storage.
Press and hold for 2-3 seconds to reset device.
Indicates state of battery:
Blinking red light - low
Red light - charging
Green light – fully charged
Allows you to connect USB cable for data exchange.
Allows you to plug in an earphone
4
III. Quick Guide
1. You will rst need to sign up for a Gmail account to fully utilize Google
services in your ENGAGE 8, and download applications via
Play Store. If you already have a Gmail account, you will only need to
sign in to access the related Google features.
2. The Starmobile ENGAGE 8 comes with a special screen backlight control
function that maximizes battery life. The screen backlight automatically powers
off when the device is idle or on standby mode for a certain period of time. You
can re-activate the screen by pressing the power on/off key.
3. In the event of an unresponsive touchscreen, you should shut down and
restart ENGAGE 8. You can also reset the device by pressing the reset
button located on the left side of the device, near the home key.
Note: Running many applications simultaneously on your device can slow down processing speed.
4. It is normal for your ENGAGE 8 to become warm during heavy use,
particularly in the event of non-stop data transmission, when playing
music, and activating Wi-Fi . In such conditions, your ENGAGE 8 is
utilizing a signicant amount of power which then generates heat. Rest
your device after every three hours of heavy use to keep it running
optimally. It is possible that device will become warmer during heavy use.
5. To maximize your device’s battery life, follow these steps: reduce
screen brightness to 30-50%, switch off Wi-Fi and data synchronization if
not in use, and adjust device volume.

5
IV. Operating Instructions
1Getting Started
1.1 Inserting your Memory Card
Your Starmobile Engage 8 supports Micro SD cards up to 32GB.
• Slide in the memory card onto the designated slot. Make sure that its
gold chip is facing upward and that its beveled edge is properly aligned
with the card slot.
1.2 Power on/Power off
Power on: Press and hold the power on/off key for three seconds, after
which ENGAGE 8 displays the start-up logo and goes to the home screen.
Power off: Press and hold the power on/off key for three seconds to switch
the device off.
Restart: Reboot your device by holding the Power button and hitting
restart.
1.3 Charging
When your ENGAGE 8 prompts that battery level is low, charge it immedi-
ately using the provided charger.
Note: Avoid leaving the charger on for more than 15 minutes after your ENGAGE 8 prompts you
that the battery has been fully charged.Overcharging your battery will signicantly cut down
battery life and performance.
6
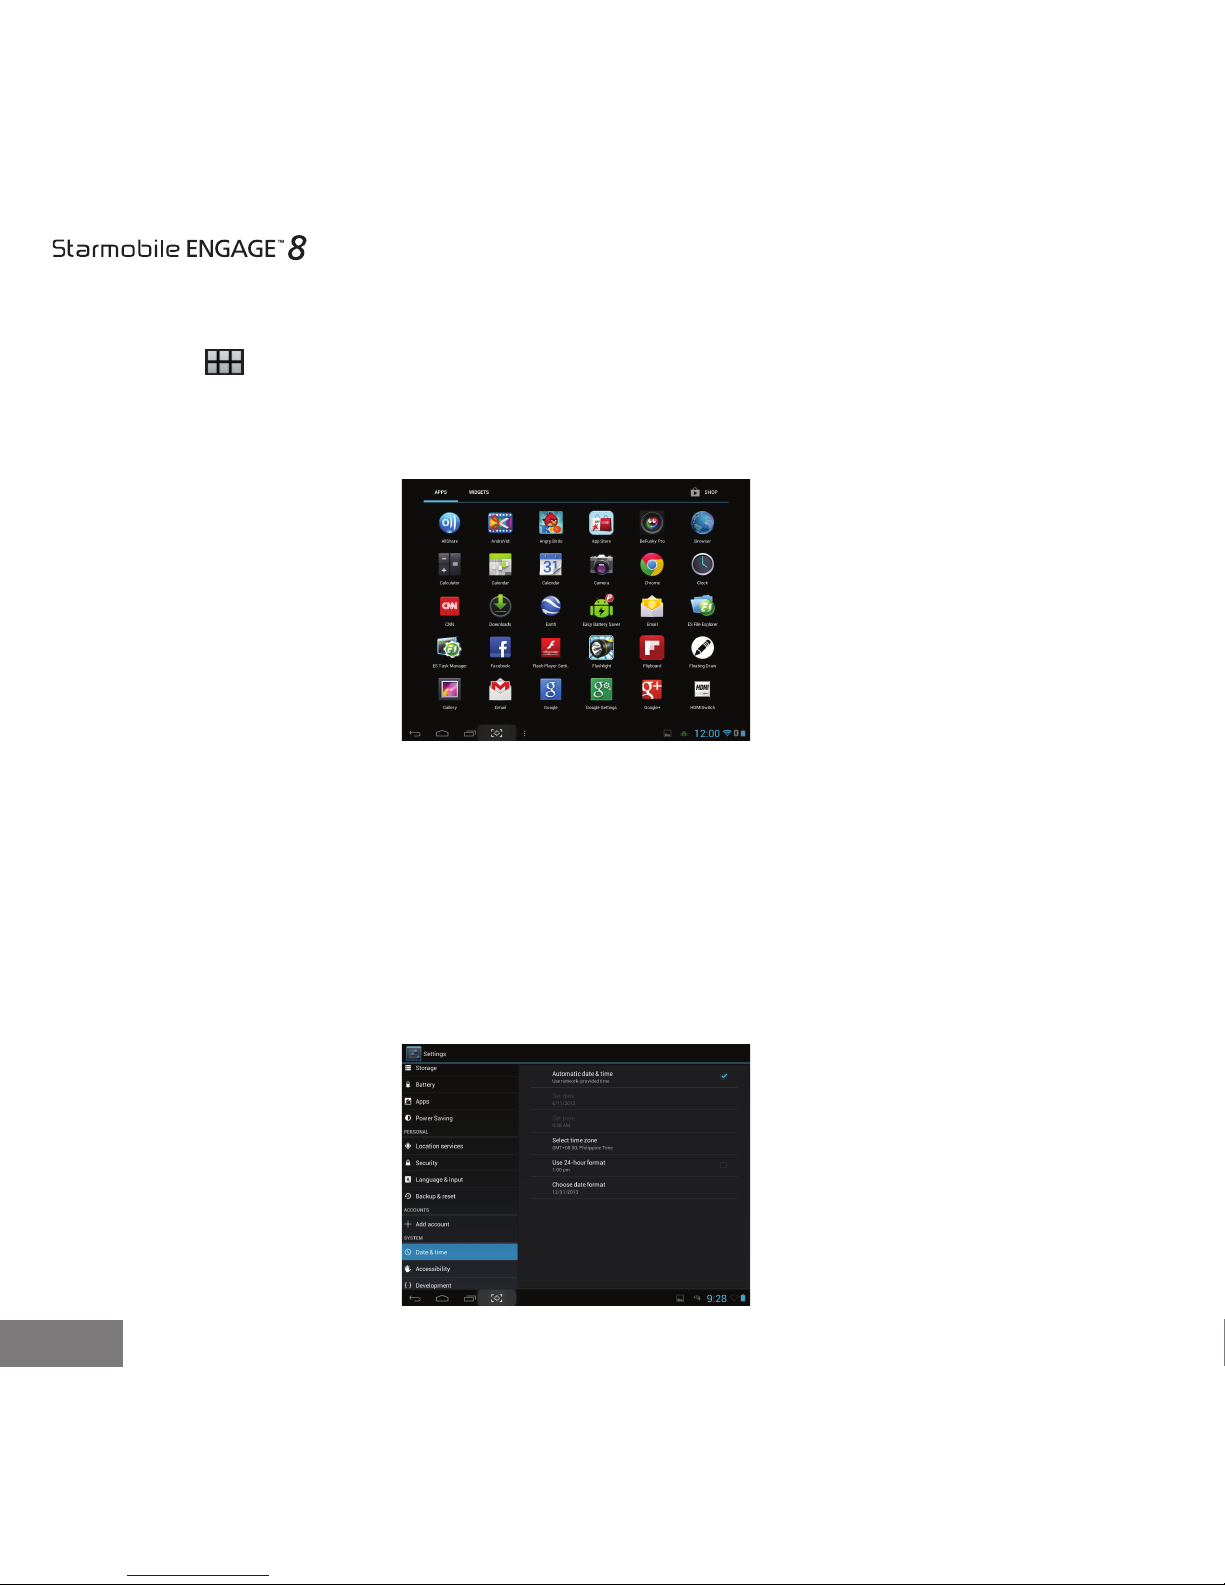
1.4 Main menu
Click the icon in the home screen to view the main menu. Here you can access
settings, music, and video playback, the web browser, and other applications you
have installed in your ENGAGE 8.
2Settings
Click “Settings” in the main screen to enter the setting interface. Adjust settings
according to your preferences.
2.1 Date and Time Setting
Click “Date & Time” under “Settings” to adjust the device date and time. Under
this function, you will be able to set the date, time, time zone, and time and date
format, among others.
1.4
2.1
7
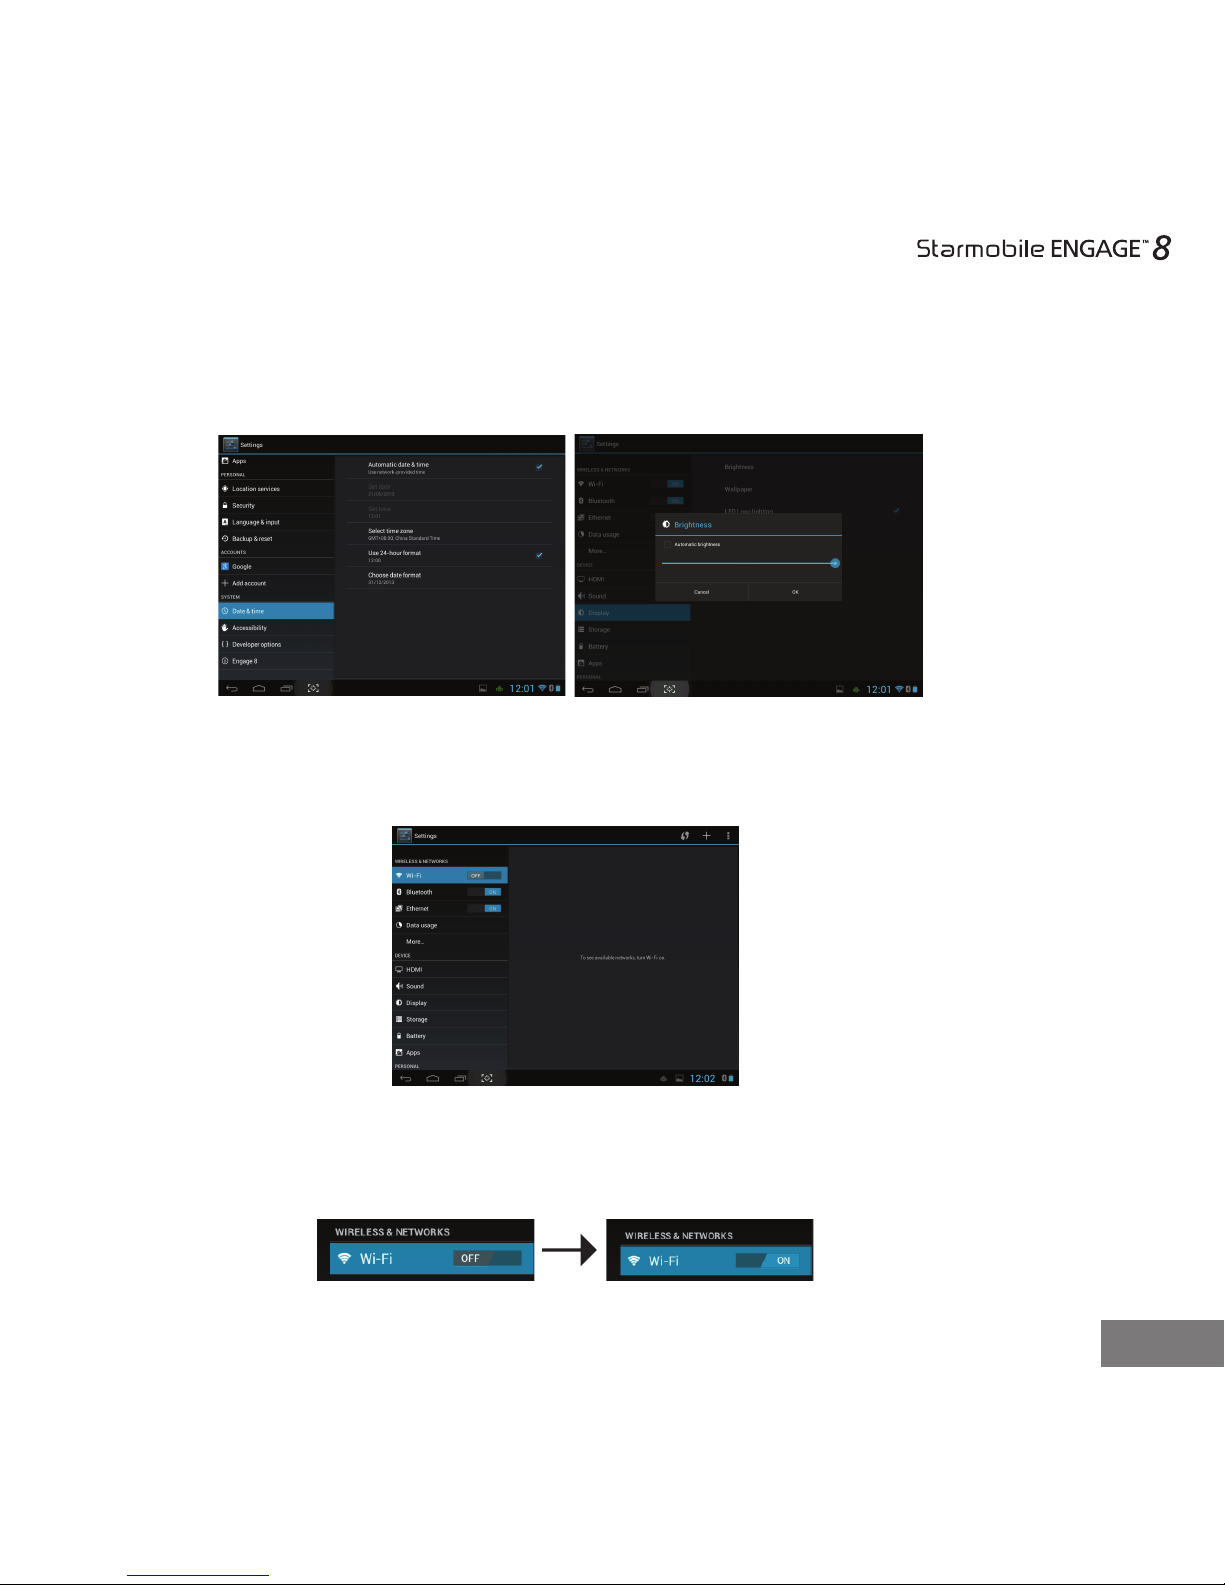
2.2 Brightness
Select “Display” under “Settings” and click “Brightness”. Drag the bar to adjust
desired screen brightness.
3Wi-Fi
3.1 Enter the “Settings” menu, as shown in the photo below:
3.2 Select Wi-Fi to switch on the Wi-Fi function. It will change from Off to On by
swiping across the button.
.
2.2.1
3.1
2.2.2
8
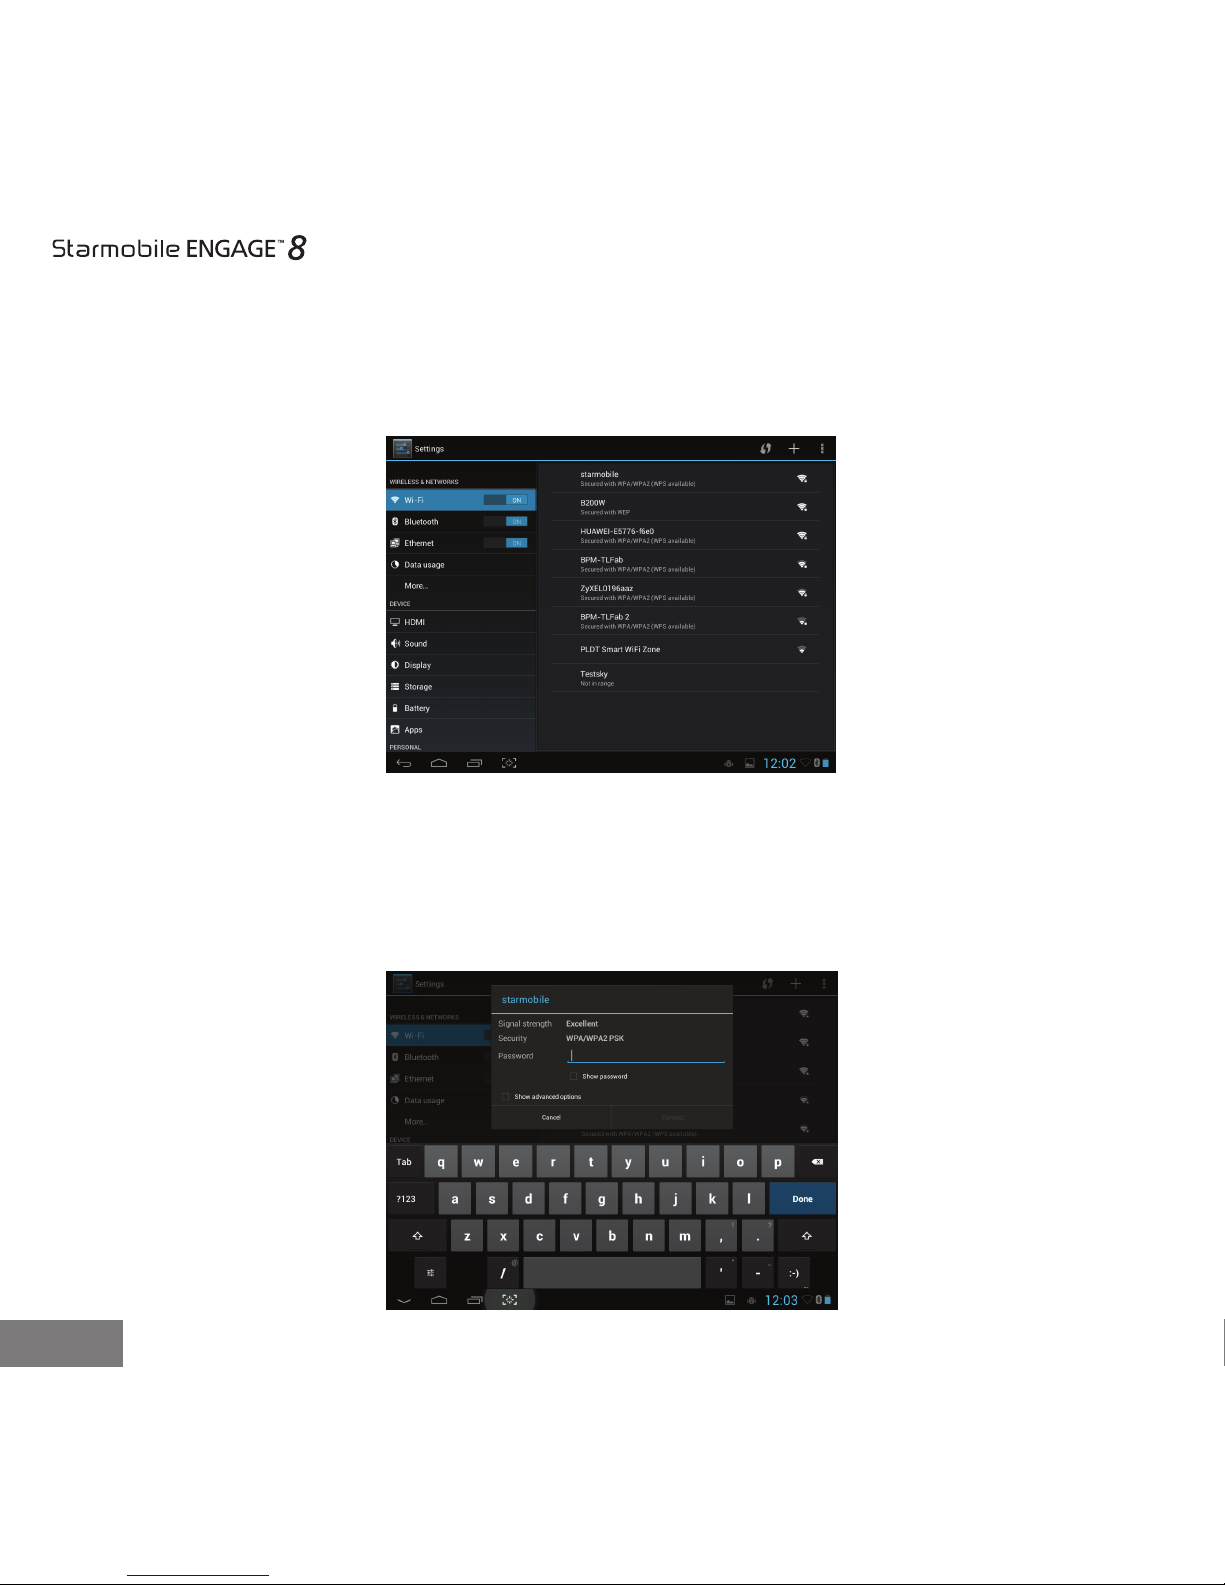
3.3 Once you’ve switched on Wi-Fi, the right side of the screen will display the
available networks as seen below.
3.4 Select the network you want to connect to. If the network is open or free for
public use, you will automatically be connected. If the network is secure, a pop-up
window will then appear prompting you to type in the network password.
3.3
3.4
9
3.5 Click “Connect” after typing in the password. Your ENGAGE 8 will obtain the
network IP address automatically.
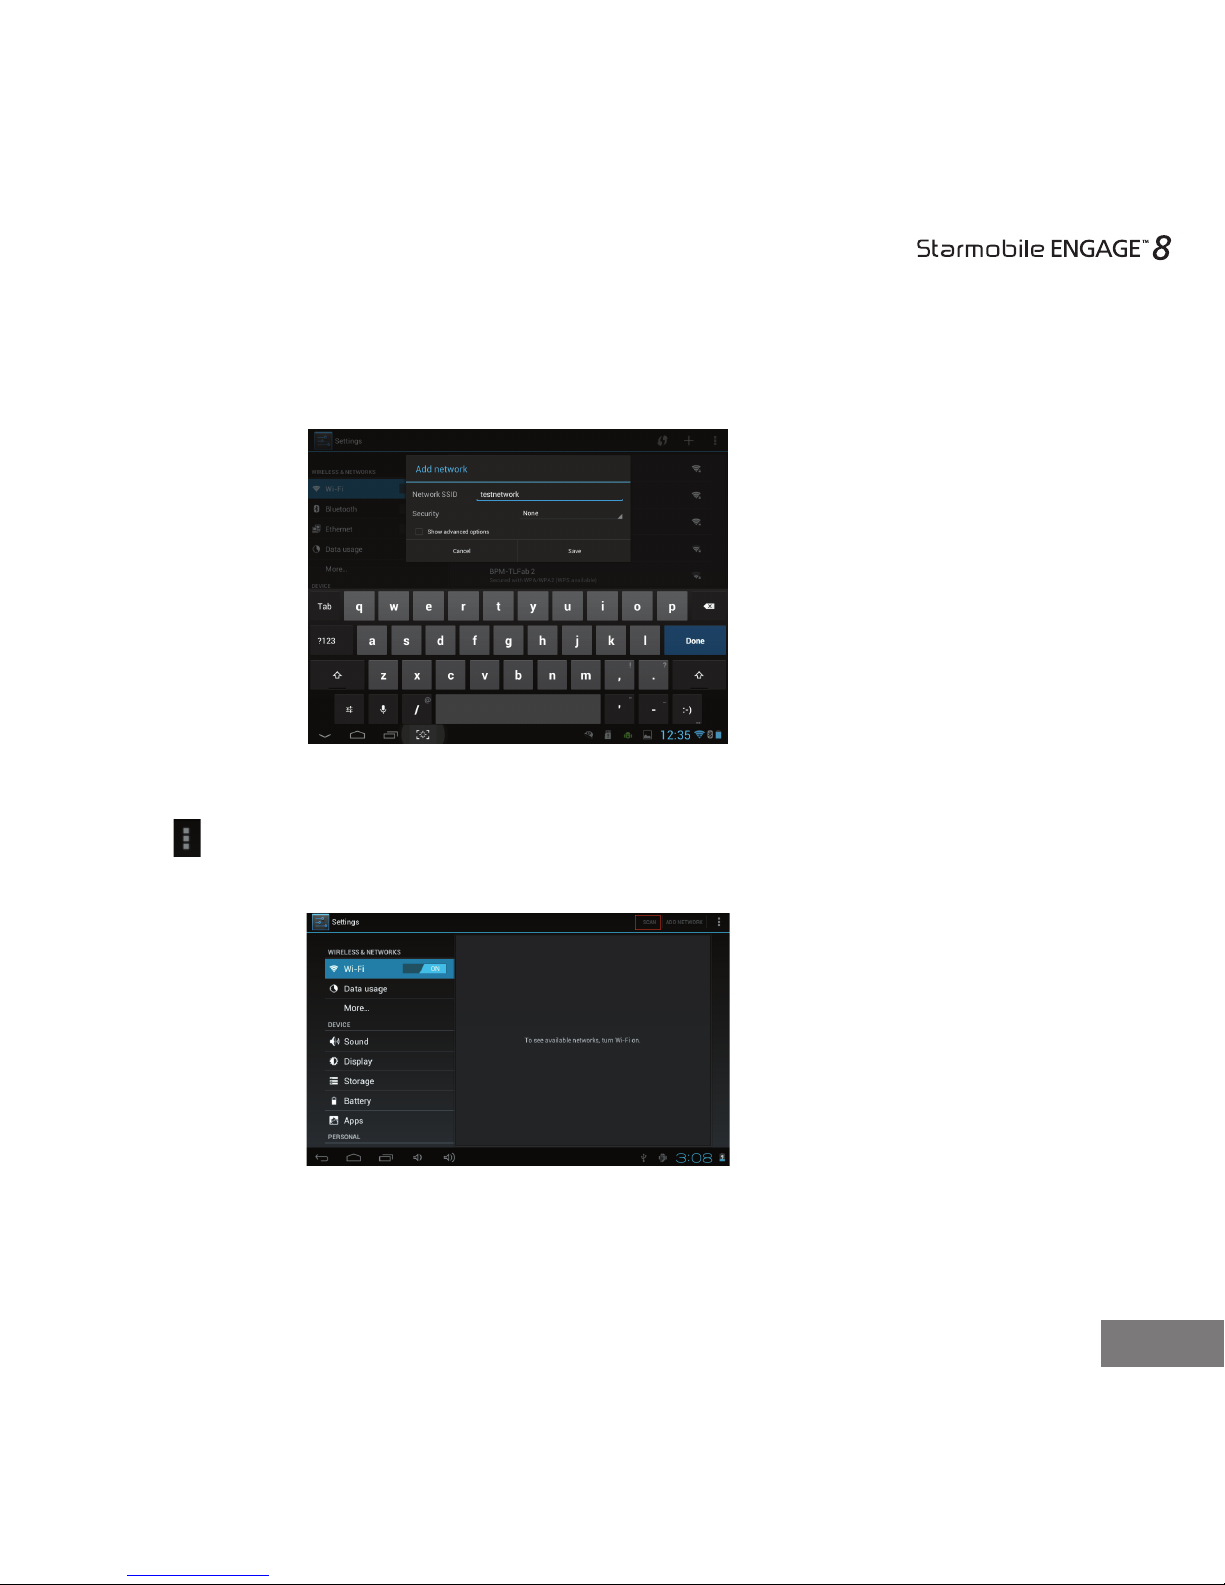
3.6 If your ENGAGE 8 does not automatically detect wireless networks to connect to,
click to scan for networks manually.
3.7 To add a network, click “+”, input the network SSID, security type, and
password, then click “Save”. Select the name of the network when you want your
ENGAGE 8 to connect to it.
3.5
3.6

10
3.8 Click to access advanced Wi-Fi options . In this interface, you can
modify network notication and sleep mode, as well as check the tablet’s MAC
address and IP address.
4Managing Applications
4.1 Install Apps
To install apps on the ENGAGE 8, click on Google Play and search for an app you
3.7
3.8
11
wish to download and follow the on-screen instructions. See section 12 for
more instructions.
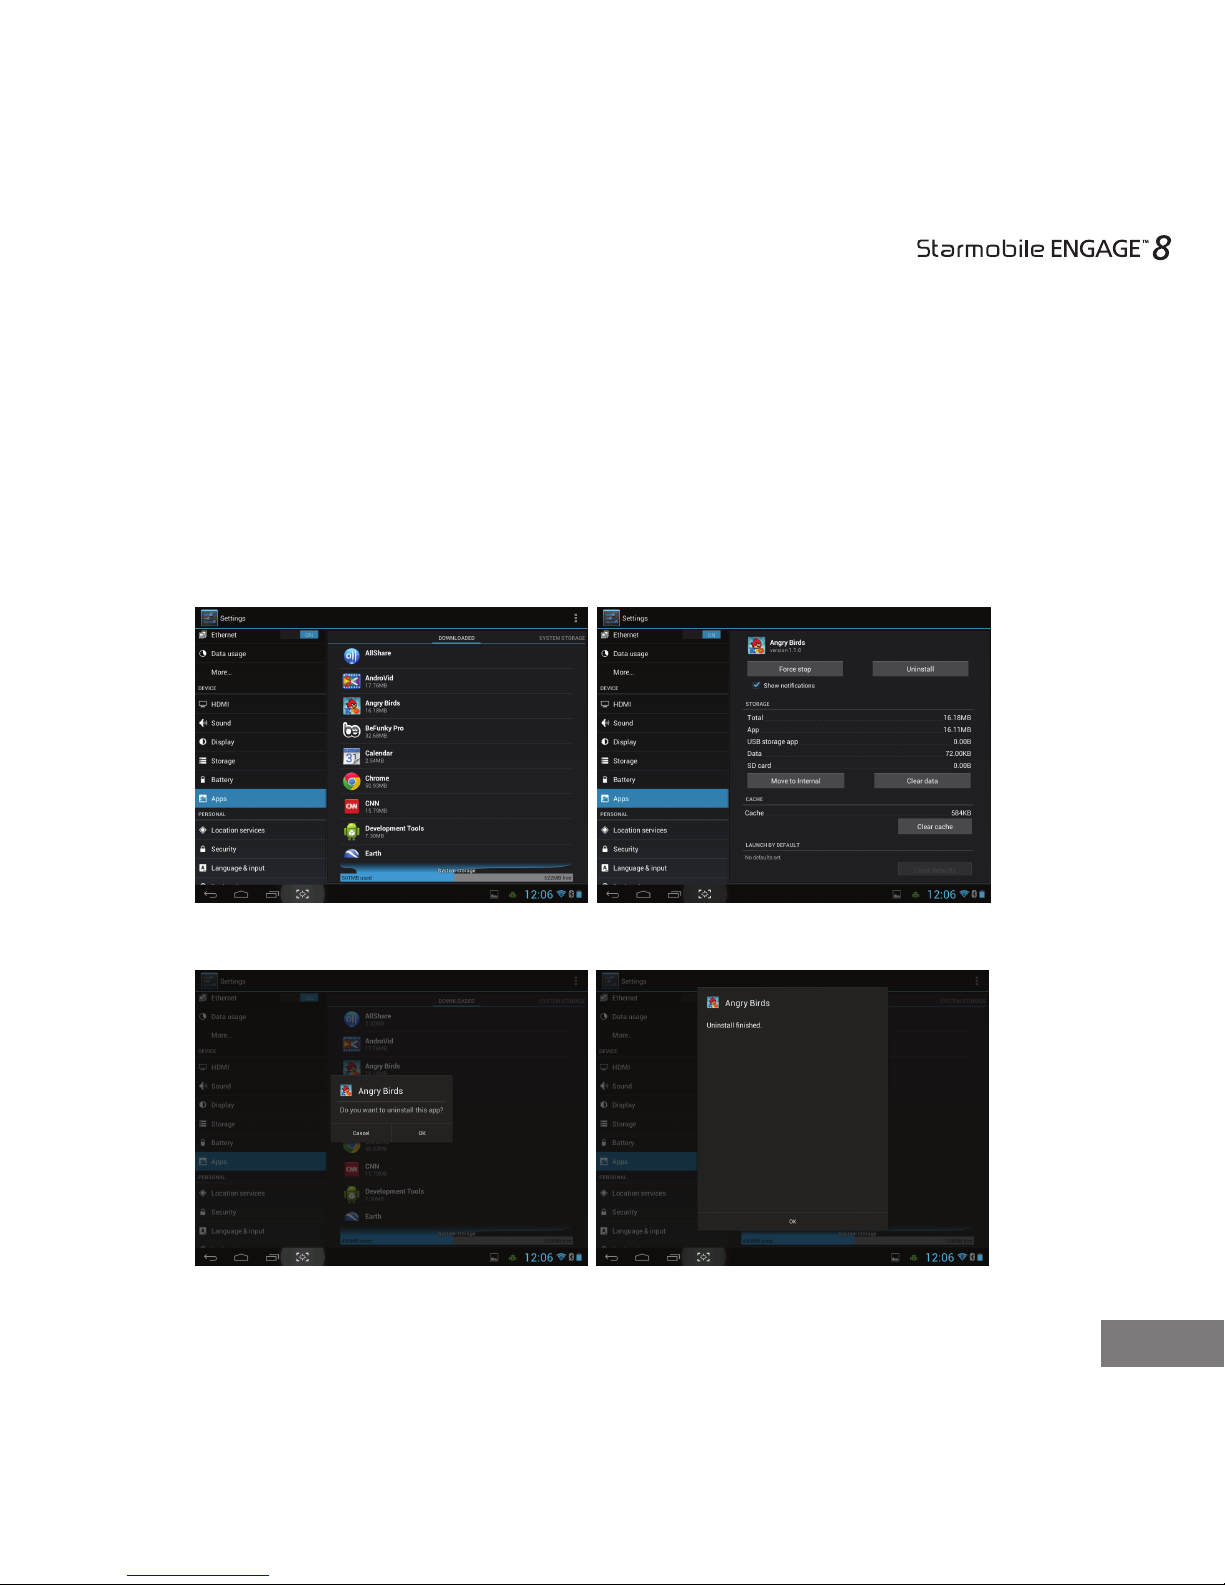
4.2 Uninstall Apps
You can uninstall applications by using the pre-installed application manage-
ment software that came with your ENGAGE 8. To uninstall an application, go
to Settings > Device > Apps, and select the application you would like to
uninstall.
4.2.1 4.2.2
4.2.3 4.2.4

12
2.2 Brightness
Select “Display” under “Settings” and click “Brightness”. Drag the bar to adjust
desired screen brightness.
3Wi-Fi
3.1 Enter the “Settings” menu, as shown in the photo below:
3.2 Select Wi-Fi to switch on the Wi-Fi function. It will change from Off to On by
swiping across the button.
.
4.3 Data Usage
Data usage refers to the amount of data uploaded or downloaded by your device
during a given period using 3G dongle. Depending on your wireless plan, you
may be charged additional fees when your data usage exceeds your plan's limit.
To monitor your data consumption, adjust your data usage settings. First check
your plan and determine what data limits may apply.
Note: The usage displayed on the data usage settings screen is measured by your tablet. Your
carrier's data usage accounting may differ. Usage in excess of your carrier plan's data limits can
result in steep coverage charges.
Data usage settings allow you to:
• Set the data usage level at which you'll receive a warning.
• Set a data usage limit.
• View or restrict data usage by app.
4.4. Sound
Congure your sound and notication settings
To set notications alerts, go to “Sound” then select from the list of available
tones. You may also set audio les stored in your micro SD card as your preferred
notication tone. Click OK to save.
To set sound volume, go to “Volume.” Drag the indicator to adjust volume level.

13
3.3 Once you’ve switched on Wi-Fi, the right side of the screen will display the
available networks as seen below.
3.4 Select the network you want to connect to. If the network is open or free for
public use, you will automatically be connected. If the network is secure, a pop-up
window will then appear prompting you to type in the network password.
4.5 Storage
Storage indicates the detailed memory consumption and free memory space of
your device whether system or internal storage. You can also set the default
storage where you want to save your pictures, music and other les. To do so,
click Preferred install location and choose from the following options: Internal
device storage, Removable SD card or Let the system decide.
4.6 Battery
This functions displays the battery percentage and battery consumptions of your
tablet.
4.7 Data reset
4.7.1 If your ENGAGE 8 malfunctions during use, you may select “Back up &
reset” under the Settings menu to reset the data.
4.7.2 If your memory card is inaccessible or if you want to delete all les in the
device, go to the Settings > Storage then click “Format SD card.”

14
4.7.1 Back up and reset
5Setup and Usage
5.1 Setting Up Your Tablet
The rst time you turn on the tablet, you'll see a Welcome screen.
• To choose a different language, go to Menu > Settings > Personal >
Language and input.
• To set up your tablet, touch Start and follow the instructions.

15
A series of screens takes you through the setup process. If you already have a
Google or Gmail account, use your Gmail address and password when asked. If
you don't have Gmail or any other Google Account, you may create one on
www.gmail.com.
5.1.1 Why use a Google Account?
A Google Account lets you organize and access your personal information from
any computer or mobile device:
• Never lose your contacts again. When you sign into your tablet with a
Google account, all the contacts you associate with that account in the
People application are automatically backed up. As a result, they're always
accessible through your Gmail account from any computer.
• Synchronize and back up everything. Whether you draft an email,add
an event to your calendar, or take a photo, your workgets backed up
continuously by Google and synchronized with anycomputer where you use
the same Google Account.
• Access from anywhere. Check your latest calendar, email, text messages,
or social stream, wherever you are, no matter what computer or mobile
device you're using.
• Keep your information secure and available. Google works round the
clock to protect your personal data from unauthorized access and to
ensure that you get it when you need it, wherever you need it.
• Use other Google services. Your Google Account also lets you take full
advantage of any other Google apps and services that you may want to
use, such as Gmail, Google, Maps, Navigation, Android Market, YouTube,
Google Talk, Messaging, and many more.

16
5.2 Screen Control
Once you are nished setting up your tablet, the Home screen opens.
At the bottom of the screen, you'll nd four Navigation buttons that will always
be available.
The Favorites tray is located just above the Navigation buttons:
The app icons you keep in the tray remain visible on every Home screen.
Icon Name Description
Back
Opens the previous screen you were
working on. Once you’ve reached the
Home screen, you can’t go back any
further in your history.
Home
Opens the central Home screen. If you're
viewing a left or right Home screen, this
opens the central Home screen.
Recent
Apps Press to view running applications
Menu Pop-up menu options
Table of contents
Other Starmobile Tablet manuals


