STATESMAN BIC5050S User manual

Please read these instructions carefully before use and retain for future reference.
Before switching on your appliance – Always check for any damage that may have been caused in transit.
Instruction Manual
Integrated 50/50 Fridge Freezer White
BIC5050S

2
CONTENTS
Important Safety Instructions ....................................3
Technical Specication...............................................4
Appliance Overview.....................................................5
Installation.............................................................. 6-10
- Door Fitting & Reversing..........................................10
Operating Instructions ........................................ 11-12
Cleaning & Maintenance..................................... 13-15
- Defrosting the Freezer Compartment ......................14
Fuse Replacement.....................................................15
Troubleshooting guide ..............................................16
Disposal Information.................................................17

3
IMPORTANT SAFETY INSTRUCTIONS
Read and follow all of the instructions even if you feel you are familiar with the
product, and nd a place to keep this manual handy for future reference.
Important: This product is intended for domestic use only, for food refrigeration
storage only. When using electrical appliances, basic safety precautions should
always be followed:
• This product is for indoor use only.
• Do not operate the appliance with a damaged cord or plug, after it malfunctions or
has been dropped or damaged in any way. All electrical repairs must be carried out
byaqualiedelectrician.Inadequaterepairsmayresultinamajorsourceofdanger
for the user and invalidate the warranty.
• Check the voltage of the appliance matches the household voltage, which is
located on the rating label.
• Use of an extension cord is not recommended with this product.
• This appliance can be used by children aged from 8 years and above if they have
been given supervision or instruction concerning the use of the appliance in a safe
way and understand the hazards involved.
• Cleaning and user maintenance shall not be made by children.
• Keep the appliance and its cord out of reach of children.
• Children shall not play with the appliance.
• This appliance can be used by persons with reduced physical, sensory or
mental capabilities or lack of experience and knowledge if they have been given
supervision or instruction concerning use of the appliance in a safe way and
understand the hazards involved.
• The appliance plug must be accessible after installation. Always unplug the
appliance before cleaning or attempting to move. When disconnecting from the
electricity supply, pull the plug and not the cord.
• Fix the accessories in the fridge during transportation to prevent damage.
• TherefrigerantofthisproductisR600a,whichisammable.Ensurewhenmoving
the appliance or during installation that the cooling system does not get damaged.
• Donotstoreexplosivesubstancessuchasaerosolcanswithaammable
propellant in this appliance or operate any electrical appliances inside the
refrigerator or freezer.
• Always keep the ventilation openings clear of obstruction. Should they become
blocked, clear them straight away.
• Do not place glass bottles or beverage cans in the freezer, as they can explode.
• Do not use mechanical devices or other means to accelerate the defrosting
process.
WARNING: The appliance is heavy and care is needed when unpacking and
moving it. Get extra help and only hold the appliance by the casing – never hold
by the door or the trim.
WARNING: Risk of child entrapment.
Before disposal of the old appliance, make sure that any locking mechanisms
havebeenbrokeno,doorshavebeenremovedbutshelveshavebeenleftinso
that children cannot easily climb inside. Also remove the plug so the appliance is
unusable.
4
SPECIFICATION
Supplier Name / Trade Mark Statesman
Model Number BIC5050S
Category Type Refrigerator with Freezer
EnergyEciencyClass A+
EUEco-LabelAward N/A
AnnualEnergyConsumption 277kWh/year
Freezing Capacity (kg/24h) 5
FridgeStorageVolume(Litre)andApplicableStarRatingCompartment 148
FreezerStorageVolume(Litre) 94
Applicable Star Rating Compartment 4 Star
Refrigeration System (Frost Free, Static, Totally No Frost) Static
Temperature Rise Time 18hours
Climate Class ST/N
This appliance is intended to be used at an ambient temperature between “16” (lowest temperature) °C and
“38”(highest temperature) °C
NoiseEmission(dB) 38
Built-in Appliance Yes
Wine Storage Appliance N/A
Voltage (V) 220-240
Wattage Power (W) 147
Frequency (Hz) 50
Power Source AC
AMBIENT ROOM TEMPERATURE LIMITS
Class Symbol Ambient Average Temperature (°C)
ExtendedTemperate SN + 10 to + 32
Temperate N + 16 to + 32
Subtropical ST + 16 to + 38
Tropical T + 16 to + 43
5
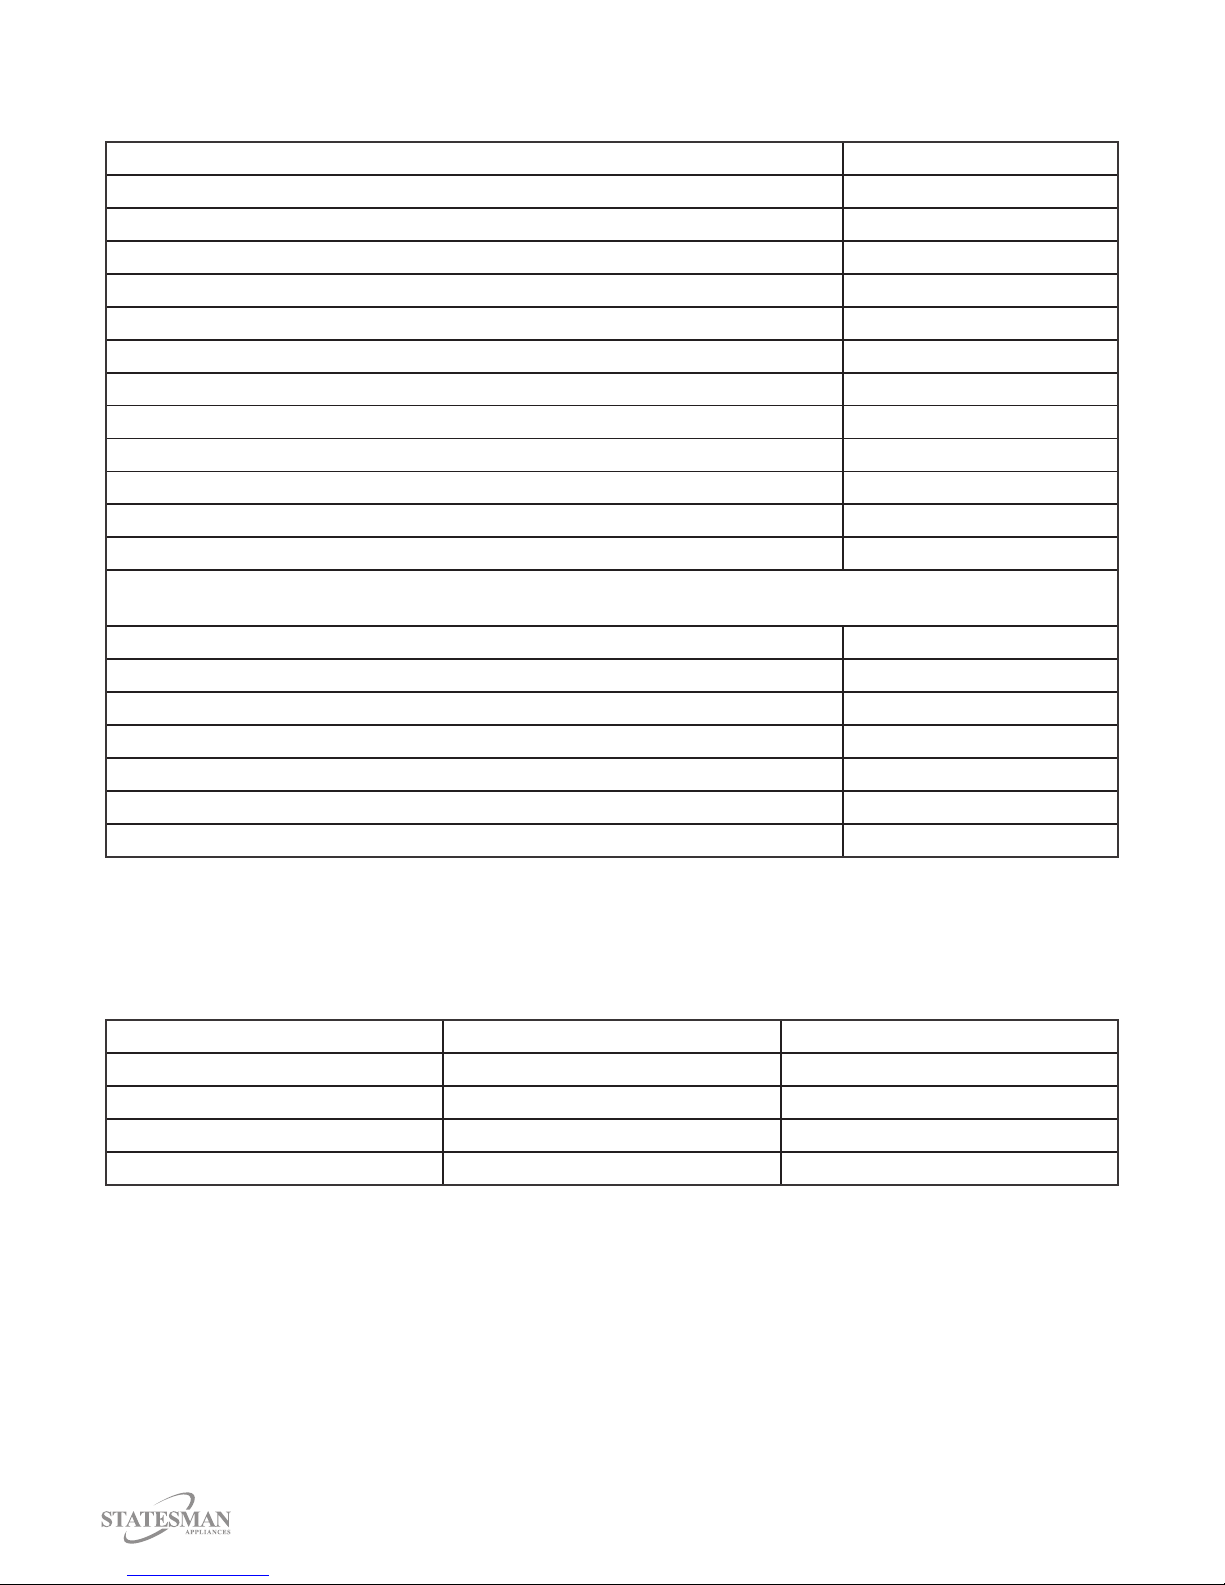
APPLIANCE OVERVIEW
A
9
8
B
3
4
5
6
7
2
1
10
11
12
A) Refrigerator Compartment
B) Freezer Compartment
1) Thermostat Dial
2)RefrigeratorLampandCover
3) Refrigerator Shelves
4) Salad Crisper Cover
5) Salad Crisper
6) Freezer Flap Closure Shelf
7) Freezer Drawers
8) Bottle Shelf
9) Door Shelves
10)EggHolder
11)IceTray
12)PlasticIceBlade

6
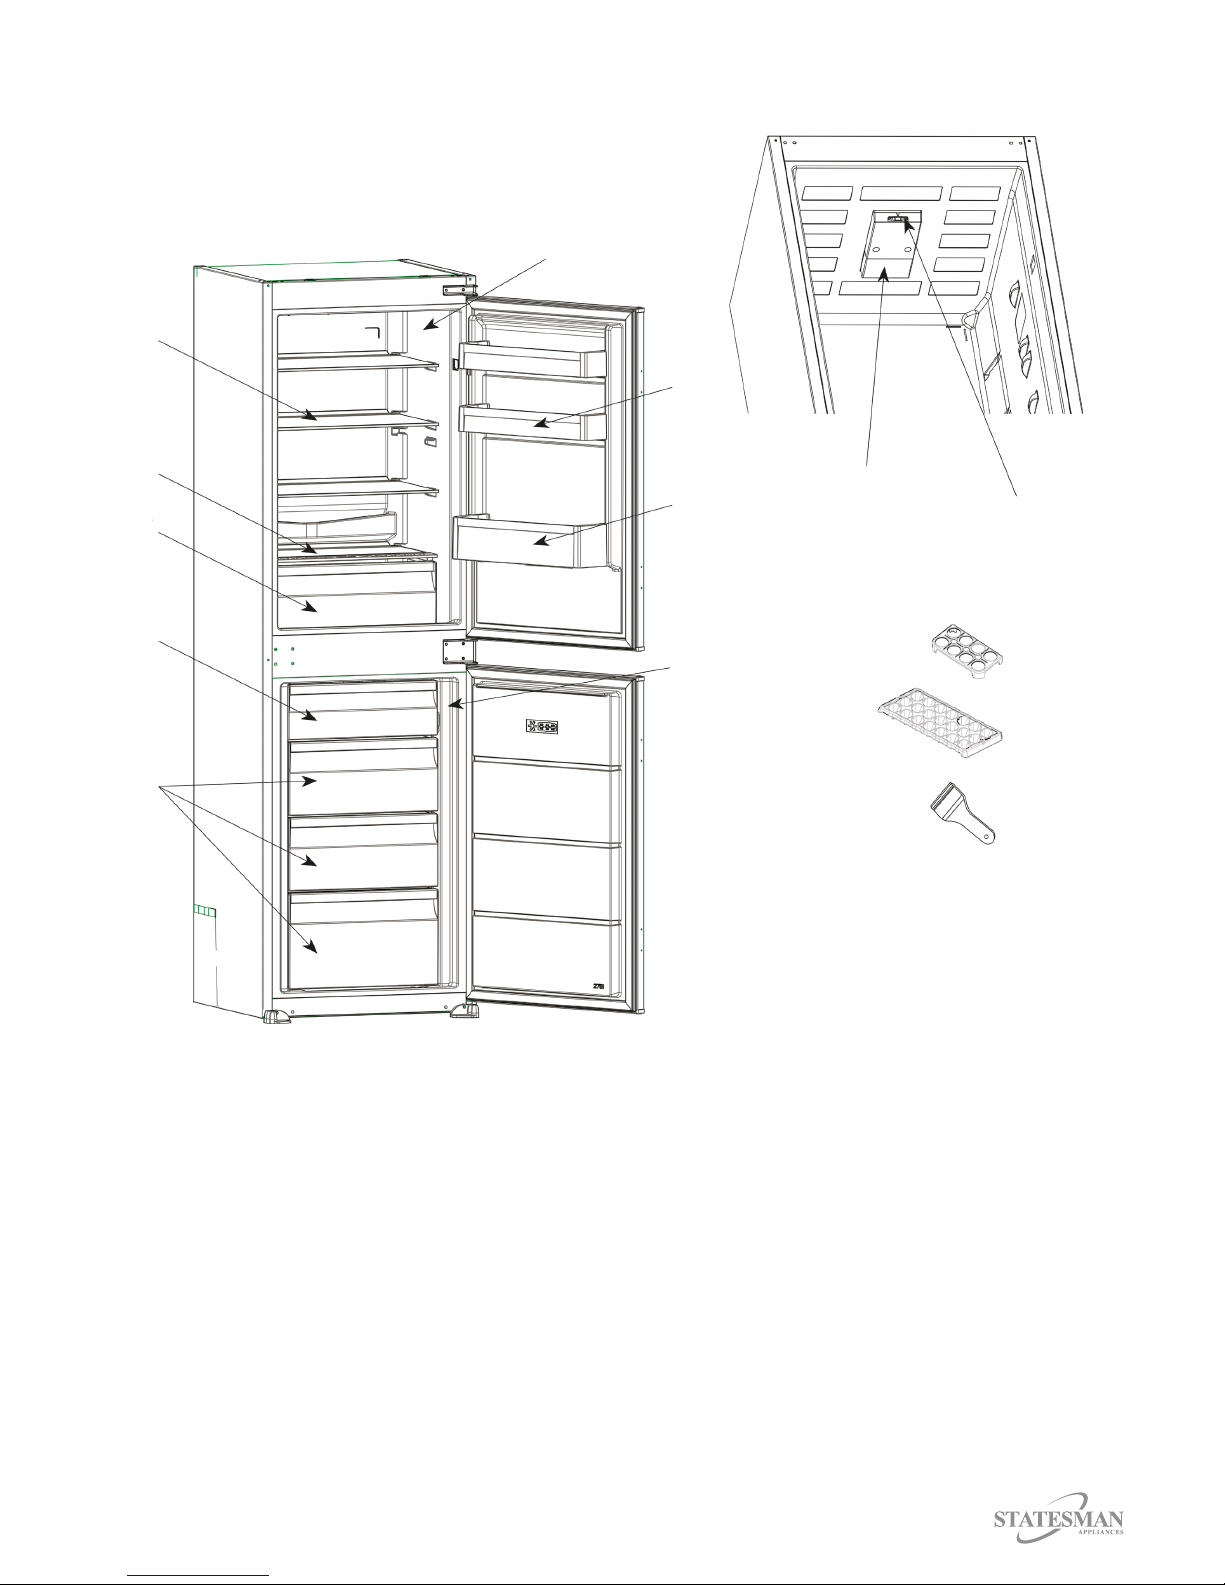
INSTALLATION
Before installing your appliance, you should pay attention to the following points:
• Operating voltage for your appliance is 220-240 V at 50Hz. Before making the connection to the
power supply, ensure that the voltage on the nameplate corresponds to the voltage of electrical
system in your home.
• Theplugmustbeaccessibleafterinstallation.Ifthesockethasnoearthcontactortheplugdoes
not match, we suggest calling an authorized electrician for assistance.
• Theremaybeanodourwhenyourstswitchontheappliance.Itwilldisappearafterthe
appliance starts to cool.
• We do not take responsibility for damages that occur due to use on installation with no earth.
• Your appliance should be at least 50cm away from stoves, Gas ovens and heaters, and should
be at least 5cm away from electrical ovens. Do not place heavy items on the appliance.
• Clean the appliance thoroughly, especially the interior, before use (See ‘Cleaning and
Maintenance’ on page 13).
• This product is intended to be used in proper kitchen units only.
• Theadjustablefrontlegsshouldbeadjustedtomakesureyourapplianceislevelandstable.You
canadjustthelegsbyturningthemclockwise(orintheoppositedirection).Thisshouldbedone
before placing food in the fridge.
• Installtheplasticdistanceguide(thepartwithblackvanesattherear)byturningit90°asshown
intheguretopreventthecondenserfromtouchingthewall.
• The appliance should be placed against a wall with a free distance not exceeding 75mm.
Installation Procedure
• Before installation, read the instructions carefully.
• Fit the refrigerator/freezer in suitable kitchen units only.
• Ifnecessary,reversethedooraccordingtoinstructions.
• Checktheinstallationdimensionsaccordingtog.C.Thepositionofthejointbetweentheunit
doorsmustbelevelwiththepositionofthejointbetweentheappliancedoors.
1)Seeg.Aforthenecessaryattachmentcomponents:
g.A: Top Fixing Bracket
Trim Gasket
Guides
Rails
Screw Type A
Screw Type B
7
2)FixtheTopFixingBracketintoslotandxwithScrewTypeA(g.B)
g.B Screw
Type A
Top
Fixing
Bracket
3) Pass the power cord through ventilation shaft and position it so that the appliance could be easily
pluggedinonceithasbeeninstalled(g.C-g.D)
g.C g.D
A B C D E
2750 1770 830 805 820 1770-1790
mm

8
4) Take out the Trim Gasket located on the side panel of the appliance and stick it on the opposite
sidetothedoorhingesoftheappliance.(g.E)
g.E
Trim Gasket
5) Raise appliance and slide into the kitchen unit. Position the appliance to the opposite appliance
hinges so that the Trim Gasket covers space between appliance and the side of the kitchen unit.
6)Alignfrontfeetwiththefrontsurfaceofthekitchenunit.(g.F)
7)ScrewthefrontfeetbyusingScrewTypeB(g.F)
g.F
Screw Type B
8)FixtheTopFixingBrackettothekitchenunitusingScrewTypeB(g.G)
g.G
Screw Type B
9
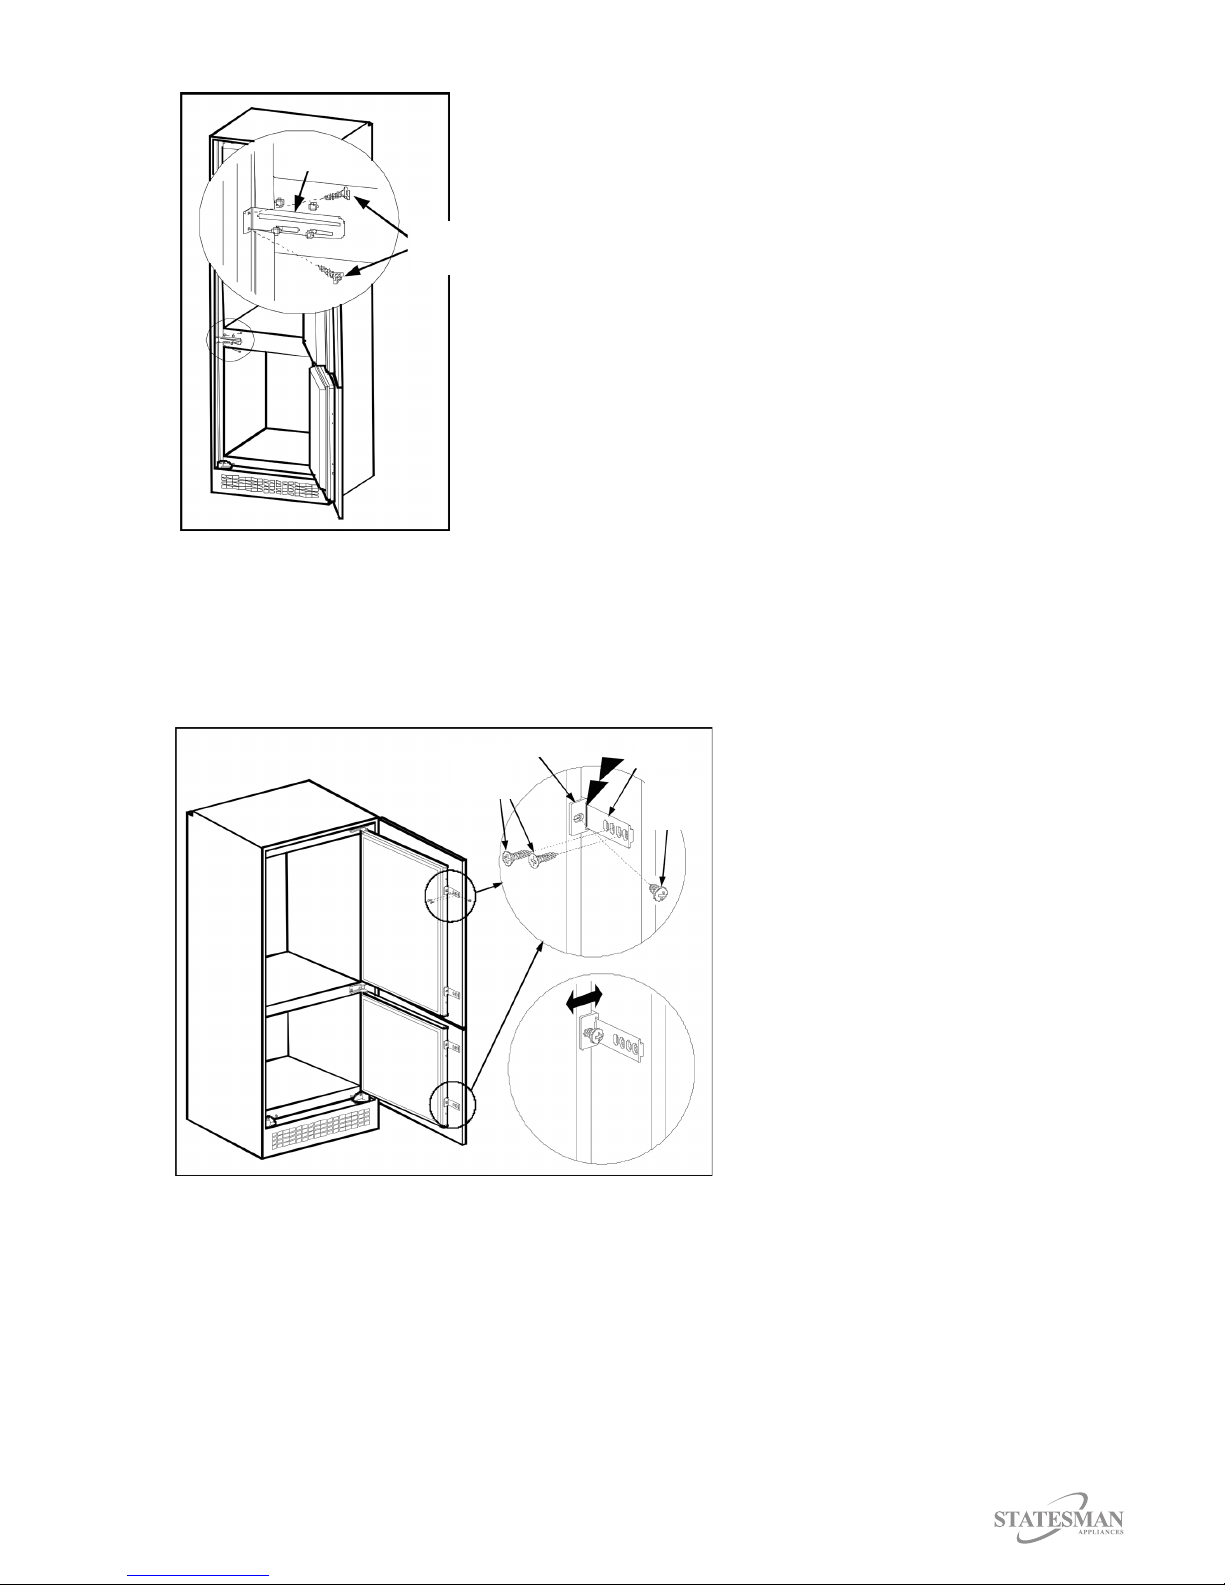
9)FixtheRailstokitchenunitusingScrewTypeB.Repeatthisfortheoppositeside.(g.H)
g.H
Rails
10)FixGuidestotheappliancedoorswithScrewTypeA.Leantheappliancedoorstotheunitdoor
as it is opened at right angle. Slide the Rails into the Guides aligning the groove. Fix the Rails to the
unitdoorswithScrewTypeB.(g.J)
11)Set1-2mmgaponthehandlesidebetweentheunititselfandtheunitdoorsbyadjustingthe
Guides.Thisisvitalforapplianceperformance.(g.J)
g.J Guides
Screw
Type B
Screw
Type B
Rails
Screw
Type A
10
g.K
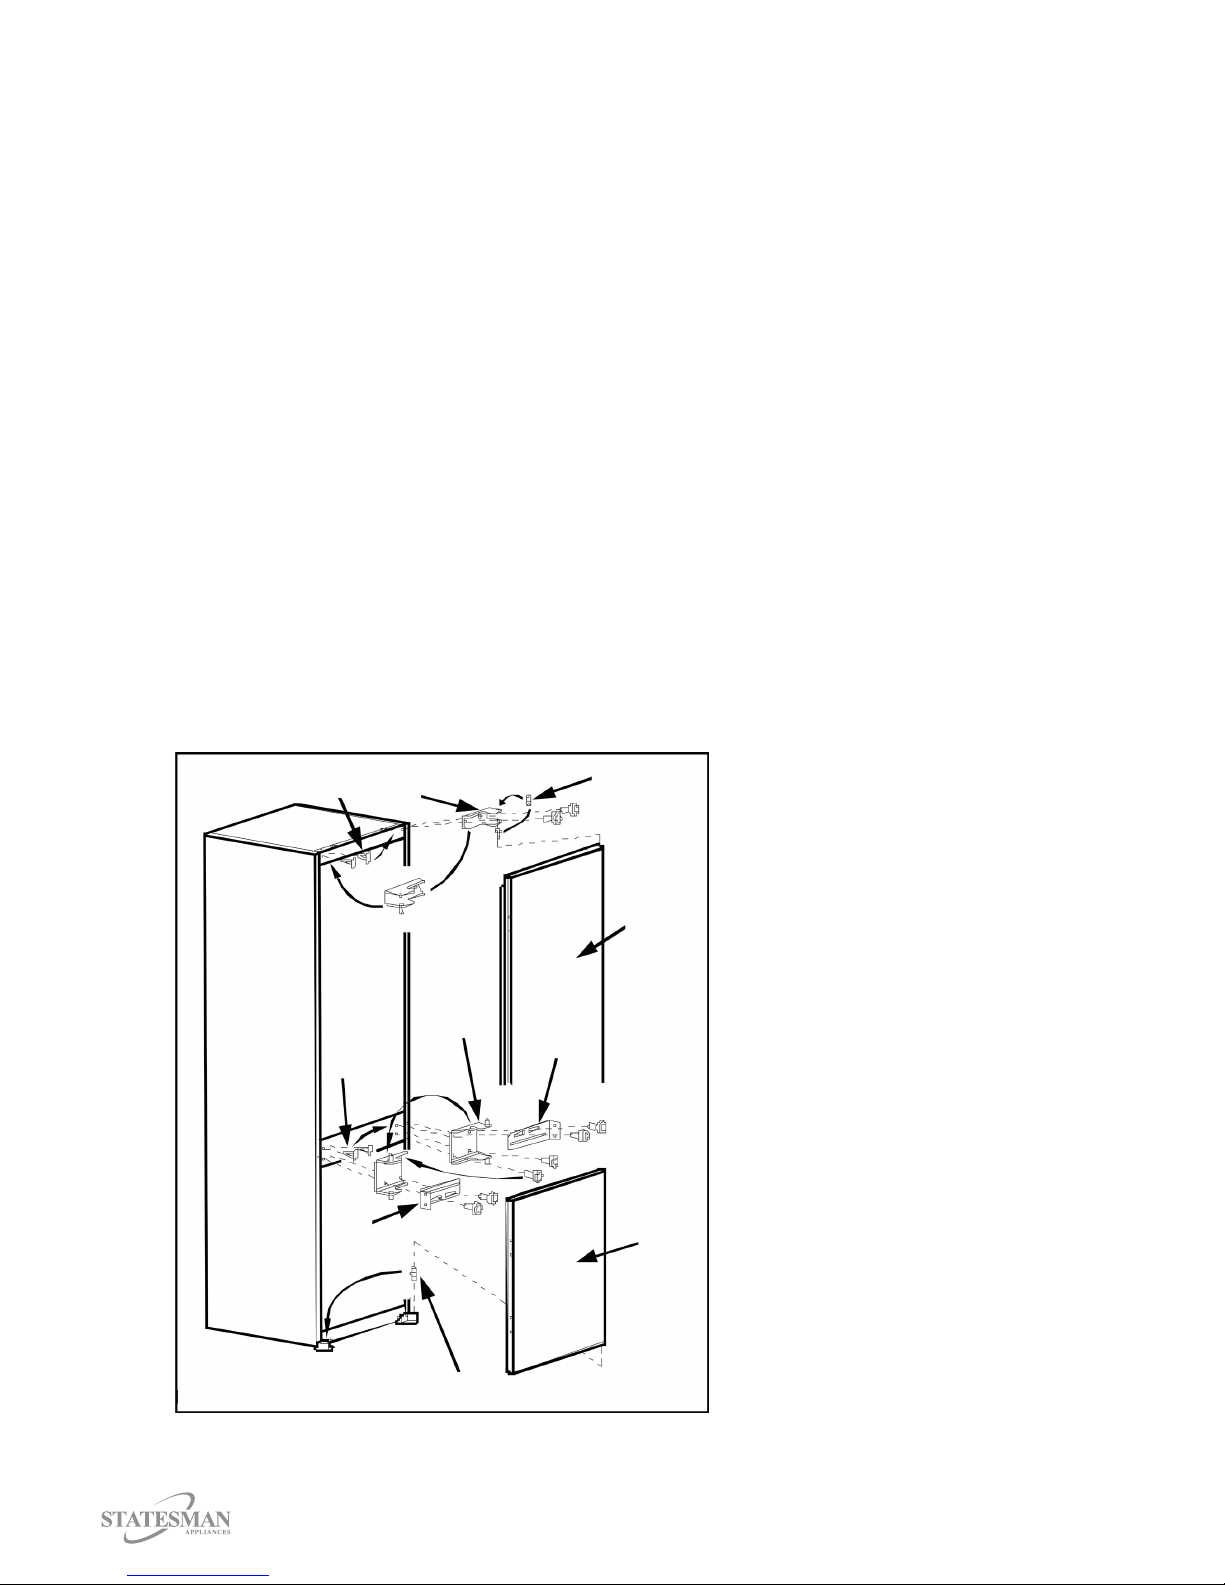
DOOR FITTING AND REVERSING
Theappliancedoorcanbettedtoopentoeithertheleftortherightdependingonitslocation.The
appliancemustbetiltedandsupportedinordertocarrythisout.Itisadvisabletogetsomehelp
duringthisprocedure.Donotlaytheapplianceatasthismaydamagethecoolantsystem.Take
carewhenttingandtighteningscrews.EnsuretheApplianceisunpluggedandempty.
To change the direction of the door, please follow these instructions:
• Unscrew the upper door hinge (1) and take the upper door (2) to a safe place.
• Unscrewthedoorhingepin(3)andscrewittotheoppositesidermlyandtaketoasafeplace.
• Unscrew the middle door hinge (4) and take the lower door (5) to safe place. Screw back the
xingbracket(6)tooriginalpositionwithoutthemiddledoorhinge(4).
• Take the door lower pin (7) to opposite side.
• Take the hole plugs (8) to empty holes on opposite side.
• Place the lower door (5) over the door lower pin (7) and close onto cabinet.
• Unscrewthexingbracket(9).Positionthemiddledoorhinge(4)ontothelowerdoor(5).Place
thexingbracket(6)ontothemiddledoorhinge(4)andscrewtogetherontocabinetrmly.
• Place the upper door (2) over the middle door hinge (4) and position the upper door hinge (1)
overtheupperdoor(2)andthenscrewtheupperdoorhinge(1)rmlyontooppositesideof
original position.
813
2
5
7
6
4
8
9

11
OPERATING INSTRUCTIONS
Before using your Appliance
• Whenitisoperatedforthersttimeoraftertransportation,keepyourapplianceintheupright
position for 3 hours prior to switching on. Otherwise, you may damage the compressor.
• Yourfridgemayhaveasmellwhenitisoperatedforthersttime;thesmellwillfadeawaywhen
your fridge starts to cool.
• Allowtheapplianceatleast24hoursbeforestoringanyfoodinsidetoallowforsucientcooling
temperature to be reached.
• The interior of the appliance needs to be cleaned prior to use by wiping with a soft cloth and
using warm water. Wipe the appliance completely dry before replacing any shelves or drawers.
Using your Appliance
• Plug the appliance into the mains socket.
• Avoid opening the door for long periods or unnecessarily.
• Tomaintainadequateaircirculation,donotoverlltheappliance.
• Everydrawerandcoolingsectionisdesignedtotakeamaximumof20kg.
• Allow hot or warm foods to cool to room temperature before storing in the appliance.
• Keep the food packed, wrapped or covered.
• For hygiene reasons, always wrap food using a suitable packaging material, before storing in
your appliance to avoid contact with the surface of the appliance.
• Do not place food directly against the rear wall of the fridge compartment.
• The temperature in the appliances compartments can be monitored by using a fridge freezer
thermometer.DonotuseaMercurylledthermometer,asabreakagewouldcauseahealth
hazard.
Adjusting the Temperature
The thermostat automatically regulates the inside temperature of the compartments. By rotating the
knob from position 1 to 5, colder temperatures can be obtained.
Important note: Do not try to rotate knob beyond 1 position, as it will stop the appliance.
Freezer & Refrigerator thermostat setting:
1-2:For short-term storage of food in the
freezer compartment, you can set the knob
between minimum and medium position.
3-4:For long-term storage of food in the freezer
compartment, you can set knob to medium
position.
5:For freezing the fresh food. The appliance will
run for colder temperatures.
Thermostat Knob
Warnings about temperature adjustments
• Itisnotrecommendedthatyouoperateyourfridgeinenvironmentscolderthan10°Cintermsof
itseciency.
• Temperatureadjustmentsshouldbemadeaccordingtothefrequencyofdooropeningsandthe
quantity of food kept inside the fridge.
• A 5 minute delaying function is applied to prevent damage to the compressor of your fridge,
when you take the plug out and then plug it in again to operate it or when an energy breakdown
occurs. Your fridge will start to operate normally after 5 minutes.
• Your fridge is designed to operate in the ambient temperature intervals stated in the standards
(Climate Class ST/N: 16ºC - 38ºC), according to the climate class stated in the information label.
We do not recommend operating your fridge out of stated temperatures value limits in terms of
coolingeectiveness.
• This appliance is designed for use at an ambient temperature
12
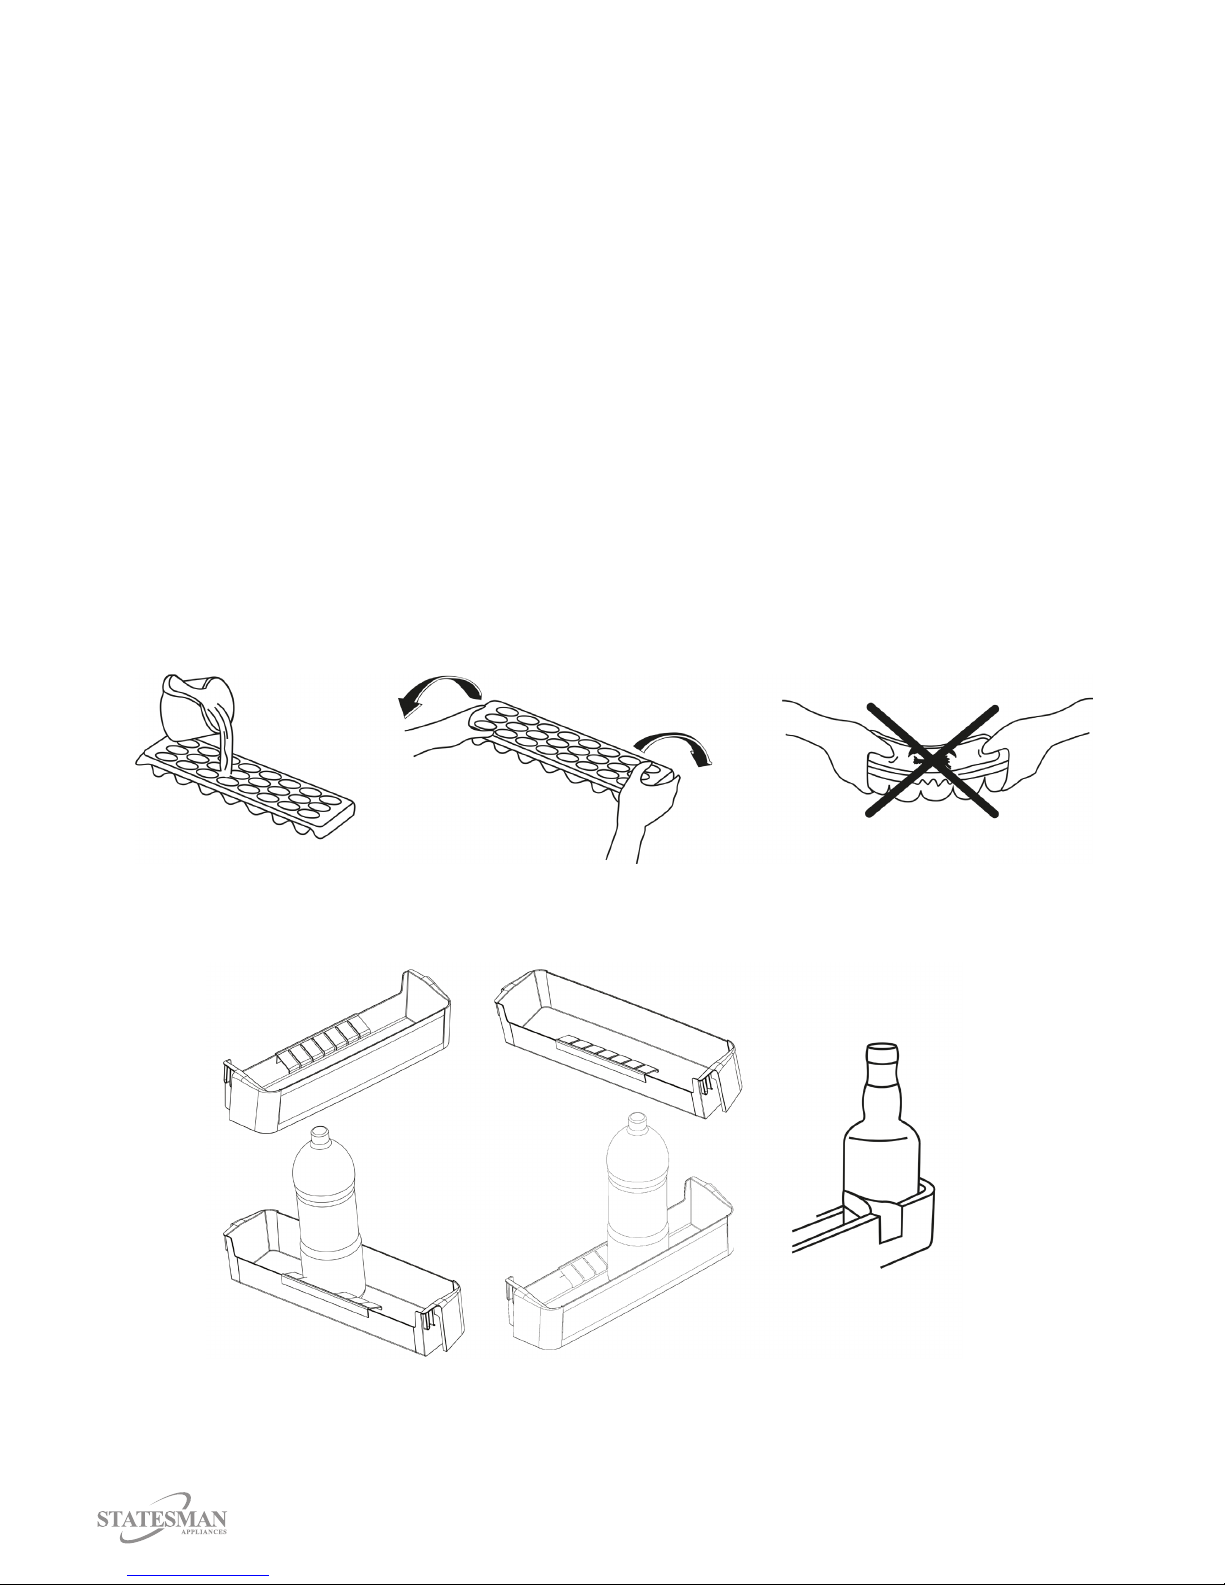
Accessories
Ice tray
Fill the ice tray with water and place in freezer compartment.
After the water completely turned into ice, you can twist the tray as shown below to remove the ice
cube.
Bottle holder
Inordertopreventthebottlesslippingorfallingoveryoucanusethebottleholder.

13
CLEANING AND MAINTENANCE
Switchotheelectricalsupplyandremovetheplugfromthemainssocketbeforecleaning.
Interior
1) Remove all food from the appliance and cover to help keep cool.
2) Remove all the drawers carefully from the appliance and wash in warm, clean water with a soft
cloth and dry thoroughly. Do not put them in the dishwasher. Never replace the drawers or shelves
whilst still wet.
3) Wipe the interior of the appliance with a damp, clean cloth.
4) The refrigerator compartment should be cleaned periodically using a solution of bicarbonate of
soda and lukewarm water.
5) Dry the interior thoroughly with a clean cloth and replace the drawers.
6) Plug in and switch on and allow the temperature in the appliance to drop back to an adequate
temperature.
7) Replace the food in the appliance.
Important: Avoid getting water into the electric components of the appliance i.e. the thermostat) as
this may damage your appliance.
WARNING: Do not use abrasive cloths, powders, household cleaners, bleach or wax polish to
clean the appliance as these can leave a smell in the appliance and can damage it.
Defrosting the Refrigerator Compartment
• Defrostingoccursautomaticallyinfridgecompartmentduringoperation;thedefrostedwaterwill
be collected by the evaporating tray and evaporates automatically.
• The drain hole in the rear of the fridge compartment should be kept clear from food and debris to
prevent water building up which could result in excess ice formation.

14
Defrosting the Freezer Compartment
After a period of time, frost will build up in the
compartments. Regular defrosting will therefore
benecessarytomaintaintheeciencyofthe
appliance. The best time to defrost your appliance
is when the amount of food stored is low.
Important: When there is more than 5mm of frost
on the shelves, defrosting must be carried out.
To defrost the appliance, please follow the steps
below:
1) Take out the frozen food and store in a spare freezer or suitable appliance, or wrap well and store
in a cool, dry place.
2) Unplug the appliance from the mains supply, making sure not to pull the cord.
3)Leavethedooropen,tospeedupthedefrostingprocess,bowlsofwarmwatercanbeplaced
inside the appliance to raise the temperature.
4) Place a shallow bowl or pan below the freezer compartment to catch dripping water.
5)Removetheicewithaplasticicescraper.DONOTusepointedorsharpedgedobjectssuchas
knives, forks or screw drivers to remove the ice.
6) When all traces of ice have been removed and defrosting is completed, clean away any water and
wipe your appliance dry.
7) Clean your appliance as described below, plug in and switch back on, select Setting 4 on your
temperature control.
8) Allow at least 5 hours for the temperature to return to the adequate temperature before putting the
food back into the appliance.
Important: Do not use any mechanical devices or other means to accelerate the defrosting process
other than those recommended by the manufacturer.
Door Seal
Use a clean, damp soft cloth to wipe the door seal and in between the creases, avoid damaging the
doorsealasthiswillaecttheperformanceofyourappliance.
Going away
Ifyouaregoingawayanddonotwanttoleavetheappliancelefton,switchoatthesocketand
remove the plug from the mains sockets ensuring not to pull the cord. Remove any food and follow
the cleaning instructions in this section.
Important: Leavethedooropenasthiswillpreventodoursandmouldaccumulatinginthe
appliance and will allow the appliance to dry completely.
Power Cut
Incaseofasuddenpowercutordisconnectingandreconnectingoftheplugtotheelectrical
socket, the compressor protective thermal element will be opened as the pressure of the gas in the
cooling system of your refrigerator has not yet been balanced. After 4 or 5 minutes, your refrigerator
will start to operate.
Important:Intheeventofapowercutkeeptheappliancedoorclosedtomaintainthetemperature
inside.
15
Operating Sounds
The compressor can make a buzzing or humming sound when it is running. This can be louder
whentheapplianceisrstswitchedonbutshouldbecomequieterinafewmonths.Gasesowing
through the cooling systems can cause gurgling, bubbling or similar sounds these noises are
normal.
Replacing LED Lighting
TheinternallightisaLEDlamp.Toreplacethelamp,pleasecontactaqualiedtechnician.
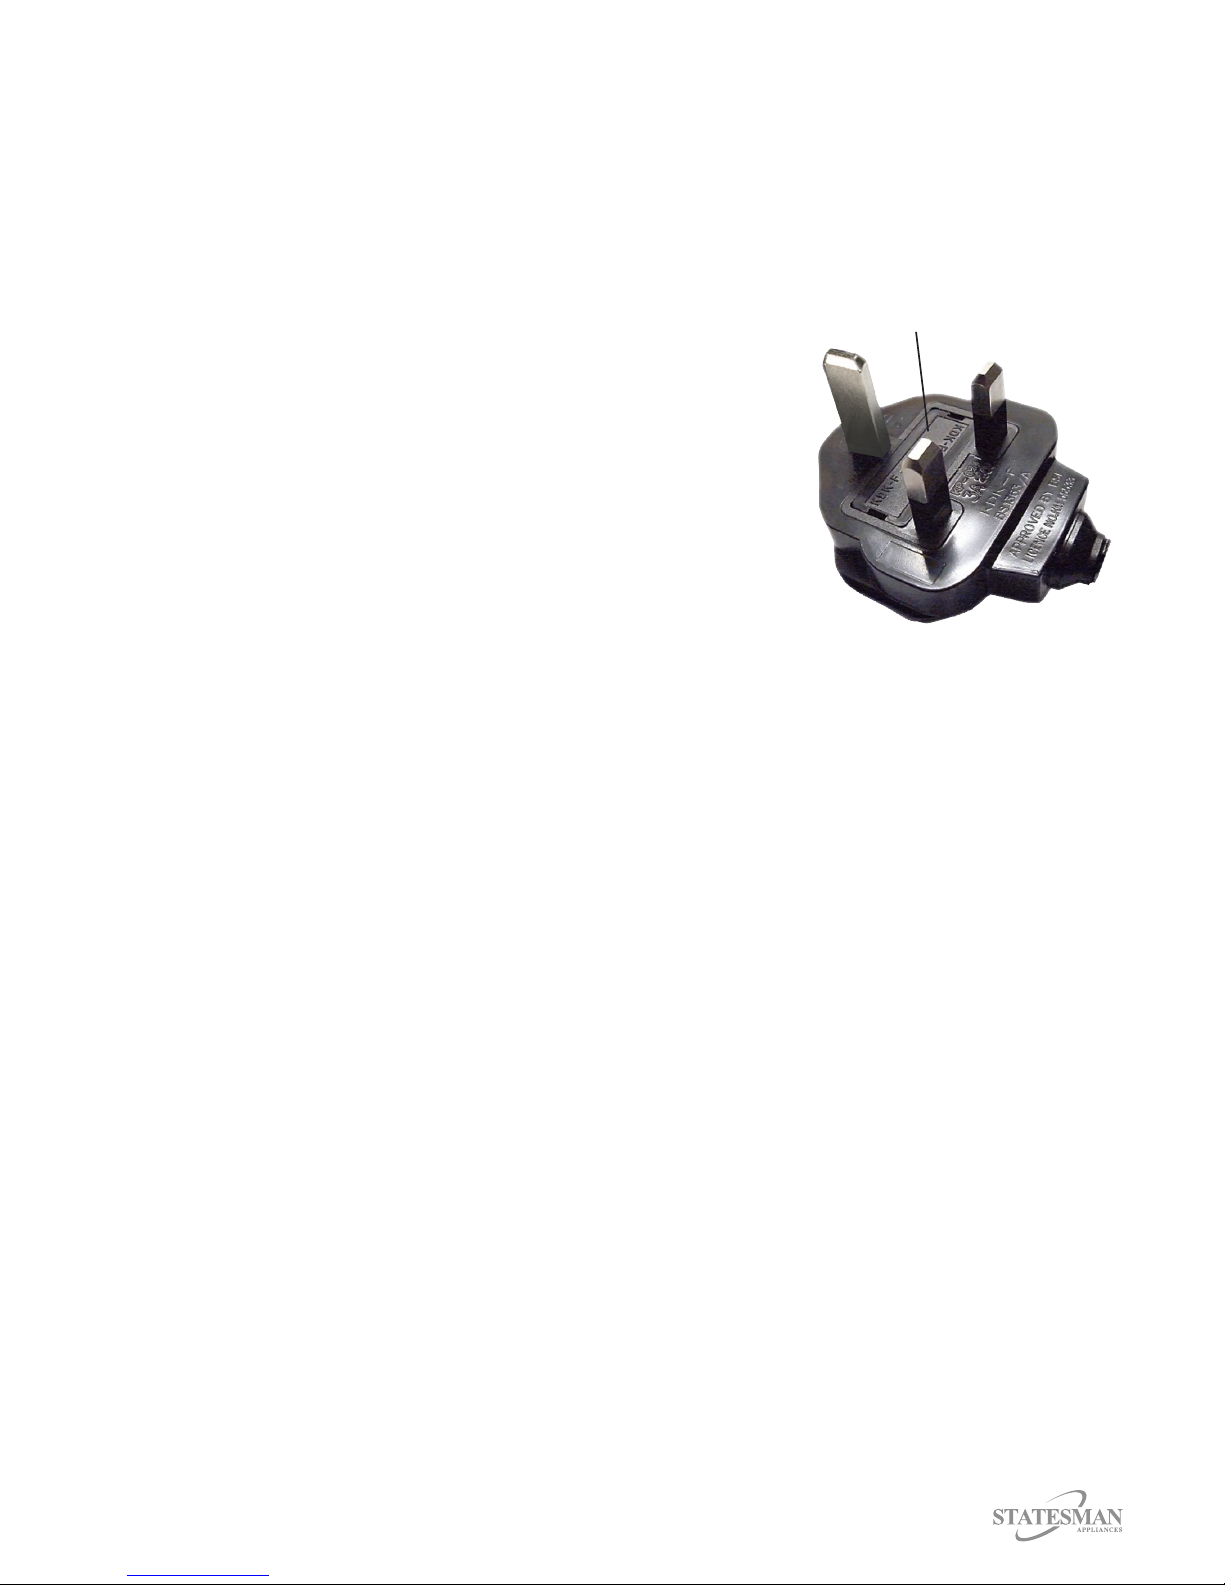
Fuse Cover
Fuse Replacement (Class I)
This appliance must be eathed. Remove the fuse cover with a small
atheadscrewdriver.Takeoutthefuseandreplacewithanewfuse
of the same Amp. Replace the fuse cover and push back into place.

16
TROUBLE SHOOTING GUIDE
Ifyouarehavingproblemswithyourappliance,pleaseuseourtroubleshootingguidebelow.Ifyou
are unable to resolve the issue using this guide, please ring our Customer Service Department on
0844 848 5861. Please have the model code and purchase information available.
Fault Possible Cause Solution
Appliance does not work. Temperature control dial is set at
number ‘0’.
Set the dial to another number to
switch on the appliance.
Mains plug is not plugged in or is
loose.
Insertmainsplug.
Fuse has blown or is defective. Check fuse, replace if necessary.
Socket is defective. Mains malfunctions are to be
correctedbyaqualiedelectrician.
The food is too warm. Temperatureisnotproperlyadjusted. Please refer to the initial ‘Temperature
Setting’ section.
Door was open for an extended
period.
Open the door only as long as
neccessary.
A large quantity of warm food was
placed in the appliance within the last
24 hours.
Turn the temperature regulation to a
colder setting temporarily.
The appliance is near a heat source. Pleaserefertothe‘Installation’
section.
Appliance cools too much. The temperature is set too cold. Turn the temperature regulation knob
to a warmer setting temporarily.
Unusual noises. Appliance is not level. Re-adjustthefeet.
The appliance is touching the wall or
otherobjects.
Move the appliance slightly.
Waterontheoor. Water drain hole is blocked. Please refer to the ‘Cleaning and
Maintenance’ section.

17
DISPOSAL
TheEuropeanDirective2012/19/EUonWasteElectricalandElectronicEquipment
(WEEE),requiresthatoldhouseholdelectricalappliancesmustnotbedisposedofin
normal unsorted municipal waste.
Old appliances must be collected separately in order to optimise the recovery and
recycling of the materials they contain and reduce the impact on human health and the
environment.
The crossed out “wheeled bin” symbol on the product reminds you of your obligation,
that when you dispose of the appliance it must be separately collected. Consumers
should contact their local authority or retailer for information concerning the correct
disposal of their old appliance.

18

19

0844 848 5861
38 Bluestem Road,
Ransomes Europark
Ipswich, IP3 9RR
Table of contents
Other STATESMAN Freezer manuals

STATESMAN
STATESMAN CHF101 User manual

STATESMAN
STATESMAN TF160LWE User manual

STATESMAN
STATESMAN F1654APWE User manual

STATESMAN
STATESMAN LF1355W User manual

STATESMAN
STATESMAN U355W User manual

STATESMAN
STATESMAN TF160LW User manual

STATESMAN
STATESMAN F2510APW User manual

STATESMAN
STATESMAN SBS177X User manual

STATESMAN
STATESMAN CHF102 User manual

STATESMAN
STATESMAN TF170LWE User manual


