STATESMAN SKAO11015BK User manual
SKAO11015BK
11 LITRE 10-IN-1 DIGITAL AIR FRYER OVEN
Instruction Manual
Please read these instructions carefully before use and retain for future reference.
Before switching on your appliance – Always check for any damage that may have
been caused in transit.

2
CONTENTS
Important Safety Instructions ................................ 3-6
Air Frying Tips.......................................................... 7-8
Product Overview .................................................. 9-12
Operating Instructions ........................................ 13-20
Cleaning & Maintenance..................................... 21-22
Troubleshooting Guide........................................ 23-24
Mains Plug Fuse Replacement.................................25
Disposal Information.................................................25
Statesman Warranty/Guarantee Information..........26

3
SAFETY INSTRUCTIONS
Please read the safety instructions and the user manual carefully before using the
appliance for the rst time. Note the warnings on the appliance and in the user
manual.
Always keep the user manual close to hand. If you sell the appliance or give it away,
please ensure that you also pass on this user manual. It is an essential component of
the product.
• The appliance is only intended for private or household use and not for industrial/
commercial purposes. Household applications include:
– in kitchens for sta in retail outlets, oces and other commercial areas
– on agricultural estates
– by customers in hotels, motels and other accommodation facilities
– in bed-and-breakfast establishments.
• Please note that we shall not be liable in cases of improper use:
- Do not modify the appliance and do not use any auxiliary equipment.
- Only use replacement parts or accessories that we have supplied or approved.
- Comply with all the information in this user manual, especially the safety
instructions. Any other use is considered improper and can cause personal injury
or property damage.
• Keep the appliance and its accessories out of the reach of children.
• This appliance can be used by children of 8 years and older, and by people with
reduced physical, sensory or mental capacity, or with a lack of experience and/
or knowledge, but only with proper supervision, or if they have been told how to
use the appliance safely, and have understood the risks involved if they use it im-
properly.
• Children must not be allowed to play with the appliance.
• Cleaning and user maintenance must not be carried out by children.
• Children do not recognise the dangers that can arise when handling electrical
appliances. Please be particularly careful while using the appliance if there are
children nearby, as they may not recognise the dangers of handling electrical
appliances.
• Children younger than 8 must be kept away from the appliance and the power
cable.
• Do not let children play with the packaging material. Keep packaging such as
plastic lm or bags away from children.
• Only connect the appliance to a properly installed and easily accessible socket that
is close to where you are using the appliance, so that it can be unplugged quickly if
necessary.
• The local mains voltage must match the voltage stated in the technical
specications for the appliance.
• Unplug the appliance from the socket if you are no longer using the appliance or if
being left unattended.

4
• If the product, power supply cord or plug shows any signs of damage or has been
dropped, stop using it immediately and unplug from power socket. Contact a
qualied technical engineer or service agent for advice.
• Always unplug the appliance from the power socket before cleaning or servicing
and before tting or removing accessories.
• Always hold the plug to remove it, and never pull the power cord.
• Do not let the appliance come into contact with or immerse in water or other
liquids. Keep the appliance, the mains cable and the mains plug away from wash
basins, sinks and similar areas. Never expose it to water drops or water spray.
• Do not place any objects lled with liquid (e.g. vases or drinks) on or near the
appliance.
• Do not use the appliance outdoors.
• Do not allow the power cord to come into contact with hot objects or surfaces (e.g.
cooker hob).
• Check the appliance and the power cord for damage before using the appliance for
the rst time, and after each use.
• Completely unwind the power cord before using the appliance. Do not kink or
crush the power cord or wrap it around the appliance during or after use.
• Contact our Service Centre without delay if the appliance has been damaged
during transport.
• Do not, under any circumstances, make any unauthorised modications to the
appliance or try to open a component and/or repair it yourself.
• Never open the housing or slide objects into the ventilation slots.
• To avoid risks, the power cord should only be repaired by an authorised repair
workshop. Alternatively, contact our Service Centre.
• Never touch the appliance or the power cord with wet hands.
• Do not use the appliance in damp or very dusty environments.
• Do not expose the appliance to extreme conditions such as high humidity or wet
conditions, direct sunlight or naked ames.
• Do not touch the housing or steam outlet grille on the side of the appliance during
use as this becomes hot and can cause burns.
• Hot steam will escape when operating. Do not reach into this steam.
• Always take hold of the accessories by the removable handle when it is in use.
Also use oven gloves.
• Steam may be released from the appliance when the door is opened. Avoid being
positioned above the appliance and do not touch the steam.
• Do not allow any easily ammable material to come into contact with the appliance
during operation (e.g. curtains, tea towels, dishcloths, paper etc.). Do not dry
textiles or other items on, above or inside the appliance. This poses a risk of re.
• Do not move the appliance while it is in use.
• To avoid risk of injury, never reach into the inside of the appliance before it has
thoroughly cooled.

5
• Do not use any metal objects inside the appliance, even aluminium foil, other than
the rotating basket, rotisserie spit, grill rack and drip tray. Doing so may result in
overheating.
• Allow the appliance and accessories to cool down completely before replacing or
removing the accessories.
• Do not allow food to come into contact with the inner walls of the appliance.
• Do not operate the appliance with an external timer switch or externally controlled
system (e.g. a remote-controlled power socket).
• Do not use the appliance in any potentially explosive environments e.g. fuel or
solvent storage areas. It must not be used in dusty or particle-laden air.
• Allow the appliance to cool down for at least 60 minutes before moving or
cleaning it, to prevent risk of injury.
• Do not use the appliance for storage. Never keep paper, card, plastic or other
items inside the appliance.
• Use only the accessories supplied.
• Place the appliance on a stable, level, heat resistant surface. If you don’t have a
heat resistant surface, please use a heat proof mat.
• Do not over-brown the food when baking or grilling. Remove any burnt residue
from the food before consuming.
• Ensure that the appliance does not come into contact with any other objects
and that air inlet (top) and air outlet (back) are not obstructed. Allow sucient
clearance (min. 40 cm) in all directions and above.
• Above all, do not set up the appliance near easily ammable materials (curtains,
drapes, paper etc.).
• This appliance may only be used as a freestanding appliance and must not be
built in (e.g. in a tted kitchen) or operated in a cupboard.
• Do not cover or place any objects on the appliance.
• Do not place the appliance on surfaces that can become hot (e.g. on hotplates).
• Do not expose the appliance to direct sources of heat (e.g. heaters) or position
close to a gas or electric cooker or to another hot oven.
• Avoid overlling the appliance. The side surfaces and the heating element should
remain free.
• Do not ll the accessories with oil, because this can pose a risk of re.
• Appliances connected to the mains during a thunder storm may be damaged
by power surges. You should therefore always unplug the plug during thunder
storms.
• Avoid the use of sharp objects to prevent scratches. Use wood or heatproof
plastic utensils to remove foods.

6
WARNING: Risk of injury to children and persons with limited physical, sensory
or mental abilities (for example, partially disabled people or older people
with limited physical and mental abilities) or to those without experience and
knowledge (such as children).
WARNING: Packaging materials can be swallowed or used improperly, posing
a risk of choking and suocation.
WARNING: There is a risk of electric shock/short circuit from live parts.
WARNING: There is a risk of re hazard and injury from burns if hot surfaces
come into contact with other objects. The housing and door can become very
hot during use.
WARNING: Injuries may result from using the appliance carelessly or
improperly.
WARNING: Baking, cooking or grilling at excessive temperatures may produce
substances harmful to health.
WARNING: Hot surfaces pose a risk of re.
WARNING: Using the appliance in a way that was not intended may damage it.
WARNING: Chemical additives in furniture coatings may corrode the material
of the appliance feet and cause residue on the furniture surface.
WARNING: Damage to the appliance can be caused due to improper handling
or use.

7
AIR FRYING TIPS
• Please check on the cooking of your food as our air fryer oven cooking technology
will cook food quicker than that of convectional ovens.
• Pat the food dry before cooking to encourage browning and to avoid excess
smoke. To ensure even cooking/browning, always open the air fryer oven halfway
through the cook time and check, turn foods if required. Some recipes call to brush
or spray oil halfway through cooking. Adjust the temperature or time if needed.
• Frying small batches will require shorter cooking times and yield crispier results.
• To avoid excess smoke when cooking foods high in fat (e.g bacon, chicken wings
or sausages), it may be necessary to empty the fat gathered in the air fryer oven
drip tray between batches.
• Create a more spaced out surface area to allow more air to pass through by cutting
food into smaller pieces. This can yield crispier foods.
• Press breading/coating onto food to help it stick. Refrigerate breaded foods for at
least 30 minutes before frying. This allows the coating to be slightly absorbed and
ensures the coating sticks to foods when cooking. We recommend NOT using the
rotating basket for breaded or coated foods.
• To improve crispiness in meat, coat the meat lightly with cornour or rice our and
spray with oil.
• Arrange breaded coated foods on grill racks so that food is not touching to allow
air ow on all surfaces.
• Spray oils work best with this air fryer oven. The spray distributes the oil more
evenly and less oil generally needed. However, canola, olive, avocado, coconut,
grape seed, peanut or vegetable oil work well too.
• When baking or using wetter foods it is best to use a baking tin or oven dish lined
with parchment paper.
• For best results with fresh chips use King Edward, Maris Piper, Romano, Désirée,
or Russet potatoes. Make sure they have been washed and dried. this will help
create a crispier chip.
Air Frying Pre-Packaged Frozen Foods
• Depending on the type and amount of food being cooked, suggested cook times
may dier. Always check food halfway through cooking time to determine the nal
cook time and temperature.
• Once the time is up, ensure the food is fully cooked.

8
Food Quantity Cooking Time Cooking Temperature
Thin-cut frozen chips 300–500 g 15–16 min. 200 °C
Thick-cut frozen chips 300–500 g 15–20 min. 200 °C
Home-made chips 300–500 g 10–16 min. 200 °C
Home-made potato wedges 300–500 g 18–22 min. 180 °C
Home-made potato cubes 500–700 g 12–18 min. 180 °C
Hash browns 250 g 15–18 min. 180 °C
Potato gratin 300 g 15–18 min. 200 °C
Steak 110–500 g 8–12 min. 180 °C
Pork chops 110–500 g 10–14 min. 180 °C
Hamburgers 110–500 g 7–14 min. 180 °C
Sausage rolls 110–500 g 13–15 min. 200 °C
Chicken drumsticks 110–500 g 18–22 min. 180 °C
Chicken breast 110–500 g 10–15 min. 180 °C
Spring rolls 110–340 g 15–20 min. 200 °C
Frozen chicken nuggets 110–500 g 10–15 min. 200 °C
Frozen sh ngers 110–500 g 6–10 min. 200 °C
Mozzarella sticks 110–500 g 8–10 min. 180 °C
Stued vegetables 110–500 g 10 min. 160 °C
Cakes 150–250 g 20–25 min. 160 °C
Quiche 150–250 g 20–22 min. 180 °C
Muns 9 o 15–18 min. 200 °C
Frozen onion rings 450 g 15 min. 200 °C
Refer to the table below for the recommended settings. The times given are for
guidance only. They may vary depending on the amount, the food itself or your own
preferences and taste.
9
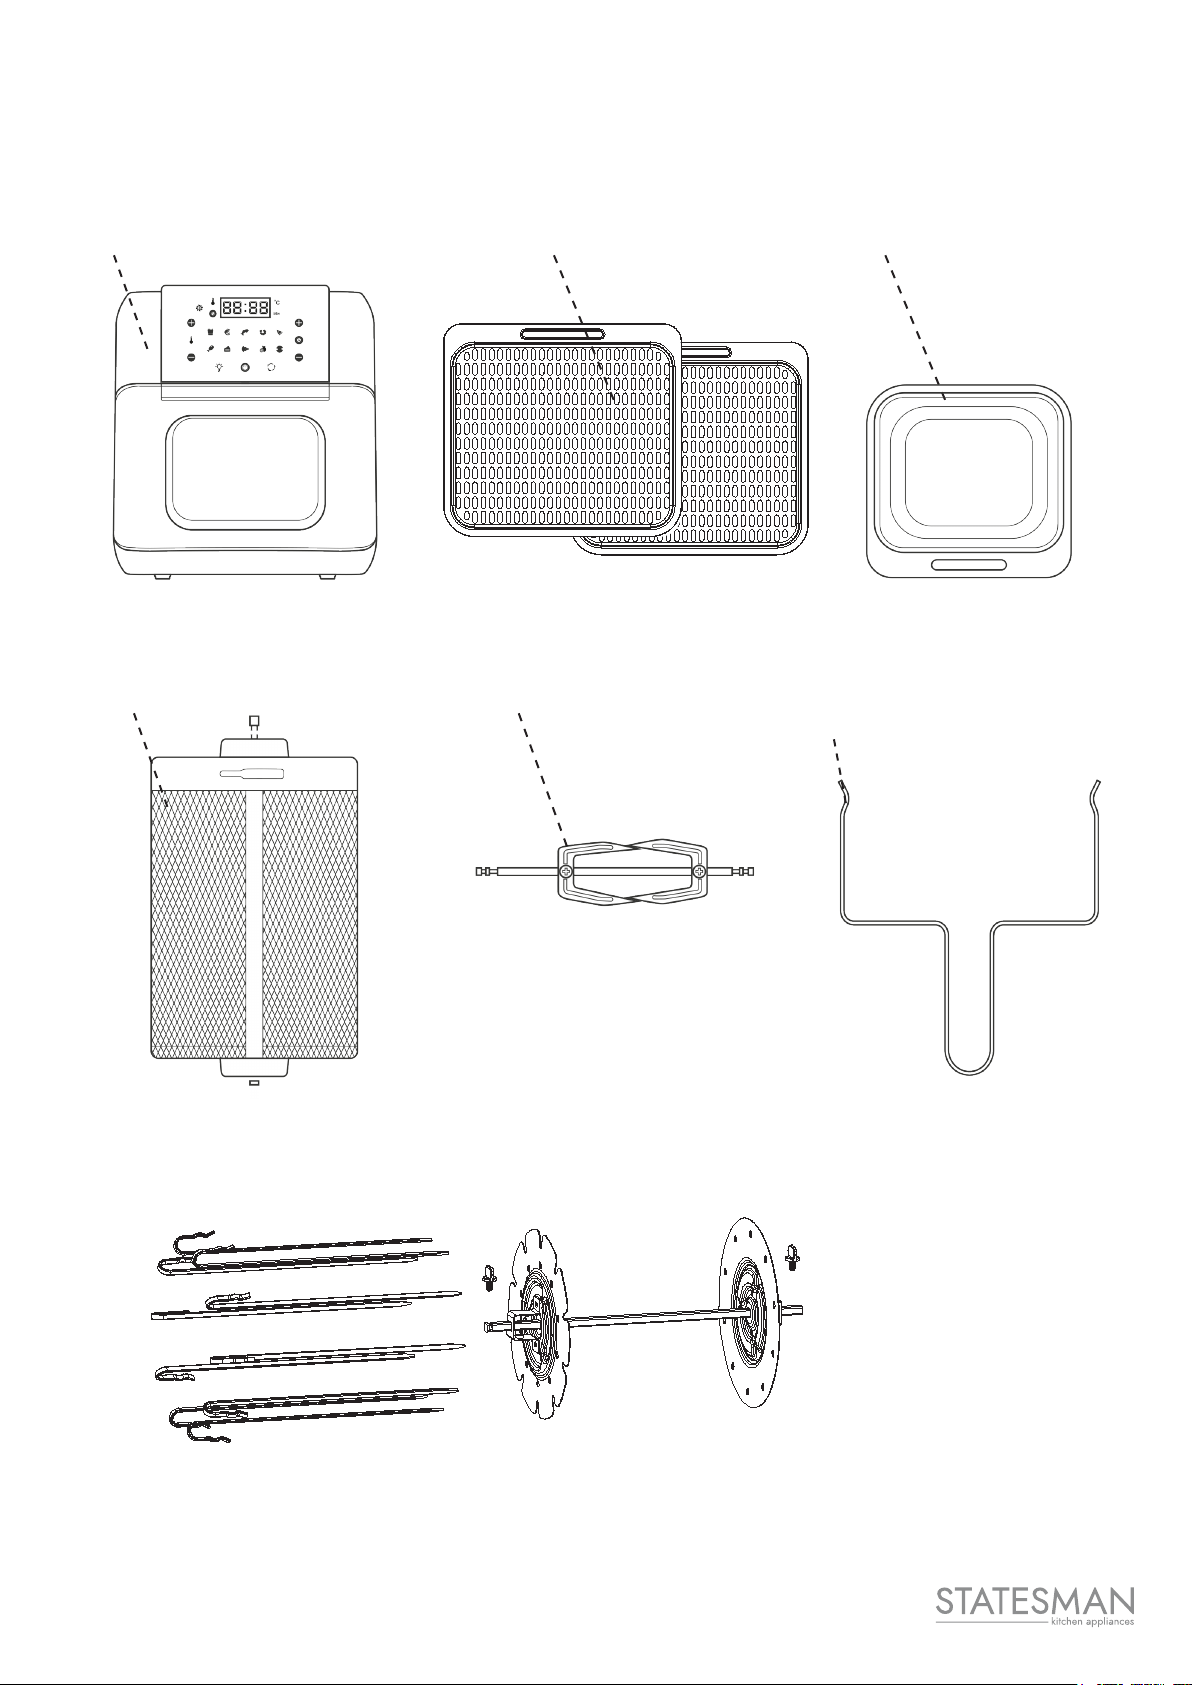
PRODUCT OVERVIEW
Air Fryer Oven
Air Fryer Oven Non Stick Grill Racks (x2) Non Stick Drip Tray
Rotating Basket
Rotisserie Fork
and Spit
Removable handle
(removal tool for rotating basket,
rotisserie spit and skewer set)
Skewer Set

10
A
B
C
H
G
F
E
D
A. Upper lid with air intake vents
B. Lock for rotating basket/rotisserie spit
C. Guide rail for rotating basket/rotisserie spit
D. Window in appliance door
E. Door handle
F. Lock switch for lock (rotating basket/rotisserie spit)
G. Guide rails grill racks
H. Control panel
Air Outlet
Air Outlet
(caution hot air)
11
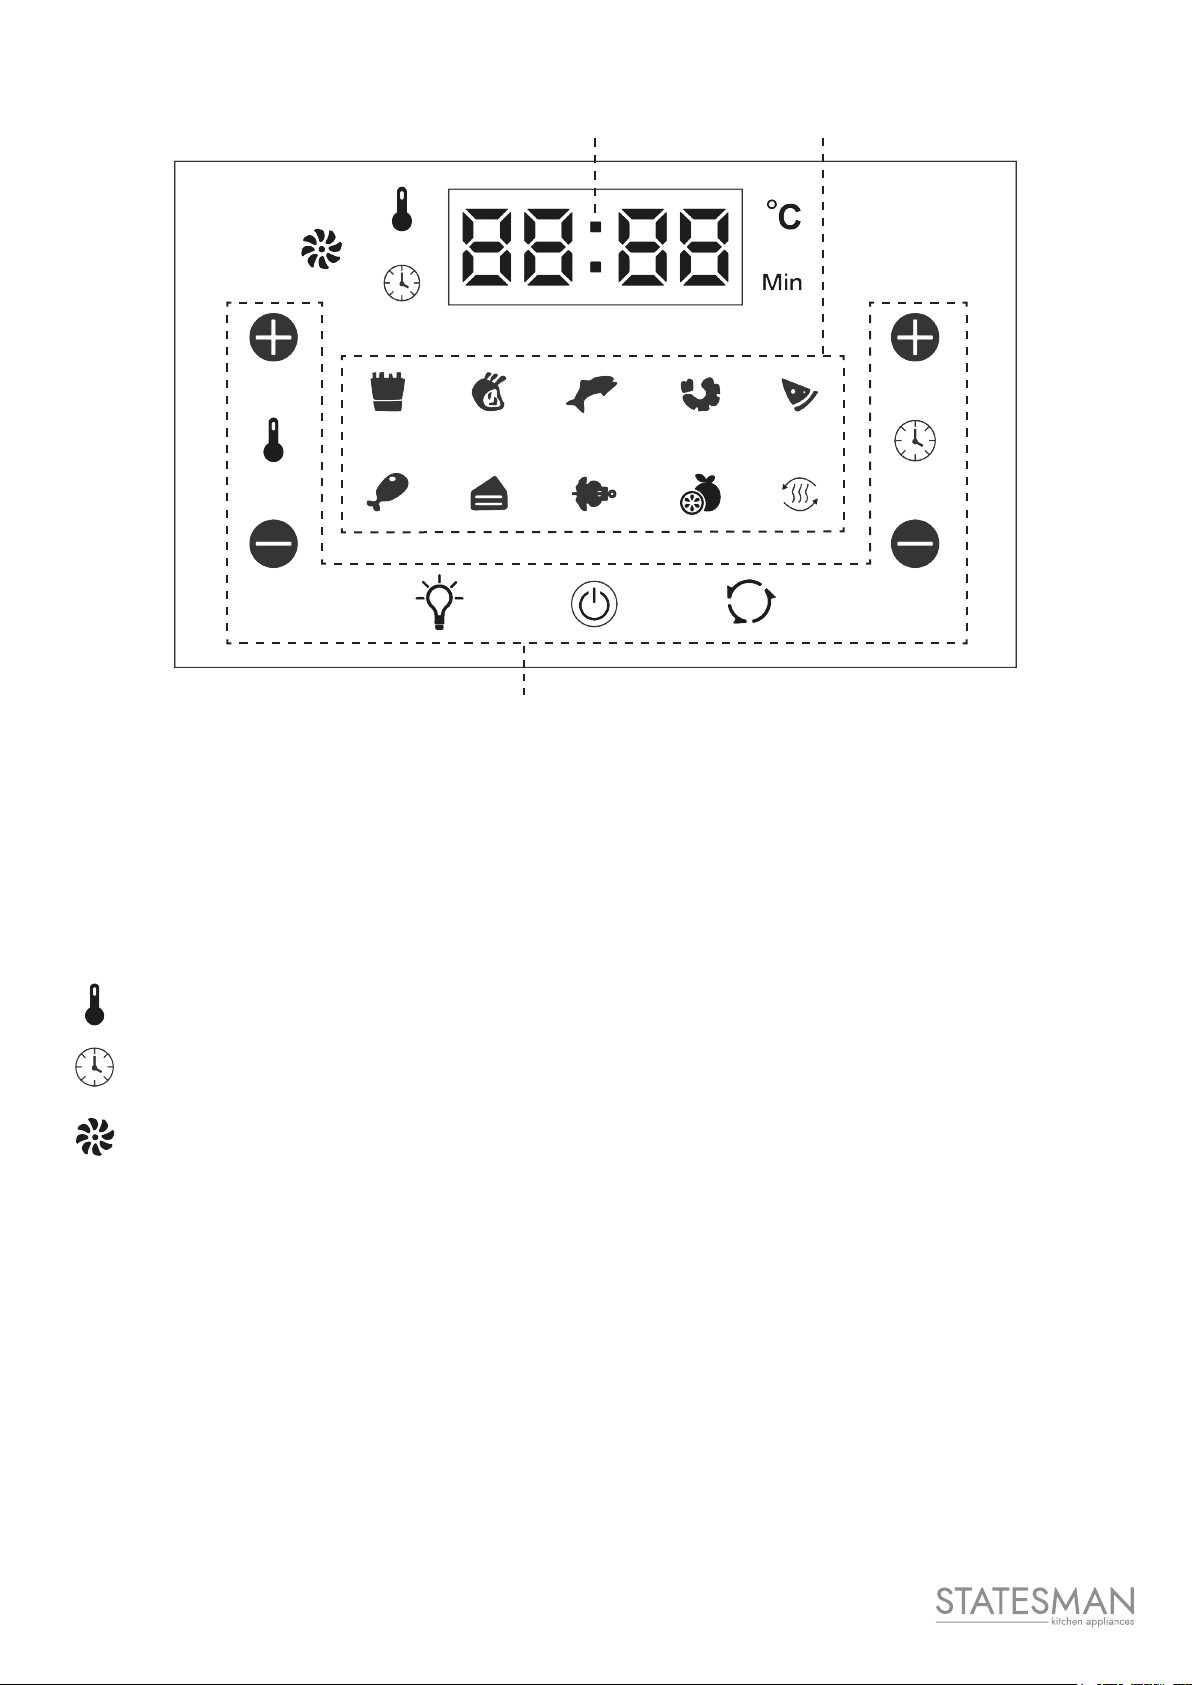
Touch Control Panel
1 2
3
1. LCD display
• Display for cooking temperature in °C and cooking time in minutes
Temperature Display
Cooking Time Display
Cooking Fan Display

12
2. Automatic Cooking Programmes
Air Fry - Fries option see table on page 18
Grill - Steak/Chops option see table on page 18
Air Fry - Prawns/Shrimp option see table on page 18
Grill - Fish option see table on page 18
Bake - Pizza option see table on page 18
Roast - Chicken Leg option see table on page 18
Bake - Cakes option see table on page 18
Roast - Rotisserie Chicken option see table on page 18
Dehydrate - Dried Fruit option see table on page 18
Preheat/Reheat option see table on page 18
3. Function Buttons
Increase Cooking Temperature
Decrease Cooking Temperature
Increase Cooking Time
Decrease Cooking Time
Switch Light On/O
On/O Button
Switch Rotation On/O (For Rotating Basket/Rotisserie Spit)

13
OPERATING INSTRUCTIONS
• Remove all packaging and plastic wrap from the appliance.
• Check to ensure that the appliance is in perfect condition and that all accessories
are included.
• Place the appliance on a level, dry and heat-resistance work surface at a
comfortable working height.
• Before you use the accessories for the rst time, and every other time you use
them, clean them all with warm water and mild washing up liquid.
• Dry the accessories thoroughly.
• Wipe the inside and outside of the appliance with a damp cloth.
WARNING: Never clean the appliance under running water and never
immerse it in water.
Preheating before first use
Before you use the air fryer oven for the rst time, it should be heated to a high
temperature with no accessories inside, to remove any residues of oil left over from
the manufacturing process.
1. Using the handle make sure the appliance door is closed properly.
2. Press and hold the On/O button for approximately 2 seconds to switch on the
appliance.
3. Press the On/O button again briey. The appliance will start with a cooking
temperature of 190 °C and a cooking time of 15 minutes.
Please note: When using the appliance for the rst time, odour or smoke may
develop due to residues caused during manufacturing. However, this is not dan-
gerous and will quickly disappear. Ensure adequate ventilation.
Allow the appliance to cool down completely before moving or installing accessories
to prevent injury.

14
Instruction For Use
WARNING: The accessories and touchable surfaces on the appliance are
extremely hot when the appliance is in use. There is a risk of burns.
• Do not touch the housing during use.
• Always open the appliance by the door handle when it is in use.
• Use the removable handle supplied to position the rotating basket and rotisserie
spit in the air fryer or to remove it. In addition, use oven gloves or a cloth to protect
yourself from burns.
• Steam escapes during cooking. Do not reach into this steam.
• Only touch the hot food using suitable utensils, e.g. tongs.
• Do not move the appliance while it is in use or whilst hot.
WARNING: There is risk of fire due to ammable objects or food.
• Take caution when using certain types of oven bag, baking paper, aluminium foil in
the air fryer oven or any metal or ammable items or glass containers.
• Do not cook pieces of food that are too large. There must be sucient space
remaining between the food and the heating elements and the walls.
Please note: possible damage to appliance:
• If the appliance door cannot be closed due to too much food being added. Do not
use force to close.
• Possibility of damage to the coating on the accessories due to use of sharp objects
or metal utensils. Use of heat resistant wooden or plastic utensils is recommended.
Using the accessories
1. Always place the food in the correct accessory for the food you are cooking, to
prevent it from coming into contact with the heating elements.
2. Pull the door handle to open the appliance door and t the respective accessory as
described below.
WARNING: The accessories become extremely hot during operation. There is
a risk of burns. Allow the appliance and accessories to cool down completely
before replacing or removing the accessories.

15
Drip tray
Food residues or drops of fat are collected in the
drip tray, allowing the inside of the appliance to be
cleaned easily.
• Before each use, push the drip tray into the
lowest guide rail to collect drips of oil, grease or
residues.
Grill rack
Use the grill rack for dehydrating, grilling, preparing crispy foods or cooking pizza.
You can use two grill racks at the same time.
• Prepare the food according to the recipe and place the food in the centre of the
grill rack.
• Place the grill rack in one of the two upper guide rails and push it fully inside.
• Always put the drip tray at the bottom of the air fryer oven when using the grill
racks.
Please note: The higher the guide rail selected, the higher the temperature. This
means that the cooking process is accelerated. As such, check the food occasionally
throughout the cooking process to prevent burning.
Rotating basket
Rotating basket is great for chips/fries and cooking any roasted/air fried vegetables
• Place food in to the basket and place the lid on top. Ensure the notches are aligned
with the indentations, then twist clockwise according to instruction on the lid itself
to lock in place.
• Push the lock switch to the right and push the rotating
basket into the lock position on the guide rail.
• Release the lock switch and lock the rotating basket
into place.
• To remove, hook each end of basket with the holder,
push the lock switch to the right to release and lift
basket out.
Please note: Use oven glove or cloth to remove lid as the rotating basket will be hot.

16
Rotisserie fork and spit
WARNING: The fork prongs are very sharp due to their function.
There is a risk of puncture injuries to the skin. Do not touch the sharp ends.
Store the accessories properly out of reach of children.
The rotisserie spit is suitable for joints/hams or whole chickens with a maximum
weight of approx. 1.3 kg. The food must not be too large and should allow enough
room to circulate fully.
Suggestion: When preparing a whole chicken we recommend trussing with cooking
string to ensure legs and wings stay tight to the body. This keeps it compact and
helps to cook evenly. Larger chickens may need to be tied around the metal forks to
keep them secure.
• Prepare the food according to the recipe.
• Insert the rotisserie spit through the whole length
of the chicken/joint.
• Mount the fork on the rotisserie spit and insert the
prongs into the esh.
• Secure the forks by tightening the screws. Make
sure forks are tightened on the rod after the rail
guide indents.
• Press the lock switch to the right and place the
rotisserie spit into the lock position on the guide rail.
• Release the lock switch and lock the rotisserie
spit in place.
• Ensure that the joint or chicken can rotate freely in
the oven.
• To remove, hook each end of spit with the
removable handle, push the lock switch to the
right to release and lift out the spit.

17
Skewer set
Ideal for kebabs, small bones meats for roasting/air frying
• Insert the metal rod from the rotisserie spit through the skewer discs. Make sure to
tighten the screws on the rod after the rail guide indents.
• Insert skewer rods one by one
putting through the inner hole all
the way to the opposite hole in the
other skewer disc. then ensure the
hook is secured to the top gap.
• Press the lock switch to the right
and place the skewer set into the
lock position on the guide rail.
• Release the lock switch and lock
the skewer set in place.
• Ensure that the skewer set can rotate freely in the oven.
• To remove, hook each end of spit with the removable handle, push the lock switch
to the right to release and lift out the skewer set.
1. Connect the air fryer to a properly installed, earthed and fused socket. The local
mains voltage must match the voltage stated in the technical specications for the
appliance. All indicators on the control panel will ash once and a beep will sound.
Then the ON/OFF BUTTON will light up.
2. Press the On/O button to switch on the appliance. A beep sounds and all
indicators on the control panel light up.

18
Pre Set Cooking Programmes
Symbol Function Temperature Cooking Time
Air Fry - Fries 200 °C 15 min.
Grill - Steak/Chops 180 °C 25 min.
Grill - Fish 160 °C 15 min.
Air Fry - Prawns/Shrimp 160 °C 12 min.
Bake - Pizza 180 °C 15 min.
Roast - Chicken Leg 190 °C 40 min.
Bake - Cakes 160 °C 30 min.
Roast - Rotisserie Chicken 190 °C 30 min.
Dehydrate - Dried Fruit 30 °C 2 hours
Preheat/Reheat 120 °C 12 min.
• Tap on the required symbol to select the automatic cooking programme.
• The corresponding symbol will then light up. The LCD display shows the cooking
temperature in °C and the cooking time in minutes. The cooking time is counted
down in minutes.
* please note remember to set the time based on the weight and on the thickness of
the food to cook or from its packaging instructions.

19
• Once you have selected the cooking programme, press the On/O button to
start the cooking programme or wait for 3 seconds for the cooking programme to
start automatically.
• The indicator will ash once more and then the cooking program will begin. The
appliance will heat up and the fan will turn on.
• Turn the food halfway through the cooking time to ensure the food is cooked
evenly.
Please note: You can use the handle to open the appliance door during the cooking
process, to check on the food. When the door is opened the cooking program will
pause. When the door is closed it will resume at the same time and temperature.
• The cooking temperature and remaining cooking time are shown alternately on the
LCD display when the appliance is in use. You can amend the cooking temperature
or the cooking time at any point.
• Press the Increase Cooking Temperature or Decrease Cooking Temperature
button to change the cooking temperature in 5°C increments. Cooking
temperatures of between 65°C and 200°C can be set.
• Press the Increase Cooking Time or Decrease Cooking Time button to
change the cooking time in minute increments. Cooking times from 0 to 90 minutes
can be set.
Please note: You can press and hold the arrow button for longer to set the cooking
time and cooking temperature more quickly.
• As part of the Rotisserie chicken automatic programme, the rotating basket/
rotisserie spit automatically rotates. During rotation mode, the Rotation button
ashes.
• If you wish to turn o rotation mode, press the Rotation button .
• To switch on the light during the cooking process, press the Switch Light On/O
button . It will switch o automatically after a 2 minutes or press again to turn o.
When it is on the button will ash.
• Once the cooking time has elapsed, 5 beeps will sound and the appliance switches
itself o. The fan will continue to run for 20 seconds.
• Open the appliance door using the handle.
• Remove the foods using oven gloves or remove the rotating basket/rotisserie spit
using the removable handle.
• Press the On/O button and hold to switch o. After the appliance is switched
o the fan will continue to run for 20 seconds.
• Pull the mains plug out of the mains socket.
• Allow the appliance to cool down with the appliance door open and then clean it.
Interrupting the cooking process
• To interrupt the cooking process before it has completed, press and hold the On/
O button for approx. 2 seconds.
• In order to deactivate the appliance completely, pull the mains plug out of the
socket.

20
Manual Cooking Programme
• Press the On/O button and the appliance will start with a cooking temperature
of 190°C and a cooking time of 15 minutes.
• To set the cooking temperature press the Increase Cooking Temperature or
Decrease Cooking Temperature buttons. Cooking temperatures of between
65°C and 200°C can be set.
• To set the cooking time press the Increase Cooking Time or Decrease Cooking
Time button . This will change the cooking time in minute increments. Cooking
times from 0 to 90 minutes can be set.
• You can amend the cooking temperature or the cooking time at any point.
Please note: You can press and hold the arrow button for longer to set the cooking
time and cooking temperature more quickly.
• Press the Rotation button to start the automatic rotation of the rotisserie spit.
During this mode, the Rotation button will ash.
Please note: You can use the handle to open the appliance door during the cooking
process, to check on the food. When the door is opened the cooking program will
pause. When the door is closed it will resume at the same time and temperature.
• To switch on the light during the cooking process, press the Switch Light On/O
button . It will switch o automatically after a 2 minutes or press again to turn o.
When it is on the button will ash.
• Turn the food halfway through the cooking time to ensure the food is cooked
evenly. Once the cooking time has elapsed, 5 beeps will sound and the appliance
switches itself o. The fan will continue to run for approx. 20 seconds.
• Open the appliance door using the removable handle.
• Remove the foods using oven gloves or remove the rotating basket/rotisserie spit
using the holder.
• Press the On/O button and hold to switch o. After the appliance is switched
o the fan will continue to run for 20 seconds.
• Pull the mains plug out of the mains socket.
• Allow the appliance to cool down with the appliance door open and then clean it.
Table of contents
Other STATESMAN Fryer manuals


Popular Fryer manuals by other brands


CASO DESIGN
CASO DESIGN AF 600 XL operating manual

Fritel
Fritel Cool Zone Fryer user manual

Keating Of Chicago
Keating Of Chicago Instant Recovery 24 BB Specification sheet

U.S. Range
U.S. Range C836-1-35F Installation and operation manual

Dean
Dean D20 Series Installation & operation manual

Henny Penny
Henny Penny OE 301 Installation