STATESMAN SKAF08017BK User manual
SKAF08017BK
8L DIGITAL DUAL ZONE AIR FRYER
Instruction Manual
Please read these instructions carefully before use and retain for future reference.
Before switching on your appliance – Always check for any damage that may have
been caused in transit.

2
CONTENTS
Important Safety Instructions ................................ 3-5
Air Frying Tips..............................................................6
Product Overview .................................................... 7-8
Operating Instructions .......................................... 9-13
Cleaning & Maintenance...........................................14
Troubleshooting Guide..............................................15
Mains Plug Fuse Replacement.................................16
Disposal Information.................................................16
Statesman Warranty/Guarantee Information..........18

3
SAFETY INSTRUCTIONS
Please ensure you read all instructions and warnings in this user guide prior to rst
use.
Keep this user guide for future reference.
Please handle this product with care and check it regularly to ensure it is in good
working order.
If the product, power supply cord or plug shows any signs of damage: stop using it
immediately or do not use. Unplug product and contact a qualied technical engineer
or service agent.
• This appliance can be used by children aged from 8 years and above if they have
been given supervision or instruction concerning the use of the appliance in a safe
way and understand the hazards involved
• Cleaning and user maintenance shall not be made by children
• Keep the appliance and its cord out of reach of children aged less than 8 years
• Children shall not play with the appliance
• This appliance can be used by persons with reduced physical, sensory or
mental capabilities or lack of experience and knowledge if they have been given
supervision or instruction concerning use of the appliance in a safe way and
understand the hazards involved
• When operating, the air fryer baskets and crisping racks will be hot. Do not touch.
Use the handle on the air fryer to remove the basket with food
• Use oven mitts or clothes when handling the air baskets as they will retain some
residual heat. This will prevent potential burns
• This air fryer is intended for indoor household use. Do not use outdoor for any
purpose
• The power cord to the air fryer should be plugged into and 200-240V AC electrical
out only
• If this air fryer begins to malfunction during use, press the basket release button
and pull any active fryer baskets out of the air fryer. Unplug the power cod and
stop use immediately. Contact a qualied technical engineer or service agent.
• Only place the air fryer on dry, at, stable and heat resistant surface
• Do not place the air fryer on or near a hot gas or electrical burner or heated oven
• Be sure to use on a heat resistant and even surface. If you have not heat resistant
surface, please use a heat proof mat. Keep the appliance at least 20cm away from
the wall, furniture or other ammables
• Do not immerse the power cord, plug or air fryer unit into water or any other liquids
• Do not allow the power cord to hang over edge of a table, counter or touch any hot
surfaces

4
• If the power cord is damaged stop use immediately and contact a qualied
technical engineer or service agent
• Do not attempt to repair the air fryer yourself. Contact a qualied technical
engineer
• Do not obstruct the air ow inlets and outlets. These are located on the back and
top of the air fryer
• Do not use any third-party attachments and accessories with this air fryer. It may
lead to malfunctions or injuries
• When using the crisping racks ensure they are properly inserted into each air fry
basket before adding food and cooking
• Always use the handles on the air fry basket to pull out each basket. Please
remember to press the release button before pulling
• Allow the air fryer to cool before cleaning or removing air fry baskets or crisping
racks
• Unplug the power cord of the air fryer before cleaning and when it is not in use
• Never operate or store the unit in direct sunlight
WARNING: This air fryer is not intended to be operated by means of an
external timer or separate remote control system
WARNING: Never move the air fryer unit when hot or when containing hot food
WARNING: The air fryer will not operate unless the active air fry basket is/are
fully inserted into the main air fry unit
WARNING: This air fryer should not be used to boil water
WARNING: This air fryer should never be used to deep fat fry food
WARNING: Under lling or over lling the air baskets may damage the air fryer
and result in serious injuries
CAUTION: Hot oil can collect at the base of the baskets. Use with caution
when removing the cooked food to avoid splashes and burns
WARNING: After operating, the air fryer baskets and crisping racks will retain
some residual heat. Let cool before washing or handling

5
WARNING: This appliance is intended to be used in household and similar
applications such as:
• Sta Kitchen areas in shops, oces and other working environments
• Farm houses
• By client in hotels, motels and other residential type environments
• Bed and breakfast type environment
WARNING: Extreme caution must be taken when handling any hot fryer
baskets or crisping racks. Careful when opening baskets avoid escaping steam
from fryer and food

6
AIR FRYING TIPS
• Please check on the cooking of your food as our Air fryer cooking technology will
cook food quicker than that of convectional ovens
• Pat the food dry before cooking to encourage browning and to avoid excess
smoke
• To ensure even cooking/browning, always open the active basket halfway through
the cook time and check, turn or shake foods in the air fryer basket. Some recipes
call to brush or spray oil halfway through cooking. Adjust the temperature or time if
needed
• Frying small batches will require shorter cooking times and yield crisper results.
• To avoid excess smoke when cooking foods high in fat (e.g bacon, chicken wings
or sausages), it may be necessary to empty the fat gathered in the air fryer basket
between batches
• Create a more spaced out surface area to allow more air to pass through by cutting
food into smaller pieces. This can yield crispier foods
• Press breading/coating onto food to help it adhere. Refrigerate breaded foods for
at least 30 minutes before frying. This allows the coating to be slightly absorbed
and ensures the coating sticks to foods when cooking
• To improve crispiness in meat, coat the meat lightly with cornour or rice our and
spray with oil
• Arrange breaded coated foods in air fryer basket so that food is not touching to
allow air ow on all surfaces
• Spray oils works best with this air fryer. The spray distributes the oil more evenly
and less oil generally needed. However, canola, olive, avocado, coconut, grape
seed, peanut or vegetable oil work well too
• When baking or using wetter foods it is best to use parchment paper to line the
basket
Air frying Pre-Packaged Frozen Foods
• Depending on the type and amount of food being cooked, suggested cook times
may dier. Always check food halfway through cooking time to determine the nal
cook time and temperature
• Once the time is up, ensure the food is fully cooked
7
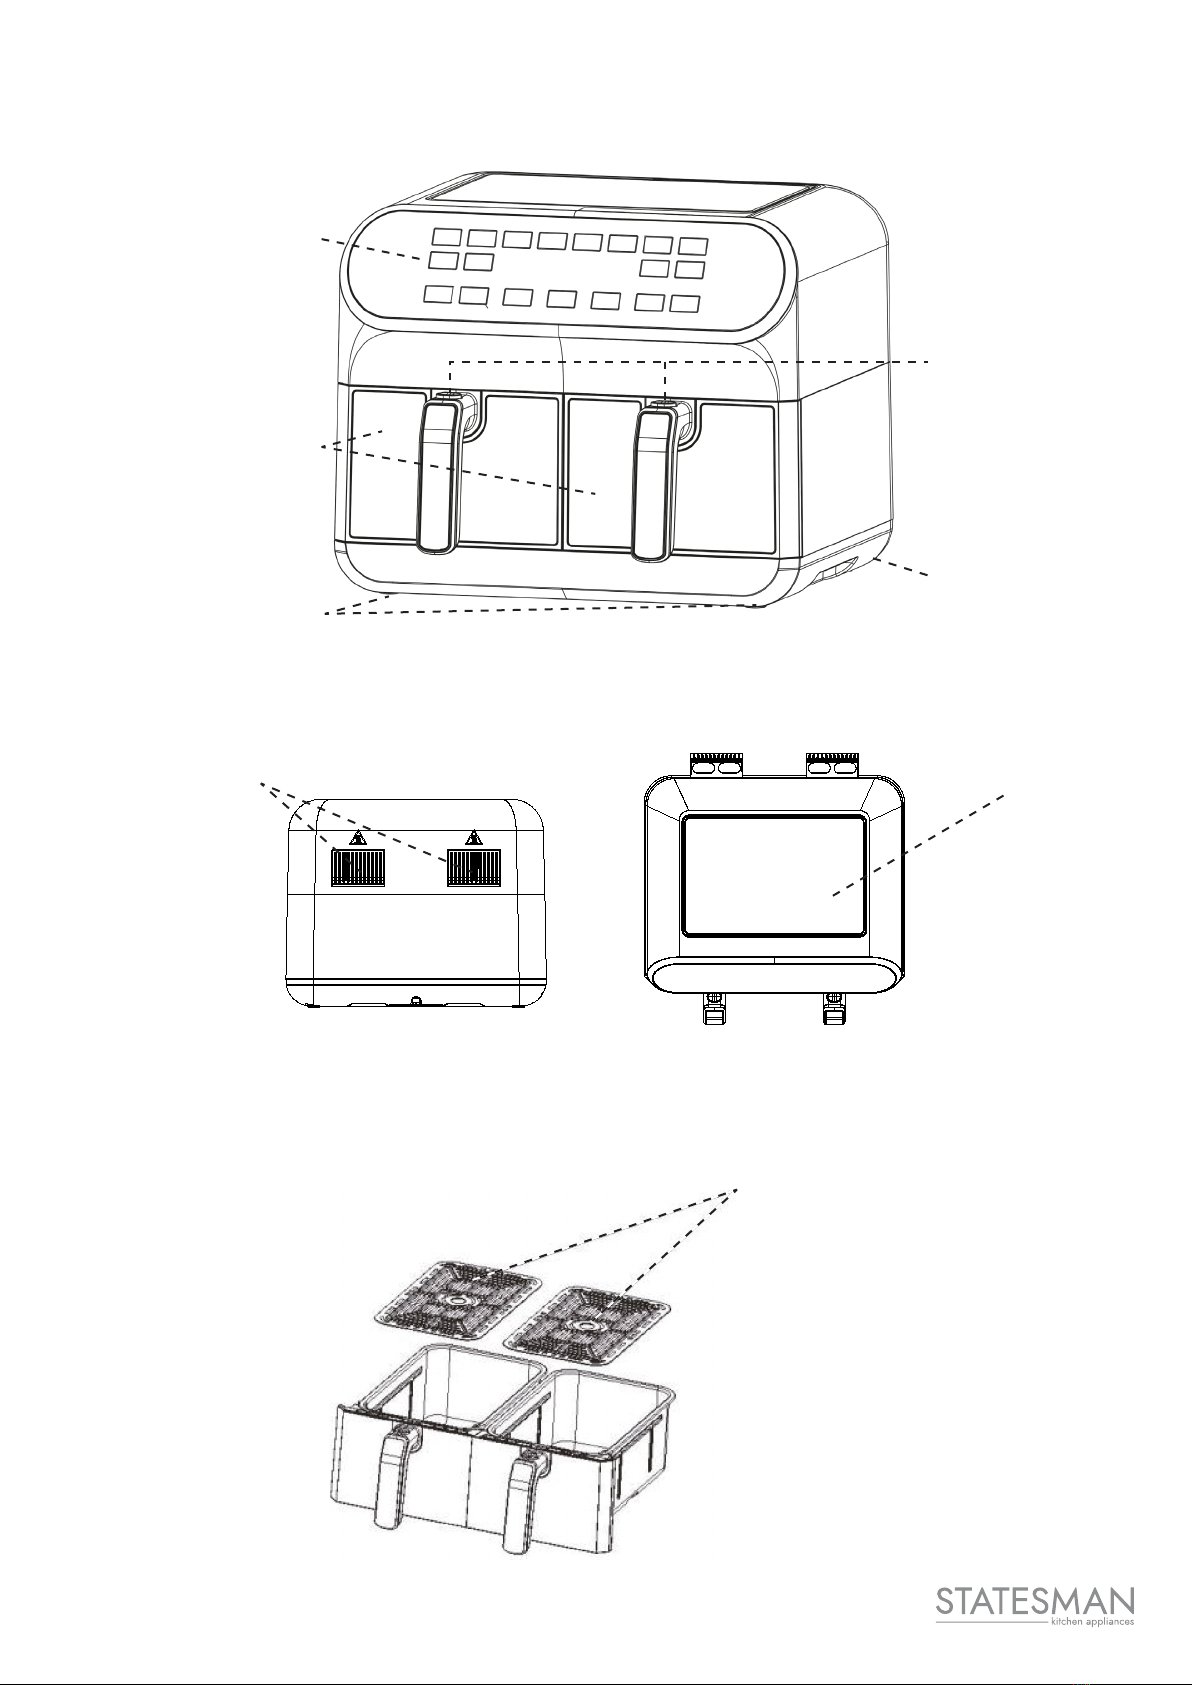
PRODUCT OVERVIEW
Touch Control Panel
Left and Right Air
Fryer Baskets with
Handles (4L each)
Non-Slip Feet
Power Cord
(not shown)
Basket Release
Button
Air Fryer
Air Fryer Inlets and Outlets
Note: Do not cover or obstruct the inlet/outlet
Air Fry Baskets
Non-Stick
Crisping Rack
Air Flow Outlet
(caution hot air)
Air Flow Inlet

8
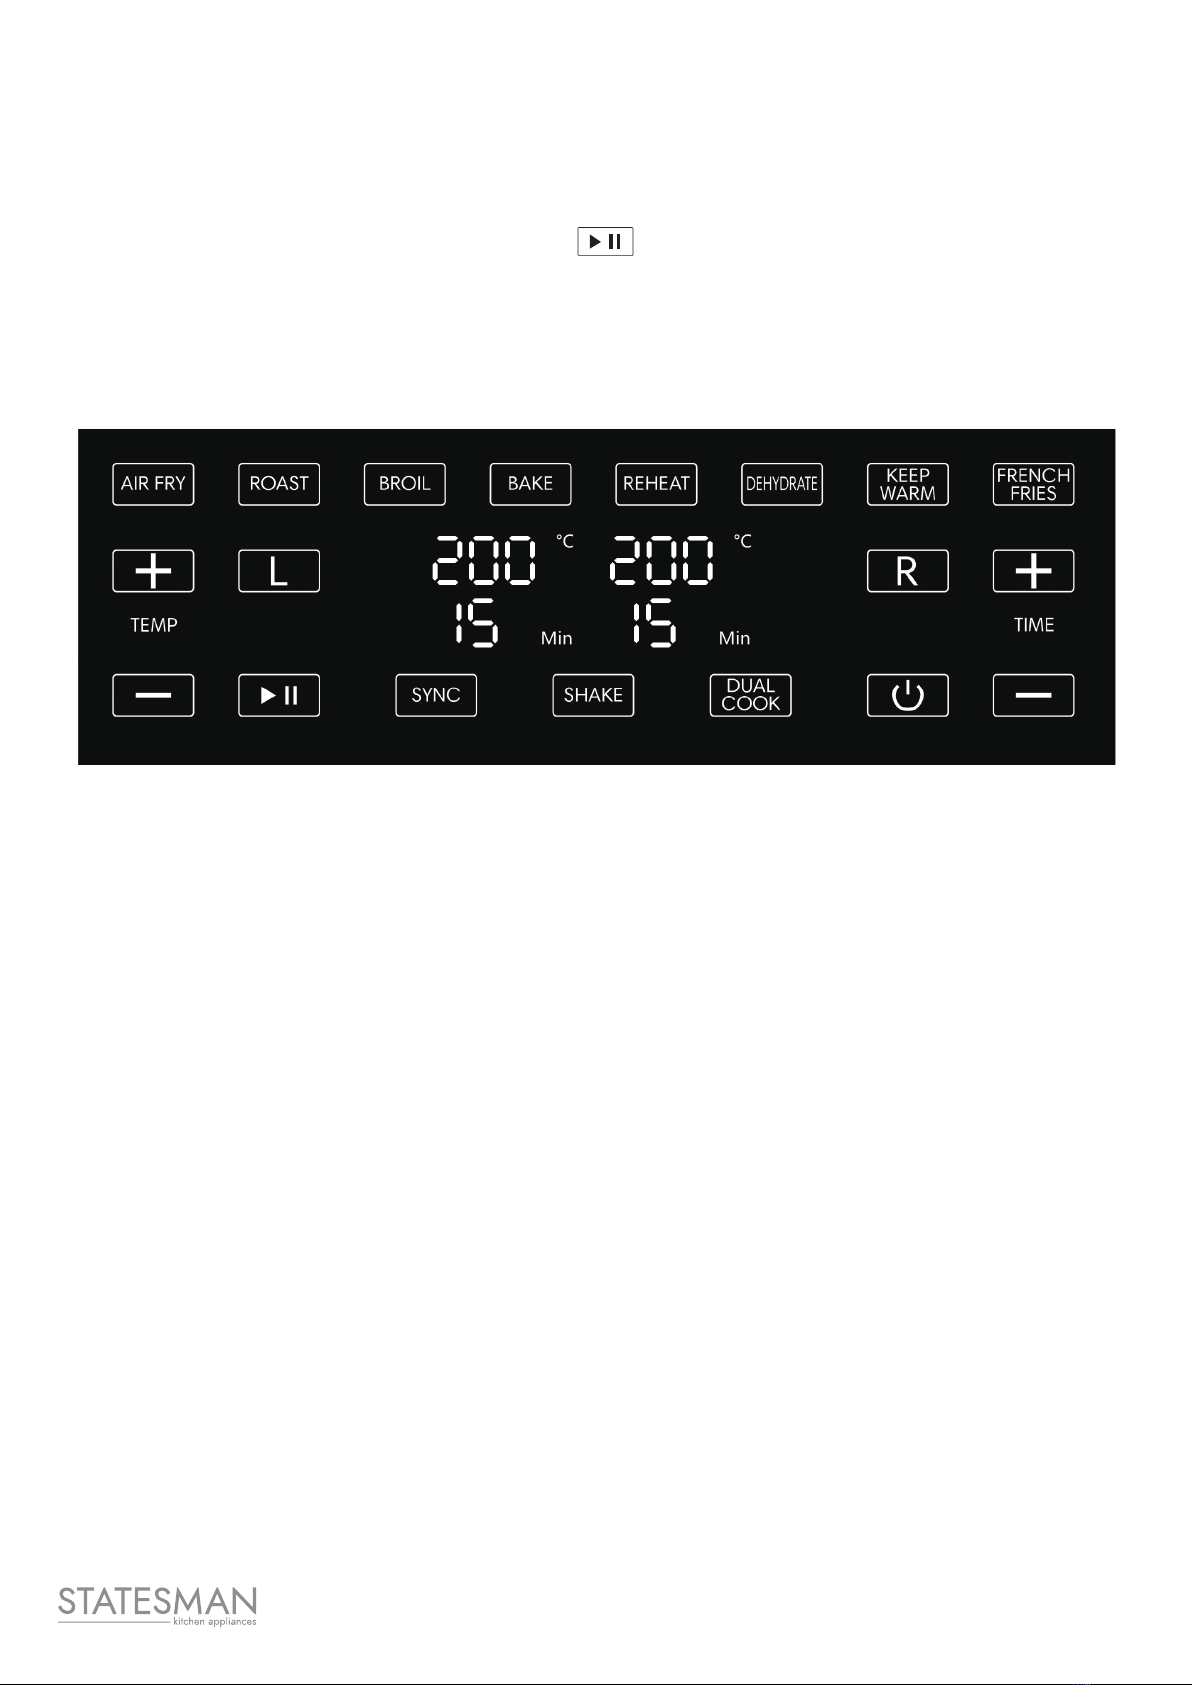
Touch Control Panel
1. Modes
2. TEMP – adjust + to increase /- to
decrease
3. Left basket control
4. Start/Pause
5. Digital Time and Temp for each basket
6. SYNC nish
7. SHAKE reminder
8. DUAL COOK
9. On/o
10.Right basket control
11.TIME adjust + to increase /- to
decrease
Modes
• AIR FRY – This mode can be used on meats, sh and vegetables. Best to use with
crisping racks
• ROAST - For joints of meats, whole sh or potatoes and vegetables
• BROIL- Another word for grill great for steak and sh
• BAKE – ideal for pastry, cake and biscuit making
• REHEAT – Any foods to reheat. Check food is hot all the way through before
serving
• DEHYDRATE – For fruit and vegetable to crisp
• KEEP WARM – If you need to keep food warm for longer after cooking. This
function can also be used to defrost foods. Check food is hot all the way through
before serving
• FRENCH FRIES – Quick mode for cooking chips
1
2 3 4 5 6 7 8 9 10 11

9
OPERATION INSTRUCTIONS
Before First Use
Remove all packaging and labels from the inside and outside of the air fryer.
Air Fryer come with 2 x crisping racks located on top of poly packaging.
Ensure you wash both the racks and the baskets with hot soapy water.
Wipe the air fryer main unit with a damp cloth.
DO NOT IMMERSES THE AIR FYER MAIN UNIT IN WATER OR ANY LIQUIDS
1. Insert one of the crisping racks into each basket so that the rubber sides t and
lock in comfortably into the basket
a. PLEASE NOTE the rubber may be sti the rst few times of using and placing in
2. Check for the left and right labels (L & R) on the air fryer handles and body then
insert the baskets into their respective sides
a. PLEASE NOTE ensure that both baskets are full inserted otherwise air fryer will
not operate
Note: During initial use, the air fryer may give o a slight odour. This is normal and
should not aect your food.

10
Instruction For Use
Before cooking please note that air fryer cooking technology cooks food quicker than
that of convectional ovens. Please check food whilst cooking to ensure you don’t
overcook.
Ensure air fryer is placed on a at, stable and heat resistant surface.
Donotoverllthebasketwithfood.Thiscouldresultinunevencookingor
potential damage to the air fryer. We suggest the capacity of one basket is up to
1.7KG or 2/3 full of the basket.
ONE ZONE COOKING or DUAL ZONE WITH SAME SETTINGS
Plug the power cord into electrical socket and switch on the mains. Air Fryer will emit
a sound prompt and the touch control panel will ash once and go to standby. Push
the basket button and pull to remove basket, then ll with desired food.
ONE ZONE COOKING
• Press on the control panel. The display switches on and some icons ash
• Press L to set cooking of left container
• Select the desired cooking mode by pressing the corresponding button on the
control panel (see paragraph “Cooking mode”) Note air fry mode is automatically
selected and should be ashing
• Set temperature with the buttons TEMP (+ / -). Set time with the buttons TIME
(+ / -). To adjust TEMP and TIME quicker press and hold down TEMP (+ / -) & TIME
(+ / -) buttons. DEHYDRATE mode time is adjusted in 1-hour increments
• The icon SHAKE must be ashing if you want to activate the function “Shake”
(paragraph “Functions”)
• Press to start cooking
• The display shows the temperature and the time remaining
• Also the selected functions will stay a light
• If using the left basket, press L to adjust the time and / or temperature during
cooking

11
• If using the right basket, press R to adjust the time and / or temperature during
cooking
• press to pause cooking (after 5 minutes the appliance switches o)
• press to stop cooking and switch o the air fryer
• When the time reaches 00:00 the display will show ‘cool cool’ before a 20 second
count down. The air fryer will beep 5 times when the food is safe to remove
Remember to press the button to release the basket
DUAL ZONE COOKING WITH SAME SETTINGS
• To match or cook both baskets with the same mode, time and temp doubling the
capacity, simply Press DUAL COOK button and follow the steps above for one
zone operation. Adjustments will be made to both zones simultaneously
DUAL ZONE COOKING with INDEPENDENT SETTINGS
• Press on the control panel (2). The display switches on and some icons ash
• Press L to set cooking of left side
• Select the desired cooking mode by pressing the corresponding button on the
control panel (see paragraph “Cooking mode”)
• Set temperature with the buttons TEMP (+ / -). Set time with the buttons TIME
(+ / -). To adjust TEMP and TIME quicker press and hold down TEMP (+ / -) & TIME
(+ / -) buttons. DEHYDRATE mode time is adjusted in 1-hour increments
• The icon SHAKE must be ashing if you want to activate the function “Shake”
(paragraph “Functions”) on the left side
• Press R to set cooking of right side
• Select the desired cooking mode by pressing the corresponding button on the
control panel (see paragraph “Cooking mode”)
• Set temperature with the buttons TEMP (+ / -). Set time with the buttons TIME
(+ / -). To adjust TEMP and TIME quicker press and hold down TEMP (+ / -) & TIME
(+ / -) buttons
• The icon SHAKE must be ashing if you want to activate the function “Shake”
(paragraph “Functions”) on the right side
• The button SYNC must be ashing if you want to activate the function
“synchronization”
• Press to start cooking. The display shows temperature and time remaining.
• Also the selected functions will stay a light
• If using the left basket, press L to adjust the time and / or temperature during
cooking
• If using the right basket, press R to adjust the time and / or temperature during
cooking
• press to standby cooking (after 5 minutes the appliance switches o)
• When the time reaches 00:00 the display will show ‘cool cool’ before a 20 second
count down. The air fryer will beep 5 times when the food is safe to remove.
Remember to press the button to release the basket
12
SYNC FUNCTION
This function will enable you to nish cooking at the same time when two recipes that
have dierent cooking times. In this way you will be able to bring 2 freshly cooked
dishes together to the table.
• Programme both air fry baskets with their representative temperature and times
• Press the SYNC button then press the
• The basket with the longer cooking time will start to count down and the other will
remain paused until the time is matched and the second basket will begin to cook
and count cooking time down in synchronicity with the other basket
KEEP WARM
• In Function “KEEP WARM”, temperature can be set from 40 to 100C, and time
from 1 to 60 minutes. In all other functions, temperature can be set from 80 to
200°C, and time from 1 to 60 minutes
• DEHYDRATE
• In Function “DEHYDRATE”, temperature can be set from 35 to 80C and time from 1
to 24 hours
SHAKE
• Enable this function when you are cooking foods that must be mixed during
cooking. After two thirds of cooking time the air fryer will emit a sound to remind
you that is time to turn or shake the food. Function Shake can be activated with the
button SHAKE on display
• Note: In the case you are making 2 independent cooking, function Shake must be
enabled 2 times, one for each container
• Function Shake cannot be activated if time set is less than 3 minutes and cannot
be activated with these cooking modes: Broil, Reheat, Dehydrate, Keep warm

13
COOKING MODES
• In the table are listed all the cooking modes featured the air fryer with setting of
time and temperature
MENU DEFAULT
TEMP
DEFAULT
TIME
DUAL
COOK
TIME
TEMP
RANGE
(°C)
TIME
RANGE SHAKE FOOD
Air Fry 190˚C 15 mins 18 mins 80~200 1-60 mins 2/3 time / once
Roast 180˚C 30 mins 35 mins 80~200 1-60 mins 2/3 time / once
Broil 200˚C 10 mins 13 mins 200 1-30 mins no
Bake 180˚C 20 mins 25 mins 80~200 1-60 mins 2/3 time / once
Reheat 120˚C 6 mins 9 mins 80~200 1-60 mins no
Dehydrate 55˚C 8 hours 8 hours 35~80 1 hr - 24hrs no recommend
Keep
Warm 50˚C 30 mins 30 mins 40~100 1-60 mins no
French
Fries 200˚C 20 mins 24 mins 80~200 1-60 mins 2/3 time / once
Notes:
If you use air fryer with only one cooking zone working, the cooking time required will
need to be reduced by 20% compared to the cooking time with two zones working
simultaneously. For this reason, the cooking times are dierent if set with one or two
active zones.
The “Keep Warm” mode is perfect to defrost food. Remember to set the time based
on the weight and on the thickness of the food to to defrost or from its packaging
instructions.

14
CLEANING & MAINTENANCE
Clean air fryer after every use.
DO NOT CLEAN WHILST STILL HOT
Unplug unit from the electrical outlet and allow each part to cool down before starting
any cleaning procedure. Remove container to make the unit cool down faster.
Do not place air fryer in water. Try to prevent splashes of water or other liquids from
reaching the unit.
Do not use any abrasive or harsh chemicals.
• Wipe the outside of the appliance with a damp cloth
• Wash both air fry baskets and crisping rack in hot soapy water or you can add to
dishwasher. If cleaning in dishwasher do not put on higher setting than 50º and on
top rack
• Clean the heating element with a cleaning brush to remove any food residues
• Clean the inside of the appliance with hot water and non-abrasive sponge Baskets
and racks can be washed as normal non-stick pans, but we suggest to use use a
low dishwasher setting
Do not use metal kitchen utensils, abrasive sponges or abrasive cleaning
materials to clean them, as this may damage the non-stick coating.
Storage
• Ensure air fryer is unplugged and all parts are clean and dry
• Do not store if still hot or wet
• Insert clean and dry crisping racks in each basket and insert fully in to air fryer
main unit correctly before storing
• Try to store covered and in dry cool place. Recommend in its original box
15
If you are having problems with your appliance, please use our troubleshooting
guide below. If you are unable to resolve the issue using this guide, please ring our
Customer Service Department on 0844 848 5861. Please have the model code and
purchase information available.
TROUBLESHOOTING GUIDE
Problem Possible Cause Possible Solution
Food is
overcooked/burnt.
Cooking temperature is set too
high.
Check cooking temperature
and lower the thermostat
accordingly.
Cooking time too long. Check cooking time of
product and be aware air
fryer may cook quicker than
conventional ovens.
Food is
undercooked.
Cooking temperature is set too
low.
Check cooking temperature
and increase accordingly.
Cooking time is too short. Check cooking time and
increase the cooking time
accordingly.
The Air Fryer basket has been
overlled.
Ensure that the Air Fryer
basket is not lled to the
brim please leave 3-4cm
area free for the air to
circulate.
The crisping racks have not
been tted to the base of the Air
Fryer baskets reducing air ow.
Ensure the crisping racks are
inserted into the base of the
Air Fryer baskets.
Unit does not
power up.
LED Digital Display is not
illuminated.
Press the Power button on
the control panel.
No power to Air Fryer. Check that the mains plug is
inserted into the socket and
the socket is switched on (if
applicable).
The Air Fryer basket/s is not
inserted or fully pushed home
Ensure the basket is inserted
and fully pushed home.
Burning smell from
unit.
Food trapped under crisping
racks.
Ensure Air Fryer basket/s
and crisping racks are clean.
Previous food remains on Air
Fryer basket/s or crisping racks.

16
DISPOSAL OF OLD ELECTRICAL APPLIANCES
The European Directive 2002/96/EC on Waste Electrical and Electronic
Equipment (WEEE), requires that old household electrical appliances
must not be disposed of in normal unsorted municipal waste. Old
appliances must be collected separately in order to optimise the
recovery and recycling of the materials they contain and reduce
the impact on human health and the environment. The crossed out
“wheeled bin” symbol on the product reminds you of your obligation,
that when you dispose of the appliance it must be separately
collected. Consumers should contact their local authority or retailer for
information concerning the correct disposal of their old appliance.
MAINS PLUG FUSE REPLACEMENT Fuse Cover
Fuse Replacement (Class I)
This appliance must be earthed. Remove the fuse cover
with a small at head screw driver. Take out the fuse and
replace with a new fuse of the same Amp. Replace the
fuse cover and push back into place.

17

18
STATESMAN WARRANTY/GUARANTEE TERMS & CONDITIONS
THANK YOU FOR CHOOSING STATESMAN
As a valued customer we would like to oer you a FREE 2-year warranty to cover
your product against any electrical or mechanical defects.
This means that in the unlikely event you develop a fault or problem with your product
we will happily repair or replace the item free of charge.
To qualify for the guarantee, the product must be used for domestic household use
only and in accordance with the instructions in the user manual. Any misuse of the
product will result in the warranty being void.
The guarantee does not cover accidental damage, misuse, neglect, tampering or
incorrect adjustment or installation.
The guarantee will be rendered invalid if the product is resold, has had its serial
number or rating label removed (or has an invalid serial number or rating label), or if an
unauthorised person has carried out any repairs or alterations.
The warranty does not cover accessories or consumable parts that require
replacement under normal use. This includes shelving, dials, lters, belts and trays
etc.
In the unlikely event of a breakdown please refer to the Troubleshooting Guide in your
user manual and check all plugs, fuses and the electricity supply.
If you still require assistance, please contact our Customer Service Department on
01473 271 272 or write to us at the following address:
Customer Service Department
38 Bluestem Road, Ransomes Industrial Estate, Ipswich, IP3 9RR
Please quote the Product Code and the PO number on the rating label and give
details of the exact fault. We will then decide whether to replace the item.
IMPORTANT NOTE: Before we arrange the replacement, you will be required to
return a copy of your proof of purchase. Please retain your original.
If an item is replaced within the agreed warranty period, the warranty for the
replacement item will be calculated from the purchase date of the original.
In the event that the product is inspected, and no fault is found, or the product is not
within the guarantee period you will be charged for the repair and any carriage costs.

19

0844 848 5861
38 Bluestem Road, Ransomes Europark, Ipswich, IP3 9RR
EU: Castle Electrical Factors Ltd., Dundalk, A91 KA9R, IR
Table of contents
Other STATESMAN Fryer manuals


Popular Fryer manuals by other brands


GILES
GILES GBF Series Operation & service manual

Giles & Posner
Giles & Posner GBF-35 Banked Operation & service manual

ORIGO
ORIGO AF-560 instruction manual

CARTER-HOFFMANN
CARTER-HOFFMANN CNH14XD Operator's manual

Outdoor Gourmet
Outdoor Gourmet TF2048911-OG-00 Assembly instructions & user manual

Domo
Domo DO537FR quick start guide