Steam Australia SV8W User manual
SV8W Quick Start Guide
1
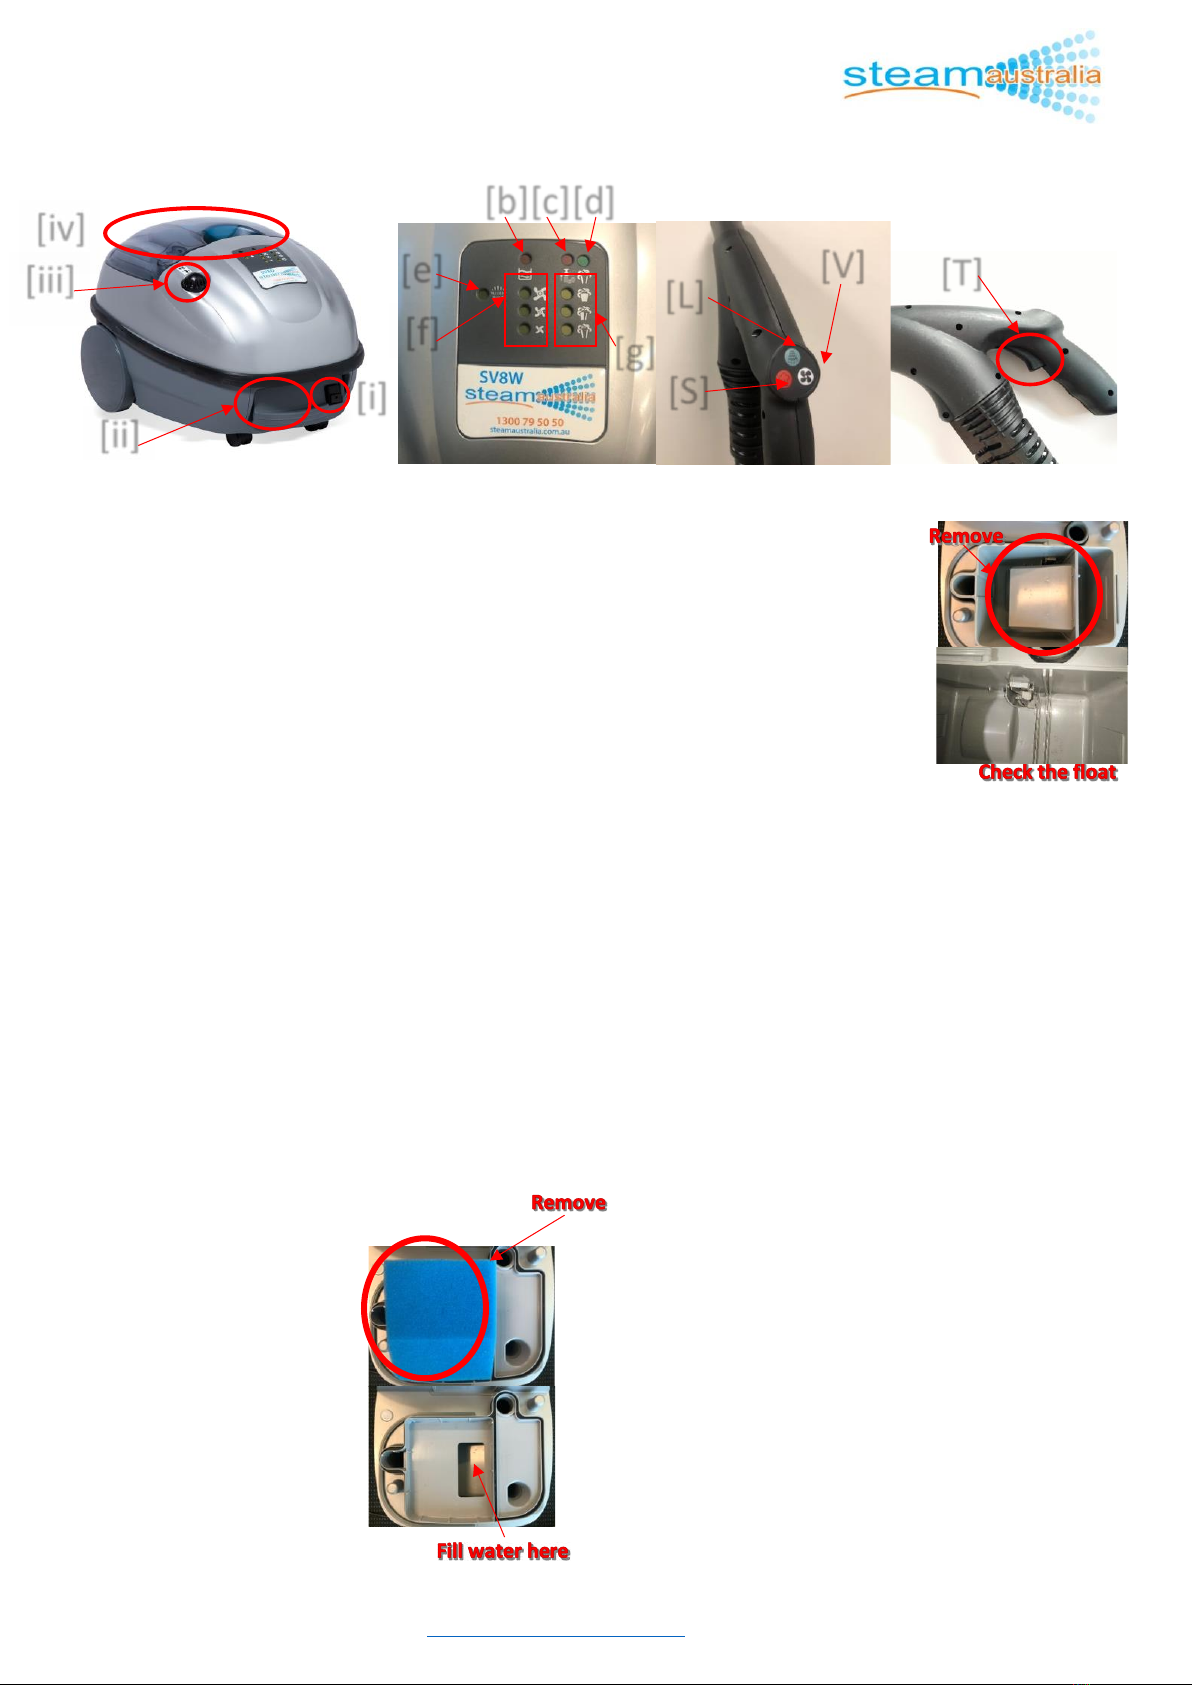
SV8W SV8W Display SV8W Hose Controls
______________________________________________________________________________________________
Preparing the SV8W
Steam Operation:
1. Plug cable into a wall outlet.
NOTE: Do NOT use multi-outlet power-boards and
avoid using low-quality extension cables.
2. Open water tank filler cap (iii), fill tank with clean tap
water up to the top then close filler cap.
NOTE: Do NOT use de-mineralised water and do NOT
fill with any chemicals.
3. Turn SV8W on using the ON/OFF switch (i), making
sure the steam level lights on the display (g) light up
after a few seconds.
4. Connect hose into the SV8W by opening the
protective plastic flap located on the front of the
machine (ii) and pushing the plug end of the hose in
with the round red button on the top side of the hose
until it clicks.
Proceed to “Vacuum Operation” and/or “Water Injection
Operation” section if you are planning on using the vacuum
and/or water injection functions together with the steam
functions.
Vacuum Operation:
1. Turn the vacuum on from the hose controls by quick-
pressing (V).
The SV8W will make a beeping noise and
the vacuum waste tank lights
(b) will flash on the display.
2. Open the transparent
vacuum cover (iv), remove blue
foam filter and slowly fill clean
tap water into the rectangular
hole on top of the vacuum
waste tank until the vacuum
waste tank lights (b) stops
flashing.
3. Replace the blue foam filter
and the transparent vacuum cover (iv).
NOTE: If the vacuum waste tank
lights (b) still flashes after filling
the tank up, remove the plastic
part with the rectangular hole,
then remove the plastic divider
underneath. You will see a white
float, make sure the white
float’s surrounding areas and
the float itself is clean and can
move freely. Re-assemble the
waste tank, fill the tank with clean tap water until the
vacuum waste tank lights (b) stops flashing then put
the blue foam filter and transparent vacuum cover (iv)
back on.
Hose Handle Operations
Steam Functions:
1. After 5-6 minutes the ‘Steam Ready’ lights (d) will
light up on the display and the steam function is ready
for use. Make sure the steam level lights (g) is on,
otherwise quick-press the RED steam button (S) until
the steam level lights turn on to prepare the steam
function for use.
2. If the SV8W makes a beeping noise and the ‘Low
Water’ lights (c) flashes, proceed to Step 2 of
“Preparing the SV8W | Steam Operations”.
3. Press and hold the RED steam button (S)to select
between 3 steam levels: low, medium, or high. The
steam level lights (g) display will light up in
correspondence to the different steam levels: 1 = Low,
2= Medium and 3= High.
4. Once you have selected which steam levels you
want, press the trigger located underneath the hose
handle (T)to release steam from the nozzle.
WARNING: Do NOT operate hose with steam nozzle
pointing at persons, animals or electrical machinery
/equipment/outlets/sensors that are sensitive to
water and heat (especially near fire alarm sensors).
[S]
[L]
[V]
[T]
[i]
[ii]
[iii]
[iv]
[f]
[g]
[e]
[b][c][d]

SV8W Quick Start Guide
2
Vacuum Functions:
1. Press the BLACK & WHITE vacuum button (V)to
engage the vacuum function. The vacuum will turn on
and you will feel suction from the vacuum nozzle.
2. If the vacuum stops, a beeping noise is heard and the
vacuum waste tank lights (b) flashes, check for any
water present in the waste tank. Remove any water
present and proceed to Step 2 & 3 of “Preparing the
SV8W | Vacuum Operations” (page 1).
3. Press and hold the BLACK & WHITE vacuum button
(V)to select 3 vacuum levels: low, medium, or high. The
vacuum level lights display will light up in
correspondence to the different vacuum levels:
1= Low, 2= Medium and 3= High.
Water Injection Functions:
1. The water injection function only works when the
steam function is active. Water gets injected together
with steam when it is activated.
2. To activate the water injection, press the BLUE water
injection (L)button on the hose. The water injection
light (e) will light up on the display.
3. If the SV8W makes a beeping noise and the ‘Water
tank low’ light (c) flashes on the display, proceed to
Step 2 of “Preparing the SV8W | Steam
Operations”(page 1).
NOTE: Using the water injection continuously will
quickly drain the water tank, therefore it is advised
that the water injection function is to be used only
when cleaning hard to remove stained areas.
Warning Lights
The SV8W will make a beeping noise and a red light will
flash on certain conditions:
- Water tank low level (c)
- Vacuum waste tank no water/too much waste (b)
For water tank low level, refer to Step 2 of
“Preparing the SV8W | Steam Operations”.
For vacuum waste tank issues, clean out the waste tank
and proceed to Step 2 & 3 of “Preparing the SV8W |
Vacuum Operations”.
Cleaning the SV8W
Draining the SV8W’s boiler once a month ensures that
the machine operates at optimal conditions.
WARNING: Ensure machine has cooled down before
attempting to clean out the boiler by checking that
the machine does not feel warm on the bottom part
and machine is free from any pressure.
You will need:
- A pan or container that can hold at least 5L of water
- A rag
- Flathead screwdriver
- Supplied socket wrench
1. Ensure the machine is not plugged into a power
source and the machine does not feel warm with no
pressure present.
2. Using a flathead screwdriver, remove the black
plastic cover concealing the boiler drain plug located
underneath the SV8W by inserting the screwdriver into
the slit and turning counter clockwise.
3. Once the brass boiler plug is exposed, prepare the
SV8W by positioning it on top of a pan or container.
4. Using the supplied socket wrench, unscrew the
boiler plug by slowly turning counter clockwise. You
may need to use a rag to hold the plug as you unscrew
the plug by hand after loosening using the socket
wrench. Let the water drain, then screw the plug back
on and tighten with supplied socket wrench.
Other manuals for SV8W
1
Other Steam Australia Vacuum Cleaner manuals


