Steam Australia SV8W User manual
www.steamaustralia.com.au –info@steamaustralia.com.au –1300 79 50 50
1
SV8W User Manual

www.steamaustralia.com.au –info@steamaustralia.com.au –1300 79 50 50
2
Contents
Safety Precautions ............................................................................................................................................................ 3
Steam Cleaner Description................................................................................................................................................ 4
Components...................................................................................................................................................................... 5
Accessories........................................................................................................................................................................ 5
Standard Accessories .................................................................................................................................................... 5
Optional Accessories..................................................................................................................................................... 6
Before Switching On.......................................................................................................................................................... 7
Water Quality................................................................................................................................................................ 7
Filling with Water.......................................................................................................................................................... 7
Attaching/Removing the Hose...................................................................................................................................... 7
Using Your Appliance ........................................................................................................................................................ 7
Turning on the SV8W .................................................................................................................................................... 7
Steam Operation........................................................................................................................................................... 7
Vacuum Operation........................................................................................................................................................ 8
Water Injection Operation............................................................................................................................................ 9
Accessories Guide ...........................................................................................................................................................10
Maintenance ...................................................................................................................................................................14
Accessory Maintenance .............................................................................................................................................. 14
Boiler maintenance..................................................................................................................................................... 14
Servicing...................................................................................................................................................................... 15
Warranty .........................................................................................................................................................................15
Warranty Terms and Conditions................................................................................................................................. 15
Making a Warranty Claim ...........................................................................................................................................15

www.steamaustralia.com.au –info@steamaustralia.com.au –1300 79 50 50
3
Safety Precautions
•Carefully read all the safety warnings and precautions in these instructions as they provide important
information for the safe assembly, use and maintenance of the steam generator.
•After removing the packaging, check that the steam generator is undamaged. If in any doubt, do not use the
appliance and instead contact an authorised service agent. The packaging materials must be kept out of reach
of the children as they could pose a health and safety risk.
•This appliance must only be used in accordance with these instructions. It is to be used as a steam generator
with steam cleaning accessories to clean flooring, walls, upholstery, tiles, windows, fabrics and bench tops.
The manufacturer cannot be held liable for improper, incorrect or unreasonable use of this steam generator
or its accessories. The user is solely responsible for ensuring that the item to be cleaned will not be
damaged/discoloured by subjecting it to steam at high temperatures nor that the accessories will damage the
item being cleaned.
WARNING !
−There are no components serviceable by the user inside this appliance with exception to draining the boiler,
all maintenance MUST be carried out by authorised personnel.
−This steam generator MUST be earthed.
−Never use extension leads without an earth or the appropriate safety marks
−Never use the appliance barefoot
−Never aim the steam at people or animals
−Never aim the steam at electrical switches, socket outlets or any electrical appliances
−Never pull the mains lead or the appliance itself to unplug from the mains supply
−Never allow the mains cord to rub against sharp edges; do not trap the cord between doors, windows or
drawers
−Always check that the mains cord and plug are in good condition before use
−Protect the mains cord from heat, steam and oil
−Never allow children to operate this appliance
−Never allow inexperienced users to operate this appliance without supervision
−Never leave the steam generator unattended when switched on
−Never leave the appliance unprotected from the weather (sun, ice, rain, frost, etc)
−Never store the appliance in an area that is likely to freeze
−Never immerse in water
−Never overfill the water tank
−Never direct the steam into the steam generator or steam hose
−Never use any accessory that is damaged
−Never put the steam generator away while it is still hot, wait until it has completely cooled down
−Never steam synthetic velvet
−Only fill or top up the tank with clean tap water
−Only use the machine on a flat surface with all wheels touching the floor
−Always check in an inconspicuous area that the item to be cleaned will not be damaged or discolour
−Always keep the steam generator away from heat sources such as fires, radiators, direct sunlight, etc.
•During use the steam generator can reach very high temperatures, take care not to touch any metal or any of
the steam jets from the machine, accessories or hoses.
•Always unplug at the mains;
oBefore emptying the boiler;
oBefore cleaning the appliance;
oWhen interrupting its use, even for short periods.

www.steamaustralia.com.au –info@steamaustralia.com.au –1300 79 50 50
4
•A hydraulically operated safety pressure relief valve is fitted inside the appliance, it MUST only be replaced by
an authorised service personnel.
•The steam generator is fitted with a safety overload cut-out that MUST only be replaced with an identical
component by authorised service personnel to prevent a safety hazard.
•In the event of a breakdown and/or malfunction, unplug the mains socket and do not tamper. Contact the
authorised service personnel for advice or repair. Any tampering with this appliance could create a serious
safety hazard.
•If the mains cord on this appliance is damaged, it MUST be replaced by authorised service personnel to prevent
a safety hazard.
•Every time the steam generator heats up from cold, the air inside the appliance prevents steam from being
delivered immediately. After one minute of heating up, activate the steam on the maximum setting to dispel
this air.
•Electrical or electronic appliances (computers, tv, radio, lights, telephones, etc) should never be cleaned with
steam as this could cause damage or create a safety hazard, even if these are not connected to the mains
supply.
•Never put detergents, perfumes, any other chemical substances or debris in the water tank with the exception
of products indicated by Steam Australia.
•Fill the tank with clean water, use a funnel and take care not to overfill. Fill to just below the filler cap and refit
the water tank cap.
Steam Cleaner Description
The SV8W permits cleaning and sanitising without the need to use chemicals. Steam cleaning is hygienic and helps us
reduce our water and chemical consumption making us more environmentally responsible. High temperature steam
removes dirt, kills bacteria and dust mites. It can be used on many different surfaces including: ceramic floor tiles,
stone floors, parquet flooring, vinyl floors, carpets, rugs, wooden ceilings, wall paper, windows, mirrors, sanitary ware,
taps, cooking surfaces, ovens, grills, radiators, window and door frames, furniture, fireplaces, cars, seats etc. Steam
can be generated continuously by topping up the water tank.
Steam Cleaning is different to traditional cleaning as we are super heating the water to over 170°C and in most cases,
we will only use the steam and the super-heated water vapour to sanitise and clean at the same time. This means we
use a very small amount of water over the duration of our clean and the higher pressures reduces the amount of
“elbow grease” required.
NOTE: Steam can cause damage, please read all instructions carefully and understand the safety instructions before
use.
www.steamaustralia.com.au –info@steamaustralia.com.au –1300 79 50 50
5
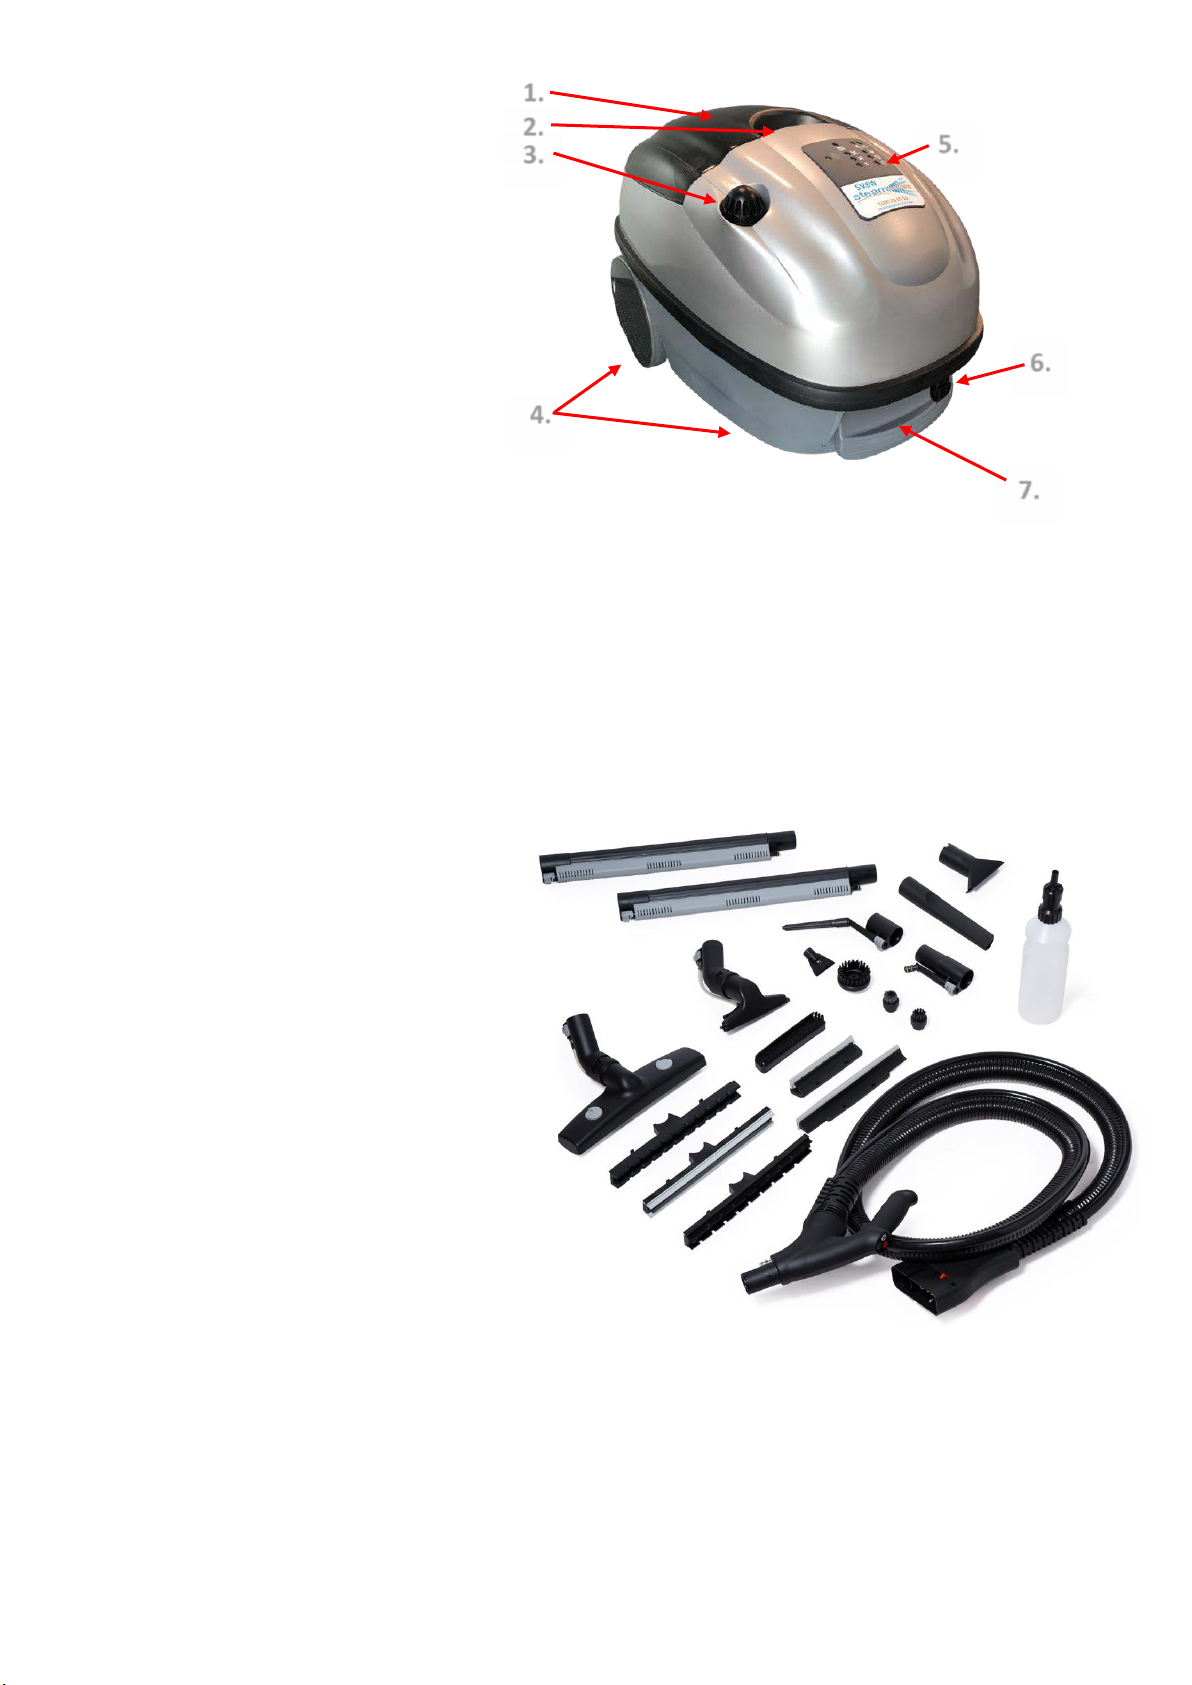
Components
1. Transparent Cover
2. Carry Handle
3. Water Tank Cap
4. Wheels
5. Display Lights
6. Mains ON/OFF Switch
7. Steam Hose Socket
Accessories
Standard Accessories
1. AC8000135: Hose SVD 2.5m
2. AE0000011: Extension Tube S/V 500mm
3. AC8000047: Extension Tube S/V Short 250mm
4. AC8000034: Floor Tool S/V 300mm
5. AC8000025: Insert Dual Squeegee 300mm
6. AC8000012: Insert S/V Carpet Glider 300mm
7. AC8000026: Insert Bristled 300mm
8. AC8000027: Suction Tool S/V 150mm
9. AC8000030: Insert Bristled 150mm
10. AC8000029: Insert Window Squeegee 150mm
11. AC8000028: Insert Window Squeegee 250mm
12. AC0000009: Scraper
13. AC0010001: Brush Round Nylon 60mm
14. AC0010023: Brush Round Stainless Steel 30mm
15. AC0010025: Brush Round Stainless Steel 38mm
16. AC0010022: Brush Round Nylon 30mm
17. AC0010021: Brush Round Nylon 38mm
18. AC8000024: Nozzle Detail w/ Extension
19. AC8000023: Nozzle S/V Detail
20. AC0050002: Nozzle Vac Vertical
21. AC0050001: Nozzle Vac Horizontal
22. AC0020004: Microfibre Sockette Small
23. AI0000019: Bottle with non-spill cap 800ml
24. AC0000003: Anti-limestone Spray 50ml
25. TO3300002: Tool Boiler Drain Nut
1.
2.
3.
4.
7.
6.
5.
www.steamaustralia.com.au –info@steamaustralia.com.au –1300 79 50 50
6
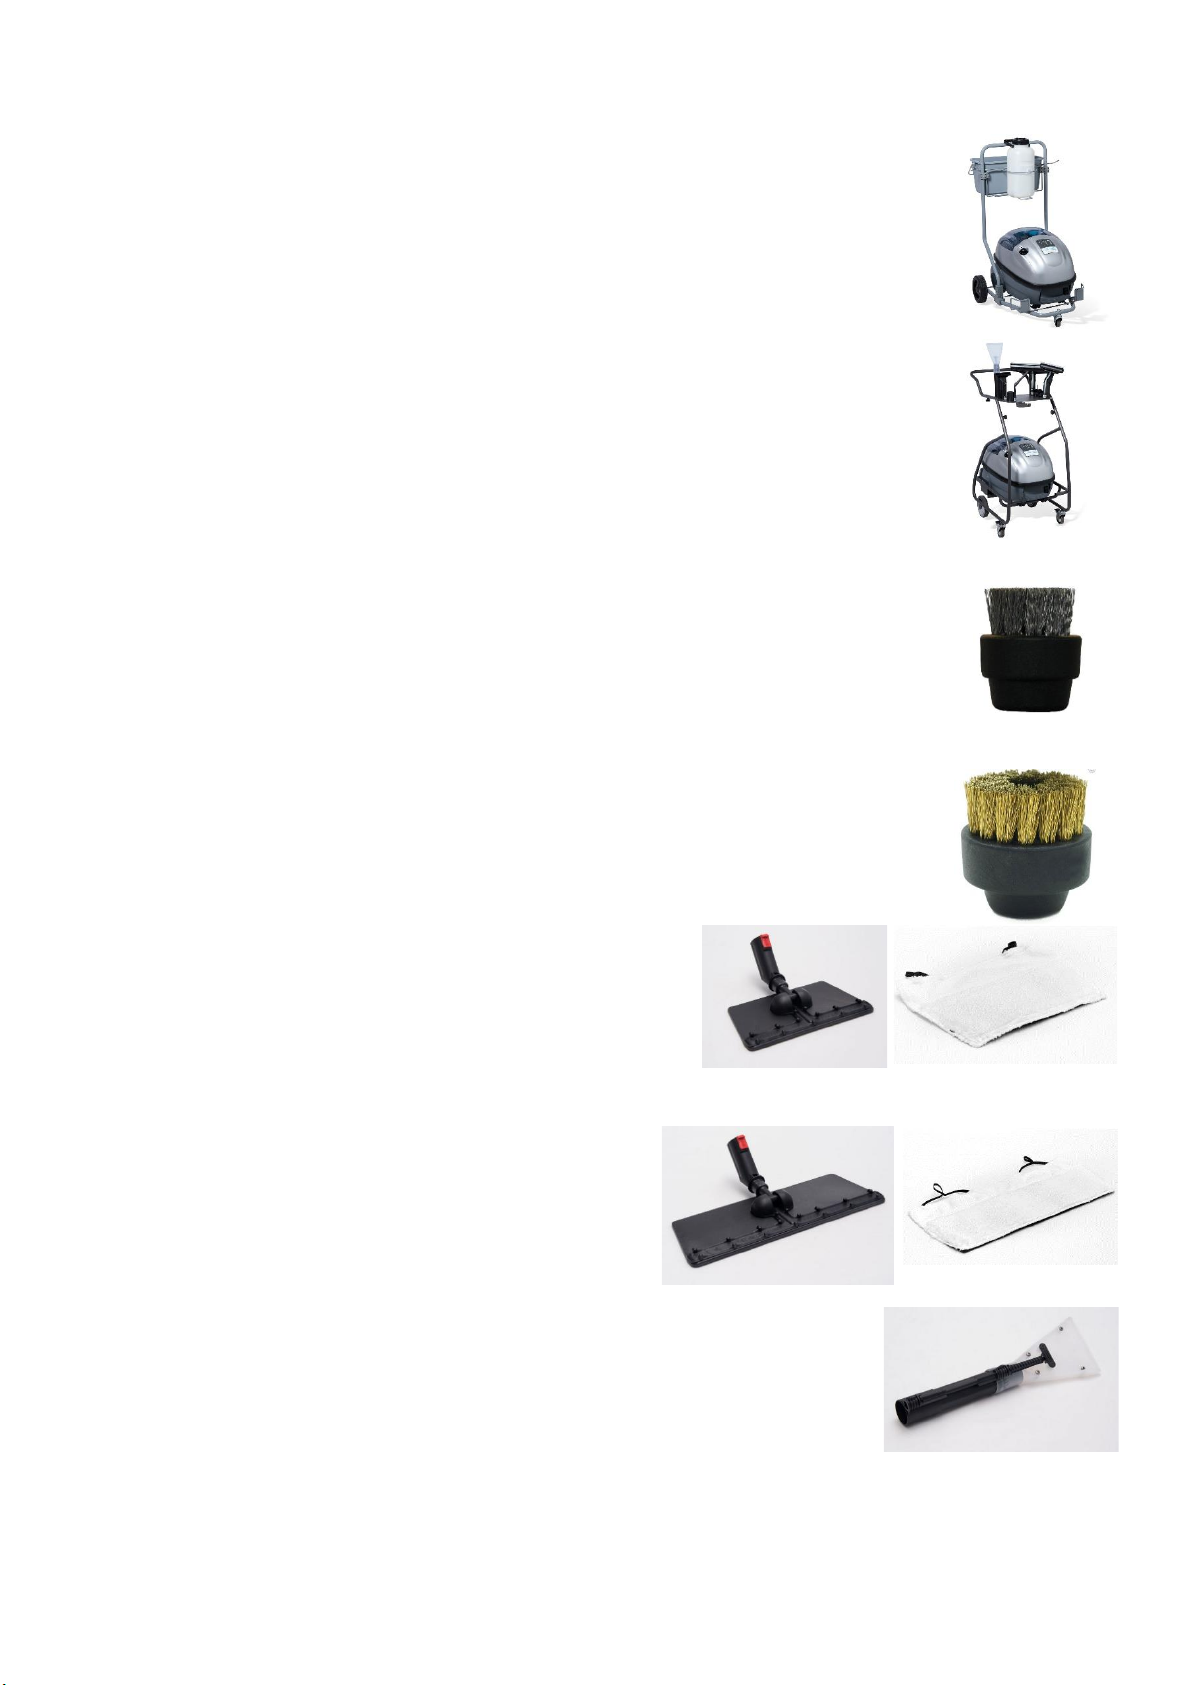
Optional Accessories
AC8000412 SV8D/W Trolley w/ 5L Water Bottle………………………………………………………………………
AC8000094: Trolley SV8D/W Skywalker Infinite Grey………………………………………………………………
AC0010023 Brush Round Stainless Steel 30mm………………………………………………………………………
AC0010020 Brush Round Brass 30mm……………………………………………………………………………………
AC8000040 Mop Head Wall 250mm +
AC0020001 Microfibre Mop Pad Wall 250mm………………………………….
AC8000016 Mop Head Floor 390mm +
AC0020002 Microfibre Mop Pad Floor 390mm………………………….
AC8000067 Upholstery Tool………………………………………………………………………………

www.steamaustralia.com.au –info@steamaustralia.com.au –1300 79 50 50
7
Before Switching On
Water Quality
It is important to ensure that only clean water is being used with your machine. Water should be free of any
sediment, detergents, oils or other contaminates. If there is any sediment or contaminates coming from your water
system filtered water should be used. Water hardness should not exceed 180 parts per million, it is recommended
that you check the water quality with your supplier. If water hardness exceeds 180 parts per million the machine
should be drained and serviced more frequently. Distilled water should never be used. If the water quality is poor
and you have no means of filter the water, you should dilute the tap water with distilled water with a 50:50 mix.
Filling with Water
Open the filler cap, place funnel into the tank's intake and slowly fill the water tank with clean tap water until the
water level reaches the top. Filling with warm water will reduce the heating time. If the water tank overflows, use a
rag to absorb the excess water sitting near the intake before replacing the filler cap. Wipe dry any spilled water
around the machine as any excess water spillage around the machine can cause electrical and/or slipping hazards if
not removed.
Attaching/Removing the Hose
Open the protective flap in front of the machine. Connect the hose by the plug end of the
hose into the plug opening of the machine. Make sure that the round red button on the
plug end of the hose is facing up (pictured), then push the plug in until it clicks. To remove
the hose press the red button and gently pull the hose plug out.
Using Your Appliance
Turning on the SV8W
Plug the cable into a wall outlet. Do NOT use a multi-outlet power-board and avoid using low-quality extension
cables. Multi-outlet power boards typically do not have the capacity to accommodate equipment rated at high-
wattage, therefore making it not suitable for use with the SV8W. If you need to use an extension cable with the
SV8W, make sure that a “heavy duty” extension cable is used.
Turn the machine on using the On/Off button located on the right corner of the protective flap. The button will light
up and the boiler should start heating up the water. If there is too little water in the
boiler, the SV8W will start pumping water from the tank into the boiler which will make
the machine vibrate for a little while. It will take approximately 6 minutes for the water
to heat up to the right temperature and for the pressure to build up to the right amount.
Once the machine is ready for use, the green “Steam Ready” indicator light will turn on.
Steam Operation
Steam levels can be selected using the red switch located on the hose handle.
Hold the red switch to toggle between 3 steam levels:
Steam Level
Display Lights
Low

www.steamaustralia.com.au –info@steamaustralia.com.au –1300 79 50 50
8
Then press the trigger to activate the steam function.
If there is no water present in the tank or the machine has used up all the water in the
tank, the “Empty Tank” light will flash red and a beeping sound can be heard.
Refill the tank with water and wait until water is boiled and the green “Steam Ready”
indicator light turns on. If topping up water after using the machine for a while, the
“Steam Ready” indicator light will turn on almost instantly and it is ready for use.
Vacuum Operation
The vacuum uses a tank that filters dirt using a water-filtered system. To operate the
vacuum, the SV8W uses a magnetic-float sensor that senses if water is present in the
vacuum tank. If there is no water, not enough water or too much water the vacuum will
not turn on and the “Check Vacuum Tank” light will flash red with a beeping sound.
Remove the transparent cover. You will see the vacuum tank covered with a blue foam
(Fig. 1). Remove the blue foam and you will see a rectangular hole in the middle (Fig. 2).
Fig. 1 Fig. 2 Fig. 3 Fig. 4
Press the white switch on the handle to turn the vacuum on.
The “Check Vacuum Tank” light will flash with a beeping sound. While the light are still
flashing, slowly fill the rectangular hole as seen on Fig. 2 with clean water while observing the
“Check Vacuum Tank” light. Once the light stops flashing, the water level in the vacuum tank
should be enough for operation.
If the “Check Vacuum Tank” light still flashes, check the magnetic float in the vacuum tank by lifting the tank up using
the handle. Remove the grey cover with the rectangular hole and tip off any remaining water. Remove the grey divider
in the tank (Fig. 3) and you will see a white float sitting in a mould within the tank (circled in Fig. 4). Pull the float out
and clean any dirt stuck to it before re-assembling all the components.
Turn the vacuum back on using the white switch on the handle, let the “Check Vacuum Tank” light flash and beep and
slowly fill the vacuum tank with clean water until the light stops flashing.
Medium
High

www.steamaustralia.com.au –info@steamaustralia.com.au –1300 79 50 50
9
Once the vacuum turns on, the vacuum levels can be toggled using the same white switch by holding on it:
Water Injection Operation
The Water Injection function only works when the steam function is active.
Water gets injected down the steam line together with steam when trigger is active.
To activate the water injection, press the blue water injection button on the hose.
The water injection light will light up on the display (fig. 1).
Fig 1. Fig 2. Fig 3.
If there is no water present in the tank or the machine has used up all the water in the tank, the “Empty Tank” light
(fig. 2) will flash red and a beeping sound can be heard.
Refill the tank with water and wait until water is boiled and the green “Steam Ready” indicator light turns on (fig. 3).
If topping up water after using the machine for a while, the “Steam Ready” indicator light will turn on almost instantly
and it is ready for use.
Note: Using the water injection continuously will quickly drain the water tank, therefore it is advised that the water
injection function is to be used only when cleaning hard to remove stained areas.
Vacuum Level
Display Lights
Low
Medium
High
www.steamaustralia.com.au –info@steamaustralia.com.au –1300 79 50 50
10
Accessories Guide
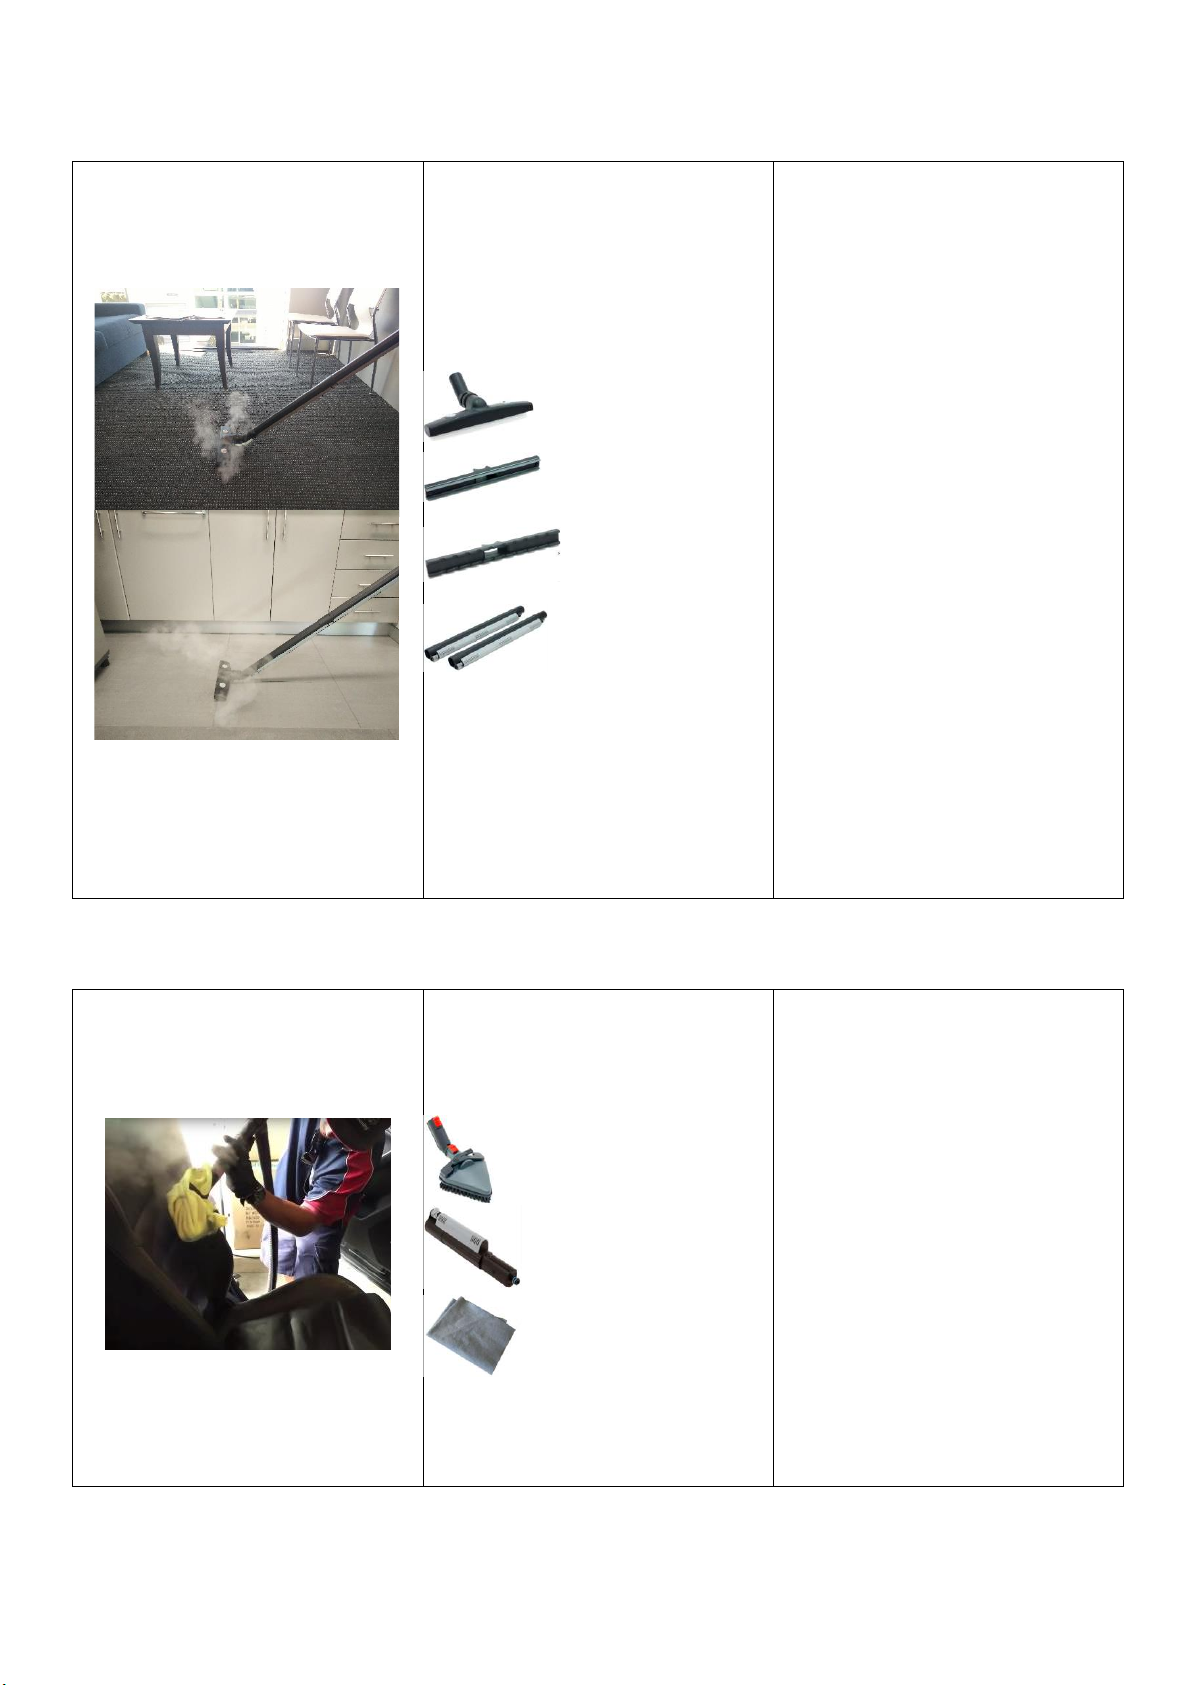
Floor Steam + Vacuum Tool
Triangular Brush (Optional Accessory)
AC8000061 Triangular Brush
S/O Red Bristles
AC8000041 Adapter S/V to
S/O
Microfibre Cloth
For cleaning skirting boards, kitchen
benchtops, underneath kitchen
cabinets, rangehoods, car interior
and other areas.
Use the brush and steam to remove
dirt on hard surfaces only.
If using on gentle upholstery
surfaces such as leather, wrap the
triangular brush with a microfibre
cloth to steam clean.
AC8000034 Floor Tool
S/V 300mm
AC8000025 Insert Dual
Squeegee 300mm
AC8000012 Insert S/V
Carpet Glider 300mm
2 x AE0000011
Extension Tube S/V
500mm
For hard floor surfaces such as:
- Tiles
- Marble
- Most sealed hardwood
- Linoleum & Vinyl
- Carpets
- Non-slip surfaces
First, use high steam pressure to lift
dirt off the floor. Then disengage
the steam and turn on the vacuum
to suck the floor dry.
When using with carpets, set steam
pressure to medium and vacuum
level to high.
www.steamaustralia.com.au –info@steamaustralia.com.au –1300 79 50 50
11
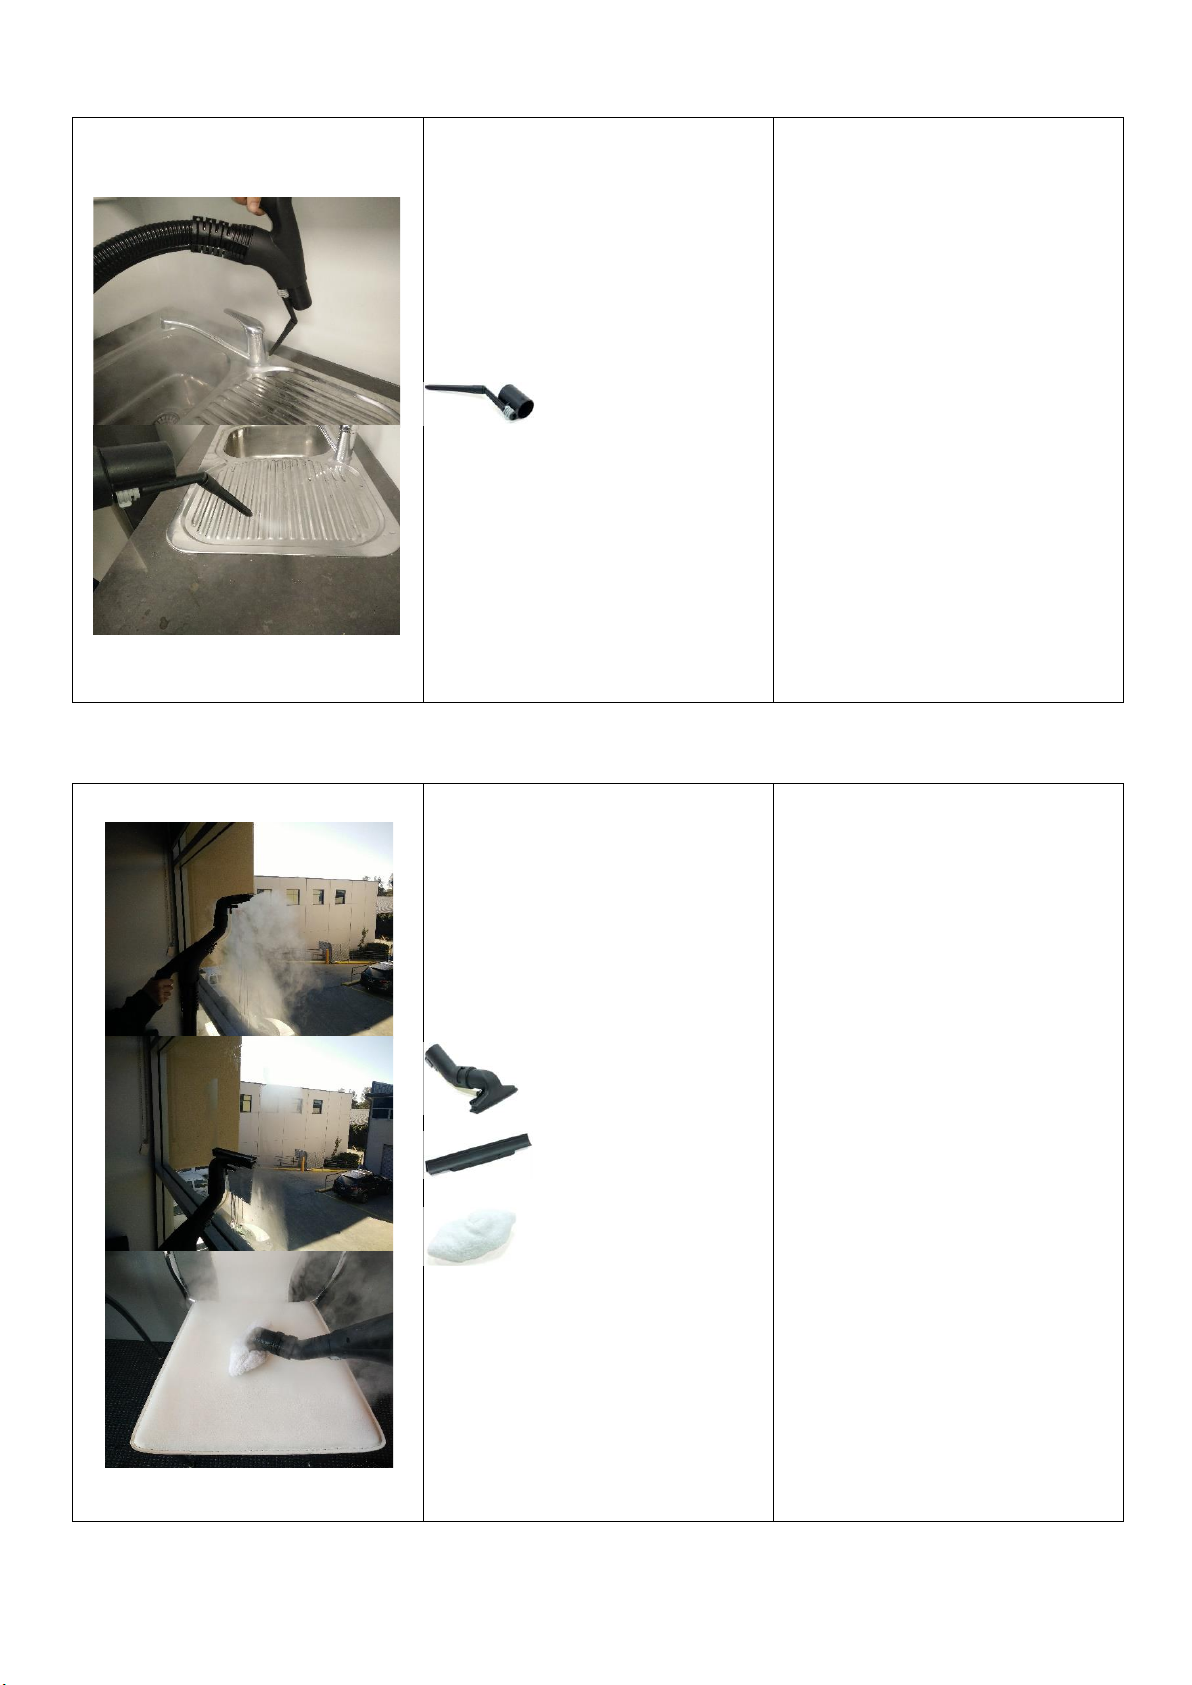
Detailing Extension
AC8000024 Nozzle Detail
w/Extension
For cleaning and sanitizing areas
such as:
- Sinks
- Toilets
- Car interior & exterior
- Hard to reach nooks & crannies
150mm S/V Head
AC8000027 Suction Tool SV
150mm
AC8000029 Insert
Window Squeegee
250mm
AC0020004 Small Sockette
150mm
As window squeegee function:
Attach the AC8000029 squeegee
insert. Spray a stream of steam in a
circular motion onto the glass
surface, then use the rubber
squeegee part to remove water
condensation and clean the surface.
Turning on the vacuum helps
sucking excess water droplets while
cleaning.
If using in areas with frosty climates,
warm the windows or mirrors by
spraying a high stream of steam for
a slightly prolonged time before
cleaning.
As flat surface cleaner:
Attach small sockette. Use medium
steam level and wipe across surface.
Suitable for doors, kitchen
benchtops and upholstery.

www.steamaustralia.com.au –info@steamaustralia.com.au –1300 79 50 50
12
S/V Detailing Nozzle + Small Nylon Brush
Floor Mop Head + Microfibre Mop Pad (Optional Accessory)
AC8000016 Mop Head Floor
390mm
AC0020002 Microfibre Mop
Pad Floor 390mm
AC8000041 Adapter S/V to
S/O
2 x AE0000011
Extension Tube S/V
500mm
For cleaning non-carpeted hard-
floor surfaces.
Use medium steam flow and move
forwards and backwards quickly
over the floor surface.
AC8000023 Nozzle S/V
Detail
2 x AE0000011
Extension Tube S/V
500mm
AC0010022 Brush Round
Nylon 30mm
Optional Accessories:
AC0010023 Brush Round
Stainless Steel 30mm
AC0010020 Brush Round
Brass 30mm
For detail cleaning in kitchens,
bathrooms and other areas:
- Tile grouts (walls and floors)
- Drains
- Cooktops
- Bathtubs
For best results, hold brush on angle
to clean sides of the grout line, and
then tilt in other direction to clean
the other side of the grout line. Turn
the water injection function on for
cleaning tougher grout stains.
Optional stainless steel and/or brass
brushes can be fitted onto the
detailing nozzle to scrub off certain
hard-to-remove stains in nooks and
crannies. Stainless steel is
particularly effective on grout.
Be wary that the stainless steel and
brass brushes may scratch certain
surfaces, leaving unwanted scratch
marks. Always test areas in an
inconspicuous spot before
proceeding.
www.steamaustralia.com.au –info@steamaustralia.com.au –1300 79 50 50
13
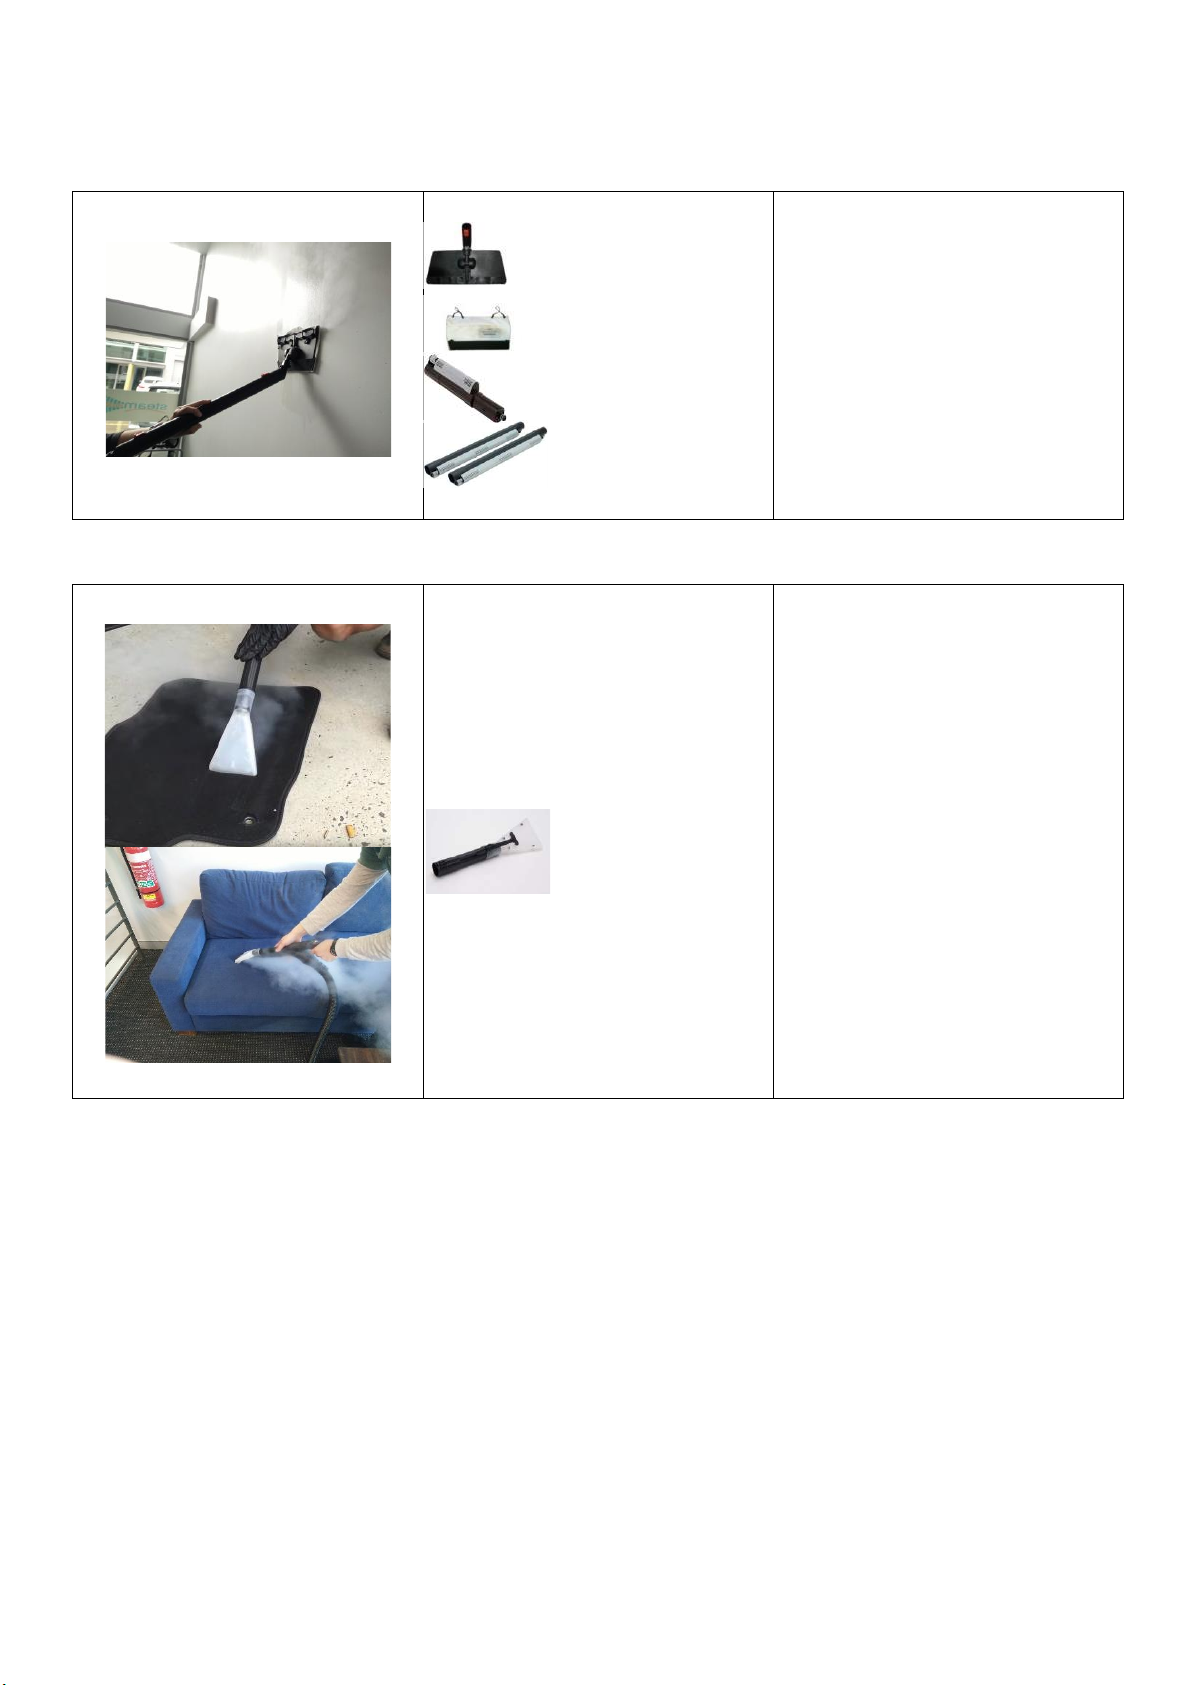
Wall Mop Head + Microfibre Mop Pad (Optional Accessory)
AC8000040 Mop Head Wall
250mm
AC0020001 Microfibre
Mop Pad Wall 250mm
AC8000041 Adapter S/V to
S/O
2 x AE0000011 Extension
Tube S/V 500mm
For hard wall surfaces and ceilings.
Used for cleaning dirt, dust and food
stains off walls. Can also be used to
sanitise walls in kitchens and other
areas.
Upholstery Tool (Optional Accessory)
AC8000067 Upholstery
Tool
For cleaning fabric upholsteries such
as sofas, office chairs, car seats and
car fabric interiors.
Best used with the water injection
function.
Engage the water injection function.
Turn vacuum on to high and steam
pressure to high. Press and hold the
trigger to let steam and water
injection out while vacuuming.
www.steamaustralia.com.au –info@steamaustralia.com.au –1300 79 50 50
14
Maintenance
Accessory Maintenance
It is recommended that you visually inspect your accessories prior to use. It is important to ensure that your hose and
accessories are all in good condition before use. You should ensure all locking clips are undamaged, the flexible hose
is in good condition and all O-rings are present. O-rings can be found on some accessories, all extensions and both
ends of the hose. If you notice steam leaking from some accessories, check the O-rings from the area where the
hose/accessories connection leaks steam. Replace the O-rings if needed.
Boiler maintenance
Water that goes through the boiler contains minerals that solidify to the insides of the boiler causing a limescale
build-up. Whenever scaling occurs, the boiler may not heat up to the correct temperature, produce excessively wet
steam or in some cases can cause damage to the machine. Preparing the water inside the water tank with the
Antical-Spray included with the machine helps prevent excessive scaling of the boiler. 1 spray of the Antical-Spray
into a full water tank is recommended each time when you're refilling the machine with clean water.
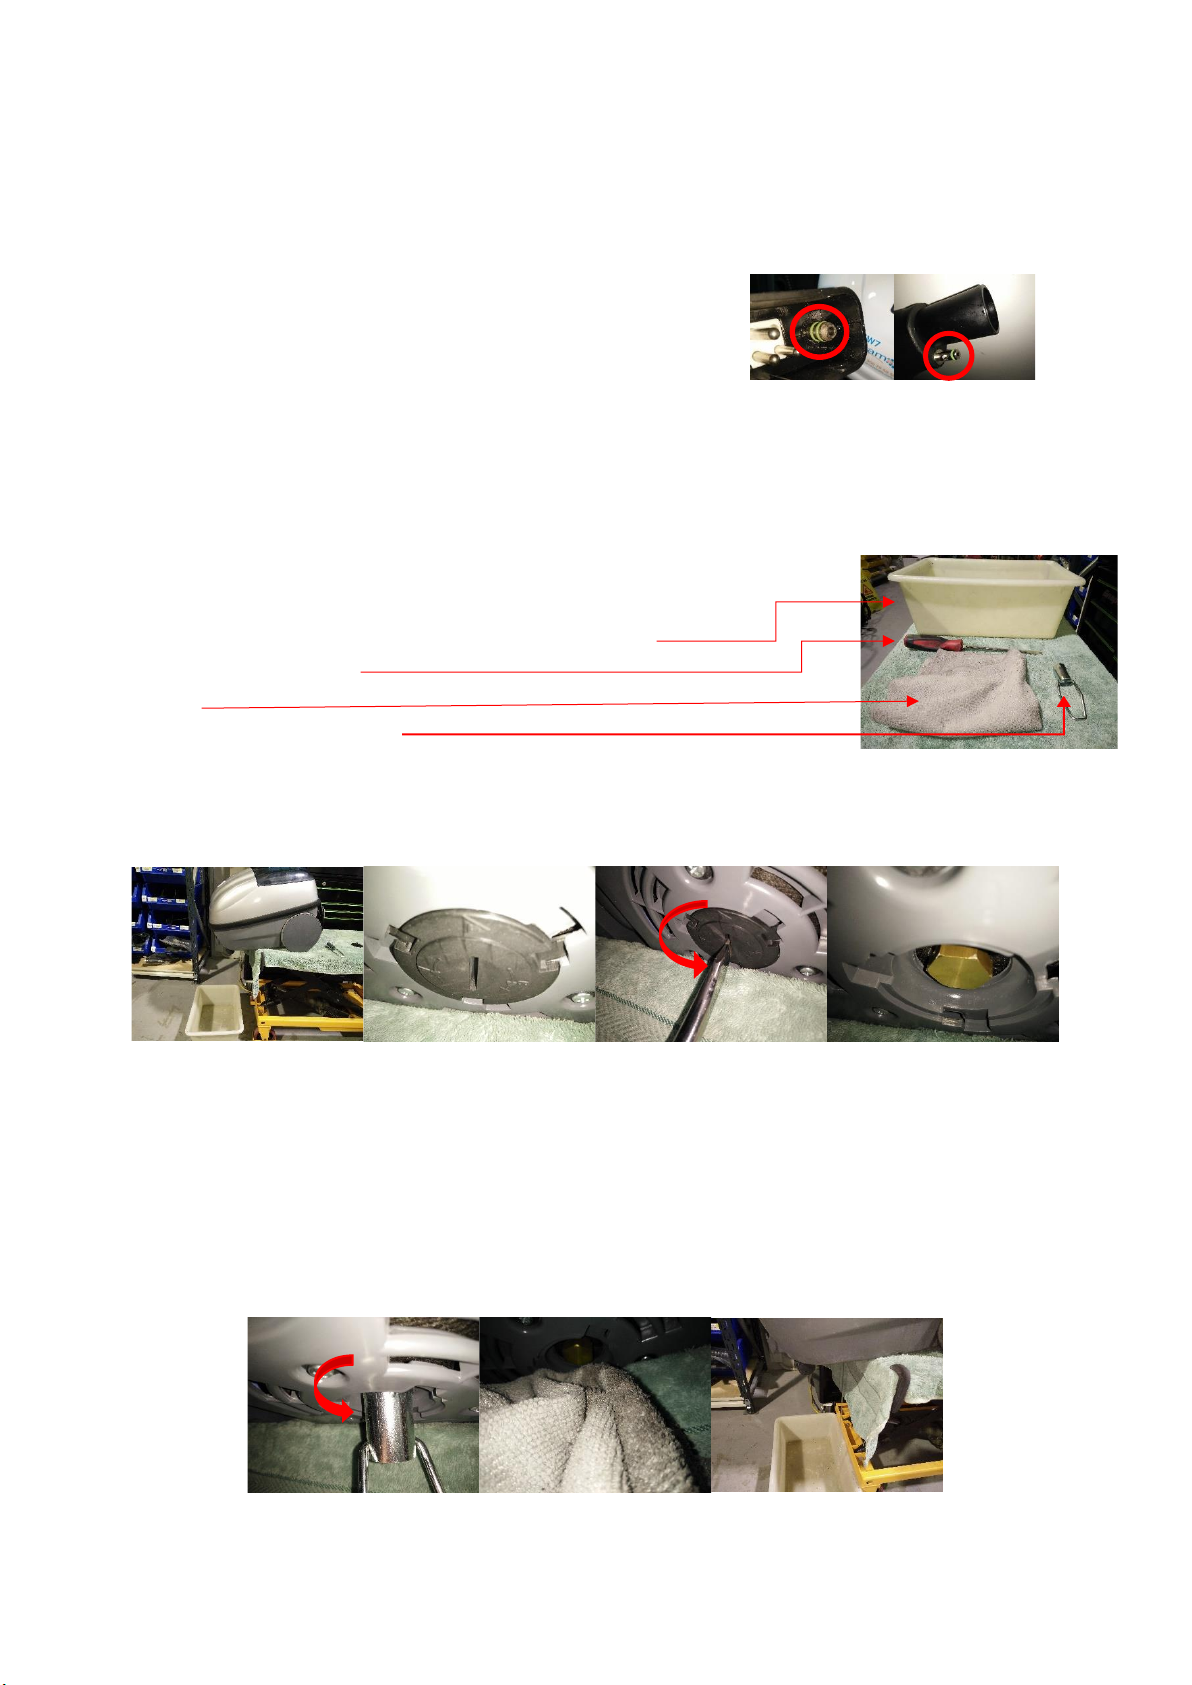
It is also best to drain the SV8W 's boiler every 1-3 months. This can be done in a few
steps. However, you will need:
•A pan or container that can hold at least 5 litres of water
•A flathead screwdriver
•A rag
•The supplied socket wrench
Make sure the machine isn't plugged into a power source. Check that the machine isn't warm. If the machine is still
warm, do NOT attempt to open the machine. Even with zero pressure the boiler may still be hot. Let the machine cool
down completely.
Fig. 1 Fig. 2 Fig. 3 Fig. 4
Once the machine has completely cooled down, move the SV8W onto an elevated platform/bench that has an opening
for you to reach the bottom part of the machine (Fig. 1). Underneath you will see a black plastic cover with a slit big
enough for a large flat-head screwdriver to fit in (Fig. 2). Use the screwdriver to remove the cover by inserting the flat-
head screwdriver into the cover’s slit and turn counter-clockwise (Fig. 3). This will expose the brass boiler plug (Fig. 4).
Prepare the pan or container by placing it underneath the SV8W to catch any water that will drain later. NOTE: To
avoid damaging the SV8W by losing balance off the platform, hold the top handle with your free hand or strap the
machine onto the platform.
Fig. 5 Fig. 6 Fig. 7

www.steamaustralia.com.au –info@steamaustralia.com.au –1300 79 50 50
15
Use the supplied socket wrench and unscrew the boiler plug by turning counter-clockwise (Fig. 5). Once you have
loosened the boiler plug a little, you can wrap the boiler plug with a rag and unscrew it by hand until it comes off (Fig.
6). Using a rag is optional, however wrapping the boiler plug with a rag decreases the chances of hurting yourself while
increasing the grip. Water should drain out and depending on how old or how often you use the machine, there may
be sediments and/or limescales that drains out with the water (Fig. 7). As water drains out, you can give the machine
a little shake to remove excess sediments or limescales that may be trapped in the nooks of the boiler.
Once all the water has drained out completely, replace the brass boiler plug by tightening using the supplied socket
wrench, and replace the black plastic cover.
Servicing
It is recommended that your machine be serviced by an authorised service agent every 12 months. More frequent
servicing is recommended if the machine is used frequently, particularly in areas with hard water, or if the boiler has
been subjected to contaminated water.
The SV8W may present certain symptoms depending on age, water quality or rough use. Usually a visual inspection is
adequate to determine and rectify any abnormal symptoms.
1. Steam leaking from hose plug/accessories
Check the O-rings from the area where the hose/accessories connection leaks steam. Replace the O-rings if
needed. Replacement O-rings suitable for use with the machine are supplied by Steam Australia and
participating authorised service agents.
2. Drop in steam pressure at all steam level settings
Follow the steps in “Boiler Maintenance” to drain the boiler. If problem persists, contact your local
authorised service agents.
If you are unsure about any symptoms you should stop use of the steam cleaner and contact Steam Australia or your
local authorised repair agent.
Warranty
Warranty Terms and Conditions
Steam Australia warrants that the products and services it provides are free from defective design, materials and
workmanship and are fit for the purpose they are intended for a period of 12 months for machines, 24 months for
boilers and 3 months for service, repair and spare parts.
Note: Warranty does not cover damage resulting from fair wear and tear, misuse including the use of incorrect
accessories or consumables, wilful damage, use beyond specification or design, unauthorised alterations or additions.
This includes addition of chemical or distilled water to the water tank, snapped accessories due to excessive force,
damaged or missing power plug pins etc.
Warranty is decided by Steam Australia at its sole discretion.
Making a Warranty Claim
If you are experiencing issues with your machine your machine must be returned to an authorised repairer or place of
purchase. If you are unsure where to take your machine, please contact Steam Australia for assistance.
Other manuals for SV8W
1
Table of contents
Other Steam Australia Vacuum Cleaner manuals


