ORFELD YD-578 User manual

IMPORTANT: Read before using.
www.orfeldtech.com
Model No.: YD-578
Cordless Vacuum Cleaner
Tire Inflator LED Lights
Measuring Tire Pressure
USER MANUAL
Multifunctional Car Vacuum Cleaner

User Manual
Contents
Chapter 1: Product Specification....................................................................................1
Chapter 2: Product And Functions ................................................................................ 2
Chapter 3: Charging Instructions....................................................................................3
Chapter 4: Vacuum Cleaner Mode ................................................................................3
Chapter 5:Tire Inflator Mode ..........................................................................................5
Chapter 6:Precautions ................................................................................................... 6
Chapter 7:Troubleshooting ............................................................................................. 7
Chapter 8: Service Information.......................................................................................8

Charge Time:
Adapter:About 4.5h
USB Cable:About 8h
About:15min
HEPA Fliter*1
AC Adapter*1
USB Cable*1
Brush Tool*1 Hose*1
Crevice Tool*1
Inflation Accessories*3
Air Hose*1
Product
Product Specification
Brush*1
Product Name
Voltage:
Battery CapacityProduct Weight
Model No. YD-578
Multifunctional
Vacuum Cleaner
Light Led
Rating Power:
Suction
Capacity:
About:6 Kpa
Product
Dimension:
1.1 kg
Air Flow
393x136x114mm
Rate Rurrent
2000mAh*3
35L/min
Work Time
Accessories
11.1V
70W
0.6L 10A
1
Rated Voltage: DC12.6V,450mA
100-240V AC,50-60Hz
0.2A Max
Output Voltage:

Charging Interface
Digital Display Pressure Gauge
Inflator Air Valve
Power Switch
LED Light Switch
Dust Cup
LED Light
Shut Down Mode Tire Inflator Mode
STEP 1 STEP 2
PRESS
PUSH
PUSH
LED Mode
PRESS
Center
Front
DOWN
Product And Functions
Connection Buckle
Vaccum Cleaner Mode
2

Instructions for Use (when used as a vacuum cleaner)
Instructions for Use of Accessories
1.(Brush Tool)2.(Crevice Tool)3.(Hose)
When charging with AC adapter Use USB port for charging
(At home or hotel) (At home or car or hotel)
Product Charge
:
Provides 2 modes of charging:
It is in Charging Mode when the indicator light is red.
It is fully charged when the indicator light changes to green.
Reference: AC: Adapter: about 4.5h, USB: Charging: about 8h
Attention: In order to prevent the machine from heating up and not gaining a full charge,
Please allow the machine to cool for 15 minutes prior to charging.
1.Connect the charger and fully charge the battery
2.Connect the corresponding accessories according to the occasion of use
(see the instructions for use of the accessories )
3. To operate vacuum, push "Power" switch forward.
1.Brush Tool:Combining the function of suction and wiping is suitable for
cleaning various areas including cushions, fabric foot pads, air outlets,
and other hard-to-reach areas.
2.Crevice Tool:Suitable for cleaning dust and small debris from doors, seats, and ashtrays.
3.Hose: Can flexibly match with all attachable accessories to clean up every corner.
3

Disassembly & Cleaning
1. Use your finger to press the button in the direction of arrow 1,
and use the other hand to rotate the dust cup out ( Figure 1)
2. Take out the HEPA in the dust cup and install it in the direction of the arrow (Figure 2)
3. Discard the garbage in the dust cup. The garbage on the HEPA can be cleaned
with a brush (included).
If HEPA and the dust cup are dirty,please rinse with clean water.
The HEPA must be fully dried before using if washed.(Figure 3)
Figure 1
Figure 2
Figure 4
Assemble: Align the HEPA filter with the dust cup according to the shape,
and reinstall it in the direction of the arrow,After the HEPA is installed to the end,
put the entire dust box back into the body in the reverse direction of disassembly,
When you hear a "snap", it means the installation is complete. (Figure 4)
Figure 3
4

Inflation tube connection diagram
Instructions For Use (when used as an Tire Inflator)
Figure 5
How to use the digital display table:
: Press once to turn on the LED display,
Afterward, every press on the R can switch the unit between kg / m2,
PSI, BAR, KPA
: Decrease tire pressure
: Increase tire pressure
NOTICE: When the number flashes 3 times on the LED Screen,
the tire pressure value will switch back to the current value of the machine in real-time
Note:Before using, please make sure that the battery has sufficient power.
When measuring tire pressure:
1, Make sure the hose is connected according to Figure 5 (above).
2, Pressing the " " key, the LED screen will immediately display the tire pressure.
Tire Inflator Mode
1. Put the machine switch in the middle position (Shut down mode).
2. According to the above picture, connect one end of the inflation tube to the machine
and one end to the tire.
3. Press the key, the LED screen will turn on, and the current tire pressure will
be displayed.
Continue to press the key to adjust the unit: kg / m2, PSI, BAR, KPA
4. Press the key or key to adjust the preset tire pressure.
(Suggestion: Summer: 2.3 kg / cm2; Winter: 2.5 kg / cm2)
LED flashes 3 times, the preset tire pressure value is saved
To start the air pump, push the "Power" switch. The pump will automatically stop
when it reaches the desired value you previously set.
This will also turn off the LED screen
Attention: Please do not operate the air pump more than 10 minutes continuously
to prevent overheating.
5

Precautions:
1.Before using the air pump for the first time, please read the manual carefully.
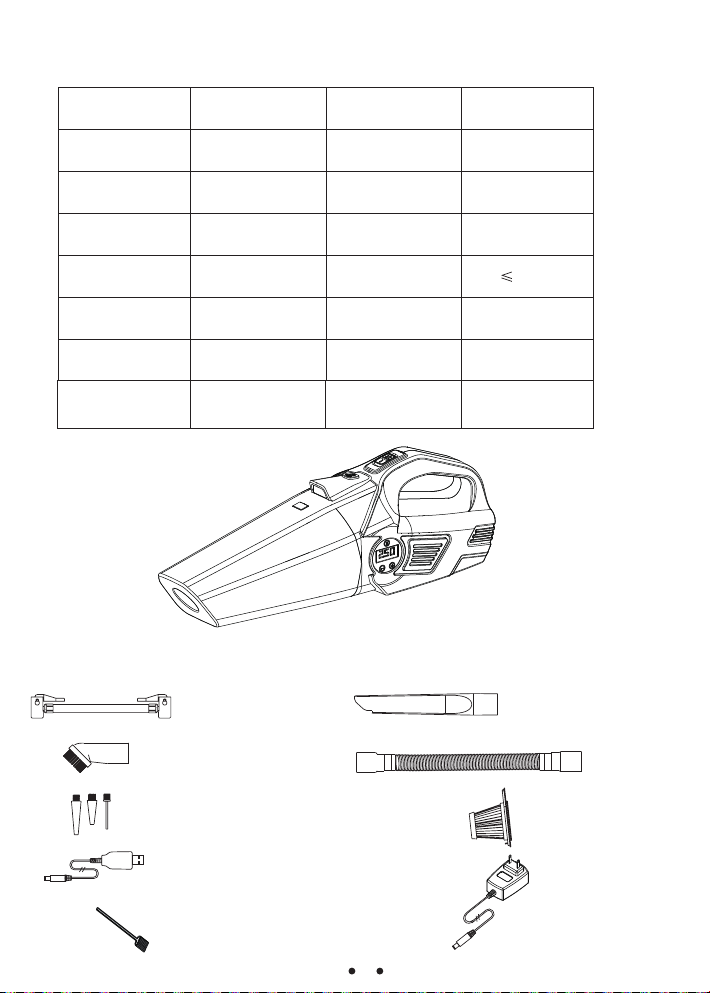
Confirm all pieces are present and also check for any damage (switch, wires...)
2.Do not expose air pump to moisture, drops or sediment intrusion. The machine is not a toy
and children should not operate unless under close supervision of an adult.
3.Please read the instruction manual of this machine carefully, and use the original spare parts
of our company.
4.If the vacuum does not arrive with a filter, please contact us to obtain a filter prior to first use.
Operation without a filter will damage the product.
5.Using this machine to clean up liquid substances, combustibles, cooled ash or other
hazards may result in damage to the machine or even fire.
6.Any unauthorized disassembly of the machine will void the warranty and may cause injury or
product failure.
7.If the machine is damaged or partially damaged, do not use it.
8.This machine is not suitable for tire inflation of vehicles over 14000 lbs.
9.Do not operate near flammable liquids or gases, near sparks or open flame,
explosive objects or liquids...
10.When used for car inflation, the machine will heat up after about 10 minutes of continuous use.
It is recommended to cool down before using it for 15 minutes.
This will extend the life of the machine.
11.When inflating a tire with this machine, do not leave it unattended, paying attention
to pressure changes. Use caution to not over-inflate.
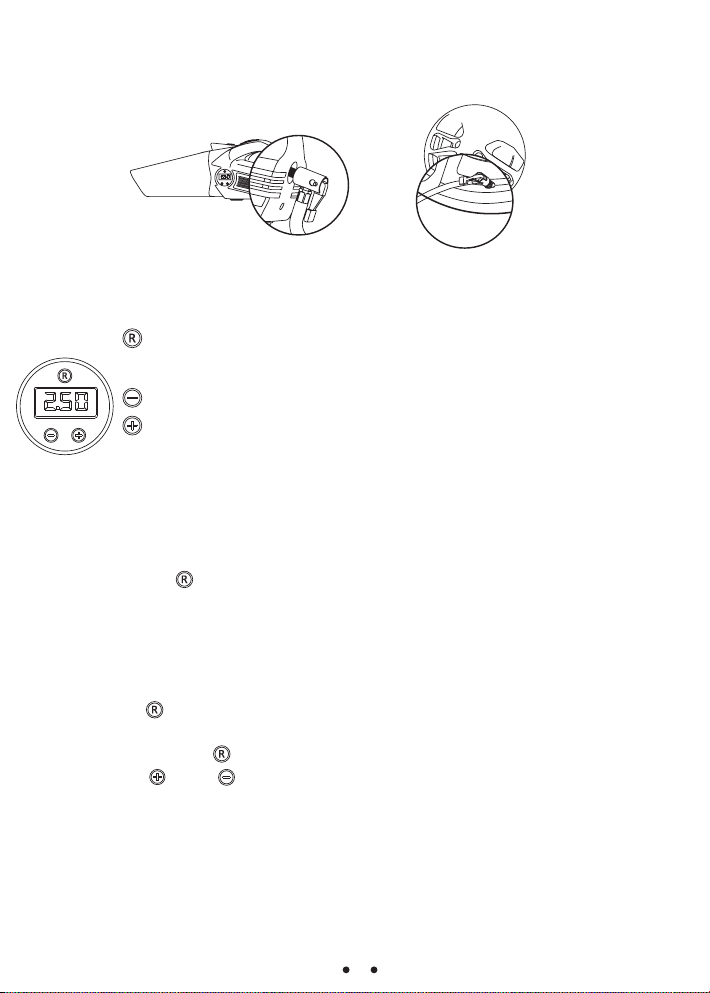
12.After using the air nozzle, return the lever to the straight position to avoid a lack of
internal rubber elasticity.
13.Always re-charge to full after using this machine.
14.Please allow the machine to cool for 15 minutes prior to charging.
6

Troubleshooting Possible Reason Approach
The motor does
not rotate
or stops during
inflation
Low battery Charge the machine
The machine continues
to work for a long time,
the internal hest,
Start internal temperature
portection program
Naturally cool the machine for
about 15 minutes before use
Reduced suction
HEPA filter is covered with dust
The suction line is blocked
HEPA filter damp
Battery is low
Leakage in the inflation line
There are foreign objects
in the inflation pipe Check for foreign objects in the joint pipe
Check if the adapter is plugged in properly
USB adapter:
replace the adapter iarger than 1A
The output current of the USB
adapter is insufficient
Charger damaged
Internal temperature too high
No power the
charger shows
agreen light
Charging indicator
does not light
or flashing
Check the port and recinnectThe wire is not in full contact
Please let the machine set and cool for 15 minutes.
After that it should begin charging
Please contact the after-sales treatment in time
Adapter is not plugged into place
Slow inflation
Check whether the joint is connected
correctly and the tire is lesking
Charge the machine
Sun/air-dry the HEPA filter or new HEPA
Clean up the dust attached to the vacuum pipe
Clean or replace the HEPA filter
7

Shenzhen Xiaosi Technology Co., Ltd.
ADD: 5A17,Bldg B,WePark,Road 1,China South City,Pinghu,Longgang,
Shenzhen,China
MADE IN CHINA
Facebook
Website
Instagram
Twitter
8
www.orfeldtech.com
Table of contents
Other ORFELD Vacuum Cleaner manuals