SteamandGo SAGS3 User manual

1
GARMENT STEAMER
INSTRUCTION MANUAL
MODEL NO.: SAGS3
PLEASE READ ALLINSTRUCTION CAREFULLY BEFORE USI

2

3
Dear customer:
Thanks for choosing our garment steamer. For your convenience of operating the steamer
correctly, please read the instructions carefully before operation.
(No further notice in case of changing of technical parameter)
The picture is only for reference.
Catalogue
Brief introduction ---------------------------------------------------------2
Safety reminder---------------------------------------------------------3
Accessory Drawings-----------------------------------------------------4—5
Installation of operation --------------------------------------------------------6—7
Installation of the clothes rack--------------------------------------------8
Method of steaming---------------------------------------------------------9
Excrete the remaining water in the machine----------------------------10
Maintenance and descaling operation------------------------------------10
Storage--------------------------------------------------------------------------11
Please read the user manual carefully before operation and keep it for future consulting.

4
Brief introduction
As a high-grade ironing appliance, the product is applicable to such places as home, hotel.
It has compact and light weight design, save storage space. It provides massive high
temperature steam, can easily remove wrinkles in short time. It heats up just in short time.
Large water tank can steam 40 minutes continuously.
Inspection should be made before operation
Get rid of blockage if it exists in the steam pipe and inlet & outlet water pipe. If the power
line has been damaged, instead of taking apart on your own, make the repair or
replacement at a specified maintenance point or by a professional.
I Feature
·1300W high-power, 35S rapid steam generation and heating
·1400ml large capacity water tank, to meet the ironing demand for a long time
·98 ℃high temperature steam, remove wrinkle, does not hurt the clothes
·Intelligent temperature controller, quality fuse, automatic overheat protection without
water, safe and reliable
·3 section telescopic pole design, free to adjust the height
·360-degree rotating racks can be folded, easy for storage
·At the bottom of the drain valve, drain directly, easy to operate
II Thermostat
Thermostat fixed on the heater controls it operating in a safe range of temperature and
prevents danger caused by high temperature effectively.
III Thermal fuse
The thermal fuse will be burned out when temperature of heater rises too high which
prevent danger automatically.
Warning:
Steam pipe nozzle should not be too low, otherwise it will lead to noise and small steam; if
the power line is damaged, in order to avoid danger, it must be maintained or replaced in
designated maintenance points specified by our company instead of replacing it by users.
No electricity during water injection and cleaning period.

5
Safety reminder
·Don’t use the product before reading the instructions.
·Careful with hot condensed water from steam vent before operation.
·Move vertically to avoid plane ironing which can lead to spray head’s spraying.
·Don’t put it (or be exposed to) in water or liquid.
·Operate the machine with care and keep it away from children
·Don’t add hot water into the water tank, which can cause the deformation of the water
tank.
·Pay attention to the safety of plug, socket and power and don’t pull or draw the plug.
·Don’t let the plug touch the heating part and store it after the body cools down and water
has been drained.
·Drain off the water and pull out the plug for the long-term idling.
·Notify professionals for maintenance in case of part damage. Incorrect maintenance may
cause injury, fire alarm and electric shock.
·Don’t touch heat-emitting place or steam spray head. Pour the excess water carefully to
avoid injury.
·Let the body cool down after operation
·Pull out the plug when the machine is not in use
·Do not pull out the steam pipe during operation.
·If the power line is damaged, make the replacement at the maintenance point.
·Don’t start power first and add water later to avoid dry burning.
·The product is subject to indoor operation.
·To avoid danger the product is not suitable for children and the disabled.
·This appliance is not intended for use by persons(including children) with reduced
physical, sensory or mental capabilities, or lack of experience and knowledge, unless they
have been given supervision or instruction concerning use of the appliance by a person
responsible for their safety.
·Children should be supervised to ensure that they do not play with the appliance,
·If the supply cord is damaged, it must be replaced by the manufacturer, its service agent
or similarly qualified persons in order to avoid a hazard.
·Care should be taken when using the appliance due to the emission of steam.
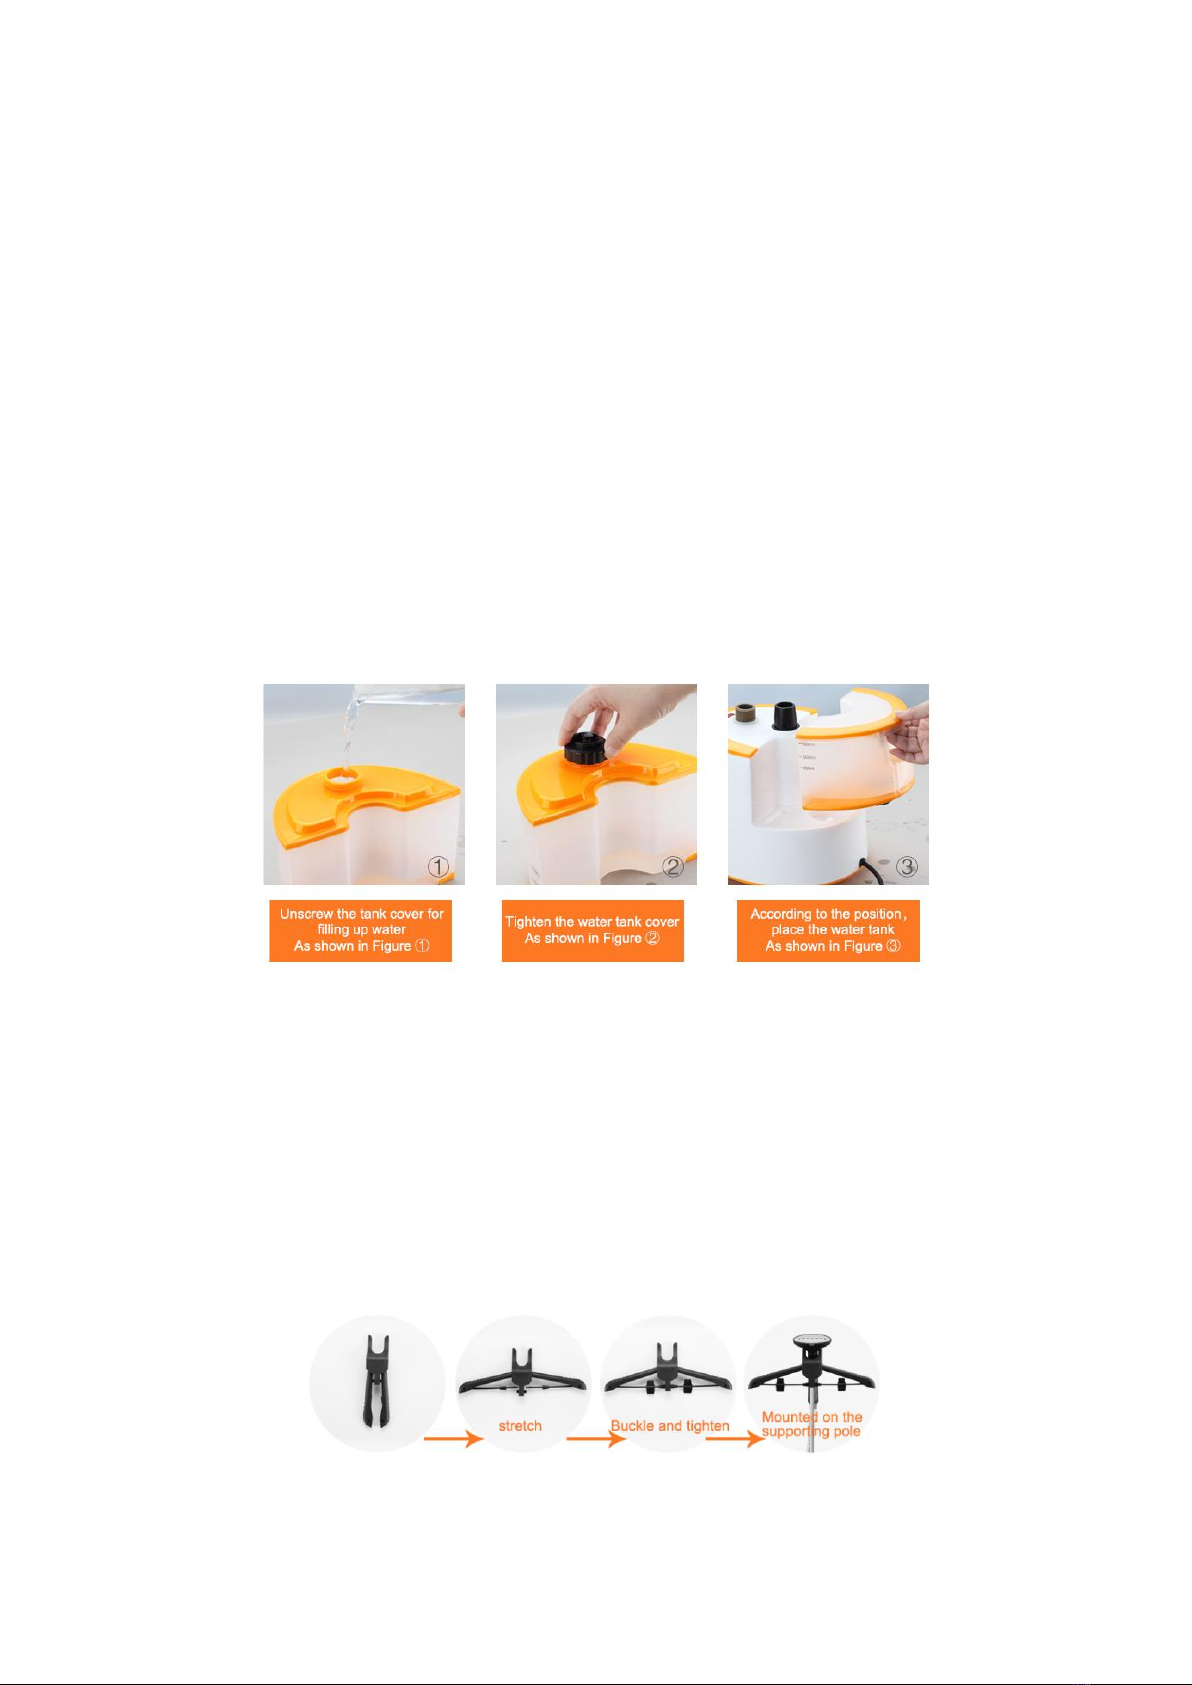
·Unplug the appliance during filling and cleaning.

6
Accessory schematic diagram
Part number
Name
1
Main body
2
Water tank
3
Steam pipe
4
Spray head
5
Fabric brush
6
Hanger with hook
7
Supporting pole
8
Trousers clamp

7
Accessory schematic diagram
Part number
Name
9
Switch
10
Boiler
11
Steam pipe connector
12
Supporting pole hole
13
Drainage cap
14
Base

8
Installation and operation
1、Install two pieces of base on the bottom of the machine by driving two screws. It
provides stability of the machine.
2、Insert the supporting pole into the body, and then screw it up with the knob.
3、Unfold the supporting poles to the proper height and fix them.
4、Place the hanger with hook on the top of the supporting pole, and unfold the hanger.
5、Insert the head of the steam pipe into the sheath, and screw it up according to the
drawing direction .
6、Turn on the power, turn the switch to the ‘1’ level and the indication light will be on, and
wait for the steam. Turn the switch to “0”, then the steamer turns off. Unplug the plug while
it is unused.
Spray head
Foldable hanger
Upper pole
Central pole
Lower pole
Switch
Buckle button
Steam pipe cover
Steam pipe sheath

9

10
Instructions of operation
1:Please make sure the power switch is off before start working.
2:Take out the water tank,turn off the tank nut on the bottom, fill the water into the
tank(see picture 1), then tighten the nut(see picture 2). Pay attention to that only can fill
cold water, not hot water. In order to extend the life of the machine, we suggest that you
may use the water that does not contain minerals or distilled water. Put back the water
tank, and make sure that the position is installed correctly. (see picture 3)
3: Connect the plug with the power socket.
4:Turn on the switch, the steamer starts to work when the power indicator is turned on,
steam will come out from the spray head in short time.
5: Turn off the switch after finishing steaming, the power indicator will be turned off, the
machine stops working. Disconnect the plug from the power socket.
Usage of two clamps
Two clamps can fix shirts, or trousers etc.
Installation of the hanger with hook.
Firstly, unfold the hanger and buckle up the two small poles to the middle to form the
hanger shape. Place the two small clamps on the small poles. Then attach the hanger to
the top of the supporting pole. Then place the spray head on the hook.

11
Method of Steaming:
1: The effect of high temperature steam is to soften clothes fiber. If only rely on the steam
from the spray head is hard to steam clothes smoothly. Gently pull the clothes surface flat
and use the steam to soften clothes fiber is the key to steam the clothes.
2: Attach the spray head to the clothes surface closely, move the spray head up and down
gently. Steam the area you need, meanwhile fix the clothes surface flat and smooth by
pulling.
3: Hold the side of clothes when steaming the bottom of clothes. Steam up and down,
right and left. Be careful of the steam from the spray head. Wearing a glove is
recommended.
4: Press the spray head a bit harder down on the collar, keep the spray head on the collar
a little longer.
5: The same way to steam the sleeve like steaming the collar.
6: Then steam the other side.

12
Excrete the remaining water in the machine
In order to avoid that the user not to use the garment steamer for long time, the water
inside will go bad, or provide environment for bacteria to grow. So, there is a drainage cap
on the bottom, you can excrete redundant water after turn off the cap. To avoid the water
come out from the outlet when using next time, please tighten the cap after the water is
out.
Maintenance and descaling operation
Water contains mineral substance, which can result in sediment accumulation in the
appliance and impact the heating efficiency and spurt of steam. The sediments shall be
often cleaned and removed (warm tip: please do the descaling operation once a week if
using frequently). The following ways are suggested for descaling:
1: Firstly, turn off the power switch and pull up the plug so as to make this machine
complete cooling.
2: Make sure the appliance is completely cool. Take the appliance outdoor, as the water
will come out from the appliance. Then open the drainage cap on the bottom of the
appliance (see picture), place a full filled water tank on the appliance, so the water will
flush the boiler and take out the sediment out. If the sediments are not completely cleaned,
repeat above process until the boiler is cleaned.
3: If anything blocks the steamer output, do not use the appliance until the output is
cleaned. The blockage may increase the pressure inside of the appliance. Use small
pincers or other suitable tools to take the blockage out.

13
Storage
1: Please make the telescopic pole to the shortest, then remove the hose and put it aside.
2: Take the water tank, and pour out remaining water and clean up, then put back.
3: Please open the drainage cap on the bottom and pour out remaining water.
4: Clean the hose joint with clean water, make the hose around on the telescopic pole. Put
the spray head on the hook.
5: Put the machine in a dry place

14
Trouble-shooting
Facts
Reason
Solution
Out of work
completely
1.Electrical fault;
2. Attaching plug gets loose;
3.Fuse burns out;
4.Power light doesn’t work
Check and maintain by
professional staff
Big noise inside the
steam pipe with little
steam out
steam pipe gets bended under
horizontal level
Raise up steam pipe to let
condensate water backflow into
the machine
Spray head leakage
1.Spray head fracture
2. Operate flatwise
1.Replace spray head
2.Move the spray head up and
down vertically
Leakage in steam pipe
joint
1.Sealing ring aging
2. Linking joint looses
1. Replace sealing ring
2.Frap linking joint of steam pipe
Water in tank outflow
Tank fractures or has holes
Replace the tank
Hot water generates
inside the tank
Water pipe blocked
Eliminate the dirt or blockage
Steam is too small
1. voltage low
2. pipeline blocked by scale
1.Assemble voltage stabilizer
2.Eliminate the dirt or blockage
Tank deformation
1. Hot water added into the water
tank.
2. Other chemical added into the
water tank.
1. Use continually
2.Replace the tank
Power light works but
no steam comes out
1. Steam generator burns out
2.Inside components fail.
Check and maintain by
professional staff

15
Parameters:
Rated voltage:110V Steam discharge:35g/min
Rated Frequency:50/60Hz Height of whole machine:155cm
Output power:1300W Length of supporting pole:120cm
Water tank capacity:1.4L Steam pipe length:145cm
Packing list
NO.
Parts
Quantity
No.
Parts
Quantity
1
Body
1
7
Clamp
2
2
Water tank
1
8
Instruction
Manual
1
3
Spray head
1
9
Warranty
Card
1
4
Supporting
pole
1
10
glove
1
5
Hanger with
hook
1
11
Base
1
6
Fabric Brush
1
12
Screws for
the base
2
Table of contents
Other SteamandGo Steam Cleaner manuals