manuals.online logo
Brands
  1. Home
  2. •
  3. Brands
  4. •
  5. Steamist
  6. •
  7. Plumbing Product
  8. •
  9. Steamist BLSH Service manual

Steamist BLSH Service manual

Tile/Stone and the Bilateral Steam Head.
12. Apply Silicone Sealant between the Tile/Stone and the
outer edge of the Bilateral Steam Head (See Figure 5).
NOTE: Make sure there are absolutely no air gaps
between the outer edges of the Bilateral Steam Head and
the final wall material. If air gaps are left, steam will leak
between wall construction and cause water damage to
foundation.
13. Insert Front Face Cover (from step #8) back into the
Bilateral Steam Head. Push it in until it makes contact with
the wall.
14. Apply dabs of Silicone Sealant between the Left and
Right edges of the Front Face Cover and the wall
Tile/Stone to make sure the Cover does not slide out.
Installation Instructions
IMPORTANT: To use the Bilateral Steam Head, make sure the
steam room wall studs are exposed to allow for proper installation. If
the walls are fully finished and studs are not accessible, please use
a different type steam head, model# 3199.
NOTE: For maximum comfort the Bilateral Steam Head should
always be located as far from the seating area as possible.
1. The Bilateral Steam Head location should be 12" to 18" above
the shower floor or 6" above the rim of the bathtub, as far from the
seating area as possible. Do NOT install the steam head directly
below the temperature/user control. For optimum performance,
install the steam head on the wall opposite or adjacent and as far as
possible from the temperature/user control.
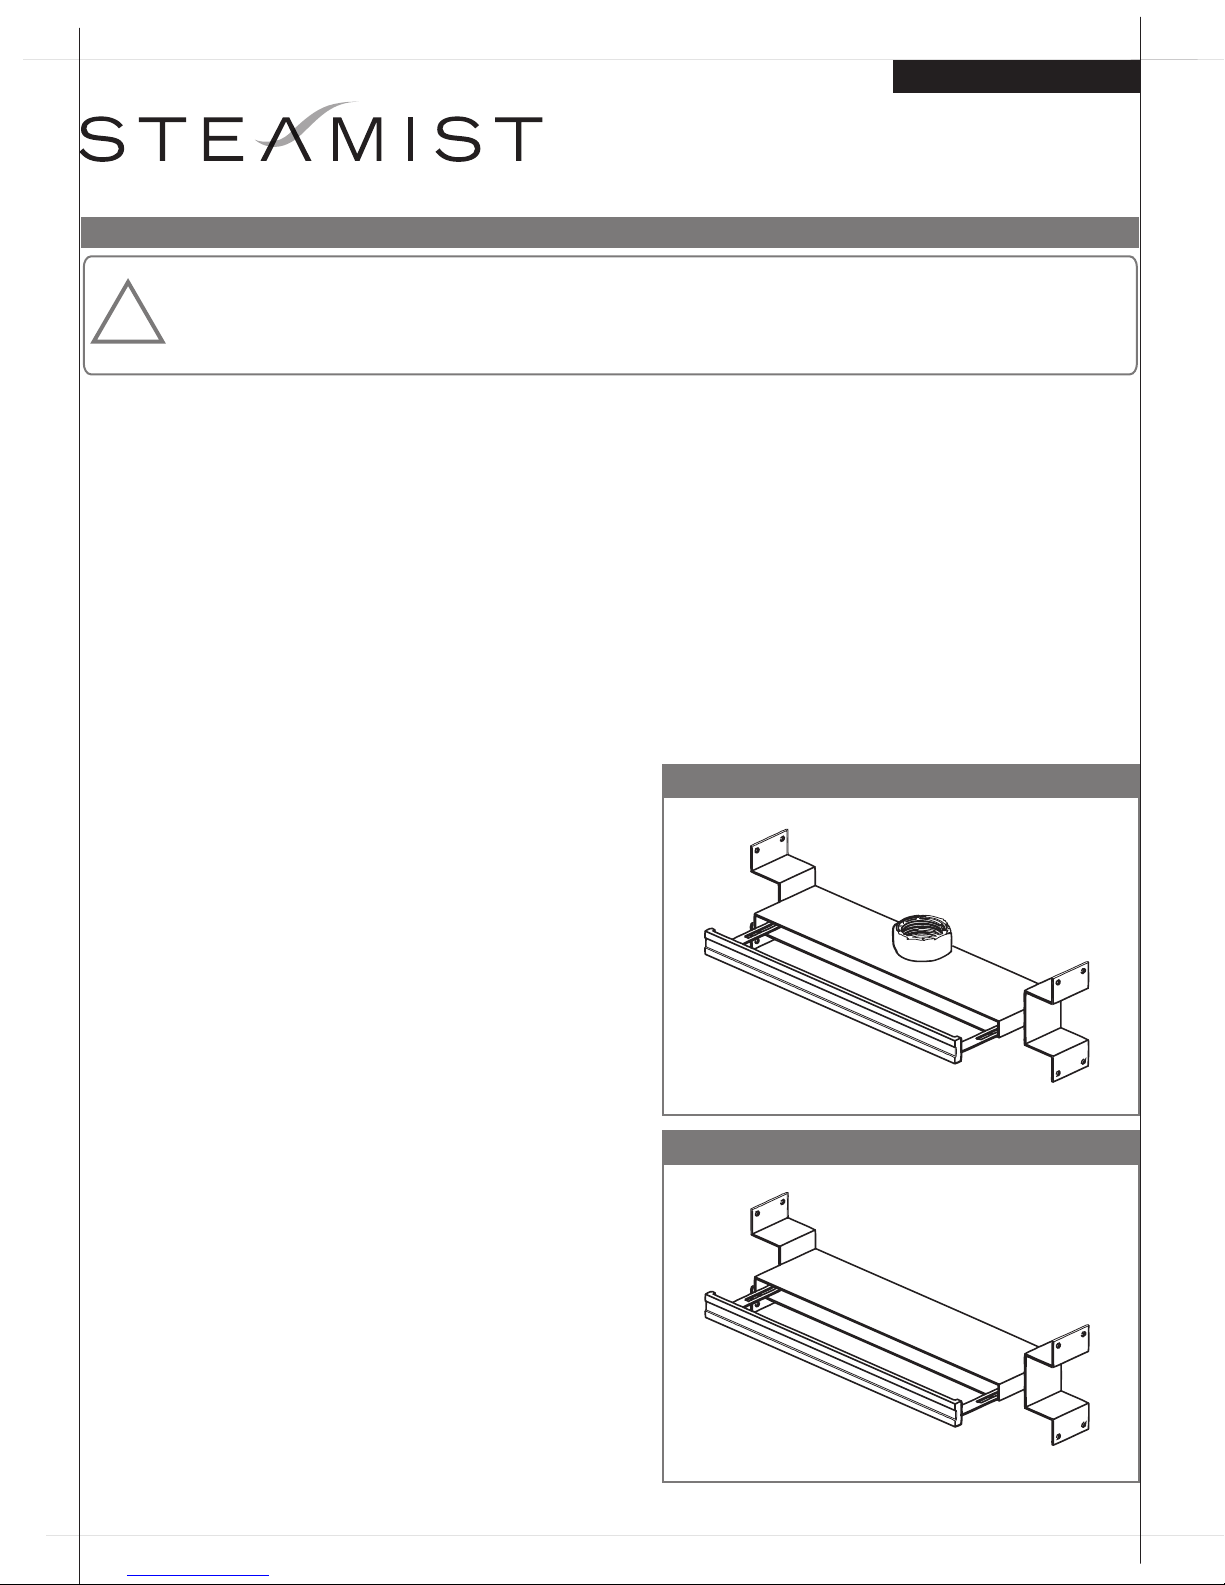
2. If the steam generator is located above or on the same level as
the steam head, install the steam head with the threaded connec-
tion at top (See Figure 1). If the steam generator is located below
the steam head, install the steam head with the threaded connec-
tion at the bottom (See Figure 2).
3. Rough in the steam line using a minimum of a ¾" copper or
brass pipe. Do NOT use black iron or galvanized pipe, it will rust
and discolor the wall of the steam room. Do NOT use CPVC or any
plastic type pipe, fitting or water type line as the steam pipe.
4. Place the Bilateral Steam Head between wall studs (See Figure
3). Make sure that the front lip is placed in such way that it will be
flush with the final wall material such as Tile or Stone (See Figure
5). If you are uncertain of the Tile/Stone thickness at the time of
install, the front lip of the steam head may be slightly recessed back
into the wall but must NOT be placed behind Backer Board and
cannot protrude past front of Tile (See Figure 4).
5. Make sure the Bilateral Steam Head is level, left to right and
front to back (See Figure 3).
6. Secure the Bilateral Steam Head to wall studs using 8 screws or
nails.
7. Connect the ¾” copper or brass pipe to the Bilateral Steam
Head.
8. Remove the Front Face Cover by sliding it out of the Bilateral
Steam Head. It will not be needed until step #13.
9. Proceed with steam room construction by insulating the walls
and installing Backer Board onto the wall. Make sure to leave a
proper size cutout in the Backer Board for the Bilateral Steam Head.
Do NOT leave a large gap between the Backer Board and the
Bilateral Steam Head.
10. Apply Silicone Sealant between the Backer Board and the outer
edge of the Bilateral Steam Head (See Figure 4).
11. Complete the wall construction with Thin Set and Tile/Stone.
Make sure to leave a proper size cutout in the Tile/Stone for the
Bilateral Steam Head. Do NOT leave a large gap between the
04/17 Pub. No. 152-A
Bilateral Steam Head Installation Instructions Model: BLSH
Figure 1
®
Important: Locate Publication No. 199 “Steam Bath Important Safety Instructions”. This publication includes a Warning
label that the contractor must install on the wall near the entrance to the steam room in a highly visible location. This
label and its additional safety information are packaged with the generator in the envelope containing the installation
instructions. If it is lost or missing contact Steamist (201-933-0700) for a replacement Publication No. 199. This publica-
tion along with all documents must be left with the owner.
!
1
Figure 2
(Pipe connection at top)
(Pipe connection at bottom)
Pub. No. 152-A
04/17 2
Figure 2
Bilateral Steamhead Installation Instructions Model: BLSH
Figure 3
Installation Instructions
x 8
IMPORTANT: Install Steam
Head 12” to 18" above the
shower floor or 6" above the
rim of the bathtub.
NOTE: Steam Head shown
with pipe connection at top. If
the pipe connection needs to
be at bottom, rotate the
Steam Head.
IMPORTANT: Set proper depth.
Make sure the front edge ends up
flush with Tile surface. If you are
uncertain of the Tile thickness at the
time of install, the front edge of the
Steam Head may be slightly
recessed back into the wall but must
NOT be placed behind Backer
Board and cannot protrude past the
surface of the Tile.
Pub. No. 152-A
04/17 3
Figure 2
Bilateral Steamhead Installation Instructions Model: BLSH
Figure 3
Installation Instructions
Figure 4
NOCILIS E
RA
E
LC
.Z
O.
LF
2
/
1
t
eN
02
5
13.
oNm
e
t
I
.
A
.S
.
U
NI
E
D
A
M
NOCILIS E
RA
E
LC
.Z
O.
LF
2
/
1
t
eN
02
5
13.
oNm
e
t
I
.
A
.S
.
U
NI
E
D
A
M
IMPORTANT: Apply Silicone
sealant between the Backer
Board and the outer edge of
the Steam Head. Make sure
to seal all gaps.
IMPORTANT: Apply Silicone
sealant between the Tile and
the outer edge of the Steam
Head. Make sure to seal all
gaps.
Backer Board
IMPORTANT: The Steam
Head MUST be sealed twice,
first to Backer Board, then to
Tile.
Tile
East Coast Office: 25 E. Union Ave., East Rutherford, NJ 07073 • Tel: 800-577-6478 • Fax: 201-933-0746
West Coast Office: Tel: 800-355-6478 • Fax: 661-940-1617
®
Pub. No. 152-A
04/17 4
Figure 2
Bilateral Steamhead Installation Instructions Model: BLSH
Figure 5
Installation Instructions
NOCILIS E
RA
E
LC
.Z
O.
LF
2
/
1
t
eN
02
5
13.
oNm
e
t
I
.
A
.S
.
U
NI
E
D
A
M
RA
E
LC
.Z
O.
LF
2
/
1
t
eN
02
5
13.
oNm
e
t
I
.
A
.S
.
U
NI
E
D
A
M
NOCILIS E
IMPORTANT: Apply Silicone
sealant between the Left and
Right edges of front Cover
and the wall Tile to make
sure the Cover does not slide
out.

Popular Plumbing Product manuals by other brands

Moen SANI-STREAM 8797 manual

Moen

Moen SANI-STREAM 8797 manual

Grohe Allure Brilliant 19 784 manual

Grohe

Grohe Allure Brilliant 19 784 manual

Cistermiser Easyflush EVO 1.5 manual

Cistermiser

Cistermiser Easyflush EVO 1.5 manual

Kohler Triton Rite-Temp K-T6910-2A installation guide

Kohler

Kohler Triton Rite-Temp K-T6910-2A installation guide

BEMIS FNOTAB100 Installation instruction

BEMIS

BEMIS FNOTAB100 Installation instruction

Hans Grohe ShowerTablet Select 700 13184000 Instructions for use/assembly instructions

Hans Grohe

Hans Grohe ShowerTablet Select 700 13184000 Instructions for use/assembly instructions

Akw Stone Wash Basin Installation instructions manual

Akw

Akw Stone Wash Basin Installation instructions manual

Enlighten Sauna Rustic-4 user manual

Enlighten Sauna

Enlighten Sauna Rustic-4 user manual

Moen ShowHouse S244 Series quick start guide

Moen

Moen ShowHouse S244 Series quick start guide

Sanela SLWN 08 Mounting instructions

Sanela

Sanela SLWN 08 Mounting instructions

Franke 7612982239618 operating instructions

Franke

Franke 7612982239618 operating instructions

Heritage Bathrooms Granley Deco PGDW02 Fitting Instructions & Contents List

Heritage Bathrooms

Heritage Bathrooms Granley Deco PGDW02 Fitting Instructions & Contents List

Tres TOUCH-TRES 1.61.445 instructions

Tres

Tres TOUCH-TRES 1.61.445 instructions

STIEBEL ELTRON WS-1 Operation and installation

STIEBEL ELTRON

STIEBEL ELTRON WS-1 Operation and installation

Miomare HG00383A manual

Miomare

Miomare HG00383A manual

BELLOSTA revivre 6521/CR1 quick start guide

BELLOSTA

BELLOSTA revivre 6521/CR1 quick start guide

American Standard Heritage Amarilis 7298.229 parts list

American Standard

American Standard Heritage Amarilis 7298.229 parts list

BorMann Elite BTW5024 quick start guide

BorMann

BorMann Elite BTW5024 quick start guide

manuals.online logo
manuals.online logoBrands
  • About & Mission
  • Contact us
  • Privacy Policy
  • Terms and Conditions

Copyright 2025 Manuals.Online. All Rights Reserved.