Steelcraft One 2 User manual

ONE 2
SECOND SEAT
www.britax.com.au Series
IMPORTANT: KEEP THIS BOOKLET IN A SAFE PLACE FOR FUTURE REFERENCE

www.britax.com.au
2
WARNINGS
• SECURETHECHILDINTHEHARNESSATALLTIMES.
• DONOTUSEANYACCESSORIESOTHERTHANTHOSEAPPROVEDFORUSE
WITHTHISSTROLLERBYBRITAX.
• ITISUNSAFETOUSEACCESSORIESNOTAPPROVEDFORUSEWITHTHIS
STROLLER.
• THEMAXIMUMWEIGHTOFTHECHILDUSINGTHISSECONDSEATISNOT
TOEXCEED15KG.
IMPORTANT NOTES:
• DONOTUSETHISSECONDSEATWITHANYOTHERMODELSOFSTROLLER.
• THESECONDSEATMUSTBECORRECTLYFITTEDANDLOCKEDONTOTHE
STROLLERFRAME.
• THESECONDSEATCANONLYBEUSEDINTHEFORWARDFACING
POSITION,CONNECTEDTOTHEREAROFTHESTROLLER.
• DONOTOVERLOADTHESTROLLER.OVERLOADINGWILLCAUSETHE
STROLLERTOTIPBACKWARDS.
WARNINGS:
ThisCAUTIONSymbolisshownatcertainstepsin
thisInstructionManualtohighlightthedangerof
beinginjuredbymovingparts.
CAUTION

www.britax.com.au 3
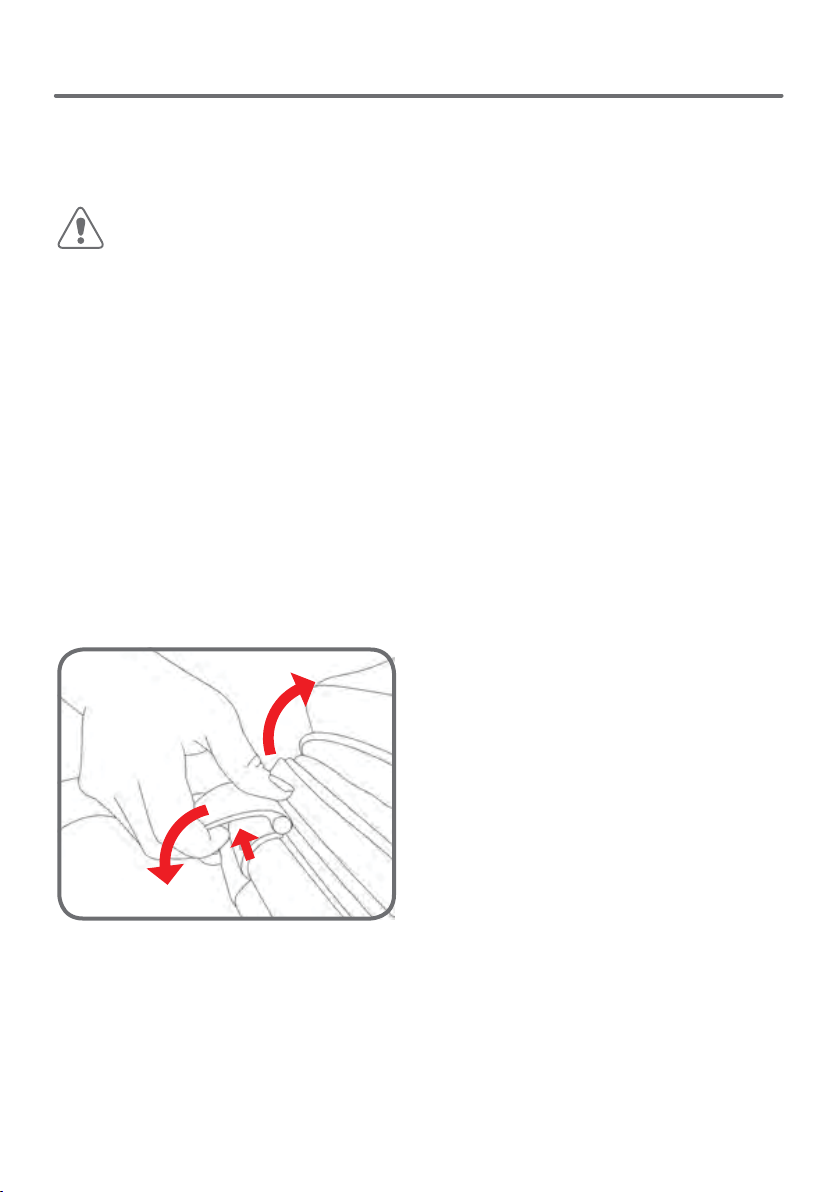
The SMART lifting technique
This technique can be used to pick up small light loads from low
levels.
Size up the Load
• Assess the load (size, shape and weight).
• Assess whether the load needs to be moved;
• Where is it going to be placed, check that there are no obstructions;
• Assess whether mechanical or human assistance is required.
Move the Load as close to the body as possible
• A load is heavier to lift or carry if it is not close to the body.
• The whole hand should be used to ensure a firm grip.
Always bend your knees
• Maintain balance.
• Keep feet apart and in a comfortable position.
• Minimise lower back bending.
• Bend knees preferable at as large an angle as possible but not at a
right angle use a semi squat in preference to a full squat.
Raise the load with your legs
• Achieve the lift smoothly and without jerkiness.
• Maintain the normal curvature of the spine to allow the force of the
load to be distributed evenly from the spine to the pelvis.
Turn your feet in the direction that you want to move the load.
• Avoid unnecessary bending, twisting and reaching.
• Change direction by turning your feet and not your back.
• To set the load down, squat down, keep your head up and
• Let your legs do the work.
Remember to ‘THINK TALL’ chest lifted, shoulders relaxed, chin
tucked in and head level.
MANUAL HANDLING TECHNIQUES

www.britax.com.au
4
1x Canopy
PARTS LIST
1x Second seat
1x Set of Extension Adaptors
1x Set of Click N Go Receivers
1x Set of wheel guards

www.britax.com.au 5
SECOND SEAT FEATURES
Peek-a-boo window
Canopy
Second seat
release button

www.britax.com.au
6
SECOND SEAT ASSEMBLY
ATTACHING THE CANOPY
IMPORTANT NOTE:
Thesunisverystrong.DONOTLEAVEYOURCHILDEXPOSEDTOTHESUN.
Thecanopyorhoodonthisproductwillnotgiveyourchildtotalprotection
fromtheharmfulraysofthesun.
A
Place the canopy on the Second seat
and push the clips on the sides of the
canopy onto the Second seat frame until
they snap into place.
B
Attach the canopy to the seat unit
with the zipper. There is peek a boo
window with magnetic closer for
better ventilation.
A B
CAUTION
A
ASlide the shoulder harness pads
onto the shoulder harness straps
and adjust to the position which fits
comfortably on the child.
IMPORTANT NOTE:
ENSURETHATTHESHOULDERSTRAPSAREFITTEDTHROUGHTHEAPPROPRIATE
HARNESSSLOTSTOSUITYOURCHILD’SSEATEDSHOULDERHEIGHT.
ATTACHING THE SHOULDER HARNESS PADS

www.britax.com.au 7
SECOND SEAT ASSEMBLY
ATTACHING THE SECOND SEAT TO THE STROLLER FRAME
IMPORTANT NOTE:
PLEASEREFERTOPAGE3FORSMARTLIFTINGTECHNIQUES.
•WHENFITTING,OPENING,ORFOLDINGTHESECONDSEAT,BEAWARE
OFTHEDANGEROFBEINGINJUREDBYMOVINGPARTSANDLOCKING
DEVICESDURINGTHEPROCESS.KEEPALLHANDSANDLIMBSCLEAR
OFTHESEPARTS.
•THEREISPOTENTIALFORFINGERSORPARTSOFTHEBODYTOBE
INJUREDWHENTHESTROLLERISBEINGFOLDEDORUNFOLDED,DUE
CARESHOULDBEEXERCISED.
•KEEPCHILDRENCLEAROFTHESTROLLERDURINGFOLDINGOFTHE
STROLLER.
PLEASENOTE:ExtensionReceiverscanbeusedtocreatemorespacebetween
thestrollerseatandsecondseat.(Refertopage18)
ATTACHING THE WHEEL GUARDS
AEngage the stroller brake.
BRotate the pivotal handle to the
highest position.
CRaise the stroller seat backrest to
the fully upright position.
DSlide each guard onto the mounting
bracket above each rear wheel
housing and push down until it locks
into place. There is left and right
wheel guard. Please ensure it is
locked.
D

www.britax.com.au
8
SECOND SEAT OPERATION
ATTACHING THE SECOND SEAT TO THE STROLLER FRAME
CPush down the Second seat until it
locks. Pull up on both sides of the
seat to ensure the seat is locked.
ABefore attaching the Second Seat
to the stroller frame push down
the back of the basket to the base
of the basket and lift the basket
divider up and press the snaps on
the side to create the division in
the basket.
ALine up the Second Seat
connectors to the second seat
frame socket inside of the stroller
frame (located on inside of the rear
wheel housing).
AB
C
CAUTION
DYou can extend the front of the
basket to create more storage
space and easy access to basket
when in double mode.
D
www.britax.com.au 9
ADJUSTING THE BACKREST
WARNINGS:
•THEUPRIGHTPOSITIONSARENOTSUITABLEFORUSEWITHCHILDREN
LESSTHAN6MONTHSOLD.
•THELOWESTRECLINEPOSITIONSHOULDBEUSEDTOTRANSPORT
BABIES.THEBACKRESTCANBEADJUSTEDTOAMOREUPRIGHT
POSITIONASTHECHILDGROWSOLDERANDISABLETOSUPPORT
ITSHEADWITHOUTASSISTANCE.
PLEASENOTE:Ifthechildissittingintheseat,supportthebackrestasit
reclines.Ifyouhavedifficultyadjustingthebackrestyoumayneedtoremove
thechildfromtheseattoallowyoutoraiseorlowerthebackrestwithease.
SECOND SEAT OPERATION
A
PLEASENOTE:Therearethreebackrest
positions.
A Lift the recline lever on the back
of the seat and hold while raising
or lowering the backrest to the
desired position.

www.britax.com.au
10
Rib
SECOND SEAT OPERATION
USETHEHARNESSATALLTIMES.
• ENSUREYOURCHILDISSECUREDWITHACORRECTLYADJUSTEDHARNESS.
• THEADJUSTEDHARNESSSHOULDCLOSELYFITTHECHILD.
• NEVERLEAVETHEHARNESSBUCKLEDWHENNOTFITTEDTOACHILDINTHE
STROLLER,BECAUSETHEHARNESSCANFORMLOOPSWHICHMAYPOSEA
STRANGULATIONHAZARD.
• WHENHARNESSISNOTINUSE,DISCONNECTSHOULDERSTRAPSFROMTHE
WAISTSTRAPSANDBUCKLETOPREVENTSTRANGULATION.
• A five point harness is provided to restrain your child.
• Buckle tongues separate for added safety.
• To reconnect buckle tongues and to secure the child in the harness please
follow the steps below carefully.
PLEASENOTE:Eachwaistbuckletonguehasaraisedribononesideandcan
onlybelockedintothebuckleassemblywiththeraisedribfacingup.Ensurethe
harnessstrapsarenottwistedastheymaybecomeuncomfortableforthechild.
AAlways apply the brakes before
placing child in stroller seat.
Position the shoulder strap near the
child’s shoulder and position crotch
strap between legs.
Thread the waist strap buckle
tongues through the shoulder strap
tongue guides.
A
WARNINGS:
BHold the centre button in on the
crotch buckle and insert the waist
buckle tongues into the crotch
strap buckle until you hear a
‘click’.
Repeat the procedure on the
other side.
Please ensure it’s locked.
B
SECURING YOUR CHILD HARNESS

www.britax.com.au 11
STROLLER OPERATION
ATighten or loosen the shoulder
straps and crotch strap by sliding
the 3 bar harness adjuster up or
down. The crotch strap should be
adjusted to a snug fit.
CAUTION: DO NOT SLIDE 3 BAR SLIDER OVER THE
SEWN TAB ON SHOULDER HARNESS.
OPENING THE HARNESS
BTighten or loosen the waist straps,
hold and lift the 4 bar harness
adjuster and pull the harness strap
to adjust to the desired fit. The waist
strap needs to fit firmly around the
child.
ARelease the harness by pressing the
centre button in on the crotch buckle
while pulling the waist tongues out of
the crotch buckle.
A
ADJUSTING THE HARNESS
B
A

www.britax.com.au
12
STROLLER OPERATION
ADJUSTING THE SHOULDER HARNESS HEIGHT
IMPORTANT NOTE:
THEHARNESSCANBEADJUSTEDTOTHREEDIFFERENTHEIGHTSTO
ACCOMMODATETHECHILD.THESHOULDERSTRAPSMUSTBEPOSITIONED
NEARTHECHILD’SSHOULDERS.
ATo change the shoulder harness
height, push the shoulder
harness tongue out of the
current harness slot and through
the back of the seat.
BSelect the appropriate shoulder
harness height and pull each
Shoulder harness tongue
through the harness slot.
A B

www.britax.com.au 13
INSTALLING AND REMOVING SEAT EXTENSION ADAPTORS
IMPORTANT NOTE:
RECEIVERSARESUPPLIEDTOCREATEMORESPACEBETWEENTHETOPSEATIF
REQUIRED,WHENUSINGTHESECONDSEATORBABYCAPSULE.
Pleaseadjustseatpositionsanddonotusethepositionsifthereisn’tenough
spaceforloweroccupant.
SECOND SEAT OPERATION
ASelect the extension adaptor that
has a coloured dot and align with
the coloured dot on the frame
socket. Note: Coloured dots are
only on one side of the frame
socket. Firmly press down on the
Extension adaptor until you hear a
‘click’ and a green indicator can be
seen through a window in the frame
socket. Repeat on the other side
with the receiver with no coloured
dot. To ensure the receiver is
engaged pull upwards.
BTo remove the extension adaptors,
press in and hold the button on the
inside of the receiver and pull up the
extension adaptors out of the frame
sockets.
AB

www.britax.com.au
14
ATTACHING THE STROLLER SEAT TO THE STROLLER FRAME
USING THE SECOND SEAT EXTENSION RECEIVERS
CAUTION:
SECOND SEAT OPERATION
STROLLER SEAT OR BABY CAPSULE
MUST BE CORRECTLY ATTACHED.

www.britax.com.au 15
CARE & MAINTENANCE
• To prolong the life of your stroller keep it clean and do not leave
it in the direct sunlight for extended periods of time.
• Removable fabric covers and trims may be cleaned using warm
water with household soap or mild detergent. Allow it to dry fully,
preferably away from the direct sunlight.
• Non removable fabric covers and trims may be spot cleaned
using a damp sponge with soap or a mild detergent. Allow it to
dry completely before folding or storing it away.
• In some climates the covers and trims may be affected by mould
and mildew, to help prevent this occurring, do not fold or store
the product if it is damp or wet. Always store the product in a
well ventilated area.
• When using your stroller at the beach - completely clean
your stroller afterwards to remove the sand and salt from the
mechanisms and wheel assembly. Sand and salt will cause
premature wear and corrosion.
• Always check parts regularly for tightness of screws, nuts and
other fasteners - tighten if required. To maintain the safety of
your nursery product, seek prompt repairs for bent, torn, worn or
broken parts. Use only those parts and accessories approved by
Steelcraft.
THIS PRODUCT IS NOT INTENDED FOR COMMERCIAL USE.

www.britax.com.au
16
DID YOU KNOW:
Registering your product purchase
online simplifies proof of purchase in
event of a warranty claim.
Scan this QR code on your phone to
go straight to our website to fill out the
registration form.
WARRANTY REGISTRATION
MAKING A WARRANTY CLAIM
Your rights under a Britax company warranty are separate from
and independent of your rights under the statutory consumer
guarantees. What you need to do to enforce your rights under a
statutory consumer guarantee is set out in the
Australian Competition and Consumer Commission’s Consumer
Guarantees - A Guide for Consumers.
To make a claim under a Britax company warranty, please contact
our customer service team on:
1300 303 330 - Australia, 0508 688 822 - New Zealand
or alternatively by email at:
You will be required to :
1. Return the product to the place of purchase or to a designated
repair agent;
2. Present your receipt as proof of purchase;
3. Identify the defect in the product; and
4. Present the product to Britax for inspection on request.

www.britax.com.au 17
WARRANTY
Britax will advise you whether the product is covered by the
Britax company warranty. Britax’s decision of whether a product is
covered by a Britax company warranty is final. Britax will act
reasonably when determining whether a product is covered by a
company warranty.
AUSTRALIAN CONSUMER LAW
On all of our goods, you have the benefit of a statutory consumer
guarantee. In summary, goods are guaranteed to be of “acceptable
quality” (fit for purpose), goods are guaranteed to match any sample
against which they are sold. These consumer guarantees are
provided for by the Australian Consumer Law and, if you believe
anyone of these guarantees is not satisfied by a Britax product,
you have rights under the Australian Consumer law to enforce that
guarantee.
Your rights under the statutory consumer guarantees are set out in
the Australian Competion and Consumer Commission’s Consumer
Guarantees - A Guide for Consumers.
In addition to the statutory consumer guarantees, BRITAX offers its
own company warranty on all of its products. You therefore have
the option of seeking redress for defective or faulty product either
under the BRITAX company warranty or the statutory guarantees.
After the Britax company warranty expires, you still have your rights
under the statutory consumer guarantees.
Depending on the product involved, the following Britax company
warranty applies:

www.britax.com.au
18
WARRANTY
STEELCRAFT WARRANTY
Steelcraft products are covered by this company warranty against
faulty materials and workmanship (normal wear and tear excluded)
that affects the normal operation of your Steelcraft product. In
the unlikely event that you find that your Steelcraft product does
not satisfy this warranty, Britax will (at its option) repair or replace
that product within a reasonable period of you making a claim in
accordance with this policy.
In the event that a replacement product is no longer available, Britax
reserves the right to provide what it considers to be a suitable
alternative.
For this company warranty to apply, you must make an application
before the expiration of the following periods from date of purchase:
• 2 years on Steelcraft strollers, Steelcraft stroller accessories,
highchairs, portable cots, walkers and rockers.
This company warranty does not apply to second hand or
aftermarket goods or goods used for rental, hire or other
commercial purposes or to any claim where the damage or fault is,
in whole or part, the result of incorrect installation, mistreatment,
intentional damage, any use other than use in normal conditions or
any use otherwise than in accordance with the Instruction Manual
for that product.
Please read your instruction manual carefully before using any of
our products.
INTERNATIONAL WARRANTY
Britax products are available through a network of retailers in
Australia and New Zealand. If you are an International customer we
do not offer a warranty service outside of these regions.

www.britax.com.au 19
NOTES

BRITAX CHILDCARE PTY. LTD.
A.B.N. 55 006 773 600
Level 4, 650 Lorimer Street, Port Melbourne, Victoria 3207, Australia
Phone: (03) 9288 7288 Fax: (03) 9311 5798
CUSTOMER SERVICE
1300 303 330 - Australia 0508 688 822 - New Zealand
Due to our continuing program of development, Britax reserves the right to alter
the specications, color or design without any further notice.
The Steelcraft trademark is the property of Britax Childcare Pty.Ltd - Australia.
The Britax trademark is the property of Britax Childcare Holdings Limited - UK.
Visit the Britax website at: www.britax.com.au or email us at [email protected]
Due to the variations in the style and design of our products the illustrations used
in this instruction booklet are generic.
This product is designed to comply with Australian and New Zealand standard
AS/NZS 2088:2013 “ Prams and Strollers - Safety Requirements”
2019 Copyright Britax Childcare Pty. Ltd. Australia
www.britax.com.au Art No.4002254
This manual suits for next models
1
Table of contents


