Steinberg MIDEX-8 User manual

MIDEX-8
English – 1
ENGLISH
MIDEX-8
Operation Manual

MIDEX-8
English – 2
❐
The information in this document is subject to change without notice and does not represent a
commitment on the part of Steinberg Media Technologies AG. No part of this publication may be
copied, reproduced or otherwise transmitted or recorded, for any purpose, without prior written
permissionbySteinbergMediaTechnologiesAG.Allproductandcompanynamesare™or®trade-
marks of their respective owners.
© Steinberg Media Technologies AG, 2001. All rights reserved
Declaration of Conformity
We,Steinberg MediaTechnologies AG,
Neuer Hoeltigbaum 22 - 32,D-22143 Hamburg
herewith confirm that the product:
Type: USB/MIDI interface
Model: MIDEX-8
meetstherequirementsofthecounciloftheEuropeancommunitiesas
specified by the following norms (or normative documents)
CENLEC EN 55 024
CENLEC EN 55 022
DIN EN 60 950
relating to electromagnetic compatibility
(Council Directives 73/23/EEC and 89/336/EEC)
The CE symbol is awarded to high-quality appliances which comply with the
European Directive 89/336/EEC or the EMVG (law relating to electromagnetic
compatibility of appliances) and which offer the following significant benefits:
• Simultaneous and interference-free operation of adjoining appliances
• No unpermitted interference signals
• High resistance to electro-smog

MIDEX-8
English – 3
ENGLISH
Table of Contents
Declaration of Conformity.................................................................................2
Table of Contents..................................................................................................3
Introduction............................................................................................................4
Contents of the Package.....................................................................................5
System Requirements – PC................................................................................6
System Requirements – Apple Computer....................................................6
The MIDEX-8 Features.........................................................................................7
MIDEX-8 – Controls and Sockets .....................................................................8
Connecting and Setting Up.............................................................................10
Software Installation – PC................................................................................13
Software Installation – Macintosh.................................................................15
Setting up your MIDI Program .......................................................................28
The Linear Time Base Method........................................................................29
The Buttons...........................................................................................................30
Windows Problems with the USB Reset......................................................32
Practical Tips.........................................................................................................33
Questions and Answers....................................................................................39

MIDEX-8
English – 4
Introduction
Congratulations on your purchase of MIDEX-8!
TheMIDEX-8canbeusedtotransferMIDIdatabetweenyourcomputer
andexternal MIDI equipment. MIDEX-8isamulti portMIDI interface.
EachMIDEX-8haseightindependentMIDIinputandoutputpairs(MIDI
ports).
Eachof the eight MIDI ports lets you use 16MIDIchannels. Therefore,
oneMIDEX-8 interface can simultaneously send and receive MIDI data
onup to 128 separate MIDI channels.TheMIDI out socket number 8 is
availabletwice and both socketscansimultaneously be used.
TheUSBportisusedtoconnectyourcomputerandtheMIDEX-8.USBis
apowerfultechnologythatsimultaneouslyletsyouconnectupto127
peripheraldevicestoyourcomputer,ifitisUSB-compatible.WithUSB,
thereisnoneedtoconfiguratejumpers,i/oaddresses,DMAchannels
etc.
Twoimportantfactors ensurethat MIDEX-8offers anextremelyreliable
andaccurately timed MIDI datatransfer:
• The communication takes place via the Universal Serial Bus (USB).
• Furthermore, the MIDEX-8uses Steinberg´s LTB- technology. LTB is the abbre-
viation for Linear Time Base, a MIDI Time Stamping method, which transfers
MIDI data to your sound modules with utmost timing accuracy.
MIDEX-8andLTBhavebeendevelopedincloseco-operationwithAccess
Music,thecompanythathasacquiredanexcellentnamewithitsVirus
synthesizerproducts.
This operation manual contains important information on how to in-
stall and use the MIDEX-8. Please read it so that you can quickly and
successfully use your new interface.
Have fun using the MIDEX-8!
The Steinberg Team

MIDEX-8
English – 5
ENGLISH
Contents of the Package
The MIDEX-8 package should contain these items:
• MIDEX-8interface.
• This operation manual.
• 1 USB A/B standard cable for connection to a Macintosh or PC.
• CD-ROM with driver software for all supported computer operating systems.
Since newer driver software might be available when you read this, we recom-
mend that you visit the Steinberg web site ( http://www.steinberg.net) and
download the latest versions.
❐
Pleasetakethetimetoread any ReadMe files that you might get with this
product or when downloading driver software! These files contain impor-
tant late-breaking information.

MIDEX-8
English – 6
System Requirements – PC
To be able to use MIDEX-8, you need:
• APCwithamainboard(motherboard)thatisequippedwithUSBconnectorsor
a PC that is equipped with a PCI USBhost adapter.
❐
Some older main boards support USB, but don’t offer the physical USB
ports on the rear of the computer. You can easily change this by buying a
port extension and installing it in your PC. Please find all corresponding
information in the manual of your computer. If necessary, consult an ex-
perienced technician.
• TouseMIDEX-8 in connection with a PC,pleasemake sure that your computer
runs a Windows 98 SE, Windows ME, Windows 2000 or Windows XP operating
system.
❐
Windows 98 Gold is not supported.
System Requirements – Apple Computer
To be able to use MIDEX-8, you need:
• An Apple Computer that is equipped with USB connectors, e.g. the iMacs, G3/
G4 Power Books or G3/G4 desktop computers. Furthermore you need Mac OS
8.6 (or higher).
• Atthetimeofwritingofthismanual,MacOSXcompatibledriverswerenotyet
available.IfyouuseMacOSX,pleasecheckoutwww.steinberg.net,fromwhere
you can download the driver software as soon as it becomes available.
• OMS version 2.3.8 or a newer version.
• If you use a PCI card that provides the USB ports, you will also need a Mac OS
that supports your USB PCI card.
❐
NotallUSBcardsavailableforretrofittingdofunctionwellinallMacintosh
computers. We have not experienced problems with cards manufactured
by Sonnet.

MIDEX-8
English – 7
ENGLISH
The MIDEX-8 Features
The MIDEX-8 USB MIDI interface has the following features:
• FullspeedconnectorforUSB-compatiblePCsorAppleComputers(12Mbit/sec).
• MIDIinterface with eight separate inputs and outputs (each connectedMIDEX-
8 interface can address up to 128 MIDI channels).
• MIDIactivityindicatorsforallinputsandoutputs.
• Under normal circumstances, theMIDEX-8 doesn’t need any external power
supply. As an external device, it is connected to the USB bus of your computer
and therefore receives the necessary power from here. Opening the computer
isnotnecessary.Ifneeded,theMIDEX-8letsyoualsoconnectastandardpower
supply. Find more information onpage 35 and page 38.
• A“MIDIThru”functionenablesMIDIdatatransferwithoutanactivesequencer.
YoucandirectlyaddressyourinstrumentswithouttheneedtochangeyourMIDI
cableconnections.
• CompatiblewithMacOS8.6(orhigher).OMS2.3.8orhigherrequired.
• At the time of writing of this manual,MacOSXcompatibledriverswerenotyet
available.IfyouareauserofMacOSX,pleasevisitwww.steinberg.nettofindthe
latestinformationonavailabledrivers.
• CompatiblewithWindows98SE(SecondEdition),WindowsME,Windows2000
andWindowsXP.Plug&PlayinstallationwithouttheneedtosetIRQs,I/Oad-
dressesorDMAChannels.
• MIDEX-8supportsmulti-clientoperation:severalactiveapplicationscansimulta-
neouslyaccessthephysicalMIDIinputsoroutputs.
• 19"rackcompatiblehousing
MIDEX-8
English – 8
MIDEX-8 – Controls and Sockets
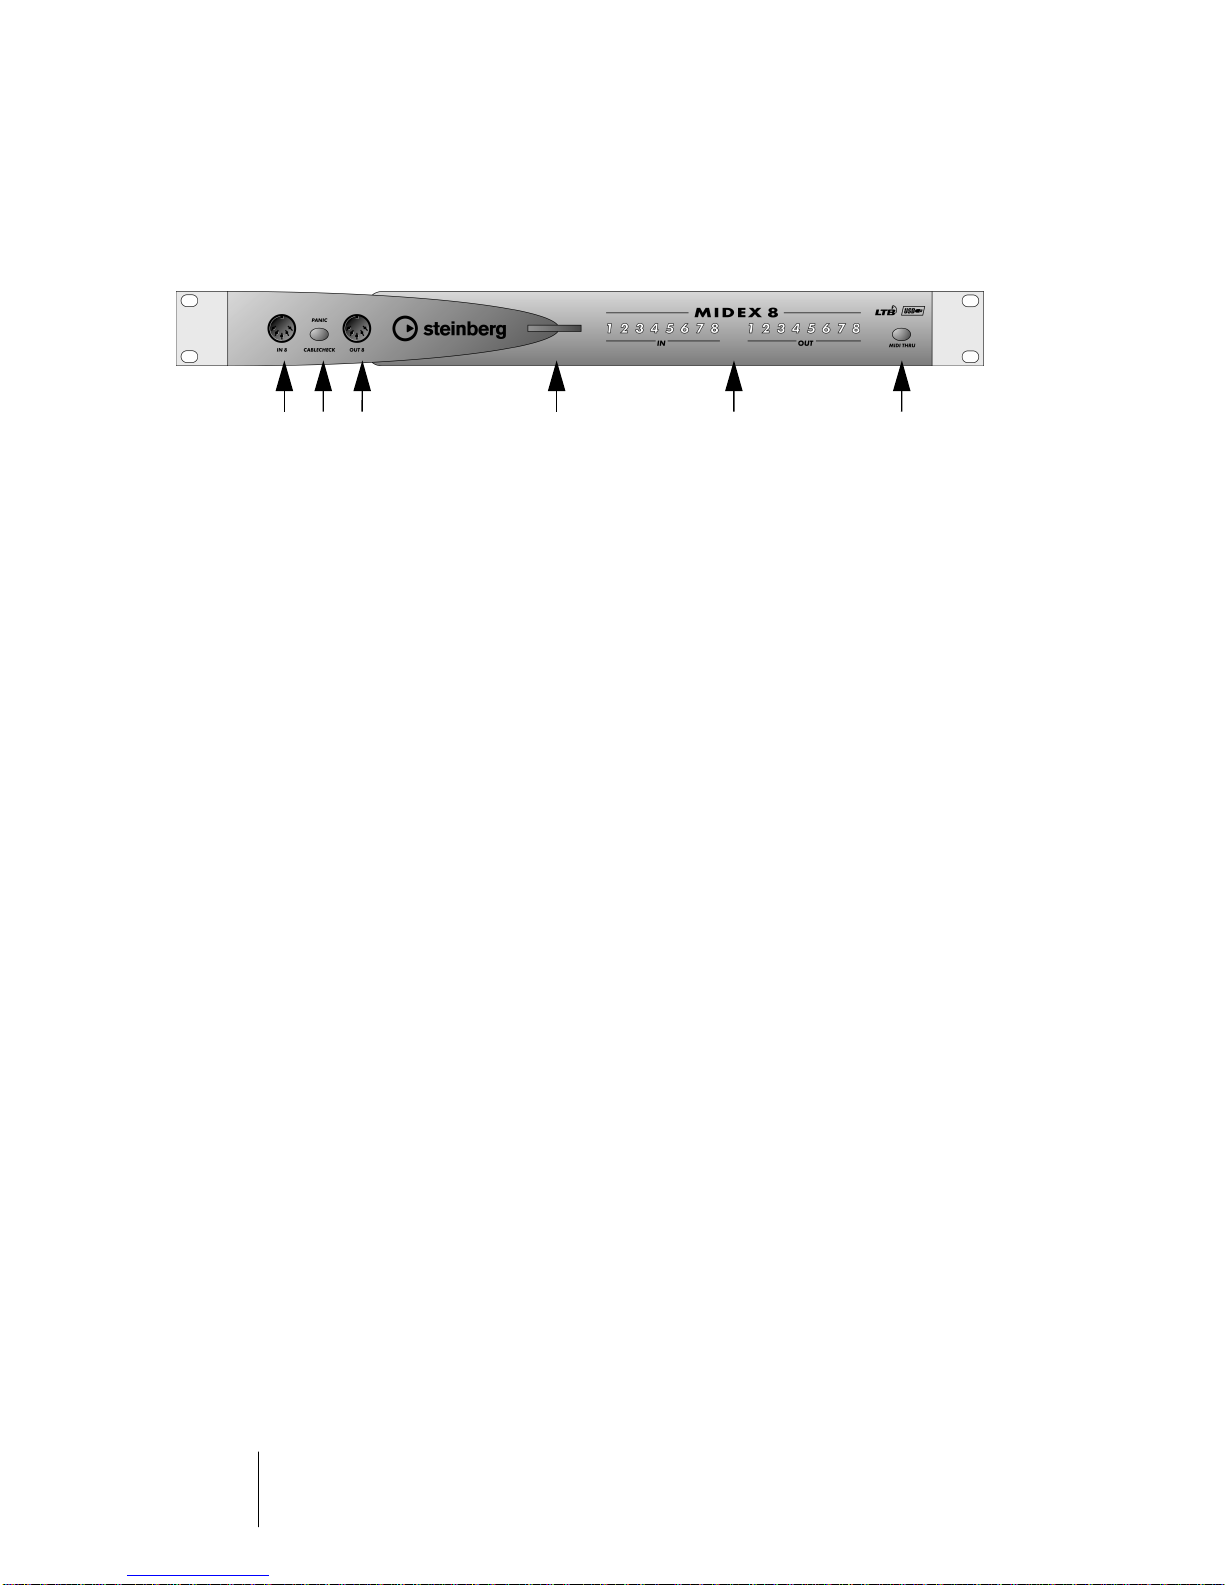
Front
➀➂ ➃ ➄➁➅
➀
➁
➂
➃
➄
➅
In 8 socket – The last of the available eight MIDI inputs.
Panic/Cablecheck button – Briefly pressing this button starts a MIDI cable check,
pressing it longer (for ca. 3 seconds) sends a MIDI Reset (All Notes Off and Controller
Reset on all channels) and thus removes “hanging notes”. Simultaneously pressing
thisbuttonand theMIDI Thrubuttontriggers aUSB Reset.Findmore informationon
page 32.
Out 8 socket – The last of the available eight MIDI outputs.
Power LED – the blue Power LED indicates that the MIDEX-8 is ready for use. This
lights up a few seconds after the connection has been made.
MIDI In and Out LEDs – these LEDs indicate MIDI activity on the MIDI inputs and
outputs.
USB/MIDI Thru button – This lets you toggle between the two MIDI Thru modes.
MIDEX-8
English – 9
ENGLISH
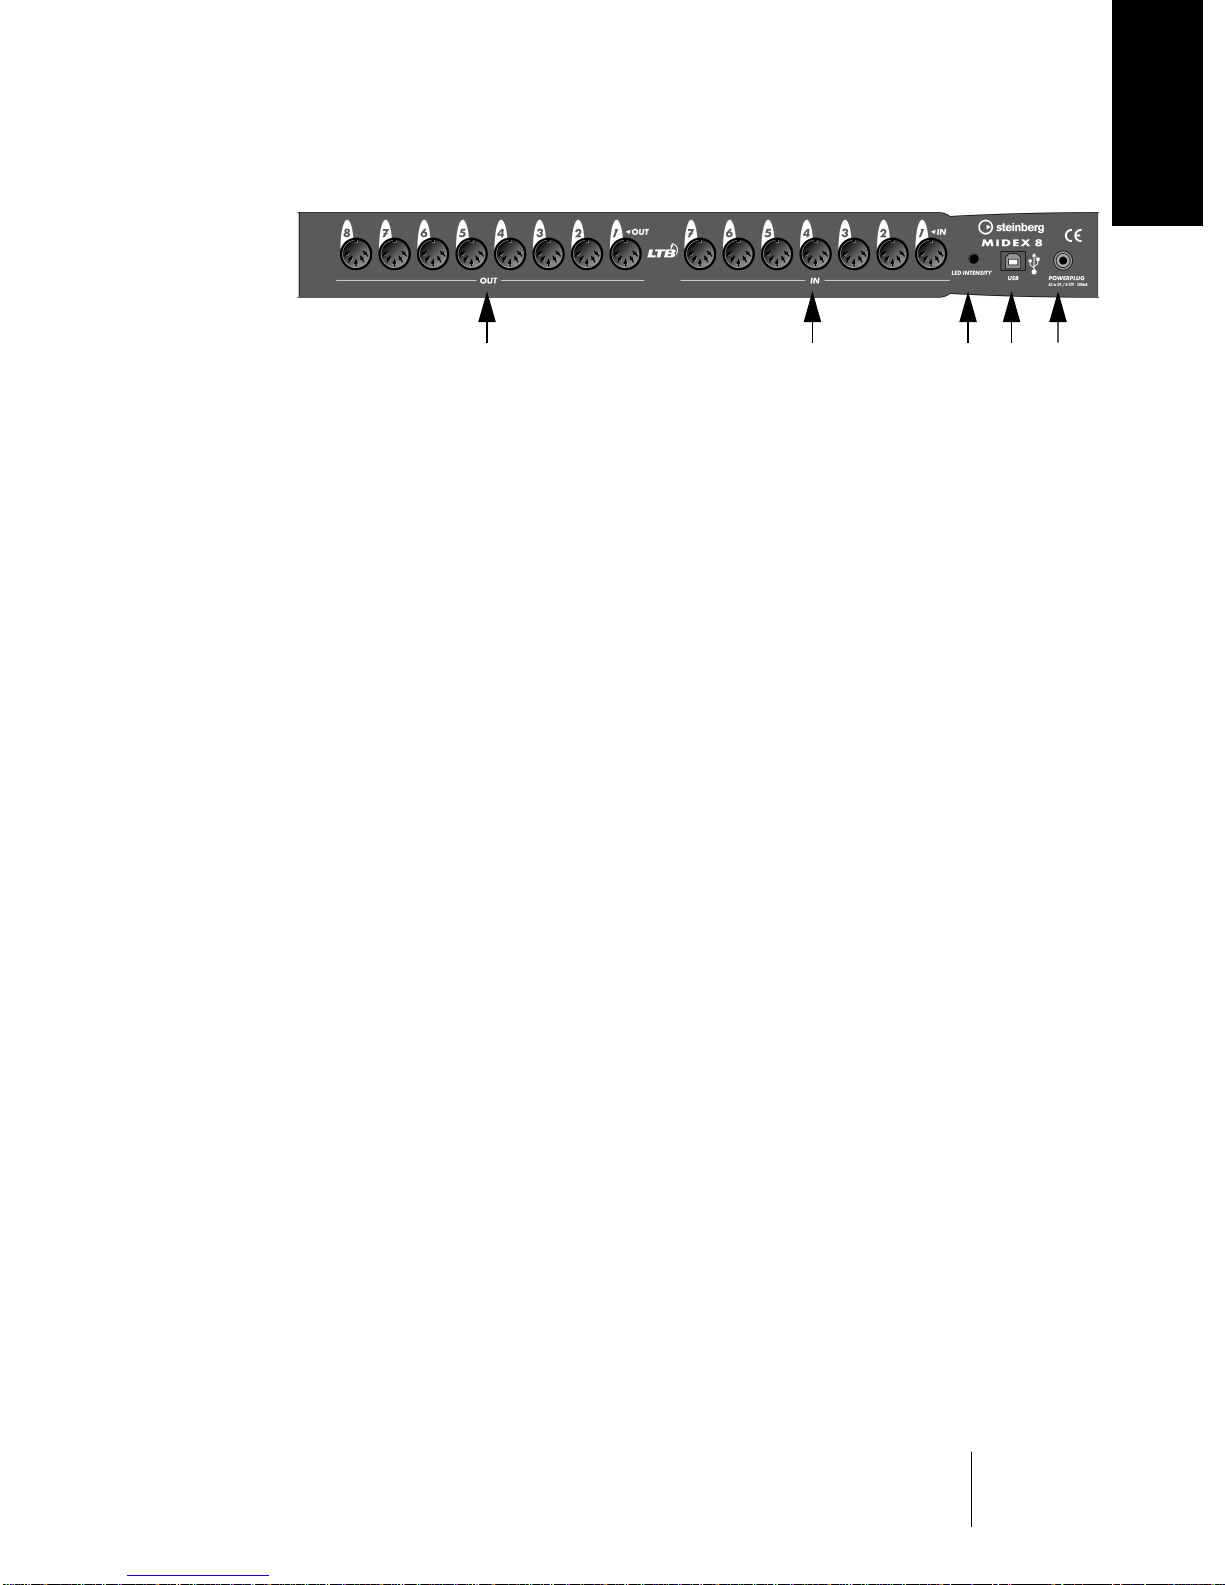
Rear
TheeightOut socketsrepresenttheMIDI outputsoftheMIDEX-8. A secondOutput8
socket is available on the front panel. Both outputs are connected in parallel.
The seven In sockets represent the MIDI inputs 1 to 7 of the MIDEX-8. The eighth
MIDI input is available on the MIDEX-8 front panel.
LED Sensitivity – Using a small screw driver, you can change the response time
setting of the MIDI In and Out LEDs. This is an elegant method to prevent flickering
MIDI LEDs, caused by “Active Sensing” messages that are constantly sent out by
some MIDI devices.
Theavailable sensitivitysettings varyfrom“slow” (aMIDI Eventactivatesthe LEDfor
at least half a second) to “swift” (a MIDI Event lets the LED just light up briefly, but
“Active Sensing” has no effect on the LED).
To set LED sensitivity to “slow”, turn the potentiometer clockwise all the way to the
end. To set LED sensitivity to “swift”, turn the potentiometer counter-clockwise.
USB socket –This MIDEX-8 socket and the host computer’s USB port must be
connected to each other using a USB cable.
Generally,theMIDEX-8 doesnot needanyadditional powersupply. Itgetsits power
via the USB port that it is connected to. Any conventional USB port that can provide
500 mA provides enough power to operate a MIDEX-8. For this reason, the MIDEX-8
comes without a power supply unit. But if you use a USB hub, its USB outputs may
not supply enough power for the proper operation of a MIDEX-8. In this case, you
can connect a simple power supply unit to the Powerplug input on the MIDEX-8 to
solve the problem. Find more details on page 35 and page 38.
➀
➁
➂
➃
➀➂➃➄➁
➄

MIDEX-8
English – 10
Connecting and Setting Up
❐
Pleaseinstallall necessary drivers and othersoftwarebefore connecting
theMIDEX-8toyourcomputer!EspeciallywheninstallingitonaMacintosh
computeritis important tofollowacertainorder to prevent installationer-
rors.Pleasedo carefully read the SoftwareInstallationchapters!
Positioning the MIDEX-8
• Position the MIDEX-8 interface in a convenient spot near your computer.
If you have a 19" rack, you can of course also install yourMIDEX-8 in that. The
MIDEX-8 provides the necessary holes for the mounting screws.
If the distance between the MIDEX-8 and the computer is too big, you
mightneed tobuy aUSB extensioncable. Thisisavailable incomputer
shops. The cable should support the “USB Full Speed Mode”.
Connecting MIDEX-8and Computer
When you have installed all necessary software, proceed as follows to
connect the MIDEX-8 to the computer:
1. Switch off the computer.
2. Use the USB standard cable that came with yourMIDEX-8 to connect the
USB port on the rear of your computer to the USB port of theMIDEX-8.
Your computer’s USB port is a small (1/8 inch x 3/8 inch) rectangular socket.
Desktop computers often have two, Laptop computers mostly have one such
socket. The USB socket on yourMIDEX-8 can easily be identified by its label.
3. If you are sure that all necessary software has been installed, you can
switch on your computer.
❐
We assume that you have properly connected theMIDEX-8 to your com-
puter’sUSBbussothatitgetsthenecessarypower,andthatthecomputer
is switched on.

MIDEX-8
English – 11
ENGLISH
Making the MIDI Connections
Use standard MIDI cables to connect the MIDEX-8 to other external
devices, instruments and sound modules.
A typical MIDI system would e.g. include your MIDEX-8 interface, a
computer,MIDIsequencersoftware,aMIDImasterkeyboardandafew
MIDIcompatiblesoundmodules.Suchasystemcouldbeconnectedas
follows:
• MIDEX-8 interface and computer are connected using the USB standard cable
that came with the MIDEX-8.
• TheMIDIoutputonyourMasterkeyboardise.g.connectedtothefirstinputon
theMIDEX-8(In 1).
• The first MIDI output (Out 1) on yourMIDEX-8 interface is connected to the
MIDI input of a sound module (this can also be your Master keyboard, if it can
generate sound).
• ThesecondMIDIoutput(Out-2)ontheMIDEX-8isconnectedtoanothersound
module.
• You can connect additional sound modules to the other MIDI outputs.
• ThesecondMIDIinput(In2)cane.g.beconnectedtoasecondMIDIcontroller–
say,drum pads or a MIDI saxophone – or can be used as a synchronisation in-
put,e.g. to receive the MIDI clock signals of a drum machine or the MIDI time
codegenerated by another synchronisation source. The same goes for the
otherMIDI inputs.
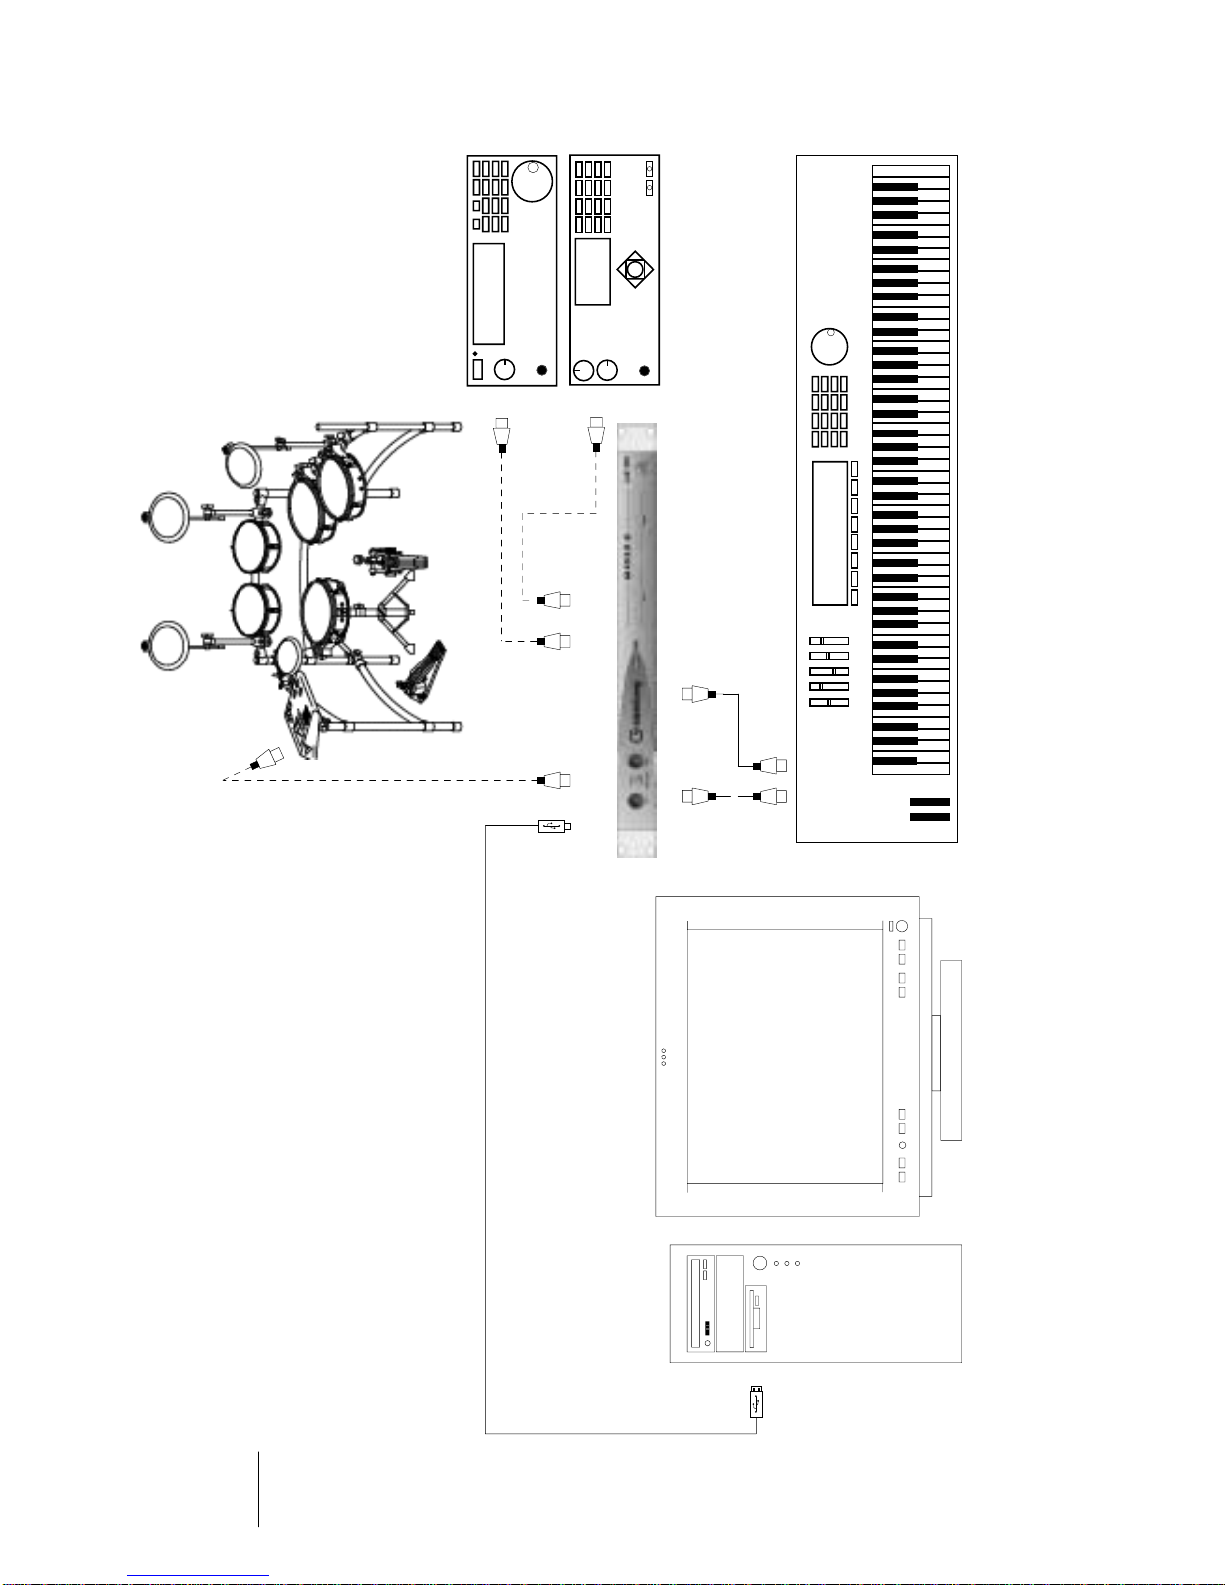
In the MIDI system setup illustration shown on the next page, the
MIDEX-8 interface is used to transfer MIDI data between master key-
board, computer with application software and sound modules. MIDI
input In 2 receives its data from an electronic drum kit.
MIDEX-8
English – 12
USB
USB Out In
In
In
Out 2 Out 3
Out 1
In 1
In 2
Out

MIDEX-8
English–13
ENGLISH
Software Installation – PC
Once you have connected the MIDEX-8 to your computer, Windows
recognizes that a new USB device has been connected and automati-
cally starts the “Add New Hardware Wizard”.
The “Add New Hardware Wizard”
1. Click on the “Next” button.
Determine the method that the Wizard should use to find the drivers.
2. Activate “Find the best driver for the device” and click the “Next” button.
Determine where the Wizard should search for the drivers.
MIDEX-8
English–14
3. Click on “CD-ROM drive” so that it is ticked. If your computer has more
than one CD-ROM drive, please specify the path of the drive that you use.
Now insert the MIDEX-8CD-ROM into the corresponding drive and click
the “Next” button.
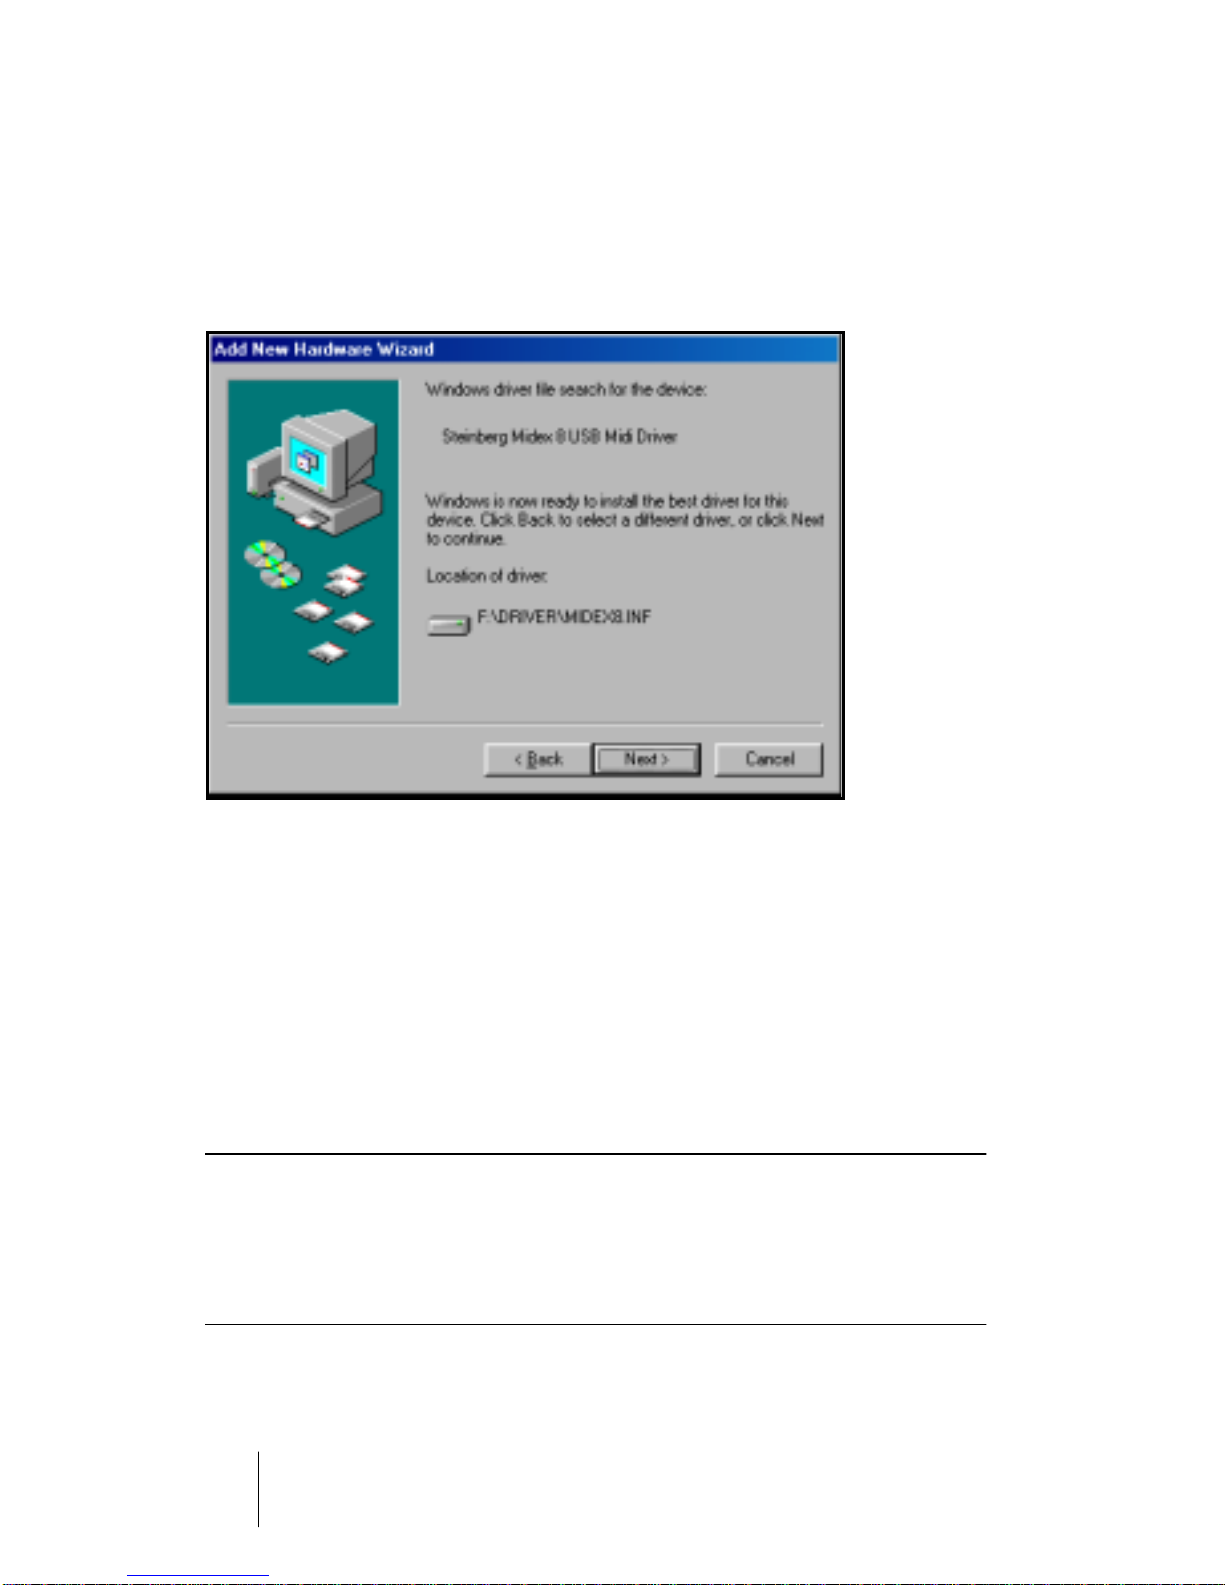
Windows indicates when it has found the drivers.
4. Click the “Next” button to install the drivers. When that has successfully
happened, Windows displays a corresponding message.
ThefirmwaredriverisnowautomaticallytransferredintotheMIDEX-8andWin-
dows might ask you to insert the Windows CD, if it needs any additional Win-
dows drivers previously not installed.
5. If necessary, insert the Windows CD and click “Browse”.
Windows will find and install the needed drivers.
6. Restart your computer when the installation is completed.
❐
Undercertainconditions,someversionsoftheWindowsoperatingsystem
do not properly recognize USB devices. You should therefore avoid to
plug in or remove yourMIDEX-8 during operation. Please find more infor-
mation about this issue in the section“Windows Problems with the USB
Reset” on page 32.

MIDEX-8
English–15
ENGLISH
Software Installation – Macintosh
Installing on the Mac – Important Information
Please definitely do read the following information before you start to
install the MIDEX-8 drivers on your Macintosh:
❐
Your Macintosh computer must be equipped with the necessary USB
port(s).It must run Mac OS version 8.6 or higher and provide sufficient
free space on its hard disk (min.10 MegaBytes).
❐
Your Cubase or Nuendo version must be compatible with the LTB technol-
ogy.Atthetime ofwritingofthis manualthiswastrueforCubaseVSTMac
version 5.0.2.and Nuendo Mac version 1.5.2.If necessary,contact the sup-
port department of the Steinberg distribution in your country.
❐
Do not connect the MIDEX-8 itself before OMS and theMIDEX-8 drivers
havecompletelybeeninstalled!Thesystemwillotherwisenotrecognizeit
correctly.
❐
OMS2.3.8oranewerversionmustcorrectlybeinstalledonyourcomputer
beforeyouactivatetheMIDEX-8Installerprogram,otherwise certain driv-
ers will not automatically be copied to the correct destinations in the Sys-
tem or OMS folders.An OMS installation program can be found on the
MIDEX-8 driver CD.
❐
If you are not familiar with OMS,please do definitely read the following
sections.
❐
IfOMS2.3.8or higher is installed on your computerand ifyouarefamiliar
with OMS,you can immediately start to install the MIDEX-8 drivers,as de-
scribed under “Installing theMIDEX-8 Driver Software”on page 18.

MIDEX-8
English–16
What is OMS?
The Open MIDI System (OMS) was co-developed by Opcode Systems
Inc.andSteinberg.Thissystem extensionclosesthegapbetween MIDI
applications and MIDI hardware on the Mac. In addition, OMS lets sev-
eral MIDI applications communicate with each other and share re-
sources (like patch names and timing information).
OMS Version
❐
To be able to use MIDEX-8, you must have installed and activated OMS
version 2.3.8 or higher on your computer. Older OMS versions do not suf-
ficiently support USB interfaces.
Please proceed as follows to find out whether OMS is installed on your
computer:
1. OpentheSystemExtensionsfolderinyourSystemfolder.IfOMSisalready
installedonyourcomputer, the “OMS” System Extension must be present
in this folder.
The OMS System Extension icon
2. To find out which version it is, click once on the “OMS” system extension
so that the icon is inverted. Now select “Information” on the Apple desk-
top File menu. A dialog appears containing the desired information.
❐
IfthemostrecentOMSversionis installed on your computer, you can skip
thesection“Installing or Updating OMS”on page17and proceed with in-
stallingthedriversoftwareasdescribedin the section“Installingthe
MIDEX-8DriverSoftware”onpage18.

MIDEX-8
English–17
ENGLISH
Installing or Updating OMS
1. Open the folder “OMS 2.3.8” on theMIDEX-8 CD-ROM and start the pro-
gram “Install OMS 2.3.8”.
ThisloadstheOMSInstallerprogram.Inthefirstdialogthatappears,click“Con-
tinue”. This will open the Installer dialog.
2. Usethe “Install Location”pop-upmenuto define whereonyourhard disk
the Installer should install the “Opcode” folder.
Among other things, this will later contain the OMS Setup program.
3. Click on the “Install” switch.
OMS 2.3.8 will now be installed on your computer.
❐
If an older OMS version was installed on your computer, it will automati-
cally be updated.
4. Please do now restart your computer!
Same as all other system extensions, OMS will only be launched at system
startup,i.e. when yourestart your computer.If you donot restart, OMSwill not
be available and therefore errors might occur during driver installation.
•The OMS Installer program has created an “Opcode”folder on your hard disk.
This contains the “OMS Setup”program which you can later use to make the
necessary settings.
•TheOMS Installer program has also createdan “OMS Folder”folder in your Sys-
tem folder. Please do not move or delete this folder.
MIDEX-8
English–18
Installing the MIDEX-8Driver Software
1. InserttheMIDEX-8DriverCDintothecorrespondingdriveonyourcomputer.
Informationon new versions of the driver software is available on the Internet.
For more information see the description in the section“Downloading a new
MIDEX-8 Driver from the Internet”on page 19.
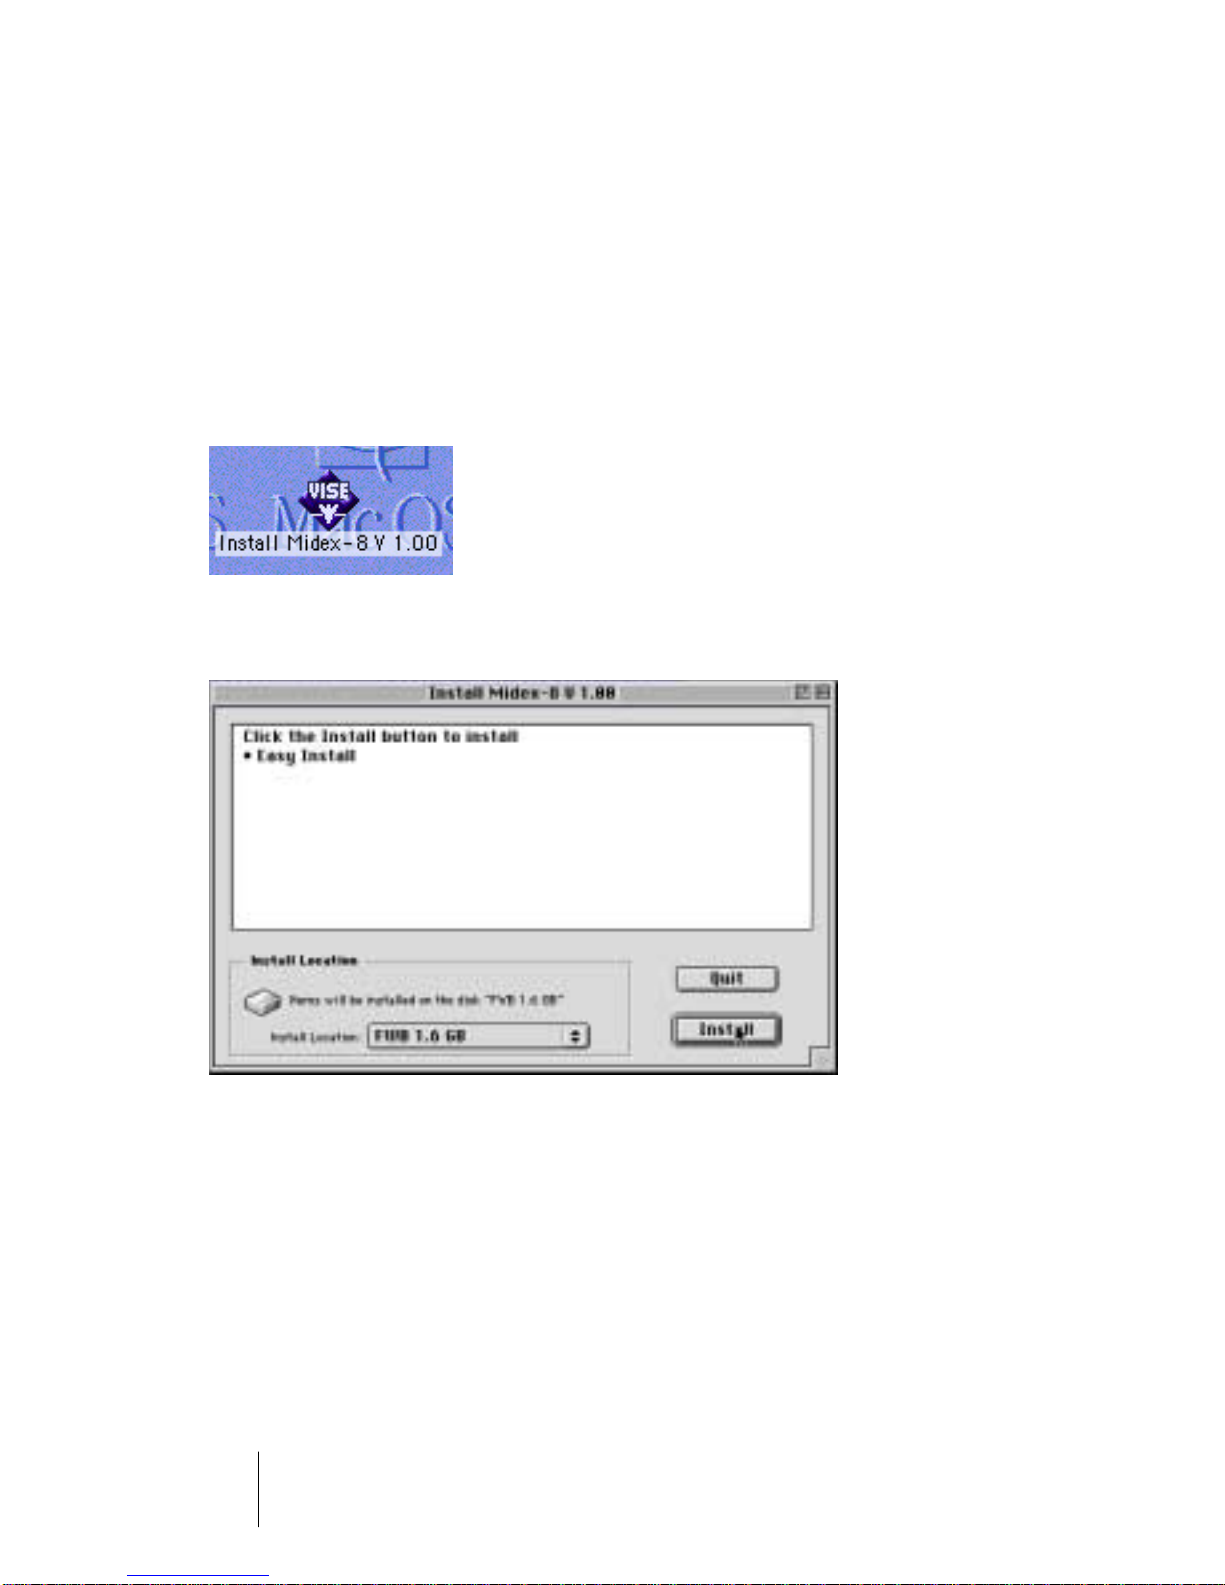
2. Start the driver software installation by double clicking the Installer icon
“MIDEX-8 Install V 1.xx”.
If you double click this icon…
…this dialog will appear:
3. Use the “Install Location” pop-up menu to tell the Installer on which hard
disk your System folder resides. Click the “Install” switch to start the in-
stallation process.
TheInstallerprograminstallsanumberoffilesin yourSystem folderand inthe
“OMS Folder”.
4. When the installation has been completed, close the dialog by clicking
“Quit”.
You do not have to restart the computer at this point.

MIDEX-8
English–19
ENGLISH
5. Using the USB cable that came with the unit, you can now finally connect
your MIDEX-8 to the USB socket on your computer, as described onpage
10 .
6. IfyourMIDEX-8isalreadyconnected,removetheUSBcableforabriefmo-
mentandconnect it againorpressthePanic/Cablecheckbuttonto force a
device reset.
TheMIDEX-8shouldnowautomaticallyberecognizedandreceiveitsdriversin
the background. The blue operation LED should light up.
Downloading a newMIDEX-8 Driver from the Internet
If you have access to the Internet, you can surf to the Steinberg web
sitetofindoutwhetheranewerversionoftheMIDEX-8driversoftware
isavailable.Thismusthave ahigherversionnumberthanthedriveron
the MIDEX-8 CD-ROM. If newer driver software is available, you should
download it and install it as described above.
Please point your Internet Browser to:
• http://www.steinberg.net/support/hardwaredriver

MIDEX-8
English–20
Setting up OMS
Youmustnowmakethenecessarysettingsinthe“OMSSetup”program
tomakesure thatOMS properlyrecognizes MIDEX-8and thatits MIDI
portsaremadeavailabletothesystem.
The“OMSSetup”program is located in the “OMS Applications”folder
which can be found in the “Opcode”folder on your hard disk.
1. Start the “OMS Setup” program by double clicking its icon.
If AppleTalk is active, you will be asked whether you wish to turn it off. If your
computer is not connected to a local area network anyway, you should defi-
nitely click the “Turn it off”switch. But even if you are connected to a network,
youshould still disconnectit, as arunning network connection willalways con-
sume computer power which you could better use for your sequencer, espe-
cially if you work with many audio tracks.
The OMS AppleTalk dialog
Table of contents
Other Steinberg Media Converter manuals


