StenoCast Realtime TV User manual
Contents
• Charging - Page 2
• Turning On - Pages 3
• Initiating Realtime - Pages 4
• Ez Verify (Test Mo e) - Page 5
• Viewing / Reviewing Text - Pages 6 - 8
• Search Feature - Pages 9 - 10
• Export / Closing Transcript - Pages 11 - 12
• Formatting Options - Page 13
• Up ating Software - Pages 14 - 15
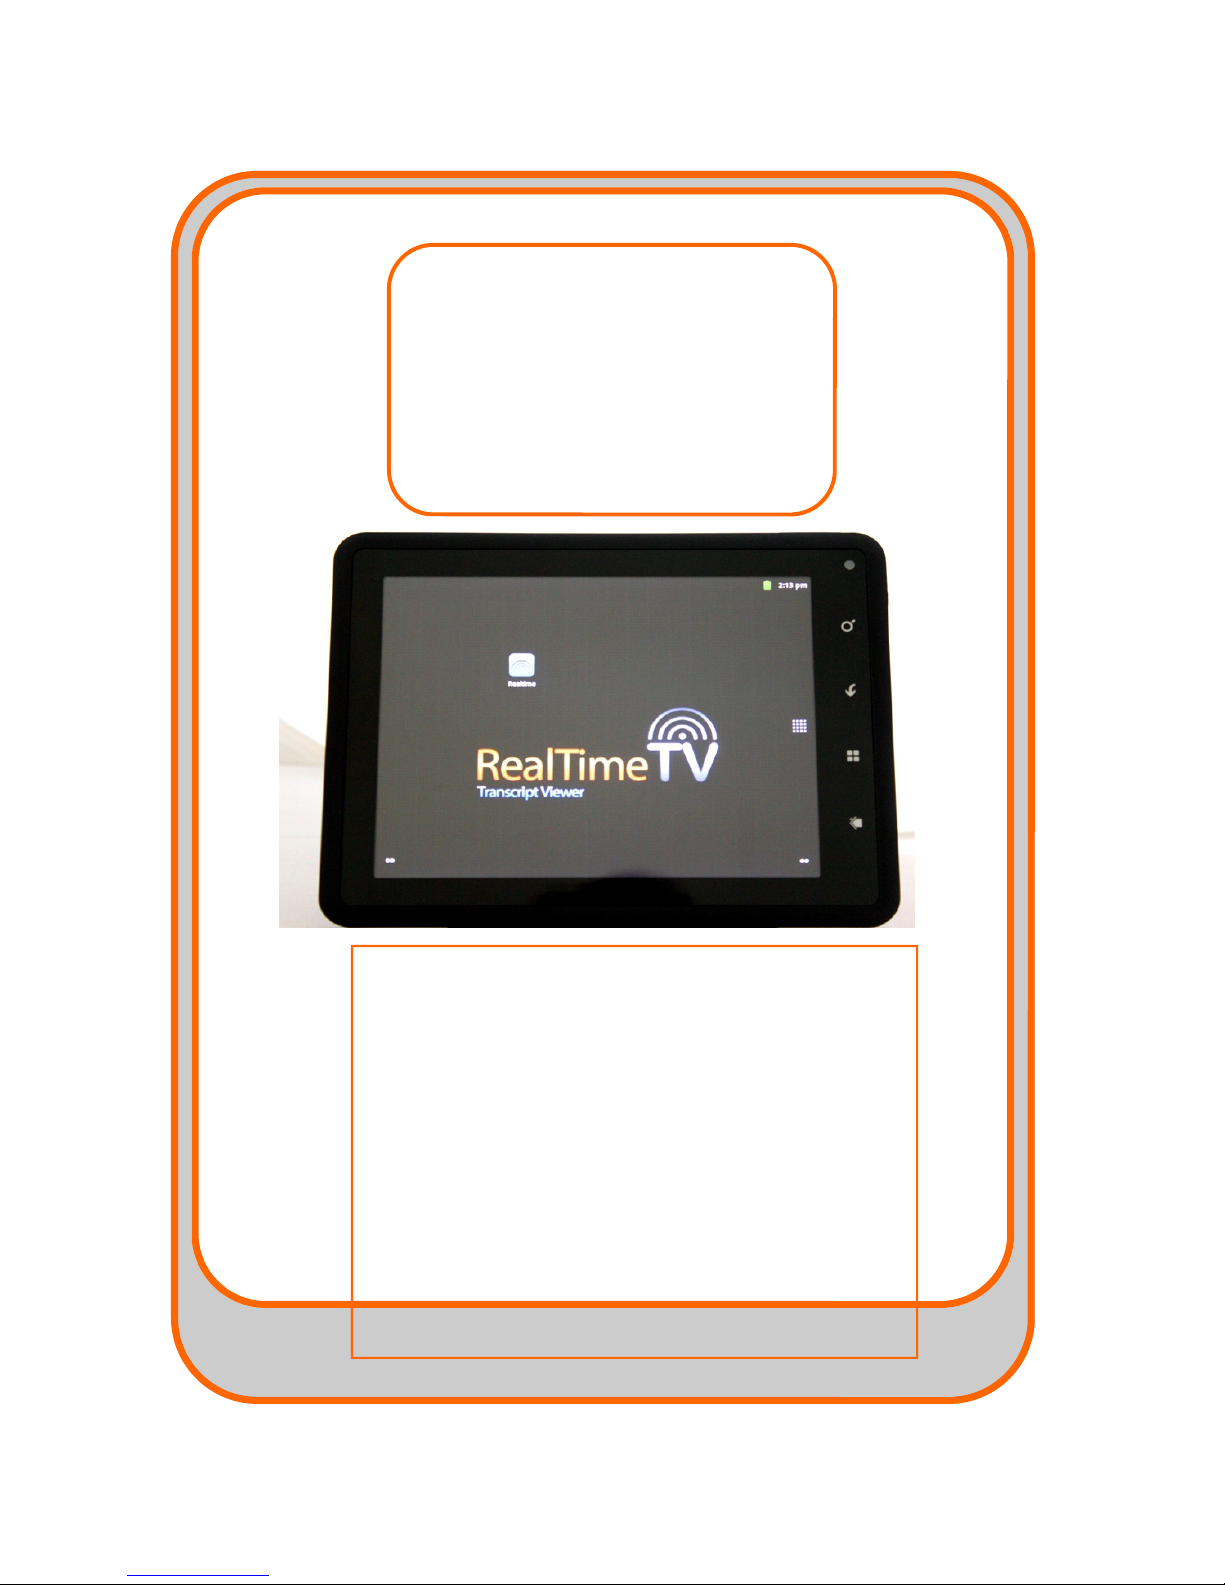
8-Inch Realtime TV
(Transcript Viewer)
User Manual 2.0
THINGS YOU SHOULD KNOW
Page 2
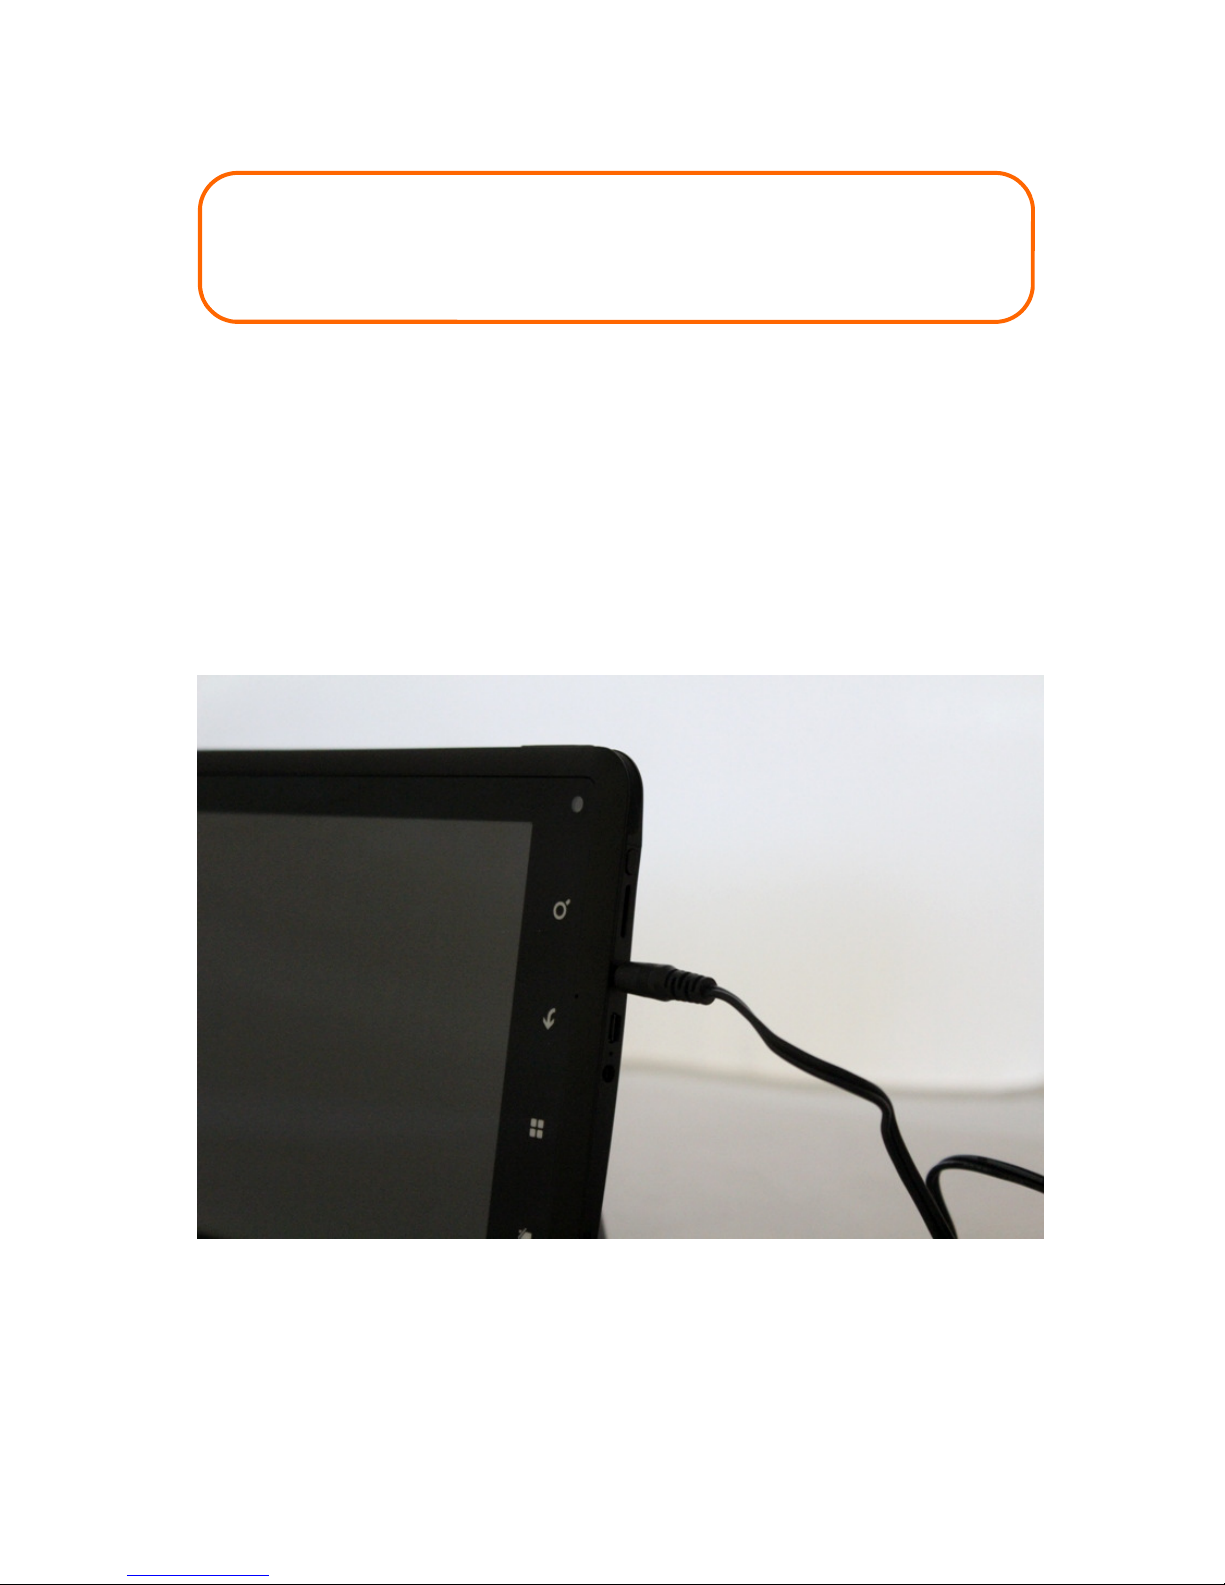
Charging the 8-inch TV (Transcript Vie er):
To charge the Realtime TV, plug the AC power cor (supplie ) into the power port on
the upper right e ge of the Realtime TV. See picture 1 below. The power port is
situate on the TV’s right e ge, between the Search icon an the Back icon.
Picture 1
THINGS YOU SHOULD KNOW
Page 3
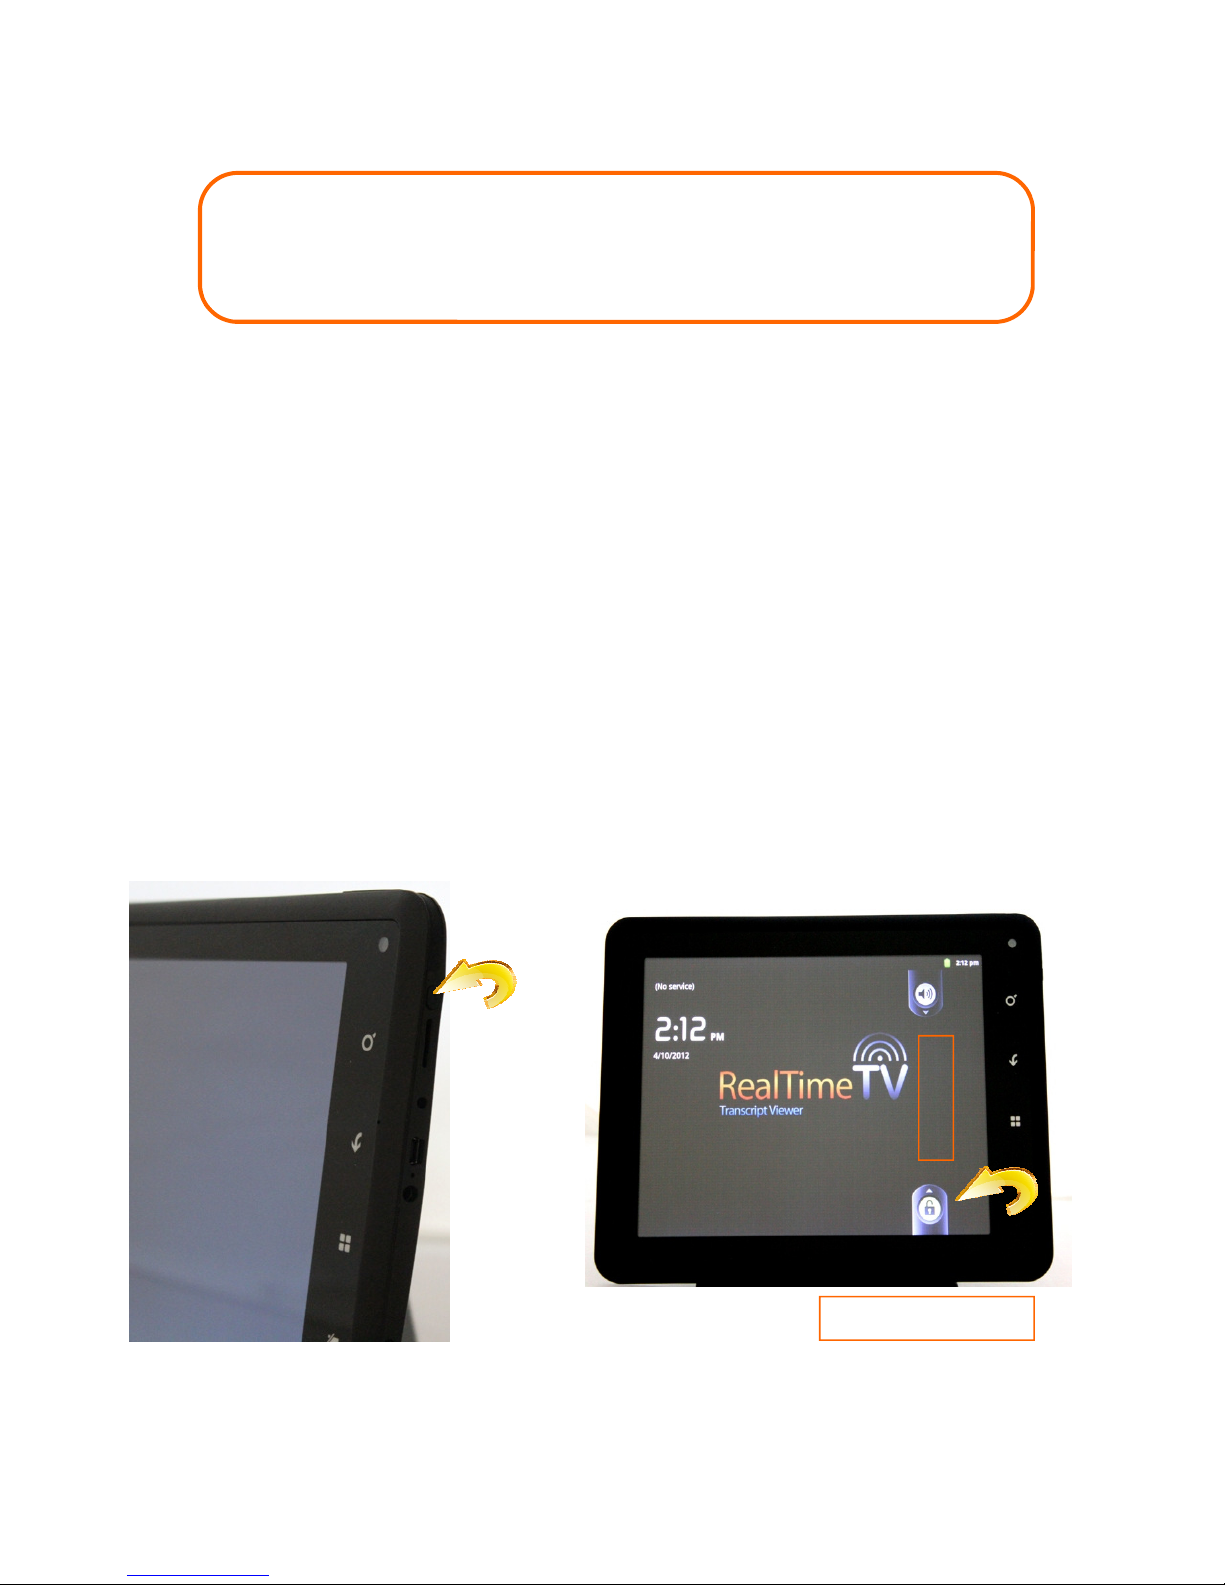
Turning on the 8-inch TV (Transcript Vie er):
1) Press an hol the On / Off button (approximately three to five secon s) until the
isplay screen turns on an you hear the “buzz.” When facing the TV screen, the
On / Off button is on the upper right-si e e ge, near the top. See Picture 1 below.
2) When the isplay screen comes on, release the On / Off button.
3) When the TV’s Operating System is fully loa e , you will see a screen lock sli e
bar (a pa lock icon) on the right si e of the isplay screen. Simply touch an hol
the sli e bar with one finger an sli e it upwar s until the screen has been
unlocke . See Picture 2 below.
4) The TV is now rea y to receive your wireless realtime transcription. Please wait
until your transmitter (ME2U, X7, RED or Ez Sen ) is plugge in an rea y to
transmit before opening your TV’s viewing software.
Picture 1
Picture 2
On / Off
UNLOCK BUTTON
SLIDE UP

FEATURES Page 4
Receiving Realtime
1) On the Homepage tap the Realtime TV icon one time.
2) The TV will automatically establish contact with your transmitter. If you o not
hit any steno strokes, your transmitter (X7, RED or Ez Sen ) will automatically
sen a test signal to your TV: “Wireless Connection Successful.” That message
will continue until your first steno stroke, at which time the test message will
cease an your realtime will be isplaye on your TV screen.
3) For ease of use, so your clients can turn the TV off uring breaks or overnight
without knowing how to appen transcripts, the TV will automatically loa the last
conclu e session an will seamlessly connect the new session with the last session.
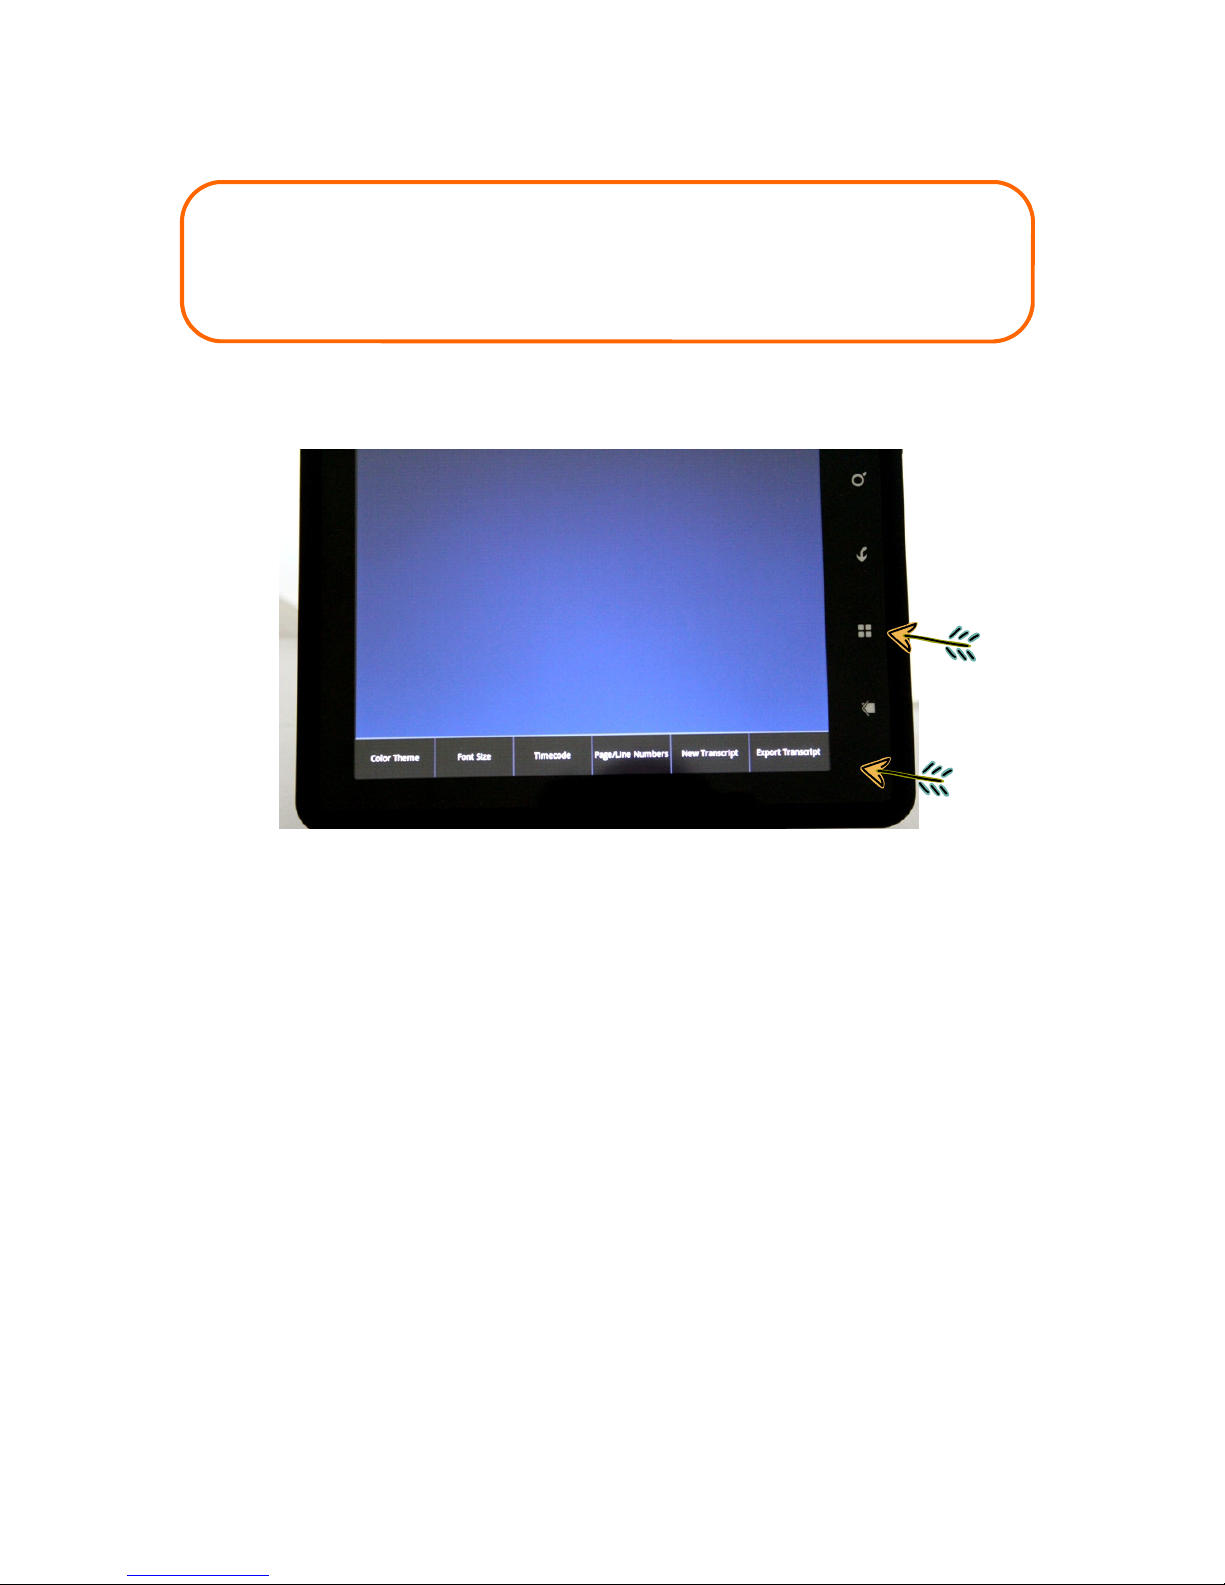
To start a new session without loa ing the previous session, hit the “Cancel” button
as the transcript is loa ing or tap the “Menu” button an then tap the “New
Transcript” tab below. You will be aske if you want to export (save) the previous
session onto a flash rive at that time.
(1) Tap “Menu” an then (2) tap “New Transcript” to start a new session.
Search -
Back -
Menu -
Home -
FEATURES Page 5
Ez Verify—Test Mode
If the Reporter is not yet sen ing realtime to clients, you may still verify that the
Realtime TV is rea y to receive realtime. Simply plug the wireless transmitter (X7,
RED or Ez Sen ) into the Reporter’s computer. Thereafter tap the Realtime icon on
your TV to open a realtime file. The TV will automatically sen a test message to
your TV: “Wireless Connection Successful.” That message will continue until your
first steno stroke, at which time the test message will cease an your realtime will be
isplaye on your TV screen.
Note: The test message is sent an will be receive on the TV even without the
Reporter’s CAT software program being opene . The test signal is not sent when
using a USB ME2U transmitter.
Wireless Connection Successful
Receiving the “Realtime Connection Successful” message tells you the transmitter
an TV are functioning properly. If the realtime transcript is thereafter not
receive on the Realtime TV an /or other computers, that is an in ication that the
bua rate, protocol or com port settings on the reporter’s computer may be the
issue.
FEATURES Page 6
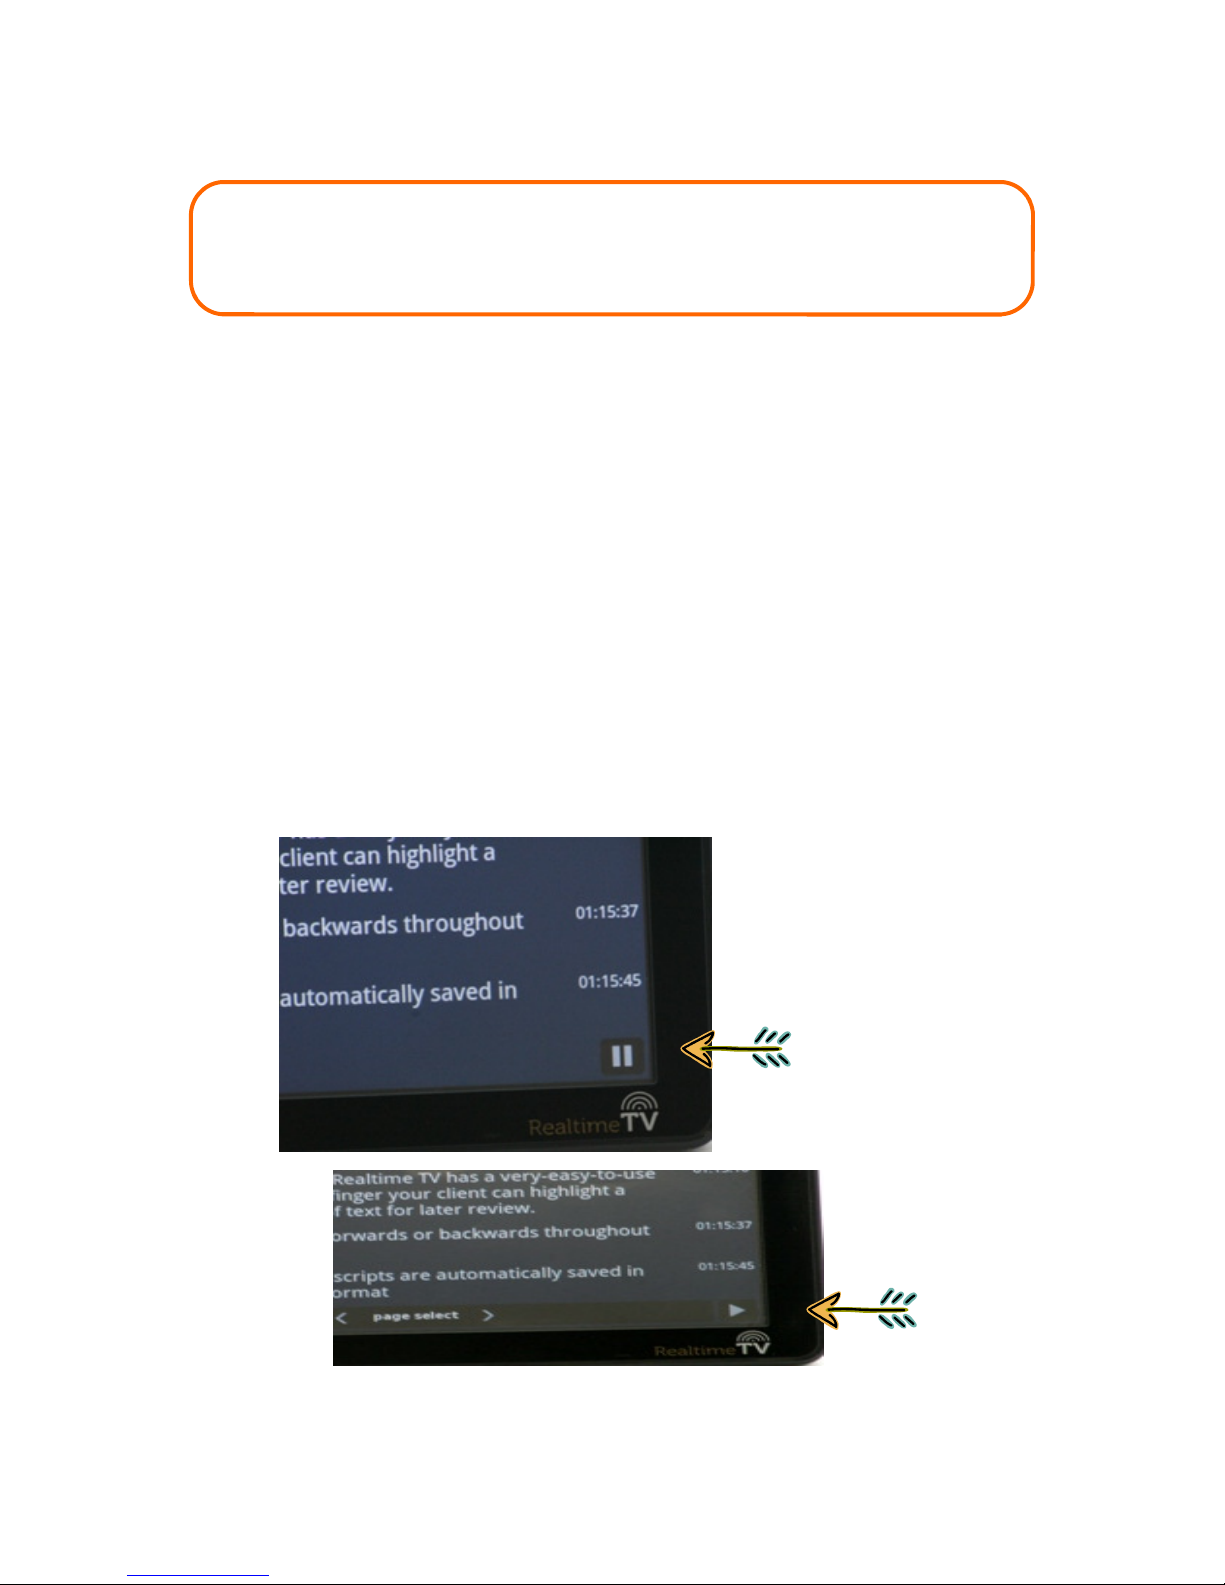
To Vie Text
• The text will automatically scroll across the TV screen.
To Revie Text (Scroll back)
• Tap the Pause button one time
• To scroll back, towar s the beginning of the realtime transcript, place one finger
at the top of the screen an move it ownwar s towar s the bottom of the
screen, maintaining contact with the screen uring this motion.
• To scroll forwar , towar s the beginning of the realtime transcript, place one
finger at the bottom of the screen an move it upwar s towar s the top of the
screen, maintaining contact with the screen uring this motion.
• To return to the en (the “live” or current) portion of the transcript, tap the
Play button one time.
PAUSE BUTTON
PLAY BUTTON
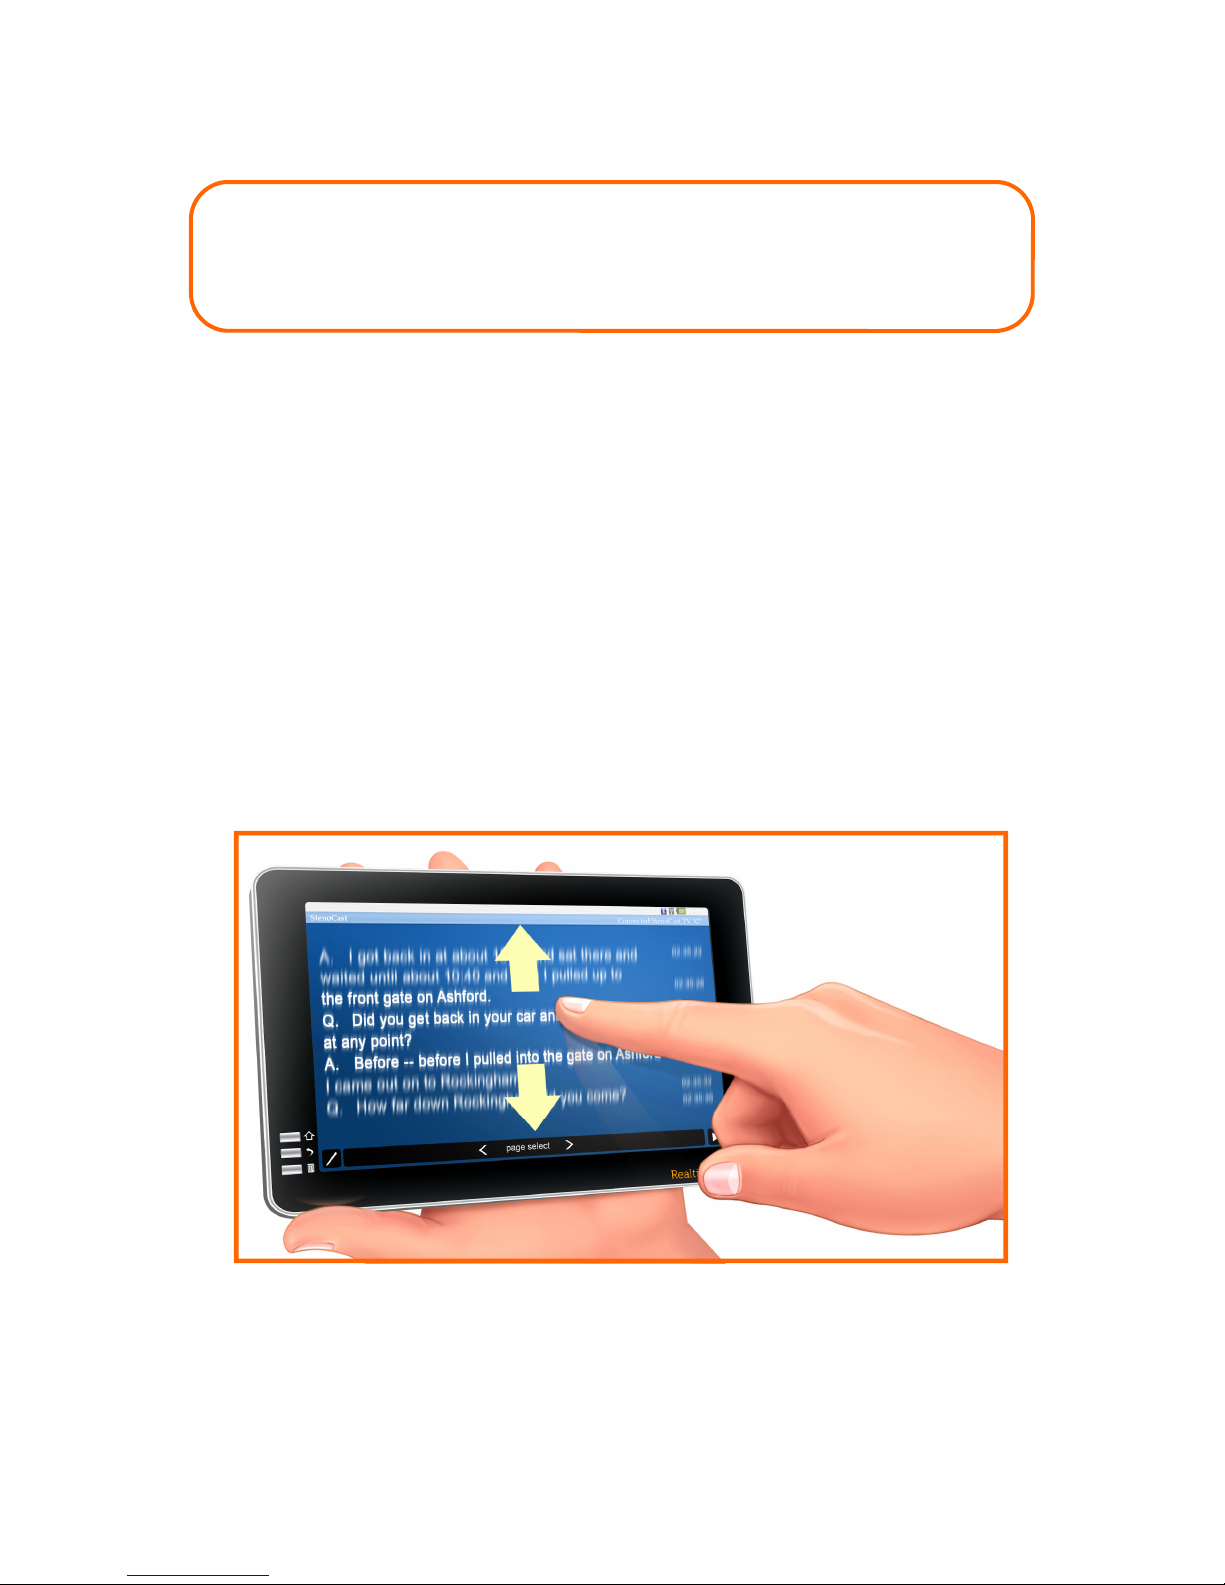
FEATURES Page 7
To Revie Text (Scroll back)
• Tap the Pause button one time
• You may either tap the arrow buttons at the bottom of the isplay screen to move
backwar s or forwar s through the transcript, or you may place one finger on the
top portion of the screen an quickly sli e your finger ownwar s (to move
backwar s through the transcript) or place one finger at the bottom of the screen
an sli e your finger quickly upwar s (to move forwar s through the transcript).
• To return to the en (live) portion of the transcript, tap the Play button one time.
THINGS YOU SHOULD KNOW
Page 8
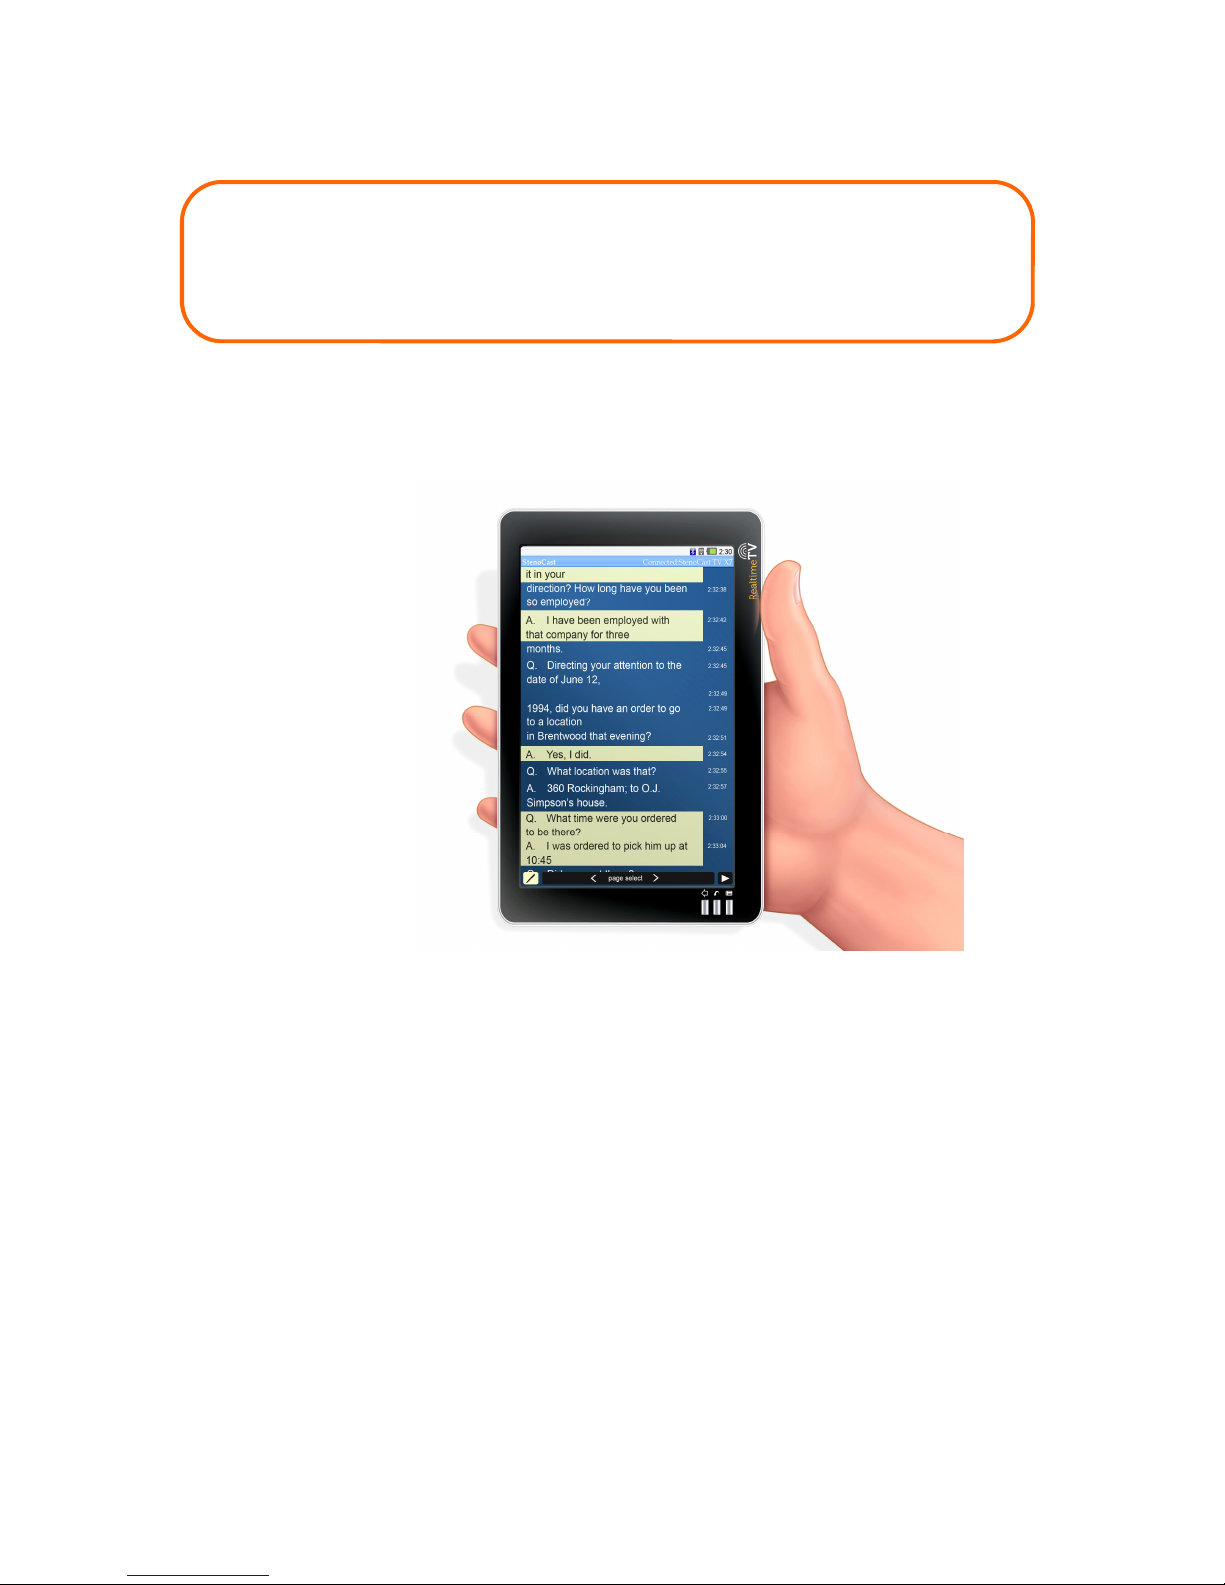
Highlighting Text
• To highlight text, simply touch (tap) the line(s) of text you wish to highlight with
one finger. You may then scroll forwar s or backwar s in or er to locate
a itional text to highlight. Make sure to maintain finger contact with the screen
in or er to scroll in either irection. If you tap the screen, that will highlight the
text. (Tap again to un-highlight) If you maintain contact with the screen, you can
scroll.
• When you wish to resume to the current (live) portion of the transcript, tap the
Play button one time (if you ha tappe the Pause button before highlighting). The
realtime transcript is being receive /store on your Realtime TV uring the
perio s when the transcript has been pause .
Note: You are not require to pause the procee ings in or er to highlight text.
To scroll, you shoul tap the Pause button first.
Note: Text may be
viewe an highlights
may be a e to text
in both the
Lan scape an
Portrait views.
This is an example in
Portrait view.

THINGS YOU SHOULD KNOW
Page 9
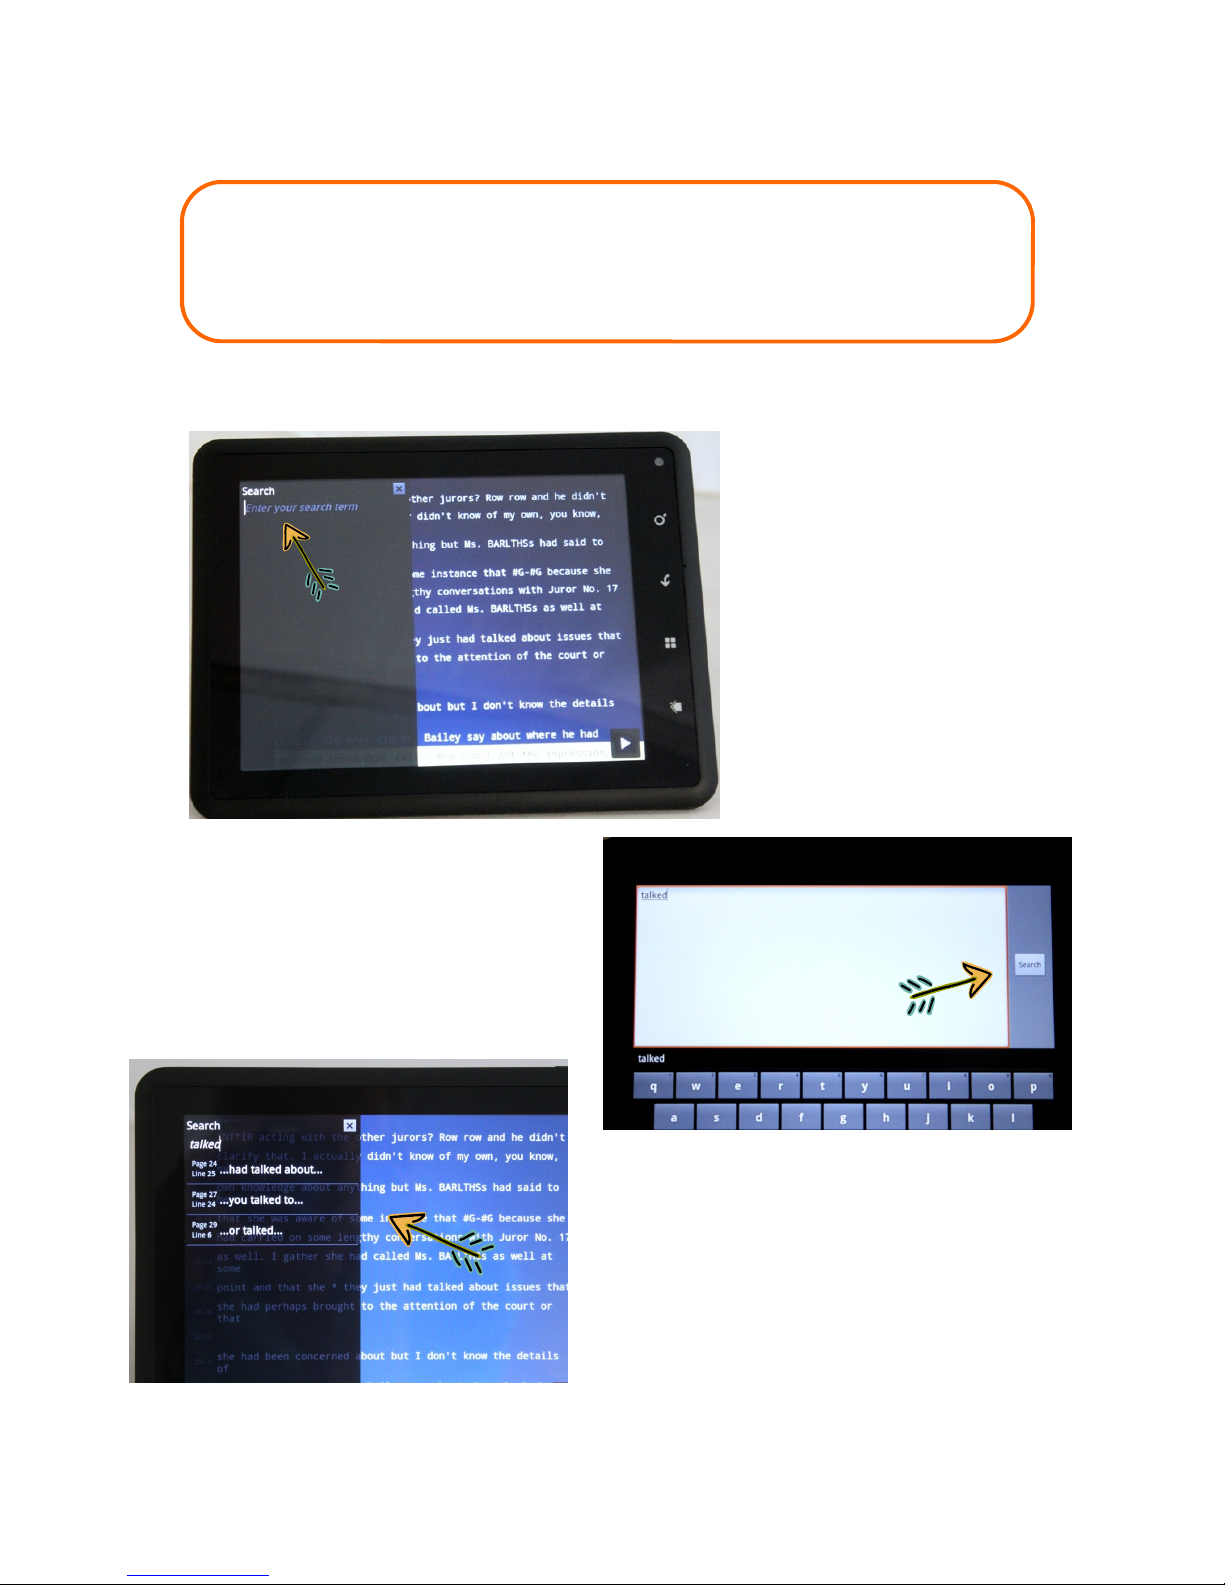
Searching for Text
With the 8-inch Realtime TV, you have two options when searching for a wor or
wor s within the realtime transcript. You may either tap the Search icon (see
Picture 1 below) or tap the Pause icon on the lower right portion of the screen (see
Picture 2 below) an then tap the Search icon that appears in the lower left corner of
the screen (see Picture 3 below).
Picture 1 Picture 2
Picture 3
THINGS YOU SHOULD KNOW
Page 10
Searching for Text cont’d
(1)
1) Tap screen
here to activate
the touch screen
keyboar .
2) Type in the wor (s) to
search on touch screen keypa
an tap the Search
button.
(2)
3) Search results appear in sha e
area. Tap on the page/line of any
results to go to that area of text
within the realtime transcript.
Tap the “X” to close the Search
function.
(3)
THINGS YOU SHOULD KNOW
Page 11
Exporting Transcripts
Saving (Exporting) the Realtime Transcript
To save the realtime transcript, whether at the en of the ay or at any point uring
the procee ings, o the following:
1) Place a USB flash/thumb rive into the USB port (via the supplie USB a apter) on
the si e of the Realtime TV.
2) Tap/Press the Menu button an then tap the Export Transcript tab.
3) When the menu opens, select the format you wish to save the transcript to:
Text, PDF or Raw. (Highlights are save in the PDF format). Note: you may save
the transcript in multiple formats.
4) Wait a few secon s after the “copy complete” message has been isplaye before
removing the flash/thumb rive from the TV’s USB port.
Note: If you export (save) a transcript an a flash/thumb rive is not plugge into the
Realtime TV USB port, then the transcript is save on the Realtime TV’s internal
storage.
Menu
Export
CLOSING REALTIME TRANSCRIPTS Page 12
Closing the Realtime Transcript - Turning off the Realtime TV
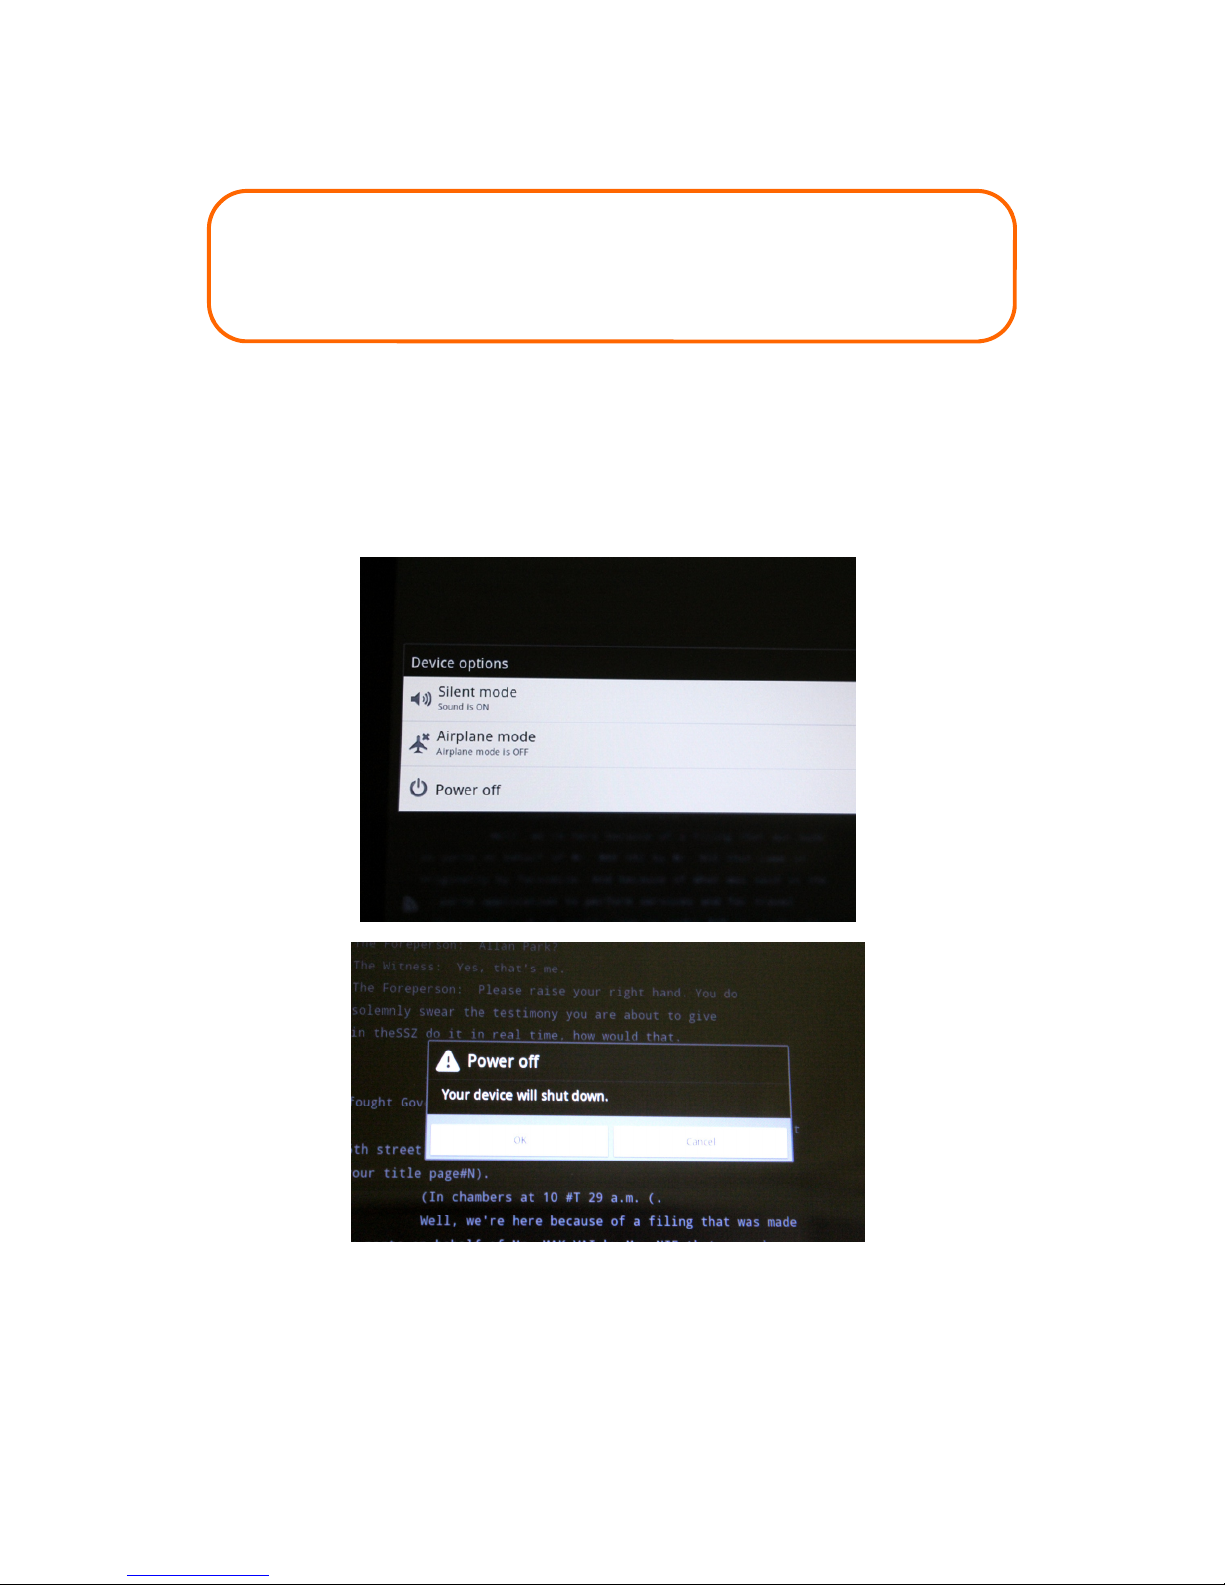
To close your realtime transcript an turn the Realtime TV off, simply press an hol
On/Off button until the Device Options menu opens. Then tap “Po er Off.” See Picture
1 below. Then select “OK” to confirm—Picture 2. The transcript of the last session is
automatically save on the Realtime TV.
Note: If the Home or Back buttons are epresse ina vertently uring a realtime session,
simply tap the Realtime TV icon on the Homepage to return to the realtime transcript. The
Realtime TV will continue to receive the transcript even if you have navigate away from the
realtime transcript page.
Picture 1
Picture 2
OK
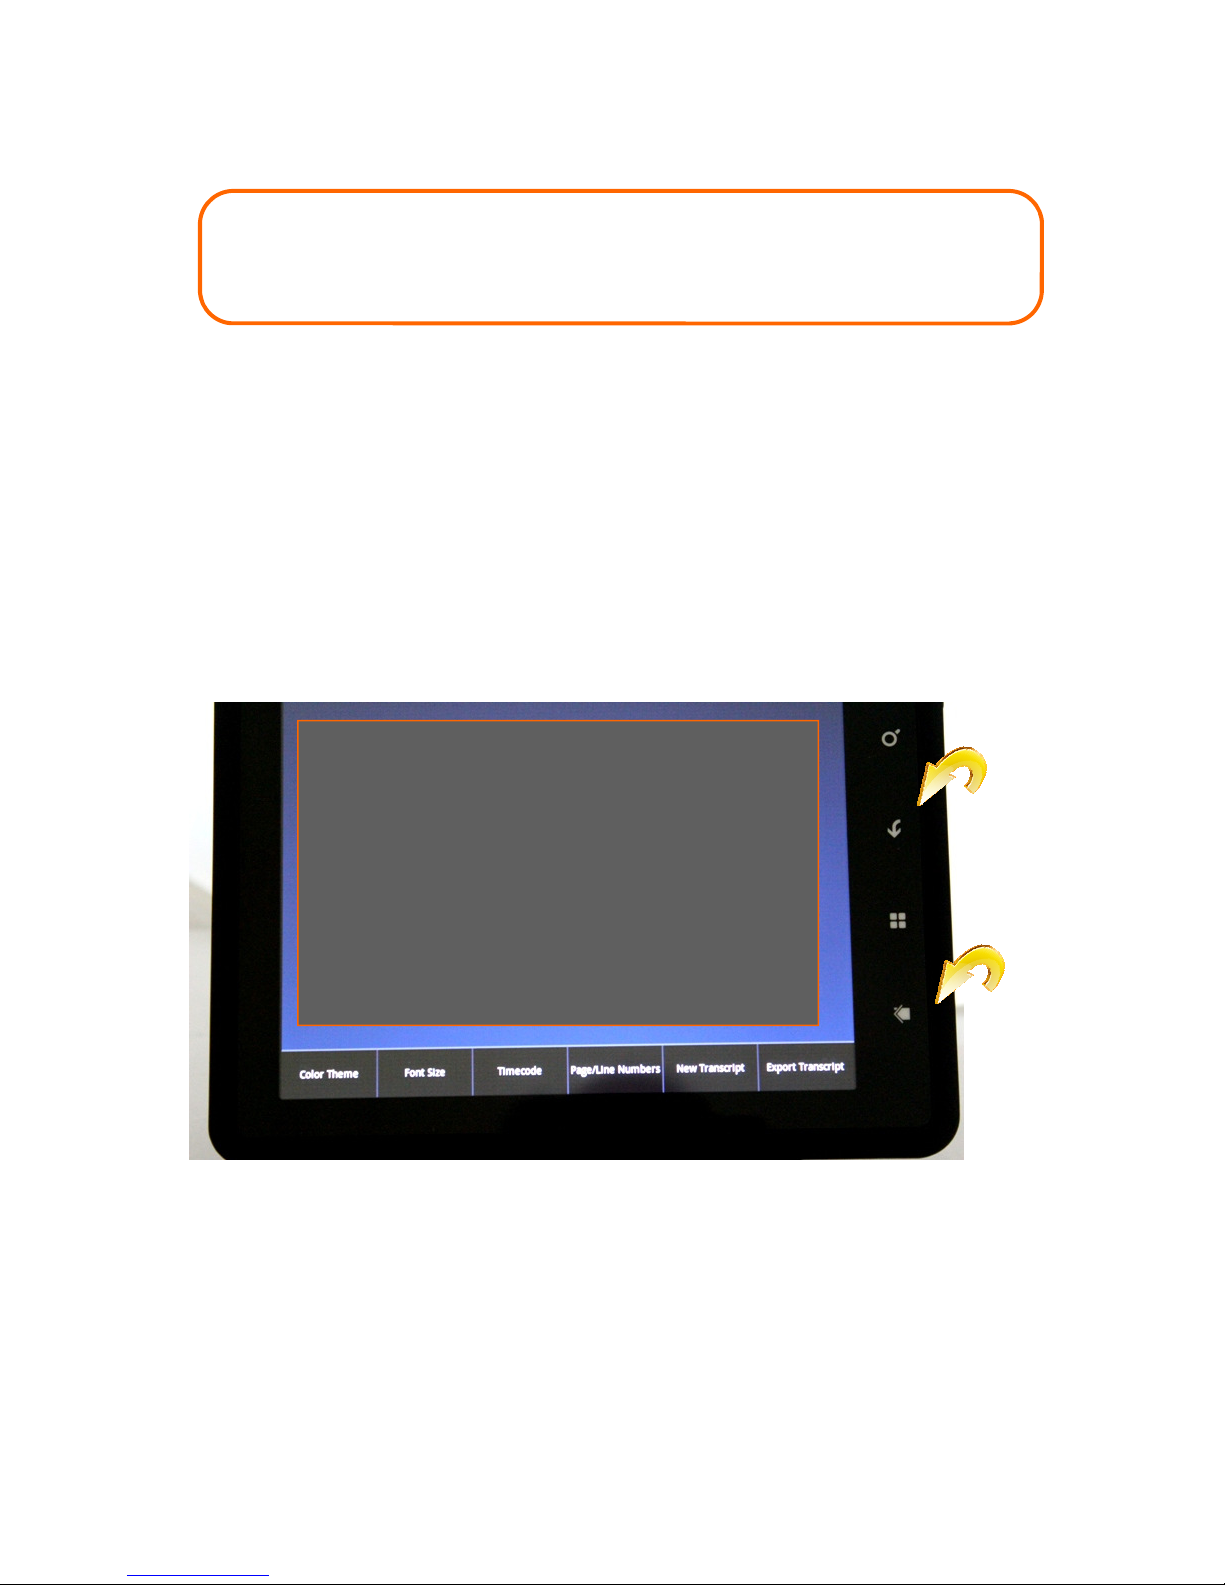
FEATURES Page 13
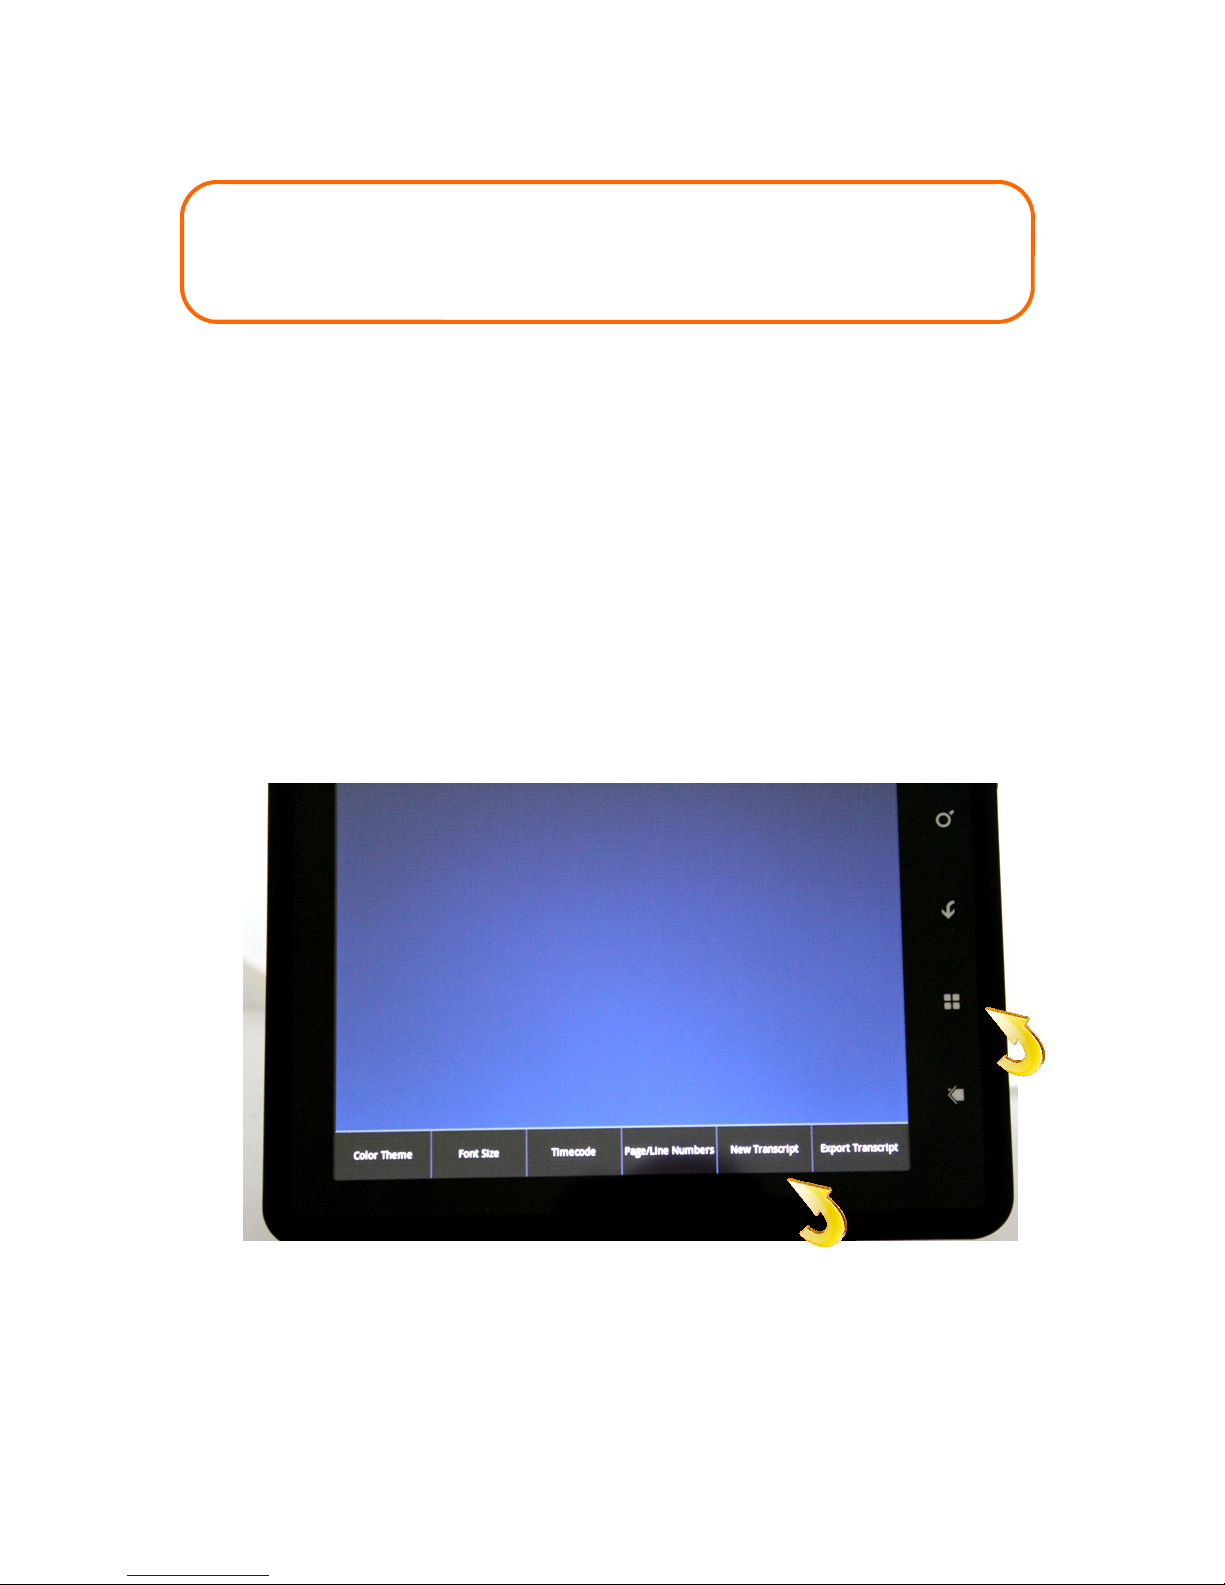
Changing the Background
Font Size & Colors & Time Stamps & Page/Line Numbers
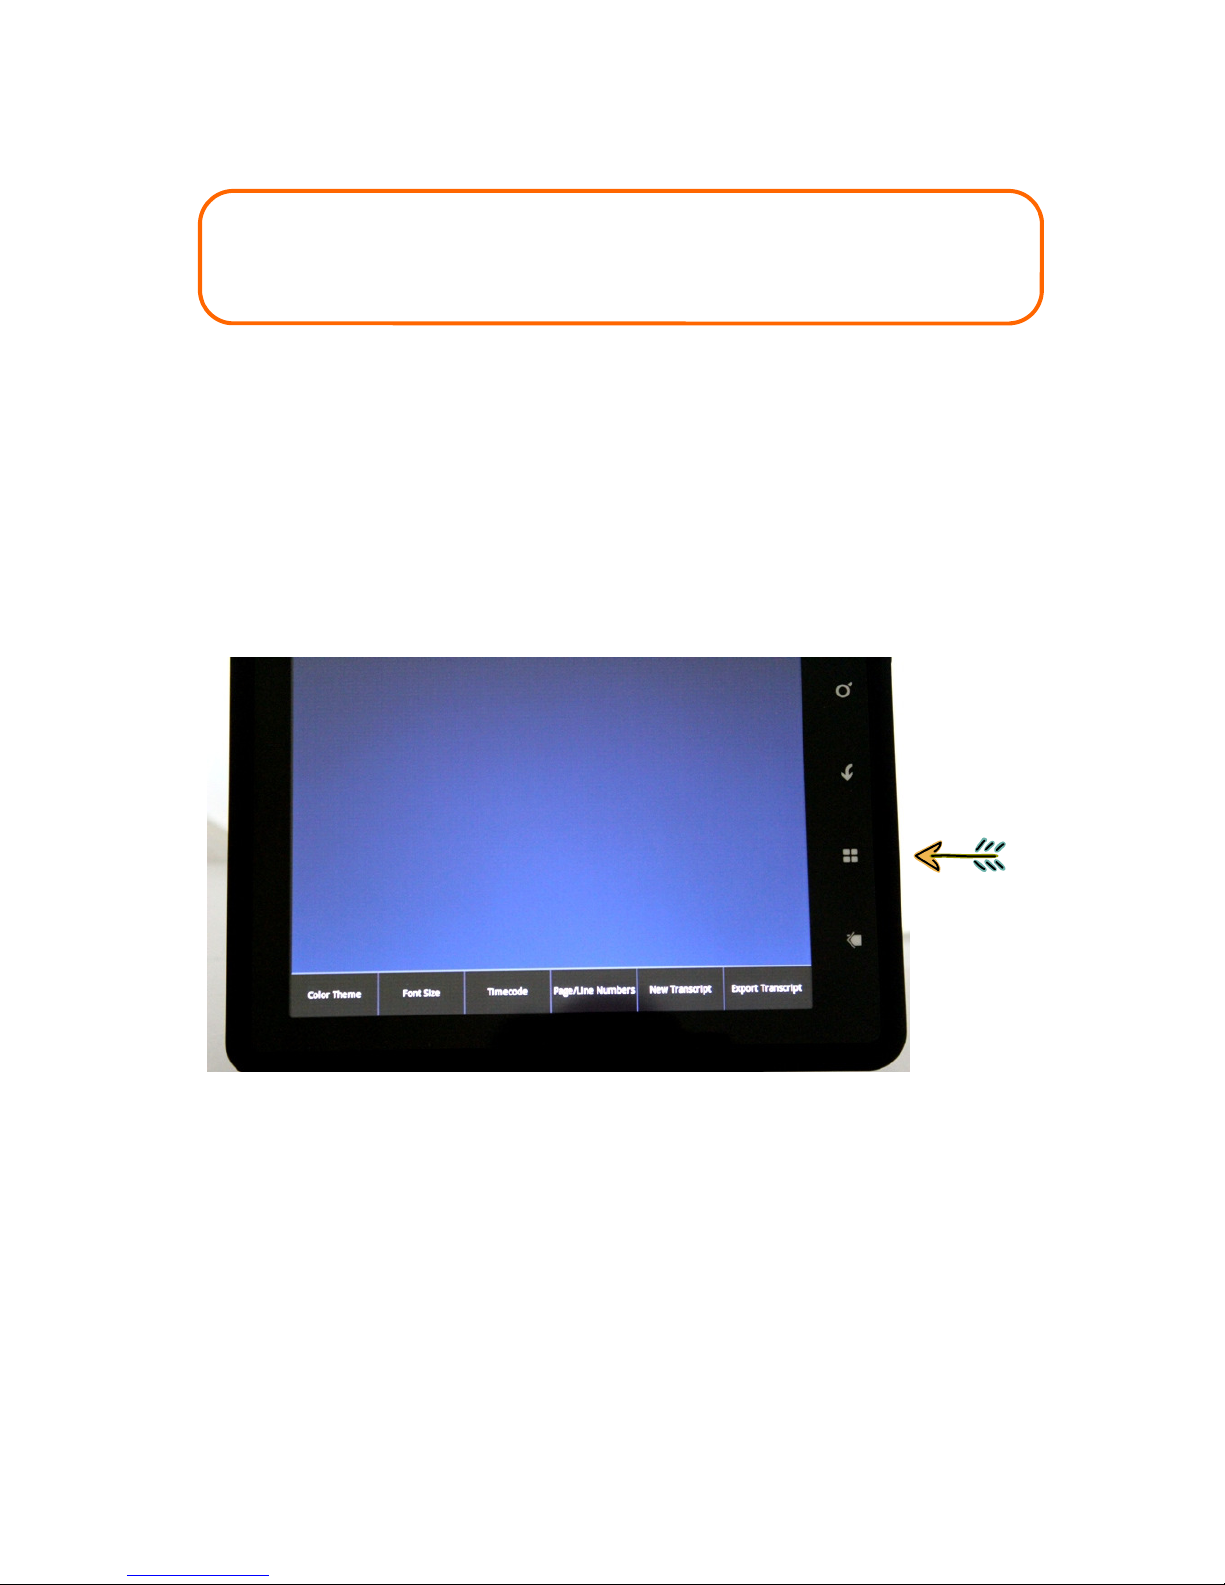
You may select font size, backgroun colors, an you eci e whether to isplay
page/line numbers an time co es. To make any changes, simply press the Format
button, then tap the esire tab.
Press the Format button one time to display
the formatting options menu.

THINGS YOU SHOULD KNOW
Page 14
Copy the TV soft are update onto
a USB flash/thumb drive. Plug the
flash/thumb drive into the USB
port on the Realtime TV (using
the provided adapter).
1) Tap the Menu Button
2) Tap ES File Explorer
Updating Realtime TV Soft are
3) Tap the “scsi_sda1” folder
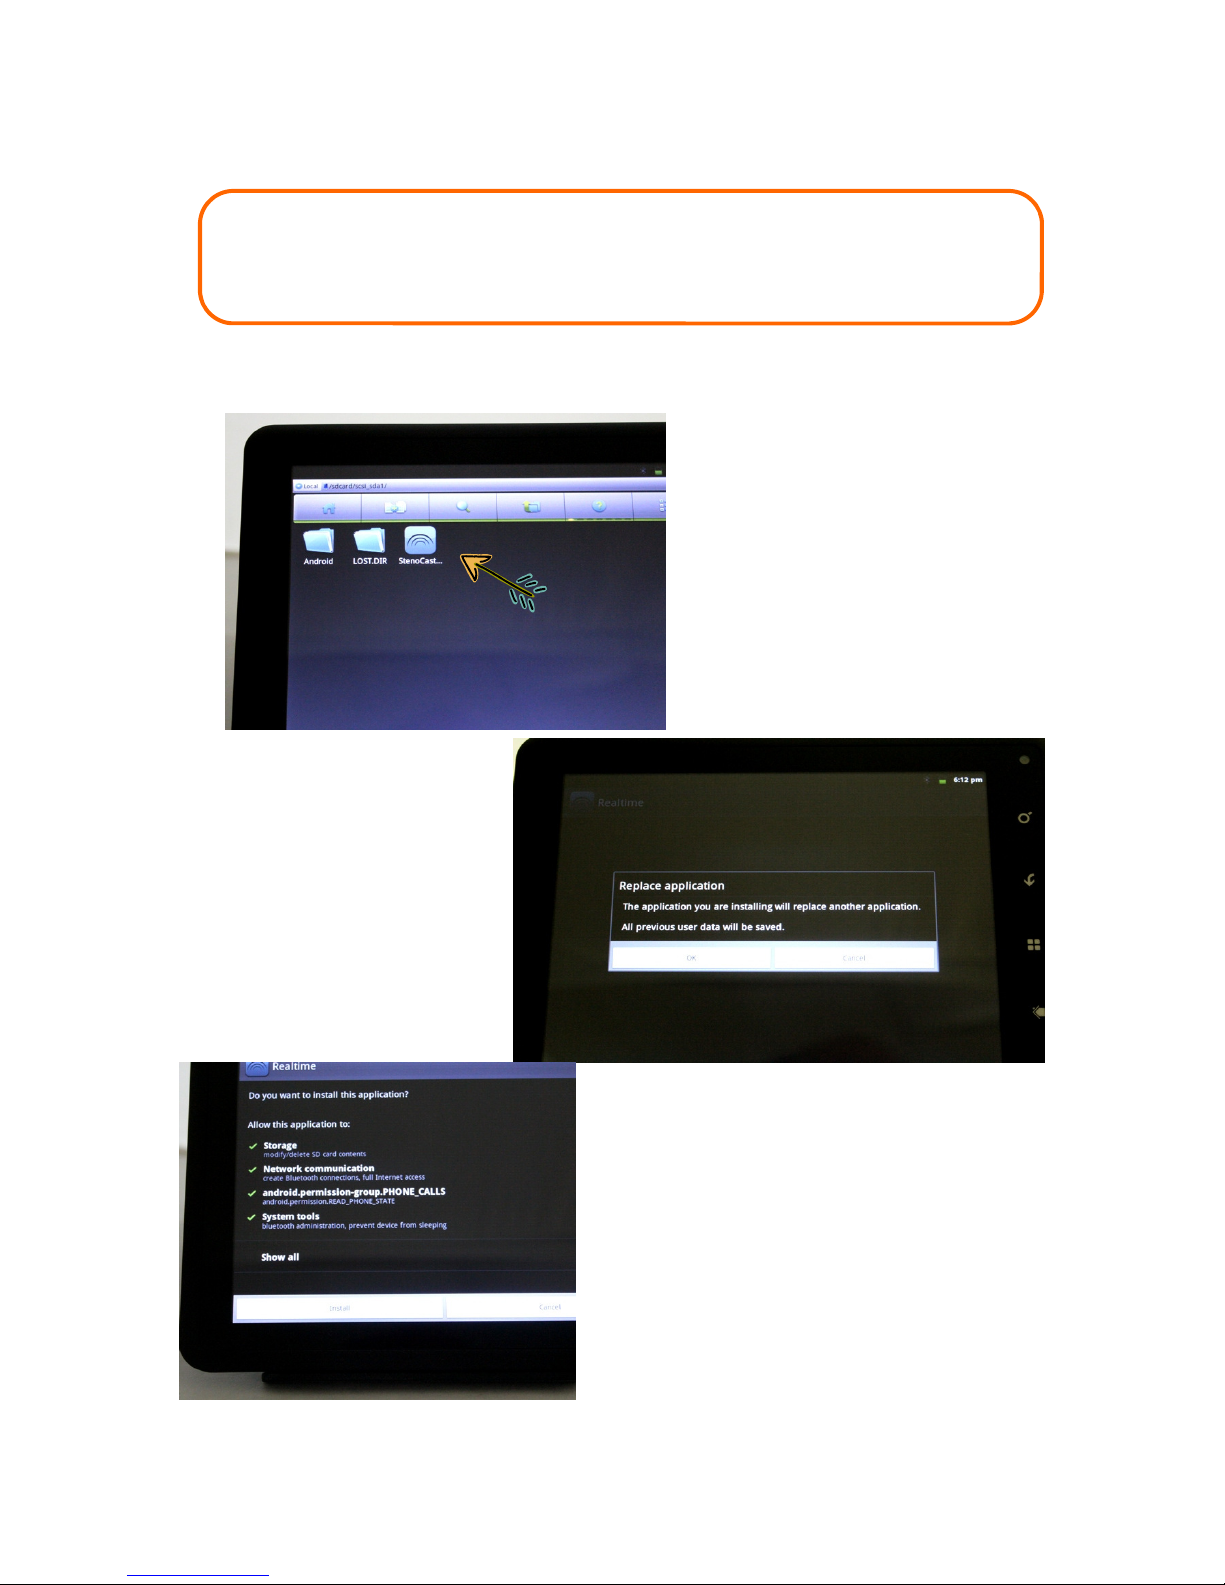
FEATURES Page 15
Updating Realtime TV Soft are (cont’d)
4) Tap the StenoCast icon
4) Tap “OK” to replace
OK
4) Tap “Install”
Install
FEATURES Page 16
Extra Capabilities—Warning!
There are several features an capabilities built into this Realtime TV evice that may
in the future be utilize , along with several apps that come stan ar with An roi
evices. It is strongly recommended that this Realtime TV be utilize exclusively
for provi ing realtime services to your clients. Support is specifically not provi e for
any application run on this evice other than the realtime viewing software provi e
by this manufacturer. Support is specifically not provi e to correct any issues arising
out of operating any application run on this evice other than the realtime viewing
software.
Mi le Button: BACKUP
Be very careful: Changing settings may cause
issues with realtime. If you have accesse
any program or menu other than your
realtime viewing software, you may press the
Backup button to back up one step at a time
or press the Home button to imme iately
return to the Home screen.
Back
Home

THINGS YOU SHOULD KNOW
Page 17
Battery
It is recommen e that prior to first use, that you charge your TV for
ten (10) hours, an after your first use charge your TV for ten (10)
hours. Thereafter, just charge until the battery level is full. There is no
“battery memory.” You cannot over-charge or un er-charge this
Lithium battery. The TV is esigne to be operate while plugge into
AC power, but will run for several hours off battery power.
Manufacturer’s Warranty
This evice is covere by the Manufacturer’s Warranty for a perio of one (1) year
from ate of initial purchase. This warranty covers both workmanship an materials.
If this pro uct fails uring the warranty perio ue to a efect in manufacture or
materials, the evice will be repaire or replace , at the Manufacturer’s iscretion.
Purchaser is responsible for all shipping charges.

Phone: 858.578.4600
Fax: 888.496.3206
E-mail: support@stenocast.com
Table of contents


