ODYSWindesk9Plus3G–KURZANLEITUNG
V2.1.0
Introduction
Pleaseobservetheinformationandwarningsfromtheusermanual.
‐ Pleaserefertotheusermanualfordetailedinstructions,conformityandsupportinformation.
‐ Themanualcanbefoundathttp://www.odys.de/web/tablet‐pc‐wintab_de.html.
‐ Usethehyperlinkat„Einstellungen–PCundGeräte–PC‐Info".
‐ Thereyouwillalsofindaguideonhowtochangethesystemlanguage.
‐ Usetheinstallationassistanttoeasilyconfigurethedevice.
Important!Pleasenote:Inordertouseallfeaturesavailable,aMicrosoftuseraccountmustbecreatedanditis
necessarytoactivateyoursystemlateron.Toresetaforgottenpasswordpleasevisitwww.live.com.
Topreventconflictswithothersystemswerecommendcreatinganewaccount.
Pleasecloseunusedappstoextendthebatterylifetimeasdescribedontheright.
Turnoffthetabletwhennotinuse.
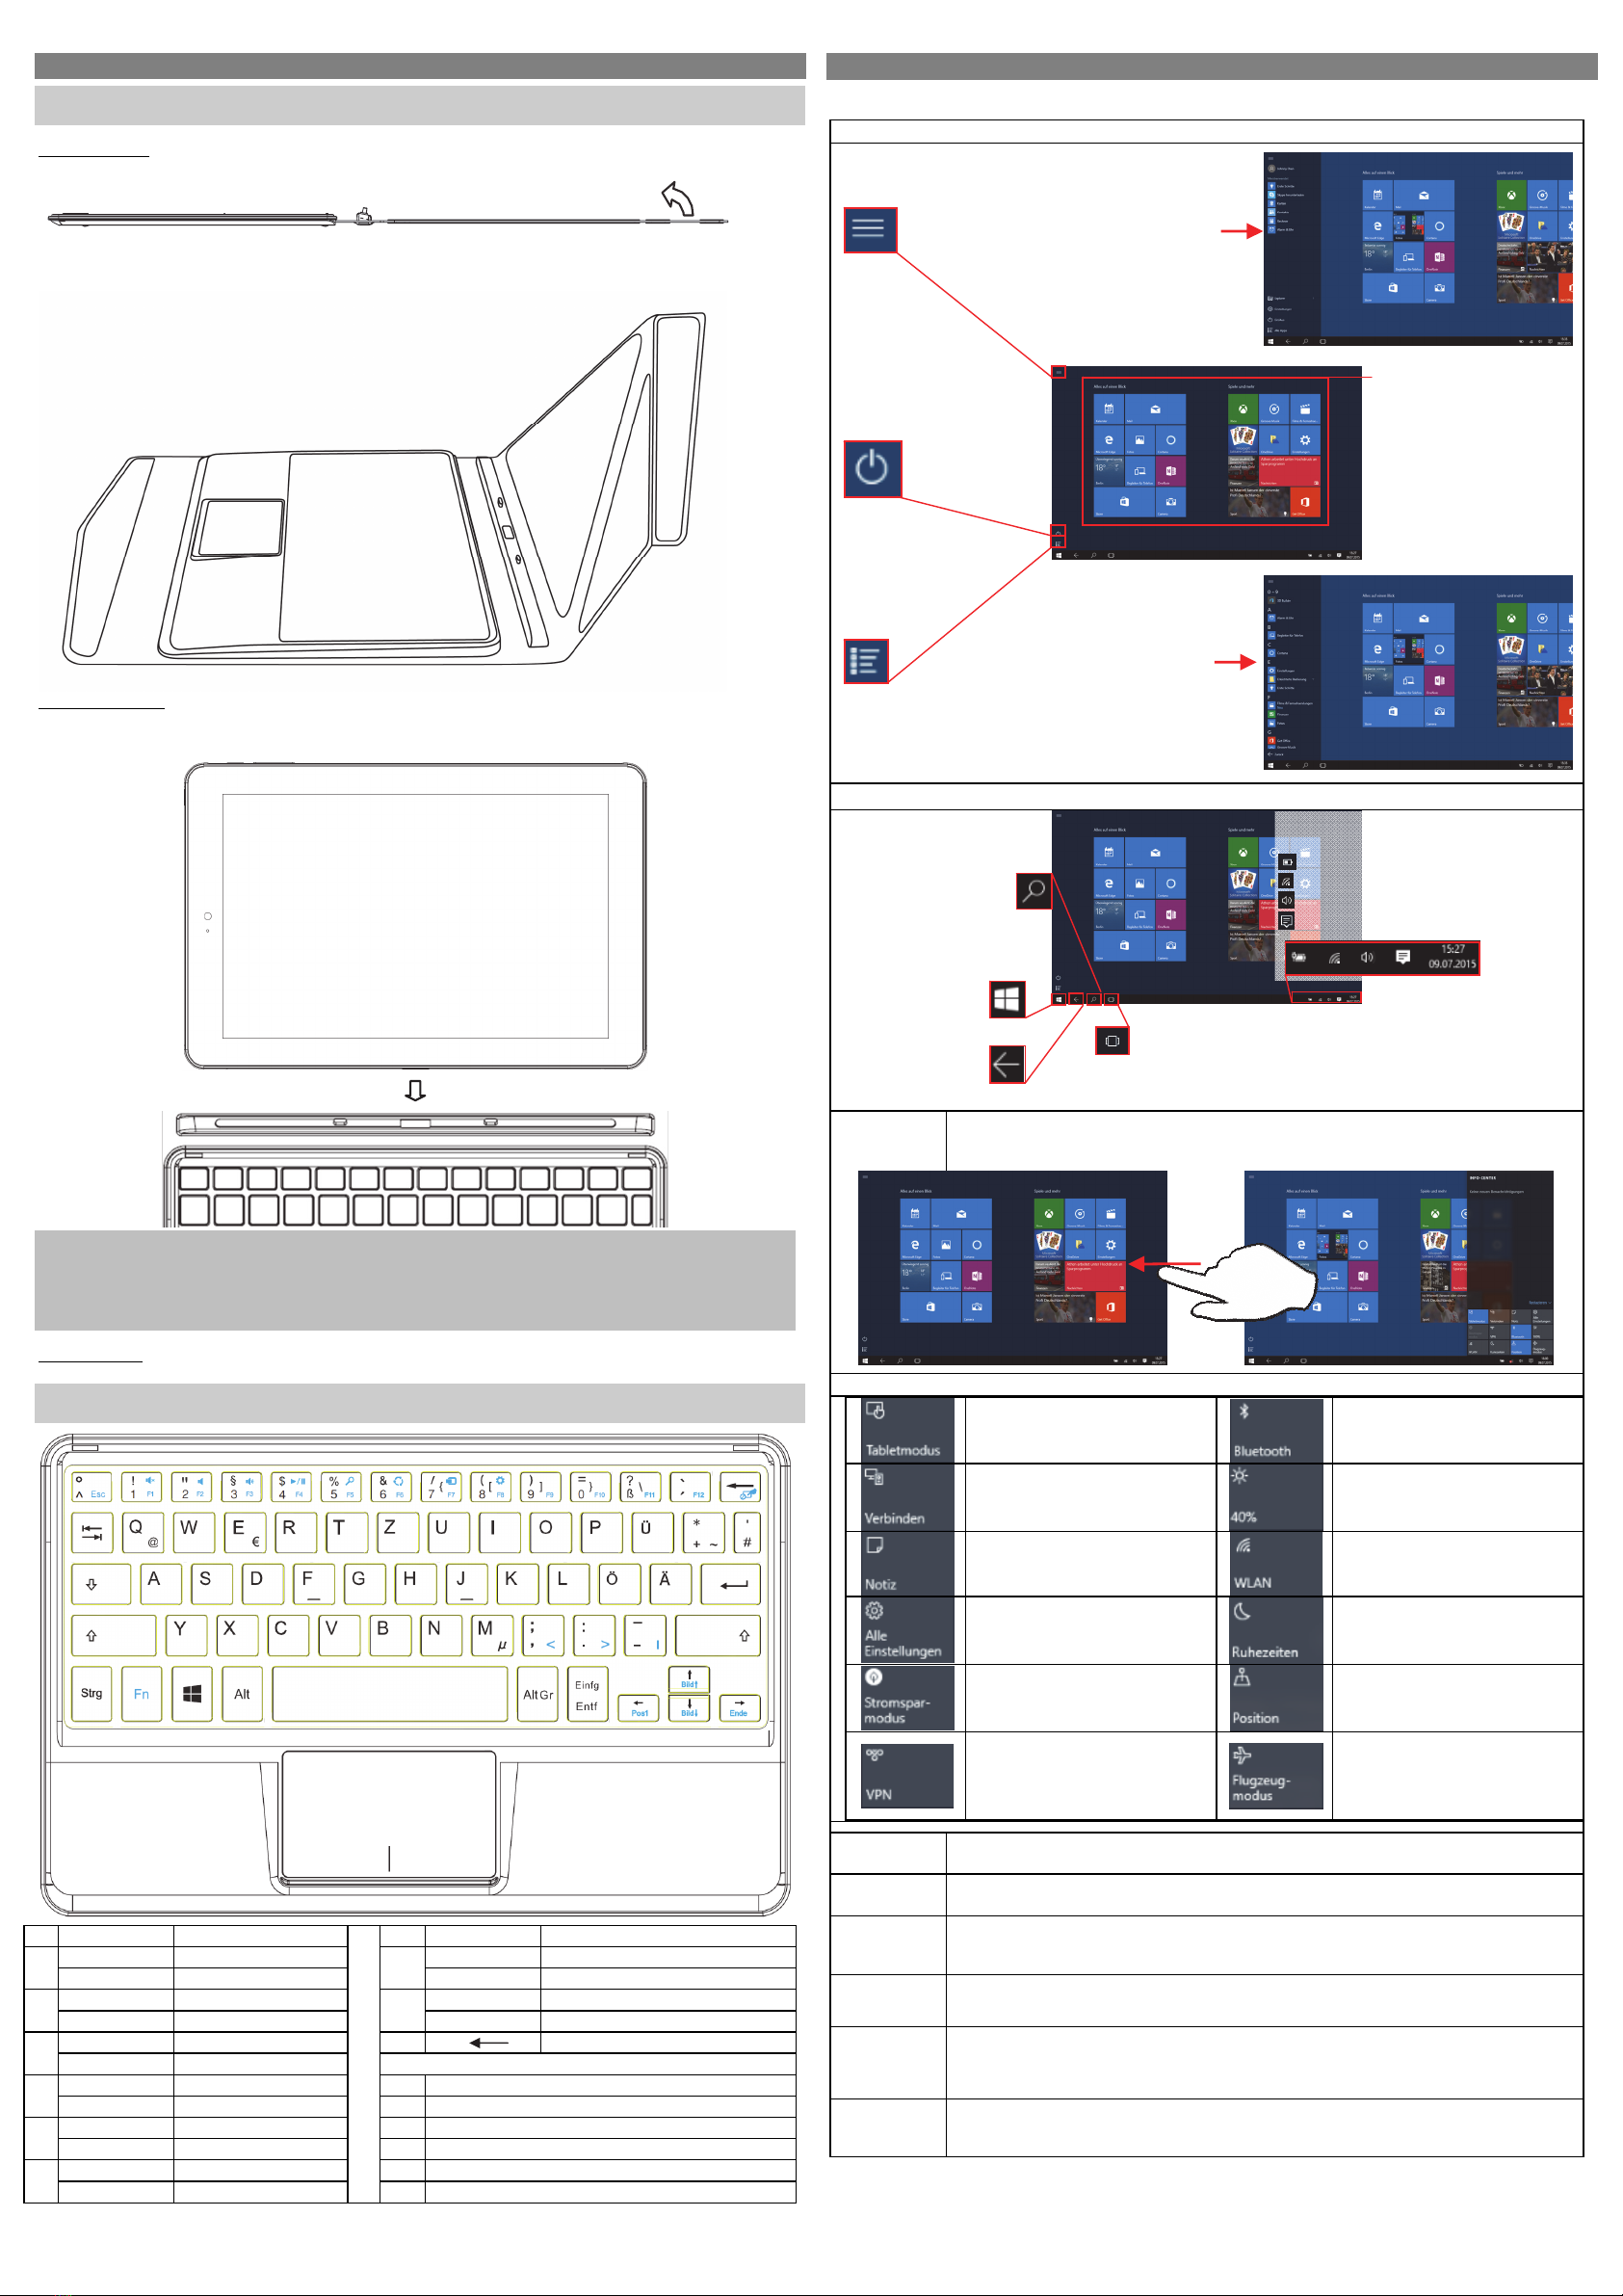
TurningOn/Off
Toturnonthedevice,pressandholdthe[Power]buttononthedeviceuntilyouseethebootscreenandthen
releasethebutton.Itmaytakeafewminutestostartupthesystem,pleasewaitbeforeyouproceed.
Toturnoffthedevice,pressandholdthe[Power]buttonuntilyouseetheturnoffpicture.
Dragdownthepictureasindicated.
Tip:Thisdevicewillgointothesleepmodeandthedisplaywillswitchoffifinactiveforafewseconds.Pressthe
[Power]buttonbrieflytoturnonthedisplayandtowakethedevice.Swipethelockscreenupwardstounlockthe
device.
PowerOn/OfftheDisplay
‐ Pressthe[Power]buttonbrieflytoturnoffthedisplay.
‐ Pressthe[Power]buttonbrieflytoturnonthedisplayagain.
Gettingstarted
1. RearCameraRear‐facingcamerafortakingpictures.
2. PowerButtonPressandholdthe[Power]buttontoturnthedeviceonoroff;pressthebutton
brieflytoturnthescreenonoroff.Shouldthedevicestopfunctioningoroperate
abnormally,pressandholdfor15secondstoresetthedeviceoff.
3. Volumekey+/‐ Pressbrieflytoincrease/decreasethevolumelevel.
4. SIMAccommodatesanyNano‐SIMCard.
5. WindowsKeyReturntothestartscreen
6. MicroSDCardSlotForusewithstandardMicroSD/SDHCmemorycard.
7. HeadphoneJackAudiooutputconnectionforheadphones.
Note:Theintegratedspeakerisautomaticallydisabledwhenheadphonesare
connectedtothedevice.
8. MicroHDMIConnecttoaTVorotherdisplay.
9. MicroUSB SupportforUSBstick,Surfstick,KeyboardandMouse.
Chargeandpowerthetabletwiththeincludedpoweradapter.
Note:
nOTGsupportingadaptercableisrequired(optional)
10. USB SupportforUSBstick,Surfstick,KeyboardandMouse.
11. Speaker
12. FrontCameraFront‐facingcamerafortakingavatarpictures.
13. StatusIndicatorStaysredduringchargingandwilltobluewhen thebatteryisfullycharged.
14. Microphone
15. DockingClipToalignthetablet.
16. DockingToconnectanoptionalavailablekeyboard.
Chargingthebattery
Thedevicehasabuilt‐inrechargeablebattery.Noadditionalbatteryinstallationisrequired.Pleasechargethe
devicewhenthedeviceindicateslowbattery.Tochargethebattery,connectthedevicetoanystandardwall
outletusingthepoweradapter.
Note:
a. Weadvisetouseonlythesuppliedpoweradapterwiththisdevice.
b. Youcanoperatethedeviceevenwhileitisbeingcharged.However,forextendedbatterylife,wesuggest
“NOT”tousethedevicewhileitischarging.Wealsorecommendfullychargingthebatterywhenitis
completelyempty.Wedonotrecommendpartialchargingasthismayshortenthebatterylifetime.
c. Itisrecommendedtochargethebatterybeforeusingthedeviceforthefirsttime.
d. Formaximumperformance,lithium‐ionbatteriesneedtobeusedoften.Ifyoudon’tusethedeviceoften,be
suretorechargethebatteryatleastoncepermonth.
e. Shouldtherechargeablebatteryofthedevicedischargecompletely,connectthedevice(usingtheadapter)to
themainpowersourceforapproximately5‐10minutesbeforeattemptingtousethedevice.
f. Insomecases,deviceswhichhavebeenchargedforlongerperiodsoftimemaynotbeabletobeswitchedback
on.Shouldthisoccurpleasedoa“reset”.
ConnectviaUSB
Note:OnlyuseaUSBcablewithamaximumlengthof100cm.Please
makesurewhenconnectingtheUSBadapterintotheUSBsocketthat
theconnectoralignmentarecorrect.Incorrectinsertionmaycause
damagetotheplugandsocket.
Ononesideoftheplugthereareusuallysmallsizesofhooksthatsecure
thefixation.Payspecialattentiontothepositionofthehooks,they
shouldshowupwardswhenconnectingthecableintothesocketwhile
thedeviceislyingonscreenup.
Inordertovieworplaybackfiles,thesemustfirstbedownloadedfrom
theinternetortransferredfromacomputerandstoredonthedevice
viaMircoSDcardorUSB‐Stick.
ATTENTION:AdirectconnectionbetweentheDeviceandComputer,viaUSB‐Cableisnotpossible!
Factory reset
Shouldyounoticeunusualbehaviororthedevicecannotbeactivated,wesuggestrestoringthedevicetothe
factorysettings.Switchoffthedevice.WhilepressingthePowerButtonandtheVolume‐Minuskey
simultaneously,startthedeviceuntiltheRecoveryModeisstarted.Followtheinstructionsunder
“Troubleshoot”or“ProblemSolving”.Select„ResetyourPC”or“Restore“
ATTENTION!Alldataandsettingswillbeerased.
UsingMicroSD/SDHCmemorycard
ThisdevicecanreadfilesdirectlyfrommemorycardandUSBmemory.
OpenthemicroSDandmicroSIMcardcompartmentonthebackside
ofthedevice.Toaccessthefilesstored,opentheapp“OneDrive”by
tappingthecorrespondingiconandselectthedesireddirectory.Once
opened,tapthemenu“OneDrive”toswitchbetweenlocalandonline
storage.
- CheckthattheMicroSDcardisinthecorrectpositionwiththe
contactpinsfacingindirectionofthescreenasillustrated.Youmay
damagethecardandtheSDcardslotiftheMicroSDcardisnot
insertedcorrectly.
- PushtheMicroSDcardintothecardslotuntilitclicks(Ifyouhaveahardtimepushingitin,pleasecheckif
youhaveinserteditcorrectly).
- ToremoveMicroSDcard,pushthecardonceuntilitclicksandpopsoutalittlebit.
Note:WerecommendusingonlyMicroSD/SDHCcardsupto64GBcapacity.
- ShouldaMicroSDcardbeinsertedintodevice,itmaytakeafewsecondstoupdatethecontents.
- PleaseavoidinsertingorejectingMicroSDcardwhenotheroperationsarerunning.
- Donotremovethecardifthecontentsinsidethecardareinuseoriffilesarebeingsavedtothecard.
- Pleaseuseyourfingernailstoproperlyinsertorremovethecard.
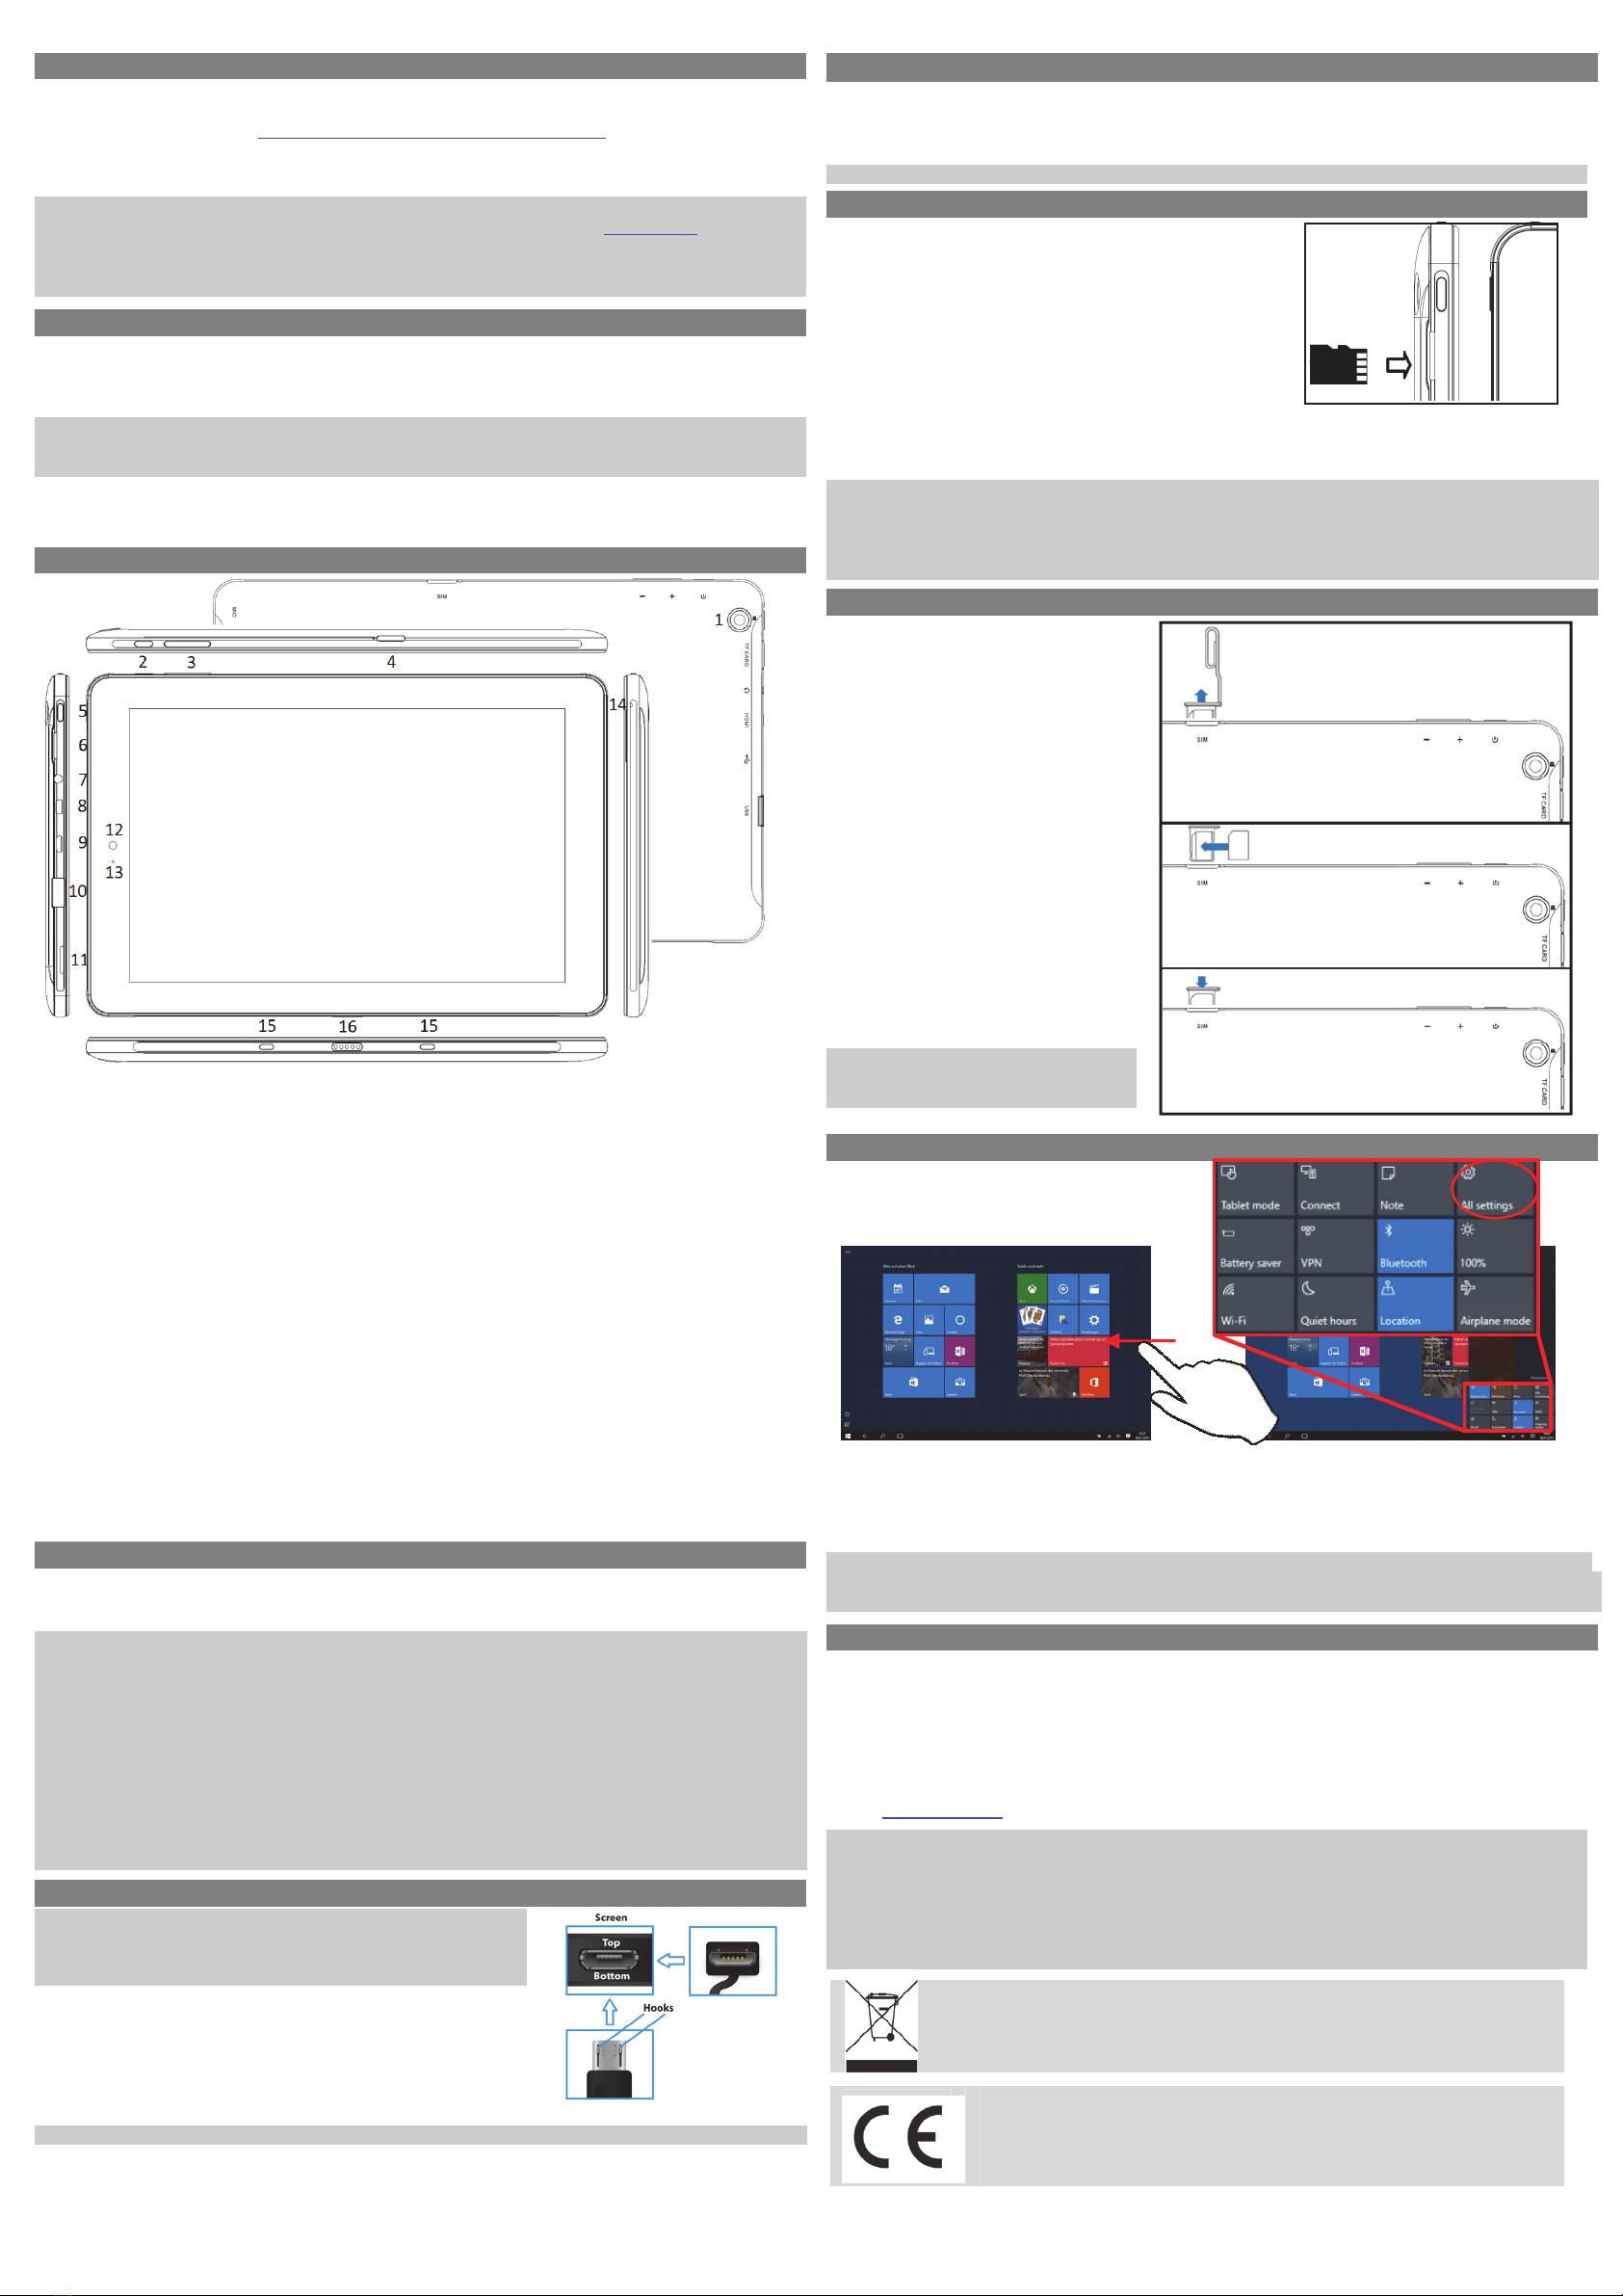
UsingaNanoSIMcard
First,openthecardslotusingthe
enclosedtoolorapaperclip.
Insertthepaperclip,asillustrated,into
theopeningofthecardtrayejectbutton
untilasmallportionofthetrayisvisible.
Removethetrayfromthedevice.The
cardtrayejectbuttonisasmallround
openinginthecardcover.
InserttheNano‐SIMcardintothereader
asillustrated.
MakesurethattheNano‐SIMcardis
alignedcorrectly.Thecontactsofthe
insertedSIMcardmustpoint
downwardsandtheroundedcorners
outwards.Damagemayoccurtothe
cardorcardreaderiftheSIMcardisnot
properlyinsertedintothedevice.
PushthetraywiththeinsertedSIMcard
backintothedeviceuntilitflusheswith
thehousing.
Pleasenote:Besuretopowerofftotheunit
beforeinsertingtheSIMotherwisethecard
willnotbedetected.
ConnectingtotheInternet
(1) Swipewithyourfingerfromtheright‐handsidetowardsthecentreandopenthefunctionbarlikethis.
(2) TouchtheicontoopenAllsettingsandselect„NetworkandInternet“.
(3) Taponthenetworkyouwishtoconnecttoandthentapon“Connect”.YourTabletwillnowattemptto
establishaconnectiontothat3Gnetwork.Iftheconnectionissuccessful,themessage“Connected”will
appearbelowthenetwork.
Note:
Ifthereisnointernetconnectionpleaserecheckthissettingandverifythatyouareconnectedtoanavilablewifior
3GNetwork.
Support
Onourwebsiteyouwillfindthelatestinformationaboutthisproduct,otherproductsofourenterprise,our
companyitselfandvalidwarrantyterms.ThelatteryouwillfindunderService‐Downloads.
AxdiaInternationalGmbH Tel:+49(0)2154/8826‐0
Formerweg9 Fax:+49(0)2154/8826‐100
D‐47877Willich(Germany)
Support‐Hotline(9.00am–1.00pm):+49(0)2154/8826‐101
E‐Mail:support@odys.de
Note
PleaseaddressanyfurtherquestionsdirectlytoourCustomerServiceDepartmentatthefollowinge‐mail
address:support@axdia.de
Inordertobeabletoprocessyourrequestquickly,weaskyoutohavethefollowinginformationready:
‐Productdescription
‐Purchasedate
‐Descriptionofproblem
Disposal
Donotdisposeofthisitemwithnormalhouseholdwaste.Pleasereturnanydefective
devicetoyourdealerortoacollectionpointforenvironmentallysounddisposal.
Compliance
AxdiaInternationalGmbHherebydeclaresthatthisdeviceisinaccordancewiththe
essentialrequirementsandotherrelevantprovisionsofDirective2004/108/EC.The
CEdeclarationofconformityforthisproductcanbefoundontheinternetat:
www.odys.de–Service–downloads