manuals.online logo
Brands
  1. Home
  2. •
  3. Brands
  4. •
  5. Steren
  6. •
  7. Adapter
  8. •
  9. Steren USB-110 User manual

Steren USB-110 User manual

Product / Producto: USB TO IDE 2.5”
HDD ENCLOSURE / ADAPTADOR
EXTERNO PARA DISCO DURO 2.5”
IDE USB 2.0
Model / Modelo: USB-110
Brand / Marca: Steren
CONDICIONES
1. Para hacer efectiva esta garantía se requiere: La presentación de esta póliza y del producto, en el lugar en donde fue adquirido o en ELECTRONICA STEREN S.A. DE C.V.
2. ELECTRONICA STEREN S.A. DE C.V. se compromete a reparar el producto en caso de estar defectuoso sin ningún cargo al consumidor.
3. El tiempo de reparación en ningún caso será mayor a 30 días contados a partir de la recepción del producto en cualquiera de los sitios en donde pueda hacerse efectiva la
garantía.
4. El lugar donde puede adquirir partes, componentes, consumibles y accesorios, así como hacer válida esta garantía es: En cualquiera de las direcciones arriba mencionadas.
ESTA GARANTIA NO ES VALIDA EN LOS SIGUIENTES CASOS:
1. Cuando el producto ha sido utilizado en condiciones distintas a las normales.
2. Cuando el producto no ha sido operado de acuerdo con el instructivo de uso.
3. Cuando el producto ha sido alterado o reparado por personas no autorizadas por ELECTRONICA STEREN S.A. DE C.V.
Nota: El consumidor podrá solicitar que se haga efectiva la garantía ante la propia casa comercial, donde adquirió el producto. Si la presente garantía se extraviara, el
consumidor puede recurrir a su proovedor para que le expida otra póliza de garantía, previa presentación de la nota de compra o factura respectiva.
DATOS DEL DISTRIBUIDOR
DISTRIBUTION / NOMBRE / DISTRIBUIDOR:
ADDRESS / DOMICILIO:
PRODUCT / PRODUCTO: BRAND / MARCA:
MODEL / MODELO: SERIAL NUMBER / No. DE SERIE:
DATE OF DELIVERY / FECHA DE ENTREGA:
Call Center / Centro de Atención a Clientes
del Interior 01 800 500 9000
Mexico City / Cd. de México: 53 54 22 90
Warranty
CONDITIONS:
1. This warranty card with all the required information, the invoice or purchase ticket, the packing or package, must be presented with the product when warranty
service is required.
2. If product hasn’t exceed warranty period, the company will repair it free of charge including transportation charges.
3. The repairing time will not exceed 30 natural days, from the day the claim was received.
4. Steren sells parts, components, consumables and accessories to customer, as well as warranty service, at any of the following addresses:
THIS WARRANTY IS VOID ON THE NEXT CASES:
If the product has been damage by an accident, acts of God, mishandling, leaky batteries, failure to follow enclosed instructions, improper repair by unauthorized
personnel, improper safe keeping.
Notes:
a) The customer can also claim the warranty service on the purchase establishment.
b) If you lose the warranty card, we can reissue it just showing the invoice or purchase ticket.
Póliza de Garantía
This Steren product is guaranteed under
normal usage against defects in
workmanship and materials to the original
purchaser for one year from the date of
purchase.
Garantiza este producto por el término de
un año en todas sus partes y mano de obra
contra cualquier defecto de fabricación y
funcionamiento, a partir de la fecha de
entrega.
V0606
INSTRUCTIVO DE USO DE ADAPTADOR EXTERNO PARA DISCO
DURO 2.5” IDE USB 2.0
Modelo: USB-110
Marca: Steren
Antes de utilizar su nuevo Adaptador Externo para Disco Duro 2,5”
IDE USB 2.0 lea este instructivo para evitar cualquier mal
funcionamiento. Guárdelo para futuras referencias.
Con su nueva unidad para disco duro convierta cualquier disco de laptop
en una unidad externa para que pueda transportar, respaldar o transferir
datos de un equipo a otro. Es fácil de armar y soporta discos de cualquier
marca y capacidad, solo deben ser interfase IDE. Fácil y rápido de usar
gracias a que se conecta por medio de puertos USB 2.0.
IMPORTANTE
Antes de manipular el disco duro, utilice una pulsera antiestática para
enviar las descargas eléctricas de su cuerpo a tierra física.
Nunca introduzca a presión los cables, podrían doblarse y quebrarse los
pines de conexión.
No use ni almacene este equipo en lugares donde existan goteras o
salpicaduras de agua.
Siempre utilice un paño suave, limpio y seco para limpiar el equipo.
CONTENIDO
Una unidad para disco duro
Un cable USB
Un disco de instalación
Un destornillador
Un estuche protector
CONTROLES
1.- Conector IDE ............................. Permite conectar el disco duro
a la unidad externa
2.- Conector USB ........................... Entrada de cable USB 2.0
3.- Adaptador de corriente .............. Conector para el adaptador de
corriente (no incluido)
4.- LED indicador ............................ Enciende cuando el equipo está
en uso
INSTALACIÓN DE HARDWARE
1.- Retire la cubierta frontal del equipo, quitando los tornillos laterales y
jalando hacia fuera (Fig. 1 y 2).
2.- Inserte el conector IDE a su disco duro, asegurándose de que los
pines del disco duro coincidan con el conector IDE (Fig.3).
3.- Coloque el disco duro en el interior de la caja.
4.- Instale los tornillos en los costados de la cubierta frontal a fin de
asegurar el disco duro.
INSTRUCTION MANUAL FOR USB TO IDE 2.5” HDD ENCLOSURE
Model: USB-110
Brand: Steren
Before using your new USB enclosure, please read this instruction
manual to prevent any damage. Put it away in a safe place for future
references.
Convert any internal laptop HDD into an external HDD. Easily you can
transport, store and transfer data from one computer to another computer.
It Is easy to assemble and can support any brand and capacity of IDE
HDD. Easy and quick to use via USB 2.0.
IMPORTANT
Before to manipulate the HDD, use an anti-static bracelet to send electric
discharges from your body to the physical ground.
Be careful when you connect the cables, pins may bend and break.
Do not use or store the equipment near wet places.
Clean only with a soft, dry cloth.
PACKAGE CONTENT
One USB IDE 2.5” Hard Disk enclosure
One USB cable
Driver software
One screwdriver
One carrying pouch
CONTROLS
1.- IDE connector ………………..…. Plug the HDD to the
enclosure
2.- USB connector ………………….. USB cable input
3.- Power Supply ……………………. Power supply connector (AC
power adaptor not included)
4.- Indicator LED ……………………. Lights on when the device is
in use
HARDWARE INSTALLATION
1.- Release the frontal panel of the USB hard disk enclosure. To do this
action, remove the screws and pull out (Fig.1 and Fig. 2).
2.- Plug the IDE connector into the HDD, please check the pins and
assure that there are correctly installed, otherwise may cause
malfunction (Fig. 3).
3.- Place the HDD into the hard disk enclosure.
4.- Fasten the HDD to the enclosure, using the provided screws.
32 4
1
Fig. 1 Fig. 2 Fig. 3
Notas:
En caso de que no tenga conocimientos acerca de modificaciones en el
disco duro se recomienda acudir con un técnico especialista, de otra
forma podría dañar el equipo.
El disco duro obtiene la energía necesaria para su funcionamiento a
través del puerto USB.
INSTALACIÓN DE DRIVERS
Si tiene instalado Windows ME, Windows 2000 o Windows XP en su
computadora, no necesita instalar drivers.
UTILIZANDO POR PRIMERA VEZ LA UNIDAD EXTERNA PARA DISCO
DURO
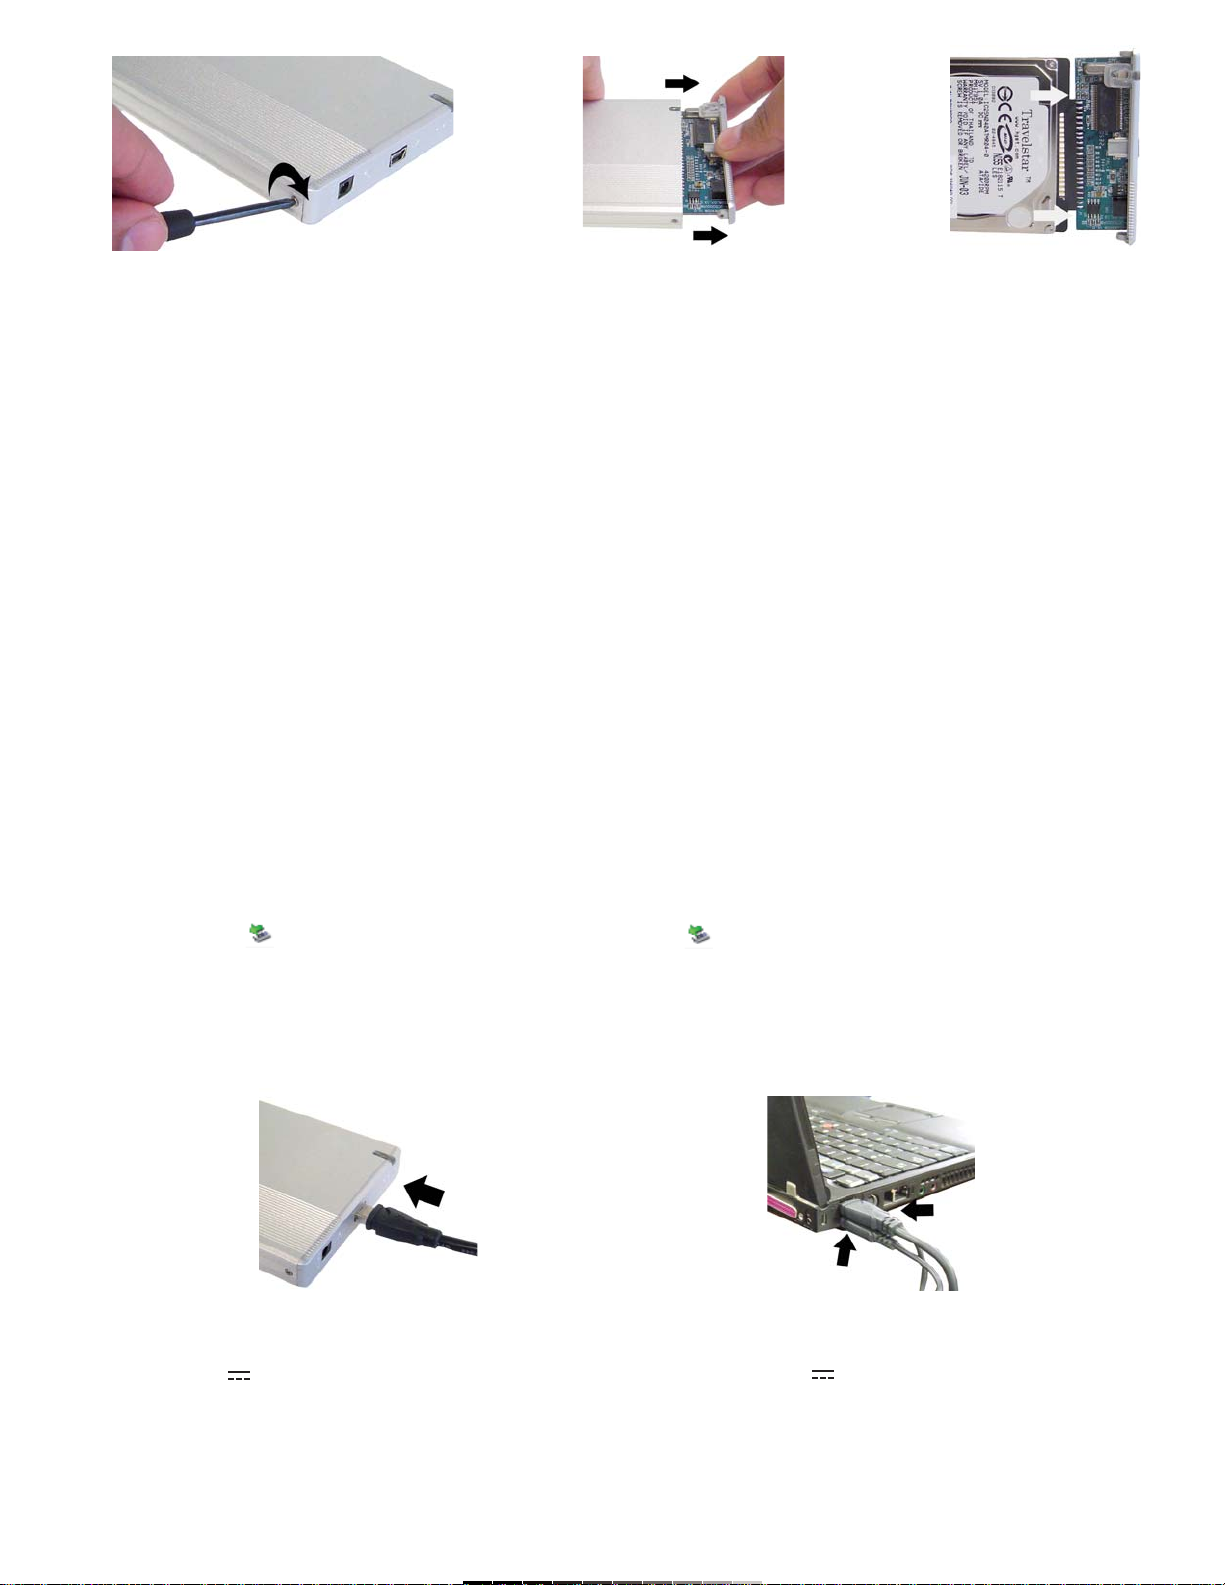
Una vez que ha realizado las conexiones internas correspondientes, usted
podrá comenzar a utilizar su nueva unidad externa para disco duro.
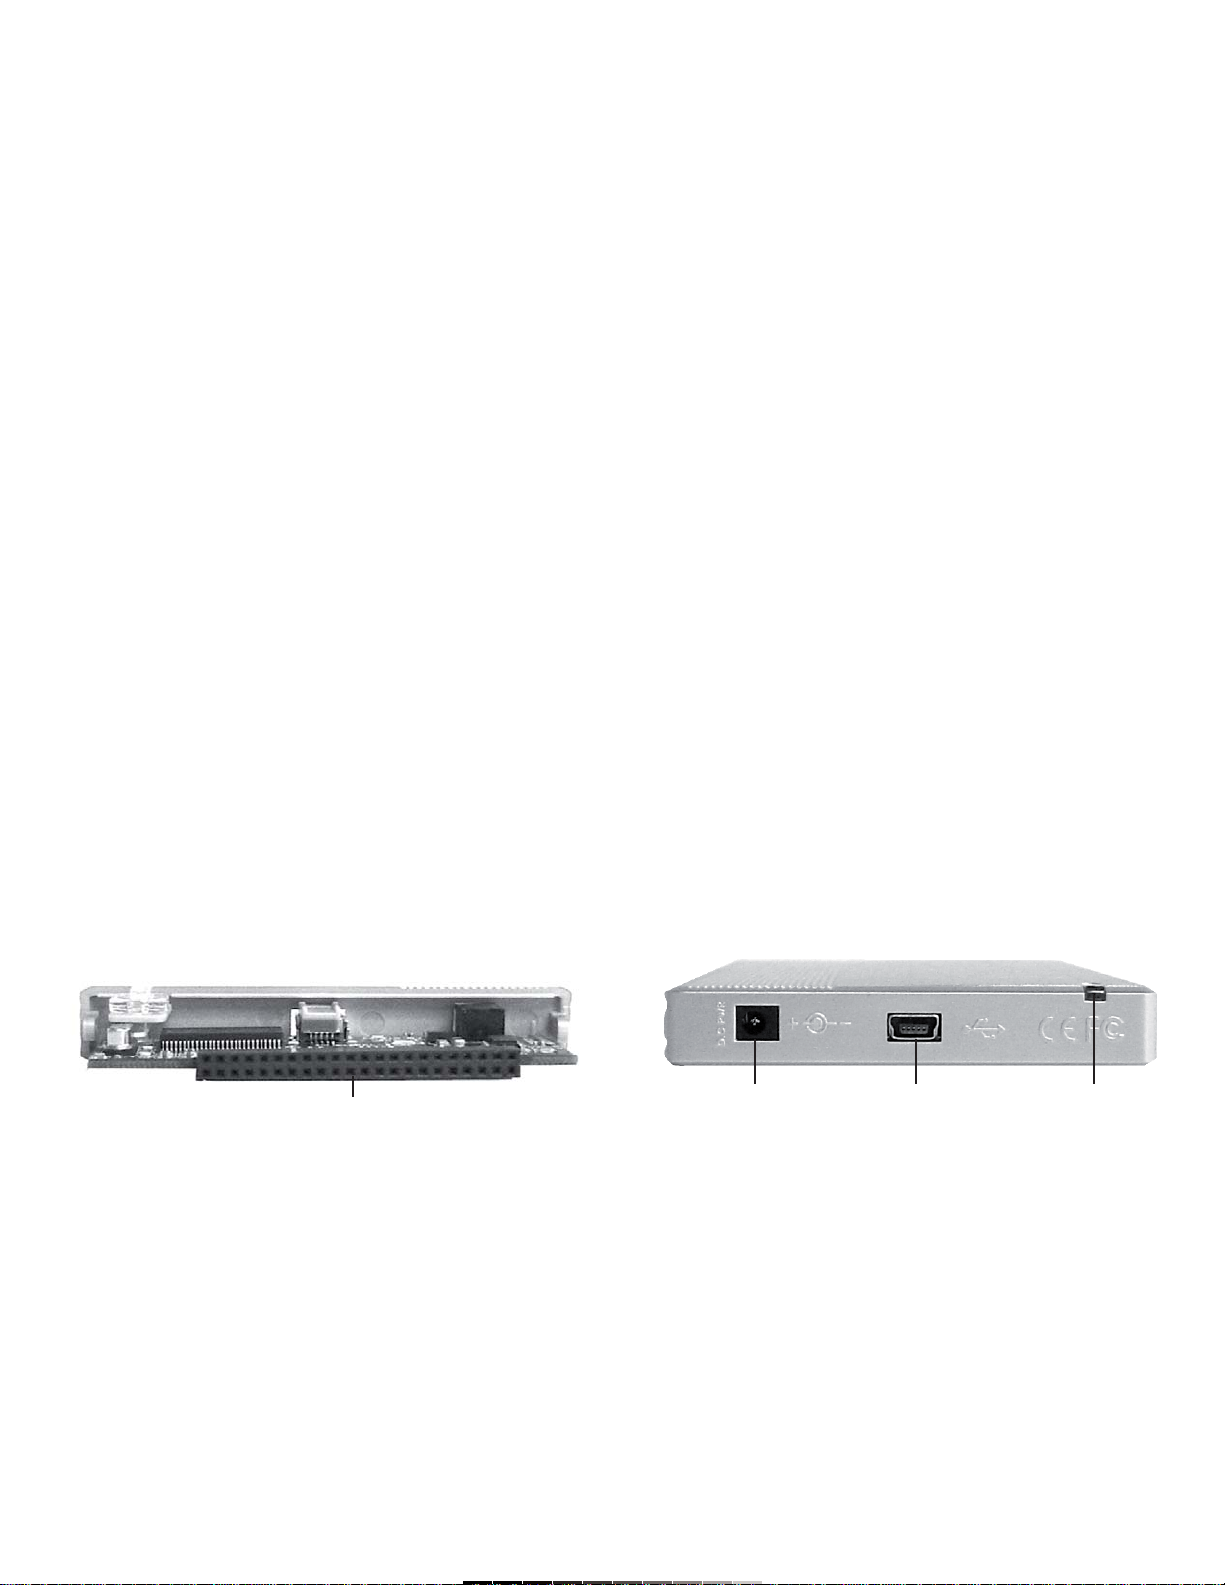
1.- Inserte el cable USB en la entrada de la unidad externa, el extremo
contrario conéctelo a un puerto USB 2.0 disponible en la computadora
(Fig. 4).
2.- Conecte un adaptador de corriente a la unidad externa y a un
tomacorriente casero (Opcional).
3.- La computadora detectará el nuevo equipo y comenzará un proceso de
actualización automática.
4.- Una vez que termine este proceso, aparecerá el mensaje de que el
equipo estará listo para usarse.
5.- Su disco duro aparecerá como un Dispositivo de Almacenamiento
Masivo USB y será identificado con una letra (F ó G normalmente, pero
podría aparecer otra).
6.- Para realizar la transferencia de archivos entre diversas unidades,
simplemente copie y pegue los archivos utilizando el Explorador de
Windows.
7.- Cuando desee retirar el equipo, presione el botón el botón izquierdo
del ratón sobre el icono “ ” y seleccione Extracción Segura. Cuando
el mensaje Es Seguro Retirar el Hardware aparezca, podrá desconectar el
equipo de la computadora.
Nota:
En caso de que requiera utilizar un disco duro de más de 150GB es
necesario que inserte los dos conectores USB a la computadora a fin de
proporcionarle la energía suficiente al disco (Fig. 5).
ESPECIFICACIONES
Entrada: 5V (a través de puerto USB)
Dimensiones: 126 x 77 x 13mm
Peso: 167g (sin disco duro, sin convertidor)
Nota:
El diseño del producto y las especificaciones pueden cambiar sin previo
aviso.
Notes:
If you don’t have enough knowledge about how to change the HDD
internal configuration, we recommend that you ask a technician, otherwise
may cause several damages on the equipment.
The HDD enclosure obtains the power supply from the USB port.
SOFTWARE INSTALLATION
If you use Windows ME, Windows 2000 or Windows XP OS, you don’t
need to install any driver.
HOW TO USE BY FIRST TIME THE USB TO IDE 2.5” HDD
ENCLOSURE
Once you have made the right internal connections, you can start to use
your new USB to IDE 2.5” HDD enclosure.
1.- Plug the USB cable into the right input jack on the enclosure, then,
insert the opposite side into an available USB 2.0 port in the computer
(Fig. 4).
2.- Plug the AC power adaptor to the enclosure and connect it into an AC
household outlet (Optional).
3.- Automatically, the PC will detects the new hardware, and then begins
an updating process.
4.- Once the process finished, the next message displays on the screen:
your new hardware is correctly installed. This message means that you
can start to use the new hardware.
5.- The external HDD appears such as USB Mass Storage Device and you
can identify it by a letter (usually by letter F or letter G, but it could displays
another one).
6.- If you want to transfer any kind of files between different drives, just
click and drag the desired files using Windows Explorer.
7.- When you want to remove the device, click on the icon in the system
tray “ ” using the left button of the mouse and choose Safety Remove.
When the message: “you may safely remove this device” displays on the
screen, you can unplug the equipment from the computer.
Note:
If you need to use a Hard Disk with a capacity higher than 150GB, you
must plug both USB connectors to the computer, in order to power the
equipment up, correctly (Fig. 5).
SPECIFICATIONS
Input: 5V (through USB port)
Dimensions: 4,9 x 3,3 x 0,5in
Weight: 167g (without HDD and AC converter)
Note:
Product design and specifications are subject to change, without notice.
Fig. 4 Fig. 5

Other Steren Adapter manuals

Steren 203-815 User manual

Steren

Steren 203-815 User manual

Steren 207-780 User manual

Steren

Steren 207-780 User manual

Steren ELI-1050 User manual

Steren

Steren ELI-1050 User manual

Steren POD-081 User manual

Steren

Steren POD-081 User manual

Steren COM-452 User manual

Steren

Steren COM-452 User manual

Steren COM-405 User manual

Steren

Steren COM-405 User manual

Steren Com-878 User manual

Steren

Steren Com-878 User manual

Steren COM-203 User manual

Steren

Steren COM-203 User manual

Steren USB-435 User manual

Steren

Steren USB-435 User manual

Steren POD-200 User manual

Steren

Steren POD-200 User manual

Steren COM-843 User manual

Steren

Steren COM-843 User manual

Steren COM-473 User manual

Steren

Steren COM-473 User manual

Steren VGA-256 User manual

Steren

Steren VGA-256 User manual

Steren USB-435 User manual

Steren

Steren USB-435 User manual

Steren USB-126 User manual

Steren

Steren USB-126 User manual

Steren 506-430 User manual

Steren

Steren 506-430 User manual

Steren COM-865 User manual

Steren

Steren COM-865 User manual

Steren ELI-1040 User manual

Steren

Steren ELI-1040 User manual

Steren USB-PAR User manual

Steren

Steren USB-PAR User manual

Steren COM-843 User manual

Steren

Steren COM-843 User manual

Steren COM-473 User manual

Steren

Steren COM-473 User manual

Steren COM-437 User manual

Steren

Steren COM-437 User manual

Steren PS2-030 User manual

Steren

Steren PS2-030 User manual

Steren ELE-9230BL User manual

Steren

Steren ELE-9230BL User manual

Popular Adapter manuals by other brands

Toto Link N300UM manual

Toto Link

Toto Link N300UM manual

3idee hp-s Assembly instructions

3idee

3idee hp-s Assembly instructions

Nikon Eh-62A instruction manual

Nikon

Nikon Eh-62A instruction manual

Asus WL-138G user manual

Asus

Asus WL-138G user manual

spirit of gamer CROSSGAME 2 manual

spirit of gamer

spirit of gamer CROSSGAME 2 manual

D-Link DGE-530T Quick installation guide

D-Link

D-Link DGE-530T Quick installation guide

Altronix NetWay1512 installation guide

Altronix

Altronix NetWay1512 installation guide

Verbatim WTEU-01 quick start guide

Verbatim

Verbatim WTEU-01 quick start guide

Philips IMAGEO 69136/55/PH brochure

Philips

Philips IMAGEO 69136/55/PH brochure

Niigata seiki LEVELNIC DL-S3 DL-BW instruction manual

Niigata seiki

Niigata seiki LEVELNIC DL-S3 DL-BW instruction manual

Asus USB-N11 user manual

Asus

Asus USB-N11 user manual

Canon BU-10 user manual

Canon

Canon BU-10 user manual

SKUTCH CK-1P7 installation manual

SKUTCH

SKUTCH CK-1P7 installation manual

Cirronet CR-HN50 quick start guide

Cirronet

Cirronet CR-HN50 quick start guide

Adaptec AHA-1520 installation guide

Adaptec

Adaptec AHA-1520 installation guide

NETGEAR FA120 installation guide

NETGEAR

NETGEAR FA120 installation guide

rtd LAN24225 user manual

rtd

rtd LAN24225 user manual

SWEEX LW153 manual

SWEEX

SWEEX LW153 manual

manuals.online logo
manuals.online logoBrands
  • About & Mission
  • Contact us
  • Privacy Policy
  • Terms and Conditions

Copyright 2025 Manuals.Online. All Rights Reserved.