Stereoping Waldorf Pulse 1 Installation manual

___________________________________________________________________________________________________________2
General features of the Synth Programmer...............................................................................................................................3
Special features of the Pulse edition...........................................................................................................................................3
Technical handling........................................................................................................................................................................3
1.Connections and integration into your setup................................................................................................4
Power supply..................................................................................................................................................................................4
Midi connections...........................................................................................................................................................................4
2.Settings and workflow...................................................................................................................................... 5
Settings on the Pulse.....................................................................................................................................................................5
Settings on the Synth Programmer.............................................................................................................................................5
Brief workflow o er iew................................................................................................................................................................5
Sa ing programs...........................................................................................................................................................................5
3.Overview............................................................................................................................................................ 6
Function keys.................................................................................................................................................................................6
PLAY Mode......................................................................................................................................................................................6
Button 'MOD'.................................................................................................................................................................................6
Button 'SYNC' / [Prefs]...................................................................................................................................................................6
Buttons Octa e..............................................................................................................................................................................6
Button 'E-Patch'.............................................................................................................................................................................6
4.P AY Mode.......................................................................................................................................................... 7
The different Volumes of the Pulse.............................................................................................................................................7
Altering parameter directly on the Pulse itself..........................................................................................................................7
Dri e................................................................................................................................................................................................7
En elope Trigger 1 & 2..................................................................................................................................................................8
All Notes Off / Panic......................................................................................................................................................................8
Portamento knob..........................................................................................................................................................................8
Paraphonic Modus........................................................................................................................................................................8
5.MODU ATION Mode........................................................................................................................................ 10
The 7 pages of the Modulation Mode.......................................................................................................................................10
Knobs and the Modulations Sources they select (keep MOD pressed).................................................................................10
Knobs and the Modulation Destinations they select (keep MOD pressed)..........................................................................10
Modulation Macros.....................................................................................................................................................................11
6.Sync Mode........................................................................................................................................................ 12
7.E-Patch Mode................................................................................................................................................... 13
If you press LOAD .......................................................................................................................................................................13
If you press SAVE ….....................................................................................................................................................................13
8.PREFS Mode...................................................................................................................................................... 14
Midichannel of the Programmer...............................................................................................................................................14
Count of connected Pulses.........................................................................................................................................................14
Exit.................................................................................................................................................................................................14
9.Arpeggiator...................................................................................................................................................... 15
Arpeggiator Setup.......................................................................................................................................................................15
10.Cascading....................................................................................................................................................... 16
Settings on the cascaded Pulses...............................................................................................................................................16
Settings on the Synth Programmer...........................................................................................................................................16
Program Management...............................................................................................................................................................16
Polyphonic or Unison playing...................................................................................................................................................16
Tips................................................................................................................................................................................................16
11.Initi Patch....................................................................................................................................................... 17
12.Updating Firmware....................................................................................................................................... 18
13.Imprint........................................................................................................................................................... 19
Synth Programmer for Waldorf Pulse – Operation manual V 1.0 – 01/2018
© Stereoping Germany, Meschede 2018

General features of the Synth Programmer______________________________________________________________3
General features of the Synth Programmer
The Stereoping Synth Programmer offers 45 control dials, 4 endless encoders and a 16 2 characters OLED
display for convenient and intuitive sound shaping of your Waldorf Pulse. At the moment you turn a knob, the
Programmer sends the suitable command to the Pulse which immediately changes sound.
•Highly specialized hardware midicontroller for Waldorf Pulse 1, Firmware Version 2.01
•Visual design suitable to the Pulse 1
•Convertable from 19“ rackmount to desktop usage – and back
•45 dials, 4 encoders, 2 16 character OLED display
•Firmwareupdate over SysE -Dump
•Current draw 100 mA
•Weight 2.650g
•Size without rackmount brackets, incl. knobs and rubber feet ca. 430 130 85 mm
Special features of the Pulse edition
•Blue knob caps for modulation parameters
•25 additional programs for the Pulse can be saved in the programmer itself – with program names
•Dedicated OCTAVE +/- buttons taking effect on all oscillators or on just one
•DRIVE macro parameter to level all 3 oscillators at once while maintaining their relative mi
•PARAPHONIC-Mode
•Highly simplified access to the 6 Modulations-Slots
•Unison mode for cascaded Pulses
Technical handling
The Synth Programmer was built to be used in a comfortable music studio environement. You can operate it
under free skies of course. But please keep in mind, it uses electricity for proper operation and therefore is quite
sensitive to water, drinks or other fluids. E cessive heat or e position to sunlight is also not advised.
Your programmer has got a neat OLED display. The OLED technology is quite young. As noone really can
guarantee how long it will keep it's perfect function when displaying the same content for hours or even days,
we integrated a little screensaver to mutiply the lifetime of the display. If the programmer is not touched for
longer than 23 minutes it will fall into screensaver mode and switch off the OLED display – the LEDs of the
buttons above the display will start to blink slowly. The programmer awakes immediately if a knob is moved or
notes are being sent through it.
Some 'No-need-to-worry' information: the datasheet of the display claims 50.000 hours until it has lost 50 % of it's
brightness. If you would use your programmer 5 hours on each day of the year this will take o er 27 years – e en with
deacti ated screensa er.
Synth Programmer for Waldorf Pulse – Operation manual V 1.0 – 01/2018
© Stereoping Germany, Meschede 2018
Connections and integration into your setup ____________________________________________________________4
1. Connections and integration into your setup
Power supply
You can use any ordinary 9 Volt DC powersupply to operate your controller. The connector should have Plus on
it's center pin and Ground - sometime labeled as 'Minus' - on the outside. The Synth Programmer has a
protection diode for not taking damage if the polarity of the power supply is wrong, it just won't work. The
current of the PSU should at least offer about 200 mA (=0.2 A). If it supplies more current (e.g. 500mA) this is fine
and won't cause problems.
Please do NEVER use a powersupply which has an 'AC'-Output. AC means alternate current. AC-PSUs have
the letter combination AC/AC or a sinewave symbol besides the word 'output'.
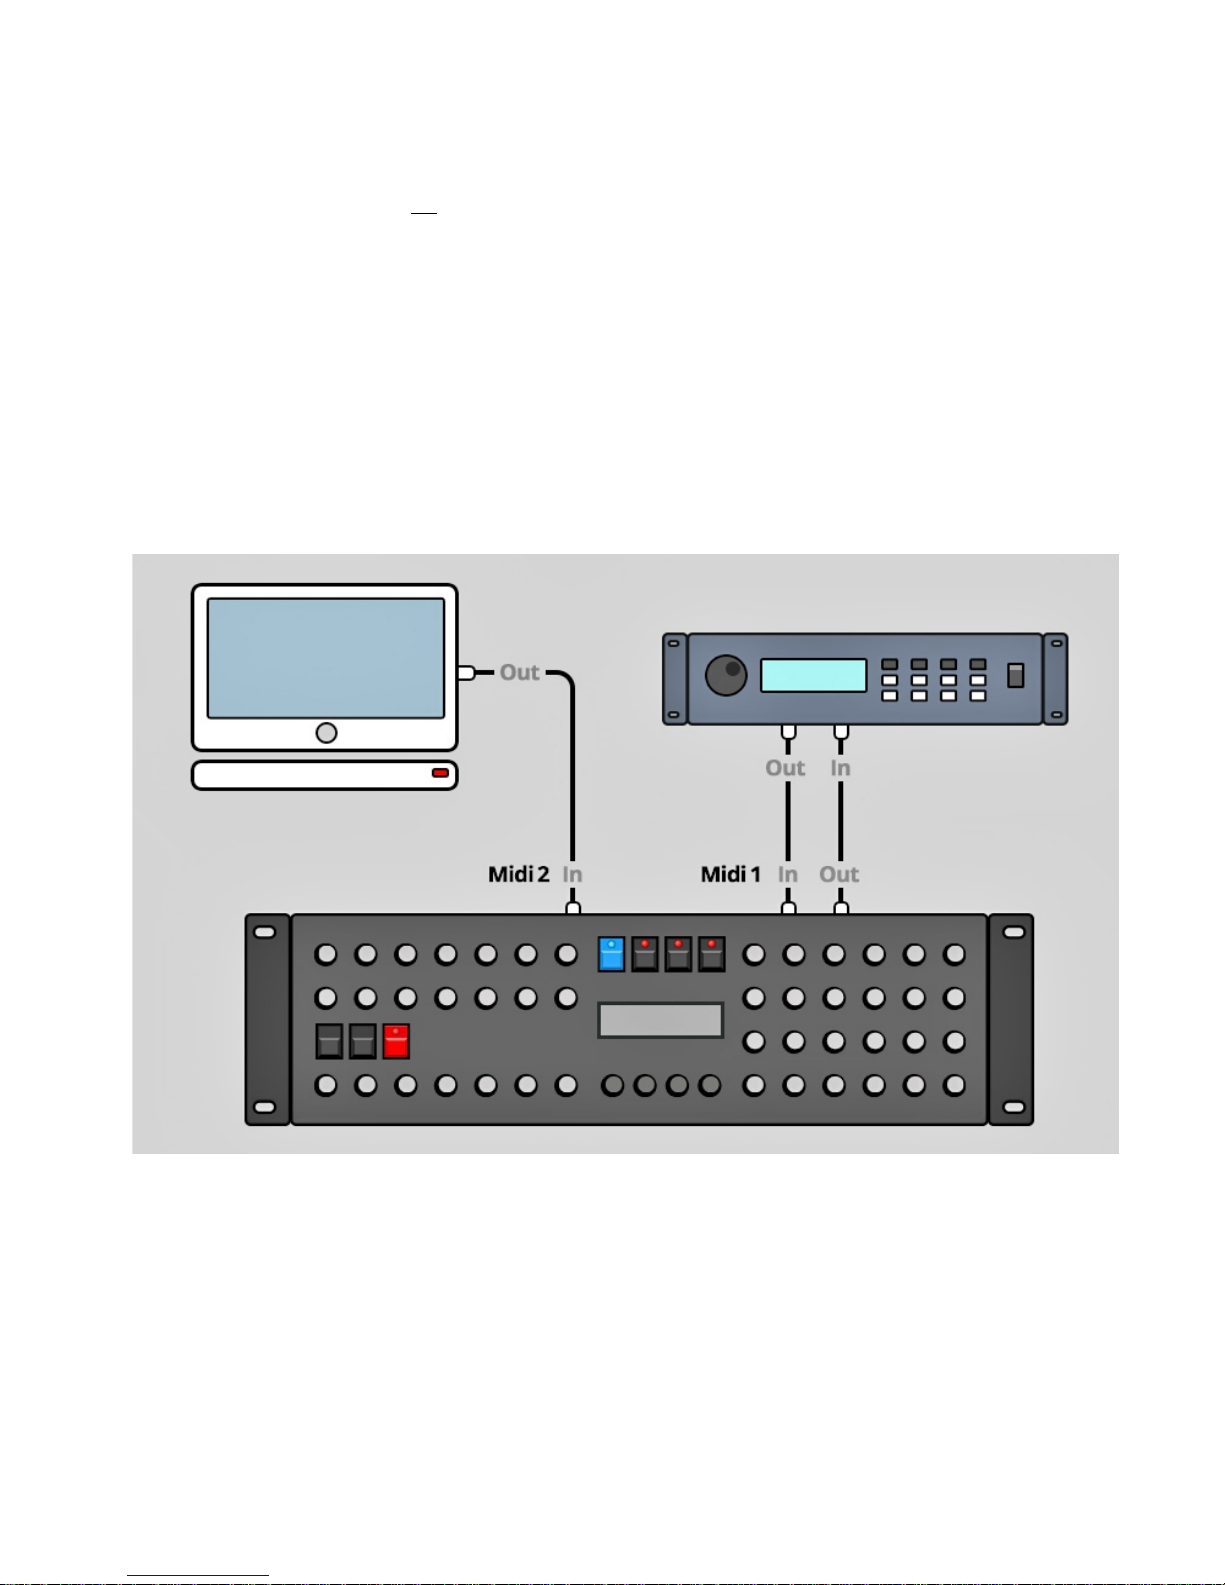
Midi connections
The Stereoping Programmer has 3 Midi jacks which should be cabled like that:
•MIDI 1 - OUT -> MIDI IN of your Pulse
•MIDI 1 - IN -> MIDI OUT of the Pulse
•MIDI 2 - IN -> MIDI OUT of your Midi interface/sequencers/keyboards
Both jacks of Midi 1 connect the Programmer with your synth in a loop. This seems unconventional but it is
necessary: the Synth Programmer must hold the same patch data in it's memory as your Pulse. This data
e change runs through MIDI 1 IN / OUT.
A Synthesizer would not make any sense if it could not receive midinotes, modulation wheel changes a.s.o.
These are coming into the programmer over the MIDI 2 IN jack from your keyboard/DAW/sequencer. They will
be merged with your parameter changes and sent together to the synthesizer.
Synth Programmer for Waldorf Pulse – Operation manual V 1.0 – 01/2018
© Stereoping Germany, Meschede 2018

Settings and workflow____________________________________________________________________________________5
2. Settings and workflow
Settings on the Pulse
•GLB Param - Midi Channel – should be the same midichannel as the one of the Synth Programmer
•GLB Param – ID – should be 0
Settings on the Synth Programmer
•The midichannel of the Programmers should be the same as the Pulse's. How to change midichannel on
the Programmer is described in Chapter 8. Prefs Mode
Brief workflow o er iew
Normal operation looks like this:
Select a program on the Pulse then synchronize the Programmer with the Pulse. Every time you want to begin
editing another program you need to 'request' it on the Programmer or 'dump' it from the Pulse to the
Programmer.
In cascading mode things are a little easier: changing programs updates the Programmer automatically. More
about cascading in Chapter 10. Cascading
Sa ing programs
A program can be saved in two ways:
•Saving the program in the Pulse's memory:
◦press SHIFT & STORE on the Pulse
◦select a target position between 01-40
◦press SHIFT & STORE again
•Saving the program in the Programmer's EEPROM, see Chapter 7. E-Patch
Synth Programmer for Waldorf Pulse – Operation manual V 1.0 – 01/2018
© Stereoping Germany, Meschede 2018

Overview_________________________________________________________________________________________________6
3. Overview
Let's take a quick look on the user interface first. Details to the different modes and buttons are following behind
– if necessary at all..
The 45 turn dials are – you guess it already – for direct changing of the parameters of the Pulse.
The 4 endless encoders are for finetuning values, the mod matri or other features tweaked best with a display.
There are 4 lines, each starting on an encoder and ending in a corner of the display. This should help finding the
right encoder of the parameter you want to change.
The 7 buttons change main modes, switch the Arpeggiator between OFF/ON/HOLD or change the octave of the
whole pulse or individual oscillators. The 4 buttons above the display sometimes have a secondary function:
Function keys
In modes like ARPEGGIATOR SETUP, MODULATION, SYNC & E-PATCH the 4 buttons above the display act as
function keys to activate different menu functions. A button acting as function key has it's LED lighted and shows
a command printed in capitals in the 1st line of the display.
PLAY Mode
After powerup you are directly in P AY MODE. This is the main mode you will spend most time in: here you
change the parameters of the Pulse with the knobs. Details to PLAY Mode follow in Chapter 4. Play Mode
Button 'MOD'
MODU ATION MODE offers comfortable access to the modulation possibilities of the Pulse. Press MOD again to
leave this mode and head back to PLAY Mode. More on this in Chapter 5. Modulation Mode
Button 'SYNC' / [Prefs]
Here you enter SYNC Mode to sync the Pulse with the Programmer. On pressing the function key REQ, the
Programmer requests the parameter data of the selected program number. More on synching in Chapter 6. Sync
Mode
Note: Programmer and Pulse can also be synched outside the Sync Mode by 'dumping' the currently selected Pulse
program manually from the Pulse: press the Pulse buttons SHIFT & MODE/DUMP, the Pulse's display shows 'PrG', simply
press SHIFT&DUMP again. The Programmer's display responds with 'RQ Success / Patch #52'.
Below the SYNC button you see the word [Prefs] in brackets. This means you can enter the Programmer's
preferences by holding the button for 2 seconds. The Prefs allow to change the Programmer's midichannel and
the number of cascaded pulses.
Buttons Octa e
The buttons labeled OCTAVE allow to quickly change tuning of the whole Pulse or individual oscillators UP and
DOWN by octaves. The last touched knob is important here: if you just dialed a knob on one of the 3 oscillators
(Semitone, Tune, Shape, Level) the OCTAVE buttons have impact on just this single oscillator. After having
changed any of the knobs not related to the oscillators (e.g. Lfo1 Speed), OCTAVE changes all 3 oscillators
together. If any of the 3 does not allow another octave up or down the display shows 'Octa ing refused – Border
reached'.
After powering up the Programmer and not having synched with the Pulse yet, the OCTAVE buttons refuse to
work saying 'Octa ing refused – No patch data'.
Button 'E-Patch'
Your Synth Programmer offers saving another 25 Pulse Programs, even with Program names. This mode is for
loading and saving these 'E-Patches' (for EEPROM-Patches). Details follow in Chapter 7. E-Patch Mode
Synth Programmer for Waldorf Pulse – Operation manual V 1.0 – 01/2018
© Stereoping Germany, Meschede 2018

PLAY Mode_______________________________________________________________________________________________7
4. P AY Mode
This is the mode after powerup. As long as the Programmer is not in sync yet, it just displays question marks for
the original values of the program and some functions like e.g. OCTAVE are locked.
To get Pulse and Programmer in sync there are 2 possible ways:
1. press SYNC; set the currently selected program with encoder 1&2; press RQ
2. engage a manual Program dump on the Pulse (press SHIFT&DUMP two times)
In both cases Programmer and Synthesizer are synced and we can start. On turning a knob the display shows 4
informations:
•In the 1st line you see the parameter name (e.g.
'Osc1 Semitone')
•2nd line to the left shows the original value of the
requested/dumped program in round brackets. If no
program was requested yet, you will see
questionmarks there.
•2nd line to the right the display shows your currently
dialed value. It can be finetuned with encoder 3.
(Why encoder 3? Follow the line from the display
parameter in the lower right corner – it ends on
encoder 3.)
E ceptions
•The four AMOUNT knobs of the modulation slots use the 1st line to show which SOURCE is modulating
which DESTINATION
•For PITCH MOD and CUTOFF MOD AMOUNT the 1st line displays the modulation source
The different Volumes of the Pulse
The turn dial labeled VOLUME targets the Pulse parameter „VCA Volume“. It's the volume of the current program
and is saved together with it.
In addition the Pulse also responds to Control Change #7, aka Midi Volume. This is completely independent from
„VCA Volume“. If you do not hear any sound although „VCA Volume“ is up, please check if maybe your DAW or
keyboard turned midi volume down by CC#7.
Altering parameter directly on the Pulse itself
In case Programmer and Pulse are in sync, you are sitting near the Pulse and the Programmer is on the other
end of your huge studio … you perfectly can change parameters on the Pulse itself. The Programmer will be
updated automatically, they always keep in sync. The Programmer even displays the incoming updates
immediately ( ... even you can not see it as you are on the other side of your huge studio). E ception: if using the
programmer in a cascade, the parameter updates are recognized and processed but not displayed (for technical
reasons).
Dri e
The parameter DRIVE is a Programmer-Makro, the Pulse itself does not offer any 'DRIVE'. DRIVE allows to change
the level of the 3 Oscillators alltogether while maintaining their relative mi levels. Very useful as the Pulse's VCF
changes it's sound drastically in dependence of the input level. Drive ends when the loudest oscillator's level
reaches 127 or the quietest approaches 0.
Oscillators with levels set to 0 by their MIX dial are considered 'intentionally muted' and are not taken into effect
by DRIVE.
As soon as you were using DRIVE the first time after sync-ing you will see another parameter when using one of
the MIX knobs. Between original and new value you will spot something like „D:065“. Means this level was set to
65 by the drive pot. After changing DRIVE the mi pots are most probably not standing in a position
corresponding to the current MIX levels. So after changing MIX unintentionally, you can find back to the level set
Synth Programmer for Waldorf Pulse – Operation manual V 1.0 – 01/2018
© Stereoping Germany, Meschede 2018

PLAY Mode_______________________________________________________________________________________________8
by DRIVE before touching MIX.
Note: DRIVE just contains as many steps as the loudest and quietest oscillator offer steps til hitting the end of the span.
If MIX 1 is on 126 and MIX 2 has a alue of 2, the full span of DRIVE only offers 3 steps!
En elope Trigger 1 & 2
The DRIVE knob unfortunately occupied the space for one of the ENV TRIGGER pots. Both envelopes therefore
have to share one knob for setting trigger mode. As soon as you move it, the 1st line shows which envelope is
currently changed, e.g. 'Env2 Trigger'. Use encoder 1 or 4 to toggle between Env1 and Env2. As usual, Encoder 3
changes value.
Note: if the number of pulses is set abo e 1 in preferences you will see another parameter: „Cas:Ply“ or „Cas:Uni“. More
on cascading in Chapter 10. Cascading.
All Notes Off / Panic
If your Pulse should suffer from a hanging note - means it still sounds although no key is pressed – you can send
it an 'All Notes Off' command, also called 'Panic-Button'. Just hold the SYNC button for a second. You can release
it as soon as you see the first question mark of the PREFS entering countdown. Your Pulse should be muted
then.
Note: The Pulse offers such a Panic-Option by itself: hold MODE and press the arrow pointing DOWN
Portamento knob
The knob for Portamento has a double function. In the left half you select the portamento mode NORMAL with
increasing time. In the right half you will get the porta mode LEGATO, of course also with increasing time. It is
crucial to find the 0 for portamento. Even a 1 leads to slided notes. To make it easier and faster setting porta to
zero we made the span's area around 0 wider by software. The downside: the ma . time ends at 120 instead of
127 (for technical reasons). You remember, encoder 3 also can change values. If you will need a porta time
beyond 120 please use encoder 3.
Paraphonic Modus
You maybe already spotted the word 'Para' near the Env Trigger modes? If you turn the dial into that position –
no matter if Env 1 or 2 is active – your Programmer turns your Pulse into a 3 voice paraphonic Synthesizer!
Means you can press 3 notes at once and play whatever triad you like. This is archived with a little trick changing
Semitone and Level of OSC 2 & 3 in relation to OSC 1 in consideration of the notes you press. The playing on the
keyboard needs a little practice and understanding the rules but it's fun and offers lots of new possibilities.
And these are the rules for paraphopnic mode:
•The 1st key starts envelopes and OSC 1 sounds up. OSC 2 & 3 are muted.
•The 1st key determines the amount of velocity for this program. For the 2nd and 3rd keypress only the
position on the keyboard is taken into account, not the velocity.
•Press a 2nd key and you will hear OSC2 with the right pitch for this key. You can release it (to mute OSC2
again) and press it elsewhere to hear another note for OSC2.
•The 3rd key brings OSC 3 into play. The function is the same as on OSC2.
•The keys for OSC 2 or 3 can be above or below the key for OSC1
•The Release phases for the envelopes are not started before releasing the 1st key
•On leaving paraphonic mode by turning ENV TRIGGER away from the Para setting, the state of Semitone
and Mi for OSC 2 & 3 are reset to the state before entering paraphonic mode
•Paraphonic mode uses 'Single 2' as triggermode for both envelopes (inevitable)
•Semitone for OSC 2 & 3 can be changed on held notes but will be overwritten on the ne t pressed
interval
•The Paraphonic Mode in combination with the Arpeggiator leads to strange results
•The OCTAVE buttons act on all oscillators together in paraphonic Mode
Synth Programmer for Waldorf Pulse – Operation manual V 1.0 – 01/2018
© Stereoping Germany, Meschede 2018

PLAY Mode_______________________________________________________________________________________________9
Two hints:
•In paraphonic mode you best play the 3 notes strummed (with a short delay before pressing the ne t
key), makes it easier archiving predictable results
•You can alter the levels of OSC 2 & 3 for your liking. E.g. to give the base note of OSC1 more impact or
change the balance of the intervals in a triad (blend OSC 1 & 2 over to OSC 1 & 3)
•Each OSC can have it's own waveshape and be modulated individually by the mod matri . Nice e ample:
◦LFO1 with SQUARE WAVEFORM modulated OSC 1 Pitch to get a simple bassline
◦OSC 2 is playing the melody line, LFO 2 on pulsewith or used for a slight vibrato on pitch OSC2
◦from time to time play a 3rd note: OSC 3 could produce an effect sound using Env 1 on pitch OSC3
Synth Programmer for Waldorf Pulse – Operation manual V 1.0 – 01/2018
© Stereoping Germany, Meschede 2018

MODULATION Mode____________________________________________________________________________________10
5. MODU ATION Mode
The Stereoping Programmer wants to simplify access to the modulation slots of the Pulse. As described above
you enter Mod Mode by pressing – yes – MOD. It's blue LED will light up. Blue is also the cap color of the si
modulation amount knobs. (Pitch, Cutoff and Mod 1-4)
Note: the Modulation Mode is locked until Programmer and
Pulse are in Sync.
The 7 pages of the Modulation Mode
MODULATION MODE offers 7 pages which you can select with
encoder 4:
•use the first 4 pages to access the Modulations slots
1-4, each with it's SOURCE, AMOUNT and
DESTINATION
•page 5 contains SOURCE and AMOUNT for Pitch-
Modulation
•page 6 contains SOURCE und AMOUNT for Cutoff-
Modulation
•page 7 offers 3 macros to dump a complete
modulation setting into the modulation matri .
Use encoder 1 to change SOURCE, encoder 2 changes DESTINATION and encoder 3 finetunes AMOUNT.
But there is an easier way:
Hint 1: By turning the Mod amount pots you quickly can jump between the modulations slots and change
AMOUNT at the same time. Amount can be finetuned with encoder 3.
Hint 2: by keeping MOD pressed you can select many SOURCES and nearly all DESTINATIONS directly thru the
knobs with the same name. The slots for Pitch (5/7) and Cutoff (6/7) logically only offer the selection of SOURCES.
Choose among the following knobs:
Knobs and the Modulations Sources they select (keep MOD pressed)
•LFO 1 Waveform in dependence how much you turn the knob you can select between Source →LFO1
(1), LFO1*ModW. (2) or LFO1*Aftert. (3)
•LFO 2 Rate or Delay in the left side of turnspan you select LFO2 (4), in the right half LFO2*Env2 (5)→
•ENV 1 A, D, S oder R →Envelope 1 (6)
•ENV 2 A, D, S oder R →Envelope 2 (7)
•Env 1 oder 2 Velocity → Velocity (8)
•Env 1 oder 2 Keytrack →Keytrack (9)
•not selectable by knob are sources 10-15
Knobs and the Modulation Destinations they select (keep MOD pressed)
•Detune von Osc 1,2 oder 3 →Pitch (0)
•Interval Osc 1 →Osc1 Pitch (1)
•Interval Osc 2 →Osc2 Pitch (2)
•Interval Osc 3 →Osc3 Pitch (3)
•Waveform Osc 1 →Pulsewidth1 (4)
•Waveform Osc 2 →Pulsewidth2 (5)
•Level Osc 1 →Osc1 Level (6)
•Level Osc 2 →Osc2 Level (7)
•Level Osc 3 →Osc3 Level (8)
Synth Programmer for Waldorf Pulse – Operation manual V 1.0 – 01/2018
© Stereoping Germany, Meschede 2018

MODULATION Mode____________________________________________________________________________________11
•Noise MIX →Noise Level (9)
•Cutoff →Cutoff (10)
•Reso →Resonance (11)
•Volume →Volume (12)
•Panning →Panning (13)
•Lfo 1 Speed →LFO1 Speed (14)
•not selectable by knob is destination 15
Modulation Macros
For having a quick starting point, page 7 offers 3 little macros. By pressing the appropriate button above the
display the programmer immediately dumps the changes in the modulation matri of the Pulse. Parameters of
the program not listed here remain untouched. Caution! There is no 'Undo'
OFF – this macro deleted all modulations:
•all sources set to Off (0), also for Pitch and Cutoff
•all amounts set to 0
•all targets of slot 1-4 set to Pitch (0)
PWM – for instant PWM-Touch:
•Slot 1: Pulsewidth of OSC 1 will be modulated by LFO1 with amount +40
•Slot 2: Pulsewidth of OSC 2 will be modulated by LFO2 with amount +40
•Slot 3: LFO1 Speed modulated by Keytrack with amount +40
•Slot 4: empty
•LFO 1 rate set to 30, Waveform to Sine
•LFO 2 rate set to 40
•OSC 1 Detune +5, Waveform Pulse, Pulsewidth 52, Level 70
•OSC 2 Detune -5, Waveform Pulse, Pulsewidth 52, Level 70
•… if the sound won't be spherical …is OSC2 Sync ON, should be off?
DETN – LFO 1 & 2 for Detuning, Modwheel blends Vibrato
•Slot 1: OSC 1 Pitch will be modulated by LFO1 with amount +3
•Slot 2: OSC 2 Pitch will be modulated by LFO2 with amount +3
•Slot 3: empty
•Slot 4: empty
•LFO 1 rate set to 30, Waveform to Sine
•LFO 2 rate set to 40
•OSC 1 Detune +5, Level 70
•OSC 2 Detune -5, Level 70
Synth Programmer for Waldorf Pulse – Operation manual V 1.0 – 01/2018
© Stereoping Germany, Meschede 2018
Sync Mode______________________________________________________________________________________________12
6. Sync Mode
After powerup the Programmer is 'empty', it has no idea about all the parameter values of the currently selected
Pulse program.
As stated above, there are 2 ways to get Programmer and Pulse in sync:
1. this Mode
2. engage a manual program dump from the Pulse (press SHIFT&DUMP two times)
In Sync-Mode the Programmer gets the values of the current Program by sending a Dump Request to the Pulse.
The Programmer needs to know WHICH Program to request, you have to provide the program number manually.
Set the currently selected Pulse program number with the 1st and 2nd encoder and press REQ. That's it.
You leave SYNC Mode by pressing XIT.
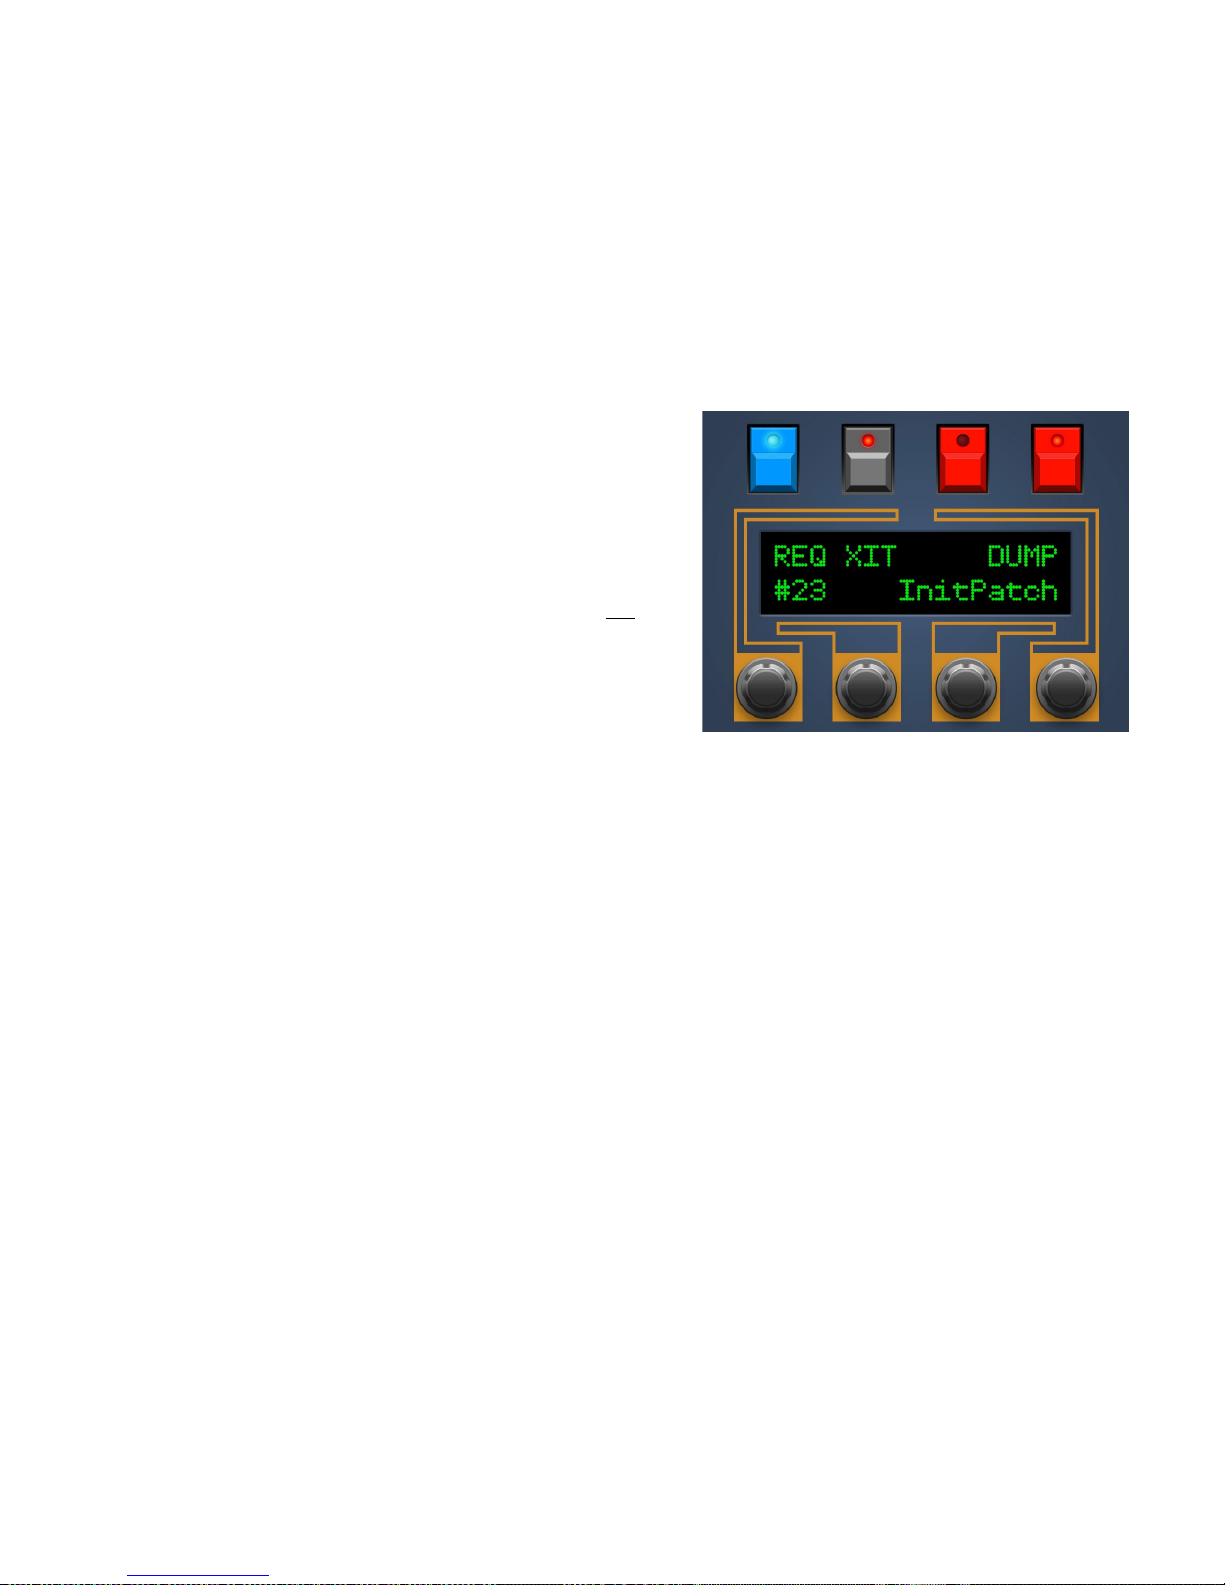
The third button labeled DUMP is used to manually dump a
program from the Programmer to the Pulse. Encoder No. 3
selects what to dump:
•InitPatch – an initialized patch is dumped to the Pulse
•Man.Pots – the current position of the Programmer's
pots will be send to the Pulse. For parameters not
mapped to pots (Modulations Sources and
Destinations, Arpeggiator …) values are taken from the
Init Patch.
•Cur.Patch – the Program currently held in the
Programmer is dumped to the Pulse
The parameter values of the Pulse's current program are overwritten. As long as you do not save, you perfectly
can revert to your original Pulse program.
Note:
A request only makes sense if you request the program number you are currently using and playing. You can as well
request any other program number. The problem is, the displayed original alues of the Programmer would not match
the alues of the currently selected program of the Pulse.
If you want to re ert to your original Pulse program (e.g. Nr. 53) after ha ing changed some parameter alues: select
another program on your Pulse (e.g. 54) and change any alue. The Pulse will restore the original program (Nr. 53)
because it needs it's edit buffer memory to hold the changes of the last edited program number (Nr. 54). Jump back to
your old program (53) and you will see the 'P' again in front of the number. The program with 'E' (for 'Edited') is the
currently edited program. In out example the Nr. 54 would ha e the 'E'.
If more than 1 Pulse is set in Preferences (means: the Programer is used with a cascade of multiple Pulses) the function
key 'REQ' will not be a ailable because a manual request is technically not possible. In cascading mode Programmer
and Pulse are synched automatically.
Synth Programmer for Waldorf Pulse – Operation manual V 1.0 – 01/2018
© Stereoping Germany, Meschede 2018

E-Patch Mode___________________________________________________________________________________________13
7. E-Patch Mode
'E-Patch' is the short term for 'EEPROM Patch'. Here you can load or save another 26 programs in the
Programmer's memory, similar to an e ternal RAM-card. You
even can give the programs names with 8 letters.
By pressing the E-Patch button you enter E-Patch Mode, in the
same way you are leaving it.
On entering E-Patch Mode you have to decide wheter to LOAD
a program and send it to the Pulse immediately.
Or if you want to SAVE the program currently in the
Programmer's memory.
If you press LOAD ...
… you can select a number between 0 and 25, the display
directly shows the program name.
If the current slot displays „Empty...“ there is no patch saved in
that slot yet. Logically you wont be offered a YES button.
By pressing YES the program will be read and sent to the Pulse
immediately. Pulse and Programmer are automatically in sync
then.
Note: as long as you did not sa e the Program on the Pulse it
resides just in the Pulses edit buffer.
With BACK you can leave the LOAD page at any time. You will
find yourself on the 1st page of E-Patch Mode then.
If you press SAVE …
... things look quite similar. But now you can give the program
to save a name before pressing YES to save the program into
the memory slot:
•Encoder 2 selects the saving slot. Each time you
change the slot, it's original name is displayed shortly
to inform, what you are overwriting.
•Encoder 3 to shift letter position
•Encoder 4 to select the letter
There is a nifty aid for naming here! Play some notes while
being in this mode, you can select letters on your keyboard:
hard press = capital, soft keypress = small letters. You even can
shoft the position with the modulation wheel :-)
The same as in LOAD: use BACK to leave this page at any time
to get back to E-Patch's 1st page.
Synth Programmer for Waldorf Pulse – Operation manual V 1.0 – 01/2018
© Stereoping Germany, Meschede 2018
PREFS Mode____________________________________________________________________________________________14
8. PREFS Mode
To get into the Programmer's preferences hold SYNC for 2 seconds. You will see a little countdown displaying the
currently selected midichannel. Lifting the button before the countdown's end cancels entering PREFS mode and
you find yourself –- yes –- in PLAY Mode again.
PREFS Mode offers 2 settings:
Midichannel of the Programmer
For Programmer and Pulse to work perfect they need to be
set to the same midichannel. Change the channel of the
Programmer with Encoder 4.
The Pulse's channel is set in „GLB – MIDI Channel“.
Or you simply send a midinote into the Programmer on your
desired midichannel.
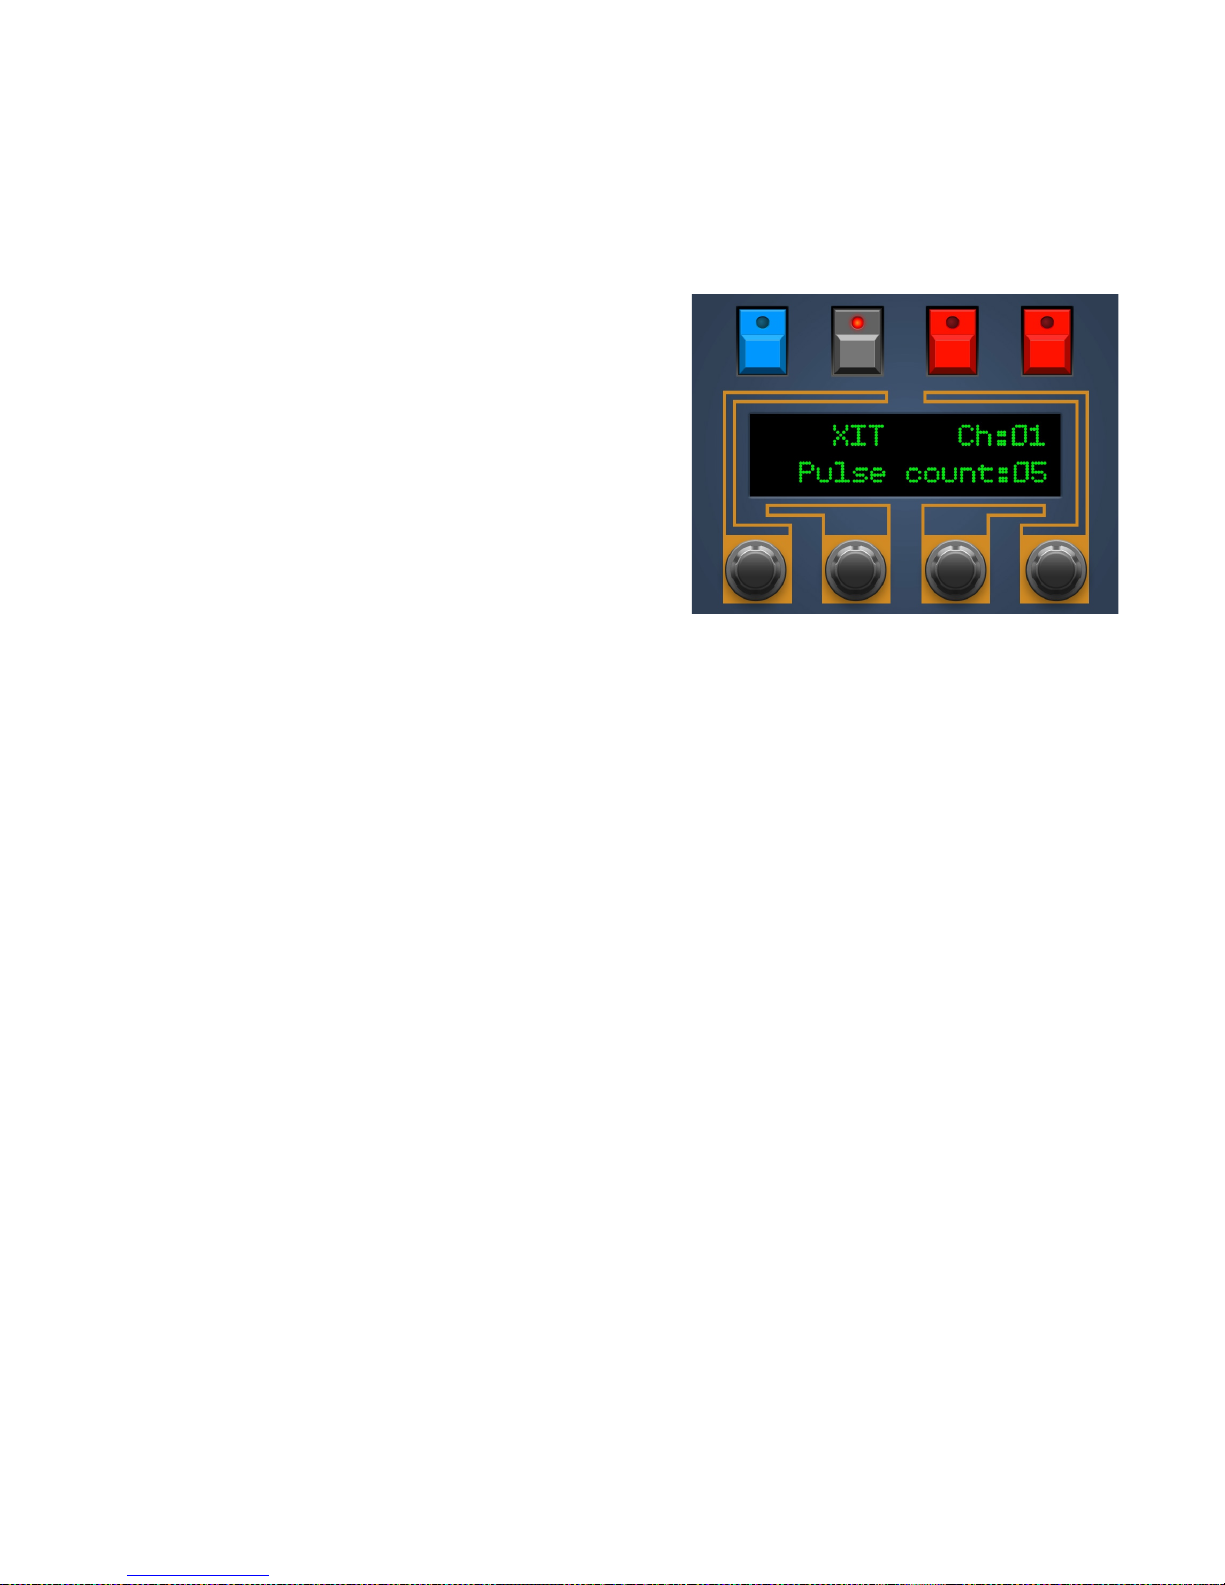
Count of connected Pulses
In most cases this value will remain on 1. It comes into play if
you want to use multiple Pulses in a cascade to get a
polyphonic Pulse. See Chapter 10. Cascading for details.
Change the count of Pulses with 2nd or 3rd encoder.
In case you ask yourself why the Programmer has to know
how much Pulses are connected … as soon as the Pulse count
e ceeds 1 there are 2 things changing in the Programmer:
•Env Trigger screen shows the additional parameter 'PLY' or 'UNI'. You can select if your cascade should
be played polyphonically or as a unison monstersynth with many (… maybe many, many) oscillators..
•if the Programmer receives a Program Dump, it will be passed thru to MIDI OUT. All cascaded Pulses
connected in the MIDI THRU chain will receive it and play the same program.
Exit
Press XIT to leave PREFS Mode. I you changed anything in this mode it will be saved in the Programmer's
memory.
Synth Programmer for Waldorf Pulse – Operation manual V 1.0 – 01/2018
© Stereoping Germany, Meschede 2018

Arpeggiator_____________________________________________________________________________________________15
9. Arpeggiator
This chapter handles the Programmers mode for editing the Pulse's arpeggiator. The Programmer itself does not
offer any arpeggiator.
You surely did not miss the dedicated ARP buttons on the Programmer. You can use them to switch the Pulse's
arpeggiator modes to ON or HOLD. Pressing it again switches the Arpeggiator OFF again. Pressing the other key
while Arp is on, the mode will be changed from ON to HOLD or vice versa.
The Arpeggiator parameters are saved with the program. It is not unlikely a program has it's Arpeggiator mode
set to ON or HOLD. This will be recognized by the Programmer on incoming dumps or manual requests. You see
at any time the current state of the arpeggiator.
Arpeggiator Setup
Now you want to change the Arpeggiator settings. Hold one
of the 2 buttons for 2 seconds and enter Arpeggiator setup.
The Programmer's Display will show something like the
picture to the right side.
On entering Setup with the ON button, the Arpeggiator will
automatically be set to ON, similar when using HOLD to enter
setup.
Use the Encoders to conveniently change the parameters.
The function of the 4 parameters with all their values are
described in the Pulse manual.
Note: Arpeggiator setup is not accessible until Programmer and
Pulse are in sync.
Synth Programmer for Waldorf Pulse – Operation manual V 1.0 – 01/2018
© Stereoping Germany, Meschede 2018

Cascading______________________________________________________________________________________________16
10. Cascading
Your Synth Programmer can be integrated perfectly into a cascade of 3, 4, 5 or more Pulses. The ma imum
amount is 12!
'Cascaded Pulses?!' As described in the Pulse's manual you can chain multiple Pulses (Firmware 2. ) to build a
polyphonic Pulse. With each Pulse you add, you get another polyphonic note you can play (incl. individual
Oscillators, Envelopes, Filter, Panning..). With 6 Pulses you nearly got something like a Memorymoog.
For your convenience in short how to setup the cascade:
Settings on the cascaded Pulses
•Connect the Audio output of each Pulse to your mi er, preferable with the same level. As the Pulse has
got Stereo-Outputs you will need 8 mi er channels for 4 Pulses. Don't forget to set the channel's panning
fully to L or R.
•Set all Pulse's to the same midichannel
•Press Shift & Dump, then Arrow down (or 4 Arrow up). The Pulse display shows something like „1 of 1“.
With the 2 leftmost dials of your Pulse you set the number of this Pulse and the total number of Pulses.
Using 3 Pulses, the first has to be set to '1 of 3', 2nd to '2 of 3' and the last to '3 of 3'.
•Now on to the connections together with the Synth Programmer, it could not be easier: for the 1st Pulse
things stay the same as they were: Programmer and Pulse in a Midi-Loop. The following Pulses get their
MIDI IN from the former Pulse's MIDI THRU jack: Pulse „1 of 4“ THRU connected to „2 of 4“ IN, Pulse „2 of
4“ THRU gets connected with „3 of 4“ IN a.s.o.
Settings on the Synth Programmer
The Programmer has to keep track how many Pulses to supply. It interprets Midi-Data of the 1st Pulse in a
special way and offers poly or unison mode in Env Trigger Display. The number of connected Pulses can be set in
the Programmer's Preferences.
Program Management
Program changes have to be made on the 1st Pulse only, the selected program will be distributed to the
Programmer and all connected Pulses automatically. A manual Program Request using Sync Mode is technically
not possible in the cascade.
Parameter changes made on the 1st Pulse are updating parameters of the Programmers as well as on all
cascaded Pulses. For technical reasons para changes on the first Pulse are recognized and processed but not
showed in realtime on the Programmer's display. The normal situation is using the Programmer for parameter
tweaking anyway.
Polyphonic or Unison playing
Running the Programmer in a cascade adds a new parameter in Envelope Trigger display to the upper left:
'Cas:Ply' or 'Cas:Uni'. You can toggle it with encoder 4, it determines if your keyboard (or sequencer) notes play
the Pulse cascade polyphonically or in unison letting all connected Pulses play the same note at the same time.
Important: for all connected Pulses to respond, the number of connected Pulses must match the number you set in the
Programmer's Prefs..
Tips
In Unison Modus the sound gets much wider when detuning the connected Pulses against each other using their
global parameter 'Mastertune'. Unfortunately you have to do this manually, for technical reasons the
Programmer can not reach the parameter 'Master Tune'.
No one holds you back from tweaking the connected Pulses (which are not the first in the chain) individually, e.g.
setting different LFO rates or paning. However: changing that parameter on Pulse No 1 or the Programmer itself
will overwrite your manual changes again.
Arpeggiator also works in the cascade :-)
Synth Programmer for Waldorf Pulse – Operation manual V 1.0 – 01/2018
© Stereoping Germany, Meschede 2018

Initi Patch_______________________________________________________________________________________________17
11. Initi Patch
This is a table continaing the values of the Init Patch
you can send to the Pulse in SYNC Mode.
Synth Programmer for Waldorf Pulse – Operation manual V 1.0 – 01/2018
© Stereoping Germany, Meschede 2018
OSC1 Semitone 40
OSC1 Tune 64
OSC1 Shape Saw (1)
OSC1 PW 127
OSC2 Semitone 40
OSC2 Tune 64
OSC2 Shape Saw (1)
OSC2 PW 127
OSC2 Sync Off
OSC2 Keytrac On
OSC3 Semitone 40
OSC3 Tune 64
OSC3 Shape Square (0)
OSC1 Level 64
OSC2 Level 0
OSC3 Level 0
Noise Level 0
LFO1 Speed 64
LFO1 Shape Sine (0)
LFO2 Speed 64
LFO2 Delay 0
ENV1 Attac 0
ENV1 Decay 32
ENV1 Sustain 0
ENV1 Release 0
ENV1 Trac 64
ENV1 Trigger Single1 (0)
ENV2 Attac 0
ENV2 Decay 0
ENV2 Sustain 127
ENV2 Release 0
ENV2 Trac 64
ENV2 Trigger Single1 (0)
Pitch Mod Amount +0 (64)
Pitch Mod Source Off (0)
Porta Time 0
Porta Mode Normal (0)
Pitchbend Scale 12
Mod 1 Source Off (0)
Mod 1 Amount +0 (64)
Mod 1 Destination 0 (Pitch)
Mod 2 Source Off (0)
Mod 2 Amount +0 (64)
Mod 2 Destination 0 (Pitch)
Mod 3 Source Off (0)
Mod 3 Amount +0 (64)
Mod 3 Destination 0 (Pitch)
Mod 4 Source Off (0)
Mod 4 Amount +0 (64)
Mod 4 Destination 0 (Pitch)
Arp Active Off (0)
Arp Range 3 (2)
Arp Cloc 16 (12)
Arp Tempo 146 (50)
Arp Mode Up (0)
Cutoff 64
VCF Trac +0 (64)
VCF Env Sens +32 (96)
VCF Velo Sens +0 (64)
VCF Mod Source Off (0)
VCF Mod Amount +0 (64)
Reso 0
Volume 80
Volume Velo Off (0)
Pan Center (64)

Updating Firmware_____________________________________________________________________________________18
12. Updating Firmware
The day may come you want to update your edition or try out another. Your Synth Programmer offers a
firmware update mode for this. After entering this mode you just send a firmware-file into the controllers Midi IN
2 jack. The firmwares in SysE -format are all compatible with your Programmer and freely available on our
website. You can dump them with any standard SysE dump tool of which several are available as freeware for
different operating systems. An e maple for PC is 'MidiOX', for the Mac you could use 'SysE Librarian'.
The technical part:
•Switch off the Stereoping Programmer
•Connect MIDI OUT of your Midi-Interface directly to the jack MIDI 2 IN of the Programmers using a short
cable of good quality
•There are some preferences in most SysE -Dump Programs like 'Delay between Buffers' or 'Delay after
F7'. Please choose something around 100mS (Milliseconds) here.
•Hold MOD and power up your Programmer. The Display should read 'BOOTLOADER'
•Load the new Firmware into your SysE -Dump Program and send it out
•The display shows OS-Version and progresst. After about 2 minutes the Programmer restarts
•If you will get an error on the screen please try another cable or increase the delay mentioned above.
The firmware update erases all E-Patches!
Synth Programmer for Waldorf Pulse – Operation manual V 1.0 – 01/2018
© Stereoping Germany, Meschede 2018

Imprint_________________________________________________________________________________________________19
13. Imprint
Stereoping is a registered trademark of Gregor Zoll, Germany.
Adresse Gregor Zoll Musikelektronik
Hermann-Voss-Str. 21
59872 Meschede
Germany
E-Mail h e llo@stereoping. com
Homepage http://www.stereoping.com
Synth Programmer for Waldorf Pulse – Operation manual V 1.0 – 01/2018
© Stereoping Germany, Meschede 2018
Table of contents


