Stid CNV 485 HID SME User manual

CNV_485_HID_SME
Notice d’utilisation
CNV_485_HID_SME
Operating instructions
© STid –20 PA des Pradeaux FR 13850 GREASQUE –NI1123C01 –1/5 –Ed. 28/07/2020
Généralités
General points
Ce câble permet d’émuler un clavier et de remonter l’intégralité des EPC
de chaque tag détecté dans la fenêtre active.
Pour cela, il faut que les caractères soient en ASCII et que la fin de trame
soit caractérisée par l’envoi de CR/LF (0x0D suivi de 0x0A).
Par défaut le câble est configuré ainsi :
➢Vitesse : 115200 bauds
➢Clavier français AZERTY
➢VID –Vendor ID : 0x1FC9
➢PID –Product ID : 0x4189
➢Les touches numériques utilisées sont celles du pavé numérique
(nécessite d’activer VerrNum).
➢Les caractères alphabétiques s’affichent en majuscules.
➢Retour à la ligne à la fin de l’affichage d’un EPC.
Le câble est livré prêt à être utilisé avec les paramètres par défaut ci-
dessus.
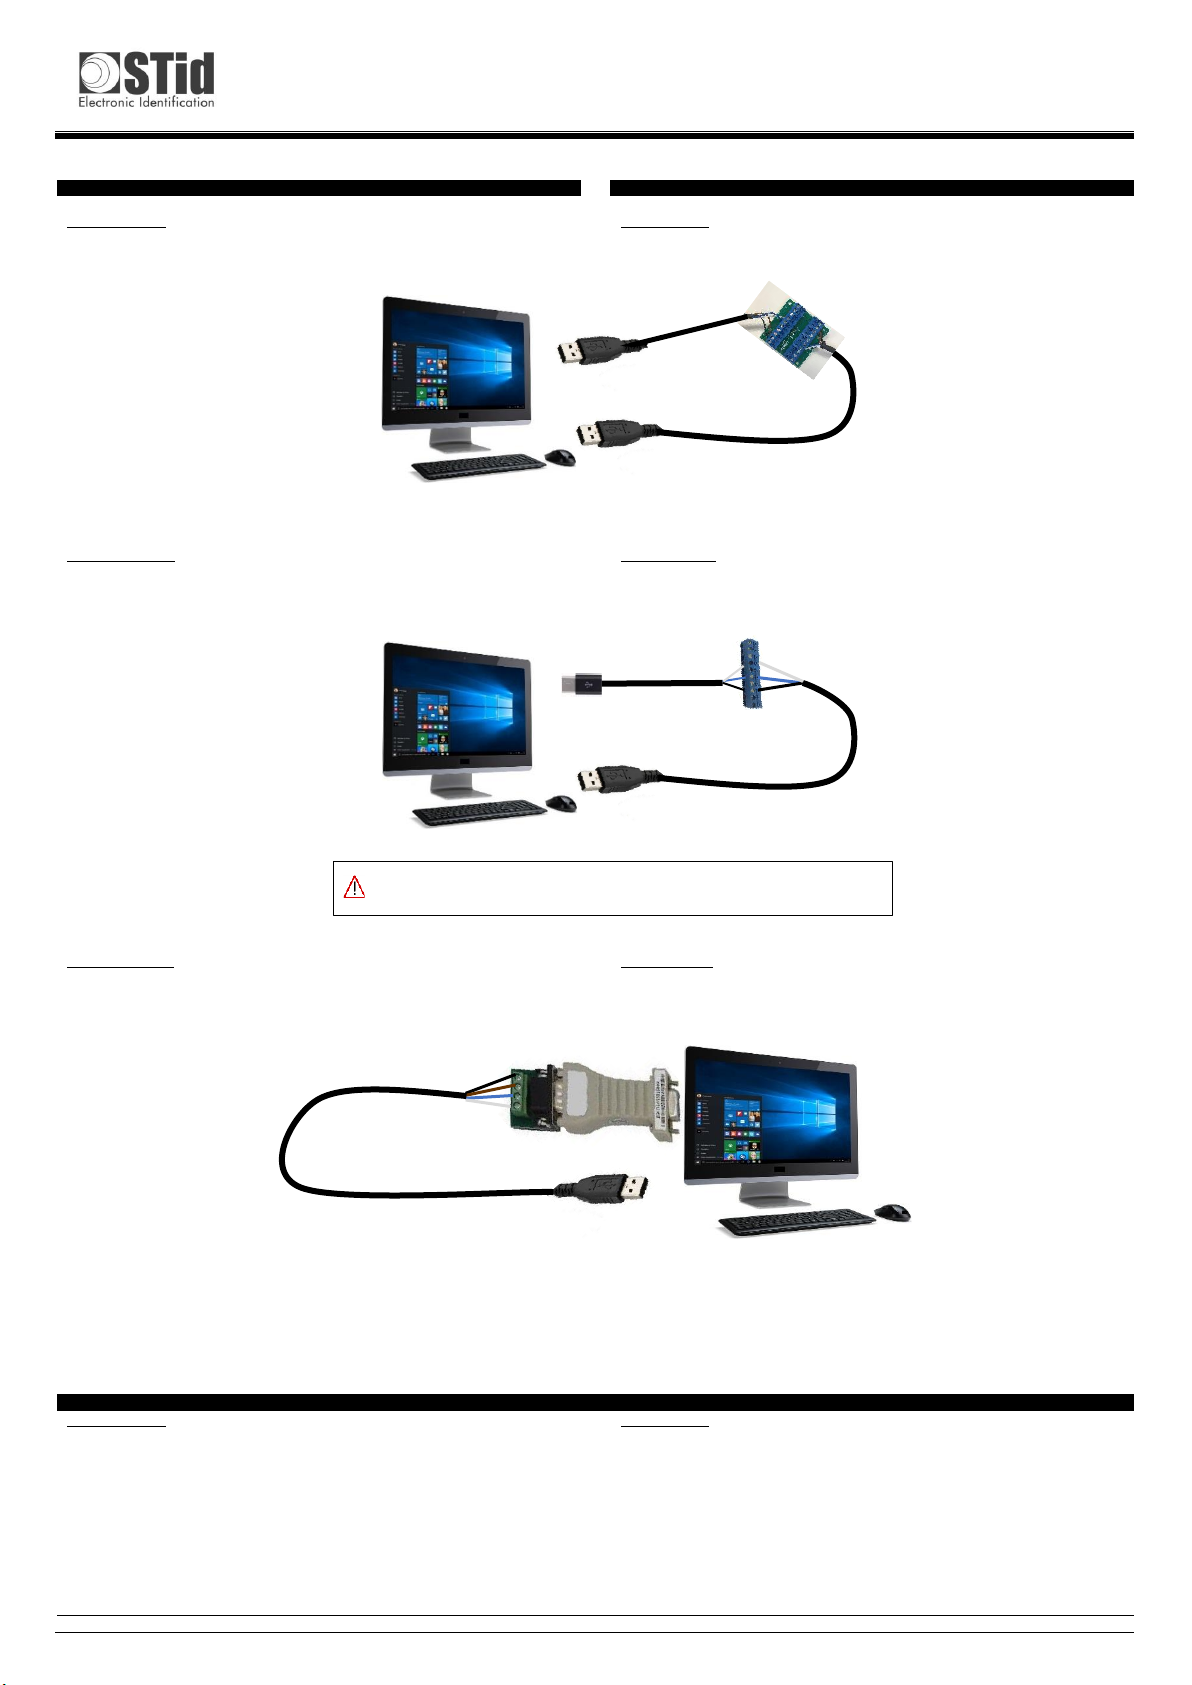
Pour utiliser le câble, il suffit de le raccorder au SME préalablement mis
en mode autonome et de connecter la prise USB au PC.
This cable emulates a keyboard and displays in the active window all
the EPCs of each tag detected.
To achieve this, the characters have to be in ASCII format and the end
of frame is characterized by CR/LF (0x0D 0x0A).
By default, the cable is set as follows:
➢Baud rate: 115200 bauds
➢French keyboard AZERTY
➢VID –Vendor ID: 0x1FC9
➢PID –Product ID: 0x4189
➢The numeric keys are those of the numeric keypad (NumLock must
be on).
➢The alphabetic characters are displayed in the upper case.
➢Carriage return after the display of an EPC.
The cable is ready-to-use, set with the above default parameters.
To use the cable, all you have to do is connect it to the SME previously
put in autonomous mode and connect the USB socket to the PC.
Programmation / Mise à jour du convertisseur
Configuring / Updating the converter
Opération à effectuer sur un PC sous Windows® 7 ou supérieur.
Le câble est livré programmé. Si une reprogrammation ou une mise à
jour doit être effectuée, suivre les instructions ci-dessous.
➢Brancher le câble sur un PC (cf. § Configuration du convertisseur).
➢Envoyer la commande « update » (cf. § Configuration du
convertisseur).
➢Le câble est reconnu en tant que CDC (Communication Device
Class → clé USB) sous le nom « CRP DISABLD ».
Une fenêtre similaire à celle ci-dessous apparaît :
➢Ouvrir le dossier ; il doit contenir un seul fichier nommé firmware.bin.
➢Supprimer le fichier firmware.bin et le remplacer par le fichier
SD244Axx.bin fourni par STid.
➢Débrancher le câble puis le rebrancher ; le câble doit être reconnu
comme un périphérique d’interface utilisateur.
This has to be done on a PC running Windows® 7 or higher.
The cable comes with the default settings, ready to use. If it needs other
settings or an update, follow the instructions below.
➢Connect the cable to the PC (see § Configuring the converter).
➢Send the “update” command (see § Configuring the converter).
➢The cable is recognized as a CDC (Communication Device Class →
USB key) with the name “CRP DISABLD”.
A window similar to the one below should appear:
➢Open the folder; it contains only one file named firmware.bin.
➢Delete the file firmware.bin and copy the file SD244Axx.bin supplied
by STid.
➢Disconnect the cable then reconnect it; the cable should be
recognized as a user interface peripheral.
Alimentation

CNV_485_HID_SME
Notice d’utilisation
CNV_485_HID_SME
Operating instructions
© STid –20 PA des Pradeaux FR 13850 GREASQUE –NI1123C01 –2/5 –Ed. 28/07/2020
Câblage du convertisseur pour configuration
Wiring the converter for configuration
1ère possibilité :
Utilisation du convertisseur RS485 vers USB CNV-USB-485 et de
l’adaptateur BT138-ARC ou BT138-ARC1.
1st possibility:
Use of the RS485 to USB converter CNV-USB-485 and the BT138-ARC or
BT138-ARC1 adapter.
2ème possibilité :
Utilisation d’un convertisseur RS485 vers USB autre que le CNV-USB-
485.
Relier le 12V seulement si le convertisseur n’est PAS auto-alimenté.
2nd possibility:
Use of an RS485 to USB converter, other than the CNV-USB-485
converter. Wire 12V only if the converter is NOT self-powered.
3ème possibilité :
Utilisation d’un convertisseur RS485 vers RS232 – Stid réf. : CNV-232-485.
3rd possibility:
Use of an RS485 to RS232 converter –STid part number: CNV-232-485.
Windows® 7 ou supérieur / Windows® 7 or higher
➢Connecter le CNV_485_HID sur un convertisseur RS485 vers USB (1ère
ou 2ème possibilité) ou RS485 vers RS232 (3ème possibilité).
➢Connecter le convertisseur RS232 ou USB au PC.
➢Connecter la prise USB du CNV_485_HID au PC.
➢Connect the CNV_485_HID cable to an RS485/USB converter (1st or
2nd possibility) or RS485/RS232 converter (3rd possibility).
➢Connect the RS232 or USB converter to the PC.
➢Connect the USB connector of the CNV_485_HID to the PC.
Configuration du convertisseur
Converter configuration
1ère possibilité : via un terminal
➢Ouvrir un terminal permettant d’envoyer des caractères sur la
liaison série (par exemple Tera Term ou Com Tools.).
➢Configurer le CNV_485_HID en envoyant les commandes en ASCII et
en respectant la casse (majuscule/minuscule) : voir tableau ci-
dessous.
➢Finir en envoyant les octets CR/LF → 0x0D 0x0A.
Le CNV_485_HID doit acquitter de la bonne réception de la trame
en envoyant les caractères ASCII « o » et « k ».
Attention à communiquer à la bonne vitesse (115200).
1st possibility: via a terminal
➢Open a terminal which can send characters on the serial link
(example Tera Term or Com Tools).
➢Configure the CNV_485_HID cable by sending commands in ASCII
case sensitive: see table below.
➢End the frame with CR/LF → 0x0D 0x0A.
The CNV_485_HID replies with acknowledgment receipt in ASCII
format “o” and “k”.
Make sure to communicate with the accurate speed (115200).
Windows® 7 ou supérieur / Windows® 7 or higher
Noir / Black : GND
Bleu / Blue : L+
Blanc / White: L-
Relier le 12V seulement si le convertisseur n’est PAS auto-alimenté /
Wired 12V only if the converter is NOT self-powered
Windows® 7 ou supérieur / Windows® 7 or higher
Noir / Black : GND
Bleu / Blue : L+
Blanc / White: L-
Noir / Black : GND
Marron / Brown : 12V
Bleu / Blue : L+
Blanc / White: L-
BT138-ARC
CNV-USB-485
CNV_485_HID
CNV_485_HID
RS485 to USB converter

CNV_485_HID_SME
Notice d’utilisation
CNV_485_HID_SME
Operating instructions
© STid –20 PA des Pradeaux FR 13850 GREASQUE –NI1123C01 –3/5 –Ed. 28/07/2020
Commande
ASCII
Données
Hexa
Description de la commande
update
Pas de donnée
Permet de passer le convertisseur en
mode reprogrammation.
reset
Pas de donnée
Permet de recharger les paramètres
usine.
info
Pas de donnée
Permet de connaitre la configuration
du câble (version, baud rate…).
language
1 octet de donnée :
Français → 0x00
Anglais → 0x01
Permet de changer la langue du
clavier (Français AZERTY, anglais
QWERTY).
casing
1 octet de donnée :
Majuscule → 0x00
Minuscule → 0x01
Permet de choisir si les caractères
alphabétiques affichés sur l'écran
apparaissent en majuscule ou en
minuscule.
numloc
1 octet de donnée :
Pavé num → 0x00
Touche num → 0x01
Permet de choisir quelles touches
numériques seront utilisés : celles du
pavé numérique ou celles situées au-
dessus des touches alphabétiques.
charreturn
1 octet de donnée :
Désactivé → 0x00
Activé → 0x01
Permet d’activer ou désactiver le
retour à la ligne (activé par défaut).
Ex. : Pour configurer le baud rate à 115200 envoyer :
‘b’ ‘a’ ‘u’ ‘d’ ‘r’ ‘a’ ‘t’ ‘e’ 0x04 0x0D 0x0A
Command
ASCII
Data
Hexa
Description of the command
update
No data
Put the converter in update
mode.
reset
No data
Set the device to factory default.
info
No data
Give the cable settings (version,
baud rate,…).
language
1 byte of data:
French → 0x00
English → 0x01
Change the keyboard language
(French AZERTY, English
QWERTY).
casing
1 byte of data:
Upper case → 0x00
Lower case → 0x01
Select the upper case or lower
case to display the alphabetic
characters.
numloc
1 byte of data:
Num keypad → 0x00
Num keys → 0x01
Select which numeric keys will
be used: numeric keypad or
numeric keys above the
alphabetic keys.
charreturn
1 byte of data:
Enabled → 0x00
Disabled → 0x01
Enable / disable the carriage
return (enabled by default).
Ex.: To set the baud rate to 11,5200 send:
‘b’ ‘a’ ‘u’ ‘d’ ‘r’ ‘a’ ‘t’ ‘e’ 0x04 0x0D 0x0A
2ème possibilité : via STid USB Wedge tool
➢Ouvrir STid USB Wedge.
➢Sélectionner le port COM sur lequel est connecté le SME et
renseigner les paramètres ci-dessous :
➢Sélectionner le paramètre à modifier dans la liste déroulante
« Command ».
➢Cliquer sur « Configure ».
2nd possibility: via STid USB Wedge tool
➢Open STid USB Wedge.
➢Select the COM Port on which the SME is connected and fill in the
parameters below:
➢Select the parameter to modify in the "Command" drop-down list.
➢Click on Configure.

CNV_485_HID_SME
Notice d’utilisation
CNV_485_HID_SME
Operating instructions
© STid –20 PA des Pradeaux FR 13850 GREASQUE –NI1123C01 –4/5 –Ed. 28/07/2020
Configuration du lecteur
Configuring the reader
Connecter le SME via l’USB-c interne
Ouvrir SESpro UHF
➢Dans l’onglet « SSCP » renseigner les paramètres suivants et le
numéro du port de communication sur lequel est connecté le SME :
➢Dans l’onglet « Async/Auto/EPCMap » renseigner les paramètres de
sortie suivant :
➢Cliquer sur Autonomous_Output.
➢Cliquer sur Autonomous_Start pour passer le SME en mode autonome.
➢Débrancher l’USB-C interne.
Connect the SME via internal USB-c
Open STid SESPro UHF
➢In the « SSCP » tab, enter the following parameters and the number of
the communication port to which the SME is connected:
➢In the « Async/Auto/EPCMap » tab, enter the following output
parameters:
➢Click on Autonomous_Output.
➢Click on Autonomous_Start to switch the SME in autonomous mode.
➢Disconnect the internal USB-C.

CNV_485_HID_SME
Notice d’utilisation
CNV_485_HID_SME
Operating instructions
© STid –20 PA des Pradeaux FR 13850 GREASQUE –NI1123C01 –5/5 –Ed. 28/07/2020
Déclaration de conformité
Declaration of compliance
STid déclare que le convertisseur CNV_485_HID est conforme aux
exigences essentielles des Directives RED 2014/53/UE et Rohs
2011/65/UE. Une copie de notre déclaration est disponible sur demande
adressée à qualite@stid.com.
STid declares that the CNV_485_HID converter is compliant to the
essential requirements of the Directives RED 2014/53/UE and Rohs
2011/65/UE. A copy of our declaration is available upon request to
Cet appareil est conforme à la Part-15 de la FCC.
Son fonctionnement est soumis aux deux conditions suivantes :
1. Cet appareil ne doit pas causer d’interférence nuisible.
2. Cet appareil doit accepter toute interférence reçue, y compris
les interférences pouvant provoquer un fonctionnement
indésirable.
Note : le fabricant n’est pas responsable des interférences radio ou TV
causées par des modifications non autorisées de l’équipement. De
telles modifications pourraient annuler le droit à l’utilisateur d’utiliser
l’équipement.
Cet appareil est conforme aux exigences de sécurité pour l'exposition
aux RF en conformité avec RSS-102 issue 5 pour les conditions
d'utilisation.
This device complies with Part 15 of the FCC rules.
Operation is subject to the following two conditions:
1. This device may not cause harmful interference.
2. This device must accept any interference received, including
interference that may cause undesired operation.
Note: the manufacturer is not responsible for any radio or TV
interference caused by unauthorized modifications to this equipment.
Such modifications could void the user’s authority to operate the
equipment.
This device complies with the safety requirements for RF exposure in
accordance with RSS-102 issue 5 for potable use conditions.
Adhérent « DEEE Pro »
En réponse à la règlementation, STid finance la filière de recyclage
de Récylum dédiée aux DEEE Pro qui reprend gratuitement les
matériels électriques d’éclairage, les équipements de contrôle et de
surveillance, et les dispositifs médicaux usagés.
Plus d’informations sur www.recylum.com.
Other Stid Cables And Connectors manuals
Popular Cables And Connectors manuals by other brands

CVS
CVS DA-2000 instruction manual

Philips
Philips SWV2432W Specifications

Dakota Micro
Dakota Micro DMAC-CNH3 Training guide

Weinzierl
Weinzierl KNX LineCoupler 650 Operation and installation manual

Staubli
Staubli Multi-Contact MA110 Assembly instructions

PCB Piezotronics
PCB Piezotronics 4106-124-01A Installation and operating manual