Stihl HTE 60 User manual

1HTE 60
English
BA_SE_124_002_01_08.fmPrinted on chlorine-free paper.
Printing inks contain vegetable oils; paper can be recycled.
© ANDREAS STIHL AG & Co. KG, 2005
0458 247 0121. M0,5. F5. T. Printed in Germany
STIHl
Contents
Guide to Using this Manual .............. 2
Safety Precautions and
Working Techniques ......................... 3
Using the Pole Pruner .................... 10
Mounting the Drive Tube ................ 13
Mounting the Bar and Chain ........... 13
Tensioning the Saw Chain .............. 14
Checking Chain Tension ................. 14
Chain Oil ......................................... 15
Filling Chain Oil Tank ...................... 15
Checking Chain Lubrication ........... 16
Fitting the Harness ......................... 16
Starting ........................................... 17
Overload Circuit Breaker ................ 18
Operating Instructions .................... 18
Taking Care of Guide Bar ............... 19
Storing the Machine ........................ 19
Checking and Replacing
the Chain Sprocket ......................... 20
Maintaining and Sharpening
Saw Chain ...................................... 20
Maintenance Chart ......................... 25
Minimize Wear and Avoid Damage 26
Main Parts and Controls ................. 27
Specifications ................................. 28
Special Accessories ....................... 29
Maintenance and Repairs ............... 29
Disposal .......................................... 29
Certificate of Conformity ................. 30
Quality Certification ........................ 30
Dear Customer,
Thank you for choosing a quality
engineered STIHL product.
This machine has been built using
modern production techniques and
comprehensive quality assurance.
Every effort has been made to ensure
your satisfaction and troublefree use
of the machine.
Please contact your dealer or our
sales company if you have any
queries concerning your machine.
Hans Peter Stihl

2
English
HTE 60
Pictograms
All the pictograms attached to the
machine are shown and explained in
this manual.
The operating and handling instructions
are supported by illustrations.
Symbols in text
The individual steps or procedures
described in the manual may be marked
in different ways:
:A bullet marks a step or procedure
without direct reference to an
illustration.
A description of a step or procedure that
refers directly to an illustration may
contain item numbers that appear in the
illustration.
Example:
Loosen the screw (1)
Lever (2) ...
In addition to the operating instructions,
this manual may contain paragraphs
that require your special attention. Such
paragraphs are marked with the
symbols described below:
Warning where there is a risk of an
accident or personal injury or
serious damage to property.
Caution where there is a risk of
damaging the machine or its
individual components.
Note or hint which is not essential
for using the machine, but may
improve the operator’s under-
standing of the situation and result
in better use of the machine.
Note or hint on correct procedure in
order to avoid damage to the
environment.
Equipment and features
This instruction manual may refer to
several models with different
features. Components that are not
installed on all models and related
applications are marked with an
asterisk (*). Such components may
be available as special accessories
from your STIHL dealer.
Engineering improvements
STIHL’s philosophy is to continually
improve all of its products. As a result,
engineering changes and improvements
are made from time to time. If the
operating characteristics or the
appearance of your machine differ from
those described in this manual, please
contact your STIHL dealer for
assistance.
Therefore some changes, modifications
and improvements may not be covered
in this manual.
Guide to Using this Manual

3HTE 60
English
Special safety
precautions must be
observed when working
with the electric pole
pruner because it is a
high-speed, fast-cutting
power tool with very sharp cutters and a
long reach.
It is important that you
read and understand the
instruction manual before
using your machine for
the first time. Keep it in a
safe place for later
reference. Non-
observance of the safety precautions in
the instruction manual may cause
serious or even fatal injury.
Observe all applicable local safety
regulations, standards and ordinances.
If you have not used this type of power
tool before:
Have your dealer or other experienced
user show you how to operate your
power tool or attend a special course of
training in power tool operation.
Minors should never be allowed to use a
power tool.
Bystanders, especially children, and
animals should not be allowed in the
area where a power tool is in use.
When the machine is not in use (work
break), shut it off so that it does not
endanger others and secure it against
unauthorized use.
The power tool user is responsible for
avoiding injury to third parties or damage
to their property.
Do not lend or rent your machine without
the instruction manual. Be sure that
anyone using your machine
understands the information contained
in this manual.
To operate the power tool you must be
rested, in good physical condition and
mental health.
If you have any condition that might be
aggravated by strenuous work, check
with your doctor before operating a
power tool.
Do not operate the power tool if you are
under the influence of any substance
(drugs, alcohol) which might impair
vision, dexterity or judgment.
Use your pole pruner for limbing and
pruning only. Use it only for cutting wood
and wooden objects.
It must not be used for any other
purpose because of the increased risk of
accidents and damage to the machine.
Never attempt to modify your power tool
in any way since this may result in
accidents or damage to the machine.
Only mount guide bars, saw chains,
sprockets or attachments that are
explicitly approved for this power tool
model by STIHL or are technically
identical. If you have any questions in
this respect, consult a servicing dealer.
To reduce the risk of accidents or
damage to the machine, use only high
quality tools and replacement parts.
Safety Precautions and
Working Techniques

4
English
HTE 60
STIHL recommends the use of STIHL
original tools, guide bars, saw chains,
sprockets and accessories. The
characteristics of these components are
specifically designed to match your
machine and meet your performance
requirements.
Use only extension cords of the
approved type. Unsuitable extension
cords may be dangerous.
Make sure that conductor cross section
(wire gauge) of the extension cord
meets the minimum requirements (see
chapter on “Starting”).
Clothing and Equipment
Wear proper protective clothing and
equipment.
Clothing must be sturdy
but allow complete
freedom of movement.
Wear snug-fitting clothing
with cut retardant
inserts – an overall and
jacket combination, do not
wear a work coat.
Avoid loose-fitting jackets, scarves,
neckties, jewellery or anything that could
get caught on wood or brush. Tie up and
confine long hair (e.g. with a hair net,
cap, hard hat, etc.).
Wear steel-toed safety
boots with cut-retardant
inserts and non-slip soles.
Wear a safety hard hat
where there is a danger of
head injuries from falling
objects. Wear safety
glasses.
Wear and hearing protection, e.g.
earplugs or ear muffs.
Wear heavy-duty
gloves, preferably made
of leather.
STIHL offers a comprehensive range of
protective clothing and equipment.
Transporting the Machine
Always switch off the motor.
Always fit the chain guard (scabbard)
over the chain and guard bar – even
when you carry the unit for short
distances.
Carry the unit properly balanced by the
drive tube.
Transporting in a vehicle: Properly
secure your unit to prevent turnover and
damage.
247BA001 KN

5HTE 60
English
Before Starting
– Check that your power tool is
properly assembled and in good
condition – refer to appropriate
chapters in the instruction
mCorrectly mounted guide bar.
– Correctly tensioned chain.
– Never attempt to modify the controls
or safety devices.
– Keep the handles dry and clean,
free from oil and pitch, for safe
control.
The voltage and frequency of your oiwer
supply and the voltage and frequency
specified on the machine (see rating
plate) must be the same.
The wall outlet must be equipped with a
ground fault circuit interrupter or such a
device must be installed in the circuit
when operating the electric pole pruner.
Contact your local electrician for more
information.
It is important to inspect the power
supply cord, plug, switch and extension
cord. Never use damaged cords,
couplings or plugs. Use only approved
extension cords.
If the power cord is
damaged or cut,
immediately disconnect
the plug from the power
supply to reduce the risk
of electrocution.
The couplings of extension cords must
be splash-proof.
To avoid the risk of accidents and
personal injury, do not operate your unit
if it is not in a safe operating condition.
Holding and Controlling the Unit
Always hold the unit firmly with both
hands. Put your right hand on the
handle housing, left hand on the drive
tube. Left handers should follow these
instructions too.
Wrap your fingers and thumbs around
the handle housing and drive tube to
maintain good control of the unit.
Make sure you always have good
balance and secure footing.
247BA002 KN

6
English
HTE 60
During Operation
In the event of imminent danger or in an
emergency, switch off the motor
immediately and disconnect the plug
from the power supply.
Your machine is designed to be
operated by one person only. Do not
allow other persons in the work area –
even when switching on.
To reduce the risk of damage, be sure
that the guide bar and chain are clear of
all obstructions and objects, including
the ground, before switching on.
Warning!
This power tool is not
insulated. To avoid the
risk of electrocution,
maintain a minimum
clearance of 15 m (50ft)
from electric power lines.
To reduce the risk of injuries from falling
objects and thrown pieces of wood,
always keep bystanders at least 15 m
(50 ft) away from your own position.
To reduce the risk of damage to
property, also maintain this distance
from other objects (vehicles, windows).
Maintain a minimum clearance of 15 m
(50 ft) between the bar nose and electric
power lines. Electricity can jump
considerable distances by means of
arcing. Higher voltage increases the
distance electricity can arc. Before
working with less clearance, contact
your electric utility and make sure
current is turned off.
Use your electric pole pruner only for the
purposes described in the instruction
manual.
The drive motor is not
waterproof. To reduce
the risk of electrocution
and short circuit, never
use the electric pole
pruner in the rain or in wet
or very damp conditions.
Do not leave the pole pruner outdoors in
the rain.
Never jerk the power cord to disconnect
the plug from the wall outlet. To unplug,
grasp the plug, not the cord.
Always unwind the extension cord
completely from the cable drum to
reduce the risk of fire from overheating.
Take special care in slippery conditions
– damp, snow, ice, on slopes, uneven
ground, etc.
Watch out for obstacles: Roots, tree
stumps or holes which could cause you
to trip or stumble.
Make sure you always have firm and
secure footing.
15m (50ft)
15m (50ft)

7HTE 60
English
When working at a height that exceeds
the unit’s reach use a lift bucket.
Never work on a ladder, in a tree or on
any other insecure support. Never
attempt to operate your pole pruner with
one hand.
Be particularly alert and cautious when
wearing hearing protection because
your ability to hear warnings (shouts,
alarms, etc.) is restricted.
To reduce the risk of accidents, take a
break in good time to avoid tiredness or
exhaustion.
Work calmly and carefully – in daylight
conditions and only when visibility is
good – ensure you do not endanger
others – stay alert at all times.
The dust that occurs during operation of
this machine (wood dust) may be
harmful to health. If dust levels are very
high, wear a suitable respirator.
If your power tool is subjected to
unusually high loads for which it was not
designed (e.g. heavy impact or a fall),
always check that it is in good condition
before continuing work – see also
“Before Starting”.
Check in particular that the safety
devices are working properly. Do not
continue operating your power tool if it is
damaged. In case of doubt, have the
machine checked by your servicing
dealer.
Limbing
Hold the pole pruner at an angle of not
more than 60° from the horizontal. Do
not stand directly underneath the limb
being cut. Watch for falling wood.
Keep the work area clear – remove
interfering limbs and brush.
Before limbing, establish a path of
escape and remove all obstacles.
max60°
247BA003 KN

8
English
HTE 60
Position the cutting attachment with the
hook against the branch and then
perform the cross-cut. This reduces the
risk of the pruner being jerked forward
as you start the cross-cut.
Always start the cut with the chain
running.
Work only with a properly sharpened
and tensioned chain – the depth gauge
setting should not be too wide.
Perform cross-cut from the top
downward to avoid the chain pinching in
the cut.
If branch is thick or heavy, make a
relieving cut (see chapter on ”Using the
Pole Pruner”).
To reduce the risk of injury, take special
care when cutting branches under
tension.
Always make a relieving cut on the
compression side first and then perform
the bucking cut at the tension side. This
helps avoid the saw chain pinching in
the cut.
Take special care when cutting
shattered wood – sharp slivers of wood
may be caught and flung in your
direction.
If on a slope, stand on the uphill side or
to one side of the branch to be cut.
Watch out for rolling branches.
When you come to the end of a cut, note
that the unit is no longer supported by
the guide bar in the cut. Hold the unit
firmly to take its weight at the end of the
cut and avoid loss of control.
Always pull the unit out of the cut with
the chain running.
To avoid the risk of accidents, use your
pole pruner for limbing and pruning only.
It is not designed for felling.
Make sure your saw chain does not
touch any foreign materials:
Stones, nails, etc. may be flung off and
damage the saw chain.
Position the power cord so that it cannot
be damaged and does not endanger
anyone. If the power cord is twisted:
Disconnect the plug from the power
supply and straighten out the cord.
Position the power cord so that it cannot
come into contact with the rotating
chain.
Make sure the power cord does not
chafe on edges, pointed or sharp
objects. Do not squeeze the power cord
through narrow gaps in doors or
windows.
Before carrying the unit a short distance,
e.g. to next cutting site: Switch off the
motor (release the switch).
Before leaving the electric pole pruner
unattended: switch off the motor and
disconnect the plug from the power
supply.
390BA052 KN

9HTE 60
English
Vibrations
Prolonged use of the unit may result in
vibration-induced circulation problems in
the hands (whitefinger disease).
No general recommendation can be
given for the length of usage because it
depends on several factors.
The period of usage is prolonged by:
– Hand protection (wearing warm
gloves)
– Operation with frequent breaks
The period of usage is shortened by:
– Any personal tendency to suffer
from poor circulation (symptoms:
frequently cold fingers, tingling
sensation)
– Low outside temperatures
– Gripping force (a tight grip hinders
circulation)
Continual and regular users should
monitor closely the condition of their
hands and fingers. If any of the above
symptoms appear (e.g. tingling
sensation in fingers), seek medical
advice.
Maintenance and Repairs
To reduce the risk of injury from
unintentional chain rotation, always
disconnect the plug from the power
supply before carrying out any
maintenance work on the machine.
Service the machine regularly. Do not
attempt any maintenance or repair work
not described in the instruction manual.
Have all other work performed by a
servicing dealer.
STIHL recommends that you have
servicing and repair work carried out
exclusively by an authorized STIHL
servicing dealer. STIHL dealers are
regularly given the opportunity to attend
training courses and receive technical
information bulletins on engineering
changes.
Use only high quality replacement parts
since there is otherwise a risk of
accidents or damage to the machine. If
you have any questions in this respect,
consult a servicing dealer.
STIHL recommends you use only
original STlHL replacement parts. The
characteristics of these parts are
specifically designed to match your
machine model and meet your
performance requirements.
Electrical components, e.g. power cord,
may only be repaired or replaced by a
qualified electrician.
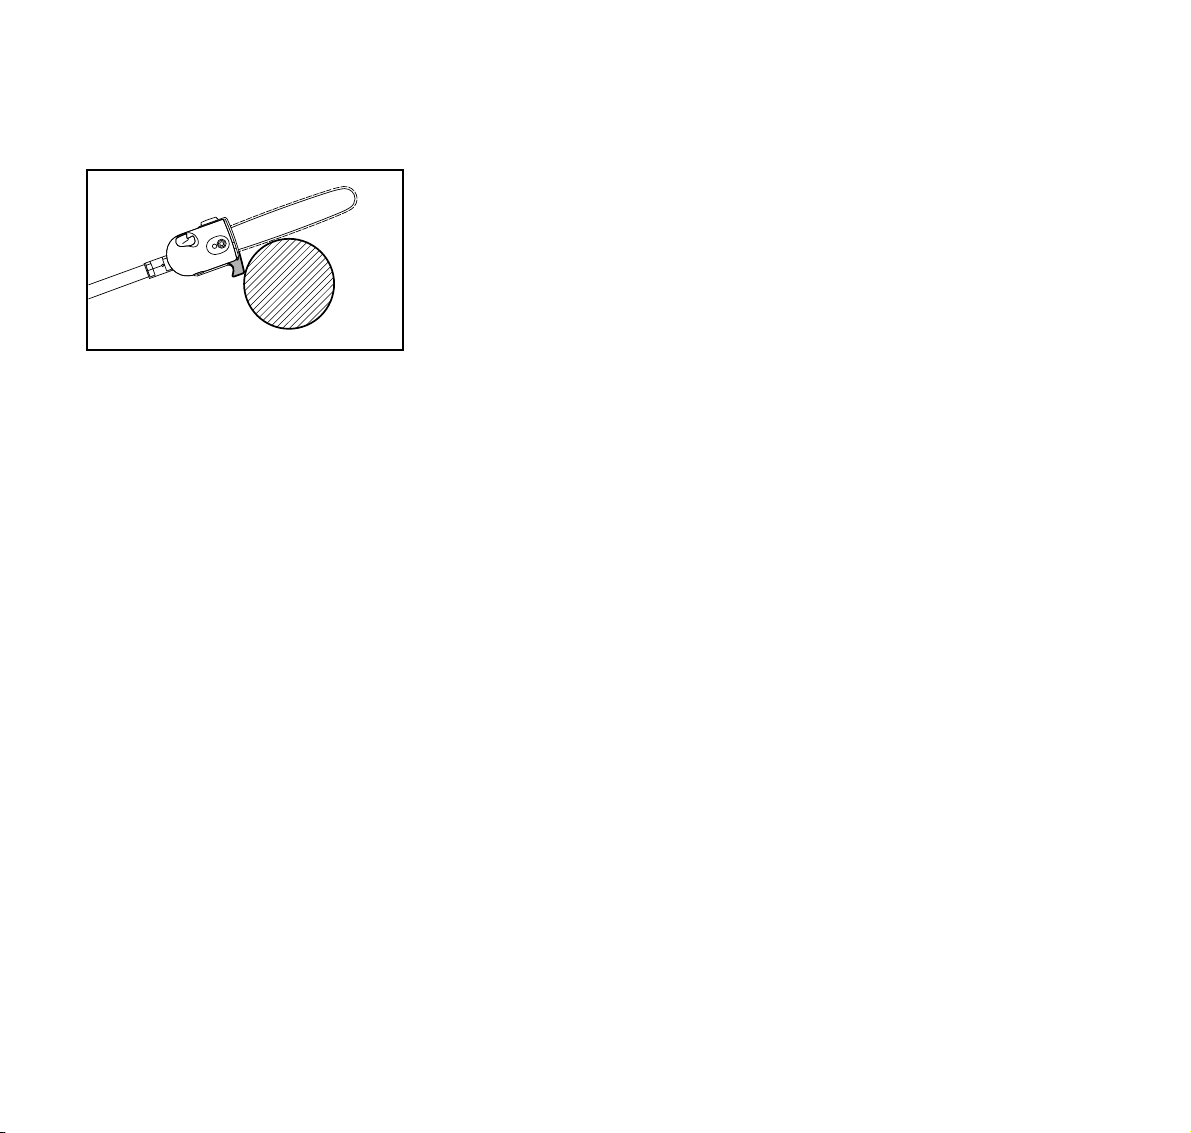
Observe sharpening instructions
for safe and correct handling of saw
chain and guide bar.
Keep the chain in good condition at all
times. It must be properly sharpened,
tensioned and well lubricated.
Always change the chain, guide bar and
sprocket in good time.
Store chain lubricant in properly labelled
canisters only.

10
English
HTE 60
Preparations
:Wear suitable protective clothing
and equipment – see "Safety
Precautions".
:Put on the shoulder strap.
Never throw cuttings into the
household garbage can – cuttings
can be composted.
Never stand directly underneath the
branch you are cutting – be wary of
falling branches. Note that a branch
may spring back at you after it hits
the ground.
Cutting sequence
To allow branches a free fall, always cut
the lower branches first. Prune heavy
branches (large diameter) in several
controllable pieces.
Working position
Hold the handle housing with your right
hand, and the drive tube with your left
hand. Your left arm should be extended
to the most comfortable position.
The drive tube should always be held at
an angle of 60° or less.
The most convenient working position is
a tool angle of 60°, but any lesser angle
may be used to suit the situation
concerned.
Cross-cut
To avoid pinching the bar in the cut,
position the cutting attachment with the
hook against the branch and then
perform the cross-cut from the top
downwards.
Using the Pole Pruner
247BA004 KN
390BA052 KN

11HTE 60
English
Relieving cut
:To avoid tearing the bark on thick
branches, always start by
performing a relieving cut (1) on the
underside of the branch.
:To do this, apply the cutting
attachment and pull it across the
bottom of the branch as far as the
bar nose.
:Locate the hook against the branch
and then perform the cross-cut (2)
from the top downwards.
Flush-cutting thick branches
:If branch diameter is more than
10 cm, first perform undercut (3)
and then cross-cut at a distance of
about 20 cm (A) from the final cut.
Then carry out the flush-cut (4),
starting with a relieving cut and
finishing with a cross-cut.
Cutting above obstacles
The unit's long reach makes it possible
to prune branches that are overhanging
obstacles, such as rivers or lakes. The
tool angle in this case depends on the
position of the branch.
2
1
390BA041 KN
3
4
A
390BA024 KN
247BA005 KN

12
English
HTE 60
Cutting from a lift bucket
The unit's long reach enables cutting to
be performed next to the trunk without
the risk of the lift bucket damaging other
branches. The tool angle depends on
the position of the branch.
30° angle drive
(special accessory)
The angle drive keeps the cutting
attachment at an angle of 30° to the
drive tube.
The angle drive may be adjusted on the
drive tube to the following positions only:
1 = For cross-cutting vertical branches
and bushes.
2 = For a better view of the cutting
attachment.
247BA006 KN
1
2
390BA053 KN

13HTE 60
English
:Push the drive tube (1) into the
motor housing (2) as far as the
mark (A), turning the drive tube
back and forth at the same time.
:Tighten down screw (3) in the
housing.
:Unscrew nut and take off cover.
:Turn tensioning screw (1)
counterclockwise until the
tensioning nut (2) butts against the
left end of the housing slot, then
back it off 5 full turns.
The chain is very sharp – wear work
gloves to protect hands from cuts.
:Fit the chain –
start at the bar nose.
Mounting the Drive Tube
1
238BA016 KN
3
A
2
A
Mounting the Bar and Chain
390BA042 KN
1
2
390BA043 KN
390BA003 KN

14
English
HTE 60
:Fit guide bar over the stud (3).
Engage peg of tensioner slide in
locating hole (4) – place the chain
over sprocket (5) at the same time.
:Now turn tensioning screw (1)
clockwise until there is very little
chain sag on the underside of the
bar – and the drive link tangs are
located in the bar groove.
:Refit the sprocket cover and screw
on the nut only fingertight.
:Now refer to "Tensioning the Saw
Chain".
The gearbox becomes hot during
operation. To avoid the risk of burn
injuries, do not touch the gear
housing.
Retensioning during cutting work:
:Switch off the motor and disconnect
plug from power supply.
:Loosen the nut.
:Hold the bar nose up.
:Use screwdriver to turn the
tensioning screw (1) clockwise until
chain fits snugly against the
underside of the bar.
:While still holding bar nose up,
tighten down the nut firmly.
A new chain has to be retensioned more
often than one that has been in use for
some time.
Check chain tension frequently – see
chapter on "Operating Instructions /
During Operation".
:Check chain tension.
The gearbox becomes hot during
operation. To avoid the risk of burn
injuries, do not touch the gear
housing.
:Switch off the motor and disconnect
plug from power supply.
:Wear work gloves to protect your
hands.
:The chain must fit snugly against
the underside of the bar and it must
still be possible to pull the chain
along the bar by hand.
:If necessary, retension the chain.
A new chain has to be retensioned more
often than one that has been in use for
some time.
Check chain tension frequently – see
chapter on "Operating Instructions /
During Operation".
1
5
390BA044 KN
43
Tensioning the Saw Chain
1
390BA045 KN
Checking Chain Tension
390BA046 KN

15HTE 60
English
For automatic and reliable
lubrication of the chain and guide
bar: Use only a quality,
environmentally compatible
chain and bar lubricant. STIHL
chain lubricant with non-fling
additive or the rapidly
biodegradable STIHL BioPlus is
recommended.
Biological chain oil must be resistant
to aging (e.g. STIHL BioPlus) since
it will otherwise quickly turn to resin.
This results in hard deposits that are
difficult to remove, especially in the
area of the chain drive and chain. It
may even cause the oil pump to
seize.
The service life of the chain and guide
bar depends on the quality of the
lubricant. It is therefore essential to use
only a specially formulated chain
lubricant!
If special chain lubricant is not available,
you may – in an emergency – use an HD
single grade or multigrade engine oil
with a viscosity that suits the prevailing
outside temperature.
Do not use waste oil!
Medical studies have shown that
renewed contact with waste oil can
cause skin cancer. It also harms the
environment!
Waste oil does not have the
required lubricating properties and
is unsuitable for chain lubrication.
Check the oil level regularly during
cutting work. Never allow the oil tank
to run dry.
The gearbox becomes hot during
operation. To avoid the risk of burn
injuries, do not touch the gear
housing.
:Thoroughly clean the filler cap and
area around it so that no dirt can fall
into the tank.
:Position the unit so that the filler cap
faces up.
If the oil level in the tank does not go
down, the reason may be a problem in
the oil supply system: Check chain
lubrication, clean the oilways, contact
your servicing dealer for assistance if
necessary. STIHL recommends that you
have maintenance and repair work
performed only by a STIHL servicing
dealer.
Chain Oil Filling
Chain Oil Tank
390BA047 KN

16
English
HTE 60
The bayonet-type oil tank filler cap with
its hinged clip can be opened and closed
without tools.
:To open the tank, swing the clip (1)
to the vertical position.
:Turn the filler cap counterclockwise
as far as stop and remove.
:Fill up with chain oil.
:To close the oil tank, place the filler
cap in position with the clip vertical,
making sure the recesses (2) are in
alignment.
:Turn the filler cap clockwise as far
as stop.
:Fold the clip down so that it is flush
with the top of the cap.
The saw chain must always throw off a
small amount of oil.
:Always check chain lubrication and
the oil level in the tank before
starting work.
Never operate your pruner without
chain lubrication. If the chain is run
dry, the whole cutting attachment
will be irretrievably damaged within
a very short time.
Inadequate lubrication can be caused by
a dirty oil strainer: Have the oil strainer
cleaned or replaced by your servicing
dealer.
Every new chain has to be broken in
for about 2 to 3 minutes.
After breaking in the chain, check
chain tension and adjust if
necessary – see chapter
"Checking Chain Tension".
Shoulder strap
:Put on the shoulder strap (1).
:Adjust length of strap so that the
spring hook (2) is at the same height
as your right hip.
247BA011 KN
12
Checking Chain Lubrication
390BA048 KN
Fitting the Harness
1
247BA007 KN
2

17HTE 60
English
Connecting to power supply
The voltage of your power supply and
the voltage specified on the unit must be
the same.
Extension cords must be suitable for
outdoor use.
Minimum conductor cross section of
extension cord:
Cord length of 2 m or more: 1.5 mm2,
type H07 RN-F
:Connect unit’s plug (1) to extension
cord coupling (2).
Strain relief
:Make a loop (3)in the extension
cord and pass it through the
opening (4).
:Slip the loop over the hook (5)and
pull it tight.
Switching on
:Make sure you have a secure and
balanced footing.
Hold your unit with both hands –
one hand on the control handle –
the other hand on the drive tube.
:Stand upright – hold the unit in a
relaxed position and always to the
right of your body.
:Do not rest the chain and bar on the
ground.
:Press down the interlock lever (1)
and hold it in that position.
:Squeeze the switch (2).
Switching off
To switch off, release the switch and
interlock lever.
Starting
238BA008 KN
12
4
238BA009 KN
5
3
2
1
247BA008 KN

18
English
HTE 60
The unit is equipped with an overload
circuit breaker which cuts off the power
supply in the event of mechanical
overload due to, e.g.
– excessive infeed force
– “lugging down” the motor
– pinching the saw chain in the cut.
If the overload circuit breaker has cut off
the power supply:
:Pull the guide bar out of the cut.
:Wait about 3 minutes for the
overload circuit breaker to cool
down.
Do not switch on the unit during this
period because you will otherwise
prolong the required cooling time.
Once the motor starts:
:Run the unit for about 15 seconds
off load. This helps cool the motor
windings and considerably delays
renewed tripping of the overload
circuit breaker.
During operation
Check chain tension frequently.
A new chain has to be tensioned more
often than one that has been in use for
some time.
Cold chain:
Tension is correct when the chain fits
snugly against the underside of the bar
and can still be pulled along the bar by
hand.
Retension if necessary – see chapter on
“Tensioning the Saw Chain”.
Chain at operating temperature:
The chain stretches and begins to sag.
The drive links on the underside of the
bar must not come out of the bar groove
– the chain may otherwise jump off the
bar.
Retension the chain – see chapter on
“Tensioning the Saw Chain”.
Always slacken off the chain again
after finishing work. The chain
contracts as it cools down. If it is not
slackened off, it may damage the
gear shaft and bearings.
After finishing work
:Slacken off the chain if you have
retensioned it at operating
temperature during cutting work.
The chain contracts as it cools
down. If it is not slackened off, it may
damage the gear shaft and
bearings.
Storing machine for a short period:
Store the machine in a dry place until
you need it again.
Storing for longer period:
See chapter "Storing the Machine".
Overload Circuit Breaker Operating Instructions

19HTE 60
English
:Turn the bar over –
every time you sharpen the chain –
and every time you replace the
chain – this avoids one-sided wear,
especiallly at nose and underside of
the bar.
Regularly clean
1 = oil inlet hole
2 = oil passage
3 = bar groove
:Measure groove depth –
with scale on filing gauge – see
"Special Accessories" – in area
used most for cutting on Rollomatic
bars.
If groove depth is less than specified:
:Replace the guide bar.
The drive link tangs will otherwise
scrape along the bottom of the groove –
the cutters and tie straps will not ride on
the rails.
For periods of about 3 months or longer:
:Remove and clean the saw chain
and guide bar, spray with corrosion
inhibiting oil.
:If you use biological chain and bar
lubricant, e.g. STIHL Bioplus,
completely fill the chain oil tank.
:Store the machine in a dry, high or
locked location – out of the reach of
children and other unauthorized
persons.
Taking Care of Guide Bar
3
2
1
390BA050 KN
Chain type Chain pitch Minimum
groove depth
Picco-Mini 3/8" P 5.0 mm
(0.20")
Storing the Machine

20
English
HTE 60
:Remove the chain sprocket cover,
chain and guide bar.
Replace the chain sprocket:
– after using two Oilomatic chains or
sooner
– if the wear marks (dimension a) on
the sprocket are deeper than
0.5 mm – the life of the chain would
otherwise be reduced. Use
reference gauge (special
accessory) to check the depth of the
wear marks.
The service life of the chain
sprocket is prolonged if it is used
with two chains in rotation.
Use only original STIHL replacement
sprockets.
:Use a screwdriver to remove the
E-clip (1).
:Pull the washer (2)and sprocket (3)
off the gear shaft.
:Clean the stub of the gear shaft and
lubricate it with STIHL lubricating
grease (special accessory).
:Fit the new chain sprocket on the
gear shaft.
:Fit the washer and E-clip on the
gear shaft.
Correctly sharpened chain
A properly sharpened chain slices
through wood effortlessly and requires
very little feed pressure.
Do not work with a dull or damaged saw
chain as it will increase the physical
effort required, cause higher vibrations,
produce unsatisfactory results and a
higher rate of wear.
:Clean the chain.
:Check the chain for cracks in the
links and damaged rivets.
:Replace any damaged or worn parts
of the chain and match the new
parts to the shape and size of the
original parts by filing back as
necessary.
It is necessary to comply with the
angles and dimensions specified
below. If the saw chain is
incorrectly sharpened – especially
if the depth gauges are too low –
there is an increased risk of
kickback and resulting injury!
Checking and Replacing
the Chain Sprocket
a
000BA054 KN
123
390BA054 KN
Maintaining and Sharpening
Saw Chain
Other manuals for HTE 60
3
Table of contents
Other Stihl Pole Saw manuals

Stihl
Stihl HTA 66 User manual

Stihl
Stihl KombiTool HT-KM 4182 User manual

Stihl
Stihl HT 105 User manual

Stihl
Stihl HL 100 User manual

Stihl
Stihl HT 131 User manual

Stihl
Stihl HT-KM User manual

Stihl
Stihl FS 100 RX User manual

Stihl
Stihl GTA 26 User manual

Stihl
Stihl HT 250 User manual

Stihl
Stihl HTE 60 User manual
Popular Pole Saw manuals by other brands

Mantis
Mantis Pruner E System Owner's manual and safety instructions

Echo
Echo Power Pruner PPT-2100 TYPE 1/1E Operator's manual

Echo
Echo PPT-260 - PARTS CATALOG SERIAL NUMBERS... parts catalog

Echo
Echo PPT-260 - PARTS CATALOG SERIAL NUMBER... parts catalog

Milwaukee
Milwaukee M18 FOPH-CSA Operator's manual

DeWalt
DeWalt DCMPS520 Original instructions