STIMARE Infinite Peripherals Infinea X User manual

INFINEA® X
INFINEA X USER MANUAL

CONTACT INFORMATION
United States:
United Kingdom:
Ireland:
Web:
General enquiries:
Support:
www.stimare.net
4730 Tejon Street
Denver
CO 80211
USA
Phone: +1 202 827 685z6
or: +1 847 448 0412
Unit 4, Bramber Court, Bramber
Road,
London,W14 9PW,
United Kingdom
Phone: +44 208 099 8071
46A Patrick Street
Dun Laoghaire
Co. Dublin
A96 YH33
Ireland
Phone: +353 1 685 4600

Infinea® X User Manual Page 1 of 32
UM-00001 Version: A
LEGAL NOTICE
“Made for iPod”, “Made for iPhone” and made for “iPad” mean that an electronic accessory
has been designed to connect specifically to the iPod, iPhone or iPad, respectively, and has
been certified by the developer to meet Apple performance standards. Apple is not
responsible for the operation of this device or its compliance with safety and regulatory
standards. Please note that the use of this accessory with iPod or iPhone may affect wireless
performance.
COMPATIBILITY
Made for:
iPod touch®5th generation mobile digital device
iPhone®5mobile digital device
iPhone®5s mobile digital device
iPad®, iPhone®and iPod touch®are trademarks of Apple, Inc., registered in the U.S. and other countries.
Lightning™is a trademark of Apple, Inc.
The Bluetooth®word mark and logos are registered trademarks owned by Bluetooth SIG, Inc. and any
use of such marks by Apple, Inc. is under license.
Infinea® X is a registered trademark of Infinite Peripherals, Inc.

Infinea® X User Manual Page 2 of 32
UM-00001 Version: A
TABLE OF CONTENTS
!
L
L
E
E
G
G
A
A
L
L
N
N
O
O
T
T
I
I
C
C
E
E
1
1
!
C
C
O
O
M
M
P
P
A
A
T
T
I
I
B
B
I
I
L
L
I
I
T
T
Y
Y
1
1
!
B
B
O
O
X
X
C
C
O
O
N
N
T
T
E
E
N
N
T
T
S
S
4
4
!
A
A
C
C
C
C
E
E
S
S
S
S
O
O
R
R
I
I
E
E
S
S
5
5
!
G
G
E
E
T
T
T
T
I
I
N
N
G
G
S
S
T
T
A
A
R
R
T
T
E
E
D
D
6
6
!
First Steps........................................................................................................................................................................... 6!
F
F
E
E
A
A
T
T
U
U
R
R
E
E
S
S
7
7
!
A
A
B
B
O
O
U
U
T
T
T
T
H
H
E
E
I
I
N
N
F
F
I
I
N
N
E
E
A
A
®
®
X
X
8
8
!
Figure 1: Dimensions.................................................................................................................................................... 8!
Figure 2: Front View.................................................................................................................................................... 9!
Figure 3: Back View................................................................................................................................................... 10!
Figure 4: Top View..................................................................................................................................................... 10!
Figure 5: Bottom View.............................................................................................................................................. 10!
Figure 6: Left View.......................................................................................................................................................11!
Figure 7: Right View ....................................................................................................................................................11!
A
A
S
S
S
S
E
E
M
M
B
B
L
L
I
I
N
N
G
G
T
T
H
H
E
E
I
I
N
N
F
F
I
I
N
N
E
E
A
A
X
X
1
1
2
2
!
iPhone and iPod Installation.........................................................................................................................................12!
I
I
N
N
S
S
T
T
A
A
L
L
L
L
I
I
N
N
G
G
T
T
H
H
E
E
I
I
N
N
F
F
I
I
N
N
E
E
A
A
X
X
B
B
A
A
T
T
T
T
E
E
R
R
Y
Y
P
P
A
A
C
C
K
K
1
1
3
3
!
Standard and Extended Battery Installation........................................................................................................... 13!
C
C
H
H
A
A
R
R
G
G
I
I
N
N
G
G
T
T
H
H
E
E
I
I
N
N
F
F
I
I
N
N
E
E
A
A
X
X
1
1
4
4
!
Battery Specifications ....................................................................................................................................................14!
Charging Using an Electrical Outlet........................................................................................................................... 15!
Charging the User Replaceable Battery ...................................................................................................................16!
Figure 8: Multi-bay battery charger ......................................................................................................................16!
Disposal ..............................................................................................................................................................................16!
D
D
E
E
V
V
E
E
L
L
O
O
P
P
I
I
N
N
G
G
A
A
P
P
P
P
L
L
I
I
C
C
A
A
T
T
I
I
O
O
N
N
S
S
1
1
7
7
!
P
P
O
O
W
W
E
E
R
R
I
I
N
N
G
G
O
O
N
N
T
T
H
H
E
E
I
I
N
N
F
F
I
I
N
N
E
E
A
A
X
X
1
1
8
8
!
Dual Purpose Scan Button............................................................................................................................................18!
Power On ...........................................................................................................................................................................18!
Figure 9: Scan/Power Button..................................................................................................................................18!
Barcode Scanning ...........................................................................................................................................................19!
RFID .....................................................................................................................................................................................19!
Figure 10: RFID Antenna ...........................................................................................................................................19!
Audio ..................................................................................................................................................................................20!
Figure 11: Speakers and Toggle Button ...............................................................................................................20!
S
S
T
T
A
A
T
T
U
U
S
S
A
A
N
N
D
D
O
O
P
P
E
E
R
R
A
A
T
T
I
I
O
O
N
N
A
A
L
L
M
M
O
O
D
D
E
E
S
S
2
2
1
1
!
Programmable LED Status ...........................................................................................................................................21!
Figure 12: Programmable LED Status ...................................................................................................................21!
Rear Speaker / Microphone Status ........................................................................................................................... 22!
Figure 13: Speaker/Microphone Status................................................................................................................ 22!

Infinea® X User Manual Page 3 of 32
UM-00001 Version: A
Manually Enable / Disable Rear Speaker................................................................................................................. 22!
R
R
E
E
S
S
E
E
T
T
Y
Y
O
O
U
U
R
R
I
I
N
N
F
F
I
I
N
N
E
E
A
A
X
X
2
2
3
3
!
Figure 14: Reset feature ........................................................................................................................................... 23!
S
S
Y
Y
N
N
C
C
I
I
N
N
G
G
2
2
4
4
!
Figure 15: Sync feature .............................................................................................................................................24!
T
T
R
R
O
O
U
U
B
B
L
L
E
E
S
S
H
H
O
O
O
O
T
T
I
I
N
N
G
G
2
2
5
5
!
Troubleshooting > General .......................................................................................................................................... 25!
Troubleshooting > Scanner ......................................................................................................................................... 25!
Troubleshooting > RFID................................................................................................................................................26!
C
C
L
L
E
E
A
A
N
N
I
I
N
N
G
G
I
I
N
N
S
S
T
T
R
R
U
U
C
C
T
T
I
I
O
O
N
N
S
S
2
2
7
7
!
Precautions....................................................................................................................................................................... 27!
Cleaning guidelines for the Infinea X........................................................................................................................ 27!
T
T
E
E
C
C
H
H
N
N
I
I
C
C
A
A
L
L
D
D
A
A
T
T
A
A
2
2
8
8
!
Mechanical ....................................................................................................................................................... 28!
Electrical........................................................................................................................................................... 28!
Environment.................................................................................................................................................... 29!
Ratings .............................................................................................................................................................. 29!
Certifications................................................................................................................................................... 29!
W
W
A
A
R
R
R
R
A
A
N
N
T
T
Y
Y
3
3
0
0
!
D
D
I
I
S
S
C
C
L
L
A
A
I
I
M
M
E
E
R
R
3
3
0
0
!
S
S
Y
Y
M
M
B
B
O
O
L
L
S
S
F
F
O
O
R
R
U
U
S
S
E
E
3
3
1
1
!
F
F
E
E
D
D
E
E
R
R
A
A
L
L
C
C
O
O
M
M
M
M
U
U
N
N
I
I
C
C
A
A
T
T
I
I
O
O
N
N
S
S
C
C
O
O
M
M
M
M
I
I
S
S
S
S
I
I
O
O
N
N
3
3
2
2
!
Federal Communications Commission (FCC) Statement .................................................................................. 32!
FCC RF Radiation Exposure Statement .................................................................................................................. 32!

Infinea® X User Manual Page 4 of 32
UM-00001 Version: A
BOX CONTENTS
The Infinea X will ship with the items listed in the table below. Standard battery shipped with
Infinea X. Please see Accessories section below for extended battery options.
Qty.
Part Number
Description
Image
1
*IX-I2DBTR-PH5-WH
*IX-I2DBTR-PH5-BK
*IX-I2DBTR-POD5-BK
*IX-I2DBTR-POD5-WH
Infinea X
1 A5005-017 USB charging/sync cable
1 * IX-BP (White)
* IX-BP-BK (Black) Battery Pack (1900mAh)
6 IX-H0008 Torx T6 Screws
1 QS-00001 Infinea X Quick Start Guide
*Note: Box contents may vary based on order configuration.

Infinea® X User Manual Page 5 of 32
UM-00001 Version: A
ACCESSORIES
The following additional accessories may be purchased for use with the Infinea X.
Part Number
Description
IX-BP-EXT Extended battery pack (3800mAh), white
IX-BP-EXT-BK Extended battery pack (3800mAh), black

Infinea® X User Manual Page 6 of 32
UM-00001 Version: A
GETTING STARTED
The Infinea X allows you to scan barcodes into the iPod touch 5 or iPhone 5. Before using
your Infinea X, the battery should be fully charged. The following table will help you get your
Infinea X ready for use.
F
F
I
I
R
R
S
S
T
T
S
S
T
T
E
E
P
P
S
S
Step
Purpose
Additional Information
1. Install battery Batteries are shipped with
approximately 50% of full charge
capacity and should be fully charged
before initial use to ensure long
battery life.
See manual section:
INSTALLING THE INFINEA X
BATTERY PACK
2. Charge the Infinea X See manual section:
CHARGING THE INFINEA X
3. Install software
Use of the Barcode Scanner, RFID
reader and LED indicator features
requires the installation of software on
your iPod or iPhone.
See manual section:
DEVELOPING APPLICATIONS
4. Power on the
Infinea X
Initialize barcode scanner and/or RFID
functions for use.
See manual section:
USING THE INFINEA X

Infinea® X User Manual Page 7 of 32
UM-00001 Version: A
FEATURES
Feature
Description
2D Barcode Scanner
The Infinea X supports one-dimensional (1D) and two-dimensional (2D)
barcode symbols, which can be read in any direction (omni-directional).
The effective reading distance of the barcode reader varies depending on
the barcode size. The barcode scanner is capable of reading barcodes on
an LCD screen.
RFID
(Radio Frequency
Identification)
The Infinea X has an RFID (Radio Frequency Identification) tag/card
reader with read and write capability at 13.56 MHz. The RFID reader
incorporates several RFID formats, depending on the model of your
Infinea X.
Audio The Infinea X has built-in, enhanced front and rear speakers that are
programmable through the Universal SDK.
Battery User replaceable Li-ion battery.
Indicators
The Infinea X has three programmable indication features: audible, visual
and haptic. An Internal electro-magnetic buzzer provides the audible
indicator. For visual indications, there are 4 multi-color SDK
programmable LEDs (blue, green, red and orange). These LEDs also
provide battery status. The haptic indicator is a programmable vibration
motor.
Power Monitoring The Infinea X contains an on board fuel gauge that facilitates accurate
monitoring of significant battery attributes using the SDK.
Bluetooth
Compatibility
Available Bluetooth 2.0 SPP compatibility, which allows connection to a
Bluetooth peripheral, such as a printer.
Ruggedized Case
The Infinea X case is IP54 rated for protection against dust and fluid
ingress. The case material is antimicrobial, which inhibits growth of
bacteria on the product.

Infinea® X User Manual Page 8 of 32
UM-00001 Version: A
ABOUT THE INFINEA® X
The Infinea X allows mobile employees to convert their iPod touch 5or iPhone 5 into a
powerful solution for warehousing, field services, and healthcare industries. The Infinea X
includes a 1D/2D barcode scanner, Bluetooth and RFID.
Figure 1: Dimensions

Infinea® X User Manual Page 9 of 32
UM-00001 Version: A
Figure 2: Front View
IOS Home button
Torx Screw
Torx Screw
Torx Screw
Torx Screw
Protective Glass
Notification LEDs
Front Speaker
Microphone
Torx Screw
Torx Screw
Infinea® X User Manual Page 10 of 32
UM-00001 Version: A
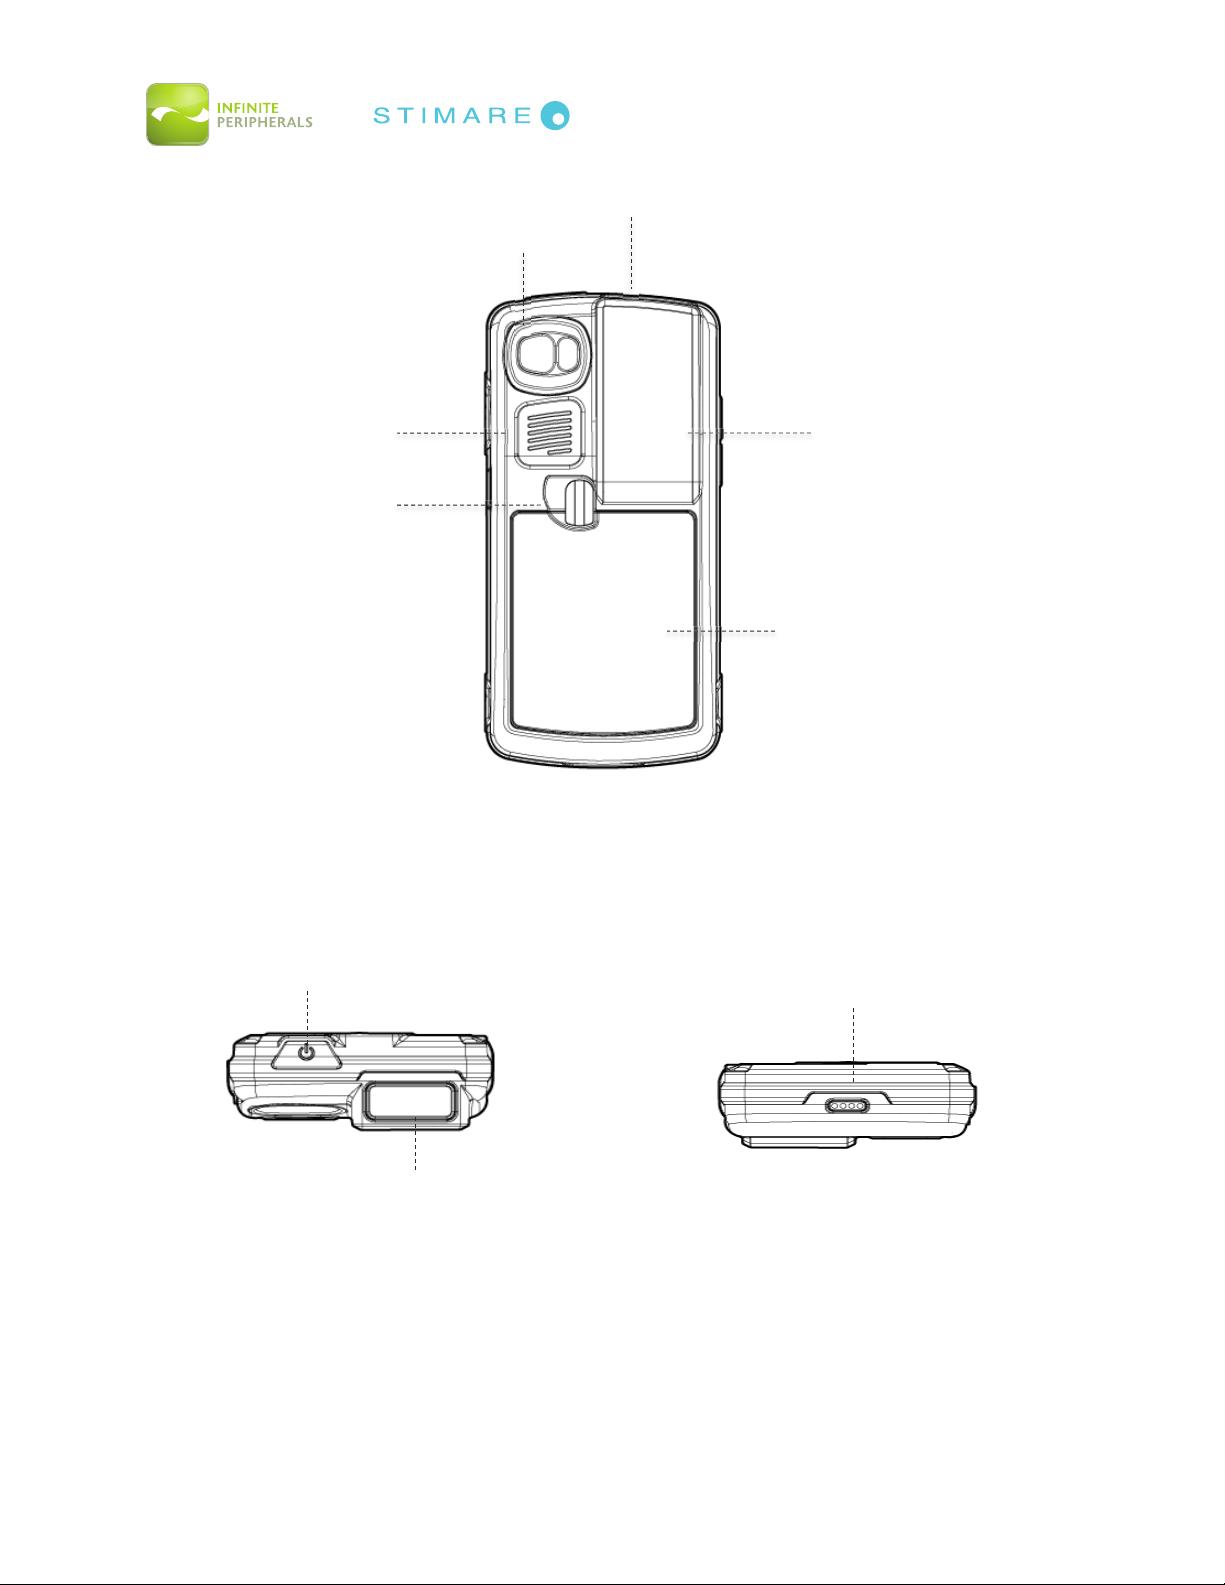
Figure 3: Back View
Figure 4: Top View
Figure 5: Bottom View
Rear Speaker
Battery Latch
Battery
RFID
Barcode Scanner
iOS Camera Hole
iOS On/Off Button
Barcode Scanner
Pads for charging station
and sync
Infinea® X User Manual Page 11 of 32
UM-00001 Version: A
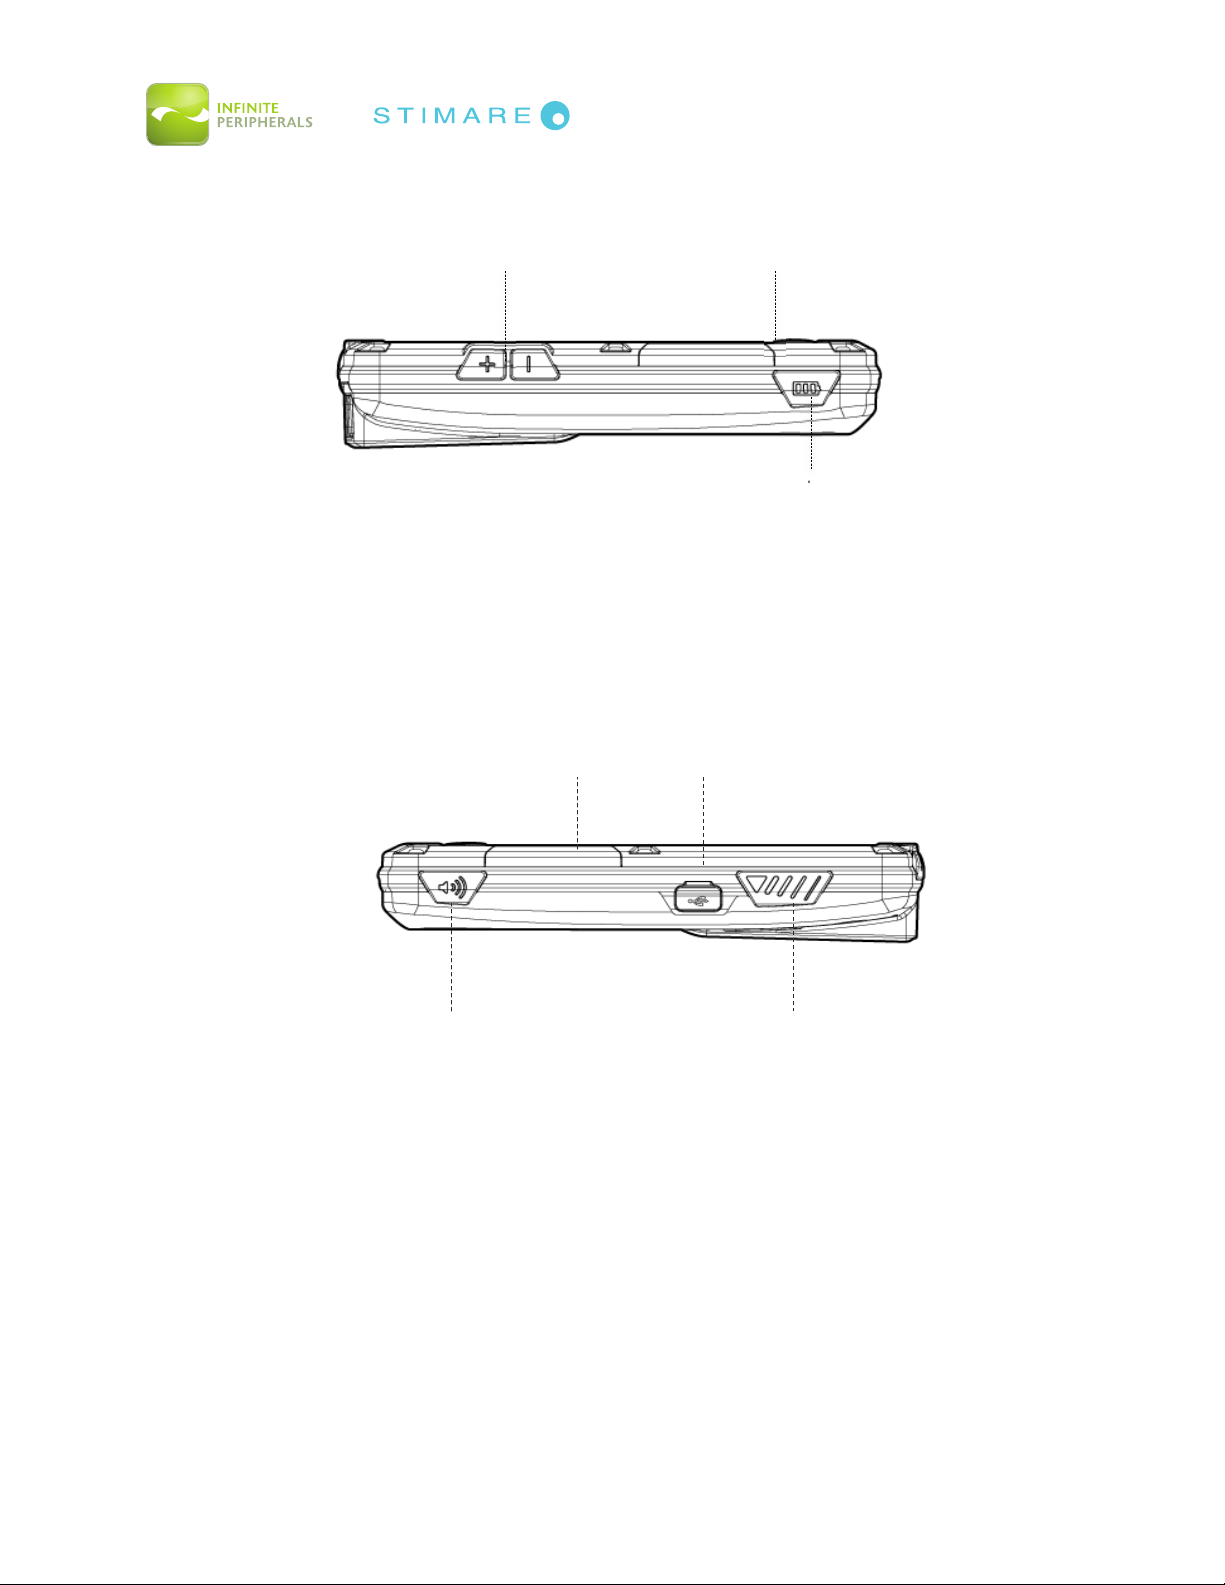
Figure 6: Left View
Figure 7: Right View
Notification LEDs
Volume Buttons
Battery Status Button
atu
t
Notification LEDs
Mini USB Connector
Front/Rear Speaker Toggle
Scan Button
Infinea® X User Manual Page 12 of 32
UM-00001 Version: A
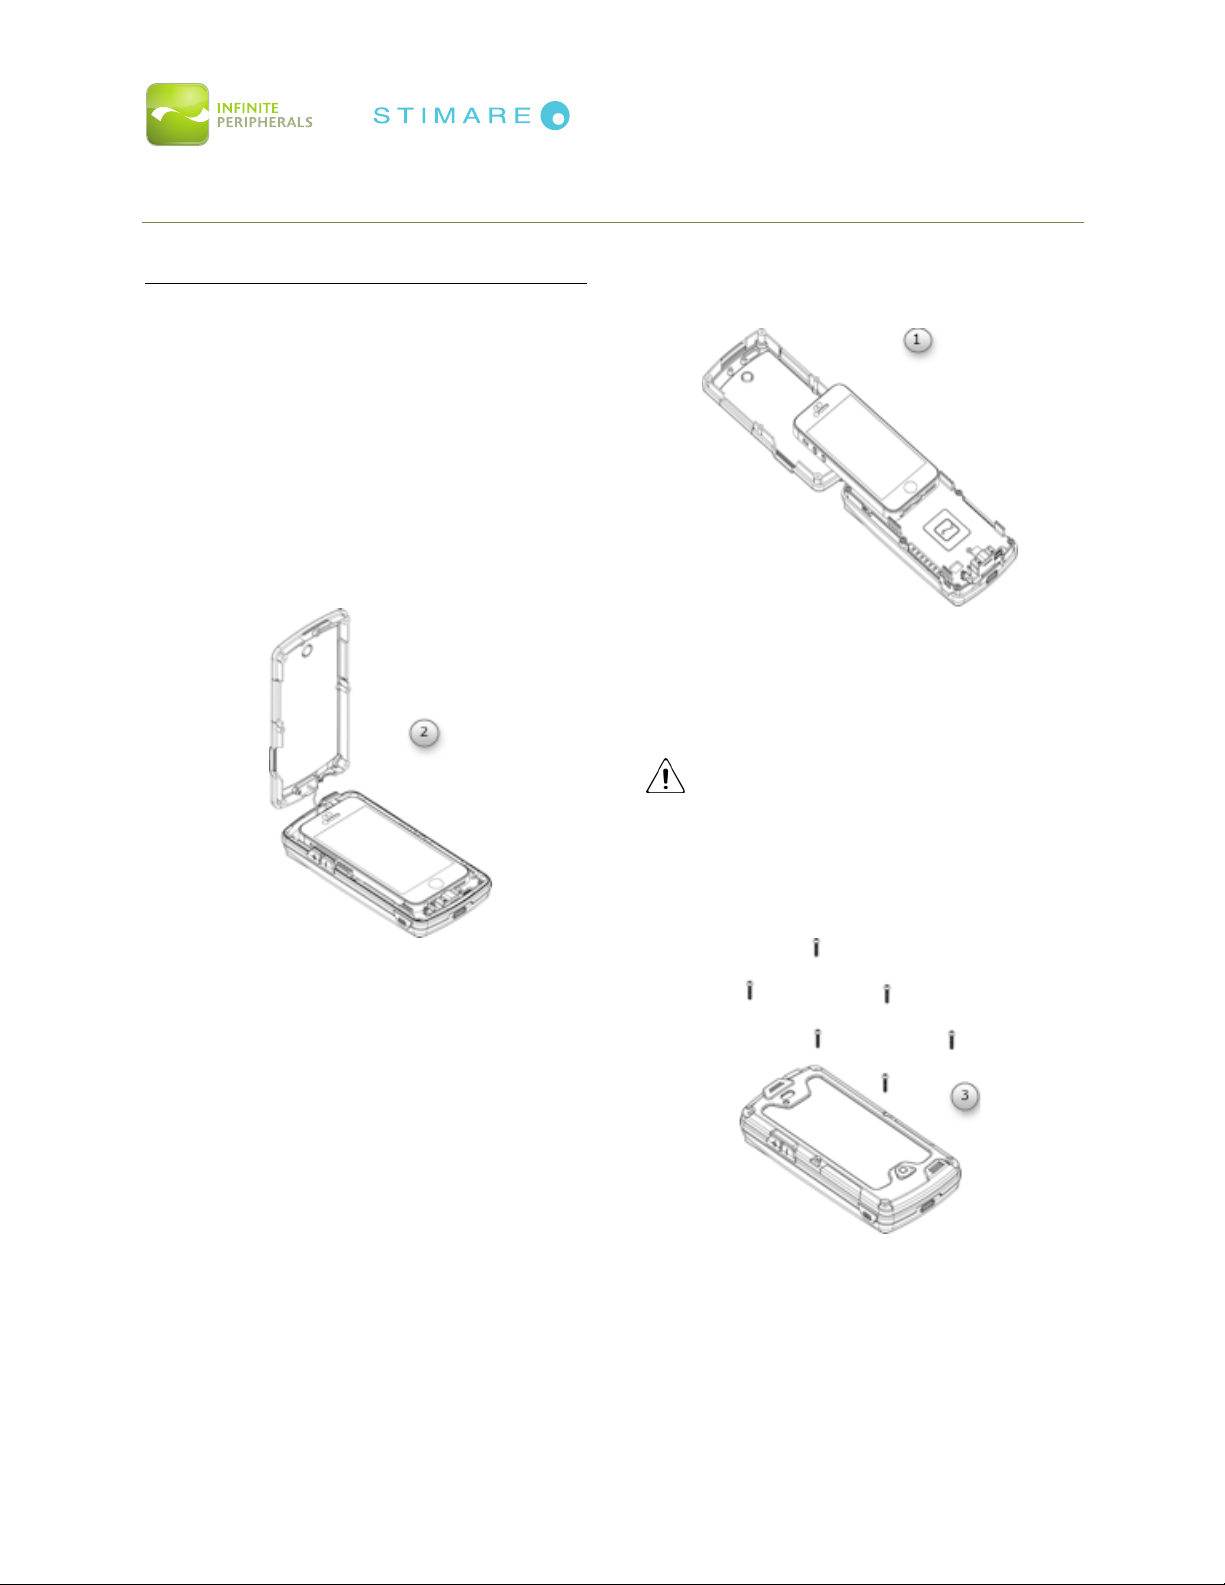
ASSEMBLING THE INFINEA X
I
I
P
P
H
H
O
O
N
N
E
E
A
A
N
N
D
D
I
I
P
P
O
O
D
D
I
I
N
N
S
S
T
T
A
A
L
L
L
L
A
A
T
T
I
I
O
O
N
N
1. Open the Infinea X, slide the iOS product* on to the
lightening connector until it clicks into place.
Clean the iOS screen with a lint-free cloth, if needed.
*Infinea X is molded specifically to iPod touch 5,
iPhone 5 and iPhone 5s specifications. iOS devices
are not interchangeable
2. Close the cover, maintaining the position of
the rubber protective bumper.
CAUTION
Take care to not damage wire connecting the
top and bottom covers.
3. Secure the cover by inserting and tightening 6 Torx
screws.

Infinea® X User Manual Page 13 of 32
UM-00001 Version: A
INSTALLING THE INFINEA X BATTERY PACK
S
S
T
T
A
A
N
N
D
D
A
A
R
R
D
D
A
A
N
N
D
D
E
E
X
X
T
T
E
E
N
N
D
D
E
E
D
D
B
B
A
A
T
T
T
T
E
E
R
R
Y
Y
I
I
N
N
S
S
T
T
A
A
L
L
L
L
A
A
T
T
I
I
O
O
N
N
The Infinea X is designed to support Standard and Extended external swappable battery
packs. The swappable battery pack design reduces down time of the Infinea X. Follow the
steps below to install or replace your Infinea X battery pack.
1
1
.
.
Check that the battery-latch is in the fully
open position.
Caution
Take care not to force the battery into place if the
latch is in the close/lock position.
2
2
.
.
Lower the battery pack into place as shown in
the figure on the left. The battery should sit flat
when installed correctly.
3
3
.
.
With slight pressure on the backside of the
battery pack, rotate the latch counter-clockwise
90-degrees or until the battery is securely locked
in place as shown in the figure on the right.

Infinea® X User Manual Page 14 of 32
UM-00001 Version: A
CHARGING THE INFINEA X
There are two options for charging the Infinea X:
•By outlet
•By user replaceable battery
The Infinea X supports pass through charging to the iOS device. An iPod or iPhone and
Infinea X combination may be charged with a USB to AC adapter or by station charger. Due
to current requirements, the Infinea X and iPod or iPhone combination cannot be charged
with a USB cable to a PC.
The Infinea X uses a Lithium Ion rechargeable battery. Before first use, the battery pack
should be charged for at least 4 hours.
B
B
A
A
T
T
T
T
E
E
R
R
Y
Y
S
S
P
P
E
E
C
C
I
I
F
F
I
I
C
C
A
A
T
T
I
I
O
O
N
N
S
S
The Infinea X standard battery has a capacity of 1,900 mAh. The extended battery pack (sold
separately) offers a capacity of 3,800 mAh.
The charge time for an empty battery to become 100% full is 3.5 hours for the standard
battery and 7 hours for an extended battery pack.
Standard Battery
Extended Battery
Battery Life Status
7755%%--110000%%
LEDs are solid green upon pressing the Battery Status button.
5500%%--7744%%
LEDs flash green upon pressing the Battery Status button.
2255%%--4499%%
LEDs flash orange upon pressing the Battery Status button.
00%%--2244%%
LEDs flash red upon pressing the Battery Status button.
00%%--99%%
One LED automatically flashes red to indicate emergency low battery status.
Note: When remaining battery capacity is below 30%, the automatic charge of the iOS device stops.

Infinea® X User Manual Page 15 of 32
UM-00001 Version: A
C
C
H
H
A
A
R
R
G
G
I
I
N
N
G
G
U
U
S
S
I
I
N
N
G
G
A
A
N
N
E
E
L
L
E
E
C
C
T
T
R
R
I
I
C
C
A
A
L
L
O
O
U
U
T
T
L
L
E
E
T
T
To prevent electrical damage to the Infinea X and/or battery, please use approved USB to
Mini USB cables only
1. Connect mini USB charger cable as
shown below.
2. Plug the USB end of the cable into
an AC wall adapter. This AC adapter
must support at least 2.1 amps.
3. To check the battery life, you can
press the Battery Status button and
look at the status LEDs.
Refer to the table to determine the
battery life in relation to the LEDs.

Infinea® X User Manual Page 16 of 32
UM-00001 Version: A
C
C
H
H
A
A
R
R
G
G
I
I
N
N
G
G
T
T
H
H
E
E
U
U
S
S
E
E
R
R
R
R
E
E
P
P
L
L
A
A
C
C
E
E
A
A
B
B
L
L
E
E
B
B
A
A
T
T
T
T
E
E
R
R
Y
Y
The multi-bay battery charger is an available accessory. 10 batteries may be charged at once.
Each battery slot has an individual LED charge indicator. A red LED indicates that charging is
in progress. A green LED indicates that the battery is fully charged. A typical full charge
takes approximately 2.5 hours for a standard capacity battery and 5 hours for an extended
capacity battery.
Figure 8: Multi-bay battery charger
WARNING
This battery charger is intended for use in charging only Infinite Peripherals Infinea X
standard and extended battery packs. Do not use this battery charger for any other battery
types.
D
D
I
I
S
S
P
P
O
O
S
S
A
A
L
L
Dispose of used batteries appropriately, according to federal law. This may include disposing
of them at a battery-recycling center or hazardous waste collection site.

Infinea® X User Manual Page 17 of 32
UM-00001 Version: A
DEVELOPING APPLICATIONS
Software is not provided with your Infinea X. Please contact your reseller or Infinite
Peripherals for Third Party software solutions.
Integrating the Infinea X into your iOS application requires the use of the Infinite Peripherals
Universal SDK. The SDK incorporates an API specifically for developing applications to use
the functionality of the Infinea X; including, but not limited to, barcode scanning, read/write
RFID and programmable LED capability of the Infinea X.
For additional details on using the Infinite Peripheral Universal SDK, please refer to the SDKs
documentation.
For the latest Infinite Peripheral Universal SDK please visit our developer portal:
http://www.ipcprint.com/developer

Infinea® X User Manual Page 18 of 32
UM-00001 Version: A
POWERING ON THE INFINEA X
D
D
U
U
A
A
L
L
P
P
U
U
R
R
P
P
O
O
S
S
E
E
S
S
C
C
A
A
N
N
B
B
U
U
T
T
T
T
O
O
N
N
The Infinea X uses a dual-purpose Scan/Power button to power on the Infinea X unit, as well
to scan barcodes. When the Infinea X is left idling for an extended period, the unit
automatically goes into sleep mode to preserve the charge of the internal battery pack.
P
P
O
O
W
W
E
E
R
R
O
O
N
N
When the Infinea X is in the Off/Sleep mode, briefly press the Scan button to power on the
unit. A single beep indicates the Infinea X is ready for use.
Pressing the scan button a second time will activate the scanner for normal barcode scanning.
Figure 9: Scan/Power Button
User Notes
Custom software must be used in order for the Infinea X to communicate with the iOS device.
Please consult your reseller for this software, or contact Infinite Peripherals for
recommendations on compatible third party software solutions.
This manual suits for next models
4
Other STIMARE Barcode Reader manuals


