Stirling TK-1818R2A-WHT User manual

N13275
INSTRUCTION MANUAL
Espresso Machine
AFTER SALES SUPPORT
1300 886 649
AUS MODEL: TK-1818R2A-WHT PRODUCT CODE: 58170 08/2017
Model Number TK-1818R2A-WHT

2
Welcome
Congratulations on choosing to buy a STIRLING®product.
All products brought to you by STIRLING®are manufactured to the highest
standards of performance and safety and, as part of our philosophy of
customer service and satisfaction, are backed by our comprehensive
3Year Warranty.
We hope you will enjoy using your purchase for many years to come.
AFTER SALES SUPPORT
1300 886 649
AUS MODEL: TK-1818R2A-WHT PRODUCT CODE: 58170 08/2017

3
02 Welcome
04 Warranty Details
05 General Safety Instructions
07 Product Overview
09 Getting Started
12 Instructions
19 FAQs and Troubleshooting Guide
21 Other Useful Information
25 Recipes
27 Repair and Refurbished Goods or Parts Notice
Contents
AFTER SALES SUPPORT
1300 886 649
AUS MODEL: TK-1818R2A-WHT PRODUCT CODE: 58170 08/2017

4
Espresso Machine
The product is guaranteed to be free from defects in workmanship and parts
for a period of 36 months from the date of purchase. Defects that occur
within this warranty period, under normal use and care, will be repaired,
replaced or refunded at our discretion, solely at our option with no charge for
parts and labour. The benefits conferred by this warranty are in addition
to all rights and remedies in respect of the product that the consumer
has under the Competition and Consumer Act 2010 and similar state and
territory laws.
Our goods come with guarantees that cannot be excluded under the
Australian Consumer Law. You are entitled to a replacement or refund for
a major failure and to compensation for any other reasonably foreseeable
loss or damage. You are also entitled to have the goods repaired or
replaced if the goods fail to be of acceptable quality and the failure does
not amount to a major failure.
YEAR WARRANTY
3
Warranty Details
REGISTER YOUR PURCHASE AT www.aldi.com.au/en/about-aldi/product-registration/ TO KEEP UP-TO-DATE WITH IMPORTANT PRODUCT INFORMATION
AFTER SALES SUPPORT
1300 886 649
AUS MODEL: TK-1818R2A-WHT PRODUCT CODE: 58170 08/2017

5
General Safety Instructions
Electrical safety and cord handling
• Voltage: Make sure your outlet voltage and circuit frequency correspond to the
voltage stated on the appliance rating label.
• Wall outlet: Only plug the appliance into a properly earthed electrical outlet.
• Do not immerse: To protect against fire and electric shock, do not immerse the
cord, plug or the appliance itself in water or other liquid, or expose any of the
electrical connections to water.
• Protect the cord: Do not kink, bend, squash or damage the power cord and
protect it from sharp edges and heat. Do not let it touch hot surfaces, including
the machine’s hot surfaces. Make sure the cord does not hang over the edge of
a table or benchtop and nothing is placed on top of the cord.
• No extension cord, no timer: Do not use the appliance with an extension cord.
Do not use it with a timer or a separate remote control system.
• Damage: Do not pick up or operate the appliance if the power supply cord, plug
or housing is damaged. Do not use the appliance after it malfunctions or has
been damaged in any manner. A damaged cord or plug must be replaced by
appropriately qualified personnel in order to avoid a hazard. In case of damage,
unplug the machine and contact our after sales support line for advice.
• Disconnect: Unplug the espresso machine from the power supply:
• If anything unusual occurs during the brewing process.
• Before cleaning, servicing or moving it (allow it to cool before cleaning).
• If you will not use it for an extended time (e.g. when going on holidays).
To disconnect, turn any control to the off position and unplug the machine from
the wall outlet. When unplugging, grab the plug, do not pull the cord.
• RCD: Unless your home is already fitted with a residual current device (safety
switch), we recommend installing an RCD with a rated residual operating
current not exceeding 30mA to provide additional safety protection when using
electrical appliances. See your electrician for professional advice.
IMPORTANT SAFETY INSTRUCTIONS
READ CAREFULLY AND KEEP FOR FUTURE REFERENCE
Read this manual thoroughly before first use, even if you are familiar with this type
of product. The safety precautions enclosed herein reduce the risk of re, electric
shock and injury when correctly adhered to. Keep the manual in a safe place for
future reference, along with the completed warranty card, purchase receipt and
carton. If applicable, pass these instructions on to the next owner of the appliance.
Always follow basic safety precautions and accident prevention measures when
using an electrical appliance, including the following:
AFTER SALES SUPPORT
1300 886 649
AUS MODEL: TK-1818R2A-WHT PRODUCT CODE: 58170 08/2017

6
General Safety Instructions (Cont.)
Usage conditions and restrictions
• Domestic use only: This appliance is intended for private household use only.
It is not intended for commercial or trade use.
• Intended purpose: Do not use the appliance for anything other than its
intended purpose, and only use it as described in this manual. Any other use
may cause fire, electric shock or injury. We accept no liability for any damage
due to improper use or handling.
• No outdoor use: Do not use this appliance outdoors.
• Accessories: Do not use this appliance with accessories that are not supplied.
The use of accessory attachments not supplied may result in fire, electric
shock or personal injury, and will void your warranty.
• Usage restriction: The appliance is not intended for use by persons (including
children) with reduced physical, sensory or mental capabilities, or lack of expe-
rience and knowledge, unless they have been given supervision or instruction
concerning use of the appliance by a person responsible for their safety.
• Children: Supervise children to ensure they do not play with the appliance.
Close supervision is necessary when any appliance is used by or near children.
• Work surface: Place the machine on a flat, stable, heat resistant surface, in a
dry environment, away from water. Do not operate it on an inclined plane.
• Do not use on hot surfaces: Never place the machine on a hot surface such
as a hotplate or inside a heated oven. Never use it around an open flame.
• WARNING: During use, do not open the lid of the water tank (filling aperture),
do not move the appliance, and do not leave it unattended.
• Noncompliance: We assume no liability for any eventual damages caused by
improper use, inappropriate handling, or noncompliance with these instructions.
CAUTION: Hot!
Surfaces: The temperature of accessible surfaces may be high during
and after use. Do not touch hot surfaces; use knobs and handles.
Steam wand/nozzle: Take care when handling the steam wand as it
becomes very hot during use. This may cause burns in case of contact.
Do not direct the steam nozzle towards your hands or any body parts.
• During operation: To avoid burns and/or other injuries from hot steam or
water, never remove the water tank or porta filter while brewing coffee or
frothing milk. Exercise extreme caution when moving the unit with hot liquids.
• Porta filter: Use caution when removing the porta filter. The metal parts may
still be very hot. Also, there may be hot water floating on top of the filter. Hold it
only by the handle when disposing of the brewed coffee grounds.
AFTER SALES SUPPORT
1300 886 649
AUS MODEL: TK-1818R2A-WHT PRODUCT CODE: 58170 08/2017

7
Scope of Delivery
A Espresso machine
1 Cup warming area
2 ON/OFF button and POWER indicator light
3 HOT WATER/STEAM selector
4 Group head
5 Removable drip tray with drainer
6 1.6L Water tank and lid (at the back)
7 HEATING indicator light
8 Function dial (espresso <-- 0 –-> water/steam)
9 Steam wand and nozzle with rubber grip
10 Stainless steel frothing attachment
11 Drip tray floater (pops up when the drip tray is full)
Product Overview
Turn over the page for more parts, accessories and other inclusions
AFTER SALES SUPPORT
1300 886 649
AUS MODEL: TK-1818R2A-WHT PRODUCT CODE: 58170 08/2017
4
5
1
2
3
6
8
10
9
7
11

8
12 13 14
15
16
Product Overview (Cont.)
B Accessories
12 Stainless steel porta filter with plastic handle
13 Deep filter (for 2 cups espresso, or a double shot)
14 Shallow filter (for 1 cup espresso)
15 Measuring spoon with tamp
16 500mL Milk jug
17 Cleaning aid (x2)
C Other inclusions (not pictured)
Silicone mat (for optional use on the drip tray drainer)
Instruction manual
Quick start guide
Warranty certificate
17
NOTE:
Due to continued product improvement, images and illustrations in this manual may vary
slightly from the product purchased. All images in this manual are for reference purposes
only. Parts are not necessarily pictured to scale.
AFTER SALES SUPPORT
1300 886 649
AUS MODEL: TK-1818R2A-WHT PRODUCT CODE: 58170 08/2017

9
Getting Started
Before first use
• Unpack the appliance but keep the original packaging materials in a safe
place. It will help prevent any damage if the product needs to be transported in
the future, and you can use it to store the appliance when it is not in use. In the
event that the carton is to be disposed of, please recycle all packaging materials.
Plastic wrapping can be a suffocation hazard for babies and young children, so
ensure all packaging materials are out of their reach and disposed of safely.
• Inspect the cord and plug for damage or wear before each use. Do not use
the appliance if the appliance or its cord have been damaged or are not working
properly. In case of damage, contact the after sales support line.
• Read all instructions and make sure you understand all warnings. Refer to the
Product Overview, pages 7–8, to familiarise yourself with the product and its parts.
• Remove and wash the water tank (see page 12), porta filter and filters, drip tray
and drainer, and the measuring spoon in warm water and a little mild detergent
to remove any dust from transport. Rinse and dry each part thoroughly, then refit
the drip tray and drainer. Wipe the steam wand clean.
• Flush the internal brewing system as follows:
1. Fill water into the container (see page 12 for details).
2. Put a filter into the porta filter – without any ground coffee at this stage –
and engage it onto the group head (see page 11 for details).
3. Place a larger container underneath the outlet openings.
4. Plug the machine into a wall outlet and set the hot water/steam selector to
the HOT WATER position (button released).
5. Press the ON/OFF button to turn the appliance on. As soon as the HEATING
light goes out, set the function dial to the position and hot water will start
flowing from the outlets.
6. While watching the container so it does not overflow, leave the pump
running until about half the water has passed through. Then turn the
function dial to the neutral position to switch off the pump.
7. Empty the hot water out of the container and place it under the steam wand.
8. As soon as the heating light goes out, turn the function dial to the
position. CAUTION: Take care, steaming hot water will start flowing from the
steam wand, and there may be some splattering!
9. While watching the container, let the water pass through until the amount
left in the container has reached the MIN mark.
10. Then turn the function dial to the neutral position to switch off the pump.
• Follow this same procedure if the appliance has not been used for a week, or
for a longer period of time.
AFTER SALES SUPPORT
1300 886 649
AUS MODEL: TK-1818R2A-WHT PRODUCT CODE: 58170 08/2017

10
Getting Started (Cont.)
A
Press the ON/OFF button to switch on the espresso machine. The red
POWER and blue HEATING indicator lights will illuminate.
B
Press down the HOT WATER/STEAM selector to produce steam for milk
frothing. With the function dial set to , steam will now be emitted from
the steam nozzle.
With the button released, the machine will produce hot water, which can be
drawn through either the espresso outlet (when the function dial is set to )
or the steam nozzle (with the function dial set to ).
CThe FUNCTION dial has three settings ( <-- 0–-> ). As soon as
the dial is turned from its neutral [ 0 ] position, either the steam wand or
espresso outlet will open and emit steam or hot water.
DPump switched on – dispensing water/espresso via the espresso
outlets
E0Pump switched off – neutral position – water/espresso or steam
flow stopped
FDispensing hot water or steam via the steam wand
G
The blue HEATING indicator will illuminate while the machine is heating up
and extinguish when it has reached the correct operating temperature.
Control panel
The espresso machine is easy to operate with just two main controls (Fig.1):
AFTER SALES SUPPORT
1300 886 649
AUS MODEL: TK-1818R2A-WHT PRODUCT CODE: 58170 08/2017
C
DE
A
B
G
F
Fig.1

11
Getting Started (Cont.)
The brewing system consists of the following parts (Fig.2):
Brewing system
J
H
K
L
The GROUP HEAD is part of the espresso machine. It is marked with an
and symbol for accurate attachment of the porta filter.
The PORTA FILTER has three lugs on the rim (only two are visible in Fig.2),
which help you fit the porta filter to the appliance.
Inserting/removing the porta filter
To attach the porta filter, make sure the handle is facing to the left of the
espresso outlet and is aligned with the symbol on the group head
(Fig.2). Firmly turn the porta filter to the right until the handle is straight at
the front at the position (Fig.3). To unlock and remove the porta filter,
turn it clockwise to the position.
The plastic HANDLE allows you to take the porta filter off the group head
safely.
The brewed espresso is dispensed through the two ESPRESSO OUTLETS
at the underside of the porta filter.
AFTER SALES SUPPORT
1300 886 649
AUS MODEL: TK-1818R2A-WHT PRODUCT CODE: 58170 08/2017
J
H
KL
Fig.2
Fig.3 CAUTION!
The porta filter is under
pressure during use. Do not
remove it while the appliance
is in use. Wait at least 30
seconds after the end of
the brewing cycle before
removing the porta filter.
12
Instructions
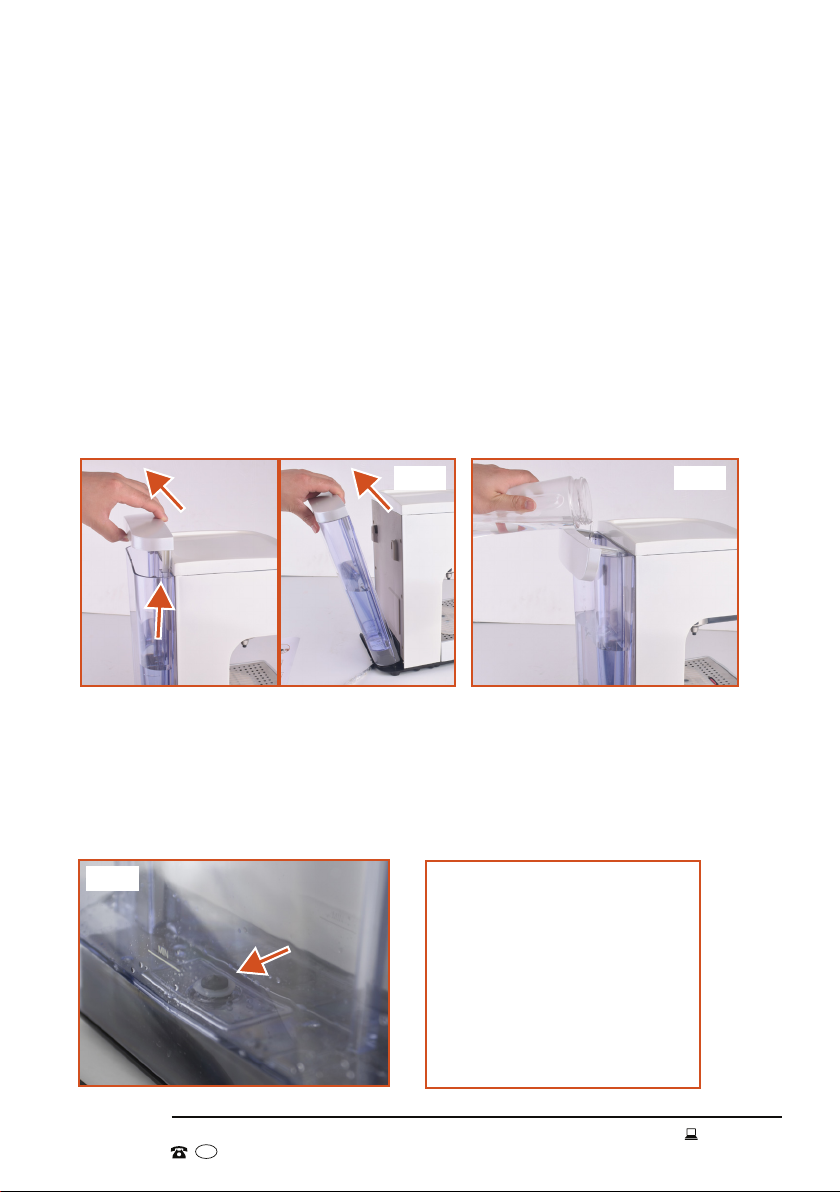
Filling the water tank
• Make sure to fill the water tank before switching on the espresso machine.
• The water tank should be filled with fresh, cold tap water. Fill the tank every
day, or whenever you want to use the machine. Make sure the water tank is
clean; see page 21 for cleaning instructions.
• The tank is removable. To fill it under the tap, lift up and flip back the lid and lift
the container out of the appliance (Fig.4). When filled, place the container back
into position, pushing down to ensure the valve at the base opens and water
can flow out into the system. Close the lid.
• Alternatively, use a kettle/jug and carefully pour water into the opening while
the tank is in place on the base (Fig.5). Close the lid.
• Do not start brewing or frothing with an empty water tank. Always keep water
in the container when in use.
• Monitor the water level throughout the day and refill before it is completely
empty. If you leave refilling until the container is empty, the pump may start
sucking in air from the empty water tank.
CAUTION!
Take out the water tank and
check the valve seals at the
base regularly (Fig.6) and, if
necessary, carefully remove
any dirt or lime deposits,
which could cause leaks.
Fig.6
AFTER SALES SUPPORT
1300 886 649
AUS MODEL: TK-1818R2A-WHT PRODUCT CODE: 58170 08/2017
Fig.4 Fig.5
13
Instructions (Cont.)
Preheating
To ensure you can enjoy your coffee at an optimum temperature, we recommend
preheating the cups, porta filter and filters you are going to use.
• Plug in the appliance and press the ON/OFF button to switch it on. The blue
HEATING indicator light will illuminate.
• Select the appropriate filter and insert it into the porta filter. (The shallow filter
is for 1 cup espresso, the deep filter is for 2 cups, or for a double shot.)
• Fit the porta filter to the appliance as described on page 11.
• Place one or two cups underneath the espresso outlets.
NOTE: If you find that lighter cups move slightly during brewing, place the
supplied silicone mat on the drip tray drainer to increase skid resistance.
• As soon as the operating temperature has been reached, the HEATING
indicator light will turn off.
• Turn the function dial to the symbol. Hot water will start flowing from the
outlets. When the cup(s) are approximately 3/4 full with water, turn the function
dial to its neutral position to switch off the pump and stop the water flow.
• Put the cup(s) aside to warm up. Pour out the water just before brewing.
Alternatively, place your cups on the cup warming area on top to preheat them.
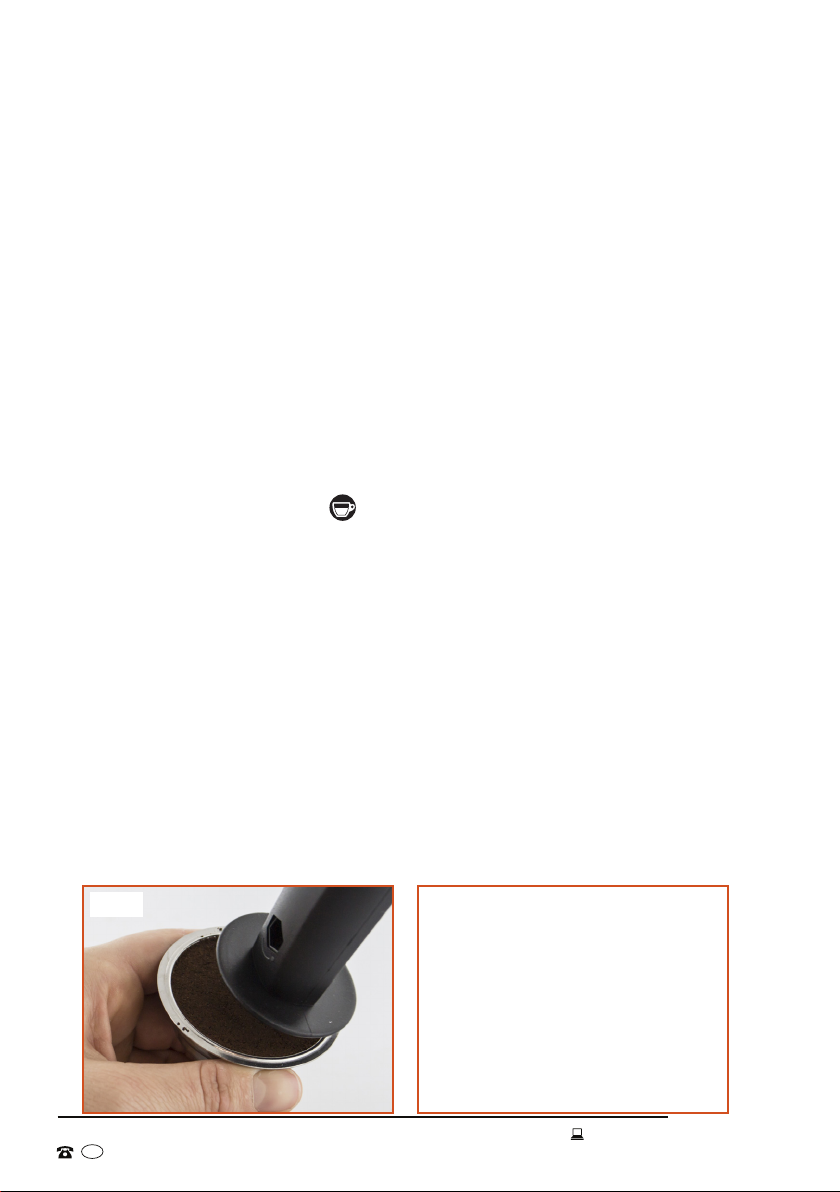
Adding ground coffee
• Holding the preheated porta filter by the handle, remove it from the appliance.
• Add an appropriate amount of ground coffee to the filter:
1 cup = 1 level measuring spoon, 2 cups = 2 level measuring spoons.
• Do not overfill the filter, otherwise the porta filter will not lock properly in place.
The deep filter holds a maximum of 2 measuring spoonfuls of ground coffee.
• Use the supplied measuring spoon to distribute the ground coffee evenly and
press it down lightly with the tamp at the other end of the spoon (Fig.7). With
your fingertip, remove any excess coffee from the rim of the porta filter.
CAUTION!
The porta filter is hot after
preheating and during use!
Handle it with utmost care.
Only hold the porta filter by
its plastic handle, and take
particular care when adding
coffee and wiping the rim.
Fig.7
AFTER SALES SUPPORT
1300 886 649
AUS MODEL: TK-1818R2A-WHT PRODUCT CODE: 58170 08/2017
14
Instructions (Cont.)
Brewing espresso
At this stage the espresso machine will be fully prepared:
• The container will be filled with water.
• The brewing system and the cup(s) to be used will be preheated.
• The porta filter (with the appropriate filter and ground coffee) will be properly
fitted to the group head.
• The POWER indicator light will be illuminated.
• The HEATING light will be on if the appliance is still heating up (or it will have
turned off when the correct working temperature has been reached).
• Place the cup(s) underneath the espresso outlets.
• Set the HOT WATER/STEAM selector to HOT WATER (released).
• When the heating indicator light turns off, set the function dial to the
position. Freshly brewed espresso will be delivered straight into the cup(s).
You must turn the function dial to its neutral position to switch the pump
off when you have enough coffee. (A traditional espresso is 30mL, brewed in
about 30 seconds.)
• Wait for approximately 30 seconds before removing the porta filter and coffee
grounds. Your espresso machine is now ready for another brewing cycle.
IMPORTANT!
• You must stop the flow manually by turning the function dial to its neutral
position when you have enough coffee.
• Exercise caution when removing the porta filter, it will be hot and may still
contain some hot water.
Emptying the used coffee grounds
• After each use, wait at least 30 seconds until the operating pressure has been
sufficiently reduced. Then take out the porta filter and clean it.
• CAUTION: Take care when handling the metal parts, they may still be hot.
The porta filter may also still have some hot water floating on top of the used
coffee grounds, especially after brewing 2 cups of espresso.
Exercise caution to avoid scalding!
• To remove the coffee grounds, gently tap the side of the porta filter against a
vertical surface. Rinse the filter and wipe the porta filter thoroughly after use.
• Before switching off the machine, turn the function dial to the setting and
let a small amount of water run through the system to wash it out.
• See pages 21–23 for thorough cleaning instructions.
AFTER SALES SUPPORT
1300 886 649
AUS MODEL: TK-1818R2A-WHT PRODUCT CODE: 58170 08/2017

15
Dispensing hot water
The hot water function is useful for turning an espresso into a long black (Fig.8),
or for making any other drink that requires hot water.
• Ensure the selector button is set to HOT WATER (released).
• Place a cup under the steam nozzle.
• Turn the function dial to the position.
• When you have collected enough hot water, turn the function dial to its neutral
position to switch the pump off.
Dispensing steam
The steam function is designed to dispense steam for heating up and texturing
milk for a cappuccino or caffè latte, or for reheating hot beverages through the
steam nozzle.
• Press the HOT WATER/STEAM selector in so that STEAM is selected.
• After a brief heating period, the HEATING indicator light will turn off and steam
will be drawn from the steam nozzle by turning the function dial to the
position.
• To ensure that the espresso outlet is safely covered, the porta filter with filter
should be fitted when steam is being dispensed.
Instructions (Cont.)
Fig.8 Fig.9
Reheating beverages
• Press the HOT WATER/STEAM selector in so STEAM is selected.
• Insert the steam nozzle into the liquid to be reheated (Fig.9), then turn the
function dial to the position.
• Once the liquid has reached the desired temperature, turn the function dial
back to its neutral position.
• When you no longer need steam, release the HOT WATER/STEAM selector.
AFTER SALES SUPPORT
1300 886 649
AUS MODEL: TK-1818R2A-WHT PRODUCT CODE: 58170 08/2017

16
Instructions (Cont.)
Texturing milk
Your new espresso machine features a steam wand and nozzle for easy
production of textured milk for Italian style milk coffees (cappuccino, caffè latte),
mocha, flat white, hot chocolate or any other milky drink. The instructions below
illustrate how to prepare cappuccino – espresso topped with steamed and
frothed milk.
• The steam wand can be used with or without the stainless steel frothing
attachment. To create large amounts of milk froth, slide it over the steam
wand; for less froth, use the wand without the attachment. Attach or
remove the attachment when the steam wand is cool. Slide it over the wand
and push it upwards (Fig.10) until it sits firmly over the rubber surround.
• For best results, we recommend texturing the milk in the supplied stainless
steel jug and pouring the milk into your coffee. Both the milk and jug should
be cold. Do not use a jug that has just been washed in warm water.
• The first step in making cappuccino is to make espresso. Follow the instructions
(page 13) to prepare it using a cappuccino cup of approximately 170–220mL
capacity.
• Place the cup with the espresso on the warming area on top of the machine to
keep it warm while you prepare the milk.
• Fill around 100mL of cold milk into the stainless steel jug and put it aside.
• Press the HOT WATER/STEAM selector in so STEAM is selected.
• When the HEATING light is off, purge the steam wand briefly by turning the
function dial to the position, and then back to the neutral position once
some hot steam has been emitted through the steam nozzle.
• Holding it by the rubber grip, swing the steam wand to the side of the
appliance for milk frothing.
• Place the milk jug underneath the steam wand, making sure the nozzle is just
below the surface of the milk (Fig.11).
AFTER SALES SUPPORT
1300 886 649
AUS MODEL: TK-1818R2A-WHT PRODUCT CODE: 58170 08/2017
Fig.10 Fig.11

17
• Turn the function dial to the position to activate the steam function.
• Move the jug round with a circular motion for around 40-45 seconds, making
sure the nozzle remains submerged while frothing is in progress. Alternatively,
angle the jug to rest the steam wand on the spout. The milk froth should be
dense with small, closely packed bubbles.
• As soon as the milk is textured to your liking, turn the function dial to its
neutral position to switch the pump off.
• The milk will be heated during texturing, but it must not be allowed to reach
boiling point. Milk should ideally be heated to just below 60°C.
• When you switch off the pump, the appliance may give off a slight noise,
which is normal and no cause for concern.
• Pour the hot milk into the cup containing the espresso coffee and, using
a spoon, spread some milk froth over it. Sprinkle with grated chocolate or
instant chocolate powder, if desired. Enjoy!
• After each use, when the appliance has cooled so it is safe to touch, wipe
the steam wand and nozzle with a damp cloth or sponge and purge the steam
wand by turning the function dial to the position – take care: hot
steam will be released – then turn the dial back to the neutral position.
• Swing the steam wand back over the drip tray.
• See pages 21–23 for thorough cleaning instructions.
Instructions (Cont.)
IMPORTANT!
• Make sure there is still water in the water tank before texturing milk.
• The bottom of the jug and the steam wand will become hot while texturing
milk, so take care not to touch hot surfaces
• Close the steam immediately when the milk has doubled in volume, or when
the sides of the stainless steel jug become too hot to touch with the palm of
your hand for more than 30 seconds.
• If you are using a beverage thermometer, insert the frothing nozzle deeper
into the milk when it has reached 38°C. Do not heat it above 65°C.
AFTER SALES SUPPORT
1300 886 649
AUS MODEL: TK-1818R2A-WHT PRODUCT CODE: 58170 08/2017

18
For best results
The coffee
• Your new espresso machine can be used with pre-ground, vacuum packed
coffee, but for the best taste we recommend buying whole coffee beans and
grinding them yourself just before use.
• Grind the coffee beans just before use, and only grind as much as you will
need, as pre-ground coffee only retains its flavour for 7–8 days, provided it
is stored in an airtight container and in a cool, dark area.
• Do not store coffee in a refrigerator or freezer.
• Coffee beans stored in an airtight container will keep their flavour for up to
4 weeks.
The grind
• Choosing the correct grind is a vital step in the espresso making process and
takes practice. The coffee must be of a fine grind, it should look like salt.
• If the grind is too fine, the water will not flow through the coffee, even under
pressure. Too fine a grind looks like powder and feels like flour when rubbed
between fingers.
• If the grind is too coarse, the water flows through the coffee too fast,
preventing a full-flavoured extraction. Too coarse a grind feels like sugar.
The brew
• For a strong, robust cup of coffee, fill the deep filter with ground coffee and
brew just one cup at a time.
• If you prefer a milder coffee, use the shallow filter, and/or extend the brewing
time so more water flows through before turning the function dial to the neutral
position and stopping the flow.
• Always use fresh water: the quality of the water you use directly affects the
taste of your coffee.
The milk froth
• Always use fresh, cold milk for frothing.
• Chill your frothing jug in the refrigerator before frothing milk.
• Make sure the frothing jug is metal or ceramic, never use a glass jug.
• Clean the steam nozzle and wand after each use with a damp cloth or sponge.
• Purge the steam nozzle at least once a day, as described on page 17.
Instructions (Cont.)
AFTER SALES SUPPORT
1300 886 649
AUS MODEL: TK-1818R2A-WHT PRODUCT CODE: 58170 08/2017

19
FAQs and Troubleshooting Guide
PROBLEM POSSIBLE CAUSE CAUSE SOLUTION
The coffee is
not hot enough.
The cup(s) and/or the brewing
system are cold.
The ground coffee is too cold.
If making milk coffee, the milk
may not be heated enough.
Preheat cups, brewing
system, porta filter and filters.
If stored in the fridge, take
out the ground coffee a little
earlier before use.
Heat/froth milk for longer, but
not above 65°C.
The coffee
drops from
the side of the
group head.
The porta filter is not properly
in place.
There is some coffee on the
side of the group head.
There is coffee remaining on
the group head gasket.
The gasket is broken.
Make sure the porta filter is
properly engaged onto the
group head.
Remove the coffee grounds
from the group head.
Clean the gasket with a damp
cloth.
Contact the after sales
support line for a new gasket.
The pump
makes a lot of
noise. *
The water tank is empty.
The water tank is not properly
in place.
Fill the container with water.
Lift out the container and
place it back correctly.
No water will
come out. *
The water tank is empty.
The water tank is not properly
in place.
The porta filter is blocked.
The coffee is too fine, or
pressed down too tightly.
The machine has limescale
deposits.
Fill the container with water.
Lift out the container and
place it back correctly.
Clean up the porta filter.
Use more coarsely ground
coffee.
Descale the machine.
Coffee is
running fast;
there is no
crema.
The coffee is too coarse.
There is not enough coffee.
The coffee is not compacted
firmly enough.
Use more finely ground coffee.
Add more ground coffee.
Use the tamp to press down
the coffee tightly.
* If none of the solutions work with these two problems, try to release some
steam by turning the function dial to the position.
AFTER SALES SUPPORT
1300 886 649
AUS MODEL: TK-1818R2A-WHT PRODUCT CODE: 58170 08/2017

20
PROBLEM POSSIBLE CAUSE SOLUTION
Coffee drips
out instead
of flowing out
properly.
The coffee is ground too
coarsely.
The coffee is not pressed
down tightly.
Use a more finely ground
coffee.
Use the tamp to press down
the coffee tightly.
The coffee is
too weak.
Using shallow filter for
double shot or 2 cups.
The ground coffee is too
coarse.
Use the deep filter for
stronger coffee.
Use a finer grind.
Too much water
remains in the
porta filter after
coffee is ready.
The ground coffee is not
tightly pressed down.
There is not enough coffee.
Use the tamp to press down
the ground coffee tightly.
Add more coffee.
Not enough,
or no steam is
generated for
frothing.
The water tank is empty.
The steam nozzle is
blocked.
Fill the container with water.
Turn off and unplug the
machine, let it cool and clean
the steam nozzle with the
cleaning aid (or a needle or
toothpick).
The milk froth is
of poor quality.
The milk is too warm. Refrigerate milk and jug
beforehand.
My cups are
moving on the
drip tray.
This may be caused by the
vibrations during brewing.
Place the supplied silicone
mat on the drip tray drainer to
increase skid resistance.
If the solutions above do not help you with the problem, or if you experience any
other problems with your espresso machine, do not try and manage them by your-
self. Contact our after sales support centre for advice on repair or replacement.
FAQs and Troubleshooting Guide (Cont.)
AFTER SALES SUPPORT
1300 886 649
AUS MODEL: TK-1818R2A-WHT PRODUCT CODE: 58170 08/2017
Other manuals for TK-1818R2A-WHT
1
Table of contents
Other Stirling Coffee Maker manuals


