Stirling STR-1858P User manual
INSTRUCTION MANUAL
19 Bar
Premium Espresso Machine
E209
AFTER SALES SUPPORT
1300 886 649
AUS MODEL: STR-1858P PRODUCT CODE: 700496 03/2020
Model Number STR-1858P

2
Welcome
Congratulations on choosing to buy a STIRLING®product.
All products brought to you by STIRLING®are manufactured to the highest
standards of performance and safety and, as part of our philosophy of
customer service and satisfaction, are backed by our comprehensive
3Year Warranty.
We hope you will enjoy using your purchase for many years to come.
AFTER SALES SUPPORT
1300 886 649
AUS MODEL: STR-1858P PRODUCT CODE: 700496 03/2020

3
02 Welcome
04 Warranty Details
05 General Safety Instructions
08 Product Overview
11 Getting Started
14 Instructions
21 FAQs and Troubleshooting Guide
23 Other Useful Information
28 Recipes
31 Repair and Refurbished Goods or Parts Notice
Contents
AFTER SALES SUPPORT
1300 886 649
AUS MODEL: STR-1858P PRODUCT CODE: 700496 03/2020

4
19 Bar Premium Espresso Machine
The product is guaranteed to be free from defects in workmanship and
parts for a period of 36 months from the date of purchase. Defects that
occur within this warranty period, under normal use and care, will be
repaired, replaced or refunded at our discretion. The benefits conferred by
this warranty are in addition to all rights and remedies in respect of the
product that the consumer has under the Competition and Consumer Act
2010 and similar state and territory laws.
Our goods come with guarantees that cannot be excluded under the
Australian Consumer Law. You are entitled to a replacement or refund for
a major failure and to compensation for any other reasonably foreseeable
loss or damage. You are also entitled to have the goods repaired or
replaced if the goods fail to be of acceptable quality and the failure does
not amount to a major failure.
YEAR WARRANTY
3
Warranty Details
REGISTER YOUR PURCHASE AT www.aldi.com.au/en/about-aldi/product-registration/ TO KEEP UP-TO-DATE WITH IMPORTANT PRODUCT INFORMATION
AFTER SALES SUPPORT
1300 886 649
AUS MODEL: STR-1858P PRODUCT CODE: 700496 03/2020

5
General Safety Instructions
Electrical safety and cord handling
• Electrical specifications: Ensure your outlet voltage and circuit frequency
correspond to the voltage stated on the appliance rating label. Your wall outlet
should be properly earthed and the appliance operated on a separate circuit.
• Connection: Prior to connecting or disconnecting the plug from wall outlet, turn
any control to the OFF or STANDBY position.
• WARNING: Do not immerse! To protect against fire and electric shock, do not
immerse the cord, plug or the appliance itself in water or other liquid, or expose
any of the electrical connections to water. If the appliance falls or accidentally
becomes immersed in water or any other liquid, unplug it immediately. Do
not reach into the water! Do not use this appliance after it has fallen into or
has become immersed in water. Contact our after sales support centre for
examination and repair.
• Short cord: A short cord reduces the risks resulting from becoming entangled
in or tripping over a longer cord. If an extension cord must be used, exercise
care and ensure its electrical rating is at least as great as that of the appliance.
• Protect the cord: Do not kink, bend, squash or damage the power cord and
protect it from sharp edges and heat. Do not let it touch hot surfaces, including
the machine’s hot surfaces. Make sure the cord does not hang over the edge of
a table or benchtop and nothing is placed on top of the cord.
• No timer: Do not use the appliance with an external timer or a separate remote
control system.
• Damage: Do not pick up or operate the appliance if the power supply cord or
plug is damaged. A damaged cord or plug must be replaced by appropriately
qualified personnel in order to avoid a hazard.
• Malfunction during use: If this appliance begins to malfunction during
use, press the POWER button and turn the function control to STANDBY.
Then immediately unplug the cord. Do not use or attempt to repair the
malfunctioning appliance. Contact our after sales support centre.
READ CAREFULLY AND KEEP FOR FUTURE REFERENCE
Read this manual thoroughly before rst use, even if you are familiar with this type of
product. The safety precautions enclosed herein reduce the risk of re, electric shock
and injury when correctly adhered to. Keep the manual in a safe place for future
reference, along with the completed warranty card, purchase receipt and carton. If
applicable, pass these instructions on to the next owner of the appliance.
Always follow basic safety precautions and accident prevention measures
when using an electrical appliance, including the following:
AFTER SALES SUPPORT
1300 886 649
AUS MODEL: STR-1858P PRODUCT CODE: 700496 03/2020

6
General Safety Instructions (Cont.)
• Disconnect: Switch off the appliance and unplug it from the power supply in
the following circumstances:
- after use, and if anything unusual occurs during the coffee-making process
- before cleaning, servicing or moving it (allow it to cool beforehand)
- before putting on or taking off parts (allow it to cool beforehand)
- if you will not use it for an extended time (e.g. when going on holidays).
To disconnect, turn any control to the OFF or STANDBY position and unplug the
machine from the wall outlet. Grab the plug when unplugging, do not pull the cord.
• RCD: Unless your home is already fitted with a residual current device (safety
switch), we recommend installing an RCD with a rated residual operating
current not exceeding 30mA to provide additional safety protection when
using electrical appliances. See your electrician for professional advice.
Usage conditions and restrictions
• Domestic use only: This appliance is intended for private household use only.
It is not intended for commercial or trade use.
• Intended purpose: Do not use the appliance for anything other than its
intended use, and only use it as described in this manual. Any other use and
misuse may cause fire or electric shock, or result in potential injury to persons.
• No outdoor use: Do not use this appliance outdoors.
• Accessories: Do not use this appliance with accessories that are not supplied.
The use of accessory attachments not supplied may result in fire, electric shock
or injury to persons, and will void your warranty.
• Usage restriction: The appliance is not intended for use by persons (including
children) with reduced physical, sensory or mental capabilities, or lack of expe-
rience and knowledge, unless they have been given supervision or instruction
concerning use of the appliance by a person responsible for their safety.
• Children: Supervise children to ensure they do not play with the appliance.
Close supervision is necessary when any appliance is used by or near children.
Cleaning and user maintenance shall not be made by children without
supervision.
• Unattended: Do not leave the appliance unattended while it is in use.
• Work surface: Place the machine on a stable and flat surface to avoid interrup-
tion of airflow underneath the appliance. Place it on a heat resistant surface, in
a dry environment, away from water. Do not operate it on an inclined plane.
• Clearances: Keep the appliance at least 10cm away from walls or other
objects during operation.
• Do not use in a cabinet: Do not place the appliance in a cabinet when in use.
AFTER SALES SUPPORT
1300 886 649
AUS MODEL: STR-1858P PRODUCT CODE: 700496 03/2020

7
General Safety Instructions (Cont.)
• Do not use on hot surfaces: Never place the machine on a hot surface such
as a hotplate or inside a heated oven. Never use it around an open flame.
• Water tank: Before turning the appliance on, always ensure you have filled the
water tank with fresh, cold tap water to between the minimum and maximum
markings and placed it securely back in the unit with its lid closed. Do not
open the lid or remove the water tank during operation as scalding may occur
if the lid is removed while coffee is being extracted. Wait until the unit is turned
off. Do not attempt to operate the machine without water in the tank. Let the
machine cool down sufficiently before adding more water to avoid splattering.
• Cleaning: In order for the appliance to work properly time after time, make sure
to clean it after every use.
• CAUTION! To prevent damage to the appliance, do not use abrasive or alkaline
cleaning agents when cleaning. Use a soft cloth and a mild detergent. Do not
immerse the appliance in water for cleaning. Wait with cleaning until all parts
are cool enough to touch. Clean the steam wand, portafilter, group head and
filter baskets regularly following the cleaning instructions on pages 23–25.
CAUTION: HOT!
• CAUTION: Avoid Burns! This appliance generates heat and escaping steam
during use. Proper precautions must be taken to prevent the risk of burns
from sprays of hot water or steam, fires, or other injury to persons or damage
to property.
• CAUTION: Hot Surfaces! Parts of the machine are subject to residual heat,
which means they are still hot after use. Use particular caution when handling
metal parts, such as the portafilter, the group head to which it is attached, the
filter basket, steam wand and water dispenser. Always use the silicone covers
and tabs installed on both the steam wand and the water dispenser to rotate
and swing either wand to the perfect position.
Also, be aware that there may be hot water floating on top of the used coffee
puck in the filter basket after extraction. Hold the portafilter only by its handle
and take care when disposing of the puck.
• CAUTION: Hot Liquids! Exercise extreme caution and do not attempt to
move the appliance containing hot liquids. Allow it to cool completely before
moving.
• CAUTION: High Pressure and Hot Steam! The portafilter is under pressure
during use. Do not remove it while the appliance is in use. Beware of hot steam
when using or purging the steam wand.
• Misuse: We assume no liability for any eventual damages caused by misuse of
the appliance, inappropriate handling or noncompliance with the instructions.
AFTER SALES SUPPORT
1300 886 649
AUS MODEL: STR-1858P PRODUCT CODE: 700496 03/2020

8
Product Overview
Scope of delivery
10
1
2
3
4
5
6
7
8
9
11
E
s
p
r
e
s
s
o
R
a
n
g
e
P
r
e
s
s
u
r
e
Stand by
Water
MAX
MIN MIN
MAX
Steam
LockInsert
Front view (Fig. 1)
Espresso machine
1 Cup-warming plate
2 Control panel (see page 10 for details)
3 Group head
4 Silicone cover and handle
5 Hot water dispenser with removable tip
6 Drip tray draining plate with removable silicone mat
7 Detachable drip tray with floater (full indicator)
8 Non-slip rubber feet
9 Steam wand with removable tip
10 Silicone cover and handle
11 Function control dial
12 Portafilter with plastic coated handle
13 Removable water tank with lid
AFTER SALES SUPPORT
1300 886 649
AUS MODEL: STR-1858P PRODUCT CODE: 700496 03/2020

9
Product Overview (Cont.)
NOTE: Due to continued product improvement, images and illustrations in this manual
may vary slightly from the product purchased. All images in this manual are for reference
purposes only. Parts are not necessarily pictured to scale.
12
13
Accessories
14 Single shot (one cup) and double
shot (two cup) filter baskets
15 Portafilter
16 Portafilter spouts
(1x single, 1x double) *
17 Stainless steel milk frothing jug
18 Measuring scoop
19 Solid, heavy duty tamper
20 Cleaning pin #
Other inclusions (not pictured)
Instruction manual
Quick start guide
Maintenance guide
Warranty certificate
Right side view (Fig. 2)
11
E
s
p
r
e
s
s
o
R
a
n
g
e
P
r
e
s
s
u
r
e
Stand by
Water
MAX
MIN
MIN
MAX
Steam
LockInsert
17
18
19 20
* The portafilter spouts are not pictured separately. They come detached from the
portafilter and need to be attached to its underside.
# The cleaning pin is stored at the back of the machine, underneath the water tank.
Accessories (Fig. 3)
Top view
Side view
14
15
16
AFTER SALES SUPPORT
1300 886 649
AUS MODEL: STR-1858P PRODUCT CODE: 700496 03/2020
10
A
Product Overview (Cont.)
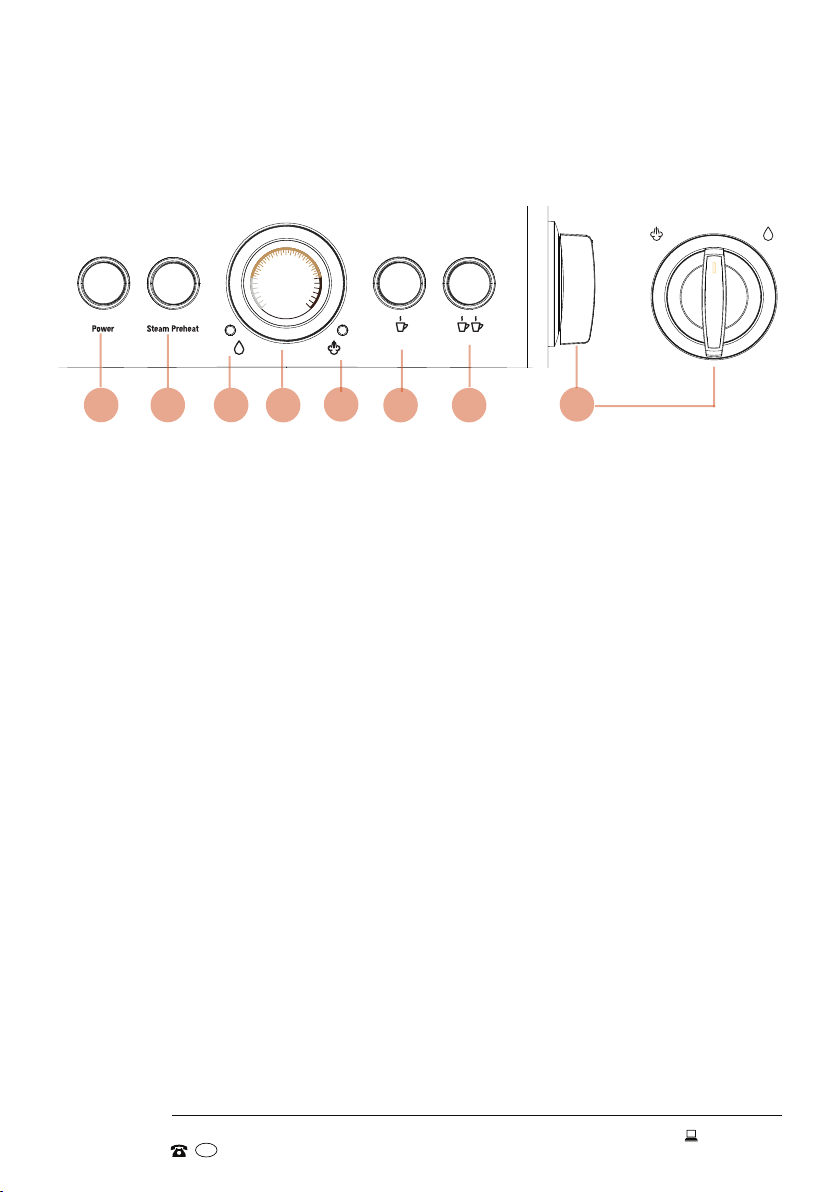
Control panel (Fig. 4)
E
s
p
r
e
s
s
o
R
a
n
g
e
P
r
e
s
s
u
r
e
Stand by
Water
MAX
MIN MIN
MAX
Steam
LockInsert
CF G
B
E
s
p
r
e
s
s
o
R
a
n
g
e
P
r
e
s
s
u
r
e
Stand by
Water
MAX
MIN MIN
MAX
Steam
LockInsert
H
DE
A POWER button: Press to turn the espresso machine on. When the system is
up to temperature, all four buttons on the control panel will be illuminated.
B STEAM PREHEAT button: To froth milk after espresso shots have been
pulled, press to activate the heater. When pressed, the STEAM PREHEAT
button will flash. As temperature is achieved and steam is built, the button
will illuminate.
C Water indicator light: As the water dispenser is activated, the water
indicator light will illuminate.
D 19 bar pressure gauge: Displays the pressure range.
E Steam indicator light: The steam indicator light will illuminate as the
pressure is directed to the steam wand.
F SINGLE SHOT (1 cup) programmable button:
Press once to initiate a 60mL extraction.
Press and hold the button for 3 seconds to adjust the volume for future
single shot extractions (refer to page 21 for details).
G DOUBLE SHOT (2 cups) programmable button:
Press once to initiate a 120mL extraction.
Press and hold the button for 3 seconds to adjust the volume for future
double shot extractions (refer to page 20 for details).
H Function control dial (Steam – Standby – Water): Once pressure is built
and the PREHEAT button is illuminated (stops flashing), turn the dial to
activate the STEAM wand.
AFTER SALES SUPPORT
1300 886 649
AUS MODEL: STR-1858P PRODUCT CODE: 700496 03/2020
11
Getting Started
Before first use
• Unpack the appliance and keep the original packaging carton in a safe place.
It will help prevent any damage if the product needs to be transported in the
future, and you can use it to store the appliance when it is not in use. In the
event that the carton is to be disposed of, please recycle it where possible.
Plastic wrapping can be a suffocation hazard for babies and young children, so
ensure all packaging materials are out of their reach and disposed of safely.
• Inspect the cord and plug for damage or wear before each use. Do not use
the appliance if the appliance or its cord has been damaged or is not working
properly. In case of damage, contact our after sales support centre.
• Read all instructions in this manual and make sure you understand all
warnings. Refer to the Product Overview, pages 8–10, to familiarise yourself with
the product and its parts.
• To remove dust from transport, wash the portafilter, filter baskets, spouts, jug
and measuring spoon in warm water and a little dish detergent. Rinse and dry.
Do not immerse the appliance in water or any other liquid.
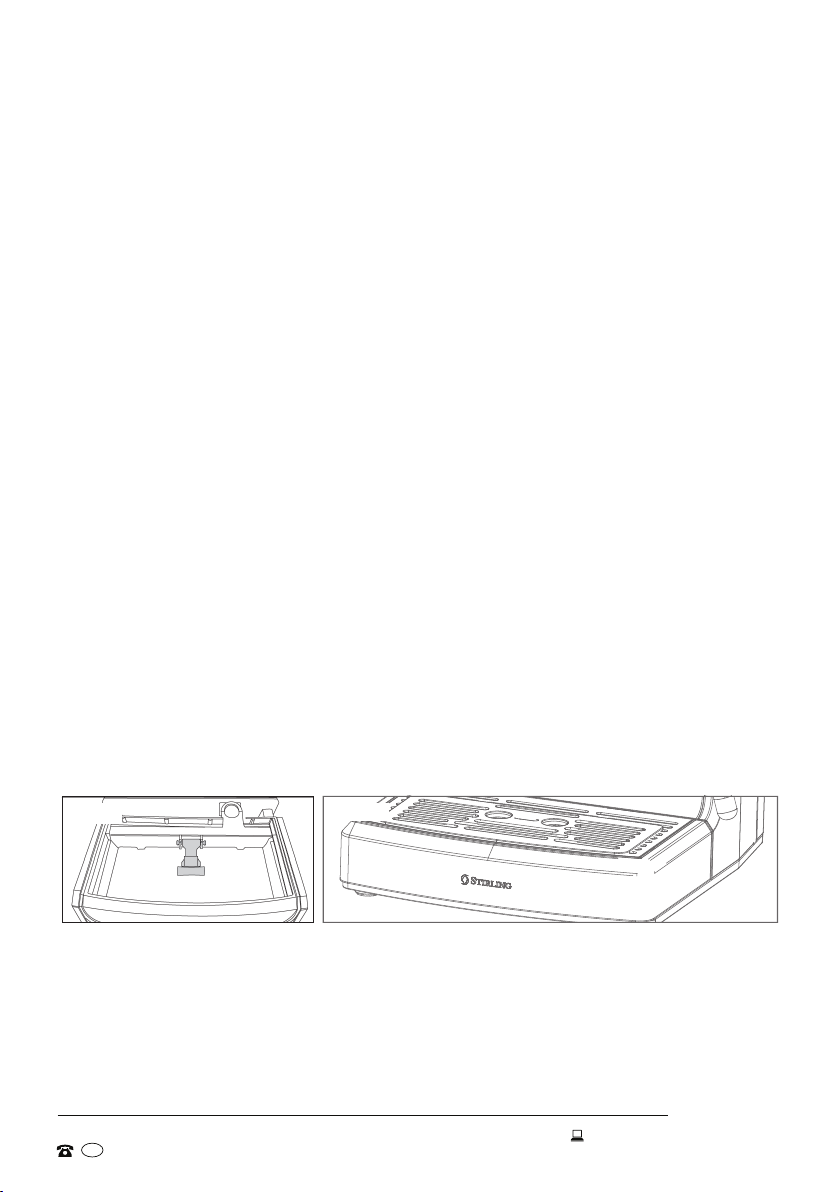
Fig. 5 Fig. 6
The drip tray
• The drip tray (Fig. 5) slides out for easy cleaning. It has a red full indicator
inside, which floats up to indicate when the tray is full of water and needs to be
emptied.
• On top of the drip tray is a removable draining plate, which is covered with a
removable silicone mat for slip resistance (Fig. 6). Use of the silicone mat is
optional.
• When too much water has accumulated in the drip tray, the red full indicator
will rise. To avoid water spillage, lift the draining plate off the tray. Carefully
slide the drip tray straight out to remove. Empty the water, rinse and wipe the
tray dry, then reassemble it into the machine.
AFTER SALES SUPPORT
1300 886 649
AUS MODEL: STR-1858P PRODUCT CODE: 700496 03/2020
12
IMPORTANT!
• Ensure there is water in the tank before you start extracting espresso or
frothing milk.
• Monitor the water level during use to ensure there is always some water in
the tank. If you leave refilling until the tank is empty, the pump may start
sucking in air from the empty water tank.
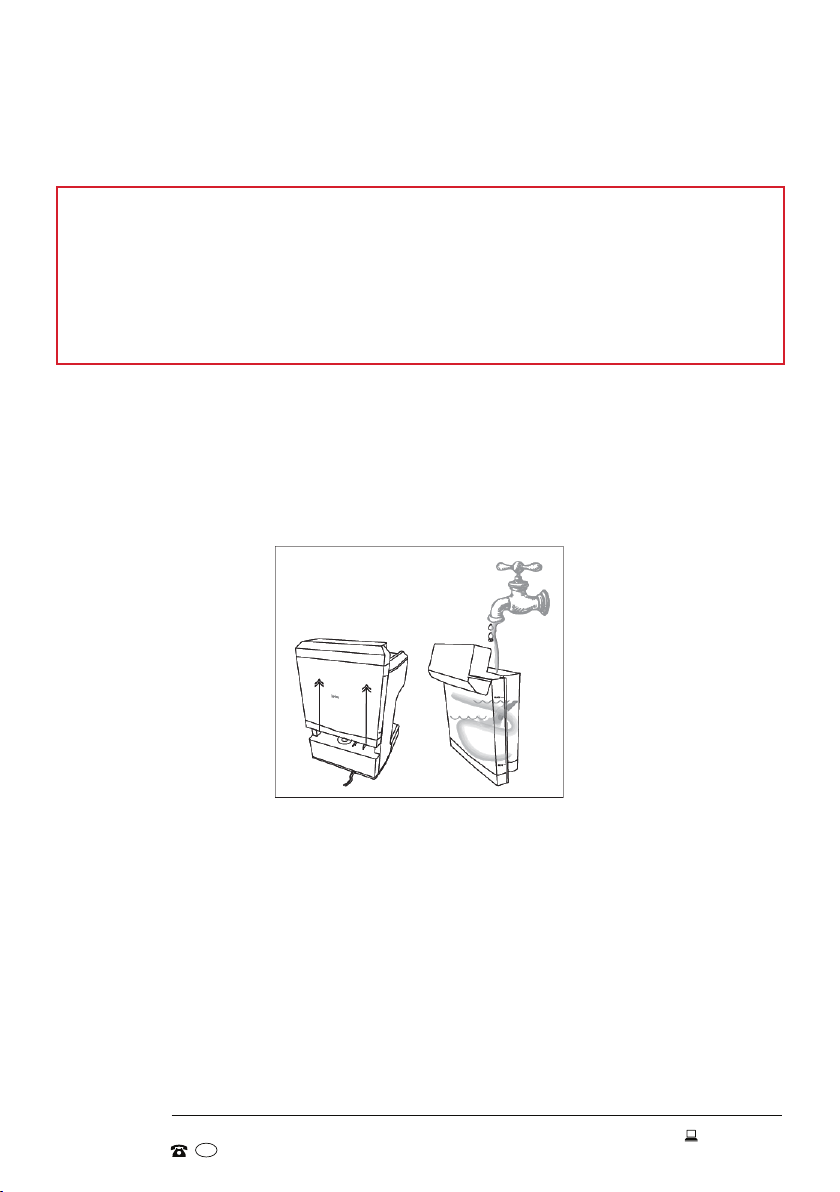
Fig. 7
Getting Started (Cont.)
Filling the water tank
Fill the water tank before switching on the espresso machine. The tank is
removable for easy filling.
1. Lift and flip open the lid of the water tank.
2. Grasp the water tank at the back of the machine and lift it up and off the unit
(Fig. 7) to fill the tank under the tap.
3. Fill the tank with cold tap water –never use warm or hot water. Replace the
water every day, or whenever you want to use the machine.
4. Rinse the tank and discard the water.
5. To prepare the machine for priming the pump, fill the tank again with cold water
to the MAX mark, then slide the full tank back into its original position. Lift the lid
to close.
Alternatively, use a jug and carefully pour water into the opening while the tank is in
place on the base of the machine, then close the lid.
AFTER SALES SUPPORT
1300 886 649
AUS MODEL: STR-1858P PRODUCT CODE: 700496 03/2020

13
Getting Started (Cont.)
Priming the pump
Before first use, please take the time to thoroughly flush the inside of the espresso
machine, as described below. This will ensure that your first cup of coffee made
with the machine tastes as well as it should.
1. Place the machine on a level surface, close to a sink to discard water.
2. Put the double shot filter basket – without any ground coffee – firmly into
the portafilter until it clicks securely into place.
3. Attach a suitable spout to the portafilter. The single spout is for a single
cup and the double spout for two cups. Just push the spout firmly onto the
espresso outlet at the underside of the portafilter. If you are using the double
spout for two cups of coffee, make sure the outlets point to the right and left
side so that you can fit a cup underneath each outlet.
4. Engage the portafilter onto the group head (refer to page 15, Fig. 9 and Fig. 10).
Make sure it is properly locked in place.
5. Centre a larger cup or mug under the portafilter. Place the steam wand’s tip
into the frothing jug. Place another empty container under the water dispenser.
6. Plug the machine into an appropriate electrical outlet, then press the POWER
button. When the system is up to temperature, all four buttons on the control
panel will be illuminated steadily.
7. Press the STEAM PREHEAT button: it will begin to flash until the temperature is
reached. Turn the function control dial to STEAM: the steam indicator light will
illuminate as the hot steam purges the line. After a maximum 45 seconds, turn
the function control dial back to STANDBY.
8. Turn the function control dial to WATER. Allow water to fill the container, then
discard. Turn the function control dial to STANDBY.
9. Press the double shot button repeatedly until the entire tank of water is
purged through the system. (You may need to empty the container during the
process.)
10. The pump is now primed and the espresso machine is cleaned. You are ready
to pull your first espresso shot.
NOTE: There may be some noise when the machine is pumping water for the first
time. This is entirely normal as the appliance is releasing air from inside the system.
The noise should stop soon.
AFTER SALES SUPPORT
1300 886 649
AUS MODEL: STR-1858P PRODUCT CODE: 700496 03/2020
14
Choosing the coffee
• Your new espresso machine can be used with pre-ground coffee, but for the
best taste we recommend you buy whole coffee beans and grind them yourself.
Coffee for espresso and other Italian coffee drinks should be dark roasted. You
may want to try a French or Italian roast.
• Using a quality grinder will ensure uniform consistency of your ground coffee.
Grind the coffee beans just before use, and only grind as much as you will need.
Coffee tastes best when it is freshly ground.
• Choosing the correct grind is a vital step in the espresso-making process and
takes practice. The coffee should be of a fine grind (it should look like salt). If the
grind is too fine, the water will not flow through the coffee, even under pressure.
Too fine a grind looks like powder and feels like flour when rubbed between
fingers. If the grind is too coarse, the water flows through the coffee too fast,
preventing a full-flavoured extraction. Too coarse a grind feels like sugar.
Instructions
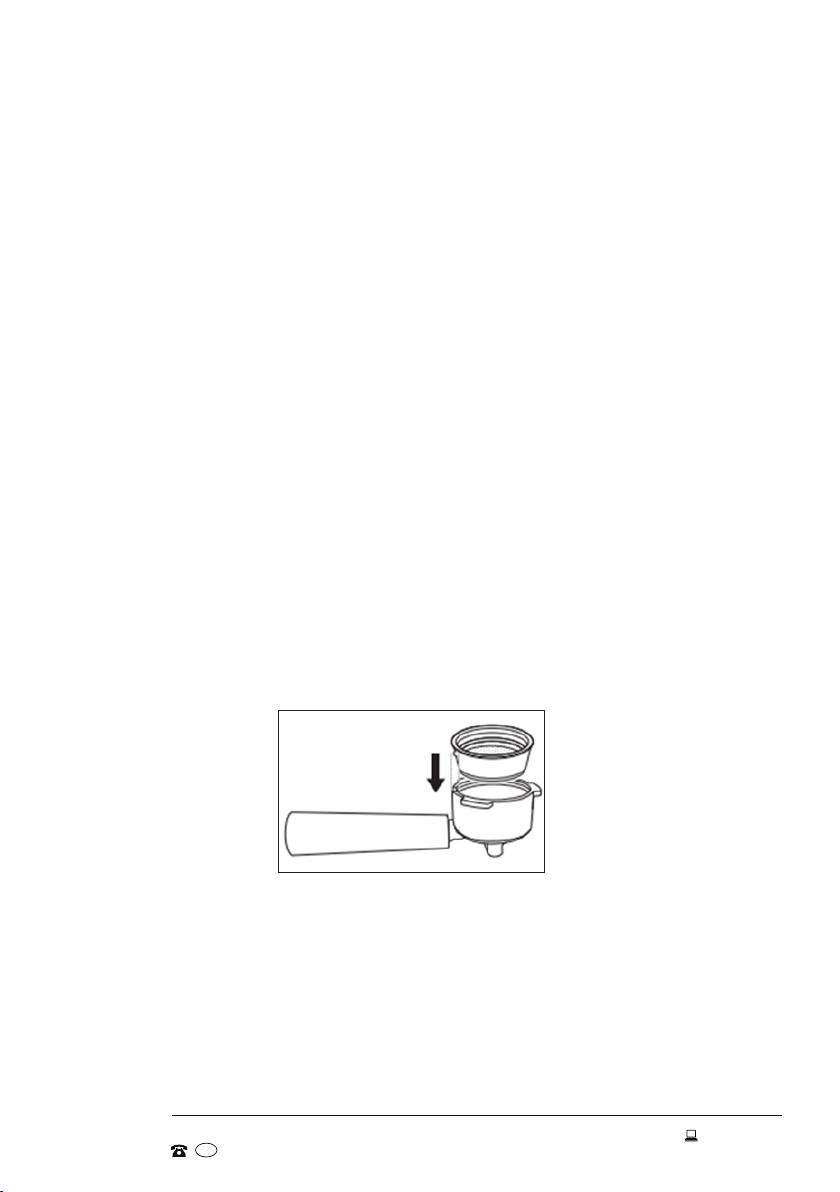
Choosing the filter basket
The espresso machine comes with two filter baskets. The shallow filter basket is
designed for a single shot of espresso and the deep filter basket for a double shot,
or for two single shots.
• Insert the selected filter basket firmly into the portafilter until it clicks securely
into place (Fig. 8).
Fig. 8
AFTER SALES SUPPORT
1300 886 649
AUS MODEL: STR-1858P PRODUCT CODE: 700496 03/2020
15
Instructions (Cont.)
Pulling an espresso
The secret to a great-tasting espresso is all about achieving a perfect balance of
taste, temperature and mouthfeel. To help you achieve that perfection, make sure
all parts of your machine (including the pumping system) are clean and preheated,
the water tank is filled with fresh, cold tap water, and your coffee is fresh and
appropriately roasted and ground for espresso.
Step-by-step coffee-making instructions
1. Fill the water tank with the desired amount of cold tap or filtered water,
ensuring it is above the MIN and below the MAX marking in the tank (see
page 12). (You should have enough water in the tank for the coffee plus a first
blank shot for preheating.) Close the lid.
2. Connect the machine. Plug the espresso machine into an appropriate
electrical outlet.
3. Preheat your cup(s). Place the empty cup(s) you are going to use on the cup
warming plate on top of the espresso machine.
4. Choose the filter basket and insert it firmly into the portafilter (see page 14).
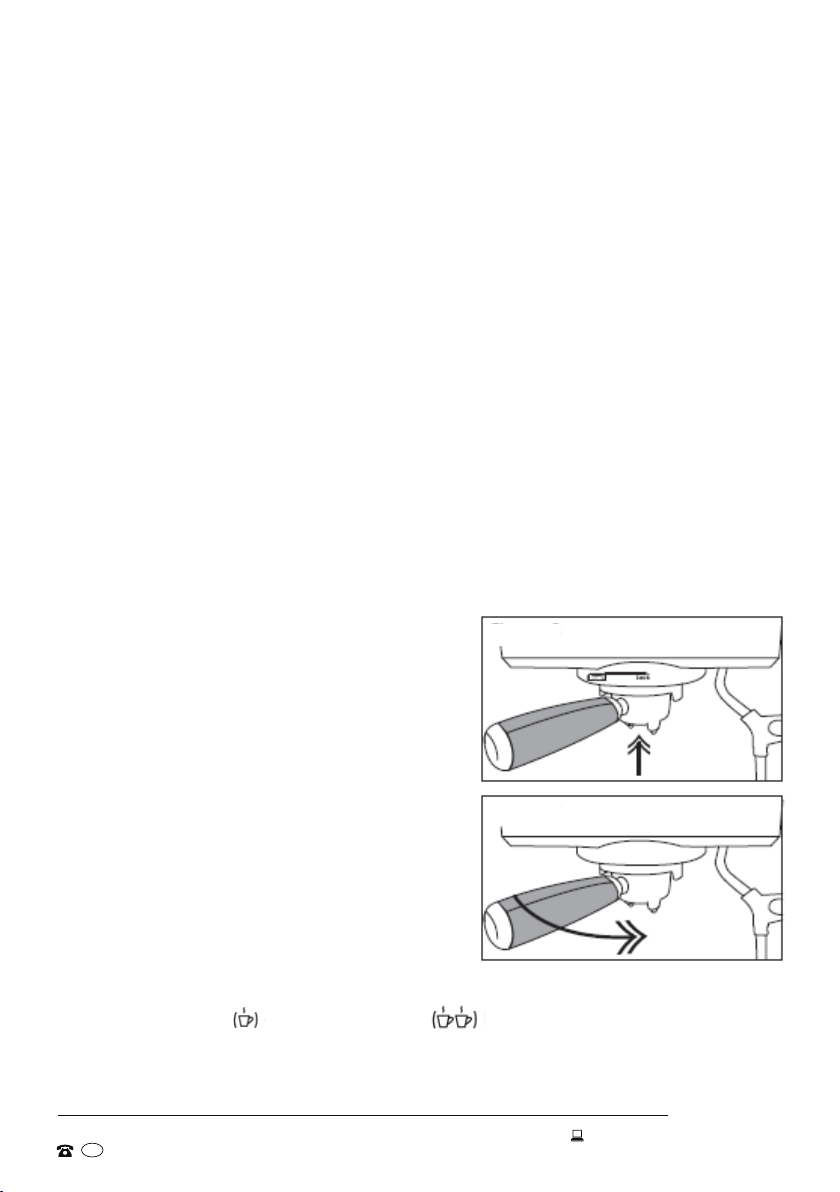
5. Engage the portafilter onto the group head.
Align the portafilter handle with the
INSERT mark on the group head (Fig. 9),
then turn the handle anticlockwise (to the
right) until the portafilter handle is facing
the front and lined up with the LOCK
mark (Fig. 10). Make sure the portafilter is
sealed and locked securely into its place.
6. Place your cup(s) on the drip tray
draining plate, ensuring the espresso
spout(s) is/are pointing into the cup(s).
7. Press the POWER button to turn the
machine on. When the appropriate
temperature has been reached, all four
buttons on the control panel will be
illuminated steadily.
8. Run a blank shot to preheat the cup and portafilter. Press either the
SINGLE SHOT or DOUBLE SHOT button. The motor will sound.
The spout (or both) will stream hot water (a blank shot) to warm the cup(s) and
portafilter and then turn off.
Fig. 9
Fig. 10
AFTER SALES SUPPORT
1300 886 649
AUS MODEL: STR-1858P PRODUCT CODE: 700496 03/2020
16
Instructions (Cont.)
9. To remove the portafilter from the group head, turn the handle clockwise (to
the left) to UNLOCK. The portafilter will drop down from the group head.
CAUTION! The portafilter is hot after preheating and during use. Handle it
with utmost care. Only hold it by its plastic handle, and take particular care
when adding coffee and wiping the rim.
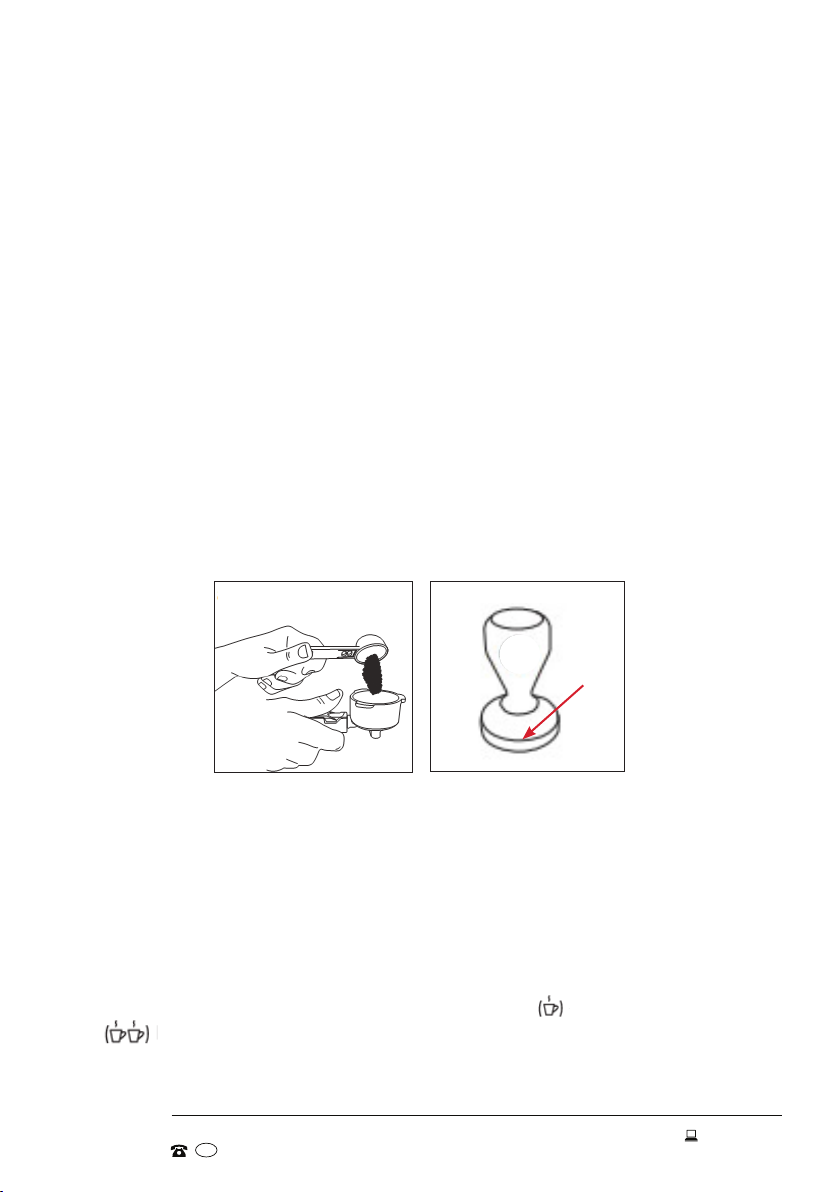
10. Add coffee. Using the supplied measuring scoop, add an appropriate amount
of fresh, finely ground espresso coffee to the filter basket (Fig. 11):
1 level measuring scoop = 1 espresso (single shot)
2 level measuring scoops = 2 espressos (or 1 double shot)
Do not overfill the filter, otherwise the portafilter will not lock properly in place.
11. Tamp. The supplied tamper is particularly heavy to help you pack the coffee
properly. Ensure the tamper is completely dry. Use it to gently press the coffee
into the filter basket, until the top of the plate (see the arrow in Fig. 12) is flush
with the top of the filter basket. To achieve a smooth and level surface, tamp
the coffee evenly and firmly with a final polish or swirl. Remove any excess
coffee from the rim to ensure proper fit under the group head.
NOTE: When tamping for a double shot, only tamp after you have filled the
filter basket. Tamping between measures may create a layer in the coffee
which may hinder extraction.
12. Engage the portafilter. Align the portafilter handle with the INSERT symbol
on the group head, then turn the handle anticlockwise (to the right) until it is
sealed and securely locked (see Fig. 9 and 10).
13. Add your cup(s). Empty the hot water from preheating out of your cup(s)
and place it/them on the drip tray draining plate, making sure the espresso
outlet(s) at the underside of the portafilter are pointing into the cup(s).
14. Pull the espresso. Press either the SINGLE SHOT or DOUBLE SHOT
button. The motor will sound. The spout(s) will stream thick, rich espresso.
Fig. 11 Fig. 12
AFTER SALES SUPPORT
1300 886 649
AUS MODEL: STR-1858P PRODUCT CODE: 700496 03/2020

17
Instructions (Cont.)
EXERCISE CAUTION TO AVOID SCALDING!
• Take care when handling the metal parts, they may still be hot. The
portafilter may also still have some hot water floating on top of the coffee
grounds, especially after pulling a double shot of espresso.
• Do not attempt to remove the portafilter during the coffee extraction process,
or when any button on the control panel is flashing.
IMPORTANT!
• Keeping your espresso machine clean and thoroughly rinsed is critical in
pulling the perfect shot. Always run water through the group head and purge
the steam wand after each use.
• Refer to pages 23–25 for thorough cleaning instructions for all parts of the
machine.
IMPORTANT! The espresso machine is preset to deliver a 60mL single or
120mL double shot of espresso, before automatically stopping the flow. If you
want to adjust this preset volume, please refer to page 20 for instructions.
15. Enjoy! Your espresso is now ready for your enjoyment. Be careful when
drinking it as it will be hot. If you want to make a cappuccino, please refer to
page 18 for milk-frothing instructions.
16. Remove the portafilter. Holding the portafilter by its plastic handle, slowly
turn it to the left and move it carefully out from under the group head.
17. Remove the espresso puck. Gently tap the side of the portafilter against a
vertical surface, or against the knock bar in a specially designed coffee grounds
bin, to discard the used espresso puck.
18. Remove the filter basket. Once the filter basket is empty, take it out of the
portafilter.
19. Rinse and wipe the filter basket and portafilter thoroughly before reuse or
storage. If you have finished with the machine, do not store the portafilter in
the group head. This can adversely affect the seal between the group head
and the portafilter while extracting coffee.
20. Disconnect. Press the POWER button to turn off the espresso machine, then
unplug it from the power supply. (If you do not turn off the machine, it will turn
off automatically after 30 minutes without operation.)
AFTER SALES SUPPORT
1300 886 649
AUS MODEL: STR-1858P PRODUCT CODE: 700496 03/2020

18
Instructions (Cont.)
Frothing milk
Your new espresso machine is equipped with a steam wand for easy production
of textured milk for Italian-style milk coffees (cappuccino, caffè latte), or for hot
chocolate. It is equipped with a silicone cover and tag for handling the hot steam
wand, and a frothing tip which is removable for cleaning.
For best results
• Use the supplied stainless steel jug for frothing milk.
• Both the milk and jug should be cold for frothing. Do not use a jug that has
just been washed in warm water.
• The milk will be heated during texturing, but it must not be allowed to
reach boiling point. Milk should ideally be heated to just below 60°C, or to
a maximum 70°C if you want extra hot milk. For best results, insert a milk
frothing thermometer into the milk during frothing.
• Start with making an espresso, then pour the hot, textured milk into the coffee.
• Clean the steam wand after every use.
Step-by-step milk-frothing instructions
The following instructions are for preparing cappuccino:
1. Pull an espresso. The first step in making cappuccino is to pull an espresso
shot. Follow the instructions on pages 15–16, using a cappuccino cup of
approximately 170–220mL capacity. Keep the portafilter fully engaged under
the group head. Place the cup with the espresso on the cup-warming plate on
top of the machine to keep it warm.
2. Prepare the milk. Fill the supplied stainless steel frothing jug no more than
one-third full with fresh, cold milk and
place it next to the espresso machine.
IMPORTANT: When texturing milk, the
volume will double. Do not overfill the jug.
3. Transition to steam. Press the STEAM
PREHEAT button (Fig. 13). It will start
flashing and illuminate solid when the
temperature is achieved and steam is built.
CAUTION!
After extracting espresso, the steam wand is hot. Always use the silicone
covers and tabs installed on both the steam wand and the water dispenser to
rotate and swing either wand in the desired position.
Fig. 13
Power Steam Preheat
AFTER SALES SUPPORT
1300 886 649
AUS MODEL: STR-1858P PRODUCT CODE: 700496 03/2020

19
Instructions (Cont.)
4. Purge the steam wand. Turn the function
control dial to STEAM (Fig. 14). Make sure
the steam wand is over the drip tray. Once
steam starts to come out from the wand,
and not water, you can change the dial
back to STANDBY.
5. Start frothing. After purging the steam
wand, insert the frothing tip about two
centimetres into the milk and turn the function control dial back to STEAM.
Hold the frothing jug at an angle, and make sure the wand is around one third
from either edge of the jug. Move the jug round with a circular motion for
about 40–45 seconds, making sure the frothing tip remains submerged during
the milk-texturing process. To create dense froth with small, closely packed
bubbles, the steam wand should barely break the milk’s surface.
6. Finish frothing. When the milk is textured to your liking and has reached the
desired volume and temperature, turn the function control dial to STANDBY
and drop the jug down and away from the steam wand.
7. Pour. Swirl the milk around for several seconds to incorporate the milk at the
bottom with the microfoam on top. Tap the frothing jug on the benchtop until
the milk appears shiny and few bubbles remain. Pour textured milk as soon as
possible. Swirl the espresso slightly to break the surface tension of the crema.
Slowly introduce the microfoam, integrating it with the espresso.
8. Straight after texturing milk, wipe the steam wand with a damp cloth.
Take care to avoid getting burnt, the metal parts are very hot. Use the silicone
tab to swivel the wand back over the drip tray.
9. IMPORTANT! To avoid milk building up inside the steam wand, purge the
steam wand after every use. Make sure the steam wand is over the drip tray.
Turn the function control dial to STEAM and leave on for a few seconds, then
turn the dial back to STANDBY.
10. Enjoy! Pour the hot milk into the cup containing the espresso and if you
wish, spoon some milk froth on top. Sprinkle with grated chocolate or
instant chocolate powder, if desired. Your cappuccino is now ready for your
enjoyment. Be careful when drinking it as it will be hot.
WARNING!
Never touch the steam wand while frothing milk. It is very hot and will burn skin.
Fig. 14
Steam Water
Standby
AFTER SALES SUPPORT
1300 886 649
AUS MODEL: STR-1858P PRODUCT CODE: 700496 03/2020

20
Instructions (Cont.)
Dispensing hot water
You may also use the espresso machine to heat water, which you can add to an
espresso to create a long black coffee.
1. Preheat the machine following steps 1–7 on page 15.
2. Transition to steam. Press the STEAM PREHEAT button. It will start flashing
and illuminate solid when the temperature is achieved and steam is built.
3. Purge the water dispenser. Turn the function control dial to WATER. Make
sure the water dispenser is over the drip tray. Once water starts to come out
from the dispenser, turn the dial back to STANDBY.
4. Dispense water. After purging the water dispenser, swivel the wand outward
over your cup and turn the function control dial to WATER.
5. Stop the water flow. When you have enough hot water in the cup, turn the
function control dial back to STANDBY to stop the flow.
TIP: To retain as much crema as possible, dispense hot water into the cup first,
then extract an espresso shot into the water.
Adjusting the preset espresso shot volume
The espresso machine is preset to deliver a 60mL single or 120mL double shot of
espresso, before automatically stopping the flow. If you want to adjust this preset
volume, please proceed as follows:
1. Preheat the machine following steps 1–7 on page 15.
2. Make sure you have placed a cup underneath the portafilter spout(s).
3. Press and hold the button for the shot volume —single or double —
you want to adjust for 3 seconds. Water will begin to flow.
4. Once you have the desired volume, press the button again to stop the flow of
water. The new volume is now set and can be reprogrammed at any time.
5. To reset the shot volumes to factory default settings, press and hold both the
single and double shot buttons until you hear two beep sounds. The
volumes are now reset to 60mL and 120mL. This may also solve any issues
relating to function errors.
AFTER SALES SUPPORT
1300 886 649
AUS MODEL: STR-1858P PRODUCT CODE: 700496 03/2020
Table of contents
Other Stirling Coffee Maker manuals


