Stones Sound Studio S200W-V2 User manual

STONES SOUND STUDIO S200W-V2 INS 14-2013.doc
STONES S200W-V2
USER MANUAL
Subwoofer Amplifier
with
TWIN A-V FILTER CURVES

STONES - S200W-V2
2
Installation and Operation Instructions
By Russell Storey
FEATURES
SSS NEW upgraded STONES S200W-V2 Amplifier
Excellent for low impedance sub driver loads single or twin 10" 12" 15" subwoofers.
Speaker sockets with high level in
Very stable under all loads
TWIN A-V FILTER CURVES
Heavy duty speaker cable
Gold plated RCA low level inputs
180/0 degrees phase switch.
Power / auto On switch
Manual control of Volume (Level) and Frequency
Green LED Position Indicators and Power On indicator
Improved signal to noise
Dynamic range
Bass transit speed
OVERVIEW
Thank you for purchasing the 200 Watt Subwoofer Amplifier. Ideal for building subwoofer projects for
audio and home theatre systems. This amplifier includes both high and low level inputs, phase switch, auto
on/off (activated by input signal) and a handy control that adjusts the volume level and a unique (Audio
and Video) switch selector that enables the electronic twin low pass filters to vary the low pass cut off
slope and frequency. When switched to Audio (used for Music Blu-ray, DVD and 2 channel systems) the sub
amplifier goes flat to 5HZ .With the switch set to Video position there is a filter at 35 HZ to reduce
subwoofer cone excursion in the 0 to 17 Hz region but this, in conjunction with the frequency control still
enables excellent Home Theatre LFE effects and tight bass.
The amplifier sums the right and left stereo inputs to a mono output, so that only one amp is required per
system. It also features a 12dB high pass filter (125Hz, 8ohm) output for satellite speakers if need be.
The amp has thermal overload and fuse protection for years of reliable use

STONES - S200W-V2
3
QUICK SETUP
CONTROLS & RECOMMENDED SETTINGS
1. PWR/PRT SET SWITCH TO “ON” (OFF / AUTO /ON/)
2. LEVEL (GAIN) SET TO “9 O’clock ”
3. FREQ ( Frequency) SET TO “9 O’clock
4. PHASE SET SWITCH TO “REV” ( REV /NOR )
5. AUDIO /VIDEO SET SWITCH TO “AUDIO”
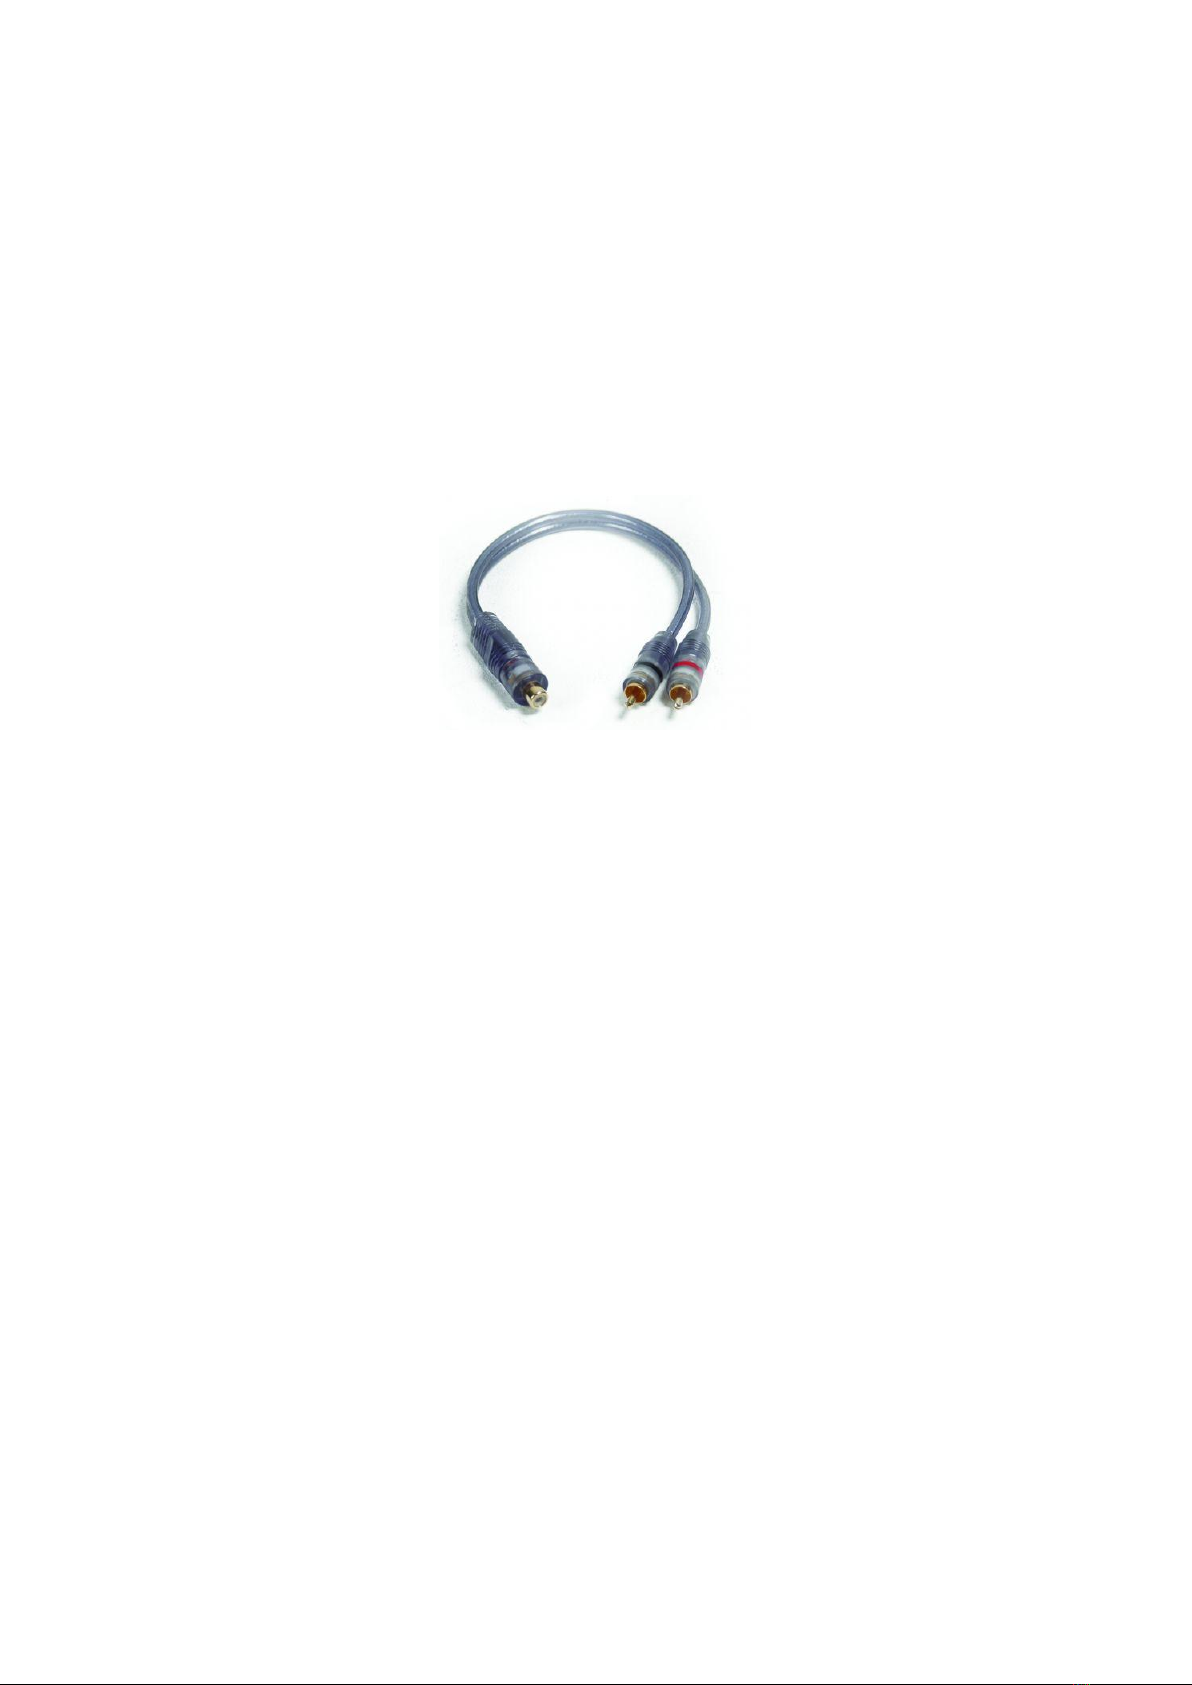
6. LOW LEVEL IN
Connect an RCA ( Y ) cable (*see page 9) to connect both the Left and Right Channel inputs together
to the input of the subwoofer amplifier then connect the other end of the cable to the Home
Theatre receiver “SUB OUT” .
7. PWR/PRT -- POWER SWITCH (OFF / AUTO /ON/)
When the power switch is in the auto on position, the amplifier will automatically turn on when a
signal is present. Note: In auto on/off mode
Russell‘s Tip 1
A/ I recommend that you leave the (OFF / AUTO /ON/) switch in the (ON) position and turn the
subwoofer power On and Off at the wall outlet when not in use. Do not leave the subwoofer or equipment
on and then go out or on holidays.
Why? This prevents main grid power surges and high voltage spikes from storms etc turning the subwoofer
unit on and off at random.
B / Power 240 V to System
If running on a 240V generator or Solar power or using Grid power in rural areas always disconnect the
mains power plugs at the wall socket or power outlet when not using the subwoofer or your Home Theatre
TV sound system. This will prevent damage to the equipment from power brown outs, voltage surges,
lightning and storm damage.

STONES - S200W-V2
4
(LEVEL) CONTROL - volume
Adjusts the output level of the Subwoofer Amplifier.
Russell‘s Tip 1: For LEVEL
#### Warning #### Don’t set the volume past 12 O’clock with the Level Control. This amp is a deceivingly
powerful amplifier and can and will damage some subwoofer drivers. If you don’t have enough level from
the sub amp it’s the HT amplifier or integrated amplifier line signal level out is not high enough to drive the
STONES 200 Watt Subwoofer Amplifier set the levels in the HT Menu >> see below .
NB For best sound quality I recommend connecting with the High level speaker inputs to the sub amplifier.
See Instructions below: -
Russell‘s Tip 2 (LEVEL) CONTROL - Volume
NB. Warning
With home theatre movies & sound effects, levels are recorded all over the place. On DVD & Blu ray it is
possible to blow up a subwoofer speaker If you have the volume or freq set to high on some movies or
music CD’s, Blu-ray & DVD’s.
I recommend that you initially leave the LEVEL setting at 9 o’clock until you get the feel of the Subwoofer
with movies over a period of a few weeks.
Pre-set your HT receiver Menu SUBWOOFER level to lower to all the other channels L, C, R and rear effects
channels to begin with.
If you have a DTS and Dolby LFE effects level setting in the HT menu set this to Max. Remember to turn the
Subwoofer On in the Speaker Settings... Some HT receiver’s auto turns the SUB off after powering On/Off
FREQUENCY CONTROL
Continuously variable from 15Hz to 150Hz at 24 dB/Octave LF and 12db HF
Russell‘s Tip 2:
Set the Frequency control to 9 o’clock and leave it there always...
Some types of music may need ¼ of a turn more but always reset the control to 9 0’clock after use.
## Why? Based on my experience with AV systems this will enable the best quality bass on any kind of
music and HT sound effects.
Setting the Frequency Control to 9 O’clock also reduces room modes (bass boom) in most room shapes
and tightens the bass. Setting the Frequency Control past 12 o’clock position can and will create room
modes (bass boom) in most room shapes and enable honky hollow bass sound.

STONES - S200W-V2
5
PHASE SWITCH Selectable between 0° and 180°. This will aid in subwoofer room placement.
Russell‘s Tip 3: PHASE
The correct position will be the one that provides the most apparent/loudest bass output level and
provides fast tight bass.
Set Phase switch to REV “” Reverse
## In the Home Theater Receiver Menu Turn OFF (Centre and Rear Effect speakers) and set up the
Subwoofer phase with the front left and right speakers running ONLY
Then Play back a CD or DVD with a fast tight bass guitar and switch the phase switch back and forth whilst
listening to the music at your normal listening position
Get a friend to switch the phase switch for you whilst listening at your normal position (lounge chair) or
you can sit on top of the subwoofer box and switch it yourself whilst looking at the Front speaker. With the
grills off you will see the speaker cones move in sync with the Subwoofer cone and the sound quality
improve in one or the other phase switch positions.

STONES - S200W-V2
6
STONES S200W-V2 200W Subwoofer Amplifier - Audio and Video Filter curves

STONES - S200W-V2
7
HUM & NOISE Home Theatre or 2 Channel Amplifier
As we have a mixture of different earth points around the house via TV antennas, satellite dishes, Foxtel,
set top boxes etc. and also combine this with the use of 2 pin (no earth) and 3 pin (earth) equipment in our
systems, sometimes a low or high level 50 Hz hum comes out through the subwoofer or main L&R
speakers.
SOLUTION :
Locating what is creating the earth loops or hum in your sound system can be a very time consuming,
frustrating and expensive even for expert technicians with a plethora of recommended techniques and
gadgets. On my own Home Theatre Sound System I hook up All my equipment (TV, Satellite, Home Theatre
amplifier, DVD, Blu-ray, CD player, computer etc.) via one protected multi power outlet board) from a
single 240V power outlet socket on the wall.
Between the 240V wall socket and the protected multi power outlet board, I insert (in series) a 240V to
240V 250 Watt Isolation Transformer. Bingo! This works!! Another benefit is you only have one switch on
the wall to turn off all the equipment after use and if there is a bad storm or lightning about you can
quickly pull the plug out of the wall to protect all your equipment in one go.
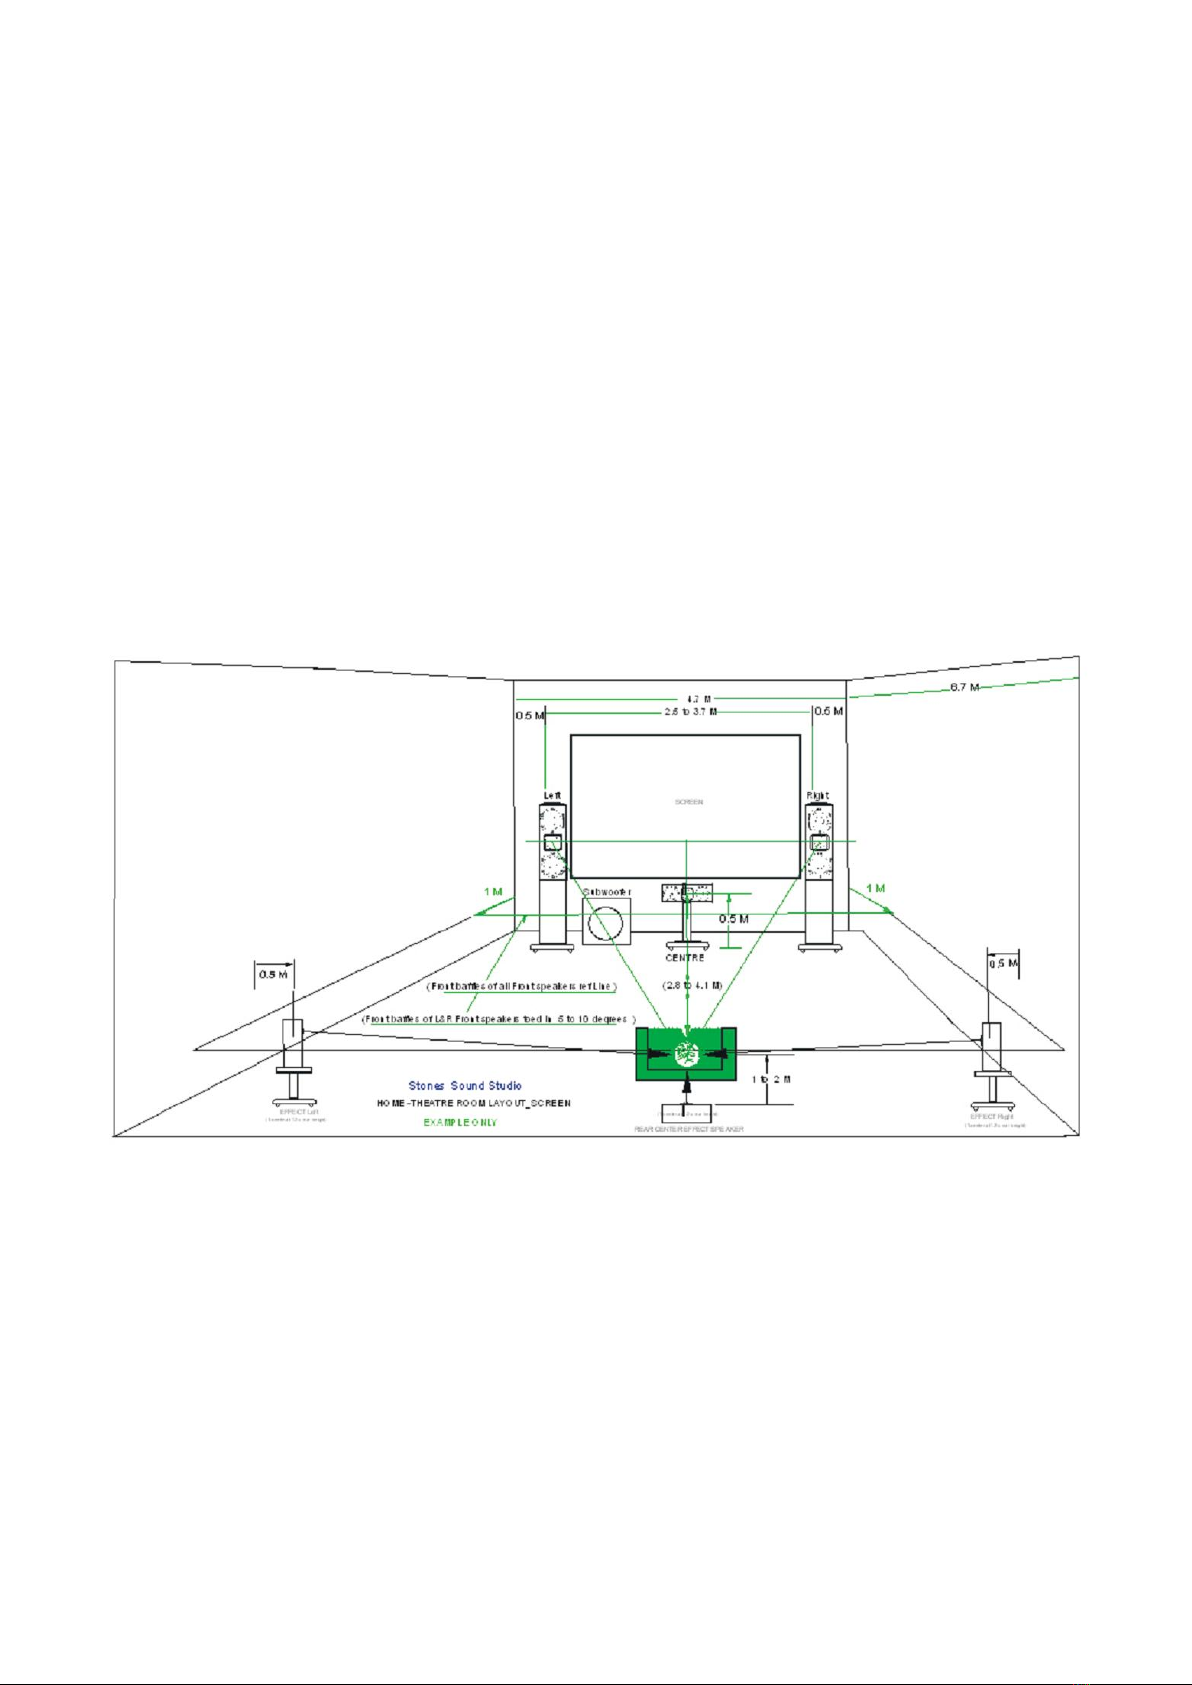
ROOM LOCATION AND SUBWOOFER HEIGHT ABOVE THE FLOOR
Russell‘s Tip 4:
Subwoofer needs to be 450mm out from the rear and adjacent side walls to enable tight bass.
Always keep the subwoofer away from the corner of a room; the corner of the room will increase the bass
but cause poor quality bass and Bass-Boom (LF room modes)!!
Experiment with Sub height above floor < forget the feet on the box >. Try sitting the Subwoofer box up on
top of a 60 to 70 mm thick phone book. This will tighten the bass and reduce room modes and boom
dramatically!! You can make your own DIY Centre Stand for the subwoofer. I recommend you fill the inside
cavity if there is one with lead and fit this to a 12mm thick rubber on the base.
STONES - S200W-V2
8
STONES Recommended HT and Subwoofer Room location V2 2010
STONES - S200W-V2
9
Input/Outputs
LOW LEVEL IN:
These are line level RCA inputs used to connect from the Home Theatre (Sub out), RCA line out OR pre-
amplifier outputs to the LOW LEVEL INPUTS on the S200W V2 Subwoofer Amplifier.
Russell‘s Tip: Use an RCA (Y) cable to connect both the Left and Right Channel inputs together.
Why? This gives a 6db level boost to the input of the Subwoofer Amplifier. The cable can be up to 5M long
LOW LEVEL OUT:
This line level RCA output provides a full range (20Hz-20kHz) output and is used to connect “daisy chain”
the line level signal to other amplifiers.
Note: LOW LEVEL OUT is only active when a signal is present at the low-level input.

STONES - S200W-V2
10
SUBWOOFER SPEAKER CONNECTIONS:
Connect the Subwoofer speaker to the Subwoofer amplifier using the supplied speaker cable with push on
speaker connectors marked speaker negative (-) and positive (+).
Russell‘s Tip: Solder speaker leads to Subwoofer Speaker as this enables most reliable connection
compared to push on connectors which can vibrate loose with very low frequencies inside the cabinet.
SUB AMPLIFIER SPEAKER LOAD (2, 4 or 8 ohm)
Russell‘s Tip: Subwoofer Speaker Impedance (DC or AC)
Some makes/brands of subwoofer drivers (specified at 4 Ohms Nominal) voice coil resistance can and
does go below 2ohms (DC or AC) especially “dual voice” coil types or when 2 x subwoofer drivers are
wired in parallel.
The subwoofer driver and configuration of wiring above needs a special amplifier that will drive 2 ohm
loads.
NB. This amplifier is not designed to drive 2 Ohm loads.
SUBWOOFER AMPLIFIER ( Cut-out Hole and screw size) = 217 x 217 mm
Russell‘s Tip:
Some amplifier modules vary in hole cut out size.
Measure amplifier sealing edge. e.g. Say it’s 17mm wide (subtract this from the outside Height &Depth)
to get the hole cut out size. Cut a sample hole in a piece of scrap timber to test best fit before you cut the
hole in the sub box and say Ooops!!!!!!!!!! Wrong size
I recommend rebating the sub enclosure with a router so the amplifier plate sits flush with the cabinet.
This provides a better look and seal.
NB. User Option Use of long chipboard screws to secure the amplifier to the subwoofer enclosure will
minimize air leaks around the gasket

STONES - S200W-V2
11
SPECIFICATIONS
STONES S200W-V2 Subwoofer Amplifier
This Subwoofer is designed to operate with 4 to 8 ohms Nominal speaker loads and NOT 2 Ohm loads.
Rated Power Output: 200 Watts
Signal to Noise Ratio: 95 dB
Amplifier Dimensions: 250 x 250 mm
Amplifier Cut-out: # 217 x 217 mm # Measure Subwoofer unit as dimensions may vary
Voltage: 240 V AC
Weight: 5.5 Kg

STONES - S200W-V2
12
STONES - S200W-V2
13
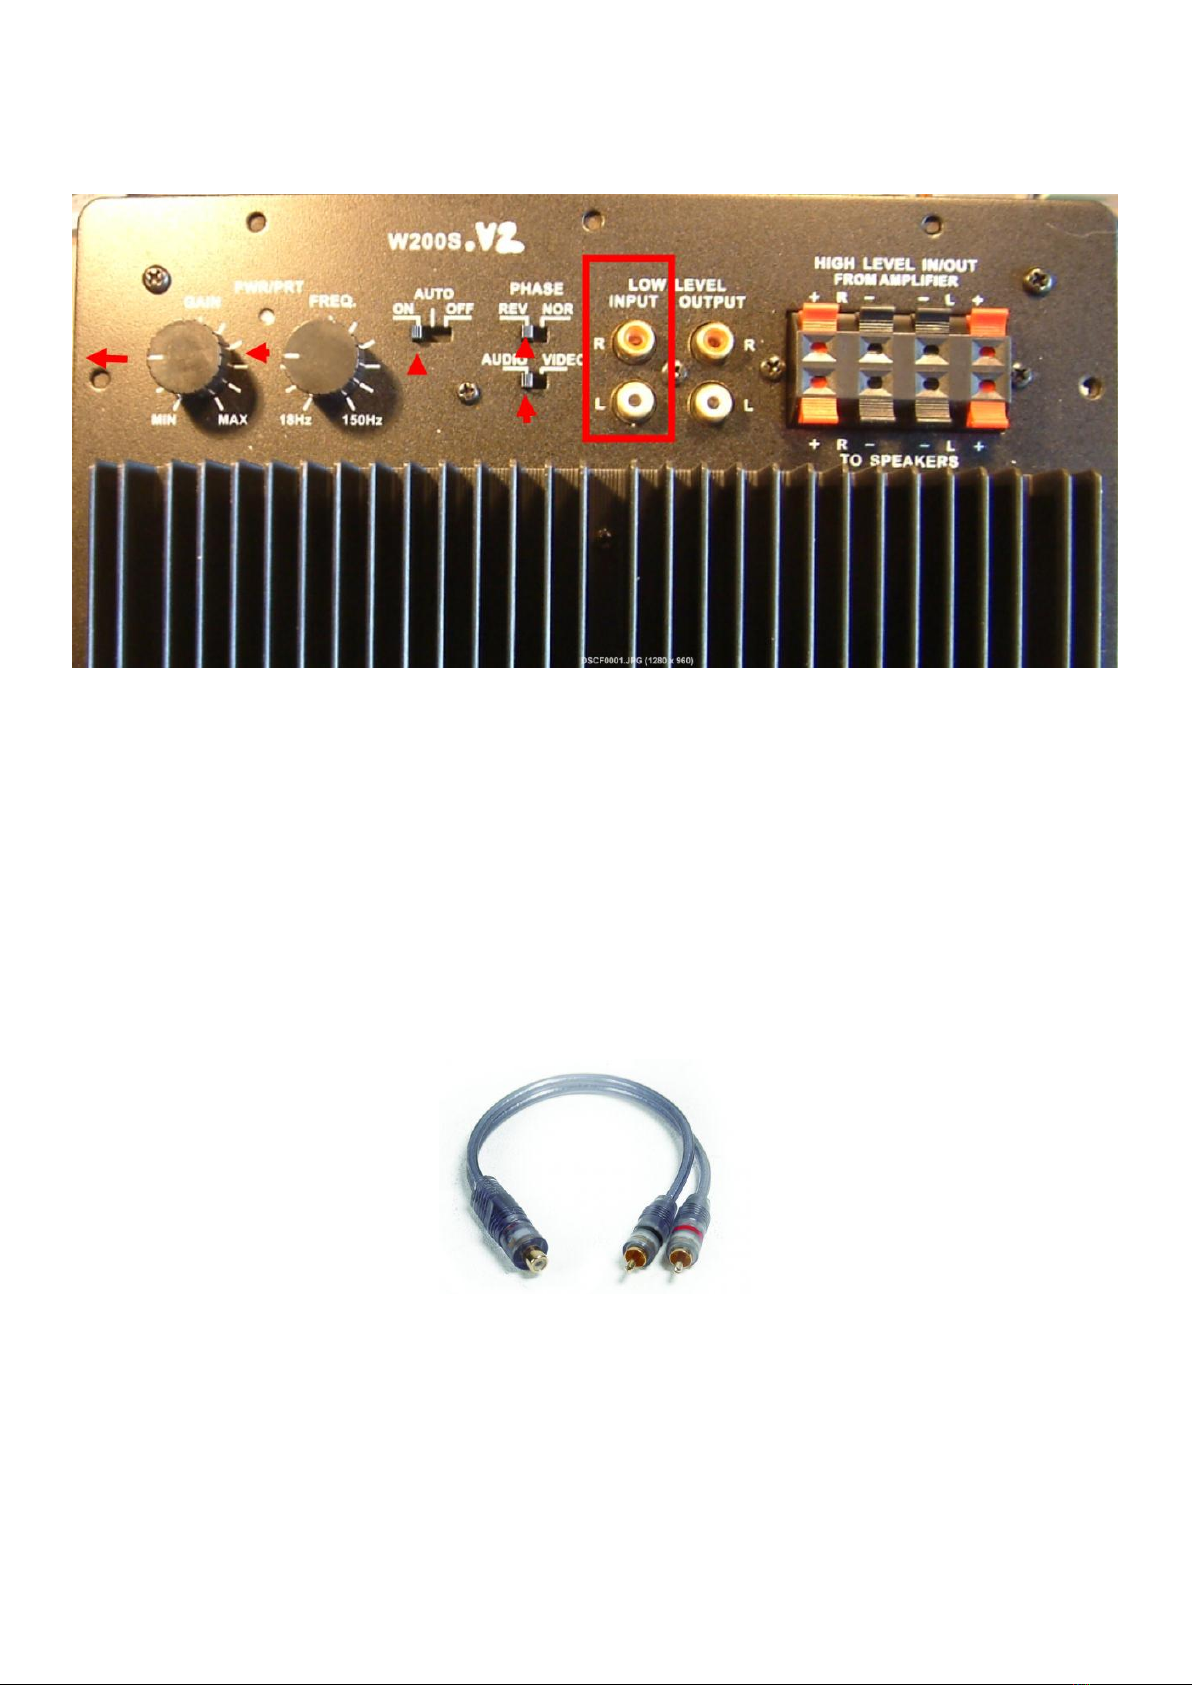
RECOMMENDED SETTINGS FOR BEST SOUND using an RCA cable from the Sub Out on Home Theatre
receiver connected to the LOW LEVEL inputs of the S200W-V2 Subwoofer amp
LOW LEVEL IN:
Wiring Diagram Options
These are line level RCA inputs. Use to connect from the Home Theatre (Sub out) RCA line out OR pre-amplifier outputs.
Russell‘s Tip : Use an RCA ( Y ) lead to connect both the Left and Ri ght Channel inputs together this gives a 6db level boost
to the input of the subwoofer amplifier . The cabl e can be up to 5M long
STONES - S200W-V2
14
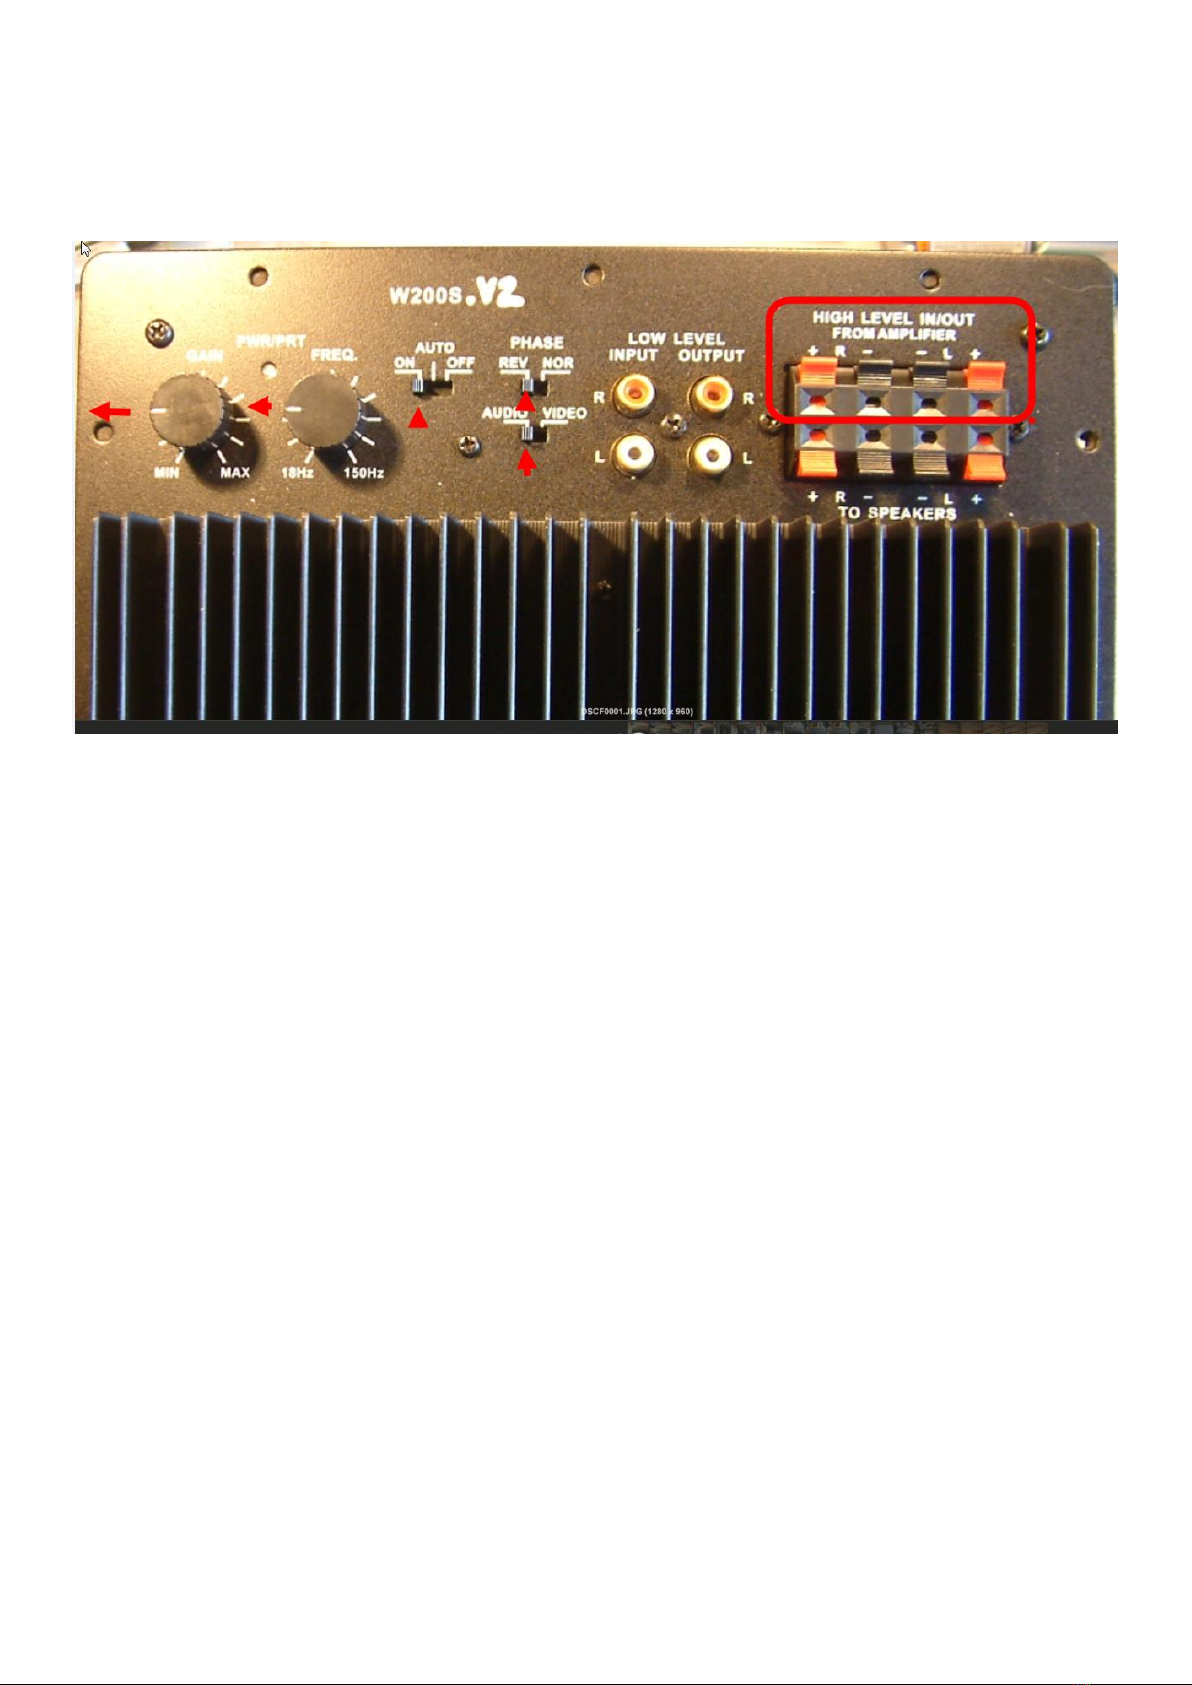
HIGH LEVEL IN: HOME THEATRE and STEREO AUDIO SETTINGS FOR BEST SOUND --- Using speaker cable
high level input to subwoofer amplifier.
Speaker Level Input. Input connects directly to receiver via speaker cables.
Russell‘s Tip: Use high level inputs to achieve the best bass transients and quality for music based
systems NOTE. The HIGH LEVEL IN on the S200W-V2 is a high impedance “ signal input only “ and will not
affect the sound quality of the speakers or the amplifier.

STONES - S200W-V2
15
High Level In Wiring Diagram Options
Table of contents


