Storex StoryDisk User manual

QUICK START GUIDE__________ ___ _ StoryDisk
© STOREX 2010 StoryDisk Page 1/20
QUICK INSTALLATION
GUIDE

QUICK START GUIDE__________ ___ _ StoryDisk
© STOREX 2010 StoryDisk Page 2/20

QUICK START GUIDE__________ ___ _ StoryDisk
© STOREX 2010 StoryDisk Page 3/20
SECURITY INFORMATION
This device has been designed and manufactured in order to ensure your security. The
security mechanisms integrated to the product you protect if you observe the procedures
for installation, use and troubleshooting: - Read carefully and follow the instructions
below before any handling and installation of your equipment, - Keep these instructions
in order to refer later.
GENERAL
- Do not shake the unit, it may damage the hard disk built inside your StoryDisk.
- Use only the accessories (power supply…) provided by the manufacturer.
- Do not move the unit when it is in operation.
SECURITY
- In order to avoid fires or electric shock, do not place the unit under objects filled with
liquids.
- If a heavy object or liquid were to fall on the unit, unplug it immediately and have it
checked by a qualified staff before the re-use.
- In operation, the surface of the enclosure generates heat; therefore, place the unit on a
flat and rigid surface and avoid covering the unit with something.
ELECTRICAL POWER SUPPLY OF THE UNIT
- In case of non-prolonged use of the unit or in case of thunderstorm, unplug the unit
from the wall socket, without pulling the cable itself.
- The power adapter provided is specific to the product. The use of an adapter other
could damage the product or cause accidents.
CHOICE OF THE LOCATION OF THE PRODUCT
- Install the unit far from any equipment to strong attraction such as micro-waves, large
loudspeakers…
- Place your unit in an adequate ventilated place and on a flat surface and rigid to
disperse the heat emitted by the unit.

QUICK START GUIDE__________ ___ _ StoryDisk
© STOREX 2010 StoryDisk Page 4/20
CLEANING
- Never open the unit for cleaning under pain of cancels the guarantee.
- Disconnect the unit from the wall outlet before proceeding to cleaning of the unit.
- Clean the outside of the unit as well as the remote control with a soft, dry cloth. Never
use of buffer abrasive, scouring powder or solvents such as alcohol or petrol.
TROUBLESHOOTING
- Entrust all troubleshooting to qualified personnel. Troubleshooting is necessary if the
unit was damaged in anyway: damaged power cord, liquid upside down on the unit,
introduction of small object in the unit, exposure to the rain or moisture, anomaly of
operation, fall of the unit…
IMPORTANT HINT
Warning: This unit allows you to maintain a video image fixed or an image-screen on
your television. If you leave a video image fixed or an image-screen on your television
screen during a prolonged period, you may damage the screen of your television. The
television plasma screen and the television projection are susceptible.

QUICK START GUIDE__________ ___ _ StoryDisk
© STOREX 2010 StoryDisk Page 5/20

QUICK START GUIDE__________ ___ _ StoryDisk
© STOREX 2010 StoryDisk Page 6/20
INTRODUCTION
Your StoryDisk is an external hard drive with a multimedia function making possible to
look at your pictures and videos on your TV, or to listen your music.
OPERATING
- Connected in USB to the computer, you can copy the files on your hard disk to the hard
disk of StoryDisk.
- When disconnected from the computer, connect the StoryDisk to your TV to visualize
your multimedia files.
PRINCIPAL SPECIFICATIONS
- USB 2.0 highspeed connection, USB HOST and memory card reader in front panel
- Video connection: Component and HDMI
- Internal electric power supply: INPUT 100V - 240V~
50-60Hz 1.0A
OUTPUT : 12.0V 2000mA
5.0V 2000mA
- Supported format - Video: Avi, Xvid, MPEG and VOB
- Audio: MP3, WMA
- Photo: JPEG

QUICK START GUIDE__________ ___ _ StoryDisk
© STOREX 2010 StoryDisk Page 7/20
UNIT INTRODUCTION
1. SD/MMC : Memory card slot
2. USB HOST : To connect external USB devices
3. IR : To receive the signal of the remote control
4. LCD DISPLAY : Display all the information during the play statue
5. ON LED : to see the state of the power
HDD LED : to see the state of playing files
1. DC IN : To connect the power supply adapter
2. POWER : Switch ON/OFF
3. HDMI : AV output (HDMI)
4. USB 2.0 : To connect the StoryDisk to the PC
5. COAXIAL : Sound output coaxial
6. VIDEO OUT : AV output (Composite)
QUICK START GUIDE__________ ___ _ StoryDisk
© STOREX 2010 StoryDisk Page 8/20
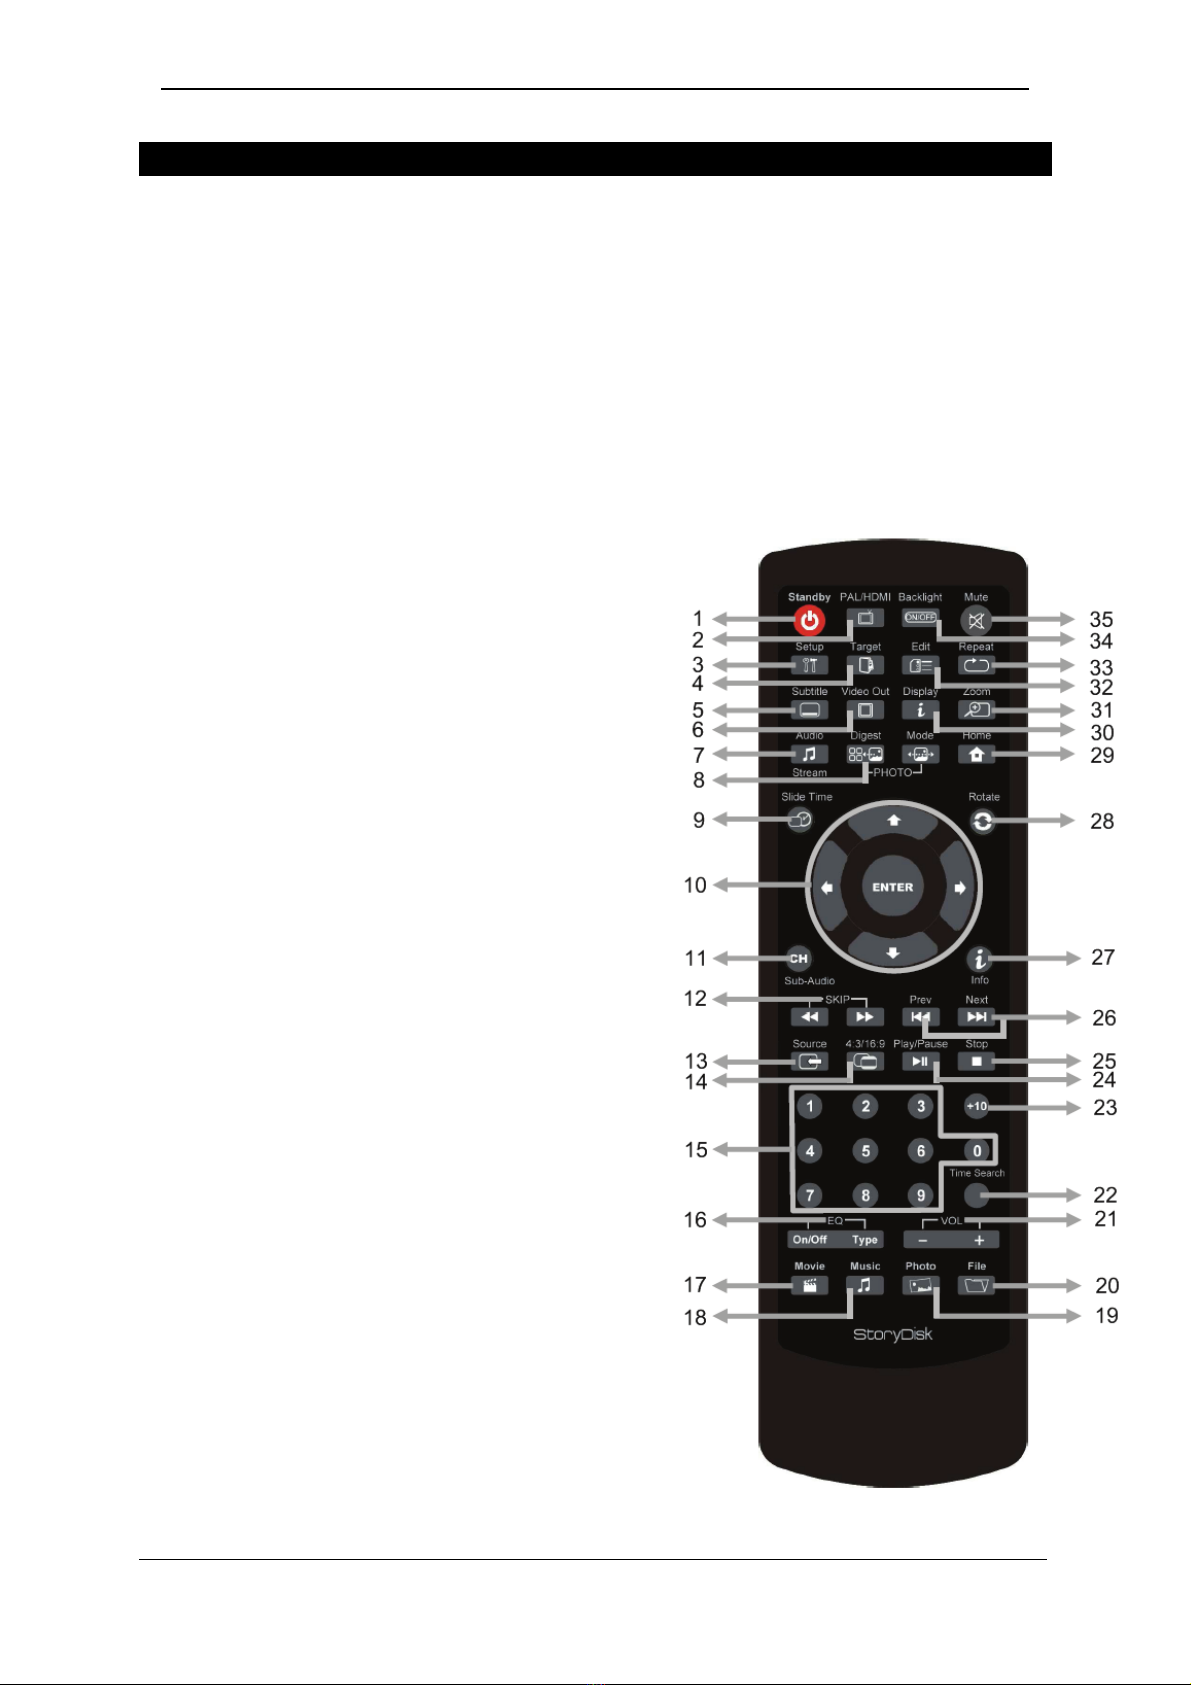
REMOTE CONTROL DETAILS
1. Standby : Turn ON/OFF the StoryDisk (Standby mode)
2. PAL/HDMI : Modify the display system
3. Setup : Setup mode
4. Target : Define the directory target (copy mode only)
5. Subtitle : Disable/Enable subtitle
6. Video out : Switch between different video output
7. Audio : Switch between different audio output
8. Digest : Display the thumbnail (photo mode)
Mode : Switch the different slide mode (photo mode)
9. Slide time : Modify the slide time between the pictures
10.Confirmation/Navigation keys
11.CH : Switch between different audio
output
12.Skip : Skip to the previous scene
Skip to the next scene
13.Source : optional button
14.4:3/16:6 : Switch between 4:3PS,
4:3LB and 16:9
15.<0-9> : Numerical pad
16.EQ On/Off: Display graphical EQ
(ON/OFF)
Type : Switch between different EQ
17.Movie : Direct access to “MOVIE”
18.Music : Direct access to “MUISC”
19.Photo : Direct access to “PICTURE”
20.File : Direct access to “FILE”
21.Vol : Decrease or increase the volume
22.Time search : Go to specific point
23.+10 : Select the file number ten by
ten
24.Play/Pause : Put on Play/pause
25.Stop : Put on Stop
26.Prev : Previous file
Next :Next File
27.i : Show information of the selected file
28.Rotate : Rotate the picture 90° to the
left
29.Home : go to the home page
30.Display : Display the information of
the file
and switch to different display mode
31.Zoom : Zoom mode
32.Edit : Edit mode (open a window to
allow to rename,
copy…)
33.Repeat : Repeat mode
34.Backlight : Optional button
35.Mute : Mute ON/OFF

QUICK START GUIDE__________ ___ _ StoryDisk
© STOREX 2010 StoryDisk Page 9/20
CONNECT THE STORYDISK TO THE COMPUTER
1. Connect the power supply adapter to the DC IN socket
2. Put the switch behind the product to ON
3. Connect the USB cable with the PC or MAC
4. The “Standby” LED lights on BLUE color
5. Take a look on “My computer”, the STOREX device will appears with an
additional letter or for MAC users it will automatically mount on the desktop
6. Just drag and drop or copy/paste all your files into the disk and enjoy watching.
Disk mounted after
USB connection
Disk mounted after
USB connection
QUICK START GUIDE__________ ___ _ StoryDisk
© STOREX 2010 StoryDisk Page 10/20
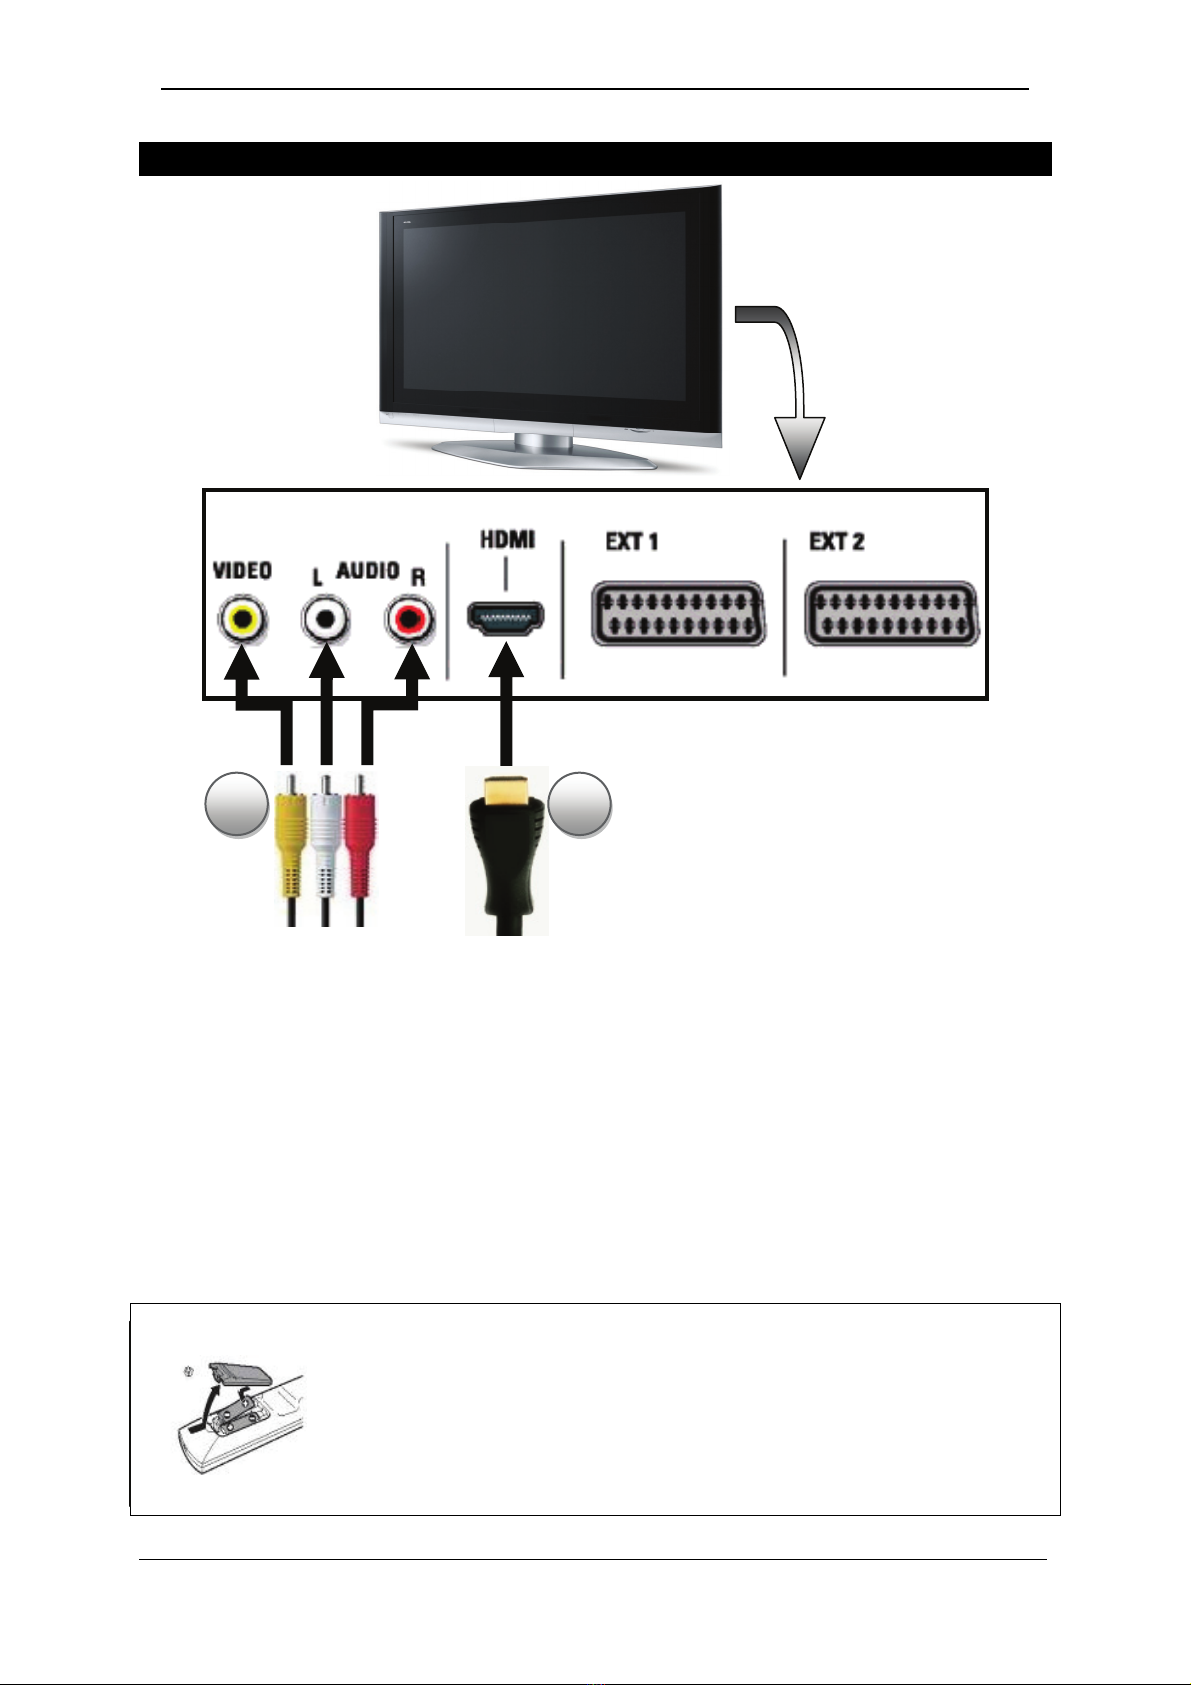
CONNECT THE STORYDISK TO THE TV
1. Connect the current cable behind the StoryDisk
2. Connect your AV cable behind the product in one side and to the TV for the other
side (as the description see before)
3. Make sure that your TV is on the good channel; basically a schema can guide you
(AV1, AV2, EXT1, EXT2…)
4. Put the switch behind the product to ON
5. The “Standby” LED lights on BLUE color
6. The LCD display “LOAD” and the TV display “Loading”
7. The home menu will appear after few seconds
NOTE:
Inserting Batteries Into the Remote Control
You can control the player using the supplied remote. Insert two
batteries (size AAA) by matching the + and - ends on the batteries to
the markings inside the compartment. When using the remote, point it
at the remote sensor on the player.
1 2
Rear TV

QUICK START GUIDE__________ ___ _ StoryDisk
© STOREX 2010 StoryDisk Page 11/20
PLAYING FILES
1. The first page (HOME) shows 4 mains icons, which you can access from the remote
control (VIDEO, MUSIC, PHOTO and FILE), just select one of the for modes to use it with
the arrows in the middle of the remote control and press "ENTER". To use the remote
control please refer to previous remote control details.
Main Page
2. Press the directional keys to move highlights to select the desired modes or files then
press "ENTER" to confirm your Selection.
3. Change disk. Press "MENU" key on remote control or on unit, return to "MAIN
PAGE". If hard disk with multi sub-area, press "STOP" key on unit again to switch disk
partition.

QUICK START GUIDE__________ ___ _ StoryDisk
© STOREX 2010 StoryDisk Page 12/20
HOW TO READ ON THE MEMORY CARD
1. Insert the memory card in the memory card slot (please refer to the chapter “unit
introduction”
2. Press "MENU" key on remote control or on unit, the memory card inserted will
appear automatically like shown above.
SD CARD = SD memory card
MMC CARD = MMC memory card
Select the partition and press "ENTER"
Select the folder or files then press "ENTER" key to confirm your selection.

QUICK START GUIDE__________ ___ _ StoryDisk
© STOREX 2010 StoryDisk Page 13/20
Video page Music page
Photo page File page
QUICK EXPLANATION
Video: Watch all your favorite movies in this mode.
Music: Listen all your favorite music’s in this mode.
Photo: Slide all your favorite pictures in this mode.
File: Browse all your files stored in the hard disk drive.
You can use the shortcut keys to access the desired function.

QUICK START GUIDE__________ ___ _ StoryDisk
© STOREX 2010 StoryDisk Page 14/20
SETTINGS
In this page you can set all the settings included the language.
1. Press the "SETUP" button in the remote control to access the "SETTINGS" page.
2. Press buttons to select the setting and press "ENTER".
In this page you can set the language
In this page you can set the resolution
HINT: The 576i/576p resolution may be not appear on the setup screen. Depending on
your configuration.

QUICK START GUIDE__________ ___ _ StoryDisk
© STOREX 2010 StoryDisk Page 15/20

QUICK START GUIDE__________ ___ _ StoryDisk
© STOREX 2010 StoryDisk Page 16/20
WEB SITE STOREX
You will find on the STOREX web site a heading SUPPORT associated with each STOREX
product. Appointment with the http://www.storex.eu address, select “Multimedia
Player” then StoryDisk. You will be able to download the last complete version of the
handbook, the software updates and to consult the frequently asked questions. Before
contacting our customer support or our hotline service, please initially check the section
“Forum” available in the miter “Support” of our Internet site because your problems
and their solution are perhaps already listed.
REGISTERING THE WARRANTY
Please take a moment to register the guarantee for your StoryDisk at our website:
http://warranty.storex.eu
All the requests must be formulated by e-mail with the following address:
support@storex.eu
or by phone
France : 01 55 85 82 00
Switzerland : 0 22 533 01 53 (support.ch@storex.eu)
Monday to Thursday from 09H30 to 19H30
Friday from 9h30 to 18h30
The STOREX’s forum, further information, updates and a customer support are accessible
on our Web site:
www.storex.eu

QUICK START GUIDE__________ ___ _ StoryDisk
© STOREX 2010 StoryDisk Page 17/20
TERMS OF WARRANTY
The WARRANTY proposed by STOREX is 1 year for the StoryDisk and 3 months for its
accessories (remote control, AV cables, power supply…).
STOREX guarantees your product against any manufacturing and assembly faults. This
warranty only applies to the first purchase of an StoryDisk by the end-user, and is not
transferable if the unit is subsequently sold. The warranty does not cover
incompatibilities detected by the end user outside the recommendations for use printed
on the box, or incompatibilities arising with other hardware or software installed on the
computer to which product is connected.
Proof of purchase must be provided to our staff before STOREX will honour the warranty.
The warranty does not cover breakdowns or faults due to failure to comply with the
instructions in this manual, negligence, transformation of the drive, faulty installation or
handling, repairs or modifications that are not authorized by STOREX, inappropriate
testing, accidents or external factors such as, but not limited to, excessive heat or
humidity, power failures or incorrect installation /removal of the StoryDisk player
STOREX’s only contractual obligation is to repair or replace the faulty product. STOREX
cannot be held liable for data loss or its consequences arising from the faulty operation
or breakdown of the product. On under any conditions STOREX’s financial liability amount
won’t be more than the price paid for the product by the end user.
The StoryDisk player warranty is as defined in this document and its scope cannot be
modified, reduced or extended without the written agreement of STOREX, and STOREX
cannot be held liable for any technical advice or service provided in relation to your
StoryDisk player.
You are not the transferee of this guarantee. The warranty covers your StoryDisk player,
and is governed by French law.
For any request outside guarantee, we invite you to contact the STOREX support or you
to connect on the website www.e-storex.com for any accessories order.
NOTE:
STOREX™ is allowed to modify without any notice, this user’s instructions following
evolutions of the product. You can find the newest version of the manual on our
company’s web site : http://www.storex.eu

QUICK START GUIDE__________ ___ _ StoryDisk
© STOREX 2010 StoryDisk Page 18/20
SAFETY AND ENVIRONMENT
Your STOREX unit was tested and is in conformity with the CE standards at the time of its
marketing.
Your STOREX unit was tested and is in conformity with the environmental standards
(RoHS) at the time of its marketing.
At the end of the unit lifetime , not to throw it to the dustbin but to bring back it to the
distributer which will be given the responsibility to make pass the product in a die of
electric waste recycling, electromechanical and electronic (DEEE).
Your STOREX unit has been prepared, tested and packaged in a french company
ISO9001 certified : 2000 by an annual audit by a qualified person of the "Bureau Veritas
Certification".

QUICK START GUIDE__________ ___ _ StoryDisk
© STOREX 2010 StoryDisk Page 19/20

QUICK START GUIDE__________ ___ _ StoryDisk
© STOREX 2010 StoryDisk Page 20/20
S
St
to
or
ry
yD
Di
is
sk
k
is a product from the range
www.storex.eu
© STOREX –2010
All the specified trademarks are registered trademarks from their respective owners.
Table of contents
Other Storex Storage manuals

Storex
Storex weZee Disk User manual

Storex
Storex StoryDisk Essential User manual

Storex
Storex WeZee Disk User manual

Storex
Storex U3S-350 User manual

Storex
Storex AivX-372HD User manual

Storex
Storex D-520 User manual

Storex
Storex StoryDisk Ultimate User manual

Storex
Storex CLUB MPiX-355 User manual

Storex
Storex D-522 User manual


