Stove Guard 2010 Installation instructions

Page 1of 6
INSTALLATION & OPERATING MANUAL
NATURAL GAS STOVE GUARD 2010
Revised June 15, 2011
Warning: This Gas Stove Guard is to be used with Natural Gas Cooking Stoves. It is not designated for use
with Propane cooking Stoves or Space Heaters!
STOVE GUARD is an electronic safety device for use with Natural Gas Stoves. It turns the gas stove OFF when you
forget by using the advanced technology found in security monitoring devices and a specially programmed micro-
controller.
STOVE GUARD controls the stove’s gas supply system to help prevent food and pots from burning, as well as
reducing the risk of fire caused by unattended cooking.
STOVE GUARD is preset at the factory at the highest fire safety setting of one minute.
This is the recommended setting for use by anyone with Alzheimer’s or similar medical conditions.
When properly installed, adjusted, and set in AUTO mode, STOVE GUARD will automatically shut the gas
stove off if no one is present in the monitored cooking area (about 10 ft.) for a preset period of time.
STOVE GUARD can also be used in a TIMER mode to set a maximum cooking time, after which the stove
will be automatically be turned OFF.
IMPORTANT TECHNICAL SAFEGUARDS
DO NOT INSTALL the EMU (Electronic Monitoring Unit):
oDirectly above a heat source or where hot/cold air or steam will blow onto it.
oOn or above a microwave or toaster oven.
oDirectly on or above the gas stove.
Do not allow grease to build up on the motion sensor window. This will reduce STOVE GUARD’s sensing
range and possibly turn the stove off even when someone is in front of the gas stove.
Clean the outer surface of the EMU with a clean, damp cloth only. Do not use soaps or cleaning liquids.
IMPORTANT PERSONAL SAFEGUARDS
STOVE GUARD must be tested with the Individual who requires this device and adjusted to their personal needs, as
well as adjusted to the home environment of use to ensure proper functioning. Additional fire safety devices; such as
smoke detectors & fire extinguishers must also be used to ensure complete cooking fire safety.
Page 2of 6
WHAT’S INCLUDED (UNPACKING CHECKLIST)
□Power Box
□Gas Valve
□EMU (Electronic Monitoring Unit)
□Instruction Manual
POWER BOX
The power box is a plastic box which contains a cable for a wall outlet 115V AC, a cable for connection to the gas
valve, and a white signal cable for connection to the electronic monitor unit.
GAS VALVE
The gas valve is a device that controls gas supply to the gas stove.
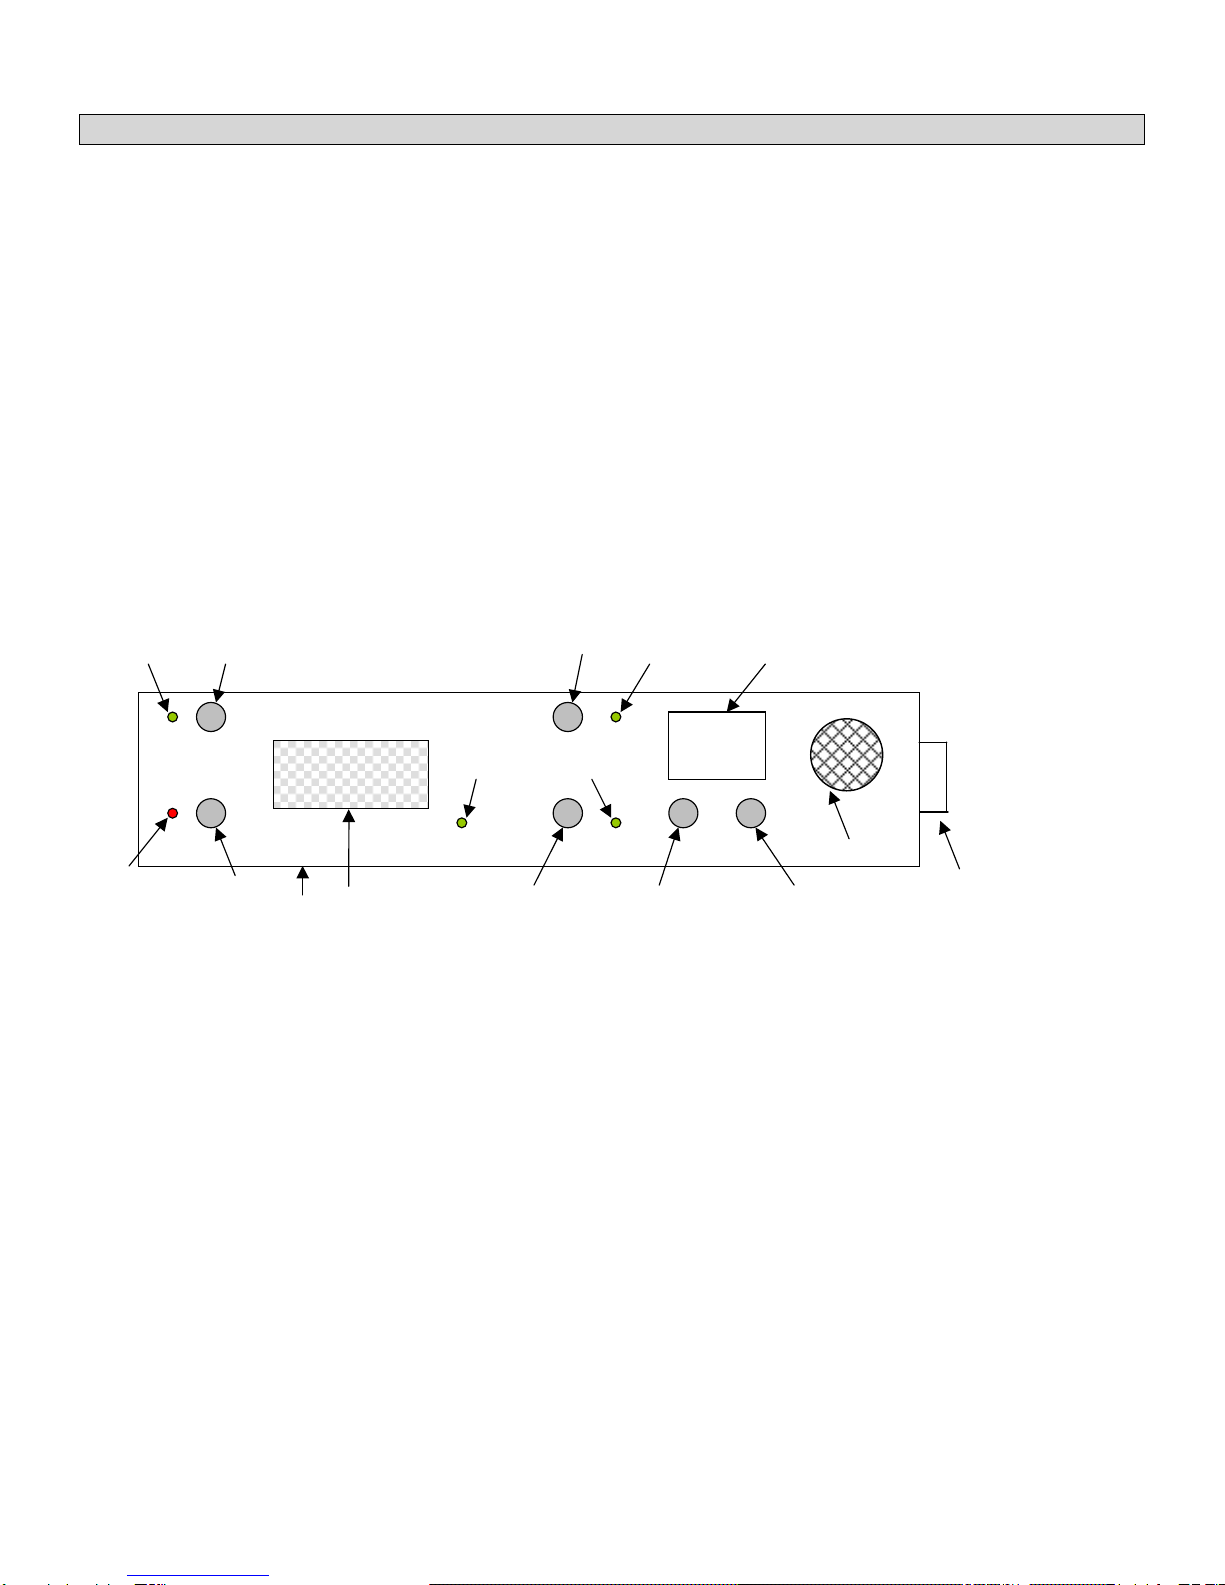
EMU - ELECTRONIC MONITORING UNIT
The control device of Natural Gas Stove Guard.
16
1. ON Button
2. OFF Button
3. AUTO MODE Button
4. TIMER MODE Button
5. TIME ADJUST Button in 10 minute intervals
6. TIME ADJUST Button in 1 minute intervals
7. ON Green Indicator LED
8. Motion Sensor MOVEMENT Green Indicator LED
9. TIMER MODE Green Indicator LED
10. AUTO MODE Green Indicator LED
11. Motion Sensor Window
12. OFF Red Indicator LED
13. TIME Display
14. Sensor Height Level (adjustment screw) to raise or lower the sensor’s field of view (Normally does not need
to be adjusted)
15. Gas Sensor
16. Buzzer
ON
OFF INDICATOR
AUTO
TIMER
0 1
TIME
1
7
4
2
12
11
8
3
9
10
13
5
6
14
15
16
Page 3of 6
INSTALLING THE GAS STOVE GUARD
Failure to use a professional will result in possible loss of life, warranty & property insurance.
1. Shut off the gas stove.
2. Disconnect the gas supply to the stove.
3. Mount the Gas Valve.
4. Connect the Gas Valve to the Power Box with included cord.
5. Connect the white cable from the Power Box to the receptacle in the back of the EMU, by lining up the pins
on the connector (Mini DIN – 6 pin), do not use force. Route the cable in the recessed groove.
6. Plug the power cord from the Power Box to the wall outlet (115V AC).
7. Check the Electronic Monitor Unit:
The red OFF LED should be blinking.
Two dashes should appear on display.
8. Connect the gas supply. Gas valve should be closed, prevents gas to reach the stove.
9. Press the ON button on the Electronic Monitor Unit. It opens the gas valve, and brings gas to the stove. The
green ON and AUTO LED should light and display should show “01” – default number of minutes before the
Stove Guard will shut off the stove if no movement is detected.
10. When movement is detected (you walk near EMU) the green indictor LED lights. Check it.
11. Light the stove. Stand out of the EMU’s motion detection area. After 1 minute, gas supply to the stove should
be disconnected and stove should be shut off. The buzzer in the Electronic Monitor Unit should beep every
minute.
12. Manually turn off the stove. Press the ON button. Gas supply to stove is established, and the gas stove is
ready for use with Stove Guard’s safety features.
13. If user’s personal needs are different from the factory default settings, adjust settings of Stove Guard. Refer to
the HOW TO ADJUST THE STOVE GUARD part of manual.
ON
OFF INDICATOR
AUTO
TIMER
_ _
TIME
Page 4of 6
INSTALLING the EMU (Electronic Monitoring Unit)
The best location for mounting the EMU is under an upper kitchen cabinet approximately 12” (30cm) from the right or
left side of the gas stove, or on the wallapproximately 18” (45cm) from the right or left side of the stove.
Remember: DO NOT place it directly on or above the stove.
MOUNTING TO THE BOTTOM OF A KITCHEN CABINET
Remove the plastic covers from the 2 holes on the top and bottom of the EMU.
Feed the two long screws from the bottom to the top of the EMU and screw directly into the
bottom of the cabinet.
Ensure that the cable is properly routed back to the Power Box.
MOUNTING TO THE WALL
Mark 2 points on the wall exactly 7 1/16 “ (18cm) apart.
Drill 2 holes and install two short screws, leaving the screw threads exposed approx. 1/4” (6mm).
Line up & Place the EMU on the screw heads and slide it down.
Ensure that the cable is properly routed back to the Power Box.
USING GAS STOVE GUARD
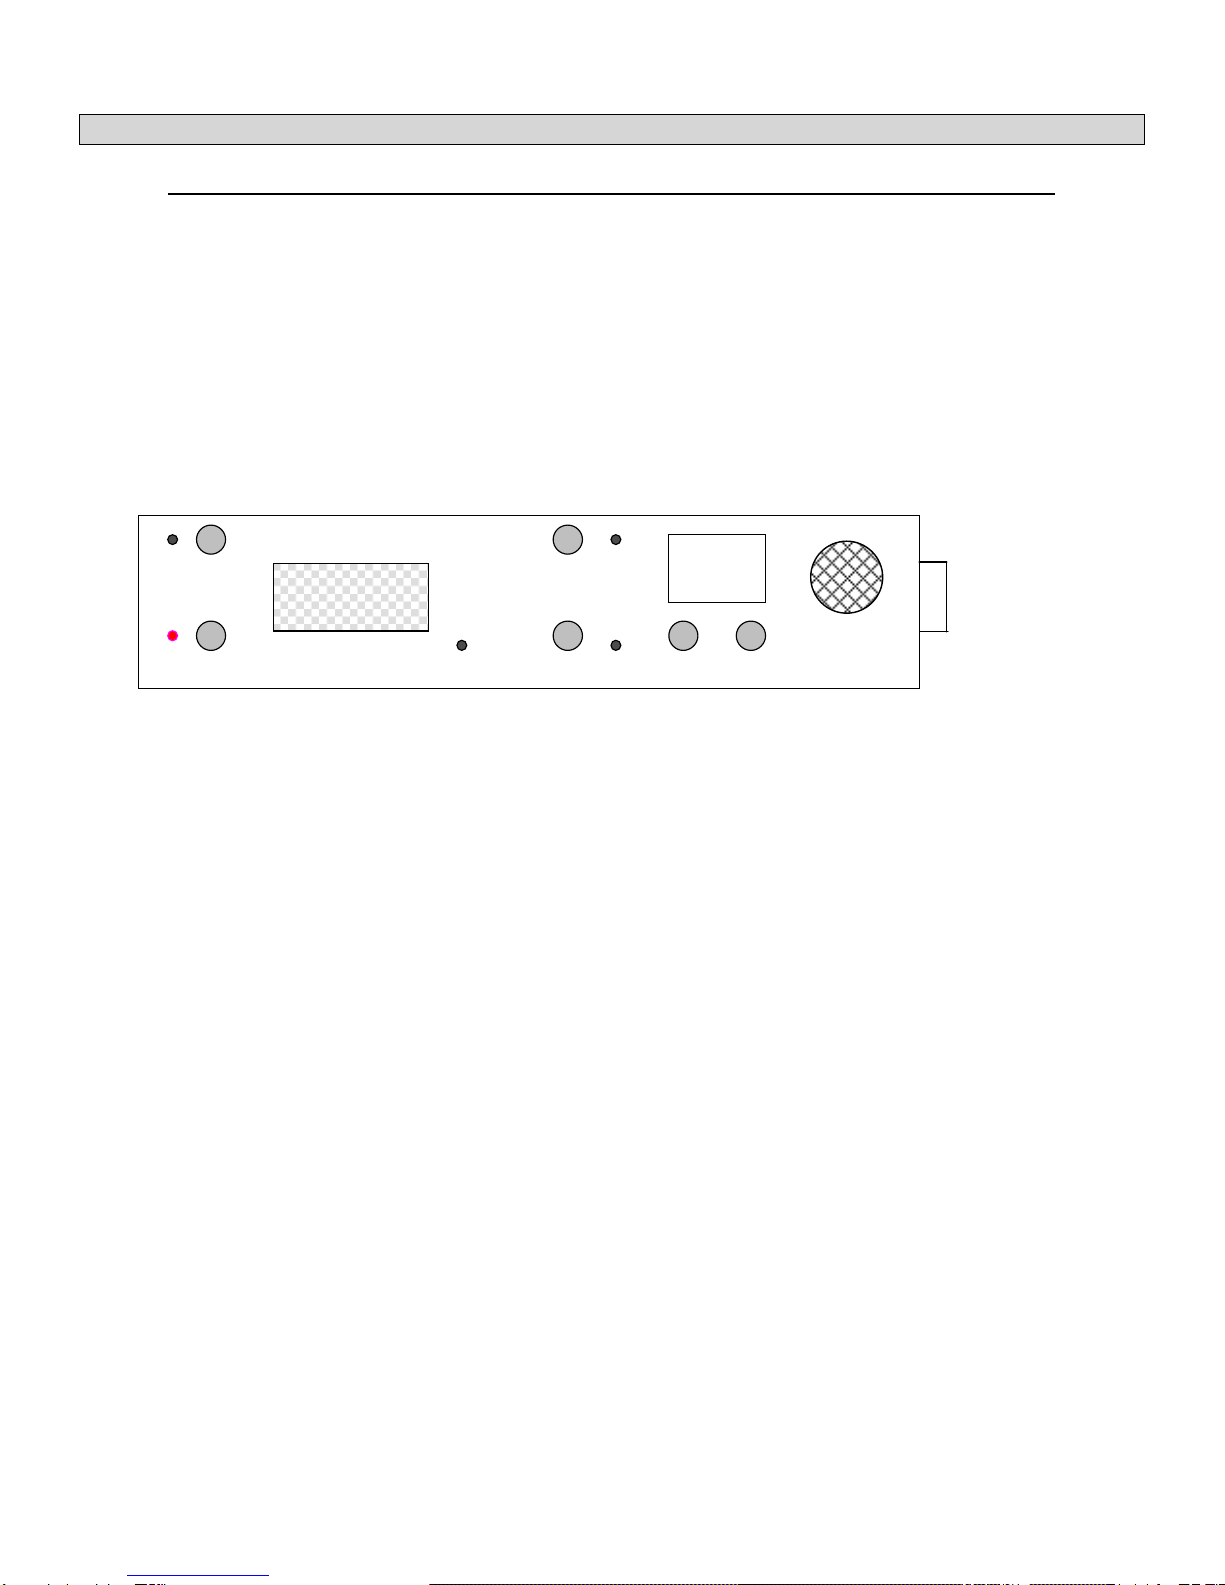
After a power failure or after first use only the red Off LED (number 12 on the first picture) will blink and display (13)
will show "--". For the safety reason the valve is closed and the stove remain turned off until user press the ON button
(1). Preset time is restored. The Stove Guard keeps this user setting even if there is a loss of power.
The Stove Guard has 3 operating modes to control the stove: AUTO, TIMER and OFF.
AUTO mode
Green ON (7) and AUTO indicators (10) light. The AUTO mode allows the passive infrared detector to automatically
shut down the stove (close the valve) if user is out of the sensing area for longer than the preset time (factory default
is 1 minute). Green movement indicator (8) lights every time when movement is detected and resets clock to the
preset time. When the user enters the sensing area, the Stove Guard will turn the Stove Guards timer back onto the
preset time. Display (13) shows number of minutes left before Stove Guard turns off the stove if no movement is
detected. If no movement is detected (user lights stove and left the kitchen) for the preset time Stove Guard will turn
off the stove, display will show "00", red Off LED (12) will blink and the buzzer in the electronic monitor unit will make
two short beeps every minute. If user presses the OFF button (2) the buzzer stops beeping, but the Stove Guard
keeps the valve closed and the stove remains turned off. If ON button is pressed, the stove has gas supply again. To
prevent fire/explosion, turn stove burner knob to OFF position before turning Stove Guard ON. This will prevent gas
from permeating the room. The user must restart the ignition of the stove’s burner manually; Stove Guard will not
restart the stove burners.
DANGER:
ENSURE THAT ALL TOP BURNERS ARE SHUT OFF
BEFORE PRESSING THE ON BUTTON.
TIMER mode
Green ON (7) and TIMER indicators (9) light. In the TIMER mode stove will operate for the preset time (default is 1
minute), which can be adjusted to the cooking time of specific dish. Display shows number of minutes left before
Stove Guard turns off the stove. Once the preset time is over, the Stove Guard will turn the stove off. The movement
detection does not work in the TIMER mode. When display does not show decimal point, time is displayed in minutes.
When decimal point lights between digits on display, remaining time is displayed in hours and tenth of hours.
From 1.7 hours, display goes back to 99 minutes. When countdown timer reach 00 Stove Guard will turn off the stove,
red Off LED will blink and the buzzer beeps every minute until OFF button is pressed.

Page 5of 6
OFF mode
Red OFF indicator (12) blinks. When the Stove Guard is in OFF mode, the valve is closed, gas is disconnected and
the stove remains turned off.
HOW TO ADJUST THE STOVE GUARD
ON button (1)
Turns ON Stove Guard from OFF mode and resets preset time in AUTO mode. Also connects gas supply. To prevent
fire/explosion, turn stove burner knob to OFF position before turning Stove Guard ON. This will prevent gas from the
stove entering the room.
OFF button (2)
Turns OFF the Stove - disconnects gas supply. When stove is restarted, the timer will be reset to the last setting.
AUTO button (3)
Turns Stove Guard in AUTO mode and resets preset time. Factory preset time is 01 min., max. Time setting is 15
min.
TIMER button (4)
Turns Stove Guard in TIMER mode and resets time to 01 minute. User has to hold the TIMER button for more than 3
seconds. This delay is a safety feature – avoids accidental activation of timer mode.
TIME adjust buttons (5 and 6)
TIME buttons are used for adjusting the preset time for AUTO and TIMER mode. User can choose between 01 and
15 minutes in AUTO and 01 minutes and 7.0 hours in TIMER mode. Left button adds 10 minutes and the right
button adds 1 minute to the preset time. After reaching the maximum, the preset time go to 01 minute. After reaching
99 minutes in TIMER mode display shows time in hours and tenth of hours. Left button adds 1 hour and the right
button adds 0.1 hour (6 minutes) to the preset time.
GAS SENSOR
An additional safety device is a gas sensor. If the gas sensor detects presence of gas in the kitchen, it will shut off the
gas supply to the stove. Buzzer will be continuously buzzing as long as the sensor detects gas.
Display will show "A2" for higher or "A1" for lower gas concentration. When no presence of gas is detected, display
will show "A0", the buzzer will beep every minute and the stove remains disconnected from gas supply. User has to
manually turn off the stove to prevent gas leaking. After that user can press the ON button, Stove Guard will open the
Gas Valve, which will supply gas to the stove. Now the stove can be restarted. For the safety reason, pressing the ON
button will not open the valve as long as gas is detected ("A2" or "A1" shown on the display).
The Gas sensor needs to reach the working temperature in order to detect gas properly. In the first 4 minutes (time
for gas sensor heating) after a loss of power or after first use of Gas Stove Guard, gas sensing is disabled.
SENSING LEVEL ADJUSTMENT (Height Adjustment)
The sensing range of the EMU (Electronic Monitoring Unit) is over 4 meters (around 12 feet) at a radius of 110
degrees. Each time the motion sensor is activated and the STOVE GUARD is in AUTO mode, the green indicator
LED flashes.
STOVE GUARD features an adjustable sensing height level to prevent the activation of the stove by
small children or pets that might be detected by the passive infrared detector.
There is a screw located underneath the EMU, which allows you to adjust the viewing height range of the
detector. Normally this does not need to be adjusted.
Note: This adjustment should only be done in the following situations:

Page 6of 6
1. It is determined that the passive infrared detector is detecting movements other than those of the intended
STOVE GUARD user (such as small children, pets, etc.) which will pass within the lower portion of it’s
detection field.
To RAISE the detection field when the EMU cannot be located higher, slowly turn the screw to the
LEFT.
2. STOVE GUARD is not detecting the movements of the user because its location is set very high up; the user
is very short, or seated in a wheelchair.
To LOWER the detection field for these situations, slowly turn the screw to the RIGHT.
TROUBLESHOOTING
You cannot light the gas stove:
The Stove Guard has been shut off the gas supply. Do not forget to press the ON button before
lighting the stove.
Check connections between the Gas Valve and EMU.
False gas detection alarm:
The gas sensor did not reach the working temperature. If the Gas Stove Guard was stored in a cold
place, the gas sensor needs more than default 4 minutes to reach the working temperature. Ignore the
false gas detection and keep the Stove Guard powered for a couple of hours.
The EMU’s LEDs do not light up:
Check that all the connections to the STOVE GUARD Power Box and EMU (Power box has to be
plugged to the wall outlet and EMU has to be connected to the Power Box) and press the ON button.
The green INDICATOR LED flashes without any reason:
Avoid placing the EMU within the proximity of the following sources of interference that might accidentally
trigger the passive infrared detector:
Reflective Surfaces: direct airflow from vents, fans and windows.
Sources of steam or cooking oil vapor.
Infrared light sources: TV or other infrared Remote Controls.
Objects causing temperature changes: such as heaters, refrigerators, toasters and ovens.
Do not place objects that a pet can climb onto (e.g. a cat on furniture) within 10 feet (3m) of the EMU,
or furniture higher than 3 feet (1m).
In addition, do not aim the EMU at a stairway a pet may have access to.
There was a loss of power (Electrical Outage):
STOVE GUARD automatically closes the valve and the stove remains turned off until user press the ON
button. Gas sensor is disabled in the first 4 minutes after power is on.
FOR TECHNICAL SUPPORT PLEASE CONTACT
STOVE GUARD INTERNATIONAL LTD.
126 O’Neil Crescent. Saskatoon, SK, S7N 1W8 CANADA
Ph: 888-607-8683
Conforms to UL 464 and Certified to CSA C22.1 No. 205
This manual suits for next models
1
Table of contents
Other Stove Guard Fireplace Accessories manuals

Popular Fireplace Accessories manuals by other brands

Majestic fireplaces
Majestic fireplaces TQS36 installation instructions

Desa
Desa Comfort Glow GA3750 installation instructions

Montigo
Montigo PL Series Installing

pleasant hearth
pleasant hearth FA010S quick start guide

Valor
Valor 975 installation instructions

Hearth & Home
Hearth & Home MEZZO-C Series installation instructions


