Streamit SAS220 User manual

SAS220 - User Manual
Project name: SAS220 - User Manual
Version: 1.3
Date: 28/10/2015
c
STREAMIT BV — All rights reserved
THE MATERIAL CONTAINED HEREIN IS COPYRIGHTED AND PROTECTED UNDER NATIONAL
AND INTERNATIONAL COPYRIGHT LAWS AS AN UNPUBLISHED WORK AND UNAUTHORIZED
REPRODUCTION OR MODIFICATION IS PROHIBITED WITHOUT WITHOUT THE EXPRESS PRIOR
WRITTEN CONSENT OF STREAMIT.

CONTENTS
Contents
1 Version history 2
2 Getting started 3
2.1 Firstandforemost... ....................................... 3
2.2 Streamitsupport ......................................... 3
2.3 UnpackingyourSAS220..................................... 3
2.4 FrontView ............................................ 4
2.5 Backview............................................. 4
2.6 BottomView ........................................... 5
3 Installation 6
3.1 Rackmount............................................ 6
3.1.1 Mounting a single SAS220 device in a 19 inch rack . . . . . . . . . . . . . . . . . . 6
3.1.2 Mounting two devices in a 19 inch rack . . . . . . . . . . . . . . . . . . . . . . . . 7
3.2 Tablemount ........................................... 8
3.3 Connecting your SAS220 device . . . . . . . . . . . . . . . . . . . . . . . . . . . . . . . . . 8
3.3.1 Connecting the protective earth . . . . . . . . . . . . . . . . . . . . . . . . . . . . . 8
3.3.2 Connecting the power supply . . . . . . . . . . . . . . . . . . . . . . . . . . . . . . 8
3.3.3 Connecting the ethernet cable . . . . . . . . . . . . . . . . . . . . . . . . . . . . . . 9
3.3.4 Connecting the audio input . . . . . . . . . . . . . . . . . . . . . . . . . . . . . . . 9
3.3.5 Connecting the headphones . . . . . . . . . . . . . . . . . . . . . . . . . . . . . . . 9
3.3.6 Connecting the USB service cable . . . . . . . . . . . . . . . . . . . . . . . . . . . 9
4 Basic knowledge 9
4.1 Audio encoding and streaming . . . . . . . . . . . . . . . . . . . . . . . . . . . . . . . . . 10
4.1.1 Whichformattochoose ................................. 10
4.1.2 Encodingquality..................................... 10
4.2 Deviceconfiguration ....................................... 11
4.3 Streamit device portal the web-interface for SAS220 devices . . . . . . . . . . . . . . . . . 11
4.4 Whyaremoteweb-interface................................... 12
4.5 Restrictions of the web-interface . . . . . . . . . . . . . . . . . . . . . . . . . . . . . . . . 12
4.6 Configurationupdate....................................... 12
4.7 Remotemonitoring........................................ 13
5 Configuring your SAS220 device 14
5.1 Configuration via web-interface . . . . . . . . . . . . . . . . . . . . . . . . . . . . . . . . . 14
5.1.1 Getting started with Streamit device portal . . . . . . . . . . . . . . . . . . . . . . 14
5.2 Telnet ............................................... 15
5.2.1 WhentouseTelnet ................................... 15
5.2.2 Whatdoyouneed .................................... 15
5.2.3 Howdoesitwork..................................... 16
5.3 STP (Streamit Terminal Program) . . . . . . . . . . . . . . . . . . . . . . . . . . . . . . . 17
5.3.1 WhentouseSTP .................................... 17
5.3.2 Configuring SAS220 with STP . . . . . . . . . . . . . . . . . . . . . . . . . . . . . 17
5.4 Switching on your SAS220 device for the first time . . . . . . . . . . . . . . . . . . . . . . 20
Version 1.3 28/10/2015 1 of 21

1. Version history
1 Version history
Version Date Editor Changes
1.0 04/01/2012 Arlind Cela Initial version
1.1 10/01/2012 Arlind Cela Created a quickstart guide version from the
user manual resource.
1.2 18/12/2012 Arlind Cela Removed references to the SAS220 Reference
Manual
1.3 28/10/2015 Gerard Hollemans General update
Version 1.3 28/10/2015 2 of 21

2. Getting started
2 Getting started
2.1 First and foremost...
thank you for purchasing the Streamit Audio Streamer (SAS220). We greet you as a new user and hope
that your new device will give you many years of pleasure. The SAS220 is a modern device and we
strongly recommend you to read this user manual thoroughly, before you start installing and using the
device for the first time.
The SAS220 is a fully autonomous working IP-audio streamer, able to encode audio in Ogg Vorbis or
MP3 format and stream to SIR and Lisa internet radio devices or to an Icecast2 audio distribution
server.
The SAS220 can be configured via the web-interface, implemented as part of the Streamit device portal,
but also via network interface (Telnet) and the Streamit Terminal Program(STP).
Streamit device portal (https://devices.streamit.eu) is a webservice that helps users to configure
and monitor their Streamit devices, straight out of the box.
STP is a user-friendly software application for your Windows PC, meant for advanced configuration and
monitoring of your Streamit devices. This program can be downloaded from the Streamit website free
of charge.
For more information on Streamit products and technologies, we invite you to visit our website https:
//www.streamit.eu.
Finally, we wish you a lot of pleasure using your SAS220 device.
Streamit B.V.
2.2 Streamit support
With this user manual we have tried to clearly describe the operation of your SAS220 device. But we
can imagine you have a question or come across an issue which is not covered in this user manual. In
such case, you are welcome to visit our support website (http://support.streamit.eu), where you will
find knowledgebase material, documentation and contact options for the support staff.
When you have purchased your SAS220 device from one of our local dealers, we recommend you contact
your dealer first.
2.3 Unpacking your SAS220
Carefully take the device and the supplied materials out of the package. Make sure that all of the
following components are included:
•1x SAS220 device
•1x 12V power supply with screw-on connector
•1x USB-AB cable
•1x SAS220 - Quick Start Guide
Version 1.3 28/10/2015 3 of 21

2.4 Front View
2.4 Front View
Fig. 1: SAS220 front view
I MMC/SD/SDHC card slot M 2x16 characters LCD display
J Power on/off button N Product type
K Infrared receiver indicator Q Streamit logo
L Status indicator
2.5 Back view
Fig. 2: SAS220 back view
A - External Protective Earth connector E - 6,3 mm headphone connector connector
B - RJ45 Ethernet connector F - Balanced right XLR connector
C - USB connector G - Balanced left XLR connector
D - Screw power supply connector
Version 1.3 28/10/2015 4 of 21
2.6 Bottom View
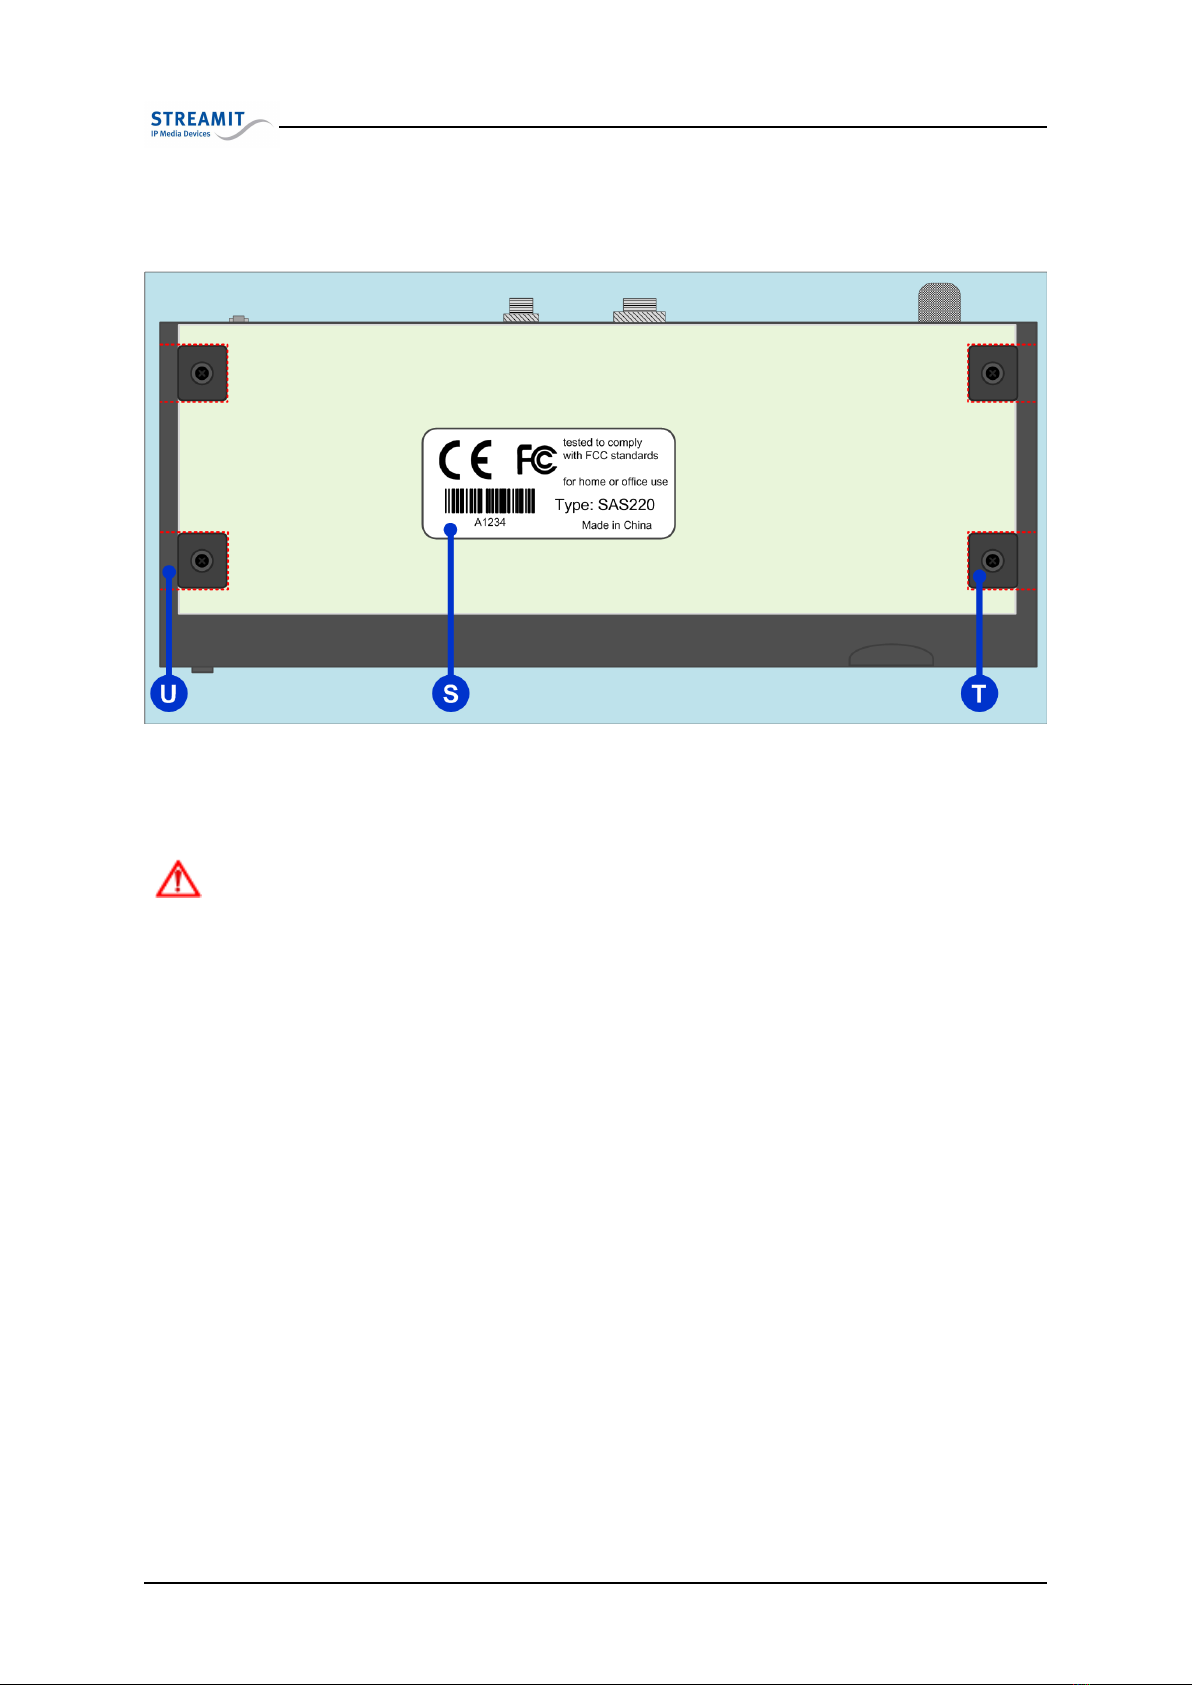
2.6 Bottom View
Fig. 3: SAS220 bottom view
S Product sticker U 4 x chassis mount openings
T 4 x rubber feet
The unique 5 (hexadecimal) digits serial number located under the barcode is a is
used as an identification for registering your device in the Streamit device portal or
other configuration platforms.
Version 1.3 28/10/2015 5 of 21
3. Installation
3 Installation
This section of the user manual will cover the installation of your SAS220 device, including mounting
and connection.
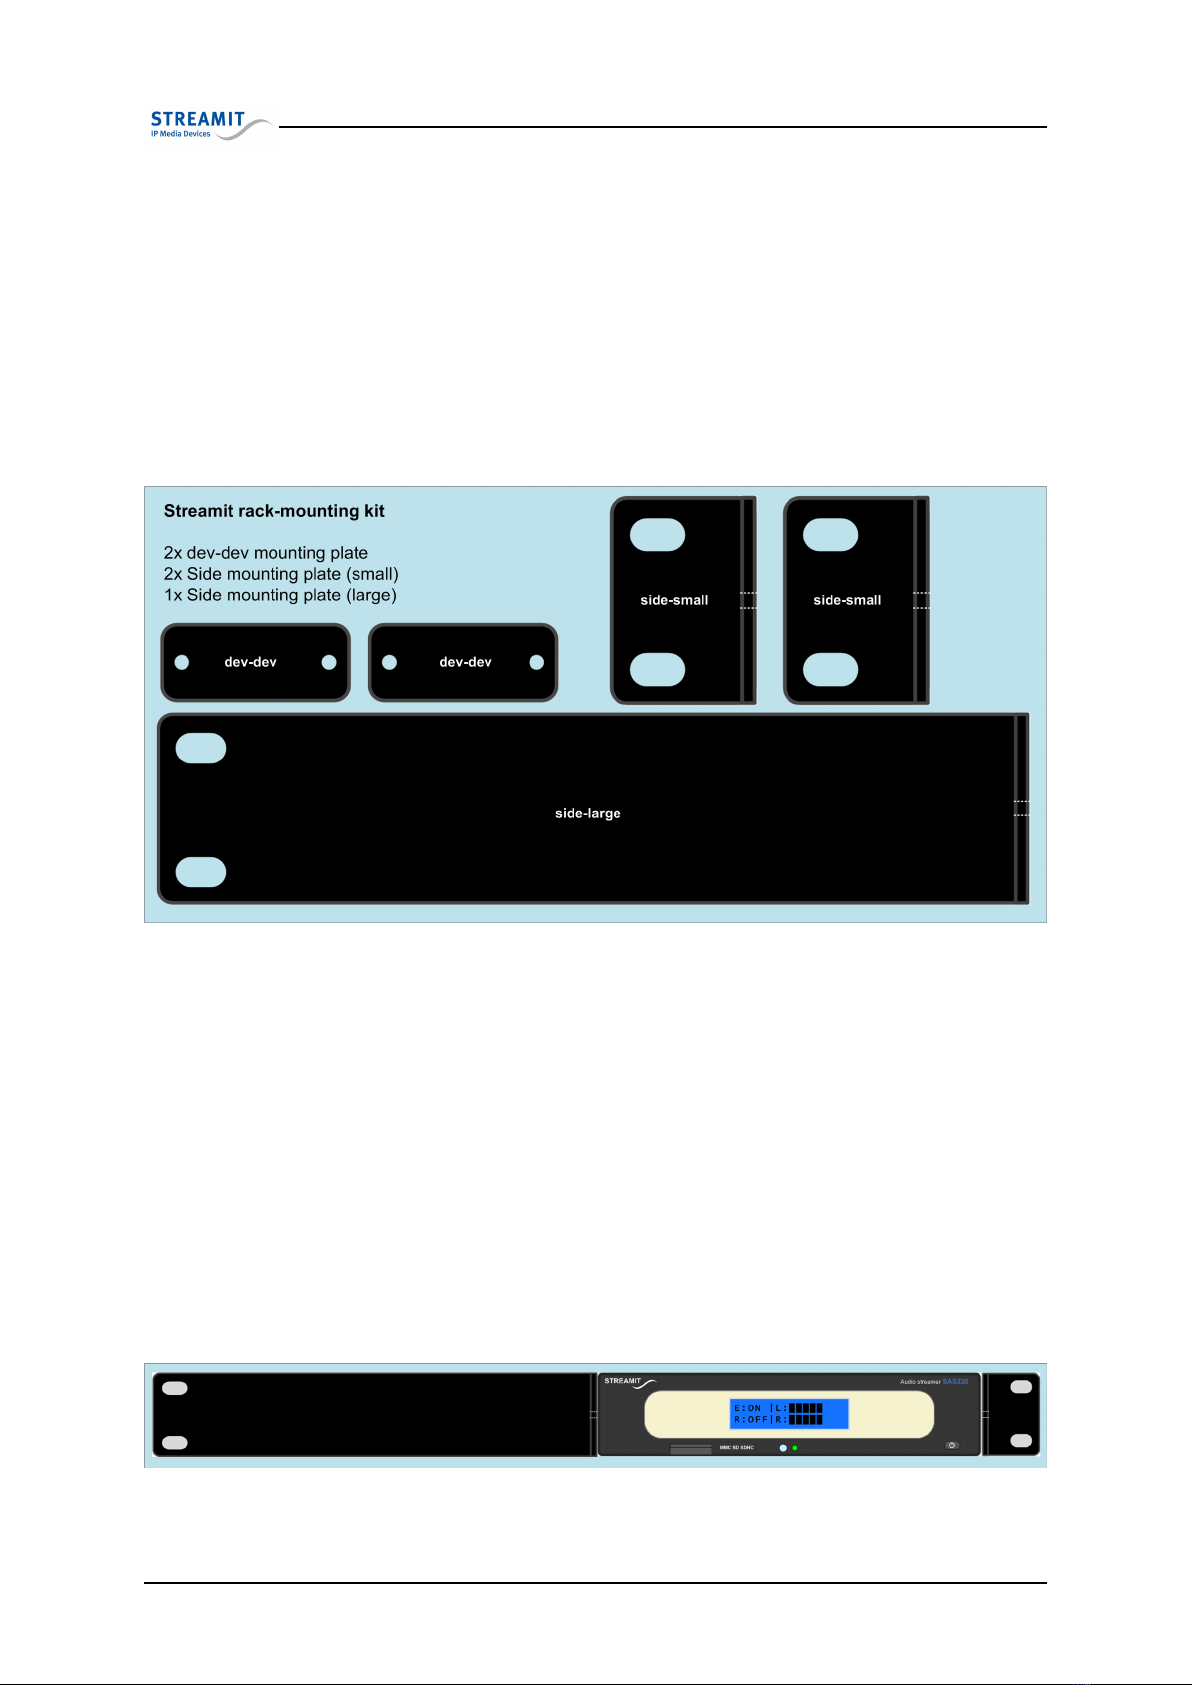
3.1 Rack mount
In line with the other Streamit professional audio devices, the SAS220 design enables you to easily
mount it in a conventional 19 inch (1 inch = 2.54 cm) racks. For rack mounting, the rack-mounting kit
is required.
Fig. 4: Streamit rack mounting kit
This kit can be ordered from Streamit or official Streamit dealers and contains 5 mounting plates in total
as shown in the figure above. Using a combination of these plates, it is possible to mount either one or
two devices in a 19 inch rack.
3.1.1 Mounting a single SAS220 device in a 19 inch rack
To mount a single SAS220 in an 19 inch rack, you make use of the large side mounting plate and one of
the small side mounting plates. At each side of the device, there are two screws and two small slot-like
openings. Start with one side of your device and remove the Phillips-head screws using an appropriate
screwdriver. Place the large side mounting plate as shown in figure below. You will see that the holes
of the mount plate will match those of the device. Carefully fasten the screws back on to connect the
device to the mounting plate. The same is done for the other side, but in this case one of the small side
mounting plates is used.
Fig. 5: One SAS220 in rack mount configuration
Version 1.3 28/10/2015 6 of 21
3.1 Rack mount
At this point you can mount the whole setup in the rack by bolting the sides to the frame of the rack. In
most cases though, we recommend that the devices are first connected and then mounted, for the simple
reason that all connections of the device are located in the back and once mounted, the devices will not
be as easy to access. Connecting the device is described later in this chapter.
3.1.2 Mounting two devices in a 19 inch rack
Mounting two devices in a 19 inch rack requires using the two dev-dev mounting plates and the two
small side mounting plates. Mounting the side plates is done in the same way as when mounting a single
device (see 3.1.1 above). You just have to make sure that the plates are oriented outwardly (see Fig. 6).
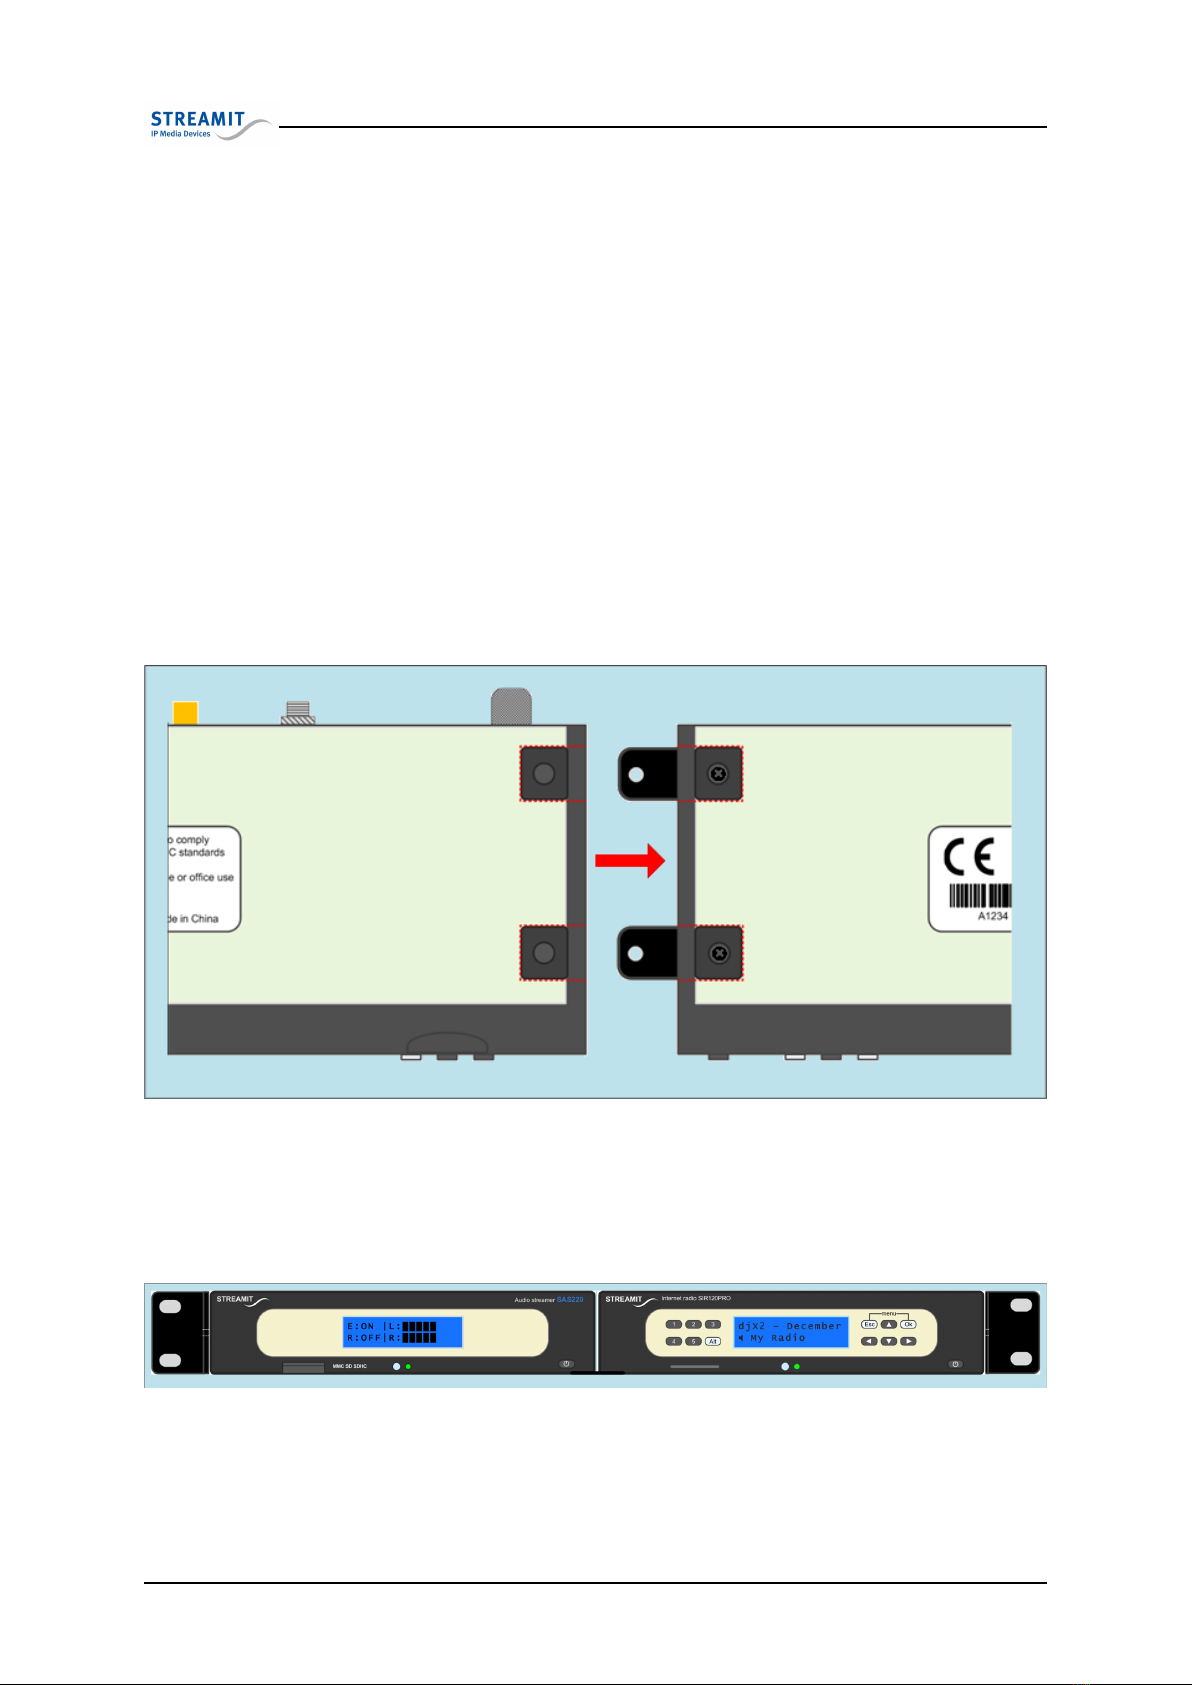
Once this is done, you connect the two devices together using the dev-dev mounting plates. Turn the
first device over. You will see it has four Phillips-head screws with black rubber feet, two for each side.
Using an appropriate screwdriver, remove the two feet on the opposite side to the side mounting plate.
The openings on the side now form slots with the same width as the dev-dev mounting plates and half
the length of the dev-dev mounting plates.
Fit the dev-dev mounting plates in the slots and you will see its holes matching with the device’s.
Carefully screw the rubber feet back on.
Fig. 6: Connecting two devices together
Now take the second device and remove the rubber feet just like you did with the first one, then connect
the two devices together by screwing the rubber feet of the second device back on. When properly done,
the resulting setup will look same as the one shown below.
Fig. 7: Two devices in rack mount configuration
At this point you can mount the whole setup in the rack by bolting the sides to the frame of the rack. In
most cases though, we recommend that the devices are first connected and then mounted, for the simple
Version 1.3 28/10/2015 7 of 21
3.2 Table mount
reason that all connections of the device are located in the back and once mounted, the devices will not
be as easy to access. Connecting the device is described later in this chapter.
3.2 Table mount
When used in an office environment the SAS220 device could be placed on your office desk, next to your
PC, while in a professional environment your SAS220 device would typically be mounted in a rack.
3.3 Connecting your SAS220 device
Regardless of where you use your SAS220 device and how it is mounted, it is important that you connect
it properly.
3.3.1 Connecting the protective earth
The SAS220 device features an external Protective Earth (PE) connector. This connection ensures that
all exposed conductive surfaces are at the same electrical potential as the surface of the Earth, to avoid
the risk of electrical shock if a person touches a device in which an insulation fault has occurred.
In an office environment, you would normally connect the PE to the chassis of your desktop com-
puter.
Normally all devices mounted in a rack have the PE (when applicable) connected to the frame of the
whole setup. When this scenario applies to you, simply connect the PE connector of the SAS220 device
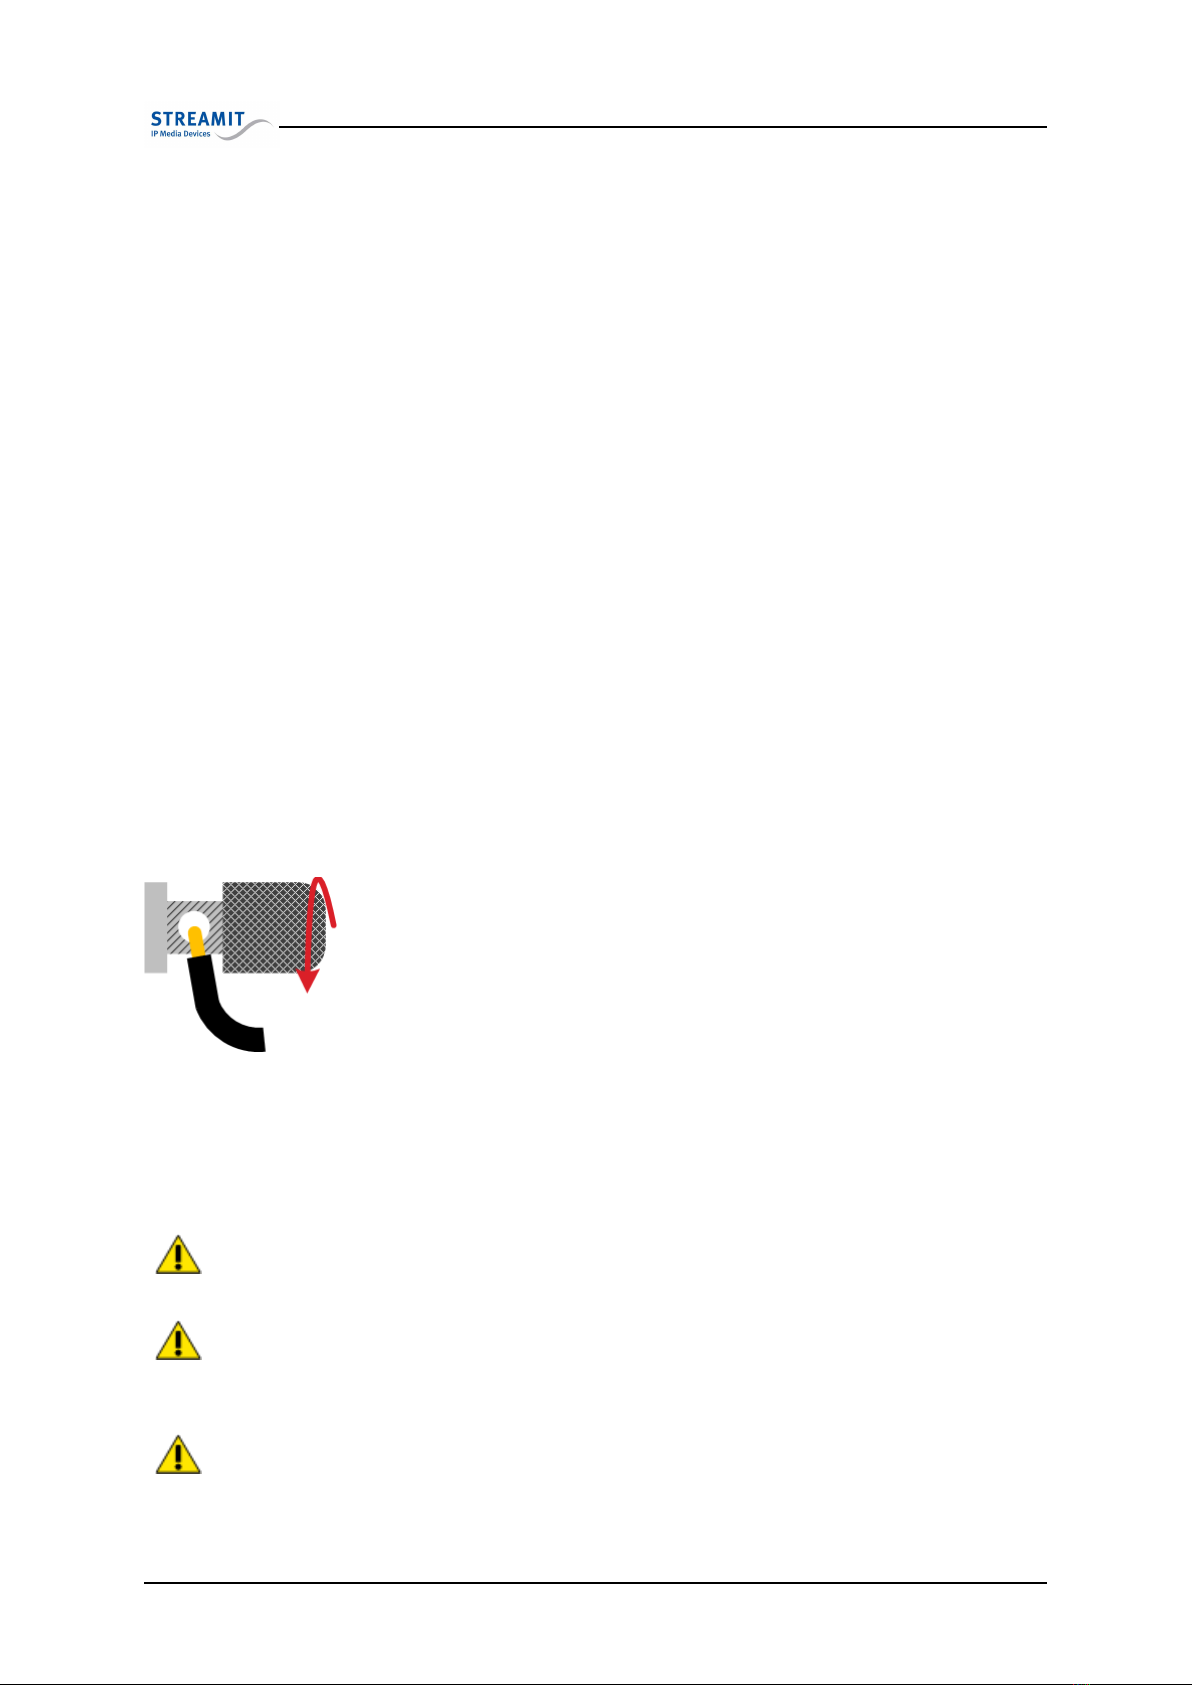
to the frame of your setup with a conductive wire. The following steps are followed:
•Unscrew the connectors head until you see the complete hole in the con-
nector.
•Put the stripped part of the conductive wire in the hole.
•Screw the connector head back on. Make sure that the wire is fixed.
•Connect the other side of the wire to the chassis of your computer or the
frame of the rack.
•You could use a digital multi-meter to verify that there is indeed connec-
tion between the chassis (rack) and your SAS220 device.
3.3.2 Connecting the power supply
Plug the power adapter to the mains outlet and then screw the connector on to you SAS220 device. In
the process we ask that you careful attention to the following instructions:
Never use wet hands when plugging the power adapter in the mains and never remove
the power adapter from the mains with wet hands.
Do not cut or damage the cord of the power adapter; do not place heavy objects on
the cord. This can cause short-circuit, resulting in electrical shocks or fire.
Pulling the cord can also damage the wire and/or isolation causing electrical shocks
or fire.
Version 1.3 28/10/2015 8 of 21

4. Basic knowledge
Using power adapters other than the one recommended for your SAS220 device, can
result in overheating and damage you device. This can cause fire, electrical shocks
and other hazards. Only use the supplied power adapter.
Applying your SAS220 device to situations with rapid changing temperatures can
result in condensation (small amount of water) on the inner and outer surface of your
device. To ensure a long lifetime of your SAS220 device, this should be prevented. In
case of such a scenario, wait until you device is ’dry’ before you use it again.
All our power adapters currently are wide-range 90-240VAC.
3.3.3 Connecting the ethernet cable
Use the provided Ethernet cable to connect your SAS220 device with your cable modem, ADSL modem
or router. If everything is OK (and the power supply has also been connected) the yellow LED of the
Ethernet connector will light-up yellow continuously while being connected. The green led will blink
randomly.
3.3.4 Connecting the audio input
Connect the line output of your audio source to the audio input of your SAS220 device, using XLR audio
cables with male connectors. No audio cables are included with your SAS220 device.
3.3.5 Connecting the headphones
To listen to the input signal of the SAS220 a headphone with 6,3 mm connector can be connected. The
audio is only available while the SAS220 is encoding/streaming.
3.3.6 Connecting the USB service cable
The USB connection is used for service purposes, which include programming your device, software up-
date and monitoring of the communication between the SAS220 device and the internet. The B-connector
of the USB cable is plugged in the device, while the A-connector connects to your Windows PC. Before
making this connection we recommend that the Streamit Terminal Program is first installed.
4 Basic knowledge
The SAS220 is an internet audio encoding and streaming device. It can encode the audio into Ogg Vorbis
or MP3 and stream it to an Icecast distribution server. The SAS220 can also be used as a server, so
that client devices can connect directly to the SAS220. In this case, the SAS220 device can serve up to
2 connected client devices.
Version 1.3 28/10/2015 9 of 21

4.1 Audio encoding and streaming
4.1 Audio encoding and streaming
The SAS220 can encode audio into one of the following formats:
•MP3 with constant bitrate.
•MP3 with variable bitrate.
•Ogg Vorbis (with variable bitrate).
So, which format should you use and what do you need to consider?
4.1.1 Which format to choose
When deciding which format you have to use, there are few things you have to take into consideration,
such as compatibility, quality and bandwidth usage.
You encode the audio, so that it can be received and played by an audio streaming receiver device (e.g.
a Lukas, Lisa, or SIR device). Depending on the setup an audio distribution server might be involved,
for distributing the audio to the receiving devices.
First and foremost, you need to make sure that all of the components in the setup support the audio
format. So, it is not a good idea to encode in Ogg Vorbis, if some of the receiving devices are of type
Lukas I, which only support MP3.
When compatibility issues have been considered/resolved, then you would look at the advantages a
format offers, such as quality/bitrate proportion, licensing costs etc.
Ogg Vorbis is a completely open, patent-free, professional audio encoding and streaming technology with
all the benefits of Open Source. Vorbis is a lossy codec just like MP3, but sounds better than MP3.
More information about Ogg Vorbis and comparison with other commonly used formats, can be found
at http://en.wikipedia.org/wiki/Ogg_Vorbis.
4.1.2 Encoding quality
When encoding audio using lossy codecs (which Vorbis and MP3 both are), the quality of the resulting
stream depends on the encoding parameters used.
You could say that for the same codec, the higher the quality, the higher the bitrate of the resulting
stream.
When encoding at a constant bitrate, all input audio is encoded uniformly. As you can imagine, this is
not always very efficient. Some audio parts are ’easier’ then others (e.g. silence, slow instrumental music
etc.) and it would be possible to encode with ’less bits’.
In contrast to constant bitrate, when encoding using variable bitrate the encoder will try to keep the
quality constant i.s.o. the bitrate. There are fewer bits required for encoding easy audio fragments then
difficult ones. As a result, the bitrate of the resulting stream is changing continuously around a nominal
value.
Ogg Vorbis performs by design better in variable bitrate mode. For this purpose, it is not possible to
configure the SAS220 to encode Ogg Vorbis at a constant bitrate. When you choose for Ogg Vorbis you
have automatically chosen for variable bitrate.
While for MP3 a nominal bitrate is used, for Ogg Vorbis the use of a quality factor is typical. The quality
factor in combination with the sampling frequency also results in a nominal bitrate. The quality factor
can have the value 0-10 (5 is typical).
Below, you can find a lookup table with an overview of what nominal bitrates would be achieved for the
different samplerate/quality-factor combinations.
Version 1.3 28/10/2015 10 of 21

4.2 Device configuration
Requires very good internet connection. Could experience issues if connection not optimal
Generates too high bitrates, which are not be supported by the device
The maximum bitrate a SAS220 can handle is limited to a value around the 200kbps.
For Ogg Vorbis a nominal bitrate of 200kbps, could produce higher bitrate values for
difficult audio. When serving to more than one host, the SAS220 needs to process
more date (twice as much for two connections). When network issues would be en-
countered, the SAS220 might need longer more time to transmit the data. All these
need to be considered when deciding what quality to use. The maximum bitrate
limitation also applies to MP3 format.
4.2 Device configuration
There are three ways to configure your SAS220 device.
•From the web-interface (Streamit device portal)
•Via a telnet client
•Using the Streamit Terminal Program
The recommended configuration interface for the SAS220 device is the web-interface; implemented as
part of the Streamit device portal. In this document, Streamit device portal and web-interface will be
used interchangeably. By default, all Streamit SAS220 devices will get their configurations from the
Streamit device portal.
4.3 Streamit device portal the web-interface for SAS220 devices
The Streamit device portal (https://devices.streamit.eu) is a free web-service that helps users to
configure and monitor their SAS audio streamer devices, straight out of the box.
The figure below shows how the Streamit device portal is used in combination with SAS220 devices.
Version 1.3 28/10/2015 11 of 21

4.4 Why a remote web-interface
Fig. 8: The web interface
The user configures the SAS220 to stream audio to a distribution server. As you can see, the web-
interface is not integrated in the device; it is a remote web interface. There is no ’direct’ communication
between the user and the device, everything goes via the Streamit device portal. Such a web-interface
has a number of advantages.
4.4 Why a remote web-interface
Streamit device portal is a remote web-interface for SAS220 devices; it is not integrated in the device.
This solution has a number of advantages with comparison to having an integrated web-interface.
•You can always access Streamit device portal, from everywhere in the world without the need to
know any (IP) information about the SAS220 device.
•There is much more freedom and resources for implementing a good Graphical User Interface (GUI)
for a website.
4.5 Restrictions of the web-interface
The only restriction of the web-interface (Streamit device portal) is that it is not possible to configure
the IP settings of the device. This restriction was introduced to avoid problems when wrong IP settings
are configured in the device. Wrong IP settings would result in the device not being able to communicate
with the web-interface anymore, which would require someone to go on-site and fix it.
By default, the SAS220 device will be using DHCP mode. When the network where the device is installed
supports DHCP then the device will get its IP settings from the DHCP server. Correct IP settings will
allow the device to communicate with the web-interface.
Note that the SAS220 needs to be configured in fixed network settings when used as a server. This will
ensure that the client device will be able to (always) find it. To configure (fixed) network settings to
your SAS220 device, STP is used(see 5.3.2).
4.6 Configuration update
The web-interface allows you to configure and reconfigure the device without the need to be next to
the device or have the IP settings of devices at hand. All you need to do is change the settings on the
web-interface and the settings will be retrieved by the device. This procedure is known as configuration
update.
Version 1.3 28/10/2015 12 of 21

4.7 Remote monitoring
When the device is configured to work with the web-interface (which by default it is), every time the
device is powered on it will perform a configuration update. The same is valid when the device is
restarted.
When you would change configurations on the Streamit device portal, you are required
to restart the device, or power it on, so that the device retrieves the new configuration.
4.7 Remote monitoring
The SAS220 supports remote monitoring. With remote monitoring, the device sends status messages
every ’in-minutes-configurable’ interval to a monitoring server. With the information contained in these
logs, you get a clear picture of the operation of the device, e.g., for troubleshooting.
The SAS220 must be configured to send monitoring messages: This function must be switched on and
the URL of the monitoring server must be set. Such a monitoring server is not readily available, but
requires custom implementation and hosting by you or a partner you select.
Please contact Streamit when you need the specifications to implement a monitoring server for the
SAS220.
Version 1.3 28/10/2015 13 of 21

5. Configuring your SAS220 device
5 Configuring your SAS220 device
There are three ways to configure your SAS220 device.
•From the web-interface (Streamit device portal)
•Via a telnet client
•Using the Streamit Terminal Program
In the rest of this chapter, each of the configuration methods will be described.
5.1 Configuration via web-interface
The web-interface is the recommended interface for configuring your SAS220 devices. When the web-
interface is used, you configure the settings of the device on the Streamit device portal. These settings
are then communicated to the device during the configuration update procedure.
Most of the time, the web-interface will be all you need to configure your SAS220 device. Depending
on your application though, this might not always be possible. To be able to use the web-interface the
following is required:
•Internet connection for the SAS220 device
•Internet enabled computer with web browser to access the Streamit device portal
When any the conditions above are not met, then you should use one of the other configuration inter-
faces.
5.1.1 Getting started with Streamit device portal
To get started with the Streamit device portal you need an account. This is very easy and free of
charge. Once you have an account, you can manage your Streamit SAS220 device and other devices
from Streamit on Streamit device portal.
When you own an account on the Streamit device portal, you can register your SAS220 device. Go
to Devices→Audio encoders and click on the button ’Add a new audio encoder’. Fill in the form that
appears, taking the following into account:
•The serial number is found on the sticker located on the bottom of the device(see Fig. 3)
•The location field is optional, but very useful for recognizing the device
Click on ‘Save’ to complete the registration. After registration, you can configure the SAS220 by editing
its details: Go to Devices→Audio encoders and click on the ‘Edit’ icon (a pencil) in front of the device
that you want to configure.
Fill in the form that appears, taking the following into account:
•Choose the audio format that the encoder has to use. The choice here depends on what is supported
by the distribution server and/or client device (see 4.1.1)
•You can choose whether both channels have to be encoded (stereo) or only one (mono).
For mono, only the left channel will be encoded. Make sure to always connect the
input at least to the left channel.
•For the quality factor (when using Ogg Vorbis encoding), you can consult the lookup table in 4.1.2
for an overview of what nominal bitrates would be achieved for the different samplerate/quality-
factor combinations
Version 1.3 28/10/2015 14 of 21

5.2 Telnet
•The streaming mode options are ‘To Icecast’, ‘Pull by client’ and ‘To SHOUTcast’. When ‘Pull by
client’ is chosen, then the SAS220 acts as a server
•When streaming to a server, the server details (IP address, port, etc.) are provided by the party
providing the audio distribution
•When using the SAS220 as a server (Pull by client), you can choose the port number that has to
be used for audio distribution. Depending on the setup, it might be required that port forwarding
and firewall setting be configured to allow access to the stream from outside the local network.
•When using the web-interface, there is no need to enable the Telnet interface. Should you have a
reason to enable Telnet, please keep in mind that there is no (password) protection; the device will
always accept any incoming Telnet connections (maximum one concurrent connection).
•The default location for software update is Streamits update server, but it is also possible to select
a custom location, e.g., your own update server.
Click the ‘Save’ button to complete the configuration.
These configurations will only be retrieved by the device when performs a configura-
tion update: When (manually) powered on or when restarted.
5.2 Telnet
Telnet is supported on SAS220 devices, but is by default disabled. To configure your SAS220device using
the Telnet interface, this must first be enabled. Telnet can be enabled from any of the other configuration
interfaces (Streamit device portal and Streamit Terminal Program).
Not all Telnet features are supported. The implementation can be seen as a command interface over
TCP port 23. There is no (password) protection; the device will always accept any incoming Telnet
connections (maximum one concurrent connection).
5.2.1 When to use Telnet
You normally would use Telnet in the following scenarios:
•There is no connection to the internet, preventing the use of Streamit device portal
•You have build some custom application using the Telnet interface
5.2.2 What do you need
To configure your device using the Telnet interface, the following is required:
•Telnet must be enabled for the SAS220 device
•Machine running a Telnet client
•The IP address of the SAS220 device to configure
The SAS220 requires that all encoding parameters are properly configured for the
encoding and streaming process to work properly. For this purpose, we discourage
the use of the command line for configuration of encoding parameters.
Version 1.3 28/10/2015 15 of 21

5.2 Telnet
5.2.3 How does it work
The device is constantly ‘listening’ for an incoming Telnet connection. When a connection is valid, it is
possible to control the device by sending commands as described in the command protocol. Type ‘help’
(without the quotes) and press enter to get a listing of the available commands.
When Telnet is used as the configuration interface, we recommend that the device is
set in the ‘I want to use fixed configuration’ operation mode using STP, otherwise
the device configuration could be overridden by the web-interface the next time the
device perform a configuration update.
Fig. 9: Using Telnet
To break the connection with the device, you type ‘quit’ (without the quotes) and press enter. If no
activity is detected over the Telnet connection for a configurable timeout, the device will automatically
close the connection.
Version 1.3 28/10/2015 16 of 21

5.3 STP (Streamit Terminal Program)
Fig. 10: Telnet screenshot
5.3 STP (Streamit Terminal Program)
STP is a (MS Windows) PC tool that can be used to configure, monitor and update your SAS and other
Streamit devices. STP is free and can be downloaded from the download area of Streamit’s website
(https://www.streamit.eu). Once you have installed STP, you can connect your device using the USB
cable. This will enable the communication with the device.
STP is mainly intended for use during the installation phase. When using STP, the device is connected
to a PC/Laptop via the USB cable. STP is required for the IP configuration of the devices which is not
possible from the web-interface.
5.3.1 When to use STP
STP is mainly intended for used in the following scenarios:
•During the installation phase, e.g. for the configuration of IP settings or to enable Telnet
•For low-level monitoring of the operation of devices
•When it is not possible or not desired to use the other configuration interfaces, e.g. you only require
fixed configuration in the device or you do not have access to the Streamit device portal. For these
scenarios you set the device in the configuration mode ‘I want to use fixed configurations’.
5.3.2 Configuring SAS220 with STP
Make sure that the STP version you are using, supports the SAS220 device. Check for updates from the
Streamit website.
Start with the ‘General settings’ of the device. Choose the Configure tab, then click Device button. This
is also the default view when you start STP.
To configure the ’General settings’ of your device you follow these steps:
•Select the correct device type (SAS220).
Version 1.3 28/10/2015 17 of 21

5.3 STP (Streamit Terminal Program)
•Select the operation mode ‘I want to use fixed configurations’.
•When required, you can change the Remote Software Update (RSU) settings. It is possible to
enable or disable the RSU feature. When RSU is enabled, it is also possible to change the software
update URL. In the screenshot below, the RSU configurations are not changed.
•When required, you can select the desired settings for Telnet in the ‘Advanced’ section of the
settings.
Fig. 11: STP general settings page
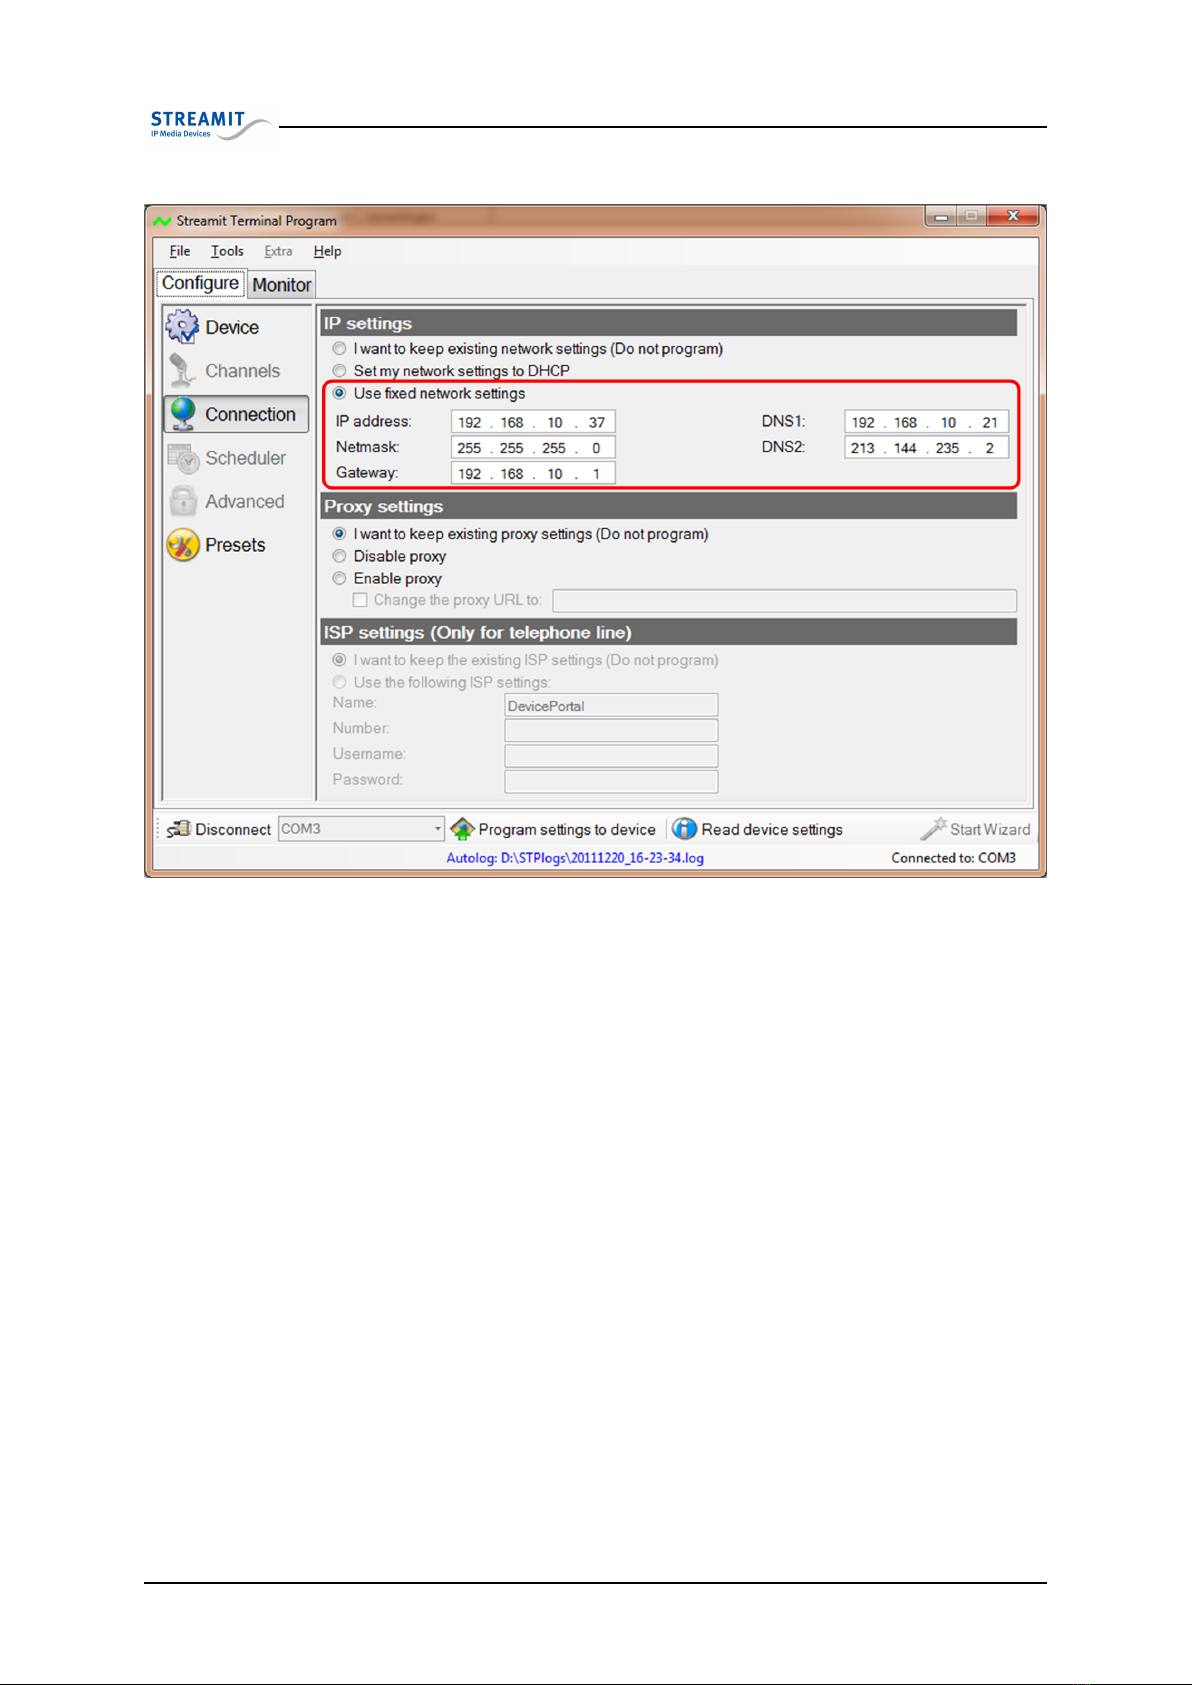
To configure the network settings of your device you follow these steps:
•Click the ‘Connection’ button to access the network configuration page.
•Under the section ‘IP settings” you are given the option to configure the device either in DHCP
or Static IP. Fixed network settings are recommended when the device is as a server (streaming
mode ‘Pull by client’) and when Telnet is used.
Version 1.3 28/10/2015 18 of 21
5.3 STP (Streamit Terminal Program)
Fig. 12: Network setup
To configure the settings related to audio encoding and streaming, you click the button ‘Presets’ and
access the Encoder Presets page:
•Under encoding settings, you can configure the audio encoding parameters.
•Under the streams settings, you can configure whether the SAS220 has to stream to a distribution
server or act as a server itself.
•Under the station details, information about the station is entered. This information is communi-
cated in the HTTP header to the server or connected client devices.
The UI has been implemented in such a way that only the relevant fields will be enabled. E.g. In case
Ogg Vorbis is selected as the encoding format, then the quality factor dropdown is enabled, while the
bitrate field (in kbps) is disabled.
Version 1.3 28/10/2015 19 of 21
Table of contents
Other Streamit Media Converter manuals


Popular Media Converter manuals by other brands

Makita
Makita BAC01 instruction manual

IDK
IDK ICP-401UHD Command reference guide

ProofVision
ProofVision PV48-BT installation manual

Crestron
Crestron HD-SCALER Operations & installation guide

HEIDENHAIN
HEIDENHAIN AK ECA 4410 operating instructions

Transition Networks
Transition Networks E-CX-FRL-03 installation guide

SignaMax
SignaMax I-1100 Series quick start guide

M-system
M-system JPR2 instruction manual

Omnitronic
Omnitronic ZD-1120 user manual

Hengstler
Hengstler DRIVE-CliQ AD58S Assembly instruction

Planet Networking & Communication
Planet Networking & Communication FT-902 Quick installation guide

DOREMIDI
DOREMIDI MIDI To TRS Box instructions


