Streetwize Accessories SWREC9 User manual

Please read and understand these instructions carefully before operating this
HD Dash Cam and retain for future reference.
SWREC9
Please Note: The internal battery for this Dash Cam is for playback and storing the
system settings only. The Camera must be powered by the 12V power cable supplied
or hard wired to the vehicle power supply to record any journeys.
HD Dash Cam
with 2.4” Screen
SWREC9 Manual AW 2017-NEW.qxp_Layout 1 16/11/2017 13:56 Page 2
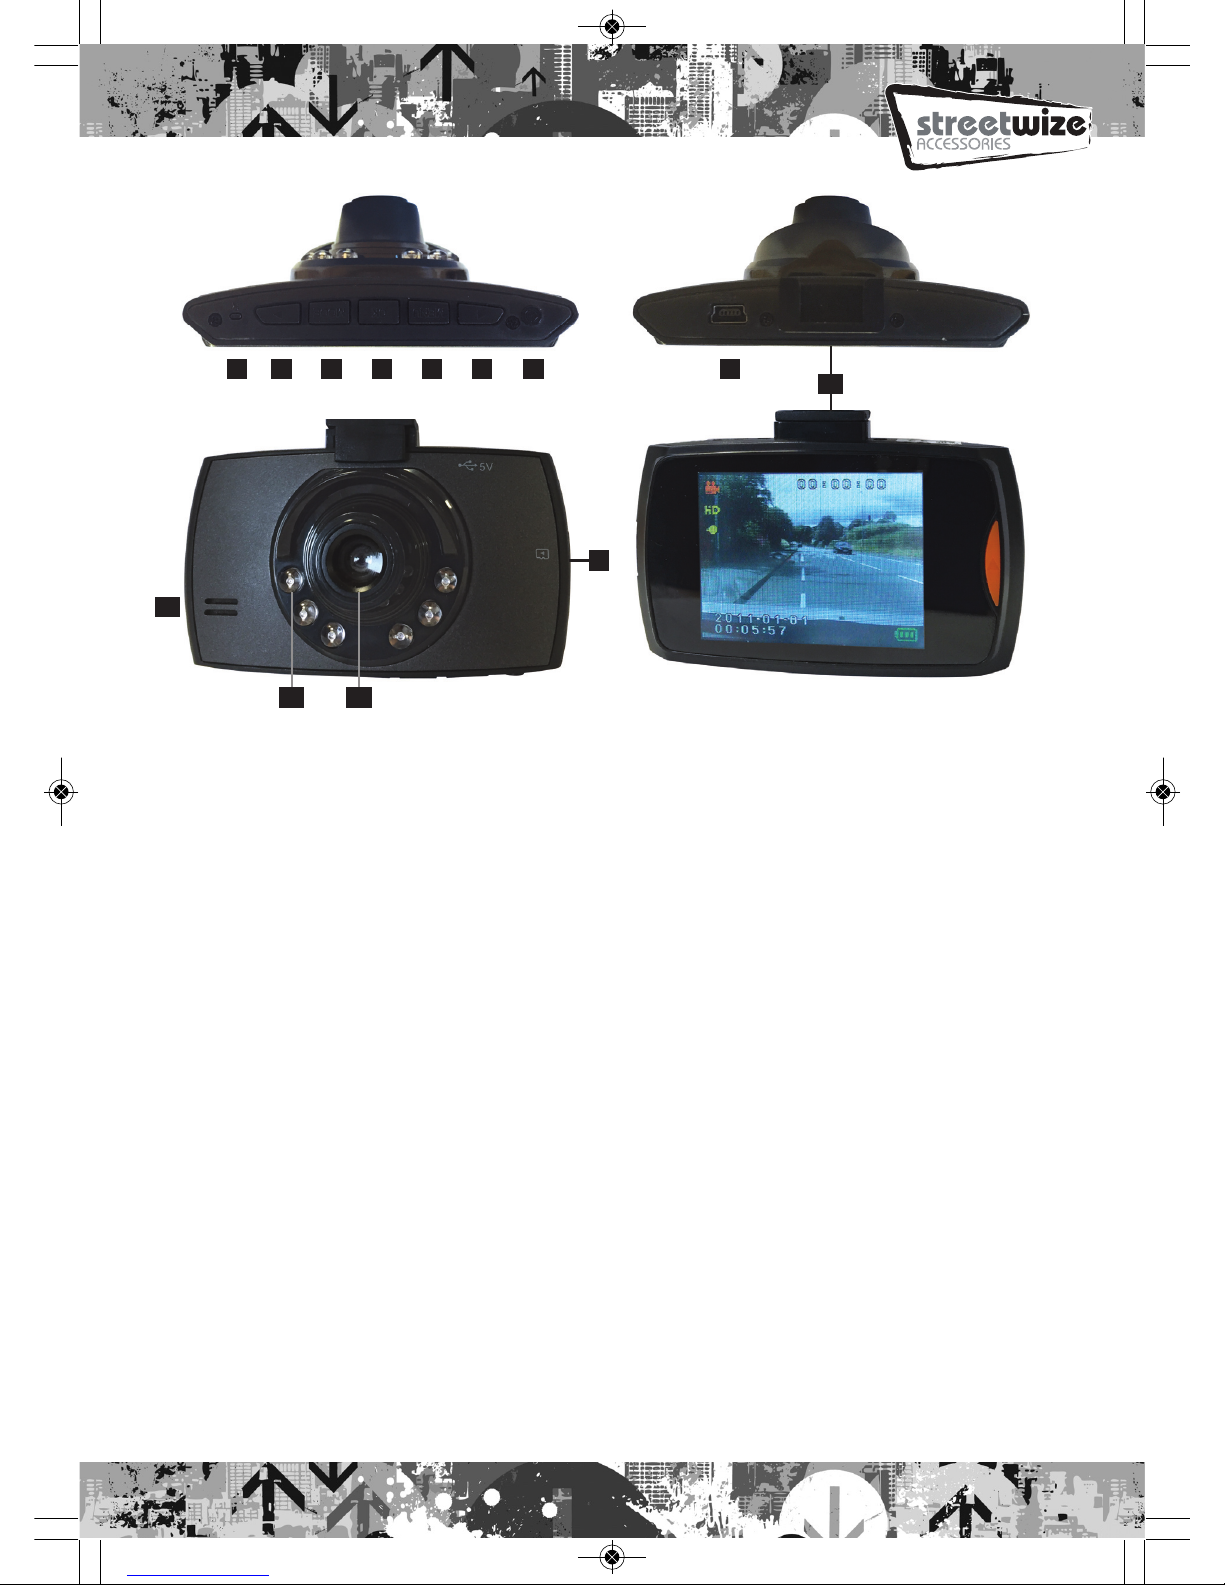
1. Reset hole 2. UP 3. Mode 4. OK 5. Menu 6. DOWN
7. On/off/power 8. SD card slot 9. USB interface 10. Mounting Bracket 11. Loud speaker
12. I.R. LED’s 13. Camera Lens 14. 2.4inch LCD
Accessories:
User manual, USB car charger(built-in 12V to 5V adapter).
Installation:
To install this Dash Cam connect the adjustable sucker to the Dash Cam using the mounting bracket, connect
to a power source (see below).
Charging:
A. Supply by the internal Li-ion battery
(1). Connect the USB car charger.
(2). Connect to the computer by USB cable, when charging, the light is green, and the green light will go
off when the Dash Cam is fully charged.
HOWEVER - This will only give enough charge to alter the settings or reviewing recordings.
B. Supply by the car power 12V
Hard wire to the vehicle power supply using a suitable connector cable.
NOTE: Dash Cam will only work under 5V voltage. To turn “Off” the Dash Cam long press the on/off key.
SET-UP:
Video recording mode:
(1) Please insert an SD card (6) up to 32mb first, the LED will light blue and flash (if the Dash Cam is on),
the files will then be saved to the SD card.
(2) The Dash Cam will begin video recording automatically if connected to the vehicle power source when the
car is started, alternatively if connected using a 12V power cable short press the on/off to begin
recording.
(3) To turn Off the Dash Cam, long the press the power button or remove the power supply.
1 2 3 4 5 6 7
8
9
10
11
12 13
SWREC9 Manual AW 2017-NEW.qxp_Layout 1 16/11/2017 13:56 Page 3

G-sensor
When the Dash Cam is recording, and if the vehicle is involved in an incident/impact the video file will be
automatically saved, and will not be deleted by the loop recording - the file name will begin “EVE”
Emergency lock
When recording, if required short press the on/off key, to lock a file manually, the video file will be automatically
saved, and will not be deleted by the loop recording - the file name will begin “SOS”
Photo taking
(1) Short press on/off key to start the Dash Cam and press OK key to stop recording.
(2) Short press on/off key to enter the photo U:king model.
(3) Press confirm key to take photo.
Review and delete files
(1) Turn on Dash Cam and press OK key to stop recording.
(2) Short press on/off key twice to enter play back mode.
(3) Press UP key or DOWN key to choose the recorded file and press OK key to play back or review,
(4) If deleting files, press MENU key after stopping playing files then enter Delete mode
(5) Press UP key or DOWN key to choose the file to delete or format;
(6) Continue pressing MODE key and close the operation.
Menu function setting
(1) Turn on Dash Cam and stop recording, press MENU key and enter the settings menu interface.
(2) Press UP key or DOWN key to select the specific parameters.
(3) Press Confirm key to confirm each selection.
(4) When all the setting have been set, press Menu key to close the settings interface.
USB mode
Connect the Dash Cam to the computer by the USB cable, and press on/off KEY. USB menu will pop-up
automatically, and there are two models to be selected.
(1). USB-disk - Under this mode, you can save the video files and the photos.
(2). PC camera - Under this mode, USB video equipment will pop-up, now you can take real-time photos or
use as a webcam.
Parking Monitoring
(1). To enter Parking Monitoring mode.
A. Under the normal recording mode, long press the OK button, the P icon appears on the screen.
When the Dash Cam turns off, it will automatically enter the Parking Monitoring mode.
B. If there is a impact on the vehicle, the Dash Cam turns on and automatically records, the screen will display
a key icon, after 30 seconds, the document will be auto saved and the file name will begin with “PART” (this
file will not be deleted when loop recording), the unit will then turn off automatically.
(2). Exit the parking monitoring mode.
Under the recording mode, the screen has a P icon, long press the OK button to exit parking monitoring.
SWREC9 Manual AW 2017-NEW.qxp_Layout 1 16/11/2017 13:56 Page 4

M17 1RY
WARRANTY: To validate the warranty on this product, please go to our web site and
enter your details on the warranty screen. www.streetwizeaccessories.com.
Streetwize Accessories:
Unit 1, Royce Trading Estate, Ashburton Road West,
Trafford Park, Manchester M17 1RY
www.streetwizeaccessories.com
Technical parameter
Display screen 2.4inch TFT LCD 16:9
View able 170°
Minimum Illumination 1 Lux
Recording way Cycle Recording/Motion Detective
Video format AVI
Video compression M-JPEG
View resolution 1920x1380P(24fps) 1440x1080 1280x720 848x480
640x480 320x240 (30fps)
Photo resolution 4032x3024 3648x2736 3264x2448 2592x1944 2048x1536
1920x1080 1280x960, 640x480
Video output AV OUT video output
Video output format PAL/NTSC
Seamless Recording Yes
Auto recording Support
G-sensor When a vehicle crashes, it will save the video files automatically
and will not delete the file when loop recording.
Lock manually When recording, short press on/off key to lock the current file
manually, this locks the file which won't be deleted in loop recording.
Menu language Russian Japanese French ltalian Spanish English
Simple Chinese Traditional Chinese.
Loop recording time 1/3/5minutes (optional)
Audio recording Built-in Microphone, audio recording can be On or Off
Night vision function Infrared LED
Memory card SD Card
Memory storage 4GB-32GB
USB interface Mini 5Pin USB 2.0
Operation system Windows 2000 Windows X Windows 7 etc.
Battery 3.7V Lithium polymer batteries
Power 5V/1A
Storage temperature -10°C – 70°C
Operation temperature -10°C – 60°C
SWREC9 Manual AW 2017-NEW.qxp_Layout 1 16/11/2017 13:56 Page 1
Table of contents


