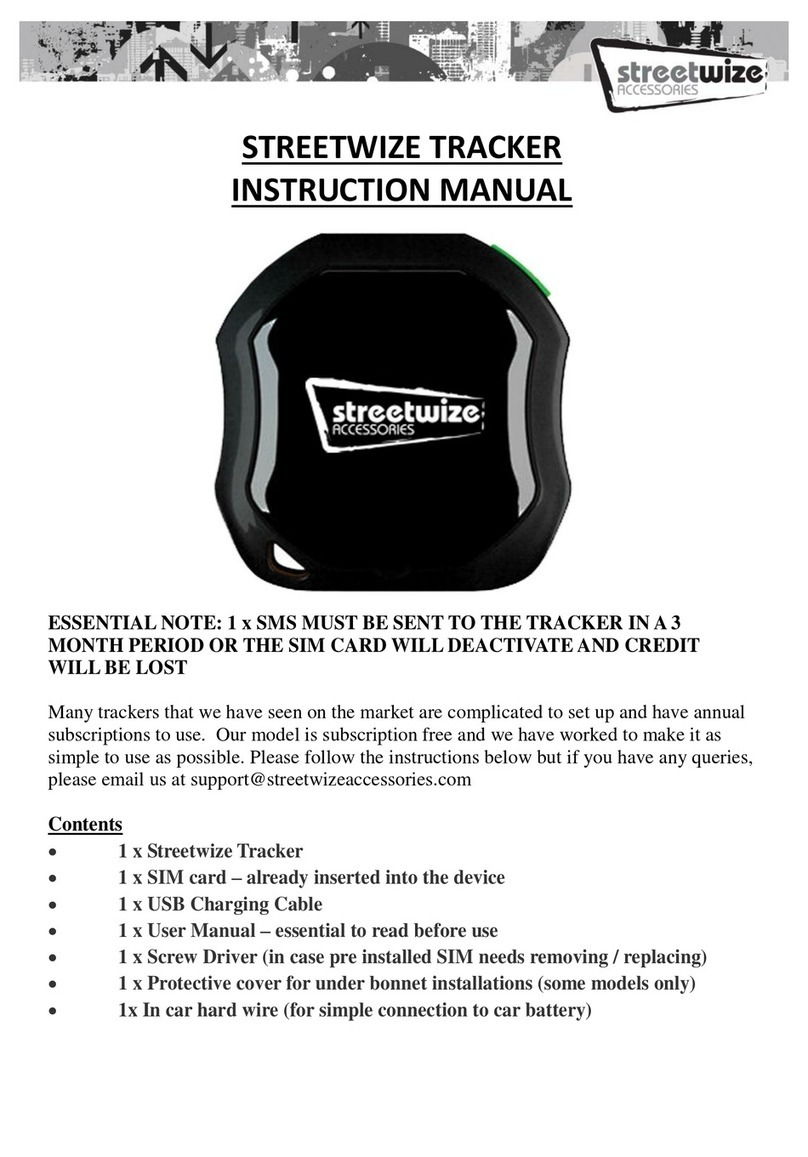
Streetwize SWTRACK1 User manual

PAYG Sim cards are widely available in shops, newsagents, garages, post offices, electrical retailers,
supermarkets and more for around £1.
Please purchase a multi sized SIM. Where not available, purchase the SIM card size which is right for
your own mobile phone so that it fits inside – options are generally a standard Sim, a micro SIM or a
Nano SIM.
The SIM you buy must be on the same network as your own mobile phone
To activate the SIM card, remove the existing SIM card from your own mobile phone and place the
new PAYG SIM into your phone instead. Follow the networks activation instructions which come
with the SIM card. Topping up and activating is very straightforward.
Once the SIM is active and credit is active remove the SIM from your own mobile phone and replace
your original SIM card. Place the new PAYG SIM into the tracker. If the SIM is too small for the
tracker, use the adapters if supplied or source a SIM card adapter if not.
Please follow network instructions regarding how often a SIM must be sent to prevent the SIM from
expiring. To see how much credit is left on the SIM card at any time, or to top up the SIM, place it
into your mobile phone and follow network instructions.
PURCHASING AND ACTIVATING A PAYG SIM CARD – REQUIRED.
AN ACTIVE PAYG (PAY AS YOU GO SIM CARD) WITH CREDIT IS REQUIRED AND MUST
BE PLACED IN THE UNIT FOR IT TO FUNCTION. SOME FEATURES WILL REQUIRE DATA
TO WORK PLEASE ADD A DATA BUNDLE IF NECESSARY.
PLEASE NOTE NOT COMPATIBLE WITH “3” NETWORK SIM CARDS
SWTRACK1- 8Page Manual-A6.qxp_Layout 1 22/06/2018 11:29 Page 2

Contents
1 x Streetwize Tracker
1 x USB Charging Cable
SIM Card Size Adapter
1 x User Manual – essential to read before use
1 x Screw Driver
1 x Protective cover for under bonnet installations (some models only)
1x In car hard wire (for simple connection to car battery)
Powering the device
If the tracker is for personal (non vehicle use), please charge it for 2-3 hours before first use. Once switched
on it will work for 24-36 hours before requiring a recharge. You can charge it via any USB socket (cable
supplied) or USB wall plug adaptor (not supplied).
For vehicle use, the unit can be hard wired to the vehicle battery to give permanent power. We very much
recommend this method. Please see installation notes opposite. To switch it on, press the power button
as shown:
*The SOS button has been
De activated for this model
for simplicity purposes so
please ignore this feature
The lights on the unit can be
used to tell you the
following:
LED INDICATOR STATUS MEANING
Left – GREEN – Not Lit Device Fault or Dormant
Left – GREEN – Continuously Lit No GPRS signal. This will always be the
case , as GPRS has been deactivated on this
model to ensure NO data charges are
incurred
Left – GREEN – Flashing GSM/GPRS communication established
Centre – RED – Not Lit Fully Charged
Centre – RED – Solid red Charging
Centre – RED – Flashing Low Battery
Right – BLUE – Not lit No power to the unit or the unit can’t start
Right – BLUE – Continuously lit Searching for GPS signal
Right – BLUE – Flashing GPS location successful
Please note the unit needs to have a GPS signal before it will send location you are advised to try in an
open space for best result (trying inside a house or flat) will not always work.
SWTRACK1- 8Page Manual-A6.qxp_Layout 1 22/06/2018 11:29 Page 3

Installing the device to the vehicle.
Please insert a correct sized ACTIVE - SIM Card WITH CREDIT (as per instructions on cover) inside the
tracker (PLEASE NOTE: tracker will NOT work with “3” (three) network SIM Cards).
1. Place one end of the lead into the tracker then connect the unit to the car battery by attaching the red cable
to the positive terminal and the black cable to the negative. There is an inline fuse inside the product.
Switch on the unit using the green power button.
2. After a couple of minutes place the tracker where you would like to locate it. It will work in many
vehicles under the bonnet as close to the front as possible. This is an ideal location as it is covert (hidden
from view).
3. Once the location is selected, close the bonnet, wait 2 minutes then test the tracker.
4. Send the following messages IN ORDER to the tracker (leaving 30 seconds gap between each one).
(1) Admin123456 (space) your mobile number eg. (Admin123456 07XXXXXXX)
(2) Sleep123456 off
(3) Begin123456
(4) G123456#
(5) Noadmin123456 (space) your mobile number eg. (Noadmin123456 07XXXXXXX)
It is essential that the “G” is a capital and you start the message immediately in the text without any gaps.
5. After a short period of time (10 seconds – 3 minutes) the tracker should have responded with its location.
If it does not, or if the location is blank, ensure the vehicle is not too close to an obstruction such as a wall
and try again. If it still does not work, try testing with the bonnet open or move the tracker to a different
location.
6. Alternative locations include inside the vehicle on the dash board. Please do not place inside glove
compartment or under steering wheel or seat as there will be too much obstruction to the signal.
7. If placing the tracker inside the vehicle you will need to feed the power cables through to the battery or
some other link to the electrics.
8. For caravans, alternative suggested locations may be either in the front locker adjacent to the battery
securing unit or in the locker situated nearest to the internal consumer unit.
9. Once you are satisfied with the location and that the Tracker is working, if under the bonnet, place the
tracker in the bag supplied for extra protection and secure the unit down into position ideally with a fixed
method like cable ties or a strong double sided adhesive pad. If you wish to use tape, please ensure it is a
strong quality tape which will not degrade over time, and try to put it around and not across the top of the
unit, as this may affect signal quality. Tidy the power cables as much as possible.
10. Ensure the tracker is faced upwards only – with the Streetwize logo pointing upwards and the SIM card
slot facing downwards.
11.If this item is still not functioning adequately then relocate again or consult an auto electrician.
The tracker will now be fully functional and installed and will be permanently powered.
The low Ampage of the unit will not drain the battery
SWTRACK1- 8Page Manual-A6.qxp_Layout 1 22/06/2018 11:29 Page 4

Tracking a Location By Text and Map
1.As mentioned above, once the setup is complete simply text G123456# to the unit .The usual
response time is several seconds but can run to several minutes on occasion.
2.The text you receive back will advise of the time, date, speed to show if the vehicle is in motion or
static and a link to a google map. Simply click the link and the map will open. There may be some
other data in the SMS but this can be ignored.
3.The location you receive is to an accuracy of 10 meters.
4.As mentioned earlier it is vital that the G is a capital “G” and there are no gaps before or after the
message.
5.The text that you get back will look something like this:
1.Google Maps link: This is the link to the Google map showing the position of the tracker unit.
2.V:A/V: Indicates GPS signal. V:A indicates there is a GPS signal; V:V indicates there is no GPS
signal.
3.2013-08-30 20:54:15: The date and time stamp when the unit last received a GPS signal.
4.Spd: 000km/h: This indicates the last known speed of the unit.
5.Bat: The approximate amount of battery charge remaining. The value is between 1 and 9, with 9
being fully charged.
6.ID: 4102000759: The ID code of tracker device.
7.S19G04; plmn: 46001 The GSM operator data from the cell towers. We have removed this
information for simplicity purposes as it serves little value.
SWTRACK1- 8Page Manual-A6.qxp_Layout 1 22/06/2018 11:29 Page 5

8.Lac: 9516,cellid: 23596: Location based service data that indicates if the data came from a cell
tower, GPS, or GPRS. We have removed this information from some models also as again it is of no
function or relevance to this unit.
If the unit is powered off, or is in a no signal area such as highly rural area, it will either respond with no
coordinates or more than likely not respond at all, depending on the circumstance. Where there is a mobile
phone signal but no GPS signal, it may text blank or last known coordinates, again depending on the
circumstance. To work fully, the unit must be powered on, in a mobile phone signal area and receiving GPS
signals which means good connectivity to satellites without too much obstruction.
Non smart phone or tablet users can take the coordinates from the link and type them into
google on their PC, see below for an example:
ADDITIONAL FEATURES FOR ADVANCED USERS
FREE ONLINE/MOBILE APP TRACKING ON A SMARTPHONE
You must send the GPRS MODE ON command to the device,before you can start tracking and may need to
buy a data bundle to reduce costs as live tracking will use data.
See table at bottom of instruction manual for how to switch on GPRS.
For you to use the free online and mobile app tracking service, you must first set up the APN for the device.
Please contact the SIM card network as each network has different APN settings. The article below will help
you, or else you can call the network or refer to the networks web site.
http://www.geeksquad.co.uk/articles/series/apn-mobile-network-settings-learning-series
SWTRACK1- 8Page Manual-A6.qxp_Layout 1 22/06/2018 11:29 Page 6

Downloading the APP:
Android devices: visit 2.tkstargps.net and download the latest android GPS application.
iOS devices: search TKSTARGPS in the apple app store and download the application to your iOS device.
Please note you must have credit on the GPS SIM card including DATA to receive the google maps links,
and other internet based services.
Once you have downloaded the app to your smartphone. Log into the GPS tracking app by using the License
Plate section using your IMEI number and password.
Server: 2.tkstargps.net
IMEI No: On back of GPS device. (Ex 41090000001)
Password: 123456
For APN setting for app please follow the instructions
APN SETTINGS CONFIGURATION BELOW.
First of all you must setup APN settings on your tracker (you must get them from your TRACKER SIMCARD
network provider or use website below) and next send these commands to tracker by SMS (30 seconds gap
between each one) APN SETTINGS FOR MOST UK PROVIDERS CAN BE FOUND HERE:
https://www.filesaveas.com/gprs.html
(1) Admin123456 (space) your mobile number eg.(Admin123456 07XXXXXXX)
(2) Apn123456 - apn name that you got from your TRACKER SIMCARD provider
(3) Apnuser123456 - user name that you got from your TRACKER SIMCARD your provider
(3) Apnpasswd123456 - password that you got from your TRACKER SIMCARD provider
(4) Gprs123456
(5) Noadmin123456 (space) your mobile number eg.(Noadmin123456 07XXXXXXX)
There are other features on this app, which are not applicable to this unit. Use this APP for tracking ONLY.
Please note you must have credit on the GPS SIM card to receive the google maps link
Additional Product Commands
6.6.1. Set up via Text: (advanced)
Once the unit has been immobile for 10 minutes you can send a SMS to set the geo-fence location.
Send the following SMS: “stockade+password+space+latitude, longitude; latitude, longitude” to the unit to
set the geo-fence.
6.6 Geo-fence
A Geo fence is a geographical area you define on a map. When the unit passes the boundary of this area it
will send you a message telling you it is passing into or out of the area.
SWTRACK1- 8Page Manual-A6.qxp_Layout 1 22/06/2018 11:29 Page 7

#
To set up the Geo-fence in the app.
Log into app
Touch real time tracking so the GPS has located you.
Back to main menu
Touch the Geo fence button
Press +at top of screen give your fence a name then press save button at top right of screen set the
distance of the Geo fence buy sliding the white circle on the bar at top , this will move in metres to set your
parameter , once set press save button again in top right corner and save again on the following screen .your
Geo fence is now set
###
"! #!#!!# !## !##
## # !###
+*)('&%$#'"!#
%'%#' #
+#+'%#
+*)('&%$#'%#
$##
!%#!%'%#
(#'%#$'&##$&
%##
$&'%#
%$&
%##
%$&'%#
(#'+'&#'%#'#
!#
##
&##
"'&##
(##'%#
!%'(##'#
#'%%'#
%#
%##
%#
(###%#%#
(##'&%$#''(%#
(#%# #'##'#
#'%'&%#&##
(##
%#
(###%#%#
''&%$#' %%' %%'%'
#
SWTRACK1- 8Page Manual-A6.qxp_Layout 1 22/06/2018 11:29 Page 8

FAQ
Can I attach the GPS to my car, motorbike, pet etc..?
Yes, but we not do provide the fixings for this.
How long does the GPS battery last for?
Standby time is 250-400 hours.
How long does the GPS take to charge fully?
Approx. 5-6 hours.
How do I reset my GPS?
Use the ‘reboot device’ command. (This can be found in the SMS command section)
Is the tracker waterproof?
The GPS is IPX6 waterproof, protected against heavy splashing and rain.
I live outside the UK will the tracker work in my country?
Yes, simply buy a PAYG SIM for your market.
How do I put credit on the tracker?
Follow mobile network instructions which come with the SIM card or review online.
Will the tracker work worldwide?
Yes tracking is available worldwide via the online or mobile app tracking.
Does the tracker have real time tracking?
Yes the Android/iOS mobile applications provide real time tracking.
Will the GPS Tracker charge-up off an in-car charger?
In Case tracker device stops responding try to call on tracker number or factory reset device
(command below).
Admin123456 your mobile number here eg.(Admin123456 071XXXXXX)
Format
Noadmin123456 your mobile number here eg.(Noadmin123456 071XXXXXX)
AFTER FACTORY RESET YOU MUST GO BACK TO FIRST STEP OF THIS MANUAL!
Password changing procedure
Send message "password 123456 XXXXXX". XXXXXX is a new password of your choice. Password must
be at least 6 characters and may be numbers or letters. If the password contains letters, they must all be lower
case. Note that if the password is forgotten, the unit will need to be reset at the factory (at your own expense).
Yes, you can charge the GPS off a Micro USB in-car charger. (This is not supplied with the GPS). We have
also supplied hard wires to connect to your vehicles battery
General Notes
WE ARE ALWAYS HAPPY TO HELP - BUT PLEASE DOUBLE CHECK ALL SET-UP IS DONE
CORRECTLY BEFORE CALLING OR E-MAILING - 95% OF CUSTOMER ISSUES ARE AS A
RESULT OF INCORRECT SET-UP!
This device will improve the chance of locating and retrieving a stolen vehicle, but in instances such as
where it fails to report the location due to mobile or GSM signals, or the vehicle is not retrievable, or the
user did not keep sufficient live credit on the SIM for example. Streetwize CANNOT be held liable or
responsible in any way. Please note that specification and information are subject to changes without prior
notice in this manual Any change will be integrated in the latest release. The manufacturer assumes not to
be responsible for any errors or omissions in this document.
Streetwize Accessories: Unit 1 Royce Trading Est, Ashburton Rd West, Trafford Park, Manchester, M17 1RY
www.streetwizeaccessories.com
Last Update: JUNE 2018
SWTRACK1- 8Page Manual-A6.qxp_Layout 1 22/06/2018 11:29 Page 1
Other manuals for SWTRACK1
2
Table of contents
Other Streetwize GPS manuals
