STUDER REVOX B795 User manual


OPERATING
INSTRUCTIONS
REVOX
B795
2
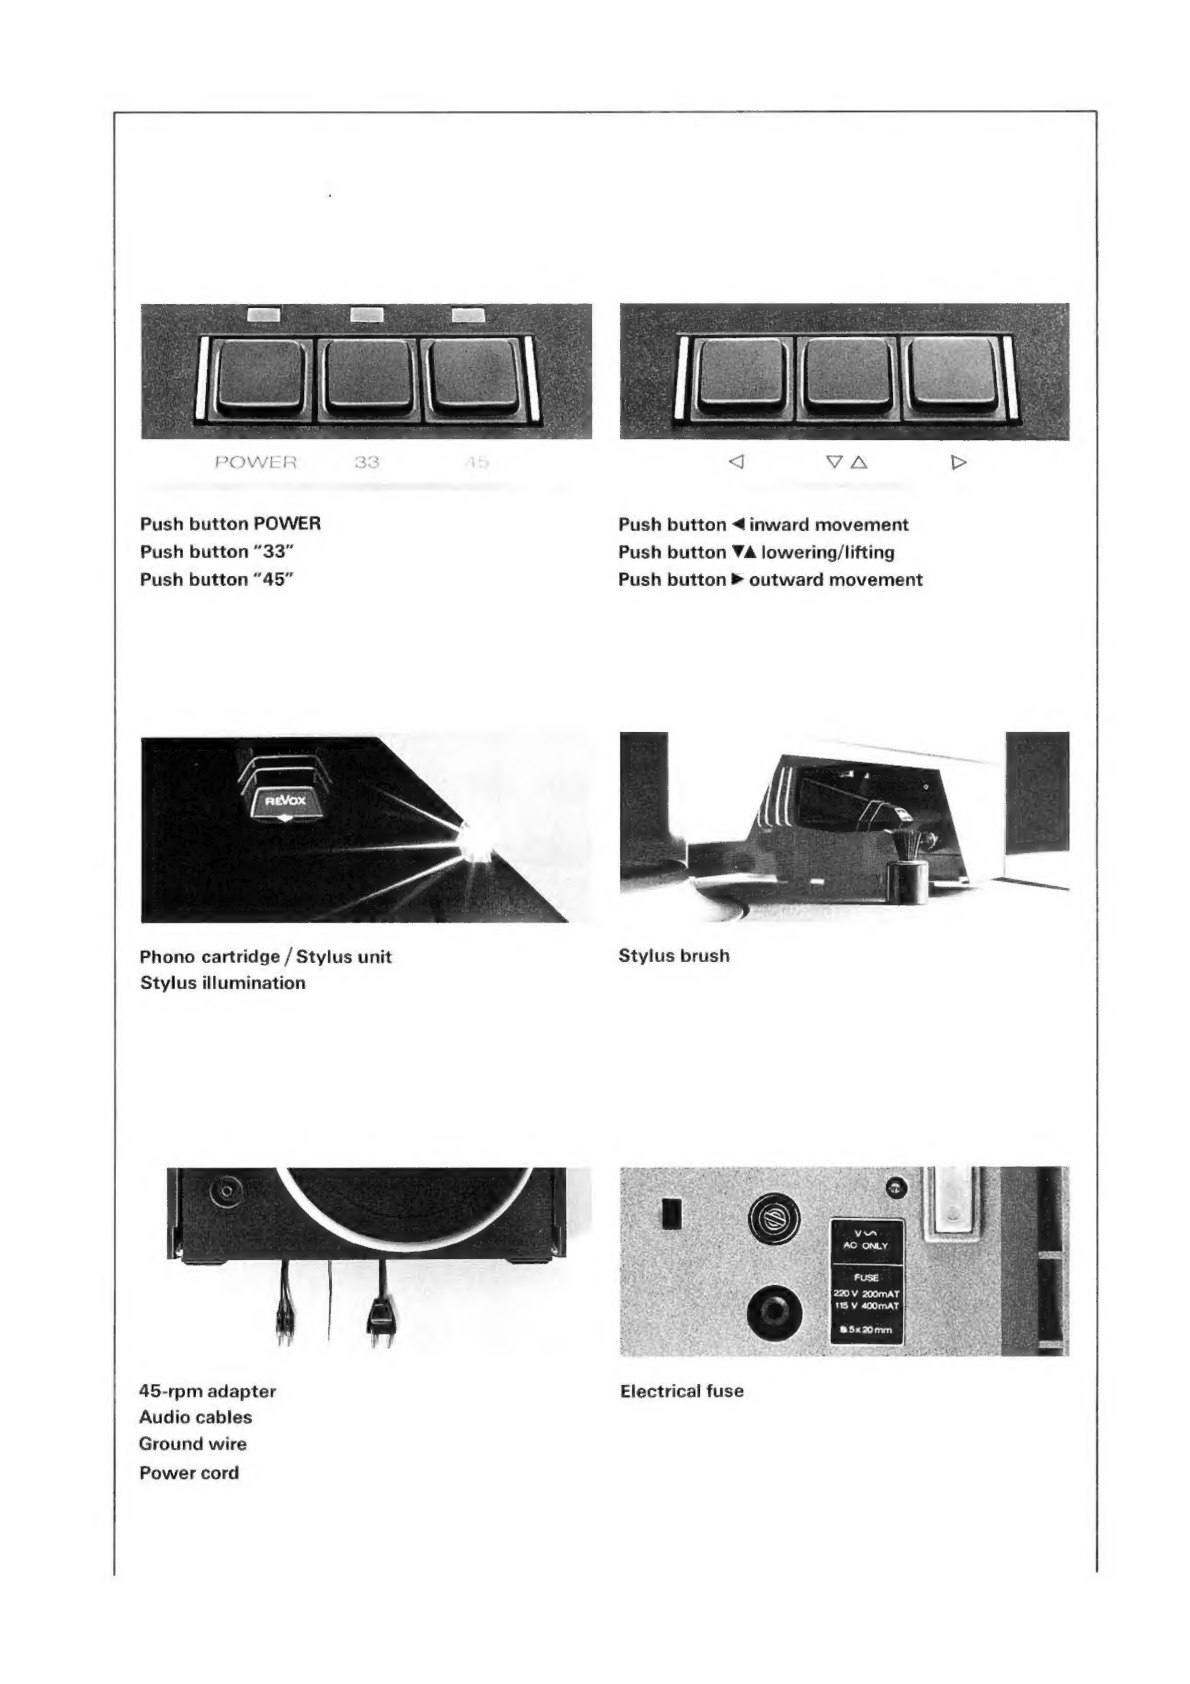
Push
button
POWER
Push
button
“33”
Push
button
“45”
Phono
cartridge
/
Stylus
unit
Stylus
illumination
45-rpm
adapter
Audio
cables
Ground
wire
Power
cord
Push
button
4
inward
movement
Push
button
VA
lowering/lifting
Push
button
©
outward
movement
Stylus
brush
Electrical
fuse
IMPORTANT
NOTES
Protect
your
turntable
from
excessive
heat
and
humidity.
Install
it
in
a
manner
which
ensures
the
free
convection
of
air
through
the
ventilating
louvers.
There
are
no
user
serviceable
parts
inside
the
equipment,
however,
should
itbecome
neces-
sary
to
open
the
turntable,
it
must
first
be
disconnected
from
the
electrical
current
supply.
Be
sure
to
connect
the
unit
to
AC
(50...60
Hz)
mains
supplies
only.
For
opera-
tion
on
different
supply
voltages,
a
wire
jumper
on
the
power
transformer
has
to
be
resoldered
to
cover
the
nominal
voltages
of
100/110/120
V
or
200/220/240
V.
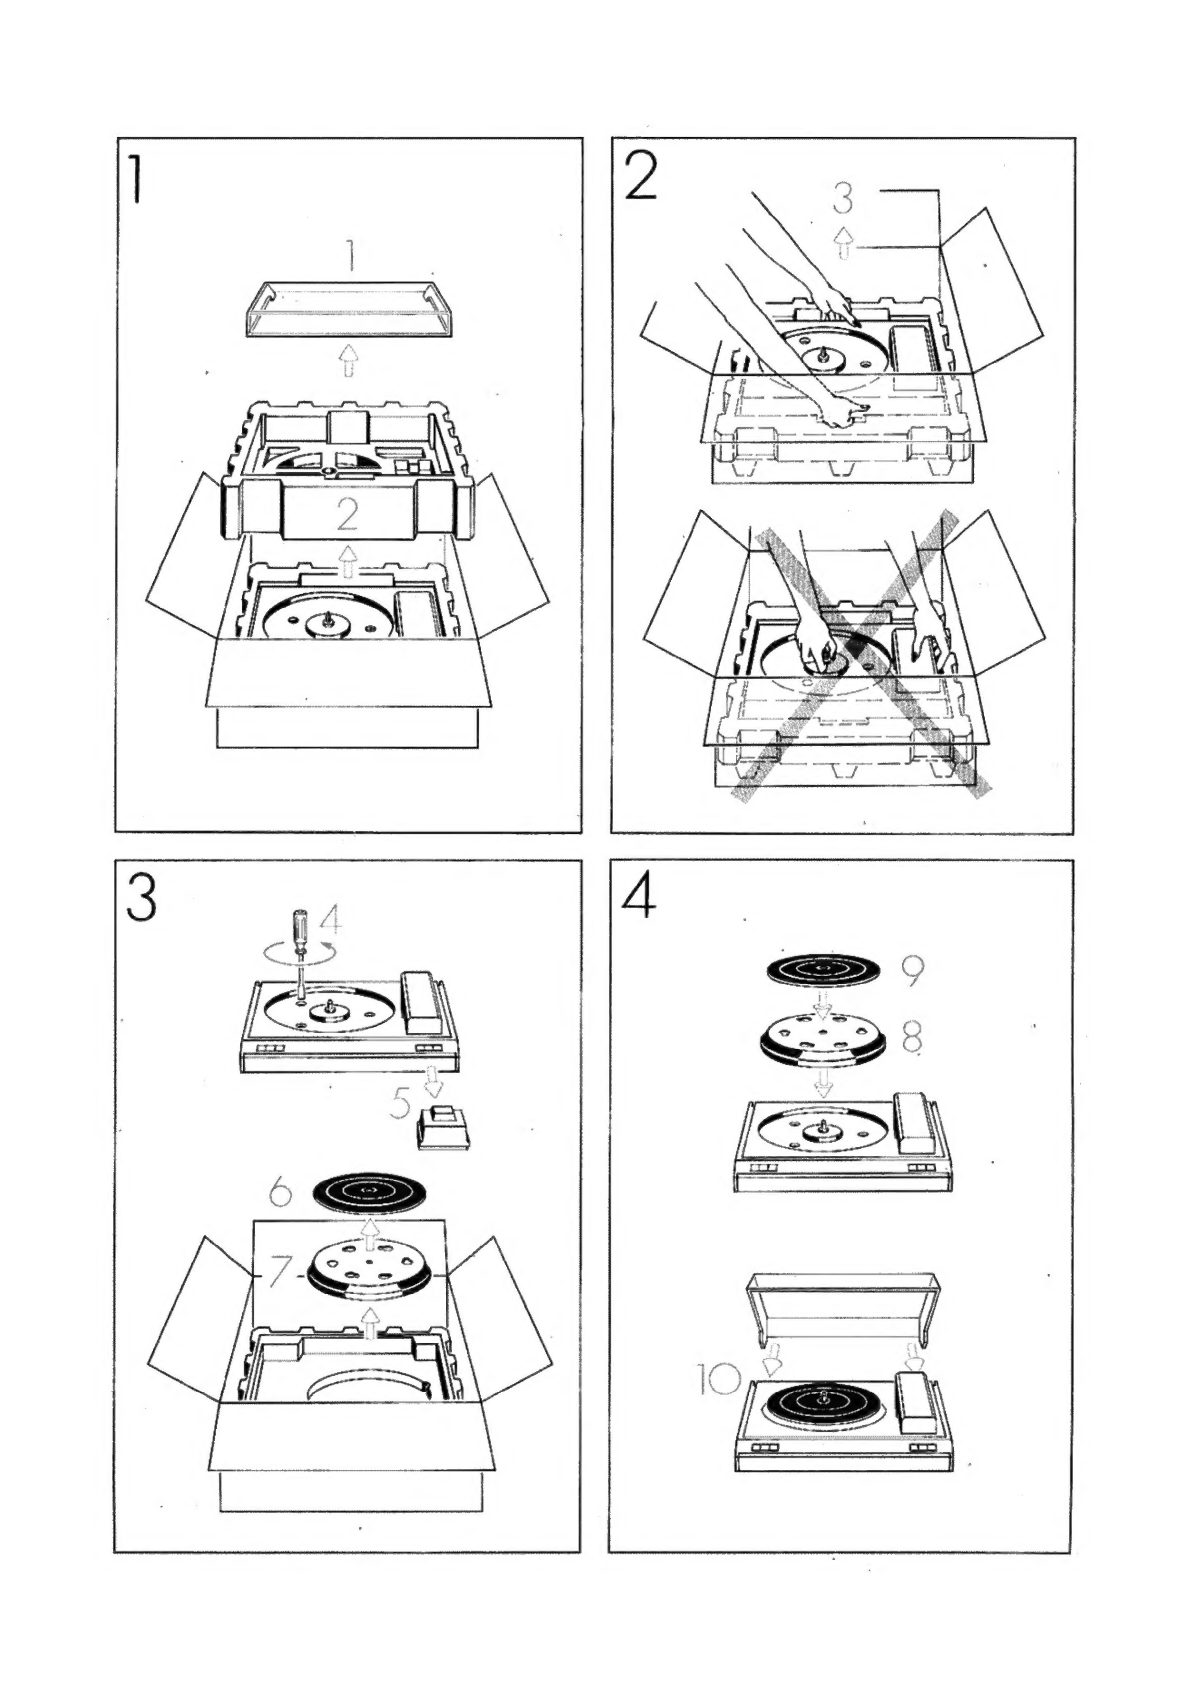
Before
putting
the
equipment
into
operation,
do
not
forget
to
loosen
the
three
transport
screws
(figure
3,
inner
page
of
the
cover).
WARRANTY
For
equipment
purchased
in
Belgium,
the
Federal
Republic
of
Germany,
Austria
and
France
a
special
warranty
application
card
is
either
contained
in
a
plastic
envelope
at-
tached
to
the
outside
of
the
packing
carton
or
is
enclosed
with
the
equipment.
If
this
card
is
missing,
please
request
it
from
your
dealer.
Complete
the
warranty
application
card
and
return
it
to
your
national
distributor
who
will
then
send
you
your
warranty
card.
PACKING
MATERIAL
/TRANSPORT
Do
not
destroy
the
original
packing.
If
you
ever
have
to
transport
your
equipment,
this
special
packing
will
provide
the
best
possible
pro-
tection
for
your
valuable
turntable.
When
transporting
the
turntable
gently
tighten
the
three
transport
screws
(figure
3,
inner
page
of
the
cover).
For
equipment
purchased
in
Switzerland,
the
warranty
responsibility
rests
with
your
dealer.
Please
note
that
the
warranty
is
not
valid
out-
side
the
country
of
purchase.
The
warranty
will
be
voided
if
the
unit
is
tam-
pered
with
or
serviced
by
unauthorized
per-
sonnel.

OPERATING
CONTROLS
AND
ELECTRICAL
CONNECTIONS
POWER
Push
button
POWER
By
pressing
this
push
button,
the
electric
current
supply
is
switch-
ed
on.
The
pilot
light
POWER
becomes
luminous.
By
pressing
this
push
button
a
second
time,
the
electric
current
supply
will
be
switched
off
again
Push
button
“33”
The
operation
of
this
button
selects
the
quartz
referenced
platter
speed
of
33.33
rpm.
The
Light
Emitting
Diode
(LED)
above
this
button
becomes
luminous
when
the
platter
has
reached
its
nominal
speed
Push
button
“45”
The
operation
of
this
button
selects
the
quartz
referenced
platter
speed
of
45.00
rpm.
The
LED
above
this
button
becomes
luminous
when
the
platter
has
reached
its
nominal
speed
Push
button
<4
inward
By
pressing
this
button,
move-
ment
of
the
cartridge
towards
the
center
of
the
turntable
is
effected,
provided
the
arm
support
is
swung
into
its
operating
position
Aslow
movement
is
effected
by
just
tapping
the
button,
contin-
uous
pressing
will
result
in
rapid
movement
Push
button
WA
lowering/
lifting
The
operation
of
this
button
en-
ables
the
lowering
or
lifting
of
the
cartridge
at
any
desired
pointofa
record
Push
button
©
outward
By
pressing
this
button,
move-
ment
of
the
cartridge
towards
the
rim
of
the
turntable
is
effected,
provided
the
arm
support
is
swung
into
its
operating
position,
A
slow
movement
is
effected
by
just
tapping
the
button,
contin-
ucus
pressing
will
result
in
rapid
movement
Linatrack”
tone
arm
support
Turn
the
swivelled
tone
arm
sup-
port
over
the
disk
on
the
platter
Located
underneath
the
cover
of
the
tone
arm
supoort
is
the
just
1%
inch
(40
mm)
long
linear
tracking
tone
arm.
45-rpm
adapter
This
adapter
is
provided
for
the
playing
of
45
rpm
records
(sin-
gles)
with
large
center
hole
Audio
cables
The
cables
are
equipped
with
phono
plugs
for
connecting
to
the
phono
input
of
the
amplifier.
The
plugs
are
marked
with
“L”
for
the
left
channel
and
“R"
for
the
right
channel
Ground
wire
Power
cord
Pick-up
cartridge
in
the
linear
tracking
tone
arm
The
cartridge
is
factory
adjusted
lf
you
intend
to
install
another
cartridge,
enquire
at
your
dealer
about
the
availability
of
the
required
installation
kit
Stylus
brush
Wipes
off
dust
particles
from
the
stylus
when
swivelling
the
arm
support
into
the
operating
posi-
tion
Fuse
100...120
V:
0.4
AT
slow-blow
200...240
V:
0,2
AT
slow-blow
PUTTING
THE
TURNTABLE
INTO
OPERATION
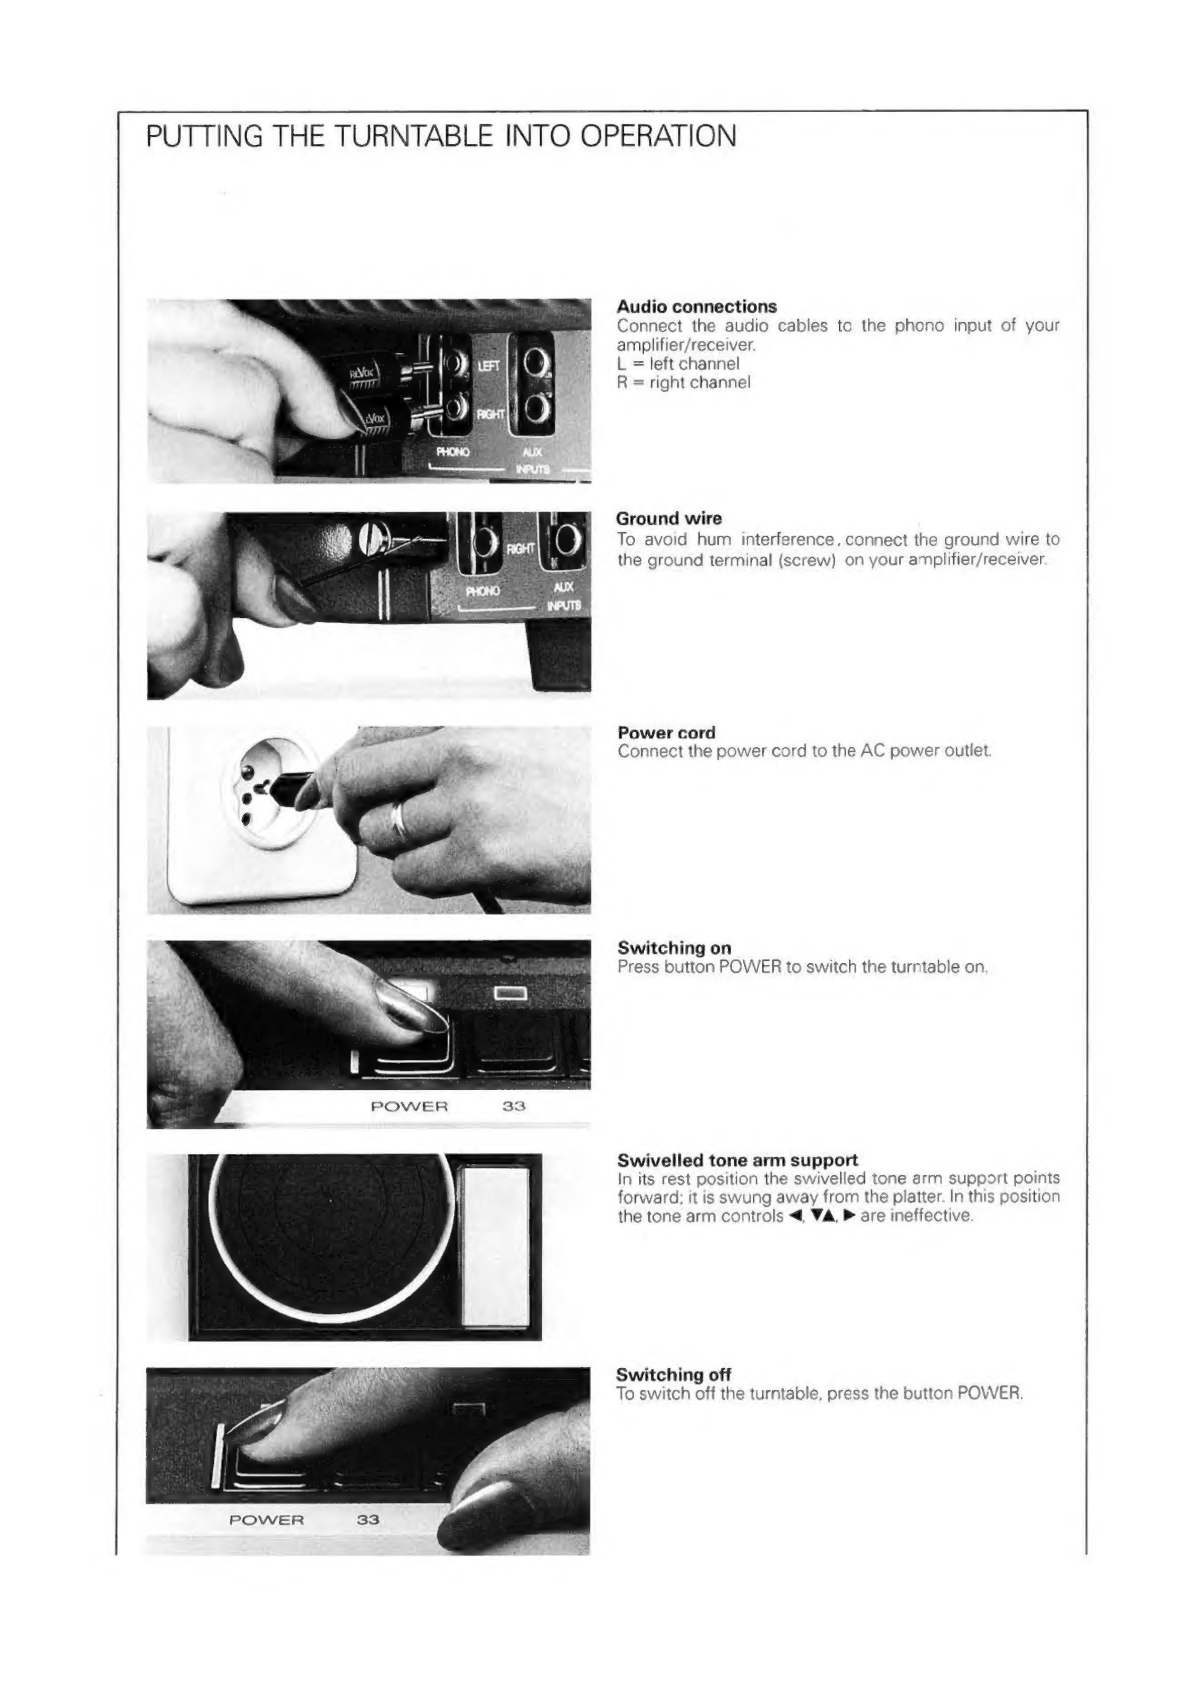
Audio
connections
Connect
the
audio
cables
to
the
phono
input
of
your
amplifier/receiver
L
=
left
channel
R
=
right
channel
Ground
wire
To
avoid
hum
interference,
connect
the
ground
wire
to
the
ground
terminal
(screw)
on
your
amplifier/receiver
Power
cord
Connect
the
power
cord
to
the
AC
power
outlet
Switching
on
Press
button
POWER
to
switch
the
turntable
on
Swivelled
tone
arm
support
In
its
rest
position
the
swivelled
tone
arm
support
points
forward;
it
is
swung
away
from
the
platter.
In
this
position
the
tone
arm
controls
<,
WA,
P
are
ineffective.
Switching
off
To
switch
off
the
turntable,
press
the
button
POWER,

OPERATION
Playing
a
33-rpm
record
Place
the
record
onto
the
platter
and
press
the
button
“33”
Swivel
the
tone
arm
support
over
the
record
until
it
locks
into
a
detent.
The
stylus
illumination
will
thus
be
switched
on
automatically
and
the
platter
begins
to
rotate.
As
soon
as
the
platter
has
reached
nominal
speed
the
LED
33
becomes
luminous,
Press
button
WA
lowering.
The
tone
arm
lowers
itself
onto
the
record
and
the
stylus
illumination
is
switched
off
auto-
matically.
Playing
a
45-rpm
record
If
the
record
possesses
a
large
center
hole,
first
place
the
adapter
and
then
the
record
onto
the
platter
Swivel
the
arm
support
over
the
record
until
it
locks
and
press
button
"45".
Press
the
button
<4{inward)
and
keep
it
depressed
until
the
tone
arm
has
been
transported
over
the
record's
run-in
groove.
Press
button
WA
(lowering).
At
the
end
of
the
record,
the
arm
will
lift
and
return
auto-
matically
to
its
start
position

GENERAL
Tone
arm
control
When
the
tone
arm
has
reached
the
end
of
a
record
(run-
out
groove)
it
gets
transported
automatically
to
its
start
position,
This
sequence
may
be
interruoted
by
pressing
the
button
<.
The
buttons
<
and
®
may
be
pressed
at
any
time,
even
in
the
midst
of
playing.
They
effect
automatic
lifting
of
the
arm
followed
by
its
transportation
in
the
desired
direction.
Automatic
control
functions
When
reaching
a
record's
run-out
groove
or
when
swivell-
ing
the
tone
arm
support
away
from
a
playing
record,
lifting
of
the
tone
erm
is
effected
and
this
is
followed
immediately
by
its
return
to
the
start
position.
After
the
tone
arm
has
arrived
at
its
start
position
the
platter
motor
becomes
switched
off.
By
pushing
the
button
Wa
play-
ing
can
be
initiated
again
at
any
time.
The
design
of
the
tone
arm
and
the
floating
chassis
is
highly
insensitive
to
vibrations
and
mechanical
shocks.
Removal
of
cover
from
the
arm
support
For
removing
the
cover
from
the
arm-support,
first
trans-
port
the
cartridge
to
a
half-way
position
then
switch
off
the
electric
current
supply.
Swivel
the
arm-support
away
from
the
platter
to
its
rest
position.
Reach
under
the
sides
of
the
cover
and
while
gently
pulling
the
sides
outwards
lift
the
cover
away
from
the
arm-support.
Tracking
force/limit
of
vertical
movement
Tracking
force
is
optimized
by
factory
adjustment
(screw
©).
Vertical
movement
is
also
limited
by
factory
adjustment
(screw
@).
The
stylus
can
not
touch
the
rubber
mat.
Should
adjustments
become
necessary
follow
the
instruc-
tions
supplied
with
the
REVOX
installation
kit.
Stylus
replacement
First
remove
the
cover
from
the
arm-support.
With
thumb
and
index
finger
of
one
hand
take
a
firm
grip
on
the
black
part
of
the
cartridge
and
carefully
pull
off
the
stylus
unit
with
your
other
hand.
When
inserting
the
new
stylus
unit
hold
the
black
part
of
the
cartridge
firmly
while
carefully
pushing
the
stylus
unit
into
place.
Replacing
a
blown
fuse
To
replace
the
fuse,
the
turntable
must
first
be
disconnected
from
the
elsctric
current
outlet.
Next,
lift
off
the
platter
from
the
drive
motor
and
tighten
the
three
transport
locking
screws.
Lift
complete
turntable
on
one
side
to
make
itstand
onthe
opposite
side.
Unscrew
the
fuse
cap
and
replace
the
defective
fuse.
The
required
fuse
ratings
are
listed
in
the
technical
data
section.
After
replacement
of
the
fuse,
proceed
in
reversed
order
of
the
steps
described
above
to
make
the
unit
operational
again

TECHNICAL
DATA
Turntable
drive:
Turntable
speeds:
Speed
accuracy:
Platter
(Turntable
proper):
Weight
(Mass):
Run
up
time:
Braking
time:
Wow
and
flutter*:
weighted:
linear:
Rumble
to
signal
ratios*™*:
Tone
arm:
Lateral
tracking
angle
error:
Skating
compensation:
Tracking
force:
Tone
arm
lowering:
Muting:
Tone
arm
follow-up:
Run-out
switch:
Automatic
functions:
Swivelling
the
tone
arm
support
in:
Swivelling
the
tone
arm
support
out:
Quartz
referenced
direct
drive
33.33
and
45.00
rpm
0.01%
Diameter
12.32
inches
(313
mm}
4
Ibs.
10
ozs.
(2.1
kg)
better
than
2
seconds
at
33.33
rpm
better
than
2
seconds
from
45
to
33.33
rom
better
than
0.05%
better
than
0.1%
better
than
48
dB
(DIN
45539
A
weighting)
better
than
50
dB
(DIN
45539A
weighting
plus
20
Hz
high
pass)
better
than
70
dB
(DIN
45539
B)
linear
tracking
tone
arm
with
servo-electronic
follow-up
control
less
than
0.5°
not
required
with
a
linear
tracking
system
adjustable
from
8...20
mN
(0.8...2
g)
electronically
controlled,
pneumatically
damped
electronically
muted
until
the
stylus
has
contacted
the
disc
Opto-electronic
sensing
with
LED
as
light
source,
servo
electronics
and
DC
motor
Automatically
activated
via
servo-electronics
turntable
platter
starts
to
rotate
at
the
selected
speed
a)
immediate
lifting
of
the
cartridge
b)
tone
arm
returns
to
start
position
c)
turntable
stops,
stylus
illu-
mination
switched
off
*measured
with
IEEE
193-1971
weighting
and
an
optimally
centered,
direct
cut
laquer,
L+R
**
ail
rumble
measurements
taken
in
position
“mono”
with
a
statically
discharged
disc
and
the
“new”
RIAA
reproduce
equali-
zation.
THE
REVOX
PRODUCT
RANGE
REVOX
offers
a
complete
range
of
hi-fi
system
components.
They
may
be
used
together
with
your
model
B795
turntable
in
any
desired
combi-
nation:
REVOX
B77
tape-recorder
REVOX
B750
integrated
amplifier
REVOX
B760
digital
synthesizer
FM
tuner
REVOX
B780
microprocessor
synthesizer
FM
receiver
REVOX
P20
MDR
20
Hz...20
kHz
+3/-1
dB
better
than
2
dB
better
than
25
dB
at
1
kHz
40
pm/mN
{static
value
at
recommended
tracking
force)
better
than
85
pm
at
12.0
mN
(1.2
grams)
Recommended
tracking
force:
12,0
mN
(1.2
grams),
factory
set
Stylus
tip
radius:
5x18
ym
elliptical,
nude
diamond
better
than
65
dB
47
kohms/470
pf
(220
pf
already
in
cable)
Phono
cartridge:
Frequency
response:
Channel
balance
(1
kHz):
Channel
separation:
Compliance:
Trackability
(at
300
Hz):
Signal
to
noise
ratio:
Recommendedioad:
Operating
controls:
Turntable
drive:
2
tactile
feedback
keys
for
33.33
and
45
rpm,
1
power
switch
Tone
arm:
3
tactile
feedback
keys
for
fast
inward
or
outward
movement
plus
lowering
and
lifting
of
the
pick-up
cartridge;
built-in
stylus
iumination.
General:
21
IC's,
19
transistors,
29
diodes,
4
LEDs,
2
bridge
type
rectifiers
Components
list:
Electric
current
supply
100/110/120
V
+
10%,
(solder
connections):
200/220/240
V
+
10%
50...60
Hz
Fuse:
100...120
V:
0.4
A
slow-blow
200...240
V:
0.2
A
slow-blow
Weight:
20
Ibs.
1
oz
(9.1
kg)
17.7x5.6x
15.6
inches
(449
x
142
x
395
mm)
height
13.4
inches
(340
mm)
Dimensions
(WxHxD):
Dust
cover
closed:
Dust
cover
open:
Ask
your
dealer
for
the
REVOX
full-line
catalog.

TURNTABLE
DRIVE
ELECTRONICS
MOTOR
ORIVER
eau
;
Lt.
VOLTAGE
CONVERTER,
COMPARATOR
DRIVE
ENABLE
FROM
ARM
ELECTRONICS
PLATTER
MOTOR
DISPLAY
ENABLE
WINDOW
COMPARATOR
SAMPLE
AND
HOLD
PRO-
RAMP
—,
GENERATOR
3.072
MHz
TONE
ARM
ELECTRONICS
Uwe
tier
ARM
SwiIcH SWITCH
SWATCH
Cee
ae
eects
eis
:
o%
RETURN
FF
PRE:
‘
AMPLIFIER
LL
END
OF
RECORD
i
ty
TRIGGER
LAY
'
SWITCH
TONE
ARM
MOTOR
POWER
AMPLIFIER
RETURN
i
UP/DOWN
SERVO
_—
wh,
L_
:
ADVANCE
SWITCH
MUTING
RELAY
LIGHT
DRIVE
ENABLE
TO
TURNTABLE
ORIVE
ELECTRONICS

Witertiieraiticstg
WILLI
STUDER
@
roll
Oo
fe
(-lantelolnvasivair4-1a
(elite!
Althardstrasse
30
WILL]
STUDER
GmbH
D-7827
Léffingen/
Germany
Talstrasse
7
Worldwide
Distribution
REVOX
ELA
AG
CH-8105
Regensdorf/Switzerland
INintelaettine
kim
ce)
Table of contents


 operating instructions")


