Studio Tech R-4 User manual

THANK YOU FOR BUYING OUR PROFESSIONAL DIGITAL RECORDER. PLEASE READ THIS MANUAL CAREFULLY
BEFORE OPERATION AND KEEP IT FOR FUTURE REFERENCE.
PROFESSIONAL DIGITAL RECORDER
R-4
INSTRUCTION MANUAL
1
INTRODUCTION
2
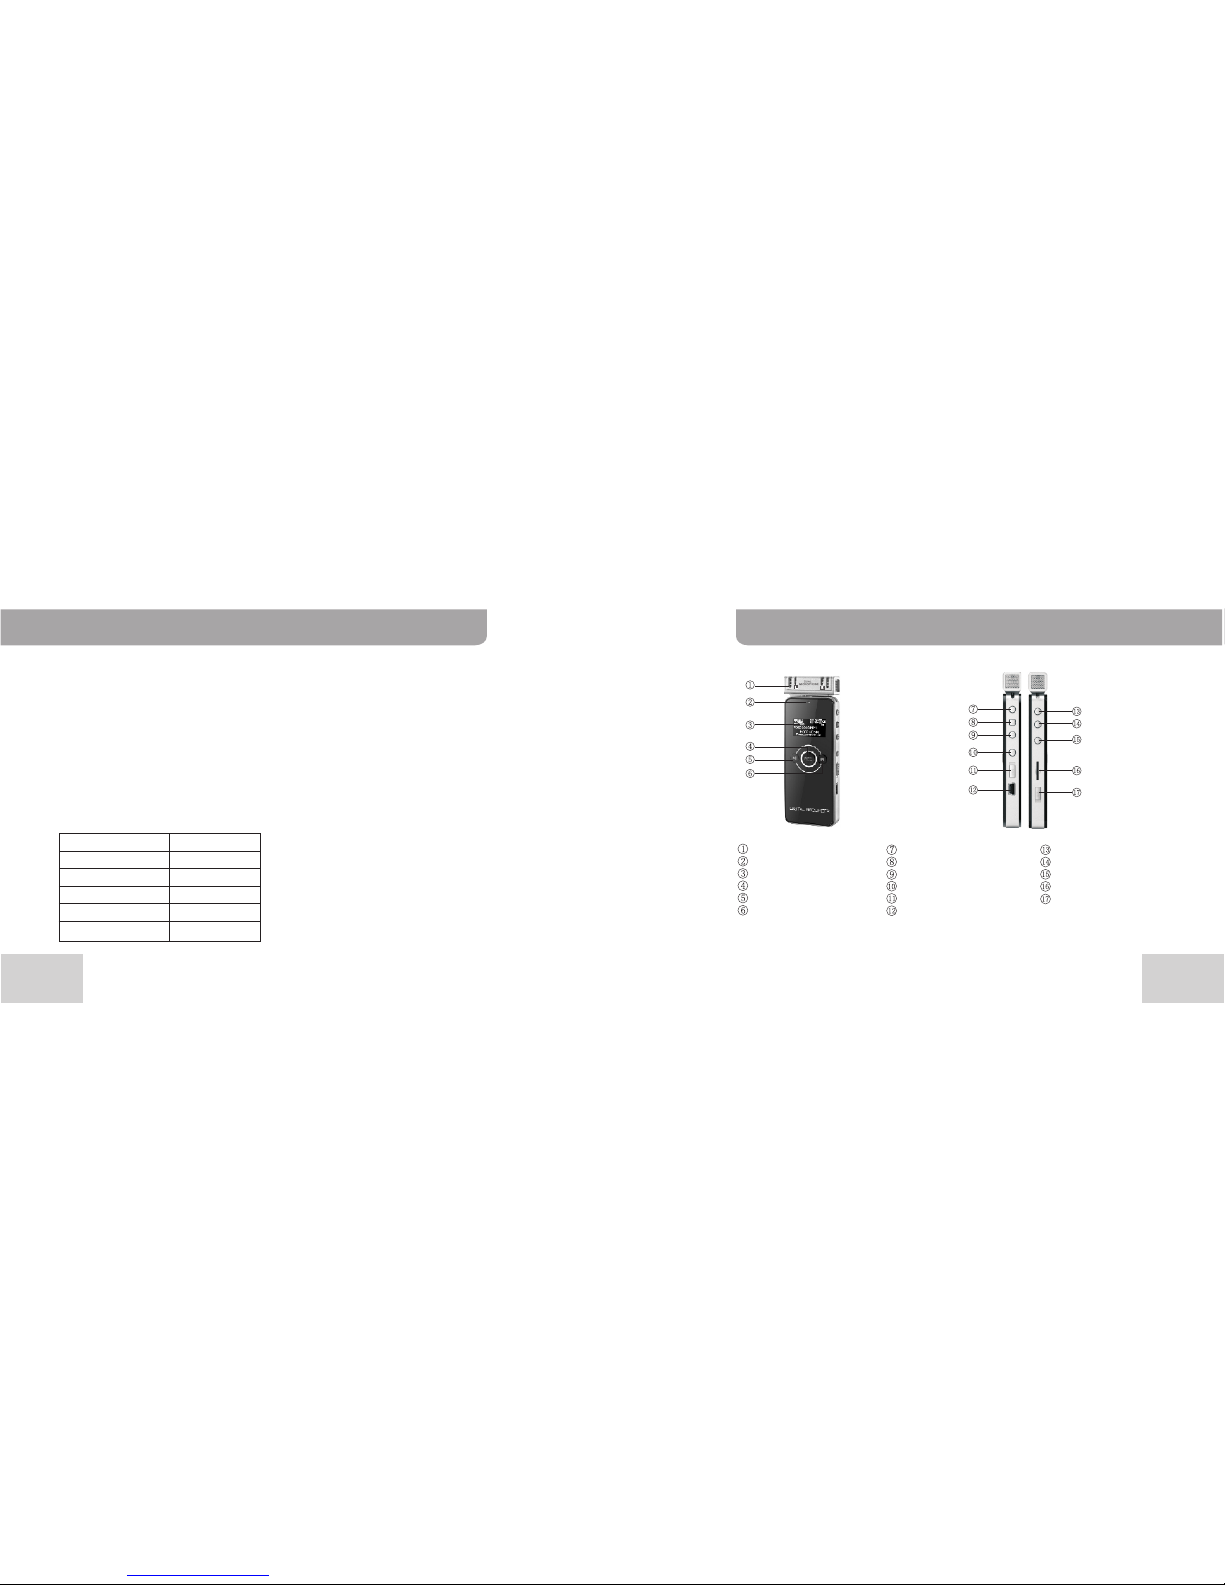
External MIC
LED indicator
LCD Display
Record
Play/Pause
This package contains following parts.
ITEM QTY
Recorder 1PC
USB cable 1PC
Earphone 1PC
External MIC 1PC
User Manual 1PC
PARTS DESCRIPTION
Stop/Folder
Previous
Menu
Next
AGC: Auto gain control
Power on/off
USB port
Volume up
Volume down
Delete/A-B
TF card slot
Lock
1. PCM linear recording
2. Support 32GB TF card
3. 10-level noise reduction
4. 16-level variable speed playback
5. 90-level VOR
6. Clock SYNC
7. 3-level AGC
8. FM radio
FEATURES:
PAC K A GE CONTENTS:

4
3
REC
PLAY
STOP/
FOLDER
VOL+
VOL-
DEL/A-B
PREVIOUS
EQ mode
File bit rate and type
Existing Folder name
MIC sensitivity
File number/Total file numbers
File name
File time
Repeat mode
Clock
Battery power indicator
Auto power on
Recording quality
VOR: voice control
Auto power off
Recording time remained
External TF card signal
KEY BUTTONS FUNCTION
Press and hold to power on/off. In standby mode press shortly to start recording.
Press again to pause recording.
Press to start playing. Press again to pause playing.
In recording mode press shortly to stop recording and save recorded file automatically.
During playing press shortly to stop playing. In standby mode press shortly to select
folder, press and hold to enter selected folder. In setup mode press shortly to return.
During playing press shortly to increase volume. In standby mode press shortly to select
recording quality. In setup mode press shortly to adjust parameters. In file browsing mode
press shortly to go to last page.
During playing press shortly to decrease volume. In standby mode press shortly to select
MIC sensitivity. In setup mode press shortly to adjust parameters. In file browsing mode
press shortly to go to next page.
In standby mode press shortly to delete selected file, press 2 times to delete all files in
selected folder, press and hold to switch between Mp3 and WAV interface. During playing
press once to set repeat starting point A, press again to set repeat ending point B.
In standby mode and file browsing mode press shortly to go to last track. During playing
press and hold to fast rewind. In FM mode press shortly to decrease FM frequency
(interval 0.1MHz), press and hold to search a lower frequency radio station.
PARTS DESCRIPTION

6
5
NEXT
MENU
AGC/VOR
ON/OFF
HOLD
In standby mode press and hold to enter LINE IN setup. In standby mode and file
browsing mode press shortly to go to next track. During playing press and hold to fast
forward. In FM mode press shortly to increase FM frequency (interval 0.1MHz), press
and hold to search a higher frequency radio station.
KEY BUTTONS FUNCTION
In standby mode press shortly to enter recording setup menu, press and hold to enter
main menu. During playing press shortly to enter playback setup menu, press and
hold to change lyrics display mode. In FM mode press shortly to enter FM setup menu.
In standby mode press shortly to enter AGC setup menu, press and hold to enter VOR
setup menu. During playing press shortly to enter variable speed playback setup menu.
Main power on/off. In off position it will cut off the power.
In ON position it will lock functions of all buttons.
OPERATION
1. POWER ON/OFF
1.1 Slide ON/OFF switch on left side of the unit to ON position. Then press and hold REC button to turn it on.
LCD screen will display WELCOME and then enter in standby mode.
1.2 Press and hold REC button to exit standby mode. If you are not going to use the unit for a long period of
time please slide ON/OFF switch to OFF position to cut off power. It will save battery life.
1.3 This unit supports AUTO power ON/OFF. Please refer to introduction of CLOCK.
2. CHARGING
2.1 This unit is with built-in lithium battery. Please charge the battery when battery power is low.
2.2 This unit supports charging via PC. Connect this unit to USB port of PC with supplied USB cable for
charging. After connecting to PC press MENU button shortly to enter standby mode.
2.3 This unit supports charging also by external AC 230V/50HZ, DC5V/350mA AC/DC adapter(not included).
After connecting external AC/DC adapter press MENU button shortly to enter standby mode.
2.4 Charging time is 3~4 hours.
NOTE: During charging please keep ON/OFF button on left side of unit in ON position.

8
7
7
OPERATIONOPERATION
3. RECORDING
3.1 RECORDING WITH BUILT-IN MIC(VOICE RECORDING)
3.1.1 Remove the external MIC on top of unit. Press REC button to start recording. Screen will display
recorded file name, MIC sensitivity, recording quality, VOR status, recording time, time remained
for recording, clock etc.
3.1.2 During recording press REC button to pause recording. Press again to resume recording.
3.1.3 Press STOP button to stop recording. Recorded file will be saved automatically in VOICE folder.
3.1.4 Press PLAY button to play recorded file.
3.2 RECORDING WITH EXTERNAL MIC(VOICE RECORDING)
3.2.1 SINGLE MIC: Insert external single MIC into MIC IN jack on top the unit. In RECORD setup menu
set line in mode to MIC(refer to 4.3). Then press REC to start recording. Press STOP button to
stop recording and save recorded file in VOICE folder.
3.2.2 DUAL MIC: Insert supplied dual MIC into MIC in jack. In RECORD setup menu set line in mode to
MIC(refer to 4.3). Then press REC to start recording. Press STOP button to stop recording and
save recorded file in VOICE folder.
3.3 TELEPHONE RECORDING(VOICE RECORDING)
In RECORD setup menu set line in mode to MIC (refer to 4.3). Connect telephone adapter with this
unit with 3.5mm cable. And connect telephone adapter with your telephone. See following illustration.
When you make a call press REC to start recording. Press STOP button to stop recording and save
recorded file in VOICE folder.
NOTE: Telephone adapter, telephone cable and 3.5mm cable are optional accessories.
3.4 RECORDING WITH EXTERNAL AUDIO SOURCE(LINE RECORDING)
Connect external audio source(such as PC, CD player etc) to MIC IN jack. In RECORD setup menu
set line in mode to LINE(refer to 4.3). Then press REC to start recording. Press STOP button to stop
recording and save recorded file in LINE folder.
3.5 FM RECORDING: In FM mode select radio station you want to record. Then press REC to start
recording. Press STOP button to stop recording and save recorded file in FM folder.
3.6 MONITORING: In RECORD setup menu( refer to 4.5) turn on monitoring. Insert earphone into PHONE
jack to monitor recording.
3.7 IMPORTANT NOTICE
3.7.1 In line recording mode please set input volume to suitable level to avoid distortion.
3.7.2 If screen displays FULL please upload files in recorder to computer to have more memory. Or you will
be not able to record.
3.7.3 This unit has AGC function. For long distance recording please set AGC to HI.
3.7.4 Before operation please check LOCK button is in OFF position.

10
9
OPERATIONOPERATION
4. RECORD SETUP
4.1 RECORDING QUALITY
4.1.1 In standby mode press VOL+ button repeatedly to adjust recording quality. Press MENU button to
confirm.
4.1.2 Or in standby mode press MENU button shortly to enter RECORD setup menu. Choose RECORD
QUALITY submenu to set recording quality. Press MENU button to return.
XQ: Super High-quality PCM linear recording, 348Kbps, WAV
HQ: High quality, 192 Kbps, Mp3
SP: Standard quality, 128 Kbps, Mp3
LP: Low quality for long time recording, 64 Kbps, Mp3
4.2 MIC SENSITIVITY
4.2.1 In standby mode press VOL- button repeatedly to adjust MIC sensitivity(HI, MD, LO). Press MENU
button to confirm.
4.2.2 Or in standby mode press MENU button shortly to enter RECORD setup menu. Choose MIC
SENSITIVITY submenu to set MIC sensitivity. Press MENU button to return.
HI: High sensitivity
MD: Medium sensitivity
LO: Low sensitivity
4.3 LINE IN
4.3.1 In standby mode press and hold NEXT button to enter LINE IN setup menu. Press PREVIOUS/NEXT
button to select suitable line in mode. Press MENU button to return.
4.3.2 Or in standby mode press MENU button shortly to enter RECORD setup menu. Choose LINE IN
submenu to select suitable line in mode. Press MENU button to return.
4.3.3 LINE IN mode:
LINE: This mode is suitable for audio source with high output such as CD, PC etc.
MIC: This mode is suitable for audio source with low output such as external single MIC, dual MIC
and telephone
4.3.4 Default line in mode is MIC.
4.4 VOR
4.4.1 In standby mode press and hold AGC button to enter VOR setup submenu to turn on/off VOR.
4.4.2 Or in standby mode press MENU button shortly to enter RECORD setup menu. Choose VOR
submenu to turn on/off VOR.
4.4.3 When VOR is turned on you can set VOR level. There are 90 VOR levels. Big level need louder voice
to start recording.
4.4.4 After VOR is turned on the recorder will start recording or pause recording according to voice level
received. This will save memory.
4.5 MONITOR: In standby mode press MENU button shortly to enter RECORD setup menu. Choose
MONITOR submenu to turn on or off monitor.
4.6 AGC: In standby mode press AGC button shortly to enter AGC setup submenu.
Or press MENU button shortly to enter record setup menu. Choose AGC submenu to
set AGC level: HI, MD, LO. When AGC is in HI level low level voice can be recorded.
4.7 NOISE REDUCTION:
4.7.1 This unit is with intelligent noise reduction function. It can filter environment noise during recording.
4.7.2 In standby mode press MENU button shortly to enter RECORD setup menu. Choose NOISE
REDUCTION submenu to set noise reduction level(0~10).

12
11
OPERATIONOPERATION
5. PLAYBACK SETUP
During playing press MENU button shortly to enter playback setup.
5.1 REPEAT: There are 5 repeat modes: repeat one, repeat all, normal, random and browse.
In playback setup menu choose REPEAT submenu. Press PREVIOUS/NEXT button to select repeat
mode. Press MENU button to confirm.
5.2 EQ: There are 7 EQ modes: natural, rock, pop, classic, soft, jazz, bass.
In playback setup menu choose EQ submenu. Press PREVIOUS/NEXT button to select EQ mode.
Press MENU button to confirm.
5.3 VARIABLE SPEED: There are 16 levels variable speed playback: -8~+8. In playback setup menu
choose VARIABLE SPEED submenu. Press PREVIOUS/NEXT button to select playback speed level.
0 is standard level.
5.4 A-B REPEAT: During playing press DEL button to set repeat starting point. Press again to set repeat
ending point. Then the unit will repeat playing content between point A and B. Press PLAY button to
return to normal playback.
5.5 REPEAT TIMES: To set A-B repeat times: 1~10. Default setting is 5 times.
5.6 REPEAT INTERVAL: To set A-B repeat interval: 1~10 seconds. Default setting is 1s.
6. FILE MANAGER
6.1 This unit has 4 folders in built-in memory: VOICE, LINE, FM, MUSIC. VOICE, LINE and FM folders
are default folders for recorded files. We suggest to save music files in MUSIC folder.
6.2 In standby mode press STOP button repeatedly to select folder.
6.3 If screen displays FULL please upload files in recorder to computer. Or recording is not allowed.
6.4 Users can set up their own folders in built-in memory to us it as a flash drive. But this unit supports
only Mp3 and WAV format files.
6.5 File list: In standby mode press and hold STOP button to list all files in existing folder. Press VOL+
or VOL- to go to last or next page. Press PREVIOUS or NEXT button to select file. Press STOP
button to return to last menu.
6.6 Delete file: In standby mode press DEL button shortly to delete selected file, press 2 times to delete
all files in selected folder. Only MP3 and WAV files can be deleted. To delete other format files please
connect this unit to computer.
6.7 File name: Voice recorded files name starts with V. Line recorded files name starts with L. FM recorded
files name starts with F. For example V0810001. V means voice recorded file. 0810 means recorded
date Aug 10th. 001 means the first recorded file on Aug 10th.
6.8 Mp3 and WAV interface change: In standby stop mode press and hold DEL button to switch between
Mp3 and WAV interface. In Mp3 interface only Mp3 files are listed and can be operated. In WAV
interface only WAV files are listed and can be operated.

14
13
OPERATIONOPERATION
7. FM RADIO
7.1 In standby mode press and hold MENU button to enter main menu. Choose FM and press MENU
to enter FM mode. Choose a FM frequency. Press PREVIOUS or NEXT button to adjust frequency
manually(Frequency interval is 0.1MHz). Press and hold PREVIOUS or NEXT button to search a
lower or higher frequency radio station automatically and save it in memory.
7.2 During playing press REC button shortly to record selected FM radio station. Press STOP button
to delete selected FM radio station from memory. Press and hold STOP button to exit FM.
7.3 FM main menu: In FM mode press MENU button to enter FM main menu.
7.3.1 Save FM radio stations manually: After search a radio station manually choose SAVE in FM
setup menu to save searched radio station.
7.3.2 FM recording: During playing FM press MENU shortly to enter FM setup menu. Choose FM
recording to start recording. Press STOP button to save recorded file in FM folder.
7.3.3 Delete FM radio station: In FM setup menu press PREVIOUS or NEXT button to select DELETE
ONE or DELETE ALL and press MENU button to confirm deleting.
7.3.4 FM band: In FM setup menu choose normal FM band or Japan FM band and press MENU to
confirm. Normal FM band: 87~108MHz; Japan FM band: 76~90MHz
NOTE: Before using FM please connect headphone to be used as antenna. Or it is possible no radio
stations can be searched.
8. CLOCK
In standby mode press and hold MENU button to enter main menu. Press
to select CLOCK and press menu to enter CLOCK setup submenu.
8.1 CALENDAR: In CALENDAR setup interface press PREVIOUS or NEXT to adjust month. Press VOL+
or VOL- to adjust date. Press MENU to confirm and return to last interface. Press STOP to cancel and
return to last interface.
8.2 CLOCK: In CLOCK setup interface press PREVIOUS or NEXT to select YEAR/MONTH/DATE/HOUR/
MINUTE/SECOND and press VOL+ or VOL- to adjust parameters. Press MENU to confirm and return
to last interface. This unit has CLOCK SYNC function. After connecting this unit with PC, clock will be .
synchronized with PC clock.
8.3 AUTO POWER ON
8.3.1 ON/OFF: Choose AUTO POWER ON and press menu to select ON or OFF.
8.3.2 Period : One (need to set power ON date. Valid for one time only), everyday, every week (same day
of every week).
8.3.3 Power on time: Press PREVIOUS or NEXT to select HOUR/MINUTE and press VOL+ or VOL- to
adjust parameters.
8.4 AUTO POWER OFF
8.4.1 ON/OFF: Choose AUTO POWER OFF and press menu to select ON or OFF.
8.4.2 Period : One( need to set power ON date. Valid for one time only), everyday, every week (same day
of every week).
8.4.3 Power off time: Press PREVIOUS or NEXT to select HOUR/MINUTE and press VOL+ or VOL- to
adjust parameters.
PREVIOUS or NEXT button

16
15
OPERATIONOPERATION
9. SYSTEM SETUP
In standby mode press and hold MENU button to enter main menu. Press
to select SYSTEM SETUP and press menu to enter SYSTEM SETUP submenu.
9.1 MEMORY SELECT: Users can select built-in flash memory or TF card to save recorded files. If TF
card is selected, but TF card is not connected, unit will save recorded files in built-in flash memory
and memorize built-in flash memory as default memory.
9.2 PASSWORD
9.2.1 In PASSWORD interface choose PASSWORD(OFF) and press MENU to turn it on. Default password
is 0000.
9.2.2 After password function is turned on users can change password. Press PREVIOUS or NEXT button
to select number position and press VOL+ or VOL- to change numbers of each position. Press
MENU button to confirm and return to last interface.
9.2.3 To turn off password function choose PASSWORD(ON) and press MENU. A window will display
asking for existing password. Type in the password you set. If you type in wrong password you will
not be able to turn off password function.
9.2.4 If you have set password, when turn unit on or connect it to PC you need to type in correct password
to operate this unit. If you type in wrong password 3 times unit will be turned off automatically.
NOTE: To avoid possible damage or loss of data in this unit, if you want to set password please write down
your password and keep it in save place.
9.3 BACKLIGHT: Choose BACKLIGHT and press PREVIOUS or NEXT to adjust backlight time.
0: light always; 5/10/15/20/25/30: backlight will be off after 5/10/15/20/25/30 seconds.
9.4 LANGUAGE: This unit supports English only.
9.5 INFO: To check system info, memory size.
9.6 RESET: To reset all setting to default settings. Password can not be reset to default setting.
PREVIOUS or NEXT button
10. DATA TRANSFER
Use supplied USB cable to connect this unit to USB port of PC. Unit will stop operation and enter into
USB connection mode. Screen will display USB. And you will find a disk label in your PC. Enter the disk
to edit the files.

-5℃-40℃
192(HQ)
128(SQ)
64(LQ)
384(XQ)
17
SPECIFICATIONS
DISPLAY: OLED LCD display
MEMORY: 4GB
RECORD
FILE FORMAT: MP3 WAV
BIT RATE(Kbps):
RECORD TIME:
48H 72H 144H 24H
SAMPLING RATE :
32KHz 48KHz
RECORD TYPE: MIC/LINE IN/FM
FREQUENCY
RESPONSE: 20Hz~20KHz
OUTPUT JACK: USB 2.0
SPEAKER:
S/N RATIO:
FILE SYSTEM:
φ Ω23, 8 0.5W,
≥80dB
FAT 32
BATTERY LIFE:
WORKING
TEMPERATURE:
BATTERY TYPE:
SIZE: 98x35x12mm
Lithium battery
10 hours
Table of contents
Other Studio Tech Recording Equipment manuals


