STX International STX-1400-TPF User manual
STX Pasta Factory
Instructions

- 3 -
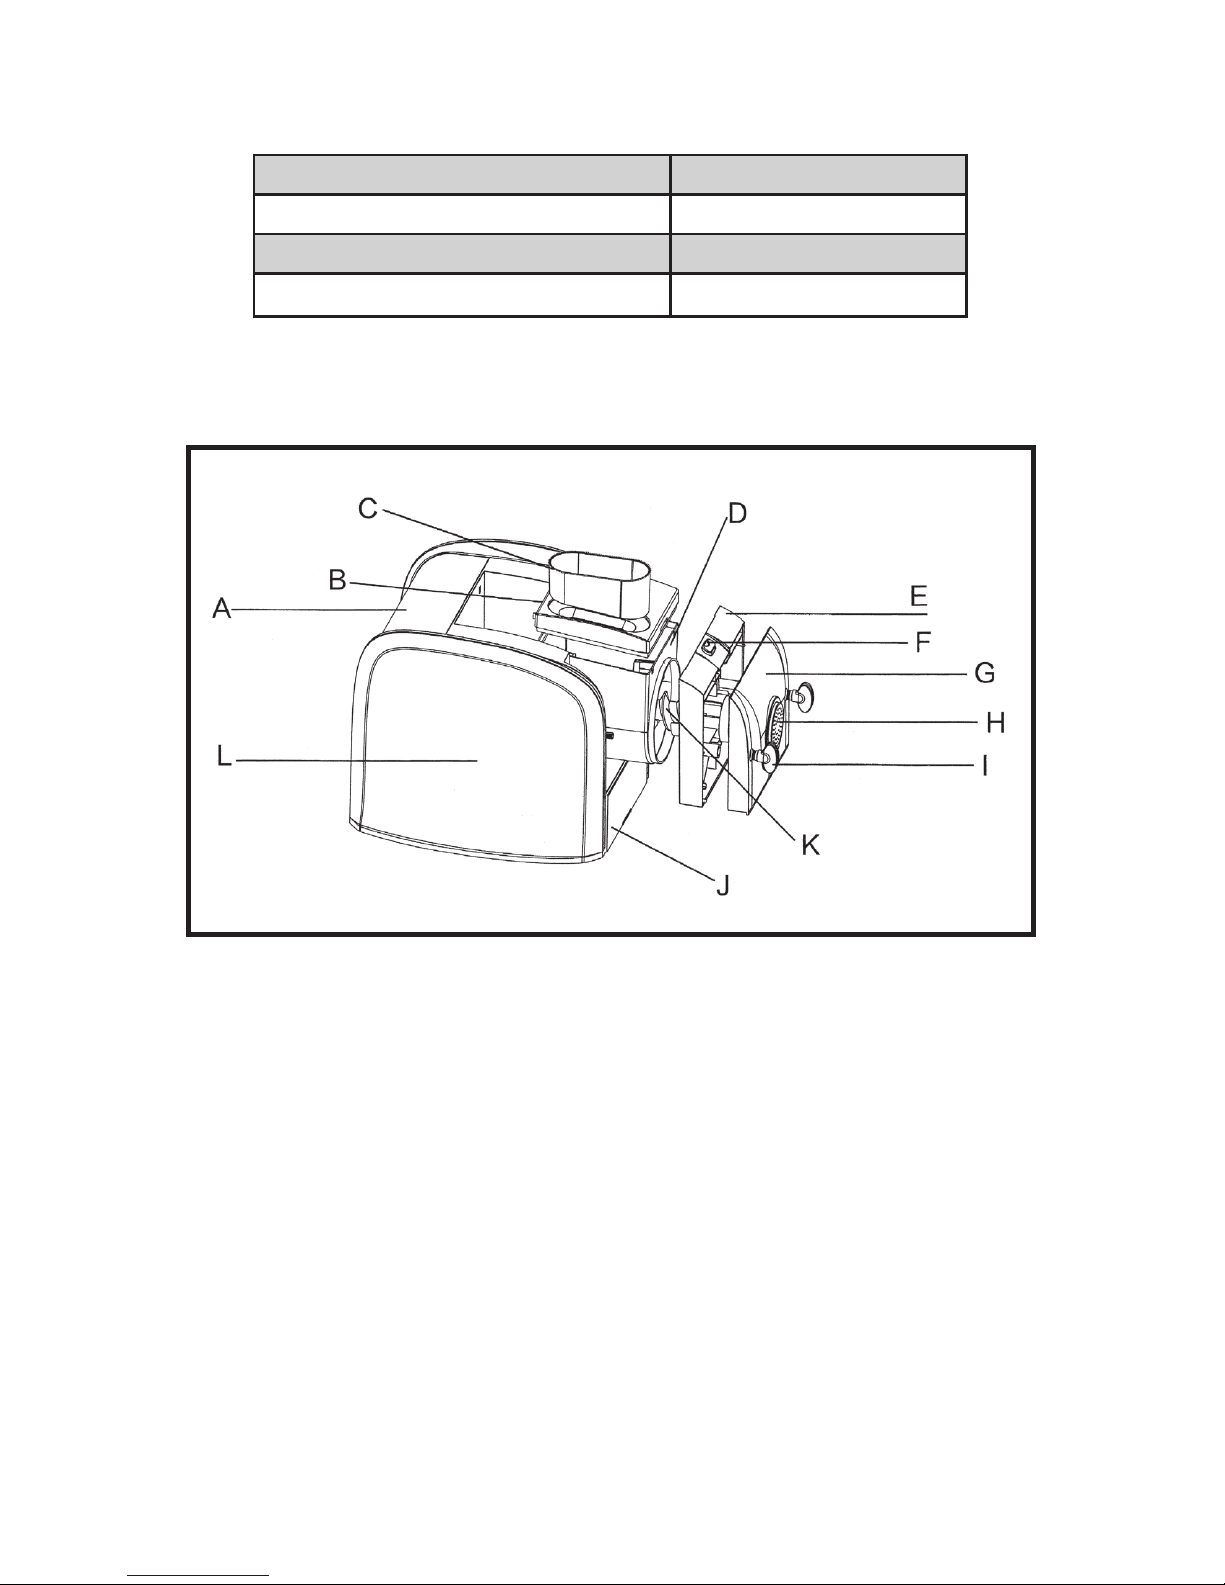
PARTS LIST AND PLACEMENT
A. Control Panel
B. Top Cover
C. Water Injection Dish
D. Mixing Bowl
E. White Inside Front Panel
(with black top edge & release button)
F. Release Button (on top side of white inside front panel)
G. Cast Aluminum Front Panel
H. Pasta Disc
I. Cast Aluminum Locking Nut
J. Pasta Disc Drawer
K. Auger
L. Main Unit
SPECIFICATIONS
Model STX-1400-TPF
Power Supply 110/120 V, 60 Hz
Net/Gross Weight 18.5 lbs../ 23.0 lbs.
Overall Dimensions (L x W x H) 12” X 13” X 12”

- 4 -
PARTS CONT.
Angel Hair Lasagna Linguine Macaroni Penne
Rotini
Adaptor Sausage
Core
Spaghetti Square Vermicelli
Dumpling/
Ravioli Core
Dumpling/
Ravioil Press
PASTA DISCS
Adaptor Dumpling/
Ravioi Core
Adaptor Sausage
Core
+=
+=
Dumpling/
Ravioli Disc
Sausage
Disc

- 5 -
CONTROL PANEL
Water Injection
Dish
Flour Cup Liquid
Measuring Cup
OTHER ACCESSORIES
Cleaning
Pick
Drying RackPasta Cutter

- 6 -
ASSEMBLY
1. Insert the plastic mixing bowl into the groove of the base with the
large round opening facing out and the square opening on the
top.
2. Insert the auger through the front opening of the mixing bowl into
the opening in the back of the base. The auger should securely
attach to the small hole on the interior of the base.
3. Secure the white plastic panel to the front of the base by lining the
appropriate holes up with the screws that are attached to the base
and pushing it back on the base over the screws until it is against
the mixing bowl.
4. Choose the white pasta disc you want to use and insert it into the
back of the metallic front panel. Make sure the tab on the white
pasta disc is inserted into the groove on the front panel.
5. Attach the metallic panel to the screws on the front of the machine
and push the panel in so it is flush against the machine. Secure
the panel by fastening the locking nuts tightly. Leave the locking
nuts in a vertical postion when tightened, this will allow room for
the pasta cutter to easily be used during operation.
6. Place the square plastic cover on top of the machine and push
down to lock it in place.

- 7 -
INGREDIENTS & MEASUREMENTS
Use the following chart to determine the appropriate amount of liquid and
flour to make the perfect noodle consistency.
Batch Size Flour Water Water & Egg Vegetable
Juice
Single 1 cup* 112.5 ml 1 egg + water to
measure 112.5 ml
112.5 ml
Double 2 cups* 225 ml 2 eggs + water to
measure 225 ml
225 ml
*The flour cup included is not equivalent to 1 cup in american standard
units.
Notes:
• When measuring flour with the measuring cup, flatten the scoop with
the pasta cutter to get the precise amount of flour required for the
batch.
• As pasta begins to extrude, coat it with additional flour to prevent it
from sticking.
• Use a tray instead of a bowl to separate the pasta and allow it to dry.
• The first parts of the noodle may be stringy, they will get smoother as
the machine runs.
• Stop and extrude again if machine is extruding too fast.
Choose ONE of the grayed options for liquids

- 8 -
MAKING PASTA
Automatic Method
1. Assemble the machine as described in the Assembly Section of the
manual, making sure to choose the correct pasta disc for the type of
pasta you desire.
2. Open the top of the machine.
3. Measure the flour and add it to the mixing bowl. Do not pack the flour
into the measuring cup. Use the pasta cutter to even out the flour
across the measuring cup. Replace the top cover and lock it in place.
4. Place the water injection dish onto the designated area on the top
cover. Ensure it is placed correctly. The holes in the water injection
dish should be on the opposite side of the holes on the top cover and
when it is placed it will sit level.
5. Put a tray under the extruding holes in the front of the machine.
6. Plug the machine in and the display will turn on.
7. Measure out the liquid so it will be ready - do NOT pour it into the
water injection dish quite yet.
8. Press the Auto button. The auger will begin to turn and the timer will
start for the indicated amount of time.
9. As soon as the mixing process begins, add the water to the water
injection dish. The water is slowly added and mixed into the flour to
make the dough.
10. When mixing is complete, the machine will automatically begin to
extrude the pasta.
11. When the pasta initially starts to extrude from the machine it will be a
little dryer and the noodles will get wetter as it extrudes more of the
dough.
12. As the pasta extrudes from the machine, use the pasta cutter along
the front of the pasta disc to cut the pasta to the length that you want.
Ensure the beveled edge of the pasta cutter is facing out (towards
you) when using it to cut the pasta from the machine.
13. When the machine finishes extracting all of the dough, 4 beeps will
sound and the machine will stop.
14. Unplug the machine when finished.
Note: If at any time you need to stop the machine during the process and
intend to continue (i.e. you wnat to add a little flour and then plan to
continue extruding), just press the release button on the top cover
and the machine will stop. When the top cover is secured again, the
machine will start again where it left off.

- 9 -
Manual Method
1. Assemble the machine as described in the Assembly Section of the
manual, making sure to choose the correct pasta disc for the type of
pasta you desire.
2. Open the top of the machine.
3. Measure the flour and add it to the mixing bowl. Replace the top
cover and lock it in place.
4. Place the water injection dish onto the designated area on the top
cover. Ensure it is placed correctly, it will be a snug fit.
5. Put a tray under the extruding holes in the front of the machine.
6. Plug the machine in and the display will turn on.
7. Measure out the liquid so it will be ready - do NOT pour it into the
water injection dish quite yet.
8. Press the Mix button. The display flashes showing the default time of
4 minutes. You can increase or decrease the amount of mixing time
by pressing the + or - buttons while the time is flashing.
9. After a couple of seconds, the display will stop flashing and the
auger begins to turn - the timer will start.
10. As soon as the mixing process begins, add the water to the water
injection dish. The water is slowly added and mixed into the flour to
make the dough.
11. When the mixing is finished, the machine will beep 3 times.
12. Put a tray under the extruding holes in the front of the machine.
Press the Extrude button. The pasta will begin coming out of the front
of the machine onto the tray.
13. As the pasta extrudes from the machine, use the pasta cutter along
the front of the pasta disc to cut the pasta to the length that you want
it.
14. When the machine finishes extracting all of the dough, 4 beeps will
sound and the machine will stop.
15. Unplug the machine when finished.
Making Egg Noodles
To make egg noodles, follow either pasta making method above with
one exception: Remove the water injection dish from the top cover.
Beat the egg and water in the measuring cup and when it is time to add
water (Step 9 or 10 respectively) slowly pour the liquid directly through
the small holes in the plastic cover on the top of the machine (where
the water injection cup would sit).

- 10 -
Making Sausage
1. Assemble the machine as described in the Assembly Section of the
manual.
2. Select the Adaptor parts and the sausage core from the parts. Insert
the sausage core into the shell and secure the shell to the spiral rod
with the sausage core facing out.
3. Attach the metallic front panel.
4. Add the meat and other sausage ingredients to the bowl and secure
the lid to the top of the machine.
5. Plug the machine in and press Mix. While the time is still blinking,
press the - button to reduce the mixing time to 3 minutes.
6. When the mixing is finished, put the sausage casing over the
sausage core, leaving enough to be able to tie the casing closed
when finished.
7. Hold the sausage casing in place on the sausage core and press
Extrude. The sausage mixture begins filling up the sausage casing.
8. Once the sausage casing is filled, press Cancel to stop the extruding
process.
9. Remove the sausage casing and tie it closed.
10. Repeat with more casings.
11. When finished, unplug the machine.
CLEANING
1. Before cleaning always ensure the power is off and the machine is
unplugged.
2. The mixing bowl, auger, top cover, panels, pasta discs, and locking
nut should all be washed with warm water and a mild detergent (like
Dawn Dishwashing Liquid).
3. The pasta discs will be easiest to clean if you let the dough dry first.
Use the cleaning pick to push out the dried dough from the holes.
Then wash with warm soapy water.
4. The exterior of the machine should be wiped down with a soft, damp
cloth.
5. Dry all parts thoroughly before storing or using.
6. The main unit should not be submerged in water or any other liquid.
7. Store the pasta machine in a cool, dry place.

- 11 -
TROUBLESHOOTING
The machine does not turn on. Check to ensure the machine is
plugged in.
Check to ensure the top cover is
closed tightly.
Check that the locking nuts in the
front of the machine are securely
fastened.
The dough does not extrude. The consistency of the dough is
not right. It may be too dry or too
wet.
If it is too dry you will see mostly
crumbs when you look through
the top cover and none of it will
be sticking together. Add more
liquid.
If it is too wet the dough will be
sticking to the auger and the
machine will make a thumping
noise as the auger rotates the
dough. You can try to add more
flour. Once it gets to this point it
is usually easier to start over, as
the mixing bowl will not be able to
mix the flour in since the dough is
stuck to the auger.
Note: It is easier to add more
liquid if it is too dry than to add
more flour if it is too wet - so start
on the dryer side and add liquid
as needed
Check that the end of the auger
is clean - the pasta disc needs to
fit in tight when the unit is asse-
bled to allow the pasta to ex-
trude. The end of the auger can
be cleaned by using the cleaning
pick to get any dough out.

- 12 -
SAFETY INSTRUCTIONS
1. Please read all instructions prior to operating this appliance.
Please keep this manual for future reference. Failure to comply with
the safety instructions and/or operating instructions contained in this
manual will void any warranty. The manufacturer/seller accepts no
liability for damages caused by failure to comply with the owner’s
manual or negligent use of this product.
2. Check for damaged parts prior to use. check that all parts are
operating properly and perform their intended functions.
3. Always check the condition of the power cord prior to use. If there is
any evidence of damage or fraying of the power cord discontinue use
and contact STX International for OEM replacement. (see Contact
Information on the back of this manual) STX International will only
use original OEM parts when/if replacement is necessary.
4. Always disconnect the unit from the power source before servicing
or cleaning the unit. Unplug the unit when not in use. Do not plug the
unit into an already damaged outlet.
5. This product is designed for indoor household use only. It is NOT
a commercial use product. Do NOT use for commercial industrial
purposes.
6. Do NOT operate outdoors or near any flammable or combustible
materials. Do NOT use during eletrical storms.
7. Keep out of the reach of children. Never leave this device
unattended.
8. It is important to monitor this product while in use. Do not leave this
unit unattended when plugged into an outlet or powered ON.
9. To prevent electric shock and damage to the unit, do NOT immerse
the main unit in water.
10. Do not operate this unit on or near near an open flame or any hot
surface.

11. Do not unplug the unit by pulling on the electrical cord itself. Never
unplug the unit with wet hands.
12. Always use 110/120 Volt power sources. DO NOT USE POWER
CONVERTERS (210/220V). DO NOT USE PLUG CONVERTERS.
13. Do not plug another high wattage appliance into the same outlet as
this product.
14. Do NOT operate under the influence of alcohol or drugs.
15. Any alteration of this unit’s components, substitution of other
manufacturer’s components to this unit, or any repairs to this grinder
not completed or authorized by STX International will immediately
void all guarantees/warranties.
16. Electrical repair or any other type of service must be done by
the seller (The Mercantile Station 2 / STX International). Proof of
purchase must be provided by consumer prior to any repair/service
acceptance. The seller will use only OEM parts and accessories.

All STX International Products come with a 3-Year Guarantee, valid only
in the 48 Contiguous United States. If you purchase this product and ship
it to a destination outside of the 48 Contiguous United States this warranty
becomes null and void.
The first 30 Days are covered by a Money Back or Replacement
Guarantee from the date of the receipt of the product. If your product
becomes damaged in shipment or is found to be defective in any way
during this period, we will replace or issue a complete refund for your
product upon return. We will pay all shipping involved during this first 30-
day period.
The remainder of the 3 Years (after the first 30 days) is covered by a
FREE REPAIR Guarantee (parts and labor included). If anything becomes
defective during this period we will fix the issue and provide a full service
inspection to your product, shipping (to & from) will be paid by the buyer.
Returns of New/Unused Products
If you have Buyer's Remorse and decide that you do not want the product,
it must be returned NEW & UNUSED in the original box and you will pay
the return shipping. PLEASE NOTE: There will be a 10% Restocking Fee
and original Shipping Costs (if applicable) will not be refunded. Used
product cannot be returned.
3-YEAR
WARRANTY
STX International
2159 Magnum Circle, Lincoln, NE 68522
How To Register Your Warranty
Go to www.STXInternational.com. Click on "Register Your Warranty" tab
and fill out the form. This is a fully secure website. Your information will
never be sold or misused in any way. This registration site is strictly for
order verification that will be used to speed up the process should you
ever need to use your Warranty for service.


QUESTIONS, PROBLEMS
OR COMPLIMENTS?
Thank You for purchasing this
STX International Product!
We are grateful for your business!
All of our STX International Products are inspected then
sealed with our NEW Product Seal prior to shipment.
Our goal is to ensure Quality, Completeness, and
Satisfaction for your order.
For Any Questions, Problems, or
Compliments please call or email us.
If you would like to shop for other STX International Products
Please visit our website
www.STXInternational.com
Toll Free: 844-861-4762
Our Business Hours are:
Monday - Thursday: 8am - 4pm CST
Friday: 8am - Noon CST
STX International
2159 Magnum Circle, Lincoln, NE 68522
Table of contents
Popular Pasta Maker manuals by other brands

Hamilton Beach Professional
Hamilton Beach Professional 63246 manual

DeLonghi
DeLonghi PM1000 Series instruction manual

Cuisinart
Cuisinart PRS-50 Quick reference guide

Hamilton Beach
Hamilton Beach 86651 manual

Fimar
Fimar MPF/1,5 Operation and maintenance manual

KitchenAid
KitchenAid 5KPEXTA Operating instructions and recipes


