STYRA Pergola Zip PZ440 User guide

Pergola Zip PZ440
MONTAGE HANDLEIDING
NOTICE DE MONTAGE
MOUNTING INSTRUCTION
MONTAGE ANWEISUNG
MONTAGE - MOUNTING PZ440
01/2018 | B
Beste klant,
dank u voor uw keuze van een HAROL
overkapping “VERSUZ”.
Onze onderneming heeft ervoor gekozen
om te investeren in kwaliteit en innovatie,
door zowel de materialen als de produc-
tieprocessen te selecteren en te perfectio-
neren.
OPGELET: Leest u, voordat u de zonwering
gebruikt, aandachtig alle waarschuwingen
en instructies in deze handleiding en in de
handleiding met gebruiksinstructies door.
Deze handleidingen zijn onderdeel van
het product en moeten voor toekomstig
gebruik bewaard en altijd ter beschikking
worden gehouden, zolang de zonwering
niet wordt afgedankt.
Dear Customer,
thanks for having chosen a HAROL cover
“VERSUZ”.
Our company has been designing and
producing sun awnings since 1960. since
our very beginning we have chosen to
invest on quality and innovation, selecting
and improving both the materials used and
the productive processes.
WARNING: before using the awning, read
carefully this instructions manual and also
the one called“Instructions Manual” .
This manuals are part of the product and
must be properly stored for any future need
until the awning disposal.
Cher Client, merci d’avoir choisi une structu-
re HAROL
“VERSUZ”.
Notre société conçoit et produit des stores
pare-soleil depuis 1960 ; dès le départ,
nous avons choisi d’investir sur la qualité
et sur l’innovation, en sélectionnant et en
perfectionnant tant les matériaux que les
processus de fabrication.
ATTENTION : avant d’utiliser le store, lire
attentivement tous les avertissements et
les instructions gurant dans ce manuel et
dans le manuel“Manuel d’utilisation.”
Ces manuels font partie intégrante du
produit et ils doivent être conservés et être
toujours à disposition pour toutes consulta-
tions futures, jusqu’à l’élimination du store.
Sehr geehrter Kunde, vielen Dank für die
Wahl eine HAROL Abdeckung“VERSUZ”.
Unsere Firma entwirft und produziert
Markisen seit 1960; vom Anfang an haben
wir gewählt in Qualität und Innovation zu
investieren, indem die Materialien wie auch
die Produktionsvorgänge ausgewählt und
verbessert wurden.
ACHTUNG: vor der Markisenbenutzung
bitte alle Hinweise und Anleitungen in
diesem Handbuch und im Handbuch
“Bedienungsanleitung”sorgfältig lesen.
Diese Handbücher begleiten das Produkt
und müssen sorgfältig aufbewahrt werden
um für jede weitere Information gribereit
zu bleiben, bis die Markise entsorgt wird.
Algemene informatie
Opmerkingen
NEDERLANDS ENGLISH FRANÇAIS DEUTSCH
General Information
Warnings
Informations Générales
Avertissements
Allgemeine Hinweise
Anmerkung
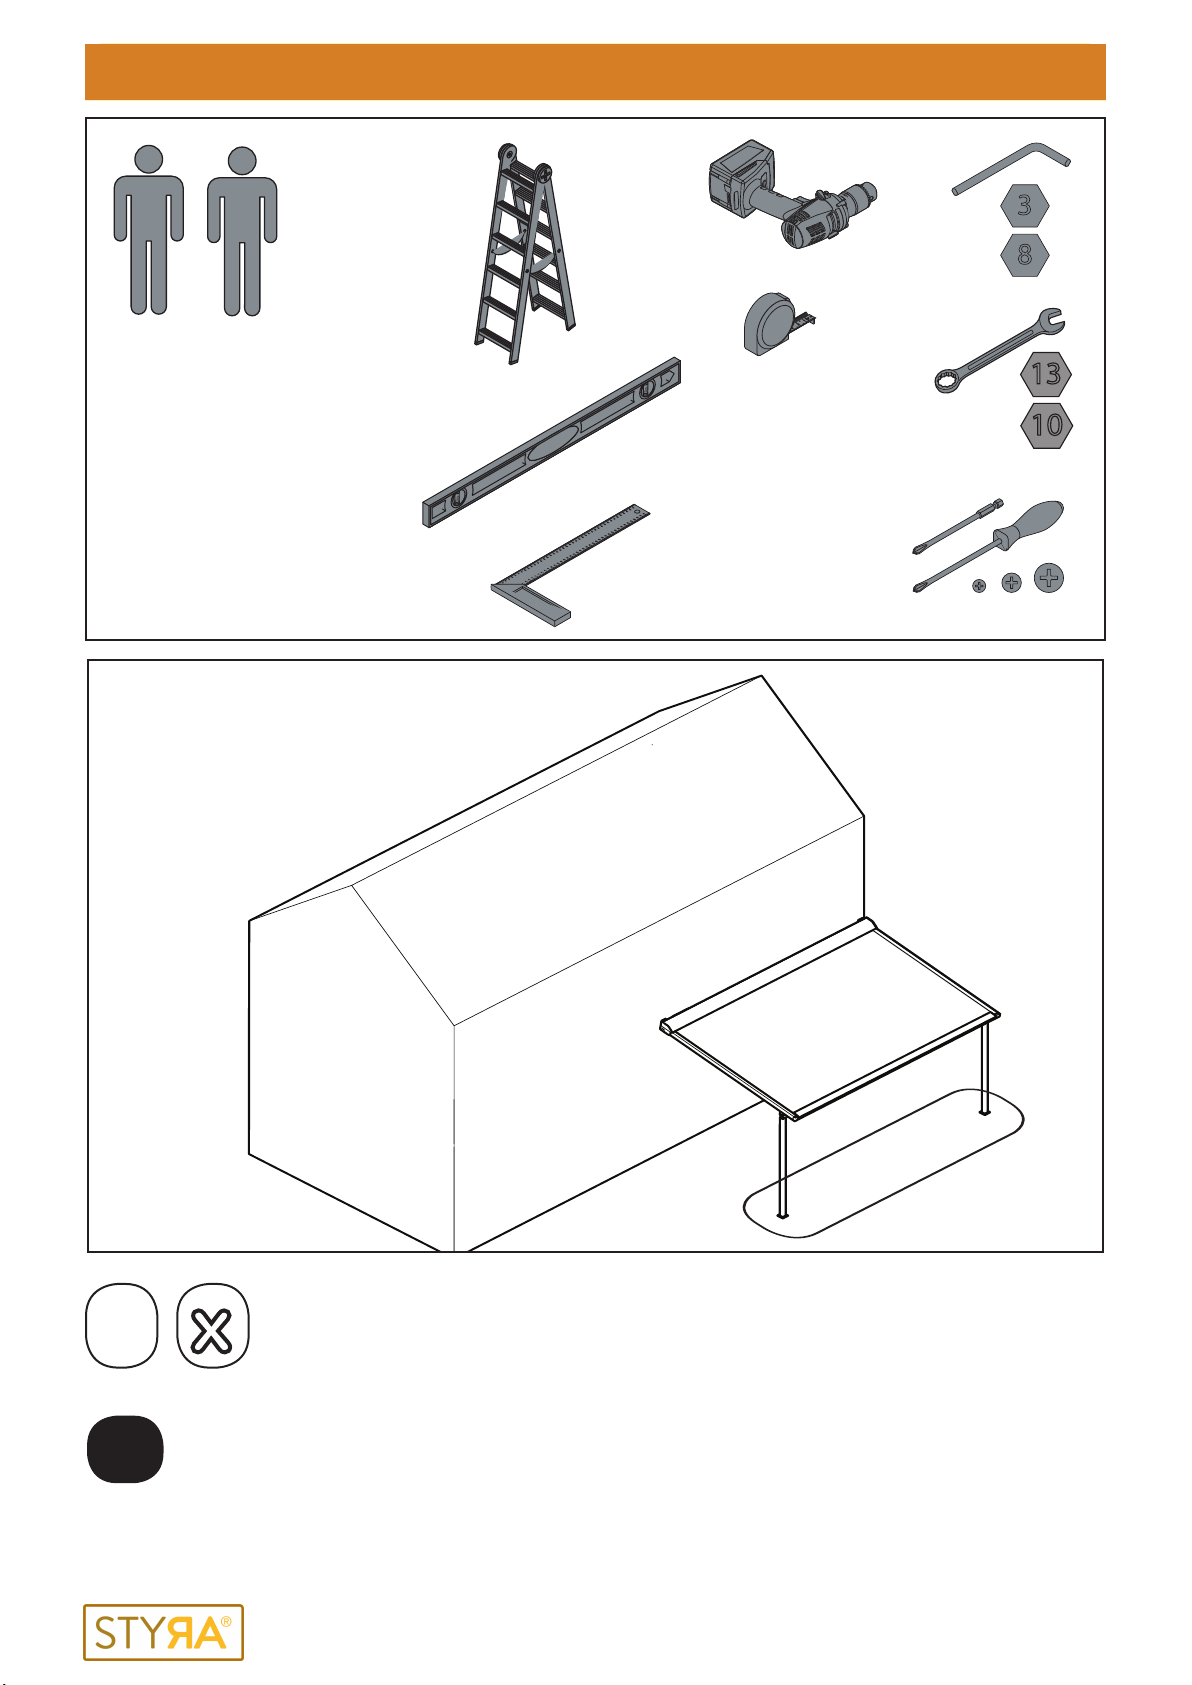
De installatie moet worden uitgevoerd
door gekwaliceerd personeel in overeen-
stemming met de IEC-normen en de natio-
nale bepalingen inzake civiele elektrische
installaties.
Raadpleeg ook de technische che
! Lees deze handleiding vooraf zorgvuldig
door.
! Door het opspannen van de veren
ontstaan er grote krachten. Ga voorzichtig
te werk. Zorg dat u stevig staat.
! Zorg voor een montageruimte met
voldoende licht. Verwijder obstakels
en vuil. Zorg ervoor dat er geen andere
personen dan monteurs aanwezig zijn.
Onbevoegden kunnen in de weg lopen of
gevaar lopen tijdens de montage.
Dit symbool duidt op mogelijk
gevaar voor personen of schade
aan het product.
Dit symbool geeft“Opgelet”aan.
Dit symbool geeft het gebruik van
kracht aan om de aangegeven
werkzaamheid te verrichten.
Wanneer u elektrische schroeven-
draaiers gebruikt, stelt u dan de
juiste koppelwaarde in.
Dit symbool geeft aan dat er een
visuele controle dient uitgevoerd
te worden
Dit symbool geeft een optioneel
toebehoren aan.
De fabrikant is niet aansprakelijk
voor eventuele onjuistheden te
wijten aan druk- fouten die in deze
handleiding kunnen aanwezig zijn.
Hij behoudt zich het recht voor om
nodige of voor de gebruiker nutti-
ge wijzigingen aan zijn producten
door te voeren, zonder afbreuk te
doen aan de functionaliteit en de
veiligheid.
Geen aanpassingen aan design
en conguratie zonder consultatie
van fabricant.
De gebruikershandleiding moet
overhandigd worden aan de
eindgebruiker.
A xxxx
Installation must be carried out by quali-
ed personnel in compliance with EN and
local safety regulations relative to domestic
electrical systems.
See also product technical data document.
! Before you start ,please do read these
instructions thoroughly.
! The tightening of springs creates impor-
tant powers. Be very careful and make sure
of a solid footing whilst operating.!
Provide sucent light in the tting area.
Dispose of obtsacles and dirt. Make sure
that, except for the tters, no other people
are in the tting area. Unauthorized people
might be in the way or at risk themselves.
This symbol indicates the possibili-
ty of injury to persons or damage
to the product.
This symbol means“Warning”.
This symbol means to use force
during the shown operation.
Using electric screwdriv-
ers set the correct torque
value.
This symbol means the need of a
visual control.
This symbol indicate a particular
which is given as optional.
The manufacturer accepts no liabil-
ity for any inaccuracies or printing
errors that may be contained in
this manual. The manufacturer
reserves the right to introduce any
modications to the product that
are considered necessary or in the
interests of the user and which do
not alter the essential operational
and safety characteristics of the
appliance.
No modication of the design or
conguartion without consulting
the manufacterer.
The instruction of use shall be
provided to the end user.
A xxxx
L’installation doit être eectuée par du
personnel qualié conformément aux
normes NF et aux dispositions nationales
relatives aux installations électriques civiles.
Voir aussi la che technique
! Commencez par lire attentivement cette
notice!
! La tension des ressorts crée une force
importante. Procédez avec précaution.
Positionnez-vous de manière stable.
! Veillez à ce que le lieu de montage soit
susamment éclairé. Débarrassez-vous des
obstacles et des crasses. Assurez-vous qu’il
n’y a personne d’autre que les monteurs.
Des personnes incompétentes pourraient
vous gêner ou courir un danger pendant le
montage.
Ce symbole indique un risque de
danger pour les personnes ou de
dommage à le produit.
Ce symbole indique: «Attention».
Ce symbole vous indique d’utiliser
de la force au cours de l’opération.
Si on utilise un visseuse électrique
il faut dénir la valeur de
couple correcte pour le serrage.
Ce symbole vous indique qu’il faut
éectuer un controle visuel.
Ce symbole vous indique un acces-
soir en option.
Le Fabricant décline toute respon-
sabilité pour les éventuelles inexac-
titudes imputables à des erreurs
d’impression ou de transcription
contenues dans cette notice.
Il se
réserve la faculté d’apporter à ses
produits toutes les modications
qu’il estime nécessaires au utiles,
y compris dans l’intérêt des utilisa-
teurs, sans modier leurs caracté-
ristiques essentielles de fonction-
nalité et sécurité.
Aucune modication de concep-
tion ou de conguration sans
consultation du fabricant.
L’instruction d’utilisation doit être
fournie à l’utilisateur nal.
A xxxx
Die Installation ist von Fachpersonal und
unter Beachtung der IECBestimmungen
und der örtlichen Vorschriften bezüglich
elektrischer Anlagen auszuführen.
Siehe auch die Technische Angaben.
! Lesen Sie die Anleitung vor der Montage
sorgfältig durch !
! Durch das Spannen der Federn entstehen
grosse Kräfte. Gehen Sie bitte vorsichtig vor
und sorgen Sie dafür, dass Sie einen festen
Stand haben !
! Sorgen Sie für ausreichend Licht
auf der Montageäche. Entfer-
nen Sie Hindernisse und Abfall.
Dieses Symbol weist auf eine
mögliche Gefahr für Personen bzw.
Schäden am Produkt.
Dieses Symbol steht für“Vorsicht!”
Dieses Symbol bedeutet, Kraftanwen-
dung bei der Operationsdurchführung.
Wenn Sie Elektrische Schrau-
ber benutzen, achten Sie bitte
auf den korrekte Drehmoment.
Dieses Symbol bedeutet, dass ein
visuell Steuerung angewendet
werden muss.
Dieses Symbol kennzeichnet ein
optionales Zubehör.
Für Unrichtigkeiten in diesem
Handbuch, die auf Druck- oder
Abschreibfehler zurückzuführen
sind, übernimmt der Hersteller keine
Haftung. Der Hersteller behält sich
das Recht vor, alle für notwendig
erachteten bzw. im Interesse der
Abnehmer liegenden Änderungen
an seinen Produkten vorzunehmen,
ohne jedoch deren wesentliche
Funktions- und Sicher-heitseigen-
schaften zu beeinträchtigen.
Keine Änderung der Gestaltung oder
Konguration der Ausrüstung ohne
Rücksprache mit dem Hersteller.
Die Gebrauchsanleitung für den
Endnutzer bereitzustellen ist.
A xxxx
01/2018 | B
13
2
1
3
4
5
6
7
8
9
10
11
12
13
14
15
16
17
18
19
20
21
22
23
24
25
26
27
28
29
30
31
32
33
34
35
36
37
38
39
40
41
42
43
44
1
0
2
3
4
5
6
7
8
9
10
11
12
13
14
15
16
17
18
19
20
21
22
23
24
25
26
27
28
29
30
31
32
33
34
35
36
37
38
39
3
8
1
2
3
4
5
10
PZ440
x
x
xMONTAGESTAPPEN
ETAPPES DE MONTAGE
MOUNTING STEPS
MONTAGESCHRITTEN
TUSSEN-STAPPEN
ETAPPES INTERMEDIARES
WITHIN-STEPS
ZWISCHEN-SCHRITTEN
MONTAGE - MOUNTING PZ440
MONTAGE - MOUNTING PZ440
01/2018 | B
PZ440
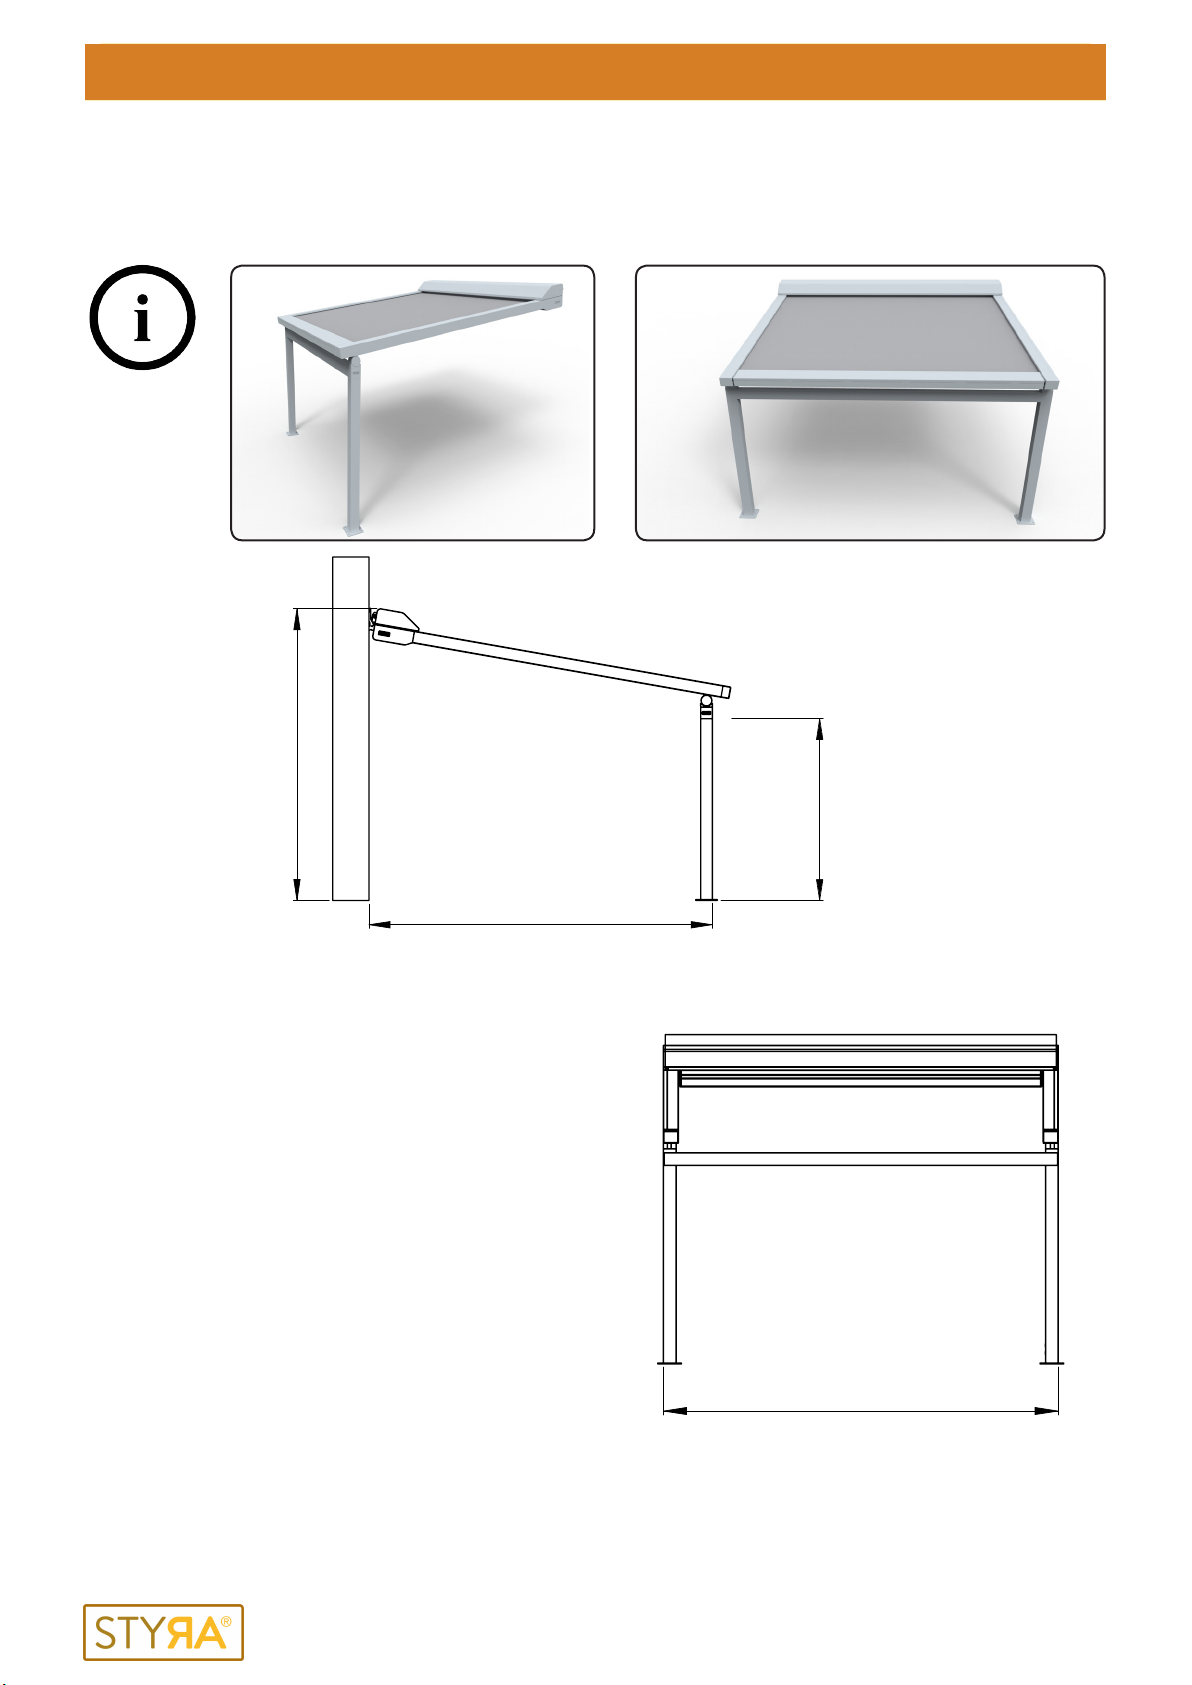
DOORLOOPHOOGTE
HAUTEUR DE PASSAGE
WALKTROUGH HEIGHT
DURCHGANGSHÖHE
UITVAL
PROFONDEUR
SLOPE
AUSFALL
HOOGTE
HAUTEUR
HEIGHT
HÖHE
HG
U
BREEDTE
LARGEUR
WIDTH
BREITE
B
01/2018 | B
min. 120mm
max. 4m
50mm
50mm
= B - 100mm
(B)
= (H) - 10 mm
90
122
40
14
24
60
B
D1 = D2
(+/- 2mm)
U
D1
D2
= B + 100mm
1
MONTAGE - MOUNTING PZ440
MONTAGE - MOUNTING PZ440
01/2018 | B
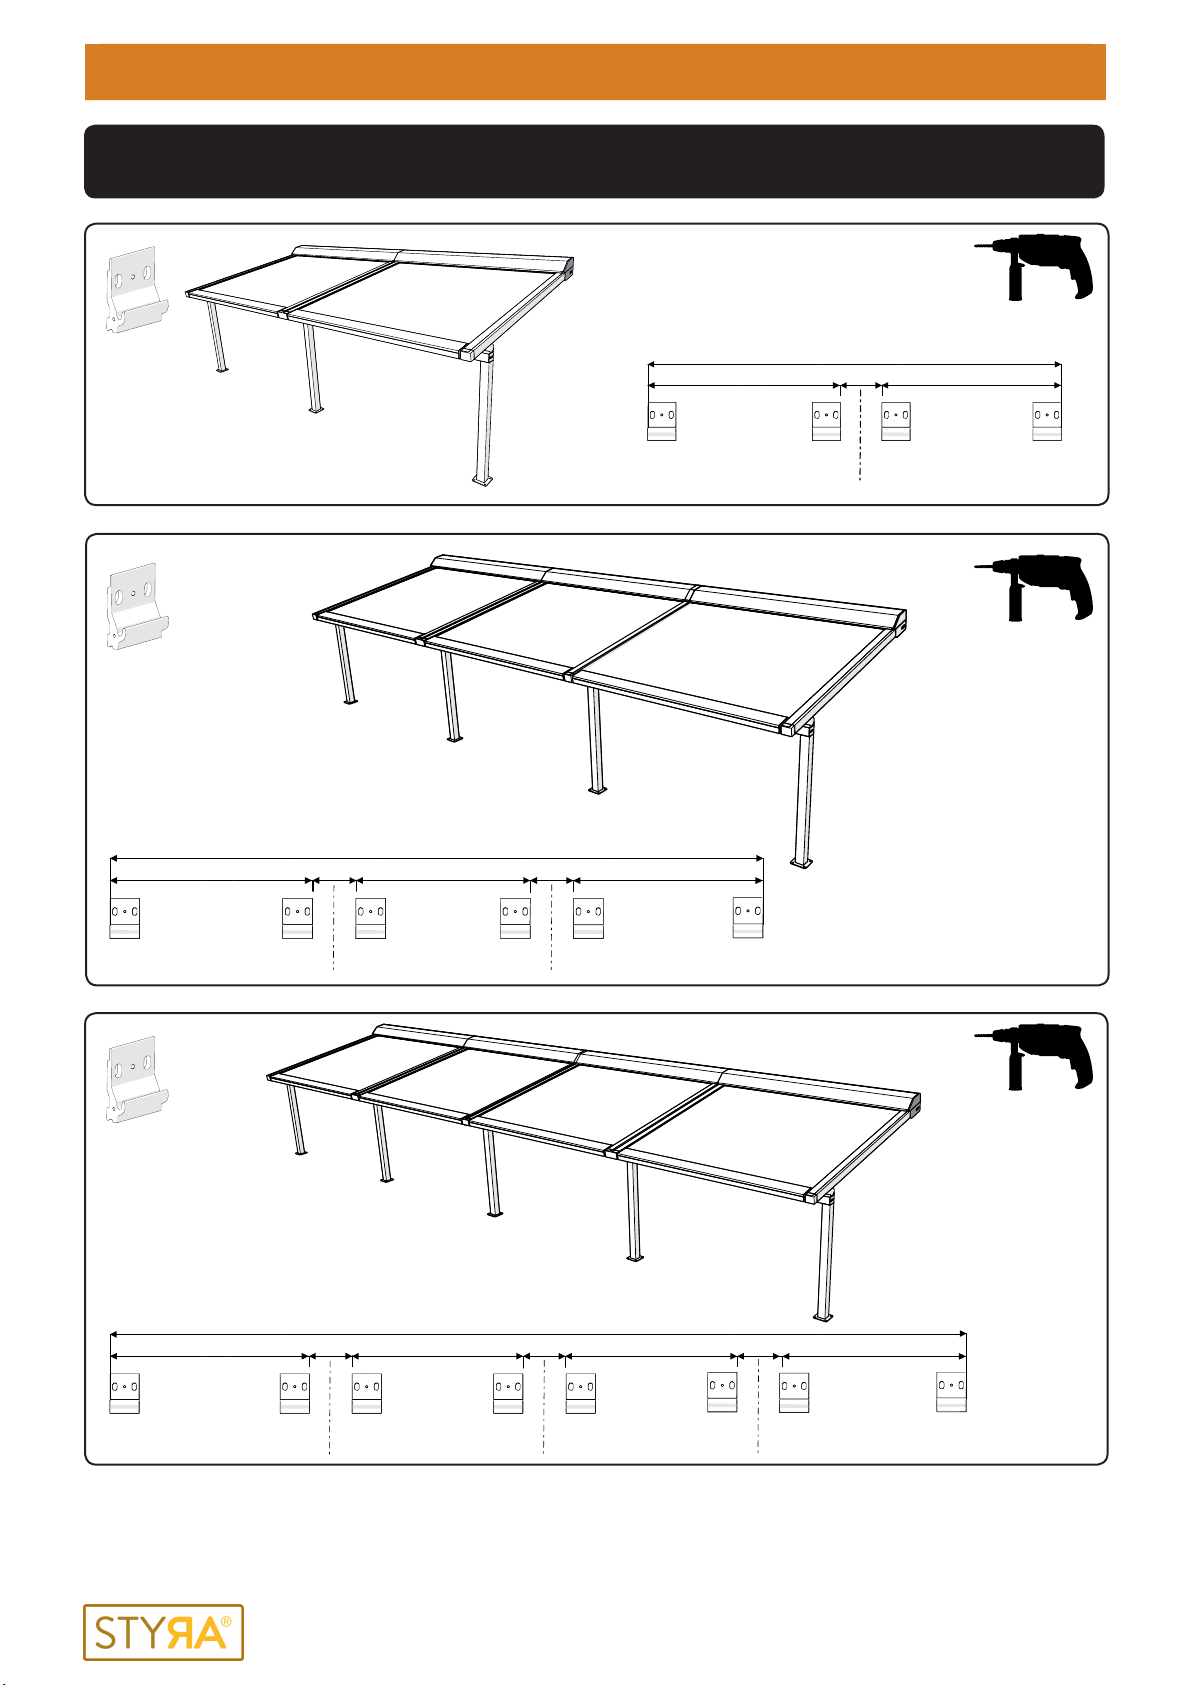
GEKOPPELD - COUPLE - LINKED - GEKOPPELT
B1-100 B2-100
100 B3-100100 B4-100100
B tot. - 100
B1-100 B2-100100 B3-100100
B tot. - 100
B1-100 B2-100100
B tot. - 100
01/2018 | B
2
5
3
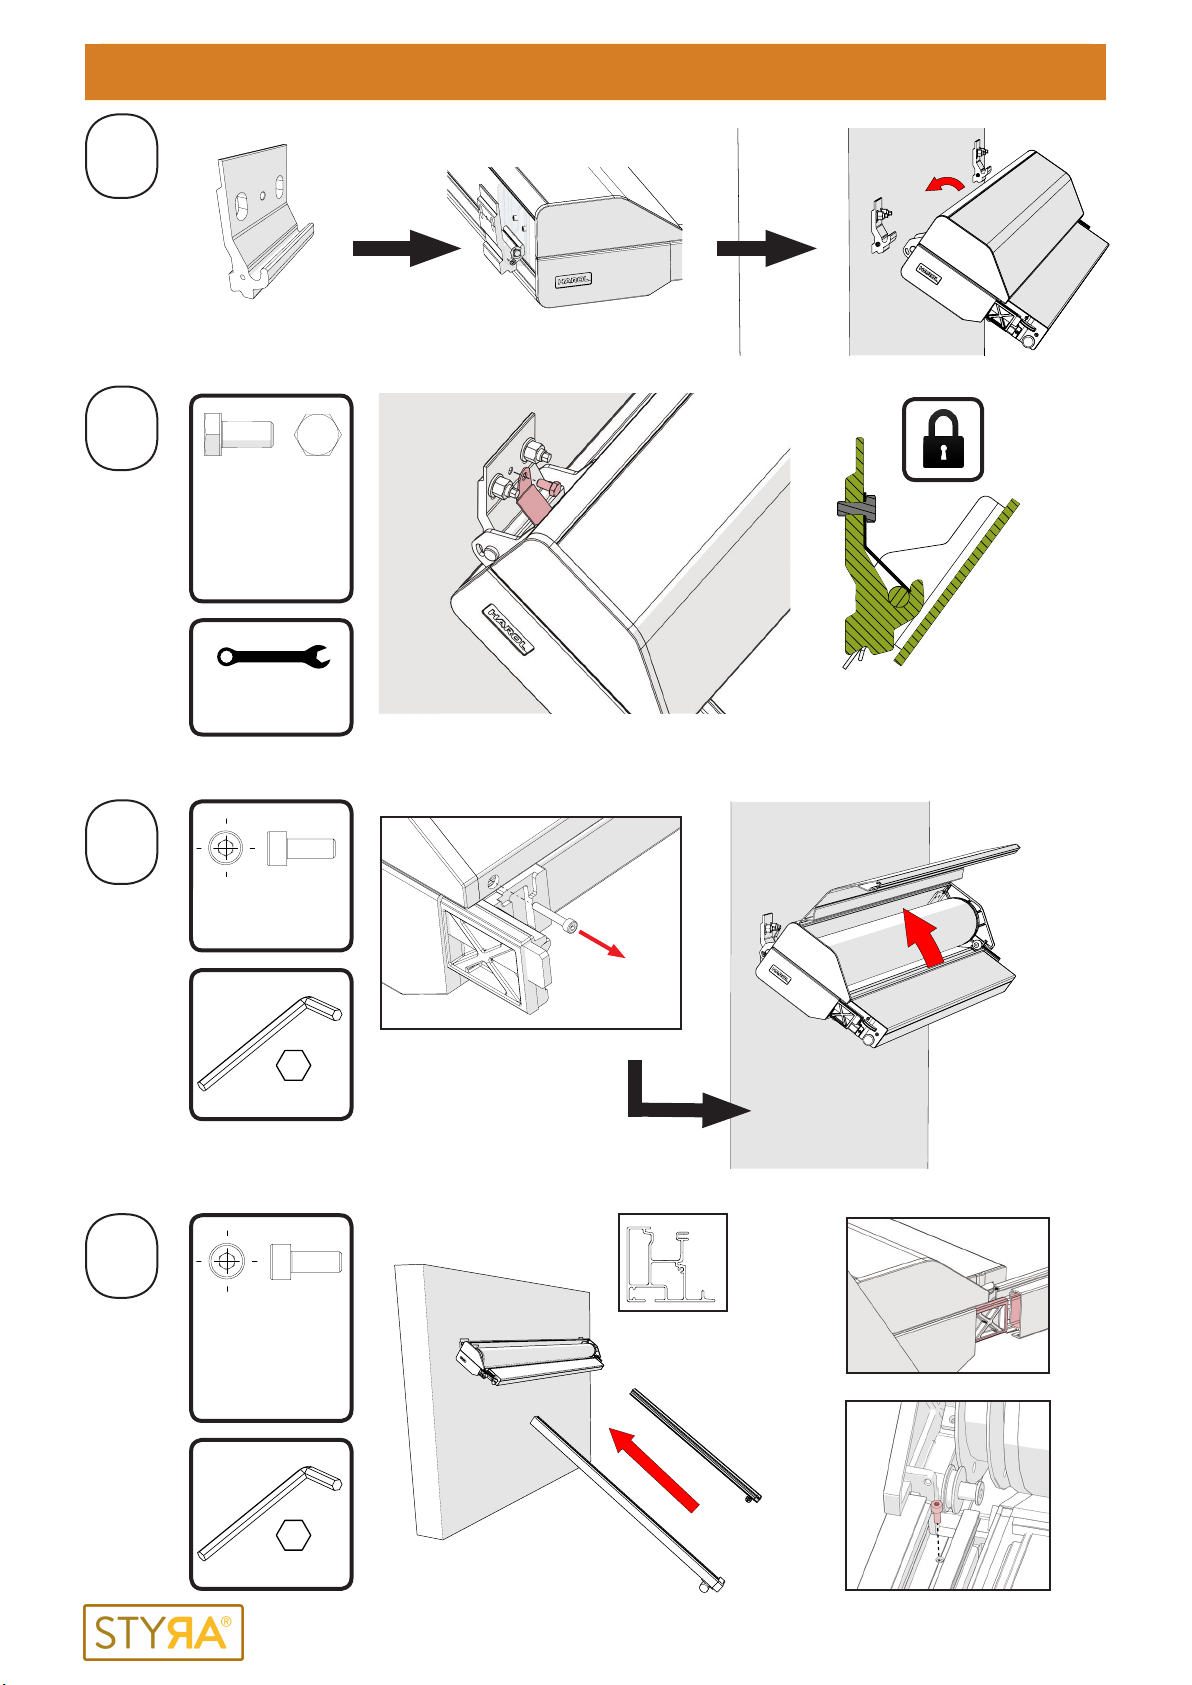
DIN 912
M4 x 12
x2
3
DIN 933
M8 x 10
x2
M8
4DIN 912
M4 x 25
3
MONTAGE - MOUNTING PZ440

MONTAGE - MOUNTING PZ440
01/2018 | B
6
6
5
4
3
1
2
5
4
6
2
3
1
7
8
3
M8
1 Din 7991 M4 x 12 2
2 Din 7981 4,8 x 13 mm 4
3 Din 125 - M5 4
4 050905 2
5 DIN 933 - M10 x 35 2
6 050699 2
7 DIN 7982 4,8 x 19 8
8 050940 2

01/2018 | B
7
8
DIN 7991
M10 x 40
x2
MONTAGE - MOUNTING PZ440

MONTAGE - MOUNTING PZ440
01/2018 | B
8
1
2
3
4
5
UITVAL
PROFONDEUR
SLOPE
AUSFALL
U
BREEDTE
LARGEUR
WIDTH
BREITE
B
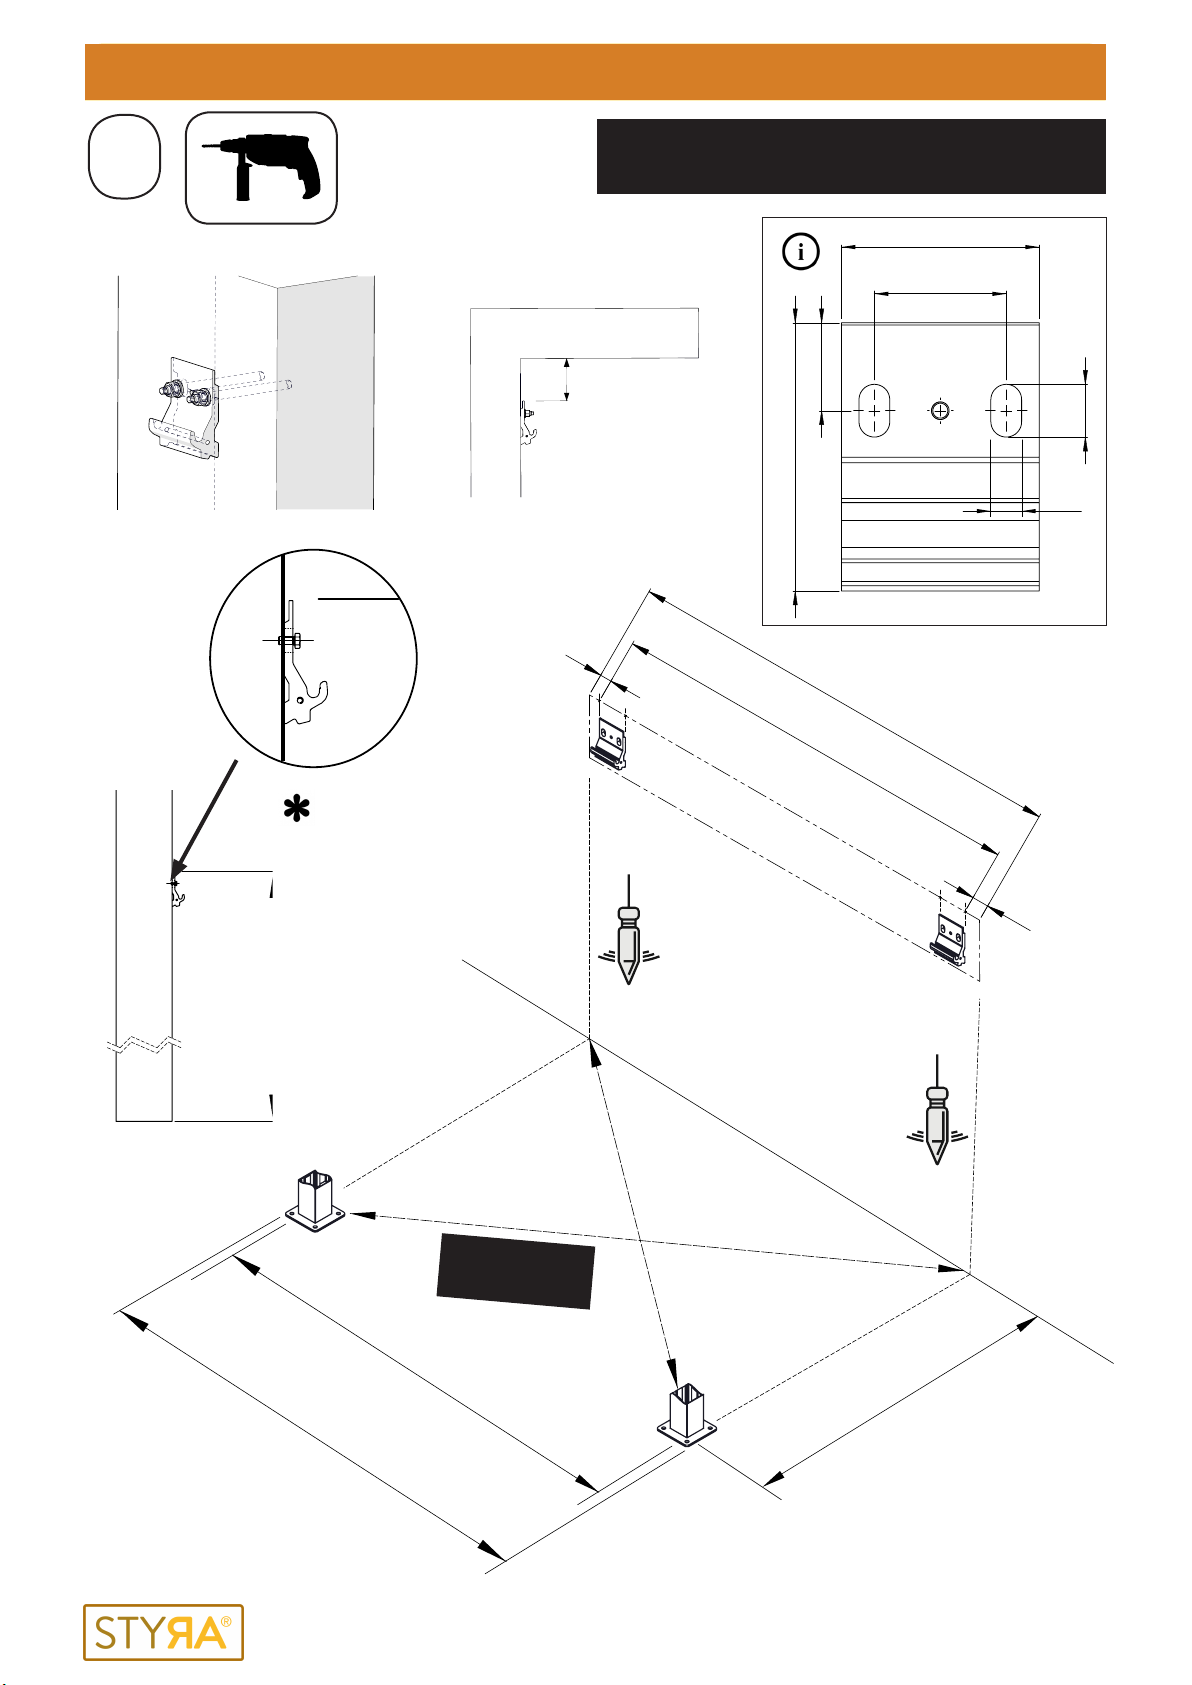
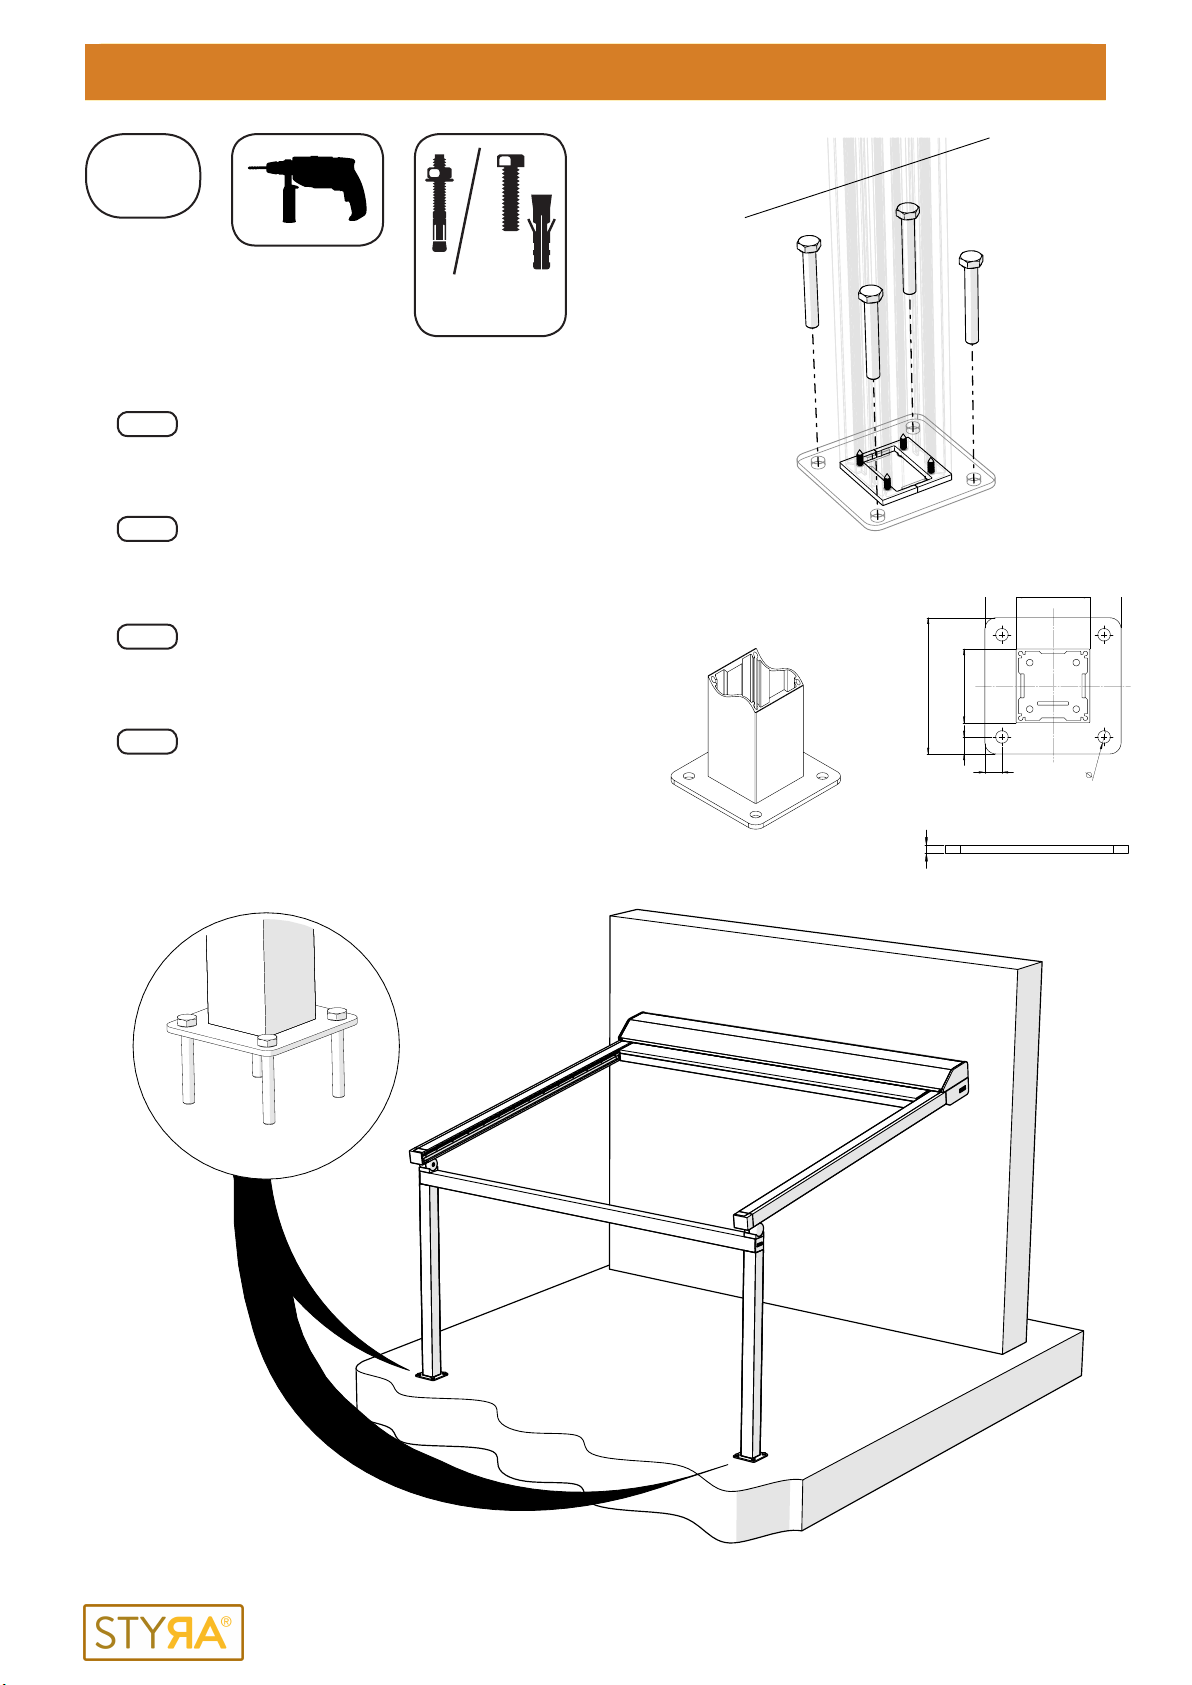
VOETPALEN NOG NIET IN DE ONDERGROND VERANKEREN !
NE PAS ENCORE FIXER LES PIED DANS LE SOL !
DO NOT ANCHORE THE POSTS INTO THE GROUND YET !
DIE PFAHLE NICHT JETZT IM BODEN VERANKERN !
01/2018 | B
91
2
1 2
MONTAGE - MOUNTING PZ440

MONTAGE - MOUNTING PZ440
01/2018 | B
1
2
3
10

01/2018 | B
DIN 912
M4 x 25
11
3
3
3
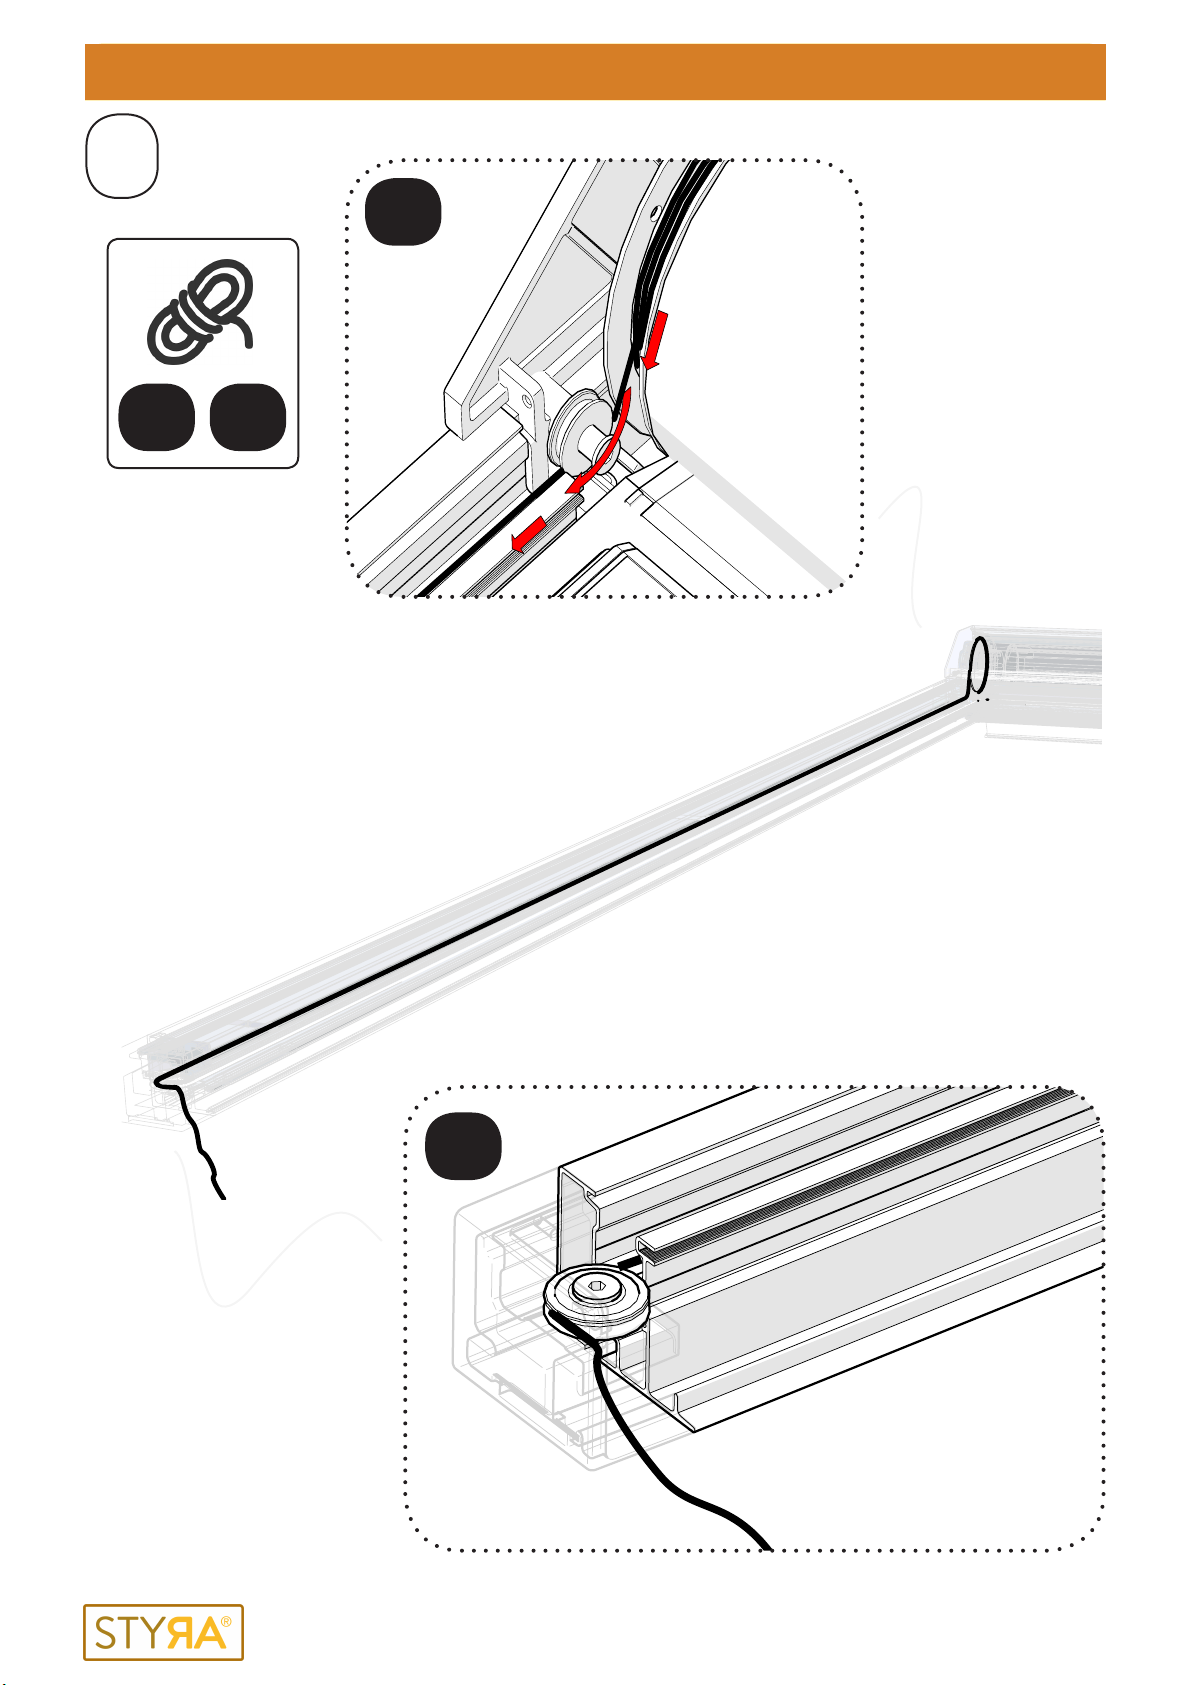
44zie p.14
voir p.14
see p.14
sehen p.14
MONTAGE - MOUNTING PZ440

MONTAGE - MOUNTING PZ440
01/2018 | B
4
1
3
4
5
zie p.15
voir p.15
see p.15
sehen p.15
2
1
2
3
4
5
01/2018 | B
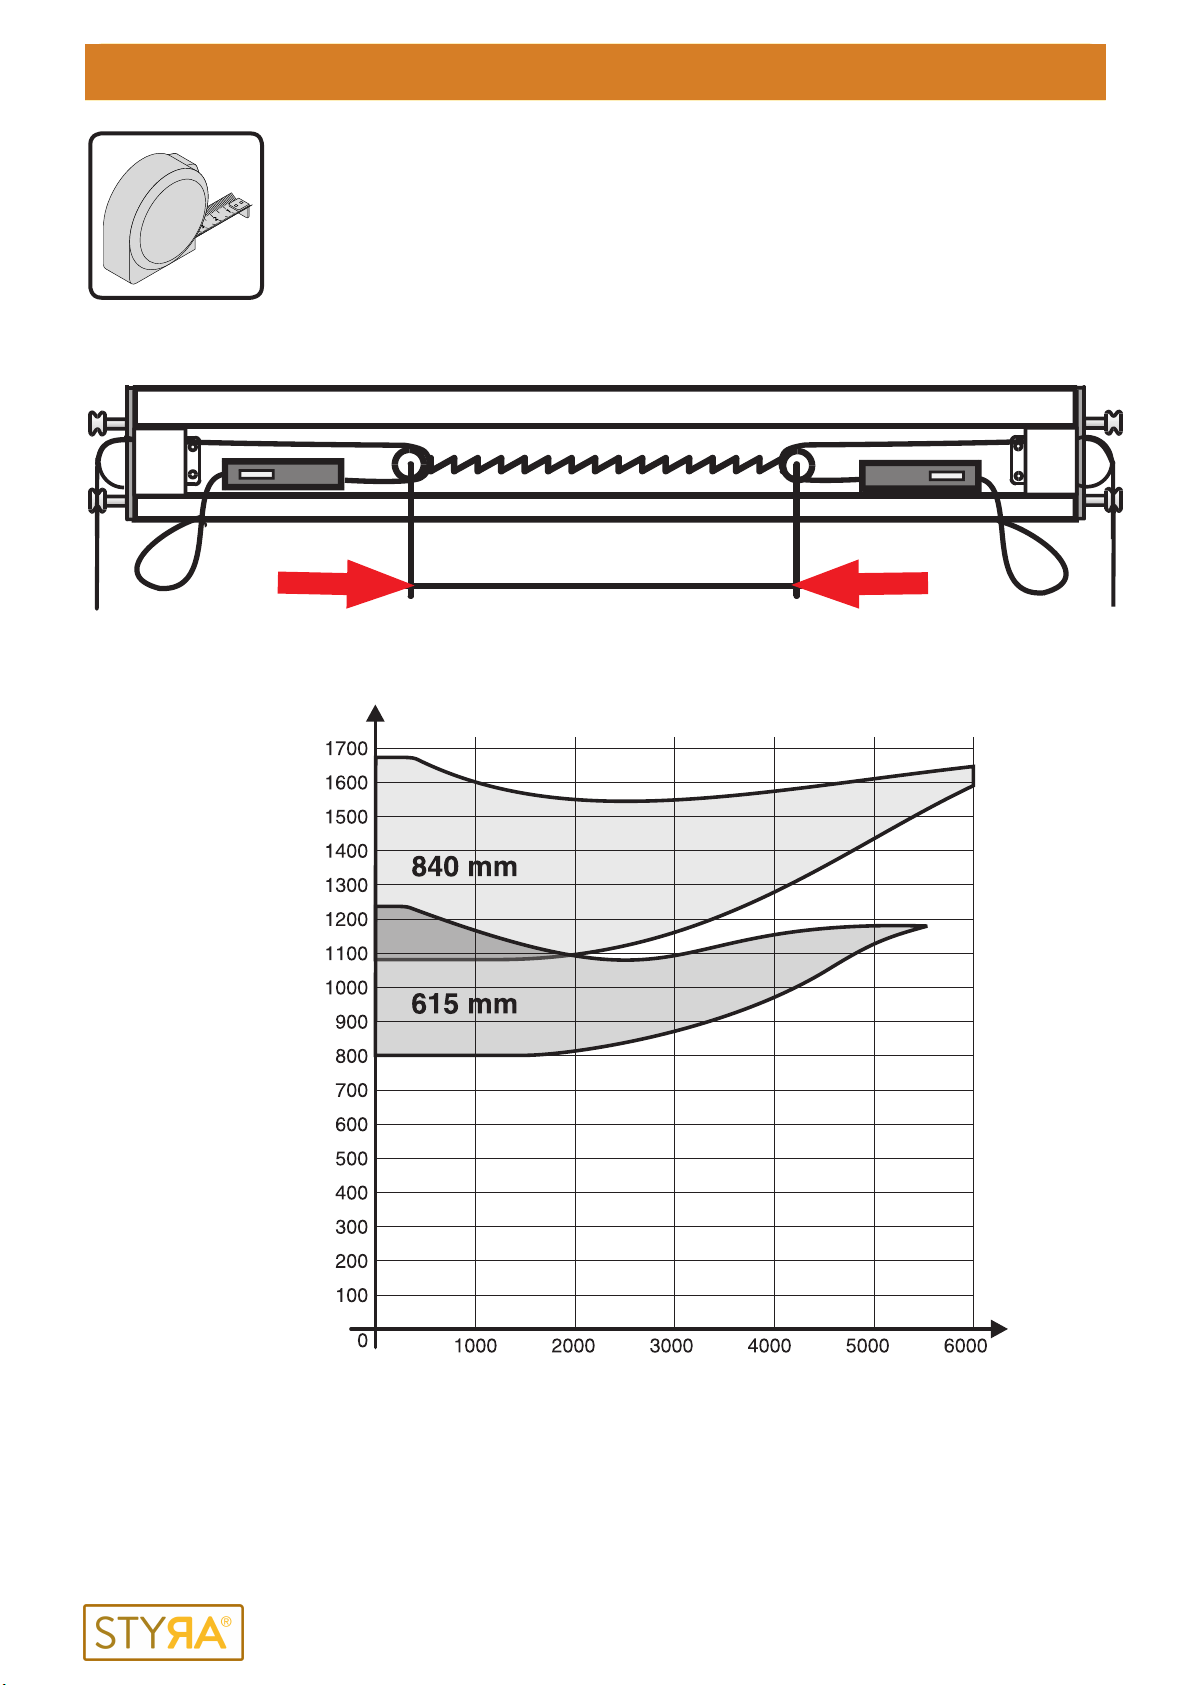
TREKVEER - RESSORT - SPRING - FEDER
TREKVEER - RESSORT - SPRING - FEDER
UITVAL
PROFONDEUR
SLOPE
AUSFALL
AFSTAND R*
DISTANCE R*
ENTFERNUNG R*
Tabel VEERAFSTAND R (in mm)
Table de la d istance R du ressort (en mm)
Table spring d istance R (in mm)
Tabelle der Federspannlänge R (in mm)
R
1
2
3
4
5
mm
mm
*AFHANGKELIJK VAN HET TYPE VEER (650mm / 850mm), AFSTAND RAFLEZEN IN GEKLEURDE ZONE.
LIRE LA DIMENSION RDANS LA ZONE COLORE SUIVANT LE TYPE DE RESSORT.
DEPENDING ON THE TYPE OF SPRING (650MM / 850MM), READ DISTANCE RIN COLORED ZONE.
ABHÄNGIG VOM FEDERTYP (650 MM / 850 MM), ABSTAND RIM FARBIGEN BEREICH ABLESEN
MONTAGE - MOUNTING PZ440
MONTAGE - MOUNTING PZ440
01/2018 | B
Left
Links
Gauche
Right
Rechts
Droite
12
DIN 84
M4 x 12
3

01/2018 | B
13
DIN 912
M4 x 25
3
14
DIN 912
M4 x 45
3
MONTAGE - MOUNTING PZ440
MONTAGE - MOUNTING PZ440
01/2018 | B
x1
16
15
www.somfy.com
OREA 50 WT 25/17
OREA 50 WT 40/17
Gemini 25/17 SLT50
Mariner 40/17 SLT50
Orea 25/17 LT50 RTS
Orea 40/17 LT50 RTS
Sunea 50 IO 25/17
Sunea 50 IO 40/17
see instruction manual Somfy (included)
zie gebruikershandleiding Somfy (bijgevoegd)
voir manuel d’instruction Somfy (inclus)
siehe Bedienungsanleitung Somfy (inbegrien)

01/2018 | B
1
2
3
4
5
B1
B2
D1 D2
100
60
80
B1 = B2 & D1 = D2
(+/- 2mm) (+/- 2mm)
CONTROL(E)
D1
D2
B2
B1
17
MONTAGE - MOUNTING PZ440
MONTAGE - MOUNTING PZ440
01/2018 | B
18
GEBRUIK DE GESCHIKTE BEVESTIG-
INGSMATERIALEN PASSEND BIJ DE
BOUWZIJDIGE OMSTANDIGHEDEN !
UTILISEZ DES MATERIAUX DE FIX-
ATIONS ADAPTES SUIVANT LES
CONDITIONS DE CONSTRUCTION !
USE SUITABLE FITTING MATERIALS
CORRESPONDING TO ONSITE CON-
DITIONS !
GEEIGNETE BEFESTIGUNGSMATE-
RIALEN ENTSPRECHEND DER BAU-
SEITIGEN GEGEBENHEITEN VER-
WENDEN !
120
120
15
65
65
15
11
5
M10
VOORBEELD
EXAMPLE
BEISPIEL
VOORBEELD
EXAMPLE
BEISPIEL
NL
FR
EN
DU
Popular Lawn And Garden Equipment manuals by other brands

Sunforce
Sunforce SOLAR user manual

GARDEN OF EDEN
GARDEN OF EDEN 55627 user manual

Goizper Group
Goizper Group MATABI POLMINOR instruction manual

Rain Bird
Rain Bird 11000 Series Operation & maintenance manual

Cub Cadet
Cub Cadet BB 230 brochure

EXTOL PREMIUM
EXTOL PREMIUM 8891590 Translation of the original user manual


Vertex
Vertex 1/3 HP Maintenance instructions

GHE
GHE AeroFlo 80 manual

Land Pride
Land Pride Post Hole Diggers HD25 Operator's manual

Yazoo/Kees
Yazoo/Kees Z9 Commercial Collection System Z9A Operator's & parts manual

Premier designs
Premier designs WindGarden 26829 Assembly instructions

Snapper
Snapper 1691351 installation instructions