ST-77481
4" WET AIR CUTTING SAW (WITHOUT SAW BLADE)
PARTS LIST
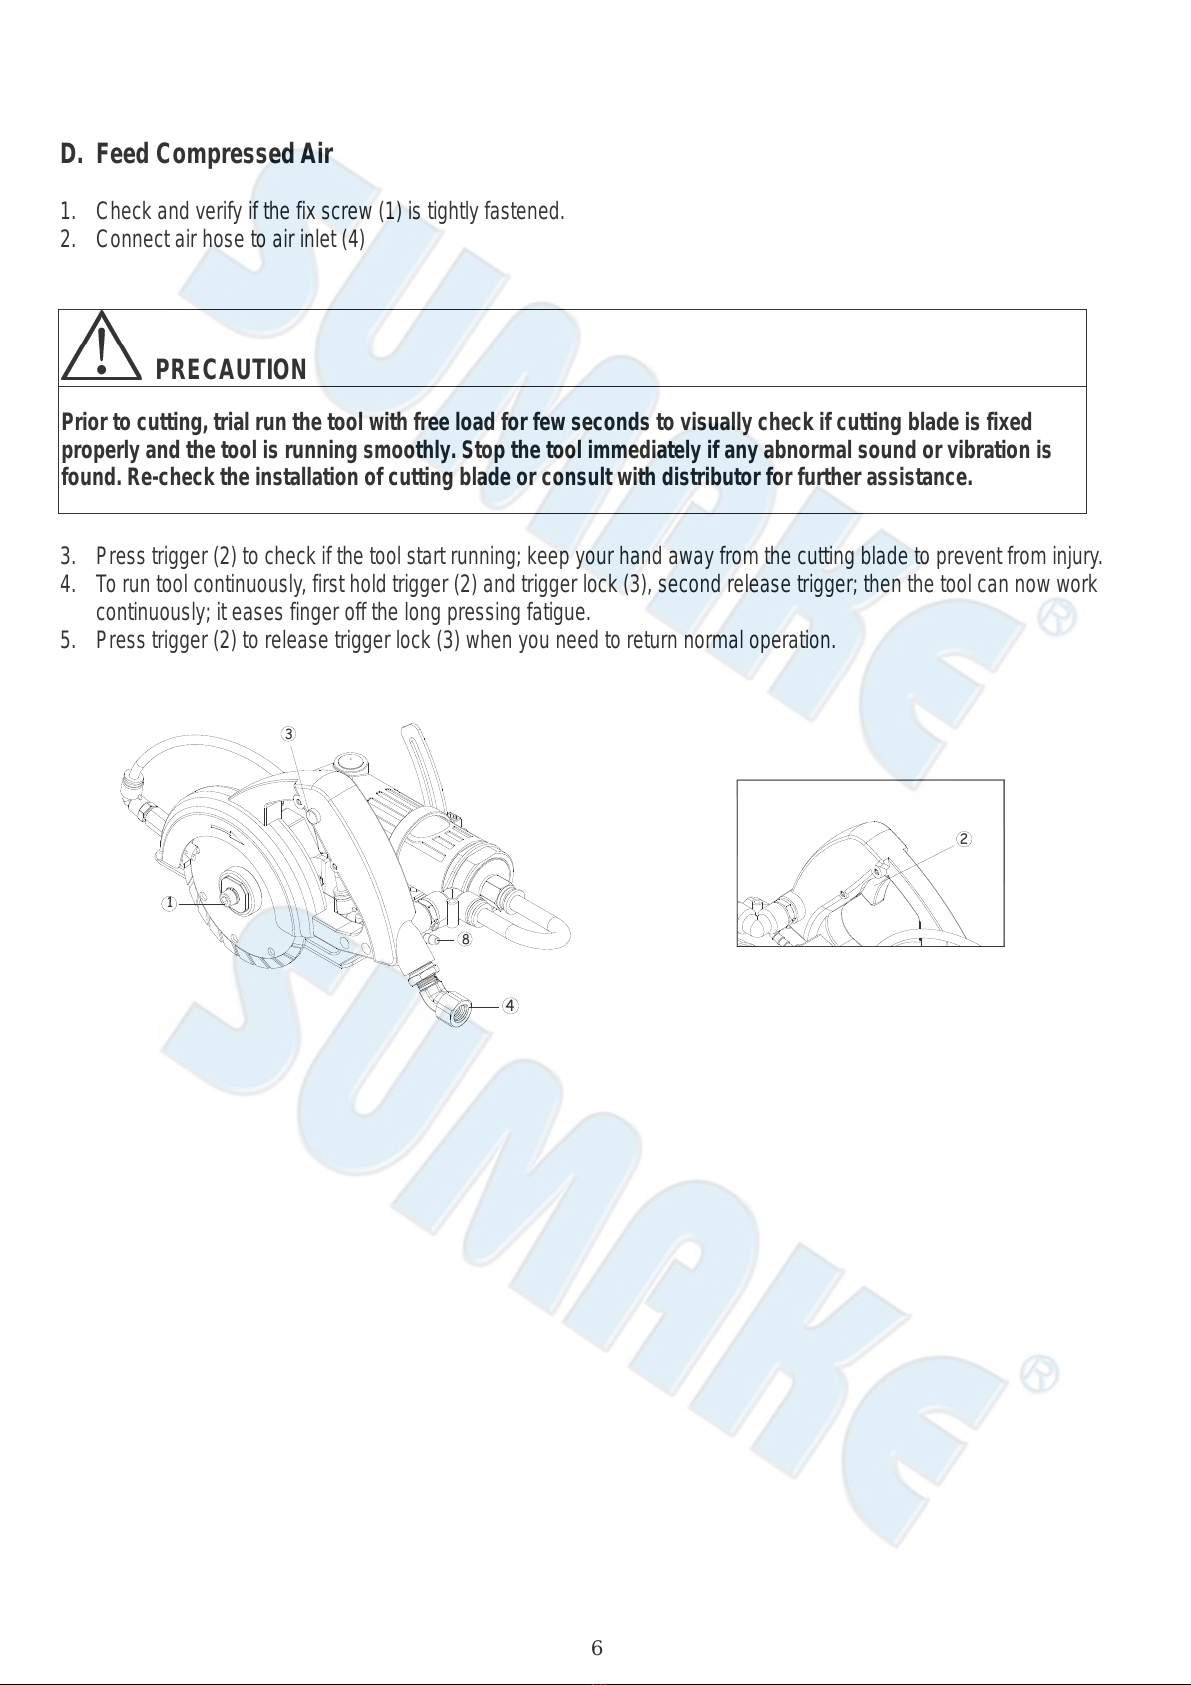
No. Parts No. Descri
tion Q't
No. Parts No. Descri
tion Q't
1 77481-01 Bod
1 55 77481-55 Tri
er 1
2 77481-02 Front Plate 1 57 77481-57 Pin 1
3 77481-03 Ball Bearin
2 58 77481-58 Pin 1
4 77481-04 Ball Bearin
1 59 77481-59 O-Rin
1
5 77481-05 Rotor 1 60 77481-60 S
rin
1
6 77481-06 C
linder 1 61 77481-61
ir Inlet Screw 1
7 77481-07 S
rin
Pin 1 62 77481-62 Water Valve Seat 1
8 77481-08 Blade 4 63 77481-63 Bushin
2
9 77481-09 Rear Plate 1 64 77481-64 Ball Valve 1
10 77481-10 Pinion Gear 1 65 77481-65 Co
er Bushin
1
11 77481-11 Rubber Ca
1 66 77481-66 S
rin
1
12 77481-12 O-Rin
1 67 77481-67 Water Valve Joint 1
13 77481-13 Lock Rin
1 68 77481-68 Shaft 1
14 77481-14 S
acer 1 69 77481-69 Screw 1
15 77481-15 Main Shaft 1 70 77481-70 S
rin
Pin 1
16 77481-16 Bearin
1 71 77481-71 Water Valve 1
17 77481-17 Ke
1 72 77481-72 Screw 1
18 77481-18 Bevel Gear 1 73 77481-73
llen Screw 3
19 77481-19 Wave Washer 1 74 77481-74 Joint Washer 2~3
20 77481-20 Retainin
Rin
1 75 77481-75 Quick Joint
L-t
e1
21 77481-21 Ball Bearin
1 76 77481-76 Screw 4
22 77481-22 Ke
1 77 77481-77
n
le Settin
Rin
1
23 77481-23 S
iral Gear 1 78 77481-78 Fix Plate 1
24 77481-24 Retainin
Rin
1 79 77481-79 Cou
lin
Nut 1
25 77481-25 Gear Box 1 80 77481-80
llen Screw 3
26 77481-26
llen Screw 6 81 77481-81 Quick Joint 1
27 77481-27 S
rin
1 82 77481-82 Exhaust Cover 1
28 77481-28 Flat Washer 1 83 77481-83 Self Ta
in
Screw 2
29 77481-29
llen Screw 1 84 77481-84 Screw 1
30 77481-30 Gear Shaft 1 85 77481-85 Ca
1
31 77481-31 Ball Bearin
1 86 77481-86 Joint Piece 1
32 77481-32 Oil Seal 1 87 77481-87 Base 1
33 77481-33 Gear Seat 1 87a 77481-87a Base 1
34 77481-34 Wave Washer 1 87-1 77481-87-1 Su
ort Frame 1
35 77481-35 Retainin
Rin
1 87-2 77481-87-2
n
le Index 1
36 77481-36 Ke
1 87-3 77481-87-3 Screw 5
37 77481-37 S
acer 1 87-4 77481-87-4 Nut 5
38 77481-38 S
iral Gear 1 88 77481-88
llen Screw 1
39 77481-39 Retainin
Rin
1 89 77481-89 Nut 1
40 77481-40 Ball Bearin
1 90 77481-90 Flat Washer 1
41 77481-41 Gasket 1 91 77481-91 Butterfl
Nut 1
42-1 77481-42-1 Disc Guard 1 92 77481-92 Water Pi
e1
42-2 77481-42-2 Shroud 1 93 77481-93
ir Inlet Pi
e1
43 77481-43 Water Exit 1 77481-94A Disc Receiver
20mm
1
44 77481-44 Water Exit Nut 1 77481-94B Disc Receiver
22mm
1
45 77481-45 Quick Joint
L-t
e 2 95 77481-95 Disc Nut 1
46 77481-46
llen Screw 3 96 77481-96 S
rin
Washer 1
47 77481-47
llen Screw 2 97 77481-97
llen Screw 1
48 77481-48 Handle 1 98 77481-98
ir Joint 1
49 77481-49 S
rin
Pin 1 99 77481-99 Bushin
1
50 77481-50 S
rin
1 100 77481-100 Sto
er 1
51 77481-51 Push Button 1 101 77481-101 Grease Hole 1
52 77481-52 Fix Nut 1 102 77481-102 Sto
S
anner 1
53 77481-53 Tri
er Lock 1 103 77481-103
llen Wrench 1
54 77481-54 S
rin
Pin 2 ST-77481-P-1012A-GI
94