Foreword
We are the manufacturer and exporter of air tools
since established. We have devote all our efforts
in improving quality and tools’ life. As well as
the noise and vibration of tools. Bring all of you
Tool
Coupler Recoil
hose
Leader
hose Water
separation Air
supply
12
Upside
high humidity. If the tool is left as it is used , th
residual moisture inside the tool can cause rust.
Before storing and after operation, oil the tool a
the air inlet with spindle oil and run it for a shor
time.
Foreword
We are the manufacturer and exporter of air tools
since established. We have devote all our efforts
in improving quality and tools’ life. As well as
the noise and vibration of tools. Bring all of you
working efficiences, profits, and enjoy using the
tool is our principle.
Features
This tool is designed to meet an extremely wide
range of materials to be sawed by ways of
Tool
Nipple
Coupler Recoil
hose
Leader
hose
Oiler Regulator
Water
separation Air
supply
Drain
daily
A portion of the water content, however, i
condensed in the piping, and can enter the too
mechanism, and may cause trouble. So, install a
air filter and on oiler between the compresso
and the tool. Use a 3 HP or lar
er com
ressor fo
12
Upside
Be careful that the illustration is upside-down for
easy description. To cease the operation, just
release your forefinger from the protuberance and
the throttle lever. For the sake of safety, put it on
hanger when not in use.
high humidity. If the tool is left as it is used , th
residual moisture inside the tool can cause rust.
Before storing and after operation, oil the tool a
the air inlet with spindle oil and run it for a shor
time.
4-3 Disposal
If the tool is too seriously damaged to be use
anymore, drop it in a resource recycling can.
Never drop it into fire.
4-4 Ordering service Parts
For further operational and handling informatio
or for replacement of parts and components,
Foreword
We are the manufacturer and exporter of air tools
since established. We have devote all our efforts
in improving quality and tools’ life. As well as
the noise and vibration of tools. Bring all of you
working efficiences, profits, and enjoy using the
tool is our principle.
Features
This tool is designed to meet an extremely wide
range of materials to be sawed by ways of
replacing a proper saw blade.
Operator‘s instruction
1. Main Applications
A breakthrough in cutting speed and durability
Tool
Nipple
Coupler Recoil
hose
Leader
hose
Oiler Regulator
Water
separation Air
supply
Drain
daily
A portion of the water content, however, i
condensed in the piping, and can enter the too
mechanism, and may cause trouble. So, install a
air filter and on oiler between the compresso
and the tool. Use a 3 HP or larger compressor fo
each sander.
2-3 Air hose
Clean the hose with a blast of compressed ai
efore connecting the hose to air tool. This wil
prevent both moisture and dust within the hos
from entering the tool and ca
12
Upside
Be careful that the illustration is upside-down for
easy description. To cease the operation, just
release your forefinger from the protuberance and
the throttle lever. For the sake of safety, put it on
hanger when not in use.
3.2 Replace the saw blade
to replace the saw blade, loose the screw,
indicted by 1, near below the blade with a
screwdriverand pull the black cover upward.
Then loose the hexagon socket screw, indicted by
2 aside the tube with a hexagon wrench key Pull
high humidity. If the tool is left as it is used , th
residual moisture inside the tool can cause rust.
Before storing and after operation, oil the tool a
the air inlet with spindle oil and run it for a shor
time.
4-3 Disposal
If the tool is too seriously damaged to be use
anymore, drop it in a resource recycling can.
Never drop it into fire.
4-4 Ordering service Parts
For further operational and handling informatio
or for replacement of parts and components,
contact the sale agent from whom you purchase
the tool or the service division of our company.
*In ordering parts and components, give each
part number, name and quantity.
Foreword
We are the manufacturer and exporter of air tools
since established. We have devote all our efforts
in improving quality and tools’ life. As well as
the noise and vibration of tools. Bring all of you
working efficiences, profits, and enjoy using the
tool is our principle.
Features
This tool is designed to meet an extremely wide
range of materials to be sawed by ways of
replacing a proper saw blade.
Operator‘s instruction
1. Main Applications
A breakthrough in cutting speed and durability.
This lightweight, fast cutting tool is ideally
suited for body shop and sheet metal work.
Leaves sheet metal smooth and free from burrs
and distortion.
Tool
Nipple
Coupler Recoil
hose
Leader
hose
Oiler Regulator
Water
separation Air
supply
Drain
daily
A portion of the water content, however, i
condensed in the piping, and can enter the too
mechanism, and may cause trouble. So, install a
air filter and on oiler between the compresso
and the tool. Use a 3 HP or larger compressor fo
each sander.
2-3 Air hose
Clean the hose with a blast of compressed ai
efore connecting the hose to air tool. This wil
prevent both moisture and dust within the hos
from entering the tool and causing possible rus
or malfunction. To compensate for unusuall
long hose (over 25 ft), the line pressure should b
increased accordingly.
12
Upside
Be careful that the illustration is upside-down for
easy description. To cease the operation, just
release your forefinger from the protuberance and
the throttle lever. For the sake of safety, put it on
hanger when not in use.
3.2 Replace the saw blade
to replace the saw blade, loose the screw,
indicted by 1, near below the blade with a
screwdriverand pull the black cover upward.
Then loose the hexagon socket screw, indicted by
2, aside the tube with a hexagon wrench key. Pull
the old blade out of 3 and insert a new one and
then tighten the screws again.
1
high humidity. If the tool is left as it is used , th
residual moisture inside the tool can cause rust.
Before storing and after operation, oil the tool a
the air inlet with spindle oil and run it for a shor
time.
4-3 Disposal
If the tool is too seriously damaged to be use
anymore, drop it in a resource recycling can.
Never drop it into fire.
4-4 Ordering service Parts
For further operational and handling informatio
or for replacement of parts and components,
contact the sale agent from whom you purchase
the tool or the service division of our company.
*In ordering parts and components, give each
part number, name and quantity.
Warning
1. This tool is not insulted for coming int
contact with electric power source.
2. It is forbidden to use this tool in explosiv
atmospheres and do not put any combustibl
workpiece since it emit sparks
Foreword
We are the manufacturer and exporter of air tools
since established. We have devote all our efforts
in improving quality and tools’ life. As well as
the noise and vibration of tools. Bring all of you
working efficiences, profits, and enjoy using the
tool is our principle.
Features
This tool is designed to meet an extremely wide
range of materials to be sawed by ways of
replacing a proper saw blade.
Operator‘s instruction
1. Main Applications
A breakthrough in cutting speed and durability.
This lightweight, fast cutting tool is ideally
suited for body shop and sheet metal work.
Leaves sheet metal smooth and free from burrs
and distortion.
2. Cautions for Use
2-1 Air pressure
Maximum performance is displayed at the proper
sanding speed, obtainable at a gauge pressure of
6.2 bar. Range-wise, this is an air pressure from
5 to 7 bar (70 to 100 psi)
Tool
Nipple
Coupler Recoil
hose
Leader
hose
Oiler Regulator
Water
separation Air
supply
Drain
daily
A portion of the water content, however, i
condensed in the piping, and can enter the too
mechanism, and may cause trouble. So, install a
air filter and on oiler between the compresso
and the tool. Use a 3 HP or larger compressor fo
each sander.
2-3 Air hose
Clean the hose with a blast of compressed ai
efore connecting the hose to air tool. This wil
prevent both moisture and dust within the hos
from entering the tool and causing possible rus
or malfunction. To compensate for unusuall
long hose (over 25 ft), the line pressure should b
increased accordingly.
Drainage
12
Upside
Be careful that the illustration is upside-down for
easy description. To cease the operation, just
release your forefinger from the protuberance and
the throttle lever. For the sake of safety, put it on
hanger when not in use.
3.2 Replace the saw blade
to replace the saw blade, loose the screw,
indicted by 1, near below the blade with a
screwdriverand pull the black cover upward.
Then loose the hexagon socket screw, indicted by
2, aside the tube with a hexagon wrench key. Pull
the old blade out of 3 and insert a new one and
then tighten the screws again.
3
Guide Plate
1
high humidity. If the tool is left as it is used , th
residual moisture inside the tool can cause rust.
Before storing and after operation, oil the tool a
the air inlet with spindle oil and run it for a shor
time.
4-3 Disposal
If the tool is too seriously damaged to be use
anymore, drop it in a resource recycling can.
Never drop it into fire.
4-4 Ordering service Parts
For further operational and handling informatio
or for replacement of parts and components,
contact the sale agent from whom you purchase
the tool or the service division of our company.
*In ordering parts and components, give each
part number, name and quantity.
Warning
1. This tool is not insulted for coming int
contact with electric power source.
2. It is forbidden to use this tool in explosiv
atmospheres and do not put any combustibl
material near the workpiece since it emit spark
when grind with metal material.
3. Ensure that the saw blade is clamped tightl
and do not use anydeformed saw blade.
4. Prevent long hair or loose clothing fro
drawing in while operate this tool.
5. Never carry the tool by hose and beware of
whippingcompressedairhose
Foreword
We are the manufacturer and exporter of air tools
since established. We have devote all our efforts
in improving quality and tools’ life. As well as
the noise and vibration of tools. Bring all of you
working efficiences, profits, and enjoy using the
tool is our principle.
Features
This tool is designed to meet an extremely wide
range of materials to be sawed by ways of
replacing a proper saw blade.
Operator‘s instruction
1. Main Applications
A breakthrough in cutting speed and durability.
This lightweight, fast cutting tool is ideally
suited for body shop and sheet metal work.
Leaves sheet metal smooth and free from burrs
and distortion.
2. Cautions for Use
2-1 Air pressure
Maximum performance is displayed at the proper
sanding speed, obtainable at a gauge pressure of
6.2 bar. Range-wise, this is an air pressure from
5 to 7 bar (70 to 100 psi)
57
Tool
Nipple
Coupler Recoil
hose
Leader
hose
Oiler Regulator
Water
separation Air
supply
Drain
daily
A portion of the water content, however, i
condensed in the piping, and can enter the too
mechanism, and may cause trouble. So, install a
air filter and on oiler between the compresso
and the tool. Use a 3 HP or larger compressor fo
each sander.
2-3 Air hose
Clean the hose with a blast of compressed ai
efore connecting the hose to air tool. This wil
prevent both moisture and dust within the hos
from entering the tool and causing possible rus
or malfunction. To compensate for unusuall
long hose (over 25 ft), the line pressure should b
increased accordingly.
Drainage
2-4 The approved eye protector, ear-muff
mouth-muffle, and gloves should be worn whe
operate this tool.
2-6 The working place shall be ventilative.
2-7 Release the on-off device in the case o
12
Upside
Be careful that the illustration is upside-down for
easy description. To cease the operation, just
release your forefinger from the protuberance and
the throttle lever. For the sake of safety, put it on
hanger when not in use.
3.2 Replace the saw blade
to replace the saw blade, loose the screw,
indicted by 1, near below the blade with a
screwdriverand pull the black cover upward.
Then loose the hexagon socket screw, indicted by
2, aside the tube with a hexagon wrench key. Pull
the old blade out of 3 and insert a new one and
then tighten the screws again.
3
2
Guide Plate
1
3.3 Rest the guide plate fullyon the workpiece.
high humidity. If the tool is left as it is used , th
residual moisture inside the tool can cause rust.
Before storing and after operation, oil the tool a
the air inlet with spindle oil and run it for a shor
time.
4-3 Disposal
If the tool is too seriously damaged to be use
anymore, drop it in a resource recycling can.
Never drop it into fire.
4-4 Ordering service Parts
For further operational and handling informatio
or for replacement of parts and components,
contact the sale agent from whom you purchase
the tool or the service division of our company.
*In ordering parts and components, give each
part number, name and quantity.
Warning
1. This tool is not insulted for coming int
contact with electric power source.
2. It is forbidden to use this tool in explosiv
atmospheres and do not put any combustibl
material near the workpiece since it emit spark
when grind with metal material.
3. Ensure that the saw blade is clamped tightl
and do not use anydeformed saw blade.
4. Prevent long hair or loose clothing fro
drawing in while operate this tool.
5. Never carry the tool by hose and beware of
whippingcompressedairhose.
6. Sawing action can cause saw blade to becom
hot. Allow to cool before changing or adjustin
lade. Disconnect air horse when changing o
adjustingblade.
7. Do not use saw blade with smaller shaft tha
Foreword
We are the manufacturer and exporter of air tools
since established. We have devote all our efforts
in improving quality and tools’ life. As well as
the noise and vibration of tools. Bring all of you
working efficiences, profits, and enjoy using the
tool is our principle.
Features
This tool is designed to meet an extremely wide
range of materials to be sawed by ways of
replacing a proper saw blade.
Operator‘s instruction
1. Main Applications
A breakthrough in cutting speed and durability.
This lightweight, fast cutting tool is ideally
suited for body shop and sheet metal work.
Leaves sheet metal smooth and free from burrs
and distortion.
2. Cautions for Use
2-1 Air pressure
Maximum performance is displayed at the proper
sanding speed, obtainable at a gauge pressure of
6.2 bar. Range-wise, this is an air pressure from
5 to 7 bar (70 to 100 psi)
57
2-2 Air line
Use a 3/8“ air hose between the compressor and
the tool . Compressed air is cooled and its water
content separated, as soon as the air leaves the
compressor.
Tool
Nipple
Coupler Recoil
hose
Leader
hose
Oiler Regulator
Water
separation Air
supply
Drain
daily
A portion of the water content, however, i
condensed in the piping, and can enter the too
mechanism, and may cause trouble. So, install a
air filter and on oiler between the compresso
and the tool. Use a 3 HP or larger compressor fo
each sander.
2-3 Air hose
Clean the hose with a blast of compressed ai
efore connecting the hose to air tool. This wil
prevent both moisture and dust within the hos
from entering the tool and causing possible rus
or malfunction. To compensate for unusuall
long hose (over 25 ft), the line pressure should b
increased accordingly.
Drainage
2-4 The approved eye protector, ear-muff
mouth-muffle, and gloves should be worn whe
operate this tool.
2-6 The working place shall be ventilative.
2-7 Release the on-off device in the case o
energy supply failure.
3. Operation, Ad
ustin
And Replacin
Method
3.1 On-off device
To operate this tool, using forefinger to push th
protuberance, indicted by 1, on the throttle leve
12
Upside
Be careful that the illustration is upside-down for
easy description. To cease the operation, just
release your forefinger from the protuberance and
the throttle lever. For the sake of safety, put it on
hanger when not in use.
3.2 Replace the saw blade
to replace the saw blade, loose the screw,
indicted by 1, near below the blade with a
screwdriverand pull the black cover upward.
Then loose the hexagon socket screw, indicted by
2, aside the tube with a hexagon wrench key. Pull
the old blade out of 3 and insert a new one and
then tighten the screws again.
3
2
Guide Plate
1
3.3 Rest the guide plate fullyon the workpiece.
4. Maintenance
4-1 Lubrication
Before connecting the hose , apply 4 or 5 drops
of #60 spindle oil at the air inlet. Use of a thicker
oil can lead to reduced performance or
high humidity. If the tool is left as it is used , th
residual moisture inside the tool can cause rust.
Before storing and after operation, oil the tool a
the air inlet with spindle oil and run it for a shor
time.
4-3 Disposal
If the tool is too seriously damaged to be use
anymore, drop it in a resource recycling can.
Never drop it into fire.
4-4 Ordering service Parts
For further operational and handling informatio
or for replacement of parts and components,
contact the sale agent from whom you purchase
the tool or the service division of our company.
*In ordering parts and components, give each
part number, name and quantity.
Warning
1. This tool is not insulted for coming int
contact with electric power source.
2. It is forbidden to use this tool in explosiv
atmospheres and do not put any combustibl
material near the workpiece since it emit spark
when grind with metal material.
3. Ensure that the saw blade is clamped tightl
and do not use anydeformed saw blade.
4. Prevent long hair or loose clothing fro
drawing in while operate this tool.
5. Never carry the tool by hose and beware of
whippingcompressedairhose.
6. Sawing action can cause saw blade to becom
hot. Allow to cool before changing or adjustin
lade. Disconnect air horse when changing o
adjustingblade.
7. Do not use saw blade with smaller shaft tha
suggested.
Blad
shaf
ST-BO11-I-1808A-DP
Foreword
We are the manufacturer and exporter of air tools
since established. We have devote all our efforts
in improving quality and tools’ life. As well as
the noise and vibration of tools. Bring all of you
working efficiences, profits, and enjoy using the
tool is our principle.
Features
This tool is designed to meet an extremely wide
range of materials to be sawed by ways of
replacing a proper saw blade.
Operator‘s instruction
1. Main Applications
A breakthrough in cutting speed and durability.
This lightweight, fast cutting tool is ideally
suited for body shop and sheet metal work.
Leaves sheet metal smooth and free from burrs
and distortion.
2. Cautions for Use
2-1 Air pressure
Maximum performance is displayed at the proper
sanding speed, obtainable at a gauge pressure of
6.2 bar. Range-wise, this is an air pressure from
5 to 7 bar (70 to 100 psi)
57
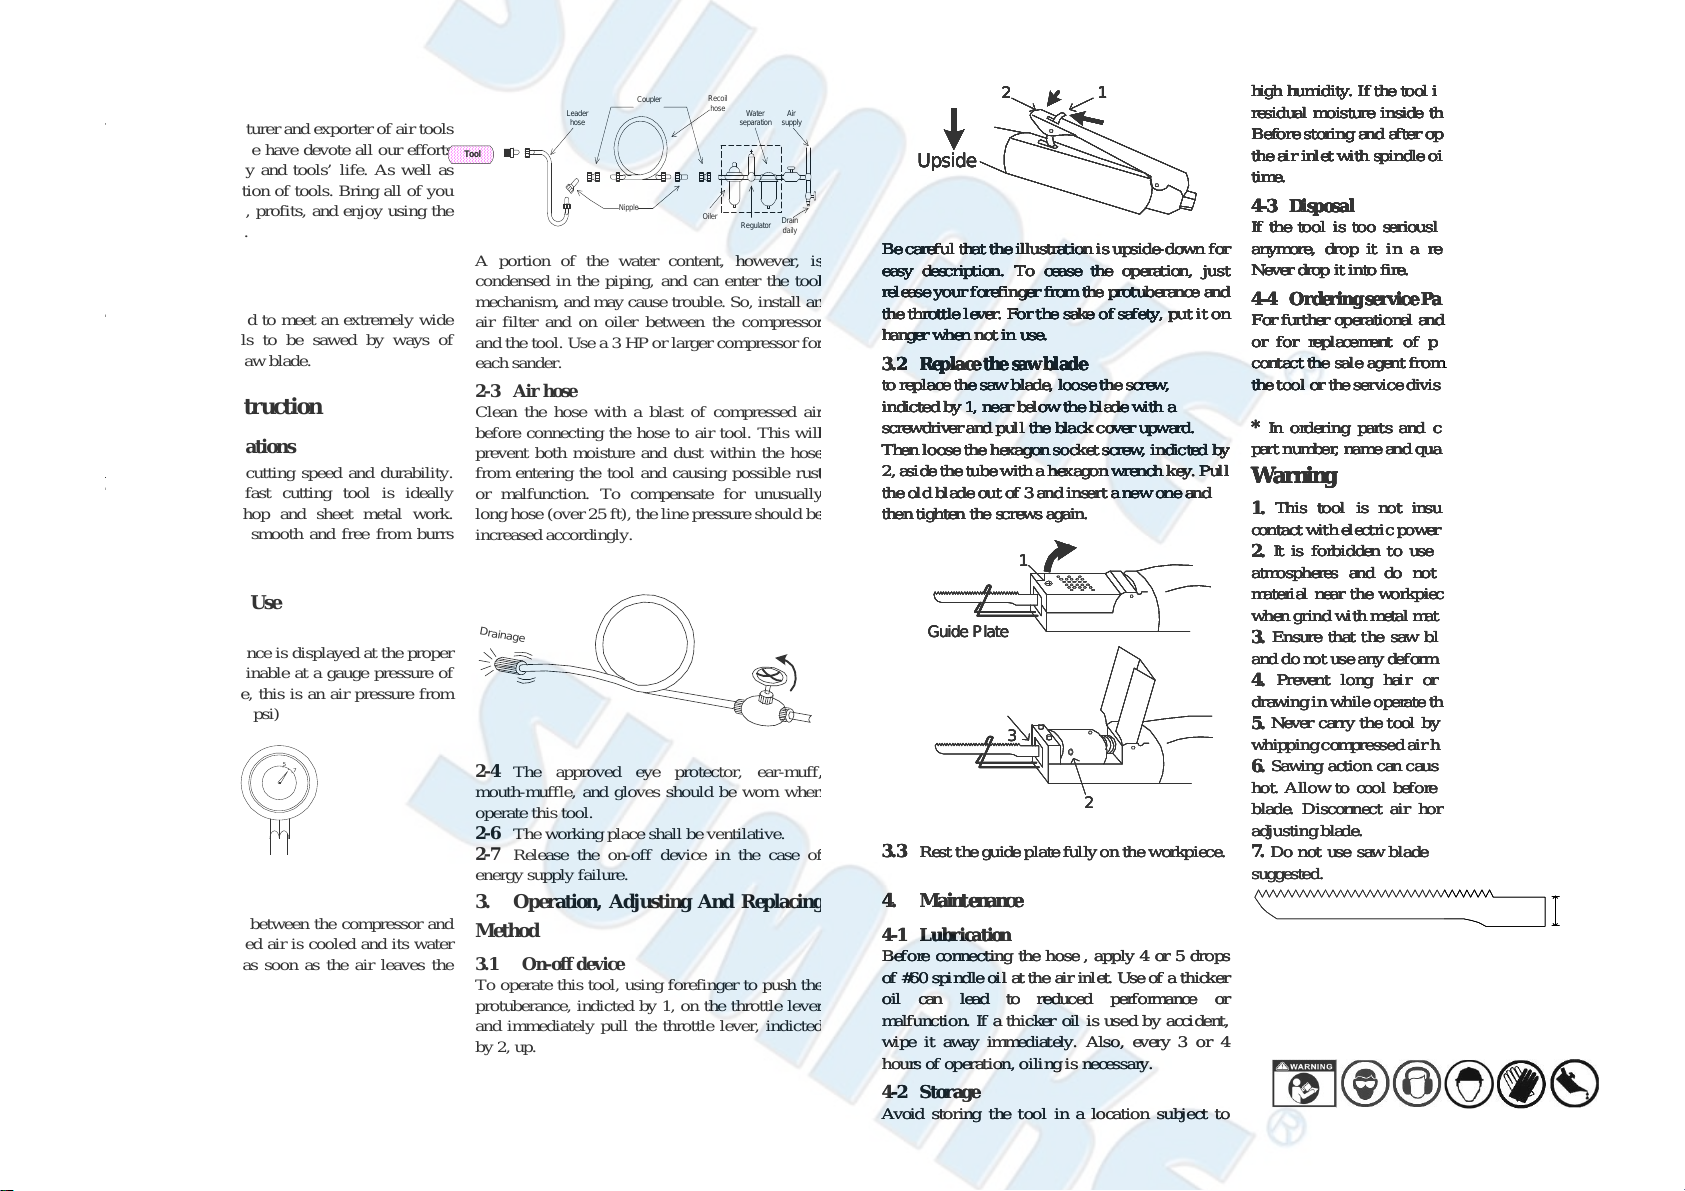
2-2 Air line
Use a 3/8“ air hose between the compressor and
the tool . Compressed air is cooled and its water
content separated, as soon as the air leaves the
compressor.
Tool
Nipple
Coupler Recoil
hose
Leader
hose
Oiler Regulator
Water
separation Air
supply
Drain
daily
A portion of the water content, however, i
condensed in the piping, and can enter the too
mechanism, and may cause trouble. So, install a
air filter and on oiler between the compresso
and the tool. Use a 3 HP or larger compressor fo
each sander.
2-3 Air hose
Clean the hose with a blast of compressed ai
efore connecting the hose to air tool. This wil
prevent both moisture and dust within the hos
from entering the tool and causing possible rus
or malfunction. To compensate for unusuall
long hose (over 25 ft), the line pressure should b
increased accordingly.
Drainage
2-4 The approved eye protector, ear-muff
mouth-muffle, and gloves should be worn whe
operate this tool.
2-6 The working place shall be ventilative.
2-7 Release the on-off device in the case o
energy supply failure.
3. Operation, Ad
ustin
And Replacin
Method
3.1 On-off device
To operate this tool, using forefinger to push th
protuberance, indicted by 1, on the throttle leve
and immediately pull the throttle lever, indicte
by 2, up.
12
Upside
Be careful that the illustration is upside-down for
easy description. To cease the operation, just
release your forefinger from the protuberance and
the throttle lever. For the sake of safety, put it on
hanger when not in use.
3.2 Replace the saw blade
to replace the saw blade, loose the screw,
indicted by 1, near below the blade with a
screwdriverand pull the black cover upward.
Then loose the hexagon socket screw, indicted by
2, aside the tube with a hexagon wrench key. Pull
the old blade out of 3 and insert a new one and
then tighten the screws again.
3
2
Guide Plate
1
3.3 Rest the guide plate fullyon the workpiece.
4. Maintenance
4-1 Lubrication
Before connecting the hose , apply 4 or 5 drops
of #60 spindle oil at the air inlet. Use of a thicker
oil can lead to reduced performance or
malfunction. If a thicker oil is used by accident,
wipe it away immediately. Also, every 3 or 4
hours of operation, oiling is necessary.
4-2 Storage
Avoid storing the tool in a location subject to
high humidity. If the tool is left as it is used , th
residual moisture inside the tool can cause rust.
Before storing and after operation, oil the tool a
the air inlet with spindle oil and run it for a shor
time.
4-3 Disposal
If the tool is too seriously damaged to be use
anymore, drop it in a resource recycling can.
Never drop it into fire.
4-4 Ordering service Parts
For further operational and handling informatio
or for replacement of parts and components,
contact the sale agent from whom you purchase
the tool or the service division of our company.
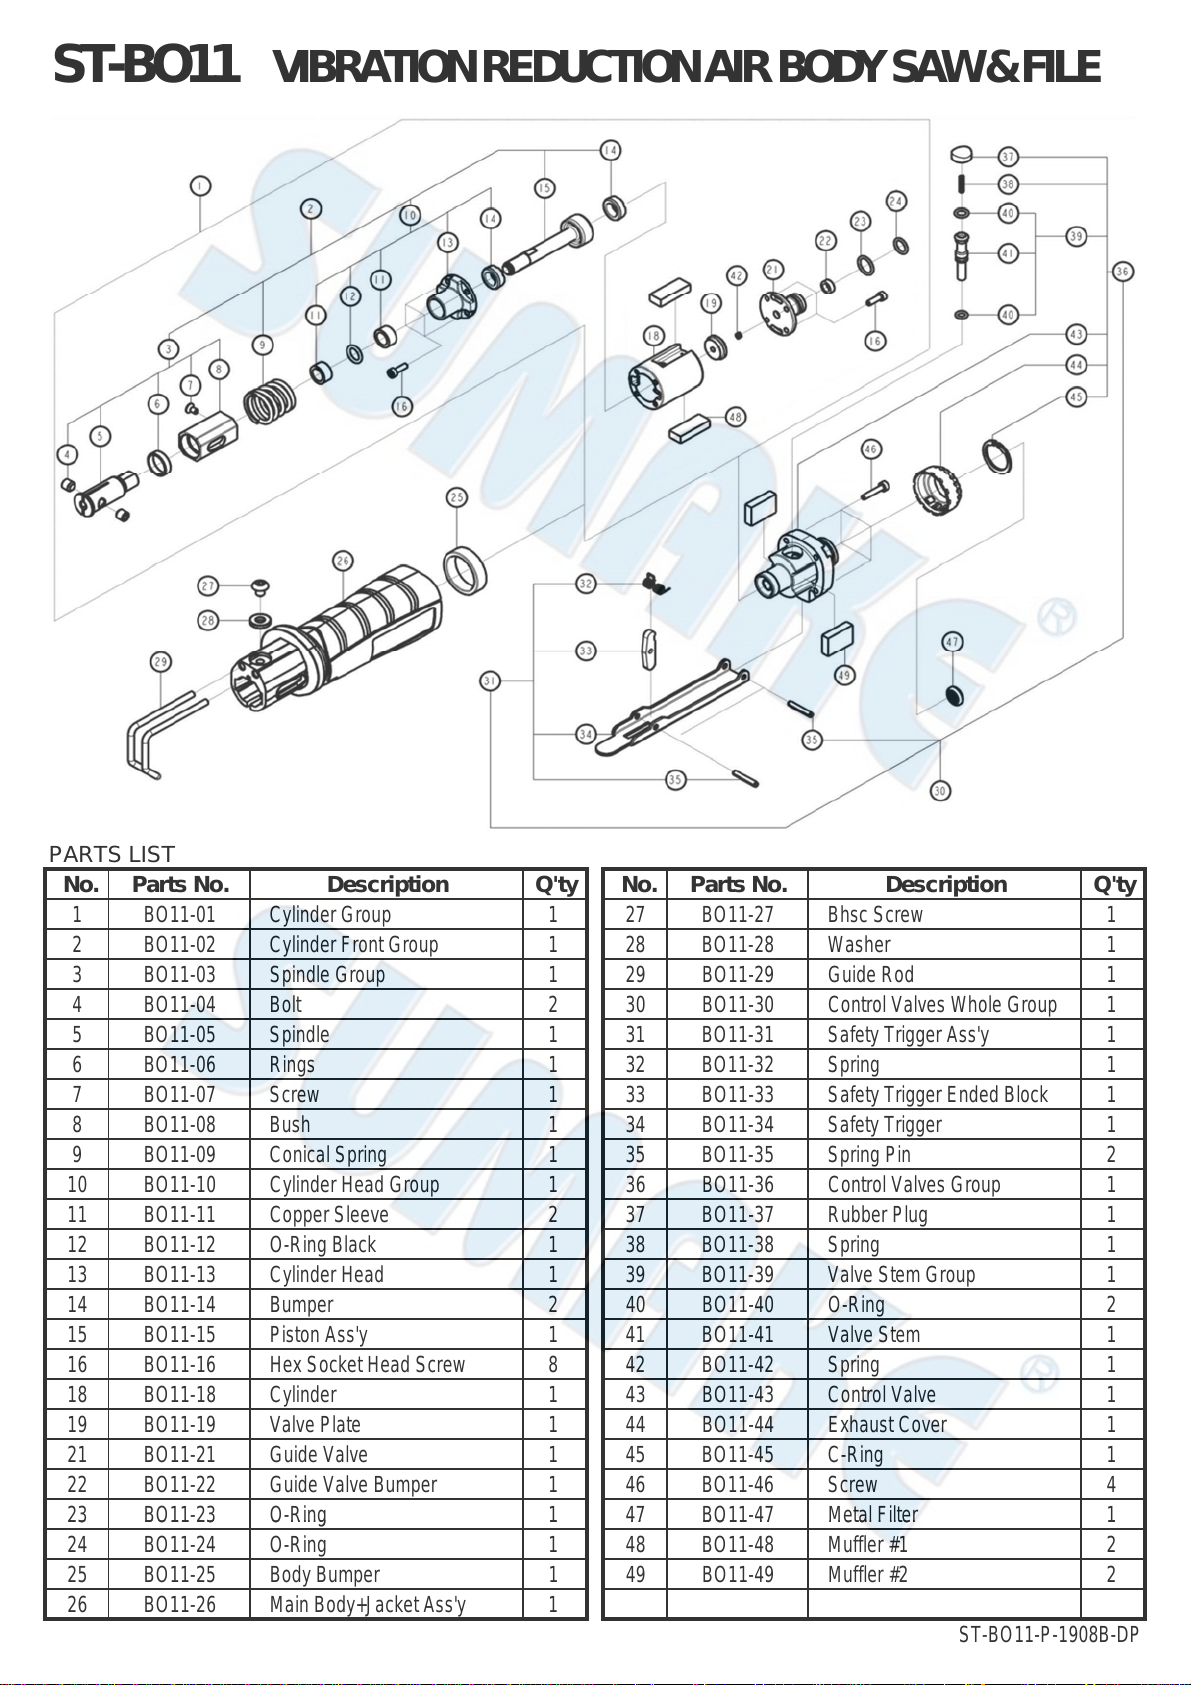
*In ordering parts and components, give each
part number, name and quantity.
Warning
1. This tool is not insulted for coming int
contact with electric power source.
2. It is forbidden to use this tool in explosiv
atmospheres and do not put any combustibl
material near the workpiece since it emit spark
when grind with metal material.
3. Ensure that the saw blade is clamped tightl
and do not use anydeformed saw blade.
4. Prevent long hair or loose clothing fro
drawing in while operate this tool.
5. Never carry the tool by hose and beware of
whippingcompressedairhose.
6. Sawing action can cause saw blade to becom
hot. Allow to cool before changing or adjustin
lade. Disconnect air horse when changing o
adjustingblade.
7. Do not use saw blade with smaller shaft tha
suggested.
Blad
shaf
ST-BO11-I-1808A-DP
Foreword
We are the manufacturer and exporter of air tools
since established. We have devote all our efforts
in improving quality and tools’ life. As well as
the noise and vibration of tools. Bring all of you
working efficiences, profits, and enjoy using the
tool is our principle.
Features
This tool is designed to meet an extremely wide
range of materials to be sawed by ways of
replacing a proper saw blade.
Operator‘s instruction
1. Main Applications
A breakthrough in cutting speed and durability.
This lightweight, fast cutting tool is ideally
suited for body shop and sheet metal work.
Leaves sheet metal smooth and free from burrs
and distortion.
2. Cautions for Use
2-1 Air pressure
Maximum performance is displayed at the proper
sanding speed, obtainable at a gauge pressure of
6.2 bar. Range-wise, this is an air pressure from
5 to 7 bar (70 to 100 psi)
57
2-2 Air line
Use a 3/8“ air hose between the compressor and
the tool . Compressed air is cooled and its water
content separated, as soon as the air leaves the
compressor.
Tool
Nipple
Coupler Recoil
hose
Leader
hose
Oiler Regulator
Water
separation Air
supply
Drain
daily
A portion of the water content, however, i
condensed in the piping, and can enter the too
mechanism, and may cause trouble. So, install a
air filter and on oiler between the compresso
and the tool. Use a 3 HP or larger compressor fo
each sander.
2-3 Air hose
Clean the hose with a blast of compressed ai
efore connecting the hose to air tool. This wil
prevent both moisture and dust within the hos
from entering the tool and causing possible rus
or malfunction. To compensate for unusuall
long hose (over 25 ft), the line pressure should b
increased accordingly.
Drainage
2-4 The approved eye protector, ear-muff
mouth-muffle, and gloves should be worn whe
operate this tool.
2-6 The working place shall be ventilative.
2-7 Release the on-off device in the case o
energy supply failure.
3. Operation, Ad
ustin
And Replacin
Method
3.1 On-off device
To operate this tool, using forefinger to push th
protuberance, indicted by 1, on the throttle leve
and immediately pull the throttle lever, indicte
by 2, up.
12
Upside
Be careful that the illustration is upside-down for
easy description. To cease the operation, just
release your forefinger from the protuberance and
the throttle lever. For the sake of safety, put it on
hanger when not in use.
3.2 Replace the saw blade
to replace the saw blade, loose the screw,
indicted by 1, near below the blade with a
screwdriverand pull the black cover upward.
Then loose the hexagon socket screw, indicted by
2, aside the tube with a hexagon wrench key. Pull
the old blade out of 3 and insert a new one and
then tighten the screws again.
3
2
Guide Plate
1
3.3 Rest the guide plate fullyon the workpiece.
4. Maintenance
4-1 Lubrication
Before connecting the hose , apply 4 or 5 drops
of #60 spindle oil at the air inlet. Use of a thicker
oil can lead to reduced performance or
malfunction. If a thicker oil is used by accident,
wipe it away immediately. Also, every 3 or 4
hours of operation, oiling is necessary.
4-2 Storage
Avoid storing the tool in a location subject to
high humidity. If the tool is left as it is used , th
residual moisture inside the tool can cause rust.
Before storing and after operation, oil the tool a
the air inlet with spindle oil and run it for a shor
time.
4-3 Disposal
If the tool is too seriously damaged to be use
anymore, drop it in a resource recycling can.
Never drop it into fire.
4-4 Ordering service Parts
For further operational and handling informatio
or for replacement of parts and components,
contact the sale agent from whom you purchase
the tool or the service division of our company.
*In ordering parts and components, give each
part number, name and quantity.
Warning
1. This tool is not insulted for coming int
contact with electric power source.
2. It is forbidden to use this tool in explosiv
atmospheres and do not put any combustibl
material near the workpiece since it emit spark
when grind with metal material.
3. Ensure that the saw blade is clamped tightl
and do not use anydeformed saw blade.
4. Prevent long hair or loose clothing fro
drawing in while operate this tool.
5. Never carry the tool by hose and beware of
whippingcompressedairhose.
6. Sawing action can cause saw blade to becom
hot. Allow to cool before changing or adjustin
lade. Disconnect air horse when changing o
adjustingblade.
7. Do not use saw blade with smaller shaft tha
suggested.
Blad
shaf